CHOICETRADER DIRECT PRO USER MANUAL Version 1.37 LOGGING ON, OPENING & SAVING DESKTOP... 2 FOUR ESSENTIAL WINDOWS OPENING OTHER WINDOWS 10
|
|
|
- Nathaniel Powell
- 8 years ago
- Views:
Transcription
1 TABLE OF CONTENTS: LOGGING ON, OPENING & SAVING DESKTOP... 2 FOUR ESSENTIAL WINDOWS OPENING OTHER WINDOWS 10 CONFIGURING WINDOWS 14 MAIL 14 CHART HOT KEYS ALERT AND TRIGGER PREDEFINED OR BASKET ORDERS STOP ORDERS. 22 & 28 MISCELLANEOUS FEATURES ECNS ORDER MATCHING PREPARING TO ENTER AN ORDER ENTERING AN ORDER OPTION TRADING COMMONLY USED FUTURES / COMMODITIES SYMBOLS E-SIGNAL INTEGRATION 42 Page 1 of 42

2 LOGGING ON Click on the start button and go to Programs. Select the program. Or, double click the program icon on your desktop. Select File then Logon from the tool bar. In the rid field, in place of YOURID, type in the User ID that was supplied to you by your broker. Next, type your password in the password window. Check Remember ID/PWD and click on Login. Figure 1 OPENING A DESKTOP SCREEN Your software installation should include a default desktop screen, which opens when you log on. If a sample screen did not open when you logged on, go to FILE on the toolbar. Left mouse click and select Open Desktop from the dropdown menu. Double click on Default.dsk. SAVING A DESKTOP SCREEN You can create your own desktop by first closing all windows and recreate one. Go to FILE and select Close All Window. Then begin opening the windows you need for trading by going to and select from the six main options. When you are satisfied with your desktop go to FILE on the toolbar. Select save Desktop. Enter a file name and click save. To open your screen, go to file. Select open screen and double click on your file name. To have your screen open automatically every time you log on, save your screen with the name "default". You can save as many different screens as you like. You can personalize your own screen using any windows you choose. All these windows may be opened by going to on your tool bar. The drop down menu displays all available windows. Page 2 of 42

3 SET A DEFAULT ACCOUNT Go to Setup on the toolbar. Select Order Template. In the Account fields for NASD, NYSE and Option stock default, select your account from the drop down menu. This is where you set your default number of shares, your preferred Route, AON/ANY and Time in Force settings. Click OK when you are satisfied with the new changes. SET TRADING DEFAULT Go to Setup and select Trading Settings. You can then enable various settings to make your trading experience smarter or with greater risk management. See section on Preparing to Enter An Order of this manual for more information on Settings. FOUR ESSENTIAL WINDOWS Windows essential for trading are the Montage, Accounts, Position and Orders. A description of these windows follows. 1. TRADE MONTAGE WINDOW This is your order execution window and Level II quote window. Type the stock symbol in the white box in the upper left corner of the Montage window and hit enter. The title bar of the Montage window displays the stock symbol and the current inside market (the best bid and ask). Previous close (PCL), day's high-low (H/L), last trade (Last), Volume (Vol) are displayed below the title bar. Net change compared to the previous day's close is displayed in red. A maximum of ten Montage windows may be opened. See image below: Title bar Stock box Link icon Message Share box Route box Reserve Lock box Account Figure 2 Preference Price box Page 3 of 42

4 a) UPPER SECTION of the MONTAGE WINDOW Following is an explanation of the functions of the boxes and buttons on the top portion of the Montage window. Title Bar Displays the NASDAQ Inside Market. (Level one, the inside market, and the best Bid / best Ask all mean the same thing). Stock Box Type a security symbol here and hit Enter. Link or blue anchor button Linking Montage windows To Time & Sale and Charts by pointing your mouse cursor on the anchor button on the Montage window. Hold down the left mouse button and drag the cursor to the Time/Sale window and release the mouse button (point, click, drag and drop). Market Designator Located above the blue anchor or link button. Because not all NASDAQ securities are the same. Securities can be distinguished by the letter code that appears here. Q NASDAQ National Market. Most major stocks are in this category. S NASDAQ SmallCap Market. Use our direct connection to ARCA. U Bulletin Board. Use our direct connection to ARCA. N - NYSE. New York Stock. Use ARCA, BRUT or OESO. On some securities you may be able to use one of the free market markers and alleviate the cost for ECN per share fees. Also some routes will not accept odd lot shares or less than 100 shares lot. A - AMEX. American Stock. Use ARCA, BRUT or OESO. On some securities you may be able to use one of the free market markers and alleviate the cost for ECN per share fees. V - Pink sheets Stock are currently routed to LAMP or FANC routes. b) MIDDLE SECTION of the MONTAGE WINDOW This is the Level II montage. It contains Market Maker (MM) ID symbols, Electronic Communication Network (ECN) ID symbols (designated by #), and the Island Book (ISB). To the right of each MM, ECN or ISB symbol is the Bid or Ask, and the size of the Bid or Ask. Size is abbreviated multiply by 100 for the actual number of shares. Left mouse click on any MM ID or ECN ID to load the Montage window with an order to that MM or ECN at the quoted price. The MM or ECN ID appears in the Preference Box, and the quoted price appears in the Price Box. Click on the displayed share size to load the shares box if desired. When directing an order to a MM or ECN, you must send buy orders at the MM or ECN Ask, and send sell orders at the MM or ECN Bid. c) LOWER SECTION of the MONTAGE WINDOW The Green Message Line displays the status of your order in real time. NOTE: Some actions will generate multiple messages. Only the last message will remain in the message line. To see the rest of the messages, click on the toggle down arrow when available. You can also review your trades by opening the Log window under in the application menu bar. Page 4 of 42
. Market Designator Located above the blue anchor or link button.")
5 Shares Box The preset default is There are four ways to adjust the number of shares. 1. Use the up /down arrows to the right of the Shares Box. Left click on the appropriate arrow, hold down the left mouse button or use the mouse wheel. 2. Use the forward / back arrow keys on the keyboard. 3. Type the number directly into the Shares Box. 4. Left click on the quote size on the Level II montage. To delete the Shares, you right click on the down arrows to the right of the Shares Box to delete a size. Move the mouse cursor over the Shares Box to make the field "live" and type in the number of shares. Preference Box Located to the right of the Route box. For mo re information on preferencing to Market Makers and ECNs see section on Order Matching. On the Level 2 montage, left click on the MM or ECN you wish to preference. The MM or ECN ID will appear in this box. Reserve Box Located to the right of the Position button. The feature is useful if you are sending a large amount of stock to the market but you do not want to display the amount that may result in increasing the price of the stock. You put the amount you want to display in the reserve box and the true amount in shares box. Price Box Located to the right of the Reserve box. There are four ways to set a price. 1. Left click on any Bid or Ask on the Level 2 montage. 2. Use the arrows to the right of the Price Box on the Montage window. The left arrows change the price in $.10 increments while the right arrows change the price in $.01 increments. Left click on the appropriate arrow, hold down the left mouse button or use the mouse wheel. When the Price Box is blank, the price always starts at the ASK price. 3. Use the up / down arrow keys on the keyboard to change the price in $.001 increments. Up adds $.001 to the best Level II Bid. Down cuts $.001 from the best Level II Ask. 4. Type the price directly in the Price Box. To de lete a Price, you right click on the arrows to the right of the Price Box to delete a price. Move the mouse cursor over the Price Box to make the field "live" and enter a new price. Route Box Click on the arrow to open the dropdown menu. Select the appropriate order type. Or use the End key on the keyboard. The default for all limit orders is no price in the price box, Buy at the ASK, Sell at the BID. Account Box If you trade more than one account, click on the arrow to select the account to be traded. Any account that begins TR denotes a training account. Page 5 of 42

6 Always select the account after entering the security symbol. NOTE: Every time you enter a stock on a Montage window, the default order is reset. Time In Force (TIF) The preset default is DAY. All unexecuted Day orders on all ECN routes except ISLD or INETL (Island) are cancelled at 6:30 PM ET. ISLD orders can be set to any TIF. AON/ANY ANY is the preset default. AON (All or None). Buy Click here to send a buy order to go long, or to cover a short position. Sell / Short Click here to send a sell order to cover a long position or to enter a Short Sell order. Shorting rules must be observed. The system will reject illegal Short Sell orders. Shorting Rules: UPTICK - May short at the bid or higher. DOWNTICK - Must short at least $.01 above the bid. If the spread is.01, you may short at the ASK. You can enter a short sell on a listed security (stock symbols with three or fewer letters, example: GE, LU, QQQ, COM, etc.) on a downtick; however, the specialist on the trading floor won't actually place the order until the stock has an up tick. IPO - Initial Public Offerings are not shortable. Bulletin Board securities and Nasdaq Small Cap securities are only available by calling your broker and are often not shortable because most are non marginable. Most marginable securities are valued above $5. The software automatically checks availability when a Short Sale order is entered. The message "Send Rej Shrt Sec isn't shortable" will be generated if the security is not available to short. Furthermore, traders can check Short availability by entering the Symbol in the Shortlist window on the application option. CXL Click here to cancel the last order sent from that Montage window. Or, click the X in the X column on the Order window. If you have more than one open order, you have the option of canceling all orders, or just the order on that you click. You also have the option of canceling all open orders for the same security as the order you selected. TMP This button otherwise known as the order template restores your default settings to the Montage window. Green Message Line Please note that only the last message of a multiple message order appears in this line. Always and frequently check your log, Account and windows. Page 6 of 42

7 Montage Active Log Click on the Green Message Bar to open that Montage window's individual log. You can also check your Log from menu bar for all trades executed intraday. P (Position) Button Left mouse click here to automatically load the Shares Box with the number of shares you hold in any security. Use it immediately after any execution, or anytime you call up a stock in which you hold a position. It is also possible to set your default order to automatically display the number of shares you hold whenever you call up a security. (Go to Setup on the toolbar and select Trading Settings) Lock Button You may lock your Montage windows to prevent accidental sending of Buy or Sell orders. To the right of the "TMP" button is a Green checkmark icon. Left mouse click here. It turns red and become and X to indicate a locked Montage window. Orders cannot be sent. Lock Account If you trade multiple accounts you can lock in the current selected account. Calling up different securities on the Montage window will not cause the default account number to be reset while this box is checked. Route Config function allows you to select your most often used routes, for example ISLD, ARCAL. To configure right mouse click anywhere between the Sell, CXL or Buy button. Scroll down to toggles between your specified routes. Type in the new route in the order you wish them to toggle. Click Apply to save any changes. The following is the correct spelling of a variety of routes. Please note that your broker may offer routes that are not shown here, or may not offer all routes that are shown here. To see all available routes, go to and select Route Status. Figure 3 CONFIGURING THE LEVEL II MONTAGE Right click over the Level II montage, and select the Level II Configure window. The following parameters can be configured. Tier Color - Each price level on the Level II montage is color-coded. These colors can be configured to your liking. Left click over a color band to configure the color. Font - Left click on the Font field to open the Font configure window. Tier Color Grouping - If a different color for each price level is too much, a price range can be specified. For example, if.0625 is entered, color grouping would include all quotes within $.0625, or what was formerly a 16th. Page 7 of 42

8 Show Grid Left click to check the box if you want to see a grid on the montage. Show ECN # - Normally checked. ECNs are designated with # following the market participant ID. Uncheck if you do not want to see the #. Only Show ECN - Normally unchecked. The Island Book, which is received directly from Island, is indicated by the symbols ISB. ISLD is the best bid/best ask quote supplied by Nasdaq. If displayed along with ISB, there will be duplicate quotes representing the top of the Island Book. This is undesirable. Only Show ECN should only be selected if for some reason the Island Book (ISB) is unavailable. Optimized Paint (for slow computer) Check this button if you experience hanging due to the data feed. ISB Number Sets the depth, or number of Island Book (ISB) price levels that are displayed on the montage. Set As Default - You can set the current Level II configuration to be the default for all your Montage windows. Load Default Left click to load your default Level II montage configuration on any Montage window. Monitor Groups where Two Market Participant IDs may be monitored by entering the MPID in the monitor field. Select text and background colors to make them stand out by left clicking over the appropriate field. NOTE: Be sure to save your screen to preserve your Level II settings, hide Column header and market makers. 2. POSITION WINDOW Displays all open positions. Right click on a symbol to load a Montage window with that security, the number of shares, and the account in which the position is held. Figure 4 Columns on the Position window are as follows: Sym: The security symbol. Right click on the symbol to load a Trading Page 8 of 42
 is unavailable. Optimized Paint (for slow computer) Check this button if you experience hanging due to the data feed.")
9 window with that security, the number of shares, and the account number. Account: Your account number. Shares: The number of shares. Avgcost: Average cost. Realized: If you have sold part of your position, the realized P&L on the sale is displayed here. Unrealized: Your P&L if you were to close the position at the current market price. Bid and Ask: The current inside market on that security. Type: Cash, Margin or Short. Withhold BP: The amount of buying power used if the position was opened on the current trade date. 3. ACCOUNT WINDOW Displays account information. Figure 5 Columns on the Account window are as follows: Account: Your account number(s). Note: Any account that begins with TR is a training account. Type: Your account type: 1 = cash 2 = margin Realized: Your P&L for the current day. Unrealized: Your change in value of all current positions combined. Init BP: Your Daytrading buying power, loaded daily for your account(s). BP: Your current buying power. Fluctuates as you open and close positions. OverNight BP: This is your Overnight buying power. It is displayed as a guide. If any position that was opened today exceeds your Over Night buying power, this field turns red, alerting you of that fact. Exceeding OverNight BP will result in a margin call. NOTE: If your overnight buying power is less than your Daytrading buying power, the software will not prevent you from exceeding your ONBP. Tickets: The number of trades for the day. Shares: The number of shares. +LiqShr: Liquidity share. 4. ORDER WINDOW Figure 6 Page 9 of 42
. Note: Any account that begins with TR is a training account.")
10 The columns are explained below: Displays all open orders. Right click on the row containing the order, to open the Cancel/Config window. Columns on the Order button are as follows: X: Left click to cancel an order. Status: Sending means the order has not yet reached the market; Accepted means the order has reached the market and Canceling means Order is not yet canceled. Symb: The security symbol. Side: B = Buy S = Sell Qty: The number of shares on the original order. Open: The number of shares currently open. Price: The price on your order. Route: The routing selected for your order. Type: L = Limit M = Market S = Stop. Time: The time the order was entered. TIF: The time period that the order is active (i.e. DAY, 1, 2, 3, 5 or 10 min.) Broker: Preference Broker Account: Your trader ID OPENING OTHER WINDOWS As previously stated, the windows essential for trading are: Montage, Account, Position and Orders. Following is a description of the additional windows you may wish to employ: s Window Displays all today s trades. The columns on the s Window is basically the same as those on the Orders window. Figure 7 Log Displays all the messages generated in the Green message line on the Montage windows. The Log is only on your computer's hard drive. This log has every action you performed on the trading platform for the day. Only the actions performed on one computer will show up on the Log, if you switch computers during the day, then you will have a separate log on the other computer. Figure 8 Page 10 of 42

11 Short List Window This feature queries stocks that are shortable through your broker. Enter the stock symbol in the Symb column and hit Enter. If the stock is shortable, the number of shares available will be displayed. In some cases, additional shares as well as additional securities may be located by calling your broker. Market: Market Designator. See section on Market Designator. HiRisk: Y = Yes N = No. Stocks designated as HiRisk have a 50% margin maintenance requirement. ShortSize: The number of shares available to sell short. Figure 9 TIME & SALE Can be a very important trading tool. It reports trades as they occur. The first column shows the price of the trade. The second column indicates the number of shares. Multiply by 100 for the actual number of shares. The third column shows the time of the trade. The forth column shows the exchange that shares are trading on. The fifth column is a Flag. Figure 10 Standalone feature - The Time & Sale window can function alone. It does not need to be linked to a Montage window to function. The full number of shares may be displayed instead of dividing the number by 100. Right click to open the Config window and uncheck Share / 100. Linking Time & Sale to a Montage window Put your mouse cursor on the Anchor Button on the Montage window. Hold down the left mouse button. While holding down the mouse button, drag the cursor to the Time & Sale window and release the mouse button (point, click, drag and drop). Color Code on Time & Sale The default settings are represented below: Page 11 of 42

12 Green represents a trade at the Ask price. Red represents a trade at the Bid price. White represents a trade between the Bid and Ask Pink represents a trade below the Bid Darker Green represents a trade above the Ask. Configuring the Time & Sale Window Right click on the Time & Sale window to open the Time & Sale Config window. Default colors may be customized. Vertical and/or horizontal grid lines may be added. Full number of shares may be displayed, and the font may be adjusted. To save your Time & Sale settings as a default, click Save as Default. To load your default settings in any Time & Sale window, click Load Default. TopList This is a live market statistics window. It lists NASDAQ (NASD) and New York/American (LIST) securities in order by most active, and percentage gainers and losers. Right click on a symbol to load a Montage window. Figure 11 ISLD BOOK Displays the Island Book. Can be linked to a Montage window, or can stand-alone. Figure 12 MARKET VIEW This window allows you to view data on stocks you wish to track. Enter the symbol in the Page 12 of 42

13 Symb column and hit enter or arrow up/down on the keyboard. To automatically load your Montage window, right mouse click on the security symbol. Figure 13 Five Market View windows can be opened at on time. The capacity for each window is forty symbols. Columns on Market View are explained below: Symbol: Security symbol Tick: Show whether the stock is up or down. Change: Net dollar amount change from yesterday's 4:00PM close. Last: Last trade Bid/Ask: Level I Size: Size of the Inside Bid and Ask price. High/Low: Today's high and low Open: Today's opening trade PrevClose: Yesterday's 4:00PM closing price. Volume: Today's total volume TodayClose: Today s 4:00PM closing price % Change: Percent change from yesterday s 4:00PM close. Range: How much the stock moved up and down for the day Configuring the Market View window - Right click anywhere except on a security symbol and select Config. Click on the Column heading and then click the Up/Down button to move heading. You can open up to five Market Viewers and load up to forty symbols in each viewer. Icon Bar Figure 14 Starting from Left to Right, the following the order of the icon buttons above: Montage, Account, Position, Orders Windows, log, Time & Sale, Option, Market Viewer, Top List, Level 1 Ticker, ECN boob, Chart, News, Predefined order, Alert& Triggers, Internal Mail, Network Configure, Hot Key Configure, Market Clock and Direct Access Software website. L1 Ticker Page 13 of 42

14 This level I ticker is for securities whose symbols you enter into the window. Whenever the Level I quote changes on your selected securities, the new Level 1 quote is displayed. Figure 15 To load your Ticker, right mouse click on the Ticker window. In the upper field type a name for the ticker. In the field below, type the security symbols in a vertical column. Click Save and Commit. An unlimited number of tickers may be configured although only one at a time can be opened. To configure multiple tickers, delete both fields and enter a new ticker name and new symbols, click Save and Commit. Additionally, colors, fonts and grid lines may be configured. CONFIGURING WINDOWS For all windows, a right mouse click opens a configuration option. Fonts and Colors are configurable on all windows For the Market View window, right click anywhere except on a security symbol. For the Top List window, Right click anywhere on the numbers on the left or the column titles on top. For the Account and Position windows, right click anywhere except on a security symbol. MAIL Mail is accessed via the Tools then Internal Message option on the toolbar. When mail has been sent to you, an alert will be displayed on the title bar of the screen. To clear the alert, click anywhere on the new message to open the Mail window. To reply to a message, click anywhere on the message, and then click the Reply button. Type in your reply, and click the Send key. Messages must be sent to a specific User ID. This feature is frequently used by our system administrators and your broker to send updates on route status intra-day. For specific issues on your account, please contact your broker directly using a regular system. CHARTS Linking Charts to a Montage window Page 14 of 42

15 RECTS Figure 16 Put your mouse cursor on the Anchor button on the Montage window. Left click. Hold down the left mouse button. While holding down the mouse button, drag the cursor to the Chart window and release the mouse button (drag and drop). RECTS The default chart window opens with two "RECTS" or rectangles. Each RECT can display up to 15 different studies. RECTS may be moved up or down, minimized, maximized and closed, using the Control Box (symbols highlighted in yellow, in the upper left corner of each RECT), or selecting from RECT options when right clicking over a chart window. The solid horizontal line between RECTS is used to change the relative size of the RECTS. Put the mouse cursor over the line. A vertical arrow appears with the message move. Left click and slide the cursor up or down. HISTORICAL DATA Move the mouse cursor to the left of the Chart window until you see an arrow such as???. Left click to recall up to five previous days of minute chart data, or day chart data back to RIGHT click anywhere on the chart. A dialog box opens with the following options. Page 15 of 42
, or selecting from RECT options when right")
16 Figure 17 Configure is the dialog setting to add grid lines to the chart, change background and label line color. Change Line Style, Color and width. Set Screen Colors - Allows adjustment of Background, Grid, and Label colors. Load Screen Setting - Load a previously saved.cst file (See below) Save Screen Setting - Save a chart configuration as a.cst file. Clear Screen Setting - Totally clears the chart window of all data. Data Config is the Data Config Dialog that allows you to set Type - Choose Minutes or Day Chart Point. Choose the desired Minute or Day Interval from the dropdown menu, or directly type in the number of minutes or days. Show Pre/Post Market. If desired, left click to put a check in the box. Configures From and To Select the specific start and end date/time of the data you wish to view. Left click anywhere on the chart to display data for that particular point in time. You can change or assign the symbol for the Chart in this window as well. NOTE: The amount of data that can be retrieved with one request is limited. Overlays further limit the date or time range available with one request. However, once chart data is retrieved, it is stored in your computer's memory. Subsequent requests will allow more historical data to be retrieved. For example, two or three days of minute chart data can be retrieved with one request. Four or five days will exceed the limit for one request. Start by requesting two or three days first, then requesting four or five days of minute chart data. The same applies for day chart data. Study Config allows you to select various studies to be displayed on the chart. For Example: Price, Volume, Moving Average, StoChastics, Momentum and to the more advanced studies. Right click on a specific RECT to open the Chart Study Config window. Click on a study on the left, in the Studies field. Click the right arrow to move the study to the right, in the Studies in chart field. Or, double click on the Studies to move it into the Studies in chart field. Studies UP/DOWN determines the order of overlaid studies in the RECT. The study on the bottom of the list is drawn first. Studies higher on the list will be overlaid on studies lower on the list. The scale displayed will be that of the study on the top of the list. Page 16 of 42

17 Chart Area allows you to add new area, overlay, remove, move or configure the chart area. Such as the following: Show Label - The time reading. Show Ruler - The horizontal scale. Show Last Sale Price - Displays the last trade price. Show Control Box - Symbols highlighted in yellow, in the upper left corner. Show Study Info - Displays a color coded list of the RECT's studies, in the upper left corner. (May be obstructed by the chart study). Tool Bar can be removed from the chart by unchecking the Tool Bar option. All options described in this section can easily accessible from here. Zoom allows you resize the data range. In or Out, also the Up/Down Keyboard Arrow Keys will do the same thing. Restore a zoomed in chart to full view. Set Data Range so that once zoomed in, locks in the displayed zoom range or Best Fit. Chart History allows you to edit the screen setting, manage data and edit Symbol history. Is a list of the last twenty charts displayed in a chart window. Double click on a symbol to display that chart. Use Move Up / Move Down to change the chart order. Use insert to insert a new chart in the list, etc. Data Manage If for some reason, such as a bad connection, the chart data stored in your computer's memory is corrupt, click Remove to delete it. Print directed to your printer. Trend Line allows you to either draw or remove Trend line on your chart. Also available is the Ray Line, Horizontal and Vertical Lines. Fibonacci Lines, Project and Arch are configurable and removable on your chart if your user is enabled for Advanced Charting. KEYBOARD ARROWS Up/Down arrows Zoom in and Zoom out. Left/Right once in Zoom Mode, these move horizontally along the time line. SCROLL BAR Once in Zoom Mode, a scroll bar appears on the bottom of the chart window. Left click on the scroll bar and hold down the mouse button. A pop up window displays the date and time. Move the scroll bar left or right the date and time display changes. Release the mouse button and the first bar on the chart will be the date and time from the display. PAGE UP / PAGE DOWN This feature scrolls through the last twenty charts that have been displayed on that Chart window. HOT KEYS Go to Setup and select Hot Key. Hotkey command is case sensitive. Be careful. BUY: Send Buy command Page 17 of 42

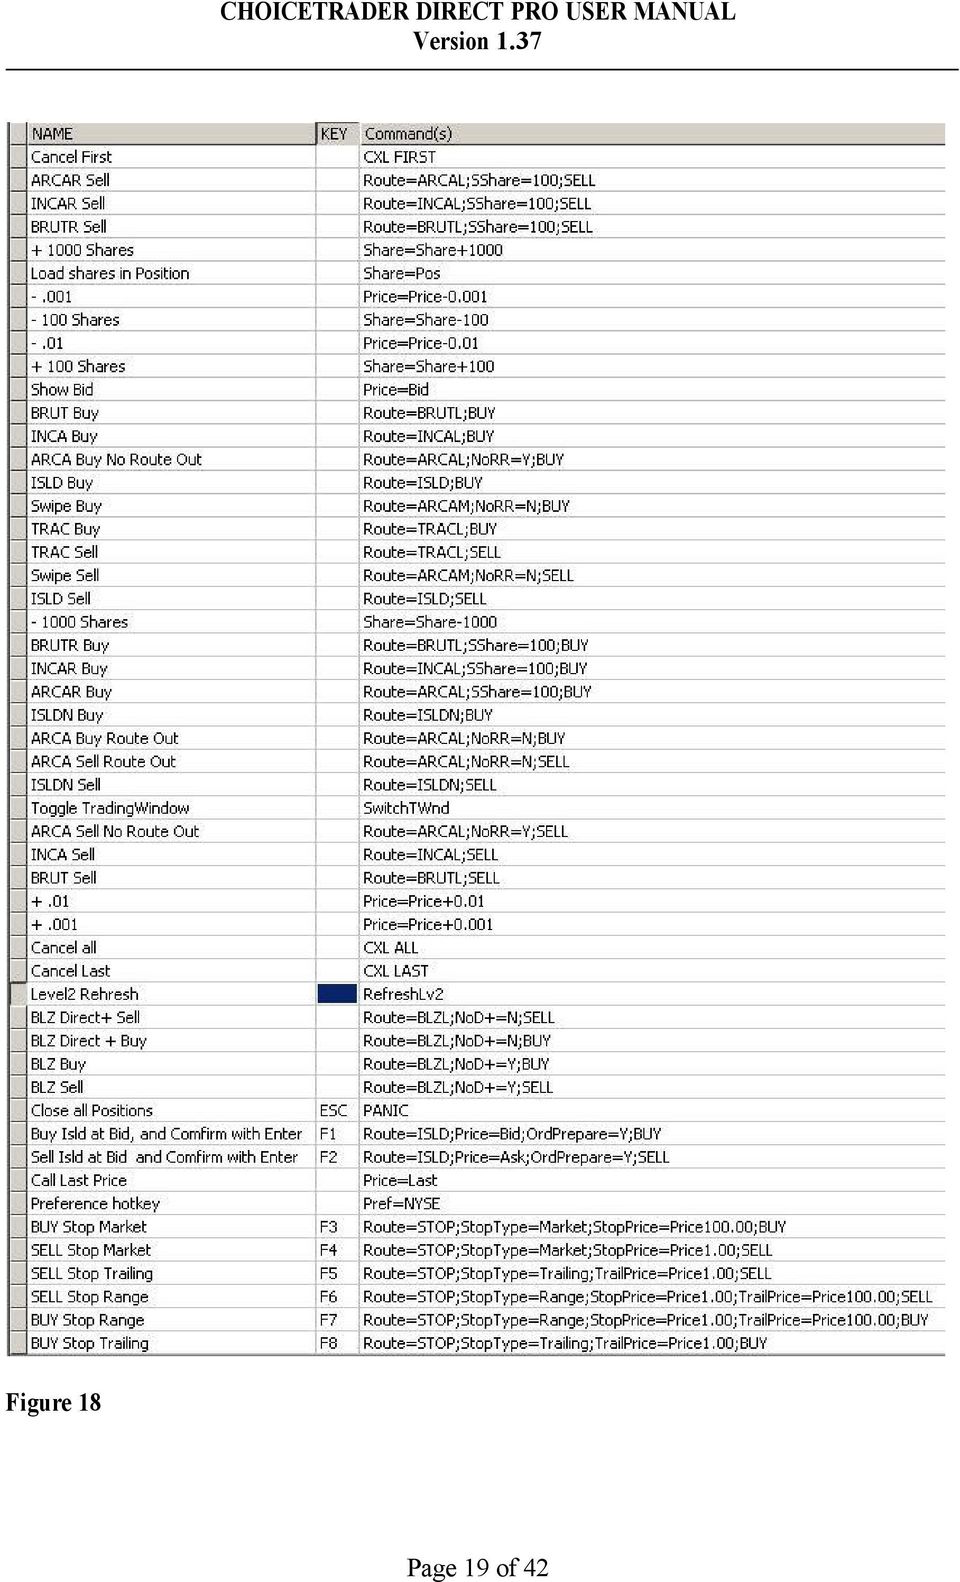
18 SELL: Send Sell command, Automatic go short if don t have enough shares. Price=??? Set the price in the price box. Bid: The Level1 Bid price; Ask: the Level1 Ask price; Bid+??? The Level 1 Bid +??? Where??? is the dollar Ask+??? The level 1 Ask +??? Price+??? Current price +?????? the exactly price for this order. [none] Clear the price box. Share=??? Set the share in the share box Pos: The Current position; Share+??? The current share incr??? or decress?????? the exactly share SShare=??? Set the share in the Show Shares box(reserve order) SShare+??? The current share incr??? or decress?????? the exactly share Route=??? Change the Route to??? CXL: Cancel last trade. CXL ALL: Cancel All the open order. CXL ALLSYMB: Cancell all the order have same symbol In Lv2 window. CXL LAST: cancel the last new order. (keeps cancel until no new order. once the order been canceling, it is not new order.). SwitchTWnd: Switch Trading window; NoRR=? NoRR=Y, Check the No ReReoute box. NoRR=N, Uncheck the No ReRRoute Box. NOTE: When you set the stack order, you don t want to change price when switch route, so you need to configure the way how to handle order in Setup menu. Check the Price don t change and the const shares. Assign a key to Hot Key Scroll down and select the command you wish to assign a key to. Eg., Scroll down to the PANIC command. Left click in the Key column and on your keyboard press a button such as ESC. Then click Save and Quit button when done. If you are trading several stocks and you have positions, and you wish to close out all positions at once, the panic Hot Key will send order to exit all. See Figure 18 below: Page 18 of 42
 SShare+??? The current share incr??? or decress?????? the exactly share Route=??? Change the Route to??? CXL: Cancel last trade.")
19 Figure 18 Page 19 of 42
20 ALERT AND TRIGGER Alerts allow you to define parameters, that when met, will trigger a visual and/or audible alert. Additionally, the alert can be set to trigger a PreDefined order. Figure 19 Select Alert &Trigger from "Tools" on the toolbar. The Alert config window will open. To Add a new alert and trigger, right mouse click and select Add. Assign a name in the Alert Name field. Set the symbol in SecSym field, unless the alert is based on time of day. Then click the Add button to set button to set the parameters. Also allows you to add multiple conditions on the same alert. You can then enable sound as well as visual action. To Edit right click anywhere on predefined trigger to edit on any previously configured alert, and then click Edit to change the parameters. (Or, double click on the row). Click the Del button to delete that row or click Add to add another parameter. The Fit button sizes the columns to fit the data. To Delete click on any previously configured alert, the click Delete to remove it. Turn Off Sound - Click to silence a triggered audible alert. See more function description below: Enable: When checked the alert is enabled. Auto Delete: When checked the alert will automatically be deleted once it has been triggered. Page 20 of 42

21 Repeat: When checked the alert will repeat daily or intraday, depending on the alert. Triggered: When checked indicates that the alert has been triggered. Show Alert Window: When checked will generate a pop up window when the alert is triggered. Sound: When checked will generate an audible alert form your computer sound card's external speakers. Beep: When checked will generate an audible alert from your computer's internal speaker. Loop: When checked will "Loop" the audible alert so that the sound is continuous, like an alarm. Browse: Allows you to select a wave file of your choice to replace the default sound. Preview: Allows you to preview selected audible alerts. Enable Auto Send: When checked will trigger specific PreDefined orders. Browse: Opens the Select Basket Prepare window. Baskets Groups or PreDefined orders may be selected for triggering when Alert parameters are met. Turn Off Sound Click to silence a currently triggered audible alert. Reset Click to reset a triggered alert. (Same as unchecking the Triggered box). OK Click to save your settings. Cancel Click to cancel your changes. PREDEFINED or BASKET ORDER PreDefined orders may be used independently or in conjunction with alerts. Go to Tools on the tool bar and select Basket. Size and position the window as you like. Size and position of the window will be stored in memory. Adding a Basket or PreDefined Order right click and select Add Order from the menu. (Or double left click anywhere in the window). Figure 20 Page 21 of 42
22 The Order Prepare window opens. Order Name: If desired, enter a name for the order. Baskets Name have been designated (See Below), orders are assigned to a Group here. Account: Select the appropriate account from the drop down menu. Action: Indicate whether the order is to BUY, SELL or SHORT. Symb: Enter the security symbol. Share: Enter the share size or select Position, to Sell the entire position. Price: Enter the price in decimals. Example: 23.95, or select a price related to the Bid or Ask when the order is triggered. Route: Select the appropriate route for the PreDefined order. Enable: When checked the order is ready to be triggered. Auto Delete: When checked the order will automatically be deleted after it has been triggered. Triggered: When checked indicates the order has already been triggered. OK: Click to save your settings. Additional Functions Select Basket from the tool bar and Right Click anywhere on the window. The following options are displayed. Trigger: Right click on a specific Basket order and select Trigger to trigger that order. Trigger All: Right click anywhere on the window and select Trigger All to trigger ALL displayed orders. Add Order: Select Add to add a new Basket Order. Edit Order: Right click on a Basket Order to edit that order. Delete Order: Right click on a Basket Order to delete that order. Filter: Right click anywhere on the window and select Filter. The Basket Order Filter window opens. Enter the parameters you wish to filter by. For example, multiple Predefined or Basket Order windows could be opened, with each window filtered by a different Group TECH Group in one window; RETAIL Group in another window, etc. Basket Define: Right click anywhere on the Basket Order window and select Basket Define. In the Name field enter a name for the Group you wish to add. Click Add to add that Group to the list. Modify Name: To change the name of a Group, right click on the Group name and then change. Click Modify Name to save the change. Delete: To delete a group, left click on the Group name and click Delete. STOP ORDERS Select the route STOP from Route dropdown menu. Bring up a security in which a position is held on a Montage window. Select the appropriate route designated for Stop orders. If you are Long the position, click the Sell button. If you are Short the position, click the Buy button. The Stop Order window opens. See below: Page 22 of 42
23 Figure 21 Order Type: Select Limit or Market or Trailing or Range stops. Limit Price: For a Stop Limit order two prices must be entered. Trigger Price: This is the price that triggers the stop order. Limit Price: This is the price beyond which your order will not execute. For a Sell order, set the Limit Price below the Trigger Price. For a Buy order, set the Limit Price above the Trigger Price. Market For a Market Stop only one price is entered. Click OK to Enter the Stop Order. MISCELLANEOUS FEATURES OverNight Buying Power Check Go to Tools on the toolbar and select Overnight BP Check. If any new position(s) you opened today exceeds your ONBP, a pop up message will alert you. (There is also an alert on your Account window. The OverNight BP field turns red. Exporting s to Access database or a text file On option on the menu bar select Report to generate trades for Orders, Execution and Tickets. Select a Format. You can choose either text file that can be imported into a spreadsheet application. If you select Access database, it will export into Microsoft Access. Click Export to start the process once completed the report is opened in MS Access or CVS (text) file. News Windows Real time news is available in the software. Go to Tools and select News. Right click and select Get Next 20. This will load twenty headlines. Left clicking on the headline loads the story in the window below. You can filter by symbol or by a category. Right click and select Filter. See figure below: Page 23 of 42
24 Figure 22 Bullets Window If your account is approved for Bullet trading your bullet positions will be displayed in this window. ECNs (Electronic Communication Networks) ARCA Archipelago ECN ATTN Attain ECN BRUT Brass Utility ECN BTRD Bloomberg Book ECN INET or ISLD Island ECN TRAC Track ECN NTRD Nextrade ECN ORDER MATCHING ECNs are designated on the Montage window with a pound sign following the symbol. For example, BRUT#. We connect with the ECNs directly. To trade with an ECN, left mouse click on the ECN symbol. An order to that ECN will be set up on the Montage window. Click the BUY button to buy at the ask. Click the SELL button to sell at the bid. If the shares are available, your order will match with an immediate execution. Since our connection to the ECNs are Direct, if you do not get the shares for any reason, your order, or the unexecuted portion of your order, will be posted to that ECN's Book. Page 24 of 42
25 POSTING ORDERS ON AN ECN BOOK While our connection to an ECN is Direct, you have the option of posting your order on any ECN's Book, in addition to matching orders that you see. Furthermore, ARCA will actively attempt to execute market orders and marketable limit orders against other ECNs and market makers, if there is not an immediate match for your order on the ARCA. Direct Connection ECNs: ISLD/INET, BRUT, ARCA (ISLD/INET) Any number of shares. 8:00 AM ET to 6:30 PM ET. Limit only. Island Book order matching. All open ISLD orders are canceled at 8 PM ET Island is one of the most dominant ECNs in today's market. Island matches buyers and sellers. When an ISLD order is matched, execution is instantaneous. The program utilizes a direct connection to Island, providing order entry and execution as fast as today's technology allows. The default order for ISLD, and all limit orders is no price in the price box, but at the ask, sell at the bid. ISLAND BOOK Represents all the Bids and Asks in the Island system. The symbol ISB, in the MMID column of the Montage window Level 2 montage, represents the Island Book quotes. NOTE: The Island Book (ISB) matches ISLD orders with other ISLD orders only. Figure 23 Matching Orders On Island Like all ECNs, Island is an order matching system. If you enter an order that matches an ISB quote you see, your order may be instantly filled, up to the number of available shares displayed. Match any ISB Ask with an ISLD Buy order, and up to the number of displayed shares Page 25 of 42
26 may be yours instantly. Match any ISB Bid with an ISLD Sell order, and up to the number of displayed shares may be yours instantly. However, other traders could beat you to it, if shares are in high demand. Shares on Island are available on a first come, first served basis. Posting Orders On Island In addition to matching orders you see on the Island Book, you can Post your own BID or ASK on the Island Book for all to see. The same procedure is used for matching orders and posting orders, on Island. If shares are available at your price or better, your order may receive an immediate match. If some shares of your order are matched, but not all, the unmatched portion of your order will be posted on the Island Book. Your posted order will stay on the Island Book for the duration of the TIF set on the Montage window. All open orders will be cancelled at 6:30 PM ET. Invisible Island Orders Invisible Island orders are available using ISLDN on the Route box dropdown menu. These orders are not displayed on the Island Book or the Level 2 montage. Use ISLDN when you do not want your order to be displayed. However, be aware that visible Island orders receive priority over invisible orders. Visible orders, at any given price, will be executed before invisible orders. IOC Island Orders Island offers two Immediate or Cancel (IOC) order options: AON and ANY. IOC/ANY- This order will execute ANY amount of your order, if shares are available, and immediately cancel any unexecuted shares. IOC/AON This order will either immediately be executed in FULL, or be immediately canceled if the total number of shares are not available. BRUT Round lots only. 8:00 AM ET to 6:30 PM ET. Limit only. Brut Book order matching. BRUT only accepts round lot orders. A round lot is 100 shares or a multiple of 100. Orders not for round lots will be rejected. BRUT matches buyers and sellers. When a BRUT order is matched, execution is instantaneous. The program utilizes a direct connection to BRUT, providing order entry and execution as fast as today's technology allows. Unlike the Island Book, the BRUT book is not displayed on the Level II montage. However, Nasdaq displays the best bid and the best ask from the BRUT book on the Level II montage. If your order represents the best bid or the best ask on the BRUT book, you will see it on the Level II montage. BRUT is most useful for matching orders you see displayed on Level II. If you wish to post an order, Island (ISLD) may be your best bet. Page 26 of 42
27 IOC BRUT Order BRUT offers one Immediate or Cancel (IOC) order option. IOC/ANY- This order will execute ANY amount of your order, if shares are available, and immediately cancel any unexecuted shares. ARCA Any Number of shares. 8:00 AM ET to 6:30 PM ET. Limit orders. 9:30 AM ET to 4:00 PM ET Market orders. Limit orders entered between 8:00 a.m. and 4:01 p.m. are canceled at 4:02 p.m. ET. Limit Orders entered after 4:02 p.m. are canceled at 6:30 p.m. ET. Market Orders are canceled at 4:00 p.m. ET. ARCA Book order matching and SmartBook order routing. ARCAL Limit order ARCAM Market order Like BRUT, ARCA matches buyers and sellers on the ARCA book. When an ARCA order is matched, execution is instantaneous. The program utilizes a direct connection to ARCA, providing order entry and execution as fast as today's technology allows. Also like BRUT, the ARCA book is not displayed on the Level II montage. However, Nasdaq displays the best bid and the best ask from the ARCA book on the Level II montage. If your order represents the best bid or the best ask on the ARCA book, you will see it on the Level II montage. The main advantage to using ARCA is its SmartBook order routing. ARCA utilizes a sophisticated execution algorithm to effectively route your order to the marketplace. Any marketable order that does not get matched on the ARCA book is sent into the marketplace in search of best price execution. ARCA is often an excellent choice, especially if the trader is inexperienced with direct access order selection. Give it a try. IOC ARCA Order ARCA offers one Immediate or Cancel (IOC) order option. IOC/ANY- This order will execute ANY amount of your order, if shares are available, and immediately cancel any unexecuted shares. NASDAQ TEST SYMBOLS NASDAQ provides a number of test symbols. You may use these symbols to practice order entry, and to test your system. These are not real securities. All NASDAQ orders may be entered on these test symbols. Real executions are possible. However, Market Makers seldom bother to fill SelectNets on test symbols. Please use this NASDAQ service responsibly. The following is a list of NASDAQ test symbols: Page 27 of 42
28 TEST TESTB TESTE TESTX ATEST NYSE and AMEX SECURITIES ISLD 8:00 AM ET to 6:30 PM ET. Limit only. ARCA 8:00 AM ET to 6:30 PM. NOTE: Although regional quotes are shown, all orders are sent to NYSE and AMEX. Odd lots (orders for a number of shares that is not a multiple of 100) must go as ANY (not AON ). ISLD / INET - Limit order Now the Island Book is available on all NYSE and AMEX Securities as well. Certain popular securities (e.g. QQQ) have significant liquidity on Island, but as of this writing, there is little liquidity on the Island Book on many Listed stocks. Use ISLD to trade the Island Book in exactly the same way as described for NASDAQ securities. ARCA Limit or Market ARCA is one of the best ways to execute orders on Listed securities. First, the order checks the ARCA order book providing the possibility of an immediate match. If there is no immediate match, the order goes to DOT. ARCA costs less than a regular DOT order and increases your chances for an execution! TICKET CHARGES What is a Ticket? In most cases, a Ticket represents any and all executions that result from one order being entered. Regardless of how many partial executions result from one order being sent, only one ticket is generated. One Ticket = one commission. If your order is partially executed, and is cancelled by you, market conditions, or any reason, the partial execution(s) represent one ticket and one commission. If additional orders are entered and executed in part or in whole, additional tickets and commissions will be generated. Most ECNs (not Island) charge a per share fee for routing through them. These fees are added to the commission on that ticket. Please review your broker s Fees and Commission information for exact charges per ticket or execution. PREPARING TO ENTER AN ORDER As previously explained, there are four essential windows you must have open when trading. They are the Montage, Account, Positions and Orders windows. Keep open the Position and Order windows. In this way you can always see your open orders and open positions. Check your open orders and open positions frequently! Page 28 of 42
29 Limit Order A limit price is specified on this type of order. If your order is executed, the price will not be higher on a Buy, or lower on a Sell, than your specified price. Limit orders are the safest way to enter an order, since they "limit" the possible price of the execution. Market Order A market order is entered without a specific price. It is an order to buy or sell at the current market price whatever that may be. In a rapidly moving market, it is common to get an execution significantly higher on a buy, or lower on a sell, than the price at the time the order was entered. Trailing Stop Places a market order to sell once the trailing stop price has been reached. The trailing stop will be activated at the increment that is set below the current market price. Trailing stops will move up along with the current market price (Eg. You place a 1 point trailing stop when the current market price is 100, this stop would be activated if the price falls to 99 or a percent value. If the stock price moves up to 103, your trailing stop will move up with it and will now be activated if the price drops to 102). To place a trailing stop, choose STOP and click the SELL or BUY button. Click the down arrow button in the StopType box, and click on Trailing. Then place the increment that you would like the trailing stop to be activated at in the TrailingPrice box (Eg. enter 1 for a one point trailing stop), then click the OK button. The TrailingPrice box can take either decimals, fractions and percentage (Eg. enter either 1 1/2 or 1.5 for a one and a half point trailing stop). Stop Range This allows you to place a stop order and limit order at the same time. You would enter a price below where the stock is currently trading at in the LowPrice field and enter a price above the trading price in the HighPrice field. When it reaches one of the prices of the range, the software will send a market order. Order Template Your software should have been installed with a default order for your Montage windows already set. Isld is the preset default order for all your Montage windows. To adjust your "Global" default order, go to Setup on the toolbar. Select Order Template from the dropdown menu. Order Template Configure window opens. Separate configurations for Nasdaq and NYSE/AMEX. Page 29 of 42
30 Figure 24 The following parameters can be set: Share number of shares. Select from the dropdown menu or enter a number. Route Any route may be set as the default. AON/ANY ANY is the preset default. AON (All or None) was formally used for SelectNet (SNET) only. ISLD orders are automatically sent as ANY. Time In Force (TIF) The default is 3 minutes. ISLD orders can be set to any TIF. Account Your account number(s) are available on the dropdown menu. Select your main account for your default order. When done configuring your order template, click OK. NOTE: Every time you type a symbol in the stock box on a Montage window, and hit enter, you reset that window to the global default. Local Default Order If you use more than one Montage window, this allows you to set individual defaults for each. This is useful if you regularly trade more than one account each Montage window can be set to default to a different account. Pull down the top of the Level II montage to expose the Config button. This button allows you to set a default order for individual Montage windows. Set the default orders and click OK. To override the individual default, check Use Global Default. Page 30 of 42
Manual: I. Getting Started:
 Manual: I. Getting Started: II. Layout: Download the Latest version of Laser trading platform from http://sharktraders.com/nyse-nasdaq-amex/platforms-nyse/laser/ Install to the appropriate directory (it
Trading Platform. User Manual
 Trading Platform User Manual 1. Introduction 2. Entering the Trading Platform 3. The Trader Menu 3.1 Trading 3.2 Chart 3.3 Time Sale 3.4 ECN Book 3.5 News 3.6 Top List 3.7 Mailbox 3.8 Market Minder 3.9
The Shield, Inc. 2014 www.turnkeybroker.com support@turnkeybroker.com
 TurboTick PRO manual version 2.022 updated 7.7.2014 Table of Contents Contents Table of Contents... 2 Getting started in TurboTick Pro... 3 Level 2... 5 Order Entry... 8 Streamlined Order Entry... 10 Portfolio
Manual: I. Getting Started:
 Manual: I. Getting Started: Download the Latest version of Laser trading platform from http://vqs-group.com/services/platform/ Install to the appropriate directory (it will automatically install it to
Knight Direct FX User Guide
 Knight Direct FX User Guide Release 3.8 June 4, 2010 Table of Contents Overview of FX Trading Platform... 3 Ticket Display... 3 FX Order Ticket... 3 Currency Pair Symbol... 4 Top of Book Price... 4 Top
STREETSMART Pro DIRECT ACCESS TRADING. powered by CyberTrader. Charles Schwab & Co., Inc., Nov. 2002 StreetSmart Pro Version 2.1
 STREETSMART Pro powered by CyberTrader DIRECT ACCESS TRADING Charles Schwab & Co., Inc., Nov. 2002 StreetSmart Pro Version 2.1 1 Table of Contents Jump to the topic in the Table of Contents below by putting
Any symbols displayed within these pages are for illustrative purposes only, and are not intended to portray any recommendation.
 mobiletws for Android Users' Guide October 2012 mobiletws for Android Version 4.1.360 2012 Interactive Brokers LLC. All Rights Reserved Any symbols displayed within these pages are for illustrative purposes
mobiletws for iphone
 mobiletws for iphone Table of Contents Log in to mobiletws... 1 Logging In... 1 Trade... 5 Submit an Order... 5 The Order Ticket... 6 Quotes, Charts, Trading... 7 Add a Contract... 8 View Expanded Ticker...
Trading Integration for ViTrade
 ViTrader Trading Integration for ViTrade TeleTrader Software GmbH Contents First Steps with the ViTrade Trading Integration 3 Accessing Your Portfolio 6 Creating Portfolios... 7 Logging In to a Portfolio...
Beginners Guide to CQG FX
 Beginners Guide to CQG FX Table of Contents Logging into CQG FX................................................................. pg. 2 Logging in for the first time (if previously traded on demo)..........................pg.4
CFD-FX Trading platform Software User Guide. May 2006
 CFD-FX Trading platform Software User Guide May 2006 CONTENTS Introduction........................................................1 Installing the trading platform........................................1
Desktop Platform User Manual Version 1.0
 Desktop Platform User Manual Version 1.0 1 Table of Contents Logging On, Saving, & Opening Desktop Layouts 3 Platform Feature Overview (Master Window) 4 Overall Platform Settings 5-8 Linking Windows 9
To download the latest version of TurboTick Pro go to http://www.turnkeybroker.com/download/turbotickpro/publish.html
 TurboTick PRO manual version 1.211 updated 12.7.2011 Getting started in TurboTick Pro TurboTick Pro is an advanced trading platform built for the active trader. With easy-to-use customizable screens, integrated
Microsoft Access 2010 handout
 Microsoft Access 2010 handout Access 2010 is a relational database program you can use to create and manage large quantities of data. You can use Access to manage anything from a home inventory to a giant
DealBook 360. User Manual. Version 1.0. gftforex.com/ 800-465-4373 / 616-956-9273 LIVE CHAT 24/7 TOLL FREE INTERNATIONAL
 DealBook 360 User Manual Version 1.0 gftforex.com/ 800-465-4373 / 616-956-9273 LIVE CHAT 24/7 TOLL FREE INTERNATIONAL Table of Contents Welcome to the DealBook 360 User Manual... 6 Before You Use DealBook
Getting Started with Barchart Professional
 Getting Started with Barchart Professional Last Updated: 12/20/2010 Welcome to Barchart Professional! Professional a full-featured quote, chart and analysis software application that you download to your
Appointment Scheduler
 EZClaim Appointment Scheduler User Guide Last Update: 11/19/2008 Copyright 2008 EZClaim This page intentionally left blank Contents Contents... iii Getting Started... 5 System Requirements... 5 Installing
WEB TRADER USER MANUAL
 WEB TRADER USER MANUAL Web Trader... 2 Getting Started... 4 Logging In... 5 The Workspace... 6 Main menu... 7 File... 7 Instruments... 8 View... 8 Quotes View... 9 Advanced View...11 Accounts View...11
WHAT S NEW IN WORD 2010 & HOW TO CUSTOMIZE IT
 WHAT S NEW IN WORD 2010 & HOW TO CUSTOMIZE IT The Ribbon... 2 Default Tabs... 2 Contextual Tabs... 2 Minimizing and Restoring the Ribbon... 3 Customizing the Ribbon... 3 A New Graphic Interface... 5 Live
J-TRADER QUICK START USERGUIDE For Version 8.0
 J-TRADER QUICK START USERGUIDE For Version 8.0 Notice Whilst every effort has been made to ensure that the information given in the J Trader Quick Start User Guide is accurate, no legal responsibility
Graybox User Manual_v3.63 1. Graybox. User Manual. Ver 3.63. Hold Software.com, Inc
 Graybox User Manual_v3.63 1 Graybox User Manual Ver 3.63 Hold Software.com, Inc All Rights Reserved, Copyright Hold Software.com, Inc 2011 Graybox User Manual_v3.63 2 CONTENTS 1. Introduction... 8 2. Graybox
Power E*TRADE PRO User Guide
 Power E*TRADE PRO User Guide 00798 (5/04) Table of Contents CHAPTER 1 How This Manual Is Organized: Quick Guide, Specific Tasks, and Menus 1 CHAPTER 2 Are You and Your Computer Ready for Power E*TRADE
AXIS 3.0. User Documentation
 AXIS 3.0 User Documentation Summer 2004 Table of Contents 1.0 Axis 3.0 Installation 3 1.1 System Requirements 3 1.2 Installing from the web 3 1.3 Installing from a CD 4 2.0 Basics 5 2.1 System Login 5
A powerful dashboard utility to improve situational awareness of the markets, place precise orders, and graphically monitor trading positions.
 A powerful dashboard utility to improve situational awareness of the markets, place precise orders, and graphically monitor trading positions. Position DashBoard Powered by BAR ANALYZER Position DashBoard
MotiveWave User s Guide Version: 1.0.2
 MotiveWave Version: 1.0.2 2014 MotiveWave Software Version 1.0.2 2014 MotiveWave Software Page 1 of 190 Table of Contents 1 Introduction 6 1.1 MotiveWave Editions and Modules 6 1.1.1 Editions 6 1.1.2 Modules
All V7 registers support barcode printing, except the Sharp 410/420 1A ROM and that limitation is based upon the register.
 Tools Section Barcode Printing These are basic instructions for Version 7 Polling barcode printing. Users will need to have a PLU/UPC file containing either UPC-A, UPC-E, EAN 13 or EAN 8 numbers, label
Introduction to ProphetX 3.0
 Introduction to ProphetX 3.0 Table of Contents User Interface... 2 Global ProphetX Preferences... 2 Navigating ProphetX 3.0... 3 Docked Panes... 3 Context Tool Bar... 3 Split Views... 4 Tabbed Displays...
Workspaces Creating and Opening Pages Creating Ticker Lists Looking up Ticker Symbols Ticker Sync Groups Market Summary Snap Quote Key Statistics
 Getting Started Workspaces Creating and Opening Pages Creating Ticker Lists Looking up Ticker Symbols Ticker Sync Groups Market Summary Snap Quote Key Statistics Snap Report Price Charts Comparing Price
Access I 2010. Tables, Queries, Forms, Reports. Lourdes Day, Technology Specialist, FDLRS Sunrise
 Access I 2010 Tables, Queries, Forms, Reports Lourdes Day, Technology Specialist, FDLRS Sunrise Objectives Participants will 1. create and edit a table 2. create queries with criteria 3. create and edit
TABLE OF CONTENTS. www.ironfx.com
 USER MANUAL TABLE OF CONTENTS [1] WELCOME TO THE IronFX Multi-Asset Trader USER MANUAL 7 [1.1] BEFORE YOU USE IronFX Multi-Asset Trader 7 [1.2] TIPS FOR USING THIS MANUAL 7 [2] SECTION 1: EXPLORING IronFX
Sterling Technologies Inc. Sterling Trader Pro
 Sterling Technologies Inc. Features: State of the art direct access trading software Broker neutral trading platform Pinpoint accuracy of order-routing and order management Integrated real-time quotes,
mobiletws for ipad Users' Guide September 2011 2011 Interactive Brokers LLC. All rights reserved.
 mobiletws for ipad Users' Guide September 2011 2011 Interactive Brokers LLC. All rights reserved. Apple, the Apple logo, ipod, ipod touch, ipad and itunes are trademarks of Apple Inc., registered in the
Microsoft Office Access 2007 Basics
 Access(ing) A Database Project PRESENTED BY THE TECHNOLOGY TRAINERS OF THE MONROE COUNTY LIBRARY SYSTEM EMAIL: TRAININGLAB@MONROE.LIB.MI.US MONROE COUNTY LIBRARY SYSTEM 734-241-5770 1 840 SOUTH ROESSLER
Trader s Guide 10.4.0.0
 Trader s Guide 10.4.0.0 November 2011 ONE BLUE HILL PLAZA, 10 TH FLOOR WWW.RITHMIC.COM ONE BLUE HILL PLAZA, 10 TH FLOOR 877 RITHMIC SALES PEARL RIVER, NEW YORK 10965-8689 877 408 0008 TECH SUPPORT Document
Metatrader 4 Tutorial
 Metatrader 4 Tutorial Thank you for your interest in Best Metatrader Broker! This tutorial goes in detail about how to install and trade with your new Metatrader Forex trading platform. With Best Metatrader
Table of Contents. Introduction Opening A Demo Account Overview Market Watch (Quotes Window) Charts Navigator
 Charts Navigator") Table of Contents Introduction Opening A Demo Account Overview Market Watch (Quotes Window) Charts Navigator (Folder File) Trade Terminal (Your Account Details) New Order Execution News Service Account
Table of Contents Introduction Opening A Demo Account Overview Market Watch (Quotes Window) Charts Navigator (Folder File) Trade Terminal (Your Account Details) New Order Execution News Service Account
MetaTrader 4 and MetaEditor
 MetaTrader 4 and MetaEditor User Manual Version 1. 2 2012 Global Futures and Forex, Ltd. All rights reserved. Table of Contents Welcome to the MetaTrader and MetaEditor User Manual... 4 Section 1: Opening
Introduction to ProphetX Mini User Guide
 Introduction to ProphetX Mini User Guide Table of Contents User Interface... 3 Global ProphetX Preferences......3 Navigating ProphetX 3.x... 3 Docked Panes... 3 Context Tool Bar... 3 Split Views... 4 Tabbed
Impact Call PC. call001. Impact Call User s Guide
 R Impact Call PC call001 Impact Call User s Guide Comdial strives to design the features in our communications systems to be fully interactive with one another. However, this is not always possible, as
History Explorer. View and Export Logged Print Job Information WHITE PAPER
 History Explorer View and Export Logged Print Job Information WHITE PAPER Contents Overview 3 Logging Information to the System Database 4 Logging Print Job Information from BarTender Designer 4 Logging
macquarie.com.au/prime Charts Macquarie Prime and IT-Finance Advanced Quick Manual
 macquarie.com.au/prime Charts Macquarie Prime and IT-Finance Advanced Quick Manual Macquarie Prime Charts Advanced Quick Manual Contents 2 Introduction 3 Customisation examples 9 Toolbar description 12
Basic Microsoft Excel 2007
 Basic Microsoft Excel 2007 The biggest difference between Excel 2007 and its predecessors is the new layout. All of the old functions are still there (with some new additions), but they are now located
Active Trader Pro. Next Generation. Moving from. 9.6 to. Active Trader Pro
 WORKSPACE Moving from Active Trader Pro 9.6 to Active Trader Pro Next Generation Active Trader Pro Next Generation is a platform that has been shaped by input from traders like you. Powerful new technologies
Microsoft Access 2010 Part 1: Introduction to Access
 CALIFORNIA STATE UNIVERSITY, LOS ANGELES INFORMATION TECHNOLOGY SERVICES Microsoft Access 2010 Part 1: Introduction to Access Fall 2014, Version 1.2 Table of Contents Introduction...3 Starting Access...3
TABLE OF CONTENTS LOGGING ON, SAVING, & OPENING DESKTOP LAYOUTS
 TABLE OF CONTENTS LOGGING ON, SAVING, & OPENING DESKTOP LAYOUTS 2 PLATFORM FEATURE OVERVIEW (MASTER WINDOW) 3 OVERALL PLATFORM SETTINGS 4-6 LINKING WINDOWS 7 CHARTS WINDOWS 8-9 FUNDAMENTALS & NEWS WINDOWS
EF MetaTrader 5 for Android OS
 User Guide for the online trading platform EF MetaTrader 5 for Android OS Euro-Finance 43 Christopher Columbus blvd., 1592 Sofia, Bulgaria tel.: +359 (0) 700 156 56; fax: +359 (0) 2 981 14 96 support@eurofinance.bg
User Guide. www.windsorbrokers.com. For more information email us on: customerservices@windsorbrokersltd.com
 User Guide www.windsorbrokers.com For more information email us on: customerservices@windsorbrokersltd.com CONTENTS Pages 1. Opening an account. 3-4 2. Server and account settings. 5-6 3. Market Watch
Netigate User Guide. Setup... 2. Introduction... 5. Questions... 6. Text box... 7. Text area... 9. Radio buttons...10. Radio buttons Weighted...
 Netigate User Guide Setup... 2 Introduction... 5 Questions... 6 Text box... 7 Text area... 9 Radio buttons...10 Radio buttons Weighted...12 Check box...13 Drop-down...15 Matrix...17 Matrix Weighted...18
Fusion DMA User s Manual
 Fusion DMA User s Manual 100 Fifth Avenue 7 TH Floor New York, NY 10011 Phone 212.531.8500 Fax 212.367.8567 Email: info@fusionts.com Copyright Notices 2012, Fusion Trading Solutions. All rights reserved.
INTRODUCTION... 4 GETTING STARTED... 5
 E-Trade User Guide E-Trade User Guide INTRODUCTION... 4 System Overview.... 4 GETTING STARTED... 5 Logging on to Your ETrade.... 5 Resetting Your Password.... 6 Retrieving Your Password.... 7 Changing
Banner Document Management Suite (BDMS) Web Access Help
 Web Access Help") May 10 th, 2011 Banner Document Management Suite (BDMS) Web Access Help Division of Information Technology AppXtender Web Access Help: For questions regarding AppXtender Web Access, please contact the
May 10 th, 2011 Banner Document Management Suite (BDMS) Web Access Help Division of Information Technology AppXtender Web Access Help: For questions regarding AppXtender Web Access, please contact the
Sterling Trader Pro. User Guide v. 6.0
 1 Sterling Trader Pro User Guide v. 6.0 Greetings, From Sterling Trader, Inc! Welcome to Sterling Trader Pro, an industry leading, state-of-the-art, global order routing and order management platform.
MetaTrader 4 for iphone Guide
 MetaTrader 4 for iphone Guide Logging in When you have first downloaded and installed the app from the App Store, you will see the Metatrader 4 icon appear on your screen. Please select this icon by tapping
Finance Reporting. Millennium FAST. User Guide Version 4.0. Memorial University of Newfoundland. September 2013
 Millennium FAST Finance Reporting Memorial University of Newfoundland September 2013 User Guide Version 4.0 FAST Finance User Guide Page i Contents Introducing FAST Finance Reporting 4.0... 2 What is FAST
Payco, Inc. Evolution and Employee Portal. Payco Services, Inc.., 2013. 1 Home
 Payco, Inc. Evolution and Employee Portal Payco Services, Inc.., 2013 1 Table of Contents Payco Services, Inc.., 2013 Table of Contents Installing Evolution... 4 Commonly Used Buttons... 5 Employee Information...
Brainreason Trading Platform User Manual
 Brainreason Trading Platform User Manual PREFACE INTRODUCTION About this document PLATFORM NAVIGATION Demo Subscription Demo Account Registration Contact Support Language Getting Started Icons and Symbols
EXCEL PIVOT TABLE David Geffen School of Medicine, UCLA Dean s Office Oct 2002
 EXCEL PIVOT TABLE David Geffen School of Medicine, UCLA Dean s Office Oct 2002 Table of Contents Part I Creating a Pivot Table Excel Database......3 What is a Pivot Table...... 3 Creating Pivot Tables
In this session, we will explain some of the basics of word processing. 1. Start Microsoft Word 11. Edit the Document cut & move
 WORD PROCESSING In this session, we will explain some of the basics of word processing. The following are the outlines: 1. Start Microsoft Word 11. Edit the Document cut & move 2. Describe the Word Screen
Appointments: Calendar Window
 Appointments Appointments: Calendar Window Purpose The Appointment Calendar window is the automated equivalent of a paper appointment book. You can make appointments, confirm appointments, and view appointments
Real Time Monitor. A Real-Time Windows Operator Interface. DDE Compliant. (for remote data display)
") Real Time Monitor A Real-Time Windows Operator Interface DDE Compliant (for remote data display) TABLE OF CONTENTS 1. INTRODUCTION...1 1.1 INSTALLATION...2 1.2 FIRST START UP - DDE CONFIGURE...2 1.3 AUTO-STARTUP...2
Real Time Monitor A Real-Time Windows Operator Interface DDE Compliant (for remote data display) TABLE OF CONTENTS 1. INTRODUCTION...1 1.1 INSTALLATION...2 1.2 FIRST START UP - DDE CONFIGURE...2 1.3 AUTO-STARTUP...2
Google Docs Basics Website: http://etc.usf.edu/te/
 Website: http://etc.usf.edu/te/ Google Docs is a free web-based office suite that allows you to store documents online so you can access them from any computer with an internet connection. With Google
TRADE INTERCEPTOR CHARTING 4.0 USER MANUAL
 TRADE INTERCEPTOR CHARTING 4.0 USER MANUAL 1 Welcome to Trade Interceptor Charting 4.0 help file This help file has been created to give you a fast understanding of what's possible with Trade Interceptor
Excel 2003 Tutorial I
 This tutorial was adapted from a tutorial by see its complete version at http://www.fgcu.edu/support/office2000/excel/index.html Excel 2003 Tutorial I Spreadsheet Basics Screen Layout Title bar Menu bar
Internet Currency Trading System User Manual
 INTRODUCTION Welcome to the Internet Currency Trading System (ICTS ) User Manual. This Manual is designed to introduce the ICTS to a trader, to show how to use the system to trade, and to provide a general
J-Trader Quick Start Demo
 J-Trader Quick Start Demo Step #1: INSTALLATION Type in your browser or click here to enter the J-Trader demo: http://www.tradewithvision.com/jtrader/demo/jtrader.htm. The first time you load this java
M-F: 7:00AM 1:00AM ET (800)704-7237 7:00 AM 12:00AM ET
704-7237 7:00 AM 12:00AM ET") Agent Guide LeadRouter Customer Service (800)704-7237 Help@LeadRouter.com M-F: 7:00AM 1:00AM ET Weekends: 7:00 AM 12:00AM ET Version 1.4 May 2012 Contents What is LeadRouter?... 4 The LeadRouter Approach...
Agent Guide LeadRouter Customer Service (800)704-7237 Help@LeadRouter.com M-F: 7:00AM 1:00AM ET Weekends: 7:00 AM 12:00AM ET Version 1.4 May 2012 Contents What is LeadRouter?... 4 The LeadRouter Approach...
Decision Support AITS University Administration. Web Intelligence Rich Client 4.1 User Guide
 Decision Support AITS University Administration Web Intelligence Rich Client 4.1 User Guide 2 P age Web Intelligence 4.1 User Guide Web Intelligence 4.1 User Guide Contents Getting Started in Web Intelligence
WEBTrader. User Guide
 WEBTrader User Guide Table of Contents Creating a Demo account How to log in Main Areas of the WebTrader Market Watch Favorites Adding Favorites Spot Panes Charts Adding New Chart Using Charts Chart Options
Microsoft PowerPoint 2010
 Microsoft PowerPoint 2010 Starting PowerPoint... 2 PowerPoint Window Properties... 2 The Ribbon... 3 Default Tabs... 3 Contextual Tabs... 3 Minimizing and Restoring the Ribbon... 4 The Backstage View...
Outlook Web Access (OWA) User Guide
 User Guide") Outlook Web Access (OWA) User Guide September 2010 TABLE OF CONTENTS TABLE OF CONTENTS... 2 1.0 INTRODUCTION... 4 1.1 OUTLOOK WEB ACCESS SECURITY CONSIDERATIONS... 4 2.0 GETTING STARTED... 5 2.1 LOGGING
Outlook Web Access (OWA) User Guide September 2010 TABLE OF CONTENTS TABLE OF CONTENTS... 2 1.0 INTRODUCTION... 4 1.1 OUTLOOK WEB ACCESS SECURITY CONSIDERATIONS... 4 2.0 GETTING STARTED... 5 2.1 LOGGING
Intellect Platform - The Workflow Engine Basic HelpDesk Troubleticket System - A102
 Intellect Platform - The Workflow Engine Basic HelpDesk Troubleticket System - A102 Interneer, Inc. Updated on 2/22/2012 Created by Erika Keresztyen Fahey 2 Workflow - A102 - Basic HelpDesk Ticketing System
SATURN Trader SATURN TRADER USER GUIDE: CFD
 SATURN Trader SATURN TRADER USER GUIDE: CFD Spread Co Ltd, Argyle House, Joel Street, Northwood Hills, London, HA6 1NW, United Kingdom Tel: (44) (0)1923 832 600 Fax: (44) (0)1923 845 308 E-mail: cs@spreadco.com
Table of Contents. Part I Welcome. Part II Introduction. Part III Getting Started. Part IV The User Interface. Part V Quick Start Tutorials
 Contents I Table of Contents Part I Welcome 5 Part II Introduction 5 1 Overview... 5 2 Product... Levels 5 3 Technical... Support 6 4 Copyright... 7 Part III Getting Started 7 1 Installation... 7 2 Register...
Microsoft Excel 2010 Tutorial
 1 Microsoft Excel 2010 Tutorial Excel is a spreadsheet program in the Microsoft Office system. You can use Excel to create and format workbooks (a collection of spreadsheets) in order to analyze data and
Introduction to Microsoft Word 2008
 1. Launch Microsoft Word icon in Applications > Microsoft Office 2008 (or on the Dock). 2. When the Project Gallery opens, view some of the available Word templates by clicking to expand the Groups, and
Client Software Feature Guide
 RIT User Guide Build 1.00 Client Software Feature Guide Introduction Welcome to Rotman Interactive Trader 2.0 (RIT 2.0). This document assumes that you have installed the Rotman Interactive Trader 2.0
MetaTrader 4 and MetaEditor
 MetaTrader 4 and MetaEditor User Manual Version 1.1 gftuk.com / 0800 358 0864 / +44 (0) 20 7170 0770 LIVE CHAT 24/7 TOLL FREE INTERNATIONAL Table of Contents Welcome to the MetaTrader and MetaEditor User
How to make a line graph using Excel 2007
 How to make a line graph using Excel 2007 Format your data sheet Make sure you have a title and each column of data has a title. If you are entering data by hand, use time or the independent variable in
Intellect Platform - Tables and Templates Basic Document Management System - A101
 Intellect Platform - Tables and Templates Basic Document Management System - A101 Interneer, Inc. 4/12/2010 Created by Erika Keresztyen 2 Tables and Templates - A101 - Basic Document Management System
Create a Poster Using Publisher
 Contents 1. Introduction 1. Starting Publisher 2. Create a Poster Template 5. Aligning your images and text 7. Apply a background 12. Add text to your poster 14. Add pictures to your poster 17. Add graphs
Asset Track Getting Started Guide. An Introduction to Asset Track
 Asset Track Getting Started Guide An Introduction to Asset Track Contents Introducing Asset Track... 3 Overview... 3 A Quick Start... 6 Quick Start Option 1... 6 Getting to Configuration... 7 Changing
USER MANNUAL. Version 1.9.6
 USER MANNUAL Version 1.9.6 Table of Contents 1. About this Document...3 2. Manuscript Composition...4 3. Getting Started...4 3.1 KASB Direct Login...4 3.1.1 To log on to KASB Direct...5 3.1.2 Server not
Outlook Tips & Tricks. Training For Current & New Employees
 Outlook Tips & Tricks Training For Current & New Employees The workshop will help build the necessary skills needed to begin using Microsoft Outlook 2010. The participant will learn how to create e-mail
Chapter 2: Clients, charts of accounts, and bank accounts
 Chapter 2: Clients, charts of accounts, and bank accounts Most operations in BankLink Practice are client specific. These include all work on coding transactions, reporting, and maintaining chart of accounts
www.gainsy.com Tading Platform Manual
 Tading Platform Manual Table of contents Description... 4 General... 5 Layout and windows management... 5 Working on several monitors... 5 Drag and drop... 5 Columns management... 5 Windows links... 6
Excel 2007 Basic knowledge
 Ribbon menu The Ribbon menu system with tabs for various Excel commands. This Ribbon system replaces the traditional menus used with Excel 2003. Above the Ribbon in the upper-left corner is the Microsoft
MS Word 2007 practical notes
 MS Word 2007 practical notes Contents Opening Microsoft Word 2007 in the practical room... 4 Screen Layout... 4 The Microsoft Office Button... 4 The Ribbon... 5 Quick Access Toolbar... 5 Moving in the
Lotus Notes Client Version 8.5 Reference Guide
 Lotus Notes Client Version 8.5 Reference Guide rev. 11/19/2009 1 Lotus Notes Client Version 8.5 Reference Guide Accessing the Lotus Notes Client From your desktop, double click the Lotus Notes icon. Logging
Ohio University Computer Services Center August, 2002 Crystal Reports Introduction Quick Reference Guide
 Open Crystal Reports From the Windows Start menu choose Programs and then Crystal Reports. Creating a Blank Report Ohio University Computer Services Center August, 2002 Crystal Reports Introduction Quick
Dispatch Anywhere 2.0 Internet-Based Transportation Management System GETTING STARTED GUIDE. Copyright 2005 Beacon Software Company, LLC
 Dispatch Anywhere 2.0 Internet-Based Transportation Management System GETTING STARTED GUIDE Copyright 2005 Beacon Software Company, LLC CONTENTS INTRODUCTION...4 Navigation...4 Introduction to Dispatch
Trader s Guide 10.1.0.0
 Trader s Guide 10.1.0.0 September 2011 ONE BLUE HILL PLAZA, 10 TH FLOOR WWW.RITHMIC.COM ONE BLUE HILL PLAZA, 10 TH FLOOR 877 RITHMIC SALES PEARL RIVER, NEW YORK 10965-8689 877 408 0008 TECH SUPPORT Document
2010 Document Template Administration. User Guide. Document Template Administration
 User Guide Document Template Administration Page 1 Document Template Administration and Related Features: Features and Related Topics: 1 Document Template Administration:...3 2 Creating a New E-Mail Document
Module One: Getting Started... 6. Opening Outlook... 6. Setting Up Outlook for the First Time... 7. Understanding the Interface...
 2 CONTENTS Module One: Getting Started... 6 Opening Outlook... 6 Setting Up Outlook for the First Time... 7 Understanding the Interface...12 Using Backstage View...14 Viewing Your Inbox...15 Closing Outlook...17
Horizon Patient Folder User s Guide
 Horizon Patient Folder User s Guide - 1 - Overview St. Mary's Medical Center is embarking on a new way to view the medical record for patients on-line. This information will guide you through the Horizon
FXCC MetaTrader 4 user guide
 Installing MetaTrader 4 Once you have downloaded the MT4 executable program and saved this to your desktop, installation is fast and simple. 1. Double-click the Metatrader exe file to install. This follows
Table of Contents. zipform 6 User Guide
 Table of Contents Welcome 4 Creating and Using Transactions.. 4 How to Create a Transaction...... 4 Creating a Transaction Using a Template....... 5 Adding and Removing Forms from a Transaction.......
CONTENTS PREFACE INTRODUCTION MANAGING SETTINGS
 User Guide CONTENTS PREFACE 8 INTRODUCTION 9 System Overview 9 Logging onto Ebroker Plus 10 Forget Password 12 Hot Keys 21 Right Click Options 22 Stock Market Terminologies 29 To exit from Ebroker Plus
OVERVIEW TABLE OF CONTENTS. Logging in 1. Main Screen 2. Tool Bar 2. Market Rates 4. Trading Cubes 5. Orders 6. Pending Orders Tab 7.
 WEB TRADER GUIDE OVERVIEW Sirix Web is an Adobe Flash, Web-based platform. Sirix Web is available on all internet browsers which support Flash version 10 and above. Sirix Web will use a Shared Wallet with
Your Workspace will be normally setup by our Dealers Group for you, below is a view of a default blank workspace.
 Default View Your Workspace will be normally setup by our Dealers Group for you, below is a view of a default blank workspace. The connections window is in view. This window gives details on Exchange connectivity
Microsoft Outlook 2010. Reference Guide for Lotus Notes Users
 Microsoft Outlook 2010 Reference Guide for Lotus Notes Users ContentsWelcome to Office Outlook 2010... 2 Mail... 3 Viewing Messages... 4 Working with Messages... 7 Responding to Messages... 11 Organizing