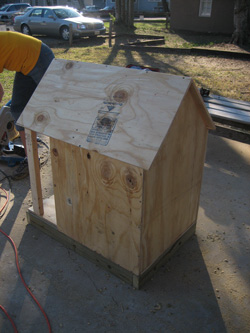
Dog House. Building Time: 2-3 hours. Age Level: 10 years and up
|
|
|
- Chad Sullivan
- 7 years ago
- Views:
Transcription
 2 ½ Galvanized Deck Screws 1 Box (1lb) - 1-5/8\" Galvanized Deck Screws 1 Quart - Exterior Grade Paint 1 Large Garbage bag Tools Needed: Tape measure Chalk line Circular saw Drill - with drill")
1 Dog House Building Time: 2-3 hours Age Level: 10 years and up Materials: 1PC - 4'x8' Exterior Grade Plywood Sheathing (5/8" thick) 1PC - 2"x4"x10' Pressure Treated 1PC - 2"x2"x10' Untreated 1 Box (1lb) 2 ½ Galvanized Deck Screws 1 Box (1lb) - 1-5/8" Galvanized Deck Screws 1 Quart - Exterior Grade Paint 1 Large Garbage bag Tools Needed: Tape measure Chalk line Circular saw Drill - with drill bit and Phillips head screw driver bit Spade Bit (3/4" or larger) Hammer Paint Brush Pencil Safety Glasses Carpenters Square Things to Consider: There are a couple of important considerations when building and designing a doghouse. Please keep these in mind if you plan to modify the plans to fit your needs. 1. Pressure treated wood should not be used on any parts the dog may chew. 2. The doghouse should be raised from the ground to keep out moisture and help insulate the dog from the cold. 3. The doghouse should be large enough for the dog to comfortably turn around but small enough to retain the dog's body heat.
2 Plywood: The doghouse should be built from exterior grade plywood. Most of the plywood you will find at your local hardware store is not exterior grade. Exterior grade plywoods have special glues that prevent the layers from coming apart when they get wet. The best material to use is exterior plywood sheathing. This wood is designed to be used on the outside of a home. It has a "rough cut" surface, sometimes with grooves cut into the surface for decoration. Foundation: Because the foundation of the doghouse will sit on the ground, we used pressure treated 2"x4"s. It is unlikely that the dog will chew these boards. If you think your dog may gnaw on them, however, you may want to use untreated wood and paint it. We also drilled 1" holes in all sides of the base to allow ground moisture to evaporate and prevent rotting. Roof: The roof to this doghouse is designed to be removable. This will allow for easy cleaning of the interior. Procedure: Cutting Plywood Key to diagrams: Green= Figure title Black= The piece being worked with; numbers in black are measurements Red= Measurements for cuts Blue= Label for each piece 1. Begin with the sheet of plywood. Measure up from the shorter (4 ) side 24. Make a mark there with your pencil. Go to the other side of the sheet and do the same. Pull the chalk line from one measurement to the other, pull tight, and snap the line. You should have a rectangle that is or 48 by 24. [Fig. 1] 2. Cut this out of the sheet. When cutting, make sure the blade is on the side that you are not currently concerned with. In this case, your blade should be on the 48 x 72 side of the line. This helps make sure all measurements are exact. * On the diagrams the shaded area is the side of the line that your blade should be on. *Ear plugs are suggested while saw is in use. 3. Take your 48 x 24 piece and cut it in half. (When doing this measure 24 from one side, snap a line with your chalk, and in this case cut right down the middle of the line.) Write side on each of these pieces. [Fig. 2] 4. Cut the 48 x72 leftover in half. To do this, measure 36 (3 ft) up from the short side and do the same on the other. Snap a line and make your cut. [Fig. 3] 5. Take the 48 x 36 section and measure 22 7/8 from a short side and snap a line. Make your cut, and then measure 24 1/8 from a short side of the same sheet and snap a
3 line, then make another cut. Label one of these pieces bottom and the other back. [Fig. 4] 6. Take the back and measure up the long side 24. Make pencil marks at each 24, but do not snap a line. 7. Measure 11 7/8 on the shorter side of back and make a mark with your pencil. 8. Snap a line from one of the 24 marks on back to the 11 7/8 mark. Do it with the other measurement. [Fig. 5] 9. Cut both lines on the waste side of your line. You should have a pentagon when done. [Fig. 5] 10. Take your remaining 48 x 36 section. Measure 18 from a 36 side. Snap a line, and make your cut. [Fig. 6] 11. Measure 12 up from the 36 side of the remaining piece, and cut that. You should have two 18 x 36 pieces and a 12 x 36 piece. Write roof on each of the 18 x 36 pieces. [Fig. 6] 12. Take the 12 x 36 piece and measure 11 7/16 on one 36 side, and 22 7/8 on the other. Snap a line from the 22 7/8 to the 11 7/16 and cut. Snap a line from the 11 7/16 mark to the corner, and cut that. You should have a triangle when complete. Label this porch [Fig. 7] 13. With the last piece, snap a line from the right angle to the 135 degree angle, and cut. [Fig. 8] 14. Using your tape, measure up 6 from the long side of the triangle. Move your tape until it hits the outside of the triangle. Doing this on both sides will give you 6 up. Snap a line, and cut. You should have a trapezoid with measurements of 24 and 12. Write brace on that piece. [Fig. 9] You are done with plywood cutting! Cutting pressure treated 2 x4 x10 1. Measure from one side up to 33. Make a mark with your pencil, and then use your square to make a straight line. (Push the big part of the square against the 2x4 so that it is tight and the straight part is next to your mark. [Fig. 1] 2. Do this again. (Tip: You can measure from each side and make your lines, then cut both.) Cut these pieces out and label them A. 3. On the remaining piece measure up 24 on both sides, and cut those. Label these pieces B. [Fig. 2]
4 Make sure you label each piece cut with its assigned letter. Untreated 2 x2 x10 1. Measure from one side 22 7/8. Mark and cut. Label it C. [Fig. 3] 2. Measure 22 1/2 from one side, mark, and cut. Do this again. Label these pieces D. [Fig. 4] 3. Measure 10 5/8 from one side, and 31 from the other. Mark and cut. Label these F and E respectively. [Fig. 5] Make sure you label each piece cut with its assigned letter. Assembly Key to diagrams: Green= Figure title Black= The piece being worked with; numbers in black are measurements Blue= Label for each piece Red= Where your screws should go 1. Begin with your 2x2 untreated wood. Take piece C and measure 10 3/4 from each side of it and make a mark. This will create a 1 1/2 space for you to line up piece F. [Fig. 1] 2. Place piece F in between the marks, and screw together with one 2 screw. (It may be helpful to use a small drill bit and make a pilot hole first. This will prevent the wood from splitting.) [Fig. 1] 3. Next line up both D pieces on the ends of C. Screw these together. [Fig. 2] 4. Taking the bottom piece of plywood, mark 2 ½ from one of the short sides with your pencil. Make sure to do this on the smoothest side of the plywood, because this will be the floor for your dog. Do the same on the parallel side. [Fig. 3] 5. Place your 2x2 frame so that the outside edge lines up with these lines. [Fig. 4] 6. Screw in 2x2s with 2 screws from below bottom. 7. Take one of your sides, and line it up with the corner of the bottom opposite the side of the 2x2 frame. Screw 1 5/8 screws in from the side into the bottom. (Again pilot holes may be useful.) Use 4, about 8 apart. [Fig. 5] 8. Do the same with the opposite side. [Fig. 6]
5 9. Take the back and have the three square sides lined up with the bottom and each side. Screw these together every 8 or so. [Fig. 7] 10. Take one B and place it on the ground with the 1 ½ side touching the ground. Place one A at each end so that they are coming off of B making a U that is 24 x 34 ½. Screw these together from B into the A s with 2 of the 2 ½ screws. Take the last B and screw it into place in the same way. You should have a 24 x 36 box. [Fig. 8] 11. Take your trash bag and cover the box frame. You might have to cut it down the seams to make it larger. It should overlap the frame. This provides a moisture barrier and more insulation for your dog. 12. Pick up the sides and bottom and place the bottom on top of that framed box. Make sure it lines up with the outsides as close as possible. Using 1 5/8 screws every 8 or so fasten the bottom to that frame from inside the doghouse. You might have to go in at an angle to do this. [Fig. 9] 13. Cut off any excess plastic. 14. Put your ¾ spade (paddle) bit into the drill. Make 2-4 holes in each side of the frame. This helps to release any condensation from below the doghouse. 15. Measure from the tip of the back down ¾ and make a mark. Take E and put it between your mark and F. Line the top of E up with that mark and the top of F. Screw E in so that it is secured with 2 ½ screws. This creates a support beam for the roof. [Fig. 10] 16. Take porch to the front of the dog house. Screw it to F with 2 of the 1 5/8 screws going into the support piece. The tip of the porch piece should be ¾ higher than the top of F. [Fig. 11] 17. Measure both roof pieces. One should be slightly shorter than the other. Put them together so that two 36 sides are matching in a right angle. Screw in from the larger piece, into the shorter. It should look like a right angle, but if you flip it over it will sit so that the peak of the roof is the 90 degree angle. [Fig. 12] 18. If you do not want your roof to be removable you can screw it into the back using 1 5/8 screws, and into porch. You may also use brace. To do that measure 18 in from back on both sides of the roof. Then crawl inside the house and position the brace against the inside of the roof. You might have to trim the brace a little bit. Have someone put in a screw or two in that 18 mark. (It works to let the screw head poke through just a little bit, then line up the brace and have them finish it off.) [Fig. 13] 19. Paint your dog house, and let your dog make it a home!
6
7
8
9
10
www.cornholesupplies.com
 www.cornholesupplies.com How To Build Regulation Cornhole Boards Home of the Original Cornhole Bags and Boards Supply List: 1-4' X 8' Piece of Plywood (pre sanded) 4-2" X 4" X 8' Studs (2 by 4s make sure
AMERICAN GOTHIC PLAYHOUSE
 AMERICAN GOTHIC PLAYHOUSE Project Plan #856 Sheet 1 of 5 Pick a spot and get started with the beautiful that your kids will love. The design of the playhouse includes 35 square feet of interior space plus
Best Barns USA Assembly Book
 Best Barns USA Assembly Book Revised November 27, 2013 the Easton - R 12'x 20' Manufactured by Reynolds Building Systems, Inc. 205 Arlington Drive Greenville, PA 16125 724-646-3775 This manual is copyrighted.
Total Quantity: IMPORTANT: Plans are to be used with 3 x6 Plexiglass (SKU #298-017).
.") # Materials: Quantity Each: 4x4x8 3 2x4x8 2 2x8x8 1 4x8x3/4 plywood 1 3 x6 corkboard (can be 18 of the 1 x1 pieces) 1 3 x6 plexiglass 1 8 door casing 3 Primer 1 qt. Total Quantity: TIPS FOR SUCCESSFUL
# Materials: Quantity Each: 4x4x8 3 2x4x8 2 2x8x8 1 4x8x3/4 plywood 1 3 x6 corkboard (can be 18 of the 1 x1 pieces) 1 3 x6 plexiglass 1 8 door casing 3 Primer 1 qt. Total Quantity: TIPS FOR SUCCESSFUL
SAMPLE INSTRUCTIONS. Best Barns USA Assembly Book. the Denver. 12'x 12' or 12'x16' Revised November 29, 2010
 Best Barns USA Assembly Book Revised November 29, 2010 SAMPLE INSTRUCTIONS the Denver 12'x 12' or 12'x16' Manufactured by Reynolds Building Systems, Inc. 205 Arlington Drive Greenville, PA 16125 724-646-3775
How to Build a Poker Table
 How to Build a Poker Table www.pokertablematerials.com 10-Person Poker Table- 96 x 48 These are step by step instructions for building a poker table. The table will measure 48" x 96" and have a 4" wide
PANELIZED HOME INSTALLATION GUIDELINE
 PANELIZED HOME INSTALLATION GUIDELINE A typical home package will be constructed of Snap-N-Lock Insulated Panels clad with steel skins. 4" panels will be used for the walls, and 6" panels for the roof.
COMPLIMENTARY WOODWORKING PLAN
 COMPLIMENTARY WOODWORKING PLAN Adirondack Chair This downloadable plan is copyrighted. Please do not share or redistribute this plan in any way. It has been created for Wilton Tools, a division of WMH
How to Build Your Own CornHole Game
 How to Build Your Own CornHole Game DIMENSIONS Here is a diagram with the basic measurements for the Cornhole board game. SUPPLIES 1/2 thick sheet of plywood one 4 x4 or two 2 x4 s 8 long 2 4 s (4) 4 1/2
Owner's Manual & Assembly Instructions
 Owner's Manual & Assembly Instructions PM01 BASE KIT Model No. FDN1014 717090311 CAUTION: SOME PARTS HAVE SHARP EDGES. CARE MUST BE TAKEN WHEN HANDLING THE VARIOUS PIECES TO AVOID A MISHAP. FOR SAFETY
SUPER SHED. Indoor shelter for your outdoor tools.
 SUPER SHED Indoor shelter for your outdoor tools. Not everyone needs a garden shed. But, if you've no more space on your garage wall for that new leaf rake, if you can't find your potting trowel because
We urge you to read and follow the attached installation instructions. Failure to do so may void the warranty of this garden window unit.
 Important Information for New Construction Installations Attention Installer! We urge you to read and follow the attached installation instructions. Failure to do so may void the warranty of this garden
How to Install UnderDeck The Original.
 How to Install UnderDeck The Original. TOOLS: Chalk Line Caulk Gun Garden hose or water bucket Gloves Hammer or Screw Gun Power Mitre Saw with OSB Blade Pencil Pliers Safety Glasses Straight Edge / Carpenter
Cedar Cottage Doghouse Plans
 Overlapping cedar shingles add an element of charm to this medium size doghouse. The walls, floor, and trim are constructed of solid cedar, making it naturally weather resistant and provides excellent
Brick Veneer Construction
 Brick Veneer Construction Check list of suggested tools & support items Claw hammer Tape measure 3/4" [19 or 20] Wood chisel Wood or plastic shims Pry bar Utility knife Caulking and caulking gun Power
DECKING INSTALLATION, CARE & MAINTENANCE INSTRUCTIONS. 866.729.2378 MOISTURESHIELD.COM limited lifetime warranty 866.729.2378 WWW.MOISTURESHIELD.
 DECKING INSTALLATION, CARE & MAINTENANCE INSTRUCTIONS 866.729.2378 MOISTURESHIELD.COM limited lifetime warranty Welcome To The Even Greater Outdoors. Congratulations on choosing MoistureShield for your
Vinyl Brick Mould Field Installation Instructions All Vinyl and Vinyl Clad Windows
 Vinyl Brick Mould Field Installation Instructions All Vinyl and Vinyl Clad Windows Viewed from the exterior. IMPORTANT: Please read before you begin installation. TABLE OF CONTENTS AND TOOL / MATERIAL
INSTRUCTION FOR ASSEMBLY. 150x180 v Traditional sauna cabin
 INSTRUCTION FOR ASSEMBLY 150x180 v Traditional sauna cabin 1. SAUNA PLAN 1800 LIGHT UNDER THE BENCH VENTILATION OUTLET UPPER BENCH 600 1500 LOWER BENCH 400 700 1656 956 HEATER 366 381 690 815 Light switch
DIY CABINET REFACING INSTALLATION GUIDE
 DIY CABINET REFACING INSTALLATION GUIDE CABINET REFACING INSTALLATION Are you ready to reface your outdated cabinets? This guide will show you how to install your new Facelifters Cabinet Refacing Products
How to Install Hardwood Flooring Over a Sub Floor
 How to Install Hardwood Flooring Over a Sub Floor Installation Preparation Instructions Read the entire instructions before starting your project. 1) INSPECT EACH PLANK (see fig. a) Wood is a natural product
AZEK Rail Install Guide
 TRIM MOULDING DECK PORCH RAIL PAVERS AZEK Rail Install Guide Installing AZEK Rail with Glass Infill... 2 Installing AZEk Rail Stairs with Glass Infill... 9 Notes...14 Please read all instructions completely
PANEL CONCEPTS LLLP.
 The Small Cottage Company DO-IT-YOURSELF CABINS & COTTAGES PANEL CONCEPTS INC. PANEL CONCEPTS LLLP. 2826 Gold 331 Creek N. M-33, Road Mio, Gold Michigan Creek, Montana 4864759733 (989) 826-6511 (406) 288-8585
How to Build an Elevated Square Foot Garden
 How to Build an Elevated Square Foot Garden Thralls, Edmund L., Extension Faculty, Urban Horticulture Fact Sheet Horticulture - 010 Tools: The Institute of Food and Agricultural Sciences (IFAS) is an Equal
QWALL 4 ACRYLIC SHOWER WALL INSTALLATION INSTRUCTIONS
 QWALL 4 ACRYLIC SHOWER WALL INSTALLATION INSTRUCTIONS IMPORTANT DreamLine TM reserves the right to alter, modify or redesign products at any time without prior notice. For the latest up-to-date technical
March 14, 2007. Installation of Bay, Bow and Garden Windows
 March 14, 2007 Re: Installation of Bay, Bow and Garden Windows Attached are the Atrium Companies, Inc recommendation for the installation of bay, bow and garden windows. These instructions were developed
HfHMD uses LP SmartSide siding and trim.
 HfHMD uses LP SmartSide siding and trim. These products are: More durable than cement fiber board. Much more volunteer-friendly to install. When installed correctly, have a 5/50- year pro-rated warranty.
Picnic Table Plans. Made out of a single sheet of plywood, it s also portable! By Kevin Ayer. This children's picnic table would
 Picnic Table Plans Made out of a single sheet of plywood, it s also portable! By Kevin Ayer Materials One 4- by 8-foot sheet of 3 4-inch AC plywood Twelve 11 4-inch wood screws Primer and exterior paint
Composite Stone Veneer
 Composite Stone Veneer Installation Guide Ver 1 Jun 2015 www.compstone.com Composite Stone Veneer Installation Guide Contents Introduction & Overview 3 Required Tools 4 Optional Tools 4 Attachment Guidelines:
AwanaGames Circle. Official. Diagram 1. Key to diagram: Pin & Striped Bean Bag C Diagonal or Starting Line. B Scoring Pins, or Center.
 Official AwanaGames Circle Diagram 1 The AwanaGames Circle is 30 feet in diameter surrounded by a 37-40 foot square. Each team is designated by a color and occupies a quarter-circle or one side of that
INSTALLATION OF A BAY WINDOW
 INSTALLATION OF A BAY WINDOW Installation of a Bay Window These instructions relate to the replacement of an existing bay window or replacement of a straight window with a new bay window, in an opening
Making a Rain Barrel at Home
 Making a Rain Barrel at Home This is a step by step guide to making your own rain barrels. Constructing a rain barrel is a pretty simple project that helps conserve water and protects the environment.
INSTALLATION INSTRUCTIONS
 Turbo Tube Slide INSTALLATION INSTRUCTIONS C A U T I O N Do not climb on the outside of the slide This slide is designed for home use only, not for Public Playgrounds PlayCore, Inc. 2004 Copyrighted Material.
We urge you to read and follow the attached installation instructions. Failure to do so may void the warranty of this garden window unit.
 Important Information for New Construction Installations Attention Installer! We urge you to read and follow the attached installation instructions. Failure to do so may void the warranty of this garden
Sun Windows General Information Sun New Construction Window Installation Instructions
 Sun Windows General Information Section 1 G F H H H A. Apply Weather Resistive Barrier B. Apply Sill Flashing Tape C. Place Waterproof Sill Shims D. Caulk Back of Nail Fin Sides & Top, Set Window, Fasten
Air Conditioner Duct Construction & Repair
 PROPER ROOF AIR CONDITIONER MOUNTING At Newmar, there are two different models of air conditioners available on all towable and motorized units. The different models are the Dometic Brisk and Penguin models,
Installing Window and Door Mouldings
 Installing Window and Door Mouldings About Window and Door Mouldings The trim around windows and doors greatly influences the look and style of your interior. They also bridge the gaps and cover spaces
Replacement Window Installation Guide Non-Impact & Impact Resistant Windows without Nailing Fin
 Replacement Window Installation Guide Non-Impact & Impact Resistant Windows without Nailing Fin americancraftsmanwindows.com Project Requirements: Failure to follow these instructions may void product
Framing a Crawl-Space Foundation These timesaving tips make short work of setting sills, posts and girders
 Framing a Crawl-Space Foundation These timesaving tips make short work of setting sills, posts and girders by Larry Haun There is no "best" foundation. Depending on what part of the country you live in,
Barewood Octagon and Elongated Windows Installation Instructions
 Step-by-step instructions to a beautiful window. Measuring and Installation of your new window from Century Specialty Windows couldn't be easier with our step-by-step instructions. Quality, function and
Basement Window Installation Guide Hopper and Sliding
 Basement Window Installation Guide Hopper and Sliding americancraftsmanwindows.com Project Requirements: Installation must comply with all applicable building codes. Existing window frame, wall and weatherresistant
Eucaboard / Eucaplac/ Eucatile paneling is intended for dry interior use only and requires care in handling.
 i This instruction sheet describes the proper methods for installing Eucatex decorative wall paneling. Eucaboard / Eucaplac/ Eucatile paneling is intended for dry interior use only and requires care in
Tundra Series Windows January 2016
 Tundra Series Windows January 2016 New Construction Installation Instructions Nail Fin, J-Fin and Brickmold Aplications product. ATTENTION! Read and understand all installation instructions before installing
Customer Service 800.780.8889 or visit us online at smithnoble.com. Wood Shutters. Step by Step Installation. Troubleshooting Tips
 reflect your style TM Customer Service 800.780.8889 or visit us online at smithnoble.com Wood Shutters Step by Step Installation Troubleshooting Tips Easy Care Instructions STEP 1 Your New Shutter Thank
DE Frame with C Series Sidelight
 TOOLS REQUIRED Tape measure 6' magnetic level 3' magnetic level Screw gun with clutch adjusted #2 phillips tip #3 phillips tip Screwdriver (used to adjust frame on will using oval slots) Pry Bar Powder
Premier & Deluxe 3-Season Room Sliding Glass Door
 DTSSGD-11 Premier & Deluxe 3-Season Room Sliding Glass Door Installation Instructions Screen Door Seal Left Side Track Top Track Assembly Right Side Track Right Side Trim Sliding Glass Door Sliding Screen
Unlike a porch, which is protected by a roof,
 Rehabbing a Rotted 34 Professional Deck Builder January/February 2013 Porch Stair A template helps to fit the bottom tread neatly around the posts by Emanuel Silva Unlike a porch, which is protected by
Canvas Office Landscape Wall Strip Installation and Disassembly for Recycling Instructions
 Y Parts Included: Canvas Office Landscape Wall Strip Installation and Disassembly for Recycling Instructions Tools Required: Power Driver Drill Bit (Determined by fastener) Driver Bit (Determined by fastener)
How to Build a Strawberry Pyramid Watch the how-to video here.
 How to Build a Strawberry Pyramid Watch the how-to video here. This simple, elegant strawberry pyramid can be built by a single person in just one afternoon. Cut the lumber yourself if you have some woodworking
AZEK Rail Install Guide
 TRIM MOULDING DECK PORCH RAIL PAVERS AZEK Rail Install Guide Installing AZEK Rail with CableRail by Feeney... 1 Installing CableRail by Feeney for AZEK Rail... 7 Installing AZEK Rail Stairs with CableRail
Table of Contents. www.hunterfan.com. What to Expect with. Preparation. Tools Needed. Wiring. Hanging the Fan. Blades. Motor Housing.
 www.hunterfan.com Table of Contents What to Expect with Your Installation 30 inches Hanging the Fan Wiring 8 Maintenance, Operation & Cleaning Light Kit 13??? 14 1 9 Troubleshooting 11 5 Blades Motor Housing
Free 12 x 8 Shed Plan With Illustrations, Blueprints & Step By Step Details
 Free 12 x 8 Shed Plan With Illustrations, Blueprints & Step By Step Details Brought To You By: MyShedPlans Click Here To Download 12,000 Shed Plans >> 12 x 8 Basic Shed This 8 12-ft. shed features a simple
HOW TO BUILD A LOU-VEE-AIRCAR
 HOW TO BUILD A LOU-VEE-AIRCAR MATERIALS (PER CAR) 1. One sheet of legal-sized paper 2. Three standard paper clips 3. One butterfly paper clip 4. One plastic soda straw 5. Two large index cards 6. Narrow
2&3 SECTION LOFT LADDER
 TWIST CATCH ASSEMBLY A4 A2 A1 A3 A7 A6 A5 2&3 SECTION LOFT LADDER Images feature the 3 section loft ladder, but the same instructions apply to both 2 & 3 section ladders Installation and Operating Instructions
Cable Support System Guide for Andersen Bow, Bay, and Box Projecting Window Units
 for Andersen Bow, Bay, and Box Projecting Window Units Congratulations! You have just purchased one of the many fine Andersen products. Proper assembly, installation and maintenance are essential if the
OLD BRICK ORIGINALS KILN-FIRED THIN BRICK VENEER Installation Guide. GeneralShale.com
 OLD BRICK ORIGINALS KILN-FIRED THIN BRICK VENEER Installation Guide GeneralShale.com OLD BRICK ORIGINALS THIN BRICK VENEER Page 2 INTRODUCTION Check local building codes for proper installation guidelines
Easy Six Cube Bookshelf. Copyrighted Material. Page 1
 Compare to: Land of Nod Cube Collection, 6 Cube Bookshelf Skill Level: Beginner Easy Six Cube Bookshelf I love the storage cubes in kids rooms because they give you an opportunity to have your children
HALE PET DOOR INSTALLATION INSTRUCTIONS HALE STANDARD PANEL MODEL
 HALE PET DOOR INSTALLATION INSTRUCTIONS HALE STANDARD PANEL MODEL Please read these instructions carefully and completely before attempting to install Hale Pet Doors; they will guide you through the steps
REDI-EXIT COMMERCIAL FIRE DOOR AND EXTERIOR DOOR KITS INSTALLATION GUIDELINES
 REDI-EXIT COMMERCIAL FIRE DOOR AND EXTERIOR DOOR KITS INSTALLATION GUIDELINES Tools Required Tape Measure Hammer Slotted Screw Driver #2 & #3 Philips Screw Driver 3-4 Foot Level 12 Pry Bar Cold Chisel
SHELVES. www.tedswoodworking.com
 SHELVES It's rare that bookshelves look as interesting as the objects you display on them. After all, how much can you decorate the edges of your shelves and sides? This unit is unusual because the shelves
2.9 WINDOW & DOOR BUCKS
 2.9 WINDOW & DOOR BUCKS Bucks provide attachment surfaces for windows and doors while holding back concrete from these openings during concrete placement. Mark the center and edges of openings as you place
Installing Window Trim and Door Trim
 Installing Window Trim and Door Trim Tools and Supplies You'll Need Screws or Finish Nails use screws or nails that are long enough to go through the Ledger and firmly attach to the wall behind it. If
CEILING SYSTEMS. Between us, ideas become reality. Installing. Suspended Ceilings. North America Version
 CEILING SYSTEMS Between us, ideas become reality Installing Suspended Ceilings North America Version 1 Installing Armstrong Suspended Ceilings An Armstrong suspended mineral fiber ceiling is functional,
Active and Passive Sash Replacement
 for Andersen Gliding Windows Read all instructions carefully before attempting this procedure. If you have any questions about your ability to complete the procedure, call Andersen at 1-888-888-7020 for
Chapter 9: INSTALLING ROOFING
 9.1 LEAK BARRIER (ICE AND WATER SHIELD) 9.2 SHINGLE UNDERLAYMENT 9.3 INSTALLING GUTTER APRON AND GABLE D-EDGE 9.4 INSTALLING SHINGLES 9.5 RIDGE VENT AND CAP Tools needed by each volunteer: Hammer (16 oz.
Important Information for Installer & Homeowner
 Important Information for Installer & Homeowner Homeowner: Please keep this information for your records, do not discard! Installation Instructions for Wood Frame Construction Replacement (See other side
LIFE SCIENCE. Hoop House Construction for New Mexico: 12-ft. x 40-ft. Hoop House BRINGING TO YOUR HOME ECONOMICS COLLEGE OF AGRICULTURE AND
 Hoop House Construction for New Mexico: 12-ft. x 40-ft. Hoop House COLLEGE OF AGRICULTURE AND HOME ECONOMICS BRINGING SCIENCE TO YOUR LIFE Hoop House Construction for New Mexico: 12-ft. x 40-ft. Hoop House
UNIT 4: SHEATHING AND SHINGLING THE ROOF
 KEY CONCEPTS 1. Identify tools needed for roofing 2. Steps to finishing a roof 3. Maintenance of a roof 4. Safety while roofing INSTRUCTIONAL ACTIVITIES 1. Complete Follow Up Worksheet from Unit 3 2. Roof
Classic Products, Inc. ClickLock Standing Seam Installation Manual
 Classic Products, Inc. ClickLock Standing Seam Installation Manual Classic Products, Inc. 8510 Industry Park Drive Piqua, OH 45356 800.543.8938 Table of Contents page Introduction 1. 1 Starter. 2. 1 Panels.
How to Install GoBoard:
 How to Install GoBoard: A Step-by-Step Guide Durable, Ultra-Lightweight, Waterproof Tile Backer Board Introducing GoBoard Every tiling project requires a durable, waterproof surface under the tile, called
How to become an Operation Christmas Child Shoe Box Character
 How to become an Operation Christmas Child Shoe Box Character SUPPLIES A large rectangular box (to look like a shoe box) Cardboard or foam strips, 2 wide, for the lid Large printed Boy or Girl shoe box
Please calculate with around 5% more square meters than needed because you will have material loss due to cutting and sorting.
 1. TEKA Soft Loc Installation Guide Thank you for having chosen TEKA Parquet. To guarantee a constant quality product TEKA engineered hardwood flooring is made out of selected wood species and runs only
Lunette 2 Series. Curved Fixed Frame Projection Screen. User s Guide
 Lunette 2 Series Curved Fixed Frame Projection Screen User s Guide Important Safety and Warning Precautions Please follow these instructions carefully to ensure proper maintenance and safety with your
UNIT 3: ROOF TRUSSES KEY CONCEPTS 1. Identify tools needed for rolling trusses 2. Identify proper nails and sizes 3. Setting roof trusses 4.
 KEY CONCEPTS 1. Identify tools needed for rolling trusses 2. Identify proper nails and sizes 3. Setting roof trusses 4. Site Safety and Hazards INSTRUCTIONAL ACTIVITIES 1. Complete Follow Up Worksheet
The JIG is UP Or A couple hours up front pays in the long run.
 Ed Simon Page 1 of 5 The JIG is UP Or A couple hours up front pays in the long run. A large part of the fun of beekeeping is the construction and assembly of the equipment. Since it is a hobby, I decided
Building an Off-Center Fixture for Turning Pendants
 Building an Off-Center Fixture for Turning Pendants Turning a pendant off-center with most available metal pendant chucks means that you will have a significant amount of mass off center, which will limit
The Hive Bodies. In the Beekeeper s Work Shop. Building a Bee Hive: The Hive Bodies. by Stephen E. Tilmann
 The Hive Bodies In the Beekeeper s Work Shop The hive body is the heart of a managed bee hive colony (Figure 1). It is where the queen lays her eggs, the house bees raise the brood and the workers store
Here is your set of Detailed Plans from Copyright 2004 All Rights Reserved
 Here is your set of Detailed Plans from Copyright 2004 All Rights Reserved Materials for the House Here is the list of materials you will need to construct the basic house then to cover it with roofing
Natural Thin Stone Veneer
 Natural Thin Stone Veneer Until recently, if a project called for the natural look of stone but could not support its weight or thickness, the options were limited to manufactured imitation stone. More
INSTALLATION INSTRUCTIONS for Bifold Doors (JII103)
") Thank you for selecting JELD-WEN products. Attached are JELD-WEN s recommended installation instructions for premium composite, hollow and solid core molded Bifold Doors. Bifolds are designed for fast
Thank you for selecting JELD-WEN products. Attached are JELD-WEN s recommended installation instructions for premium composite, hollow and solid core molded Bifold Doors. Bifolds are designed for fast
Build a Trade-Show Booth for Under $200!
 Build a Trade-Show Booth for Under $200! This corner booth, with a seven foot front and sweeping 4x8 backdrop, assembles in less than 20 minutes and can be built in one weekend. Materials Tools 4 x8 x3/4
How to secure your property after a disaster
 How to secure your property after a disaster The Red Guide to Recovery HOuse secured properly Board-Up of Windows, Doors and Roof Hole. Lot secured with Perimeter Fencing. Fires, floods, tornadoes, hurricanes,
Sash Replacement Guide
 for Andersen 200/400 Series Awning Windows Read all instructions carefully before attempting this procedure. If you have any questions about your ability to complete this procedure, call Andersen at 1-888-888-7020
Installation Manual for STANDING SEAM ROOFING
 Installation Manual for STANDING SEAM ROOFING Absolute Steel Toll Free 877-833-3237 / Phone 480-768-1618 / Fax 480-768-1514 www.metalroofingsource.com Standing Seam features approximately one-inch high
The tablesaw may be your shop s most valuable cutting. Crosscut Sleds. Foolproof. Innovative approach guarantees perfect results
 Foolproof Crosscut Sleds Innovative approach guarantees perfect results B Y A L A N T U R N E R The tablesaw may be your shop s most valuable cutting tool, but for precise, repeatable crosscuts it needs
Plans will call for one of two soffit/fascia details:
 Plans will call for one of two soffit/fascia details: Ventilated vinyl soffit with bent aluminum fascia OR Ventilated LP Smartside soffit panels with 1x6 rabbeted fascia First, let s talk terminology:
Walls. Add Strength and Water Resistance When Repairing Your. Replace damaged framing members when walls are open
 Add Strength and Water Resistance When Repairing Your Walls Any home repair or remodeling work you do presents an opportunity to make your home fare better in the next storm. Whether you are just replacing
Protecting Your Home From Hurricane Wind Damage
 T H E W I N D Protecting Your Home From Hurricane Wind Damage During a hurricane, homes may be damaged or destroyed by high winds and high waves. Debris can break windows and doors, allowing high winds
INSTALLATION INSTRUCTIONS IMPERVIA (Vent and Fixed) AWNING, CASEMENT, and LARGE AWNING WINDOW WITH FINS
 AWNING, CASEMENT, and LARGE AWNING WINDOW WITH FINS") 2009 Pella Corporation INSTALLATION INSTRUCTIONS IMPERVIA (Vent and Fixed) AWNING, CASEMENT, and LARGE AWNING WINDOW WITH FINS Part Number: 80WH0100 Installation Instructions for Typical Wood Frame Construction.
2009 Pella Corporation INSTALLATION INSTRUCTIONS IMPERVIA (Vent and Fixed) AWNING, CASEMENT, and LARGE AWNING WINDOW WITH FINS Part Number: 80WH0100 Installation Instructions for Typical Wood Frame Construction.
All content including text and photographs are protected by law - Copyright 2010 by www.vldesign.com
 Step by step directions for building your own 1500 gallon aquarium, 350 Gallon Sump, and a radiant heater. PART 1 Building the aquarium PART 2 Building the sump PART 3 The plumbing PART 4 The radiant heater
FRAMED & MOUNTED TILE MURAL
 Page 1 of 5 There is no denying that tile murals have taken the sublimation industry by storm. The unique ability to take a customer s artwork or high resolution photograph, tile it using your software
Instructions for assembly of your Pop-Up Display
 Instructions for assembly of your Pop-Up Display I: Frame a) With the Pop-Up Frame still in the travel case, open the cloth bag. Make note of the ten black pegs on the top. These pegs represent the TOP
Installation Instructions
 READ BEFORE INSTALLING UNIT For Slider Casement Air Conditioners To avoid risk of personal injury, property damage, or product damage due to the weight of this device and sharp edges that may be exposed:
Owner's Manual & Assembly Instructions
 Owner's Manual & Assembly Instructions BL01 PATIO COVER/CARPORT Model No. PC1020 Attached 705120511 Missing Parts, Questions on Assembly? Call: 1-800-851-1085 or assist@arrowsheds.com Do not return to
Residential Roofing Guide
 Residential Roofing Guide TABLE OF CONTENTS Building Detail and Accessories...... 1 Panel Introduction and Handling...... 2 Cutting and Trimming.... 3 Roof Preparation..... 3 Roof Slope..... 3 Re-roofing...
RadianceRail Installation Guide
 RadianceRail Installation Guide Installing RadianceRail with CableRail by Feeney... 2 Installing CableRail by Feeney for RadianceRail... 7 Installing RadianceRail Stairs with CableRail by Feeney... 10
Installation Instructions Double-Hung, Single-Hung, Casement, Awning, Sliding, Picture & Shapes Non-Impact & Impact Resistant Nailing Fin Windows
 Installation Instructions Double-Hung, Single-Hung, Casement, Awning, Sliding, Picture & Shapes Non-Impact & Impact Resistant Nailing Fin Windows americancraftsmanwindows.com Project Requirements: Read
2015 BLOCK OF THE MONTH 12 ½ x 12 ½
 2015 BLOCK OF THE MONTH 12 ½ x 12 ½ January- Orphan Blocks (Check your stash and pull out any unused blocks.) Any Size Any Color (These will be donated to the Charity Quilts) February- Dark Blue, Medium
Guidelines for Earthquake Bracing of Residential Water Heaters
 Guidelines for Earthquake Bracing of Residential Water Heaters Department of General Services Division of the State Architect 1102 Q Street, Suite 5100 Sacramento, CA 95814 Phone: (916) 324-7099 Fax: (916)
MGB Chrome Bumper Conversion
 MGB Chrome Bumper Conversion Installation Instructions For 1974 1/2-1980 MGB This kit requires cutting, welding, and painting. Professional installation recommended. Note: Every MGB body is slightly different
Installation Instructions
 Installation Instructions READ BEFORE INSTALLING UNIT For Low Profile Window Air Conditioner INSTALLATION WARNINGS AND CAUTION Carefully read the installation manual before beginning. Follow each step