LED TV MONITOR (MFM TV) user manual
|
|
|
- Beverly Hodges
- 8 years ago
- Views:
Transcription
1 TC350 TC370 LED TV MONITOR (MFM TV) user manual Thank you for purchasing this Samsung product. To receive more complete service, please register your product at Model Serial No.

2 Figures and illustrations in this User Manual are provided for reference only and may differ from actual product appearances. Product design and speciications may be changed without notice. Digital TV notice 1. Functionalities related to Digital TV (DVB) are only available in countries/areas where DVB-T (MPEG2 and MPEG4 AVC) digital terrestrial signals are broadcasted or where you are able to access to a compatible DVB-C (MPEG2 and MPEG4 AAC) cable-tv service. Please check with your local dealer the possibility to receive DVB-T or DVB-C signal. 2. DVB-T is the DVB European consortium standard for the broadcast transmission of digital terrestrial television and DVB-C is that for the broadcast transmission of digital TV over cable. However, some differentiated features like EPG (Electric Programme Guide), VOD (Video On Demand) and so on, are not included in this speciication. So, they cannot be workable at this moment. 3. Although this TV set meets the latest DVB-T and DVB-C standards, as of [August, 2008], the compatibility with future DVB-T digital terrestrial and DVB-C digital cable broadcasts cannot be guaranteed. 4. Depending on the countries/areas where this TV set is used some cable-tv providers may charge an additional fee for such a service and you may be required to agree to terms and conditions of their business. 5. Some Digital TV functions might be unavailable in some countries or regions and DVB-C might not work correctly with some cable service providers. 6. For more information, please contact your local Samsung customer care centre. The reception quality of TV may be affected due to differences in broadcasting method between the countries. Please check the TV performance in the local SAMSUNG Authorized Dealer, or the Samsung Call Centre whether it can be improved by reconfiguring TV setting or not. Still image warning Avoid displaying still images (like jpeg picture iles) or still image element (like TV programme logo, panorama or 4:3 image format, stock or news bar at screen bottom etc.) on the screen. Constant displaying of still picture can cause ghosting of LED screen, which will affect image quality. To reduce risk of this effect, please follow below recommendations: Avoid displaying the same TV channel for long periods. Always try do display any image on full screen, use TV set picture format menu for best possible match. Reduce brightness and contrast values to minimum required to achieve desired picture quality, exceeded values may speed up the burnout process. Frequently use all TV features designed to reduce image retention and screen burnout, refer to e-manual for details. English - 2
 cable-tv service. Please check with your local dealer the possibility to receive DVB-T or DVB-C signal. 2.")
3 Contents Getting Started Safety Precautions... 4 Providing Proper Ventilation for Your Product Accessories and Cables Using the Control Panel The Standard Remote Control Buttons How to Navigate Menus Connecting the Power Cord and the Aerial or Cable Connection Setup Connections Connecting to AV Devices (Blu-ray Players, DVD Players, etc.) Connecting to Audio Devices Connecting to a PC Connecting to a COMMON INTERFACE slot (Your product viewing Card Slot) Changing the Input Source Basic Features Correct posture to use the product Changing the Preset Picture Mode Adjusting Picture Settings Changing the Picture Size Calibrating the Screen Display Picture In Picture (PIP) Changing the Picture Options Changing the Preset Sound Mode Adjusting Sound Settings Memorizing Channels Using the INFO button (Now & Next guide) Using the Channel Menu Other Features Preference Features Setting the Time Economical Solutions Blocking Programmes Other Features Support Menu Advanced Features Application Video Playback Photo Playback Music playback Anynet+ (HDMI-CEC) Other Information Troubleshooting Supported Subtitle and Media Play ile formats Analogue Channel Teletext Feature Attaching a Wall Mount/Desktop Stand Installing the Wall Mount Anti-theft Kensington Lock Storage and Maintenance Licence Speciications Index Check the Symbol! Note Indicates additional information. Step by Step Guide Check here for instructions on how to open the relevant submenu within the OSD (on screen display). English - 3

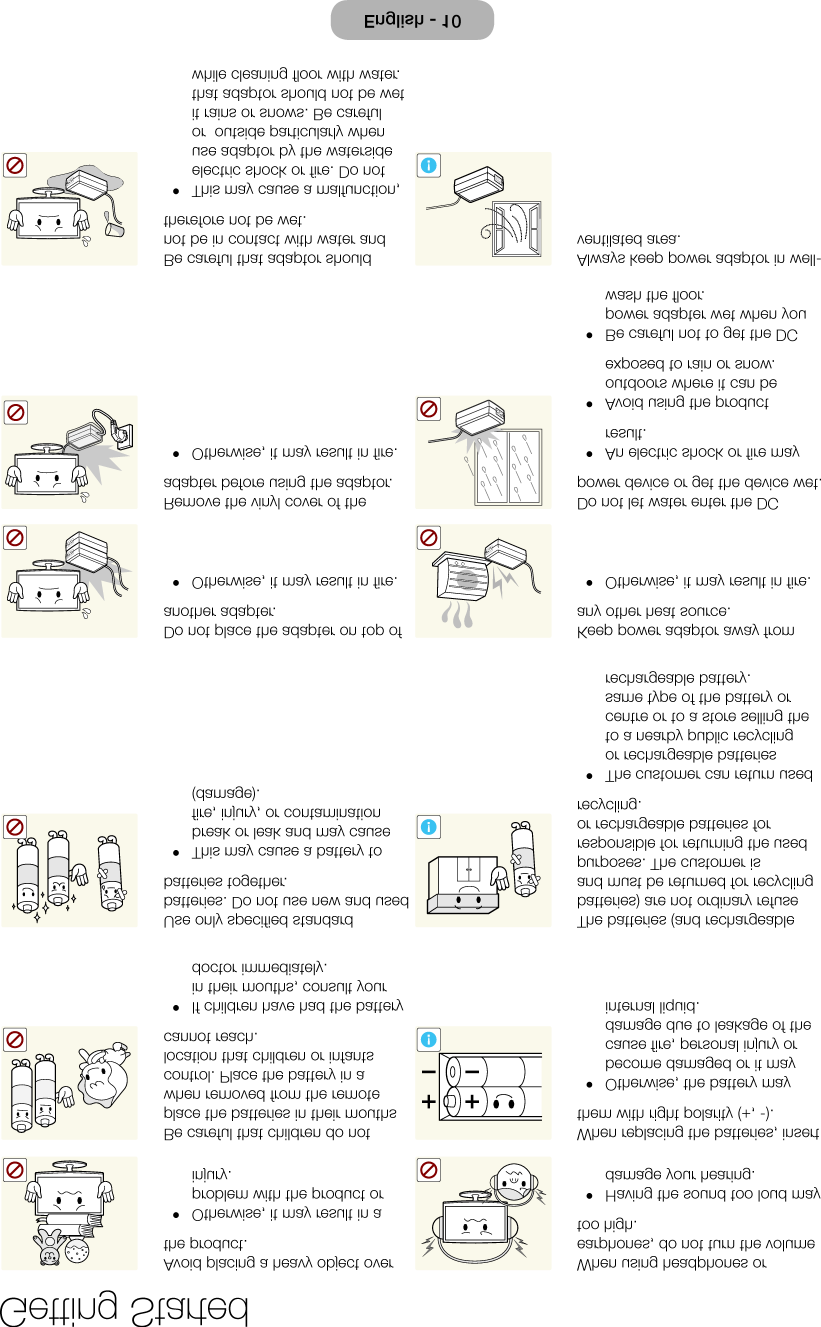
4 Getting Started Safety Precautions Icons used for safety precautions WARNING Failing to follow the precautions marked with this sign may result in a serious injury or even a fatality. CAUTION Failing to follow the precautions marked with this sign may result in a personal injury or property damage. Do not perform. Must be followed. CAUTION RISK OF ELECTRIC SHOCK DO NOT OPEN CAUTION: TO REDUCE THE RISK OF ELECTRIC SHOCK, DO NOT REMOVE COVER (OR BACK). THERE ARE NO USER SERVICEABLE PARTS INSIDE. REFER ALL SERVICING TO QUALIFIED PERSONNEL. This symbol indicates that high voltage is present inside. It is dangerous to make any kind of contact with any internal part of this product. This symbol alerts you that important literature concerning operation and maintenance has been included with this product. Power Related The following images are for your reference and may differ depending on models and countries. Warning Avoid using a damaged power cord or plug or a loose power outlet. Otherwise, it may result in electric shock or ire. Avoid connecting multiple electric appliances to a single wall outlet. Otherwise, it may result in ire due to overheating of the wall outlet. Avoid plugging in or unplugging the power supply with wet hands. Otherwise, it may result in electric shock.! Plug the power plug in irmly. Otherwise, it may result in ire.! Make sure to connect the power cord to a grounded wall outlet (for insulation class 1 equipment only). Otherwise, it may result in electric shock or injury. Avoid bending or twisting the power cord excessively and avoid placing heavy objects on the cord. Otherwise, it may result in electric shock or ire due to a damaged power cord. Keep the power cord and the product away from a heater. Otherwise, it may result in electric shock or ire.! If the pins of the power plug or the wall outlet are covered in dust, clean it using a dry cloth. Otherwise, it may result in ire. English - 4

5

6 Getting Started! Avoid installing the product in a location exposed to direct sunlight and installing the product near a heat source such as a ireplace or heater. This may shorten the product life cycle or cause ire. Bend the outdoor aerial cable downwards at the location where it comes in the house so that rainwater does not low in. If rainwater enters the product, it may result in electric shock or ire.! Avoid installing the product where children may reach it. If a child touches the product, the product may fall and this may result in injury. Since the front part is heavier, install the product on a lat and stable surface. Install the aerial far away from any high voltage cables. If the aerial touches or falls onto a high voltage cable, it may result in electric shock or ire. Caution Do not let the product drop while moving it. Do not place the product face down on the loor. This may result in a problem with the product or injury. This may damage the panel of the product. When installing the product on a console or shelf, make sure that the front of the product does not protrude out of the console or shelf. Otherwise, this may cause the product to fall off and result in a malfunction or injury. When putting the product down, handle it gently. Otherwise, it may result in a problem with the product or injury.! SAMSUNG Make sure to use a cabinet or shelf suitable to the size of the product. If the product is installed in a location where the operating conditions vary considerably, a serious quality problem may occur due to the surrounding environment. In this case, install the product only after consulting one of our service engineers about the matter. Places exposed to microscopic dust, chemicals, too high or low temperature, high humidity, airports or stations where the product is continuously used. English - 6

7

8 Getting Started! If the product generates a strange noise, a burning smell, or smoke, unplug the power plug immediately and contact a service centre. Otherwise, it may result in electric shock or ire. Avoid letting children hang or climb onto the product. Otherwise, it may result in the product falling and this may result in injury or death. If you drop the product or the case is damaged, turn the power off and unplug the power cord. Contact a service centre. Otherwise, it may result in ire or electric shock. Avoid placing objects such as toys and cookies on top of the product. If a child hangs over the product to grab an object, the object or the product may fall and this may result in injury or even death.! When thunder or lighting occurs, unplug the power cord and under no circumstance touch the aerial cable as this is dangerous. Otherwise, it may result in electric shock or ire. Avoid dropping an object over the product or cause impact to the product. Otherwise, it may result in electric shock or ire. Avoid moving the product by pulling the power cord or aerial cable. Otherwise, it may result in electric shock, ire or a problem with the product due to damage to the cable. Avoid lifting up or moving the product by holding only the power cord or signal cable. Otherwise, it may result in electric shock, ire or a problem with the product due to damage to the cable. Take care not to block the vent by a table cloth or curtain. Otherwise, it may result in ire due to internal overheating. 100 GAS When a gas leak occurs, do not touch the product or the power plug and ventilate immediately. A spark may result in an explosion or ire. During a thunder or lighting storm, do not touch the power cord or aerial cable. Avoid using or placing inlammable spray or objects near the product. This may result in an explosion or ire. Avoid inserting metal objects such as a chopsticks, coins or hairpins, or inlammable objects into the product (the vents, ports, etc). If water or substances enters the product, turn the power off, unplug the power cord and contact a service centre. Otherwise, it may result in a problem with the product, electric shock or ire. English - 8

9

10

11 Getting Started Providing Proper Ventilation for Your Product When you install your product, maintain a distance of at least 10 cm between the product and other objects (walls, cabinet sides, etc.) to ensure proper ventilation. Failing to maintain proper ventilation may result in a ire or a problem with the product caused by an increase in its internal temperature. Whether you install your product using a stand or a wall-mount, we strongly recommend you use parts provided by Samsung Electronics only. If you use parts provided by another manufacturer, it may cause dificulties with the product or result in injury caused by the product falling. Installation with a stand. 10 cm Installation with a wall-mount. 10 cm 10 cm 10 cm 10 cm 10 cm 10 cm Other Warnings The actual appearance of the product may differ from the images in this manual, depending on the model. Be careful when you touch the product. Some parts can be somewhat hot. English - 11

12 Getting Started Accessories and Cables Please make sure the following items are included with your product. If any items are missing, contact your dealer. The items colours and shapes may vary depending on the model. Make sure that there are no accessories hidden behind or under packing materials after you open the box. [ [CAUTION] INSERT SECURELY LEST SHOULD BE DETACHED IN SET Remote Control & Batteries (AAA x 2) Power Cord Warranty Card / Safety Guide / Quick Setup Guide (Depending on the model) S/W Driver CD D-Sub Cable Adapter Stand Base Stand Connector Input Cables (Sold Separately) You will need one or more of these cables to connect your product to your antenna or cable outlet and your peripheral devices (Blu-ray players, DVD players, etc.) Component Composite (AV) Coaxial (RF) HDMI-DVI Stereo Cable For the best cable connections to this product, use cables no thicker than the cable illustrated below: Maximum thickness inches (14mm) English - 12
![[ [CAUTION] INSERT SECURELY LEST SHOULD BE DETACHED IN SET Remote Control & Batteries (AAA x 2) Power Cord Warranty Card / Safety Guide / Quick Setup Guide (Depending on the model) S/W Driver CD](/docs-images/40/3173266/images/page_12.jpg "D-Sub Cable Adapter Stand Base Stand Connector Input Cables (Sold Separately) You will need one or more of these cables to connect your product to your antenna or cable outlet and your peripheral")
13 Getting Started Using the Control Panel The product colour and shape may vary depending on the model. Down (Front) m R Function menu Left Right P Up (Rear) Remote control sensor TV Controller Power on Adjusting the volume Turn the TV on by pressing the Controller when the TV is in standby mode. Adjusts the volume by moving the controller from side to side when the power is on. Selecting a channel Using the function menu Selecting the MENUm Selecting the MEDIA.P Selecting the SOURCEs Power off (P) Select a channel by moving the Controller backwards and forwards when the power is on. To view and use the Function menu, press and release the Controller when the power is on. To close the Function menu, press and release the Controller again. With the Function menu visible, select the MENUm by moving the Controller to the left. The OSD (On Screen Display) Menu appears. Select an option by moving the Controller to the right. Move the Controller to the right or left, or backwards and forwards to make additional selections. To change a parameter, select it, and then press the Controller. With the Function menu visible, select MEDIA.P by moving the Controller backwards. The MEDIA.P main screen appears. Select an application by moving the Controller, and then pressing the Controller. With the Function menu visible, open the SOURCEs by pushing the Controller to the right. The Source screen appears. To select a source, move the Controller back and forth. When the source you want is highlighted, press the Controller. With the Function menu visible, select Power off (P) by pulling the Controller forwards, and then press the Controller. To close the Menu, MEDIA.P or Source, press the Controller for more than 1 second. When selecting the function by moving the controller to the forwards/backwards/left/right directions, be sure not to press the controller. If you press it first, you cannot operate it to move the forwards/backwards/left/right directions. Standby mode Your product enters Standby mode when you turn it off and continues to consume a small amount of electric power. To be safe and to decrease power consumption, do not leave your product in standby mode for long periods of time (when you are away on vacation, for example). It is best to unplug the power cord. English - 13
 Select a channel by moving the Controller backwards and forwards when the power is on.")
14 Getting Started The Standard Remote Control Buttons This remote control has Braille points on the Power, Channel, and Volume buttons and can be used by visually impaired persons. Turn the product on and off. Display and selects the available video sources. (page 26) Give direct access to channels. Alternately select Teletext ON, Double, Mix or OFF. Return to the previous channel. Cut off the sound temporarily. Adjust the volume. Display channel list on the screen. (page 41) View the Media Play. Open the OSD (Menu). Quickly select frequently used functions. Use this button in a speciic feature. Move the cursor, select the onscreen menu items, and change the values seen on the TV's menu. Return to the previous menu. Use these buttons according to the directions on TV's screen. Use these buttons in a speciic feature. Change channels. You can enter Guide menu. (page 42) Display information on the product screen. Exit the menu. PIP: You can use PIP function. (page 33) AD/SUBT.: Turn the audio description on and off. This is not available in some locations. / Displays digital subtitles. SPORTS: Enable Sport Mode for the optimal sports viewing experience. English - 14

15 Getting Started Installing batteries (Battery size: AAA) Match the polarity of the batteries to the symbols in the battery compartment. NOTE Install the batteries so that the polarity of the batteries (+/-) matches the illustration in the battery compartment. Use the remote control within 23 feet of the product. Bright light may affect the performance of the remote control. Avoid using it near luorescent lights or neon signs. The colour and shape of the remote may vary depending on the model. English - 15

16 Getting Started How to Navigate Menus Your product s Main and Tools menus contains functions that let you control the product s features. For example, in the Main menu you can change the size and coniguration of the picture, its brightness, its contrast and so on. There are also functions that let you control the product s sound, channel coniguration, energy use, and a host of other features. To access the main, on-screen menu, press the MENUm button on your remote. To access Tools menus, press the TOOLST button. Tools menus are available when the TOOLST menu Icon is displayed on the screen MENUm button: Displays the main on-screen menu. 2 TOOLST button: Displays the Tools menus when available. 3 E and Direction buttons: Use the Direction buttons to move the cursor and highlight an item. Use the E button to select an item or conirm the setting. 4 RETURNR button: Returns to the previous menu. 5 EXITe button: Exits the on-screen menu. How to Operate the Main Menu (OSD - On Screen Display) The access steps may differ depending on the menu option you select. 1 MENUm The main menu options appear on the screen: Picture, Sound, Broadcasting, Applications, System, Support. 2 u / d Select a main menu option on the left side of the screen with the u or d button. 3 E Press E to access the sub-menus. 4 u / d Select the desired sub-menu with the u or d button. 5 u / d / l / r Adjust the value of an item with the l, r, u, or d button. The adjustment in the OSD may differ depending on the selected menu. 6 E Press E to conirm the selection. 7 EXITe Press EXITe. English - 16

17 Getting Started Connecting the Power Cord and the Aerial or Cable Connection VHF/UHF Aerial Cable Aerial Cable (Not Supplied) or Plug the power cord into a wall outlet only after you have made all other connections. If you are connecting your product to a cable or satellite box using HDMI, Component, or Composite connections, you do not need to connect the ANT IN jack to an aerial or a cable connection. Use caution when you move or swivel the product if the aerial cable is tightly connected. You could break the aerial jack off the product. Connecting the Power The picture may vary depending on the model. Power Input Setup The initial setup dialog appears when the TV is irst activated. Follow the on-screen instructions to inish the initial setup process, including menu language choice, country choice, channel source choice, channel scan, and more. At each step, either make a choice or skip the step. Users can manually perform this process at a later time under the System > Setup menu. The default PIN code is: English - 17

18 Connections Connecting to AV Devices (Blu-ray Players, DVD Players, etc.) Using an HDMI Cable for an HD connection (up to 1080p, HD digital signals) For the best quality HD picture, we recommend using an HDMI connection. Use with DVD players, Blu-ray players, HD cable boxes, and HD Set-Top-Box satellite receivers. HDMI OUT HDMI Cable (Not Supplied) HDMI IN 1 (DVI) / HDMI IN 2 For the best picture and audio quality, connect digital devices to the product using HDMI cables. An HDMI cable supports digital video and audio signals, and does not require an audio cable. To connect the product to a digital device that does not support HDMI output, use an HDMI to DVI cable and audio cables. If you connect an external device to the product that uses an older version of HDMI, the video and audio may not work. If this occurs, ask the manufacturer of the device about the HDMI version and, if it is out of date, request an upgrade. Be sure to purchase a certiied HDMI cable. Otherwise, the picture may not display or a connection error may occur. We recommend using a basic high-speed HDMI cable or an HDMI cable that is Ethernet compatible. Note that this product does not support the Ethernet function via HDMI. English - 18
 HDMI IN 1 (DVI) / HDMI IN 2 For the best picture and audio quality, connect digital devices to the product using HDMI cables.")
19 Connections Sharing Mobile Device Screens On the Displayer This displayer is capable of displaying mobile device screens. You can use the following features to enjoy video, photo, and music iles from mobile devices directly on your displayer. Use an MHL cable to display a mobile device's screen on the displayer. MHL This displayer supports MHL (Mobile High-deinition Link) via an MHL cable. Connect an MHL cable to the mobile device and the displayer. However, MHL is only available through the HDMI2 (MHL) port and only when used in conjunction with an MHL-enabled mobile device. This feature is only available with MHL-certiied mobile devices. To ind out if your mobile device is certiied, visit its manufacturer's website. You can also view a list of MHL-certiied devices on the oficial MHL website ( MHL USE Connect an MHL cable to the mobile device and the displayer. Press SOURCEs button and then select the MHL connector to display the mobile device's screen on the displayer. The following remote control functions will also be available: (REW), (FF), (Play), (Pause), (Stop), e (Previous menu) Restrictions MHL has several requirements: If you are using an HDMI adapter, the displayer recognizes the signal as an HDMI signal and may respond differently than it would to an MHL-to-HDMI cable connection. Upgrade the software to the latest version. This product is oficially MHL-certiied. If users encounter any problem when using the MHL function, they must contact the manufacturer of the device. Some mobile devices may not have suficient speciications or features to support MHL. Because the displayer screen is wider than most mobile device screens, the picture quality may appear lower on the displayer. English - 19
 port and only when used in conjunction with an MHL-enabled mobile device. This feature is only available with MHL-certiied mobile devices.")
20 Connections Using a Component Cable (up to 1080p HD signals) or an Audio/Video Cable (480i analogue signals only) Use with DVD players, Blu-ray players, cable boxes, STB satellite receivers, VCRs. Video Cable (Not Supplied) Audio Cable (Not Supplied) R W Y R W R B G Audio Cable (Not Supplied) Component Cable (Not Supplied) R W Y Red White R W R W R B G VIDEO OUT AUDIO OUT Device AUDIO OUT COMPONENT OUT Device R B G R-AUDIO-L R-AUDIO-L PR PB PG Red Blue Green For better picture quality, we recommend the Component connection over the A/V connection. When you connect a Video cable to COMPONENT / AV IN, the colour of the COMPONENT / AV IN [VIDEO] jack (green) will not match the video cable (yellow). Using a Scart Cable Available devices: DVD, VCR EXT In Ext. mode, DTV Out supports MPEG SD Video and Audio only. English - 20
 will not match the video cable (yellow).")
21 Connections Connecting to Audio Devices Using a Headphone Cable Connection Headphone Cable (Not Supplied) Headphones H: You can connect your headphones to the headphone output jack on your product. While the headphones are connected, the sound from the built-in speakers will be disabled. The sound function may be restricted when you connect headphones to the product. Headphone volume and product volume are adjusted separately. The earphone jack supports only the 3 conductor tip-ring-sleeve (TRS) type. English - 21
22 Connections Connecting to a PC Using an HDMI Cable or an HDMI to DVI Cable or a D-sub Cable Connection Your PC may not support an HDMI connection. Use your PC speakers for audio. AUDIO OUT Stereo Cable (Not supplied) PC OUT D-sub Cable (Supplied) HDMI OUT HDMI Cable (Not Supplied) DVI OUT HDMI to DVI Cable (Not Supplied) AUDIO OUT Stereo Cable (Not supplied) NOTE For an HDMI to DVI cable connection, you must use the HDMI IN 1 (DVI) jack. For PC's with DVI video out jacks, use an HDMI to DVI cable to connect the DVI out on the PC to the HDMI IN 1 (DVI) jack on the product. Use the PC's speakers for audio. English - 22
23 Connections Connecting to a COMMON INTERFACE slot (Your product viewing Card Slot) Using the CI or CI+ CARD To watch paid channels, the CI or CI+ CARD must be inserted. If you don t insert the CI or CI+ CARD, some channels will display the message Scrambled Signal. The pairing information containing a telephone number, the CI or CI+ CARD ID the Host ID and other information will be displayed in about 2~3 minutes. If an error message is displayed, please contact your service provider. When the coniguration of channel information has inished, the message Updating Completed is displayed, indicating the channel list is updated. NOTE You must obtain a CI or CI+ CARD from a local cable service provider. When removing the CI or CI+ CARD, carefully pull it out with your hands since dropping the CI or CI+ CARD may cause damage to it. Insert the CI or CI+ CARD in the direction marked on the card. The location of the COMMON INTERFACE slot may be different depending on the model. CI or CI+ CARD is not supported in some countries and regions; check with your authorized dealer. If you have any problems, please contact a service provider. Insert the CI or CI+ CARD that supports the current aerial settings. The screen will be distorted or will not be seen. English - 23
24 Connections Display Modes (D-Sub and HDMI/DVI Input) The optimal PC display resolution for this product is 1920 x 60 Hz. We very strongly recommend you set the video output of your computer to the optimal resolution. You can also select one of the standard resolutions listed in the table below and the product will be automatically adjust to the resolution you choose. If you set your computer s video output to a resolution not listed in the table, the product screen may go blank and only the power indicator will turn on. To resolve this issue, adjust the resolution according to the following table, referring to the user guide for the graphics card. Optimal resolution: 1366 x 768 pixels (T19C350 model only) Mode Display Mode Resolution Horizontal Frequency (KHz) Vertical Frequency (Hz) Pixel Clock (MHz) Sync Polarity (H / V) IBM 720 x Hz /+ VESA DMT 640 x Hz /- MAC 640 x Hz /- VESA DMT 640 x Hz /- VESA DMT 640 x Hz /- VESA DMT 800 x Hz /+ VESA DMT 800 x Hz /+ VESA DMT 800 x Hz /+ MAC 832 x Hz /- VESA DMT 1024 x Hz /- VESA DMT 1024 x Hz /- VESA DMT 1024 x Hz /+ VESA DMT 1280 x Hz /+ VESA DMT 1366 x Hz /+ English - 24
25 Connections Optimal resolution: 1920 x 1080 pixels Mode Display Mode Resolution Horizontal Frequency (KHz) Vertical Frequency (Hz) Pixel Clock (MHz) Sync Polarity (H / V) IBM 720 x Hz /+ VESA DMT 640 x Hz / MAC 640 x Hz / VESA DMT 640 x Hz / VESA DMT 640 x Hz / VESA DMT 800 x Hz /+ VESA DMT 800 x Hz /+ VESA DMT 800 x Hz /+ MAC 832 x Hz / VESA DMT 1024 x Hz / VESA DMT 1024 x Hz / VESA DMT 1024 x Hz /+ VESA DMT 1152 x Hz /+ MAC 1152 x Hz / VESA DMT 1280 x Hz /+ VESA DMT 1280 x Hz /+ VESA DMT 1280 x Hz /+ VESA DMT 1280 x Hz /+ VESA DMT 1366 x Hz /+ VESA DMT 1440 x Hz /+ VESA DMT 1600 x 900RB 60Hz /+ VESA DMT 1680 x Hz /+ VESA DMT 1920 x Hz /+ For an HDMI to DVI cable connection, you must use the HDMI IN 1 (DVI) jack. The interlace mode is not supported. The set may operate abnormally if you select a non-standard video format. Separate and Composite modes are supported. SOG(Sync On Green) is not supported. DPM(Display Power Management) Function does not work if you used in connection with the HDMI port of this product. If an HDMI to DVI cable is connected to the HDMI IN 1 (DVI) port, the audio does not work. English - 25
26 Connections Changing the Input Source Source When you are watching product and you want to watch a movie on your DVD player or Blu-ray player or switch to your cable box or STB satellite receiver, you need to change the Source. TV / Ext. / PC / HDMI1/DVI / HDMI2 / AV / Component 1. Press the SOURCEs button on your remote. The Source screen appears. 2. Select a desired external input source. You can only choose external devices that are connected to the product. In the displayed Source list, connected inputs are highlighted. In the Source, TV, Ext. and PC are always stays activated. How to Use Edit Name Edit Name lets you associate a device name to an input source. To access Edit Name, open the Tools menu when the Source list is displayed. The following selections appear under Edit Name: VCR / DVD / Cable STB / Satellite STB / PVR STB / AV Receiver / Game / Camcorder / PC / DVI PC / DVI Devices / TV / IPTV / Blu-ray / HD DVD / DMA: Select an input jack, and then select the name of the device connected to that jack from the list that appears. If you connect a PC to the HDMI IN 1 (DVI) port with an HDMI cable, assign PC to HDMI1/DVI in Edit Name. If you connect a PC to the HDMI IN 1 (DVI) port with an HDMI to DVI cable, assign DVI PC to HDMI1/DVI in Edit Name. If you connect an AV device to the HDMI IN 1 (DVI) port with an HDMI to DVI cable, assign DVI Devices to HDMI1/ DVI in Edit Name. Information You can see detailed information about the channel on TV or the selected external device. Refresh If the external devices are not displayed in the Source list, open the Tools menu, and then select Refresh, and then search for the connected devices. English - 26
27 Basic Features Correct posture to use the product Use the product in the correct posture as follows. Straighten your back. Allow a distance of 45 to 50cm between your eye and the screen, and look slightly downward at the screen. Keep your eyes directly in front of the screen. Adjust the angle so light does not relect on the screen. Keep your forearms perpendicular to your upper arms and level with the back of your hands. Keep your elbows at about a right angle. Adjust the height of the product so you can keep your knees bent at 90 degrees or more, your heels attached to the loor, and your arms lower than your heart. English - 27
28 Basic Features Changing the Preset Picture Mode Picture Mode Menu Picture Picture Mode Picture modes apply preset adjustments to the picture. Dynamic Suitable for a bright room. Standard Suitable for a normal environment. Movie Suitable for watching movies in a dark room. Entertain Sharpens the picture. Suitable for games. It is only available when connecting a PC. Samsung MagicAngle Menu Picture Samsung MagicAngle MagicAngle lets you view optimal screen quality from almost any viewing position. By setting an appropriate value for each position, you can view a high quality picture, whether you are viewing the screen from an angle below and above the product. This option is only available on the TC350 model. Samsung MagicAngle Select Lean Back Mode if viewing below the screen and Standing Mode if viewing above. Mode Determines the amount of adjustment. Numbers closer to 10 are best for lower viewing positions. English - 28
29 Basic Features Adjusting Picture Settings Backlight Menu Picture Backlight Adjusts the brightness of the screen by adjusting the brightness of the individual pixels. Contrast Menu Picture Contrast Increases or decreases the contrast between dark and light areas of the picture. Brightness Menu Picture Brightness Adjusts the brightness of the screen. Not as effective as Backlight. Sharpness Menu Picture Sharpness Sharpens or dulls the edges of objects. Colour Menu Picture Colour Adjust colour saturation levels. Tint (G/R) Menu Picture Tint (G/R) Adjust tint levels for green and red. To adjust picture quality, follow these steps: 1. Select an option you want to adjust. When you select an option, a slider screen appears. 2. Adjust the option value using your remote. When you make change to option value, the OSD will be adjusted accordingly. You can adjust and store Settings for each external device connected to the product. Lowering picture brightness reduces power consumption. Response Time (Normal / Faster / Fastest) Accelerate the panel response rate to make video appear more vivid and nature. English - 29
30 Basic Features Changing the Picture Size Picture Size Menu Picture Picture Size Using this function, you can make change to various picture size and aspect ratio options. Picture Size If you have a cable box or satellite receiver, it may have its own set of screen sizes as well. However, we highly recommend you use your products 16:9 mode most of the time. Auto Wide: Automatically adjusts the picture size to the 16:9 aspect ratio. 16:9: Sets the picture to the 16:9 wide screen format. Wide Zoom: Magniies the picture size more than 4:3. Adjusts the Position by using u / d buttons. Zoom : Magniies the 16:9 wide pictures vertically to it the screen size. Adjusts the Zoom or Position by using u / d button. 4:3: Sets the picture to basic (4:3) mode. Do not set your product to 4:3 format for a long time. The borders displayed on the left and right, or top and bottom of the screen may cause image retention (screen burn) which is not covered by the warranty. Screen Fit: Displays the full image without any cut-off when HDMI (720p / 1080i / 1080p) or Component (1080i / 1080p) signals are inputted. Adjusts the Position by using u / d / l / r button. NOTE Depending on the input source, the picture size options may vary. The available items may differ depending on the selected mode. When connecting a PC, only 16:9 and 4:3 modes can be adjusted. Settings can be adjusted and stored for each external device connected to an input on the LED display. If you use the Screen Fit function with HDMI 720p input, 1 line will be cut at the top, bottom, left and right as in the overscan function. Zoom/Position:You can adjust picture size and position by u / d / l / r button. It's only available when picture size is set as Zoom, Wide Zoom, and Screen Fit. In Wide Zoom mode, you can only use Position adjustment. Reset: Reset the Zoom and Position to the default settings. English - 30
31 Basic Features To use the Position function after selecting Wide Zoom, Zoom or Screen Fit, follow these steps: 1. Select the Position. 2. On the Position screen, select Position, and then move the picture to position you want using your remote. 3. When done, select Position again, and then select Close. 4. To reset the picture position, select Reset. Picture Sizes available by Input Source: ATV, EXT, AV: Auto Wide, 16:9, Wide Zoom, Zoom, 4:3 DTV (576i/p, 720p): Auto Wide, 16:9, Wide Zoom, Zoom, 4:3 DTV (1080i, 1080p): Auto Wide, 16:9, Wide Zoom, Zoom, 4:3, Screen Fit Component (480i/p, 576i/p, 720p): 16:9, Wide Zoom, Zoom, 4:3 Component (1080i, 1080p): 16:9, Wide Zoom, Zoom, 4:3, Screen Fit HDMI (480i/p, 576i/p): 16:9, Wide Zoom, Zoom, 4:3 HDMI (720p, 1080i, 1080p): 16:9, Wide Zoom, Zoom, 4:3, Screen Fit Depending on the input source, the picture size options may vary. The available items may differ depending on the selected mode. HD (High Definition): 16:9-1080i/1080p (1920x1080), 720p (1280x720) You can adjust and store settings for each external device you have connected to an input on the product. 4:3 Screen Size (16:9 / Wide Zoom / Zoom / 4:3): Available only when picture size is set to Auto Wide. You can determine the desired picture size at the 4:3 WSS (Wide Screen Service) size or the original size. Each European country requires different picture size. Not available in HDMI, Component, and HDMI/DVI mode. English - 31
32 Basic Features Calibrating the Screen Display Auto Adjustment Menu Picture Auto Adjustment Automatically adjusts the picture's frequency, position, and ine tune settings in the PC mode. Available only when you connect your PC to the product with a D-Sub cable. PC Screen Adjustment Menu Picture PC Screen Adjustment Available in PC mode only. Coarse / Fine: Removes or reduces picture noise. If the noise is not removed by Fine-tuning alone, use the Coarse function to adjust the frequency as best as possible (Coarse) and Fine-tune again. After the noise has been reduced, re-adjust the picture so that it is aligned with the centre of screen. Position: Adjust the PC s screen position using your remote if it is not centre or does not it the product screen. Image Reset: Resets the image to the default settings. Using Your Product as a Computer (PC) Display Entering the Video Settings (Based on Windows 7, 8) For your product to work properly as a computer display, you must enter the correct video settings. Depending on your version of Windows and your video card, the procedure on your PC will probably differ slightly from the procedure presented here. However, the same basic information will apply in most cases. (If not, contact your computer manufacturer or Samsung Dealer.) 1. Click Control Panel on the Windows start menu. 2. Click Appearance and Themes in the Control Panel window. A display dialog box appears. 3. Click Display. Another display dialog box appears. 4. Click the Settings tab on the display dialog box. On the Settings tab, set the correct resolution (screen size). The optimal resolution for this product is 1920 x If a vertical-frequency option exists on your display settings dialog box, select 60 or 60 Hz. Otherwise, just click OK and exit the dialog box. English - 32
33 Basic Features Picture In Picture (PIP) PIP Menu Picture PIP View two sources on the TV at the same time. PIP Activate or deactivate the PIP function. Source Changes the source. Aerial Choose between Air or Cable. Channel Select the channel for the sub-picture screen. Size Select a size for the sub-picture screen. Position Select a position for the sub-picture screen. Sound Select You can choose to listen to the sound from the main picture or the sub picture. If you turn the product off while watching in the PIP mode, the PIP function is reset to Off. When you turn your product on, you must turn PIP on again to watch in the PIP mode. You may notice that the picture in the PIP screen becomes slightly unnatural when you use the main screen to view a game or karaoke. PIP Settings Main picture: TV, PC, AV, Component, HDMI1/DVI, HDMI2, SCART Sub picture: TV, PC, AV, Component, HDMI1/DVI, HDMI2, SCART English - 33

34

35
36 Basic Features Picture Off Menu Picture Picture Off Turns off the screen and plays audio only. To turn the screen back on, press any button (except Power and Volume buttons) on your remote. Reset Picture Menu Picture Reset Picture Resets your current picture mode to its default settings. Changing the Preset Sound Mode Sound Mode Menu Sound Sound Mode Sound modes apply preset adjustments to the sound. Standard Selects the normal sound mode. Music Emphasizes music over voices. Movie Provides the best sound for movies. Clear Voice Emphasizes voices over other sounds. Amplify Increase the intensity of high-frequency sound to allow a better listening experience for the hearing impaired. English - 36
37 Basic Features Adjusting Sound Settings Sound Effect Menu Sound Sound Effect Available only when the Sound Mode is set to Standard. DTS TruSurround Produces sound that will make you feel like you are sitting in a movie theatre or concert hall. DTS TruDialog Increases the voice intensity to make dialog clearer. Equaliser The Equaliser displays a series of sliders. Use the arrow buttons to select a slider, and change the slider s value. To Reset the Equaliser, select the Reset. A pop-up appears asking if you want to reset, select Yes; otherwise select No. To exit, select Close. Balance L/R: Adjusts the balance between the right and left speaker. 100Hz / 300Hz / 1kHz / 3kHz / 10kHz (Bandwidth Adjustment): Adjusts the loudness of speciic bandwidth frequencies. Reset: Resets the equalizer to its default settings. English - 37
38 Basic Features Speaker Settings Menu Sound Speaker Settings Auto Volume Because each station has its own broadcasting conditions, the volume may luctuate each time you change the channel. This feature automatically adjusts the volume of a channel by lowering the sound output when the modulation signal is high or by raising the sound output when the modulation signal is low. To use the volume control of a connected source device, set Auto Volume to Off. A change to the volume control of the connected source device may not be applied if Auto Volume is set to Normal or Night. Additional Settings (digital channels only) DTV Audio Level (MPEG / HE-AAC): This function allows you to reduce the disparity of a voice signal (which is one of the signals received during a digital TV broadcast) to a desired level. According to the type of broadcast signal, MPEG / HE-AAC can be adjusted between -10dB and 0dB. To increase or decrease the volume, adjust between the range 0 and -10 respectively. Dolby Digital Comp (Line / RF): This function minimizes signal disparity between a dolby digital signal and a voice signal (i.e. MPEG Audio, HE-AAC, ATV Sound). Select Line to obtain dynamic sound, and RF to reduce the difference between loud and soft sounds at night time. Line: Set the output level for signals greater or less than -31dB (reference) to either -20dB or -31dB. RF: Set the output level for signals greater or less than -20dB (reference) to either -10dB or -20dB. Reset Sound Menu Sound Reset Sound Reset all sound settings to the factory defaults. Selecting the Sound Mode t When you set to Dual fg, the current sound mode is displayed on the screen. Audio Type Dual f-g Default A2 Stereo Mono Mono Stereo Stereo Mono Automatic change Dual Dual f Dual g Dual f NICAM Stereo Mono Mono Stereo Dual Mono Stereo Mono Dual f Dual g Automatic change Dual f If the Stereo signal is weak and an automatic switching, occurs, then switch to the Mono. Only activated in stereo sound signal. Only available when the input Source is set to TV. English - 38
39 Basic Features Memorizing Channels Aerial Menu Broadcasting Aerial Before your product can memorize the available channels, you must select your Product signal source, Air (using an aerial) or Cable. Select Air or Cable. After you have selected the signal source, go on to the Auto Tuning function. Selecting the signal source using the Aerial function also determines the signal source the product is tuned to. For example, if you receive your product signal over the air, and you select Cable, you will see only snow. You must select Air to see a picture. Auto Tuning Menu Broadcasting Auto Tuning Automatically scans and indexes all channels received through the TV's aerial input connector. To start, navigate to Broadcasting and select Auto Tuning. Select Start when prompted with a message. This initiates the Auto Tuning function. The process can take up to 30 minutes to complete. If Starting the Auto Tuning function when there is an existing index of channels overwrites the previous index. Auto Tuning Scans for channels automatically and stores them in the TV s memory. Cable Search Option (when the aerial was set to Cable) (Depending on the country) Sets additional search options such as the frequency and symbol rate for a cable network search. Country (Area) Menu Broadcasting Channel Settings Country (Area) Select your country so that the product can correctly auto-tune the broadcasting channels. The PIN input screen appears. Enter your 4 digit PIN number. Digital Channel: Change the country for digital channels. Analogue Channel: Change the country for analogue channels. English - 39
40 Basic Features Manual Tuning Menu Broadcasting Channel Settings Manual Tuning Scans for a channel manually and stores in the TV. If a channel is locked using the Channel Lock function, the PIN input window appears. This function may not be supported depending on the region. Digital Channel Tuning Scans for a digital channel. 1. Select the New. When selecting Aerial Air Channel, Frequency, Bandwidth When selecting Aerial Cable Frequency, Modulation, Symbol Rate 2. Select the Search. When scanning has inished, a channel is updated in the channel list. Analogue Channel Tuning Scans for a analogue channel. 1. Select the New. 2. Set the Programme, Colour System, Sound System, Channel and Search. 3. Select the Store. When scanning has inished, a channel is updated in the channel list. Channel mode P (programme mode) When tuning is complete, the broadcasting stations in your area have been assigned to position numbers from P0 to P99. You can select a channel by entering the position number in this mode. C (aerial channel mode) / S (cable channel mode) These two modes allow you to select a channel by entering the assigned number for each aerial broadcasting station or cable channel. English - 40
41
42 Basic Features Change the Broadcast Signal Press r button on the remote and select a broadcasting signal. This will change the signal source immediately. Change the Channel List Press r button on the remote and switch to the Favourites list. However, the Favourites list can only be selected if it contains at least one favourites channel. If no favourites channel was previously added, select Edit Favourites and add channels from the Edit Favourites screen. You can also change the antenna to Air or Cable. You can choose your channel source from All, TV, or Analogue. Guide Menu Broadcasting Guide View each digital channel's programming schedule, including showtimes. Check the programming schedules and even setup a Schedule Viewing or Schedule Recording. Press Guide to launch the guide. Make sure that the date and time is set properly under the System > Time > Clock menu. Using Channel View a (Quick Nav): Press a button. A popup window will open. Each press of l or r arrow button moves the focus 24 hours back or forward, enabling faster browsing of the programming schedule. However, the focus cannot be on a time prior to the current time. b (Channel Category): The TV's channel index is divided into different categories such as Show All and TV. Choose a category. { (Schedule Manager): Press { button and navigate to the Schedule Manager screen to view a list of reserved programmes. English - 42
43
44 Basic Features Digital Channel Schedule Viewing Schedule Viewing for programmes on digital channels can be set up through the following two options: Guide From Guide, select a programme you wish to view. Programme Info Press INFO` button and select a programme you wish to view. Analogue Channel Schedule Viewing The Schedule Viewing function for programmes on analogue channels can be set up by specifying the time and date. Run Schedule Manager and then select Schedule. A popup menu will appear. Select Schedule Viewing to proceed. Specify that programme's Channel, Repeat, and Start Time and then select, OK to inish. Cancel a Schedule Viewing To cancel a Schedule Viewing for a speciic programme, select the programme from the Schedule Manager screen. A popup menu will appear. Select Delete to cancel. Edit Timer List Select an entry from the Schedule Manager screen and then select Edit from the popup menu. Edit the settings of the selected entry. English - 44
45
46 Basic Features Add Channels Add a channel to a favourites channels list. 1. Press a button to bring up the channel list containing the channels you wish to add and then select the channels. 2. Press b button to bring up a favourites channels list and then { button to add the selected channels. Remove Channels Remove channels from a favourites channels list. 1. Press b button to bring up a favourites channels list and then select the channels you wish to remove. 2. Press { button to remove the channels from the list. Rename a Favourites Channel List Rename an existing favourites channels list. 1. Press TOOLST button and select Rename Favourites from the list. 2. Rename the list in the popup window. The new name can be up to 20 characters long. Rearrange the Favourites Channels List Rearrange the order of the channels in a Favourites Channels List. 1. Press b button to bring up a favourites channels list and select the channel you wish to move. 2. Press a button to rearrange the order of the selected channel. Press E button. Copy a Favourites Channels List Copy channels from one favourites channels list to another. 1. Press b button to bring up a Favourites Channels List and select the channels you wish to copy. 2. Press TOOLST button, select Copy to Favourites from the list, and then select the Favourites Channels List(s) you wish to copy to. This copies over the channels to the selected Favourites Channels List(s). English - 46
47 Basic Features Other Features Fine Tune Menu Broadcasting Channel Settings Fine Tune (analogue channels only) If the reception is clear, you do not have to ine tune the channel, as this is done automatically during the search and store operation. If the signal is weak or distorted, ine tune the channel manually. Scroll to the left or right until the image is clear. Select the channel, and then select Fine Tune. Fine tuned channels that have been saved are marked with an asterisk * on the right-hand side of the channel number in the channel banner. To reset fine-tuning, select the channel, select Fine Tune, and then select Reset on the Fine Tune screen. Transfer Channel List Menu Broadcasting Channel Settings Transfer Channel List Imports or exports the channel map. You should connect USB storage to use this function. The PIN input screen appears. Enter the PIN using your remote. Import from USB: Import channel list from USB. Export to USB: Export channel list to USB. This function is available when USB is connected. USB format should be FAT32. Delete CAM Operator Profile Menu Broadcasting Channel Settings Select the CAM operator to delete. Subtitle t Menu Broadcasting Subtitle Use this menu to set the Subtitle mode. Subtitle (Off / On): Switches subtitles on or off. Subtitle Mode (Normal / Hearing Impaired): Sets the subtitle mode. Subtitle Language: Sets the subtitle language. Primary Subtitle: Set the primary subtitle language. Secondary Subtitle: Set the secondary subtitle language. If the programme you are watching does not support the Hearing Impaired function, Preferred automatically activates even if the Hearing Impaired mode is selected. English is the default in cases where the selected language is unavailable in the broadcast. English - 47
LED TV MONITOR (MFM TV) user manual
 user manual") TE390 T22E390EW T22E390EX T24E390EW T24E390EX LED TV MONITOR (MFM TV) user manual Thank you for purchasing this Samsung product. To receive more complete service, please register your product at www.samsung.com/register
TE390 T22E390EW T22E390EX T24E390EW T24E390EX LED TV MONITOR (MFM TV) user manual Thank you for purchasing this Samsung product. To receive more complete service, please register your product at www.samsung.com/register
LED TV user manual TD310 T24D310ES T24D310EW T24D310EX T28D310ES T28D310EW T28D310EX T31D310EW T31D310EX
 TD310 T24D310ES T24D310EW T24D310EX T28D310ES T28D310EW T28D310EX T31D310EW T31D310EX LED TV user manual Thank you for purchasing this Samsung product. To receive more complete service, please register
PDP TV. quick start guide. imagine the possibilities
 PDP TV quick start guide imagine the possibilities Thank you for purchasing a Samsung product. To receive a more complete service, please register your product at www.samsung.com/global/register 02134A_CMS.indd
Movie Cube N150H. User s Manual
 Movie Cube N150H User s Manual (v1.0) TABLE OF CONTENTS 1. Main Features... 4 1.1 Front panel... 4 1.2 Back panel... 4 2. Remote Control... 5 3. Welcome Page... 6 4. Installation Guide... 6 5. Program...
(2012 10 24) manual_tocomsat duo LITE.indd 20-1 2012-10-24 7:44:57
 manual_tocomsat duo LITE.indd 20-1 2012-10-24 7:44:57") (2012 10 24) manual_tocomsat duo LITE.indd 20-1 2012-10-24 7:44:57 TABLE OF CONTENTS Table of Contents Table of Contents Safety Warning General Information Package Contents & Features Front Panel Rear
(2012 10 24) manual_tocomsat duo LITE.indd 20-1 2012-10-24 7:44:57 TABLE OF CONTENTS Table of Contents Table of Contents Safety Warning General Information Package Contents & Features Front Panel Rear
Troubleshooting Guide
 Poor or Distorted Picture Troubleshooting Guide Poor picture quality compared to what was seen in the store. Picture is distorted. (Macroblock, small block, dots, pixelization.) Wrong or missing color
Register your product and get support at www.philips.com/welcome. User Manual
 Register your product and get support at www.philips.com/welcome User Manual Contents 1 Your new TV 3 1.1 EasyLink 3 2 Setting up 4 2.1 Read safety 4 2.2 TV stand and wall mounting 4 2.3 Tips on placement
Evolution Digital HD Set-Top Box Important Safety Instructions
 Evolution Digital HD Set-Top Box Important Safety Instructions 1. Read these instructions. 2. Keep these instructions. 3. Heed all warnings. 4. Follow all instructions. 5. Do not use this apparatus near
CAUTION RISK OF ELECTRIC SHOCK NO NOT OPEN
 Evolution Digital HD Set-Top Box Important Safety Instructions 1. Read these instructions. 2. Keep these instructions. 3. Heed all warnings. 4. Follow all instructions. 5. Do not use this apparatus near
VideoMate V200/V200F Analog Standalone TV Box Start Up Guide
 VideoMate V200/V200F Analog Standalone TV Box Start Up Guide Compro Technology, Inc. www.comprousa.com 1 Table of Contents About This Guide... 3 VideoMate V200/V200F TV Box Contents... 4 Install V200/V200F
LED TV MONITOR (MFM TV) user manual. imagine the possibilities
 user manual. imagine the possibilities") TA300 LED TV MONITOR (MFM TV) user manual imagine the possibilities Thank you for purchasing this Samsung product. To receive more complete service, please register your product at www.samsung.com/register
TA300 LED TV MONITOR (MFM TV) user manual imagine the possibilities Thank you for purchasing this Samsung product. To receive more complete service, please register your product at www.samsung.com/register
AVR 158. Audio/video receiver. Quick-Start Guide ENGLISH
 158 Audio/video receiver ENGLISH Quick-Start Guide 158 Introduction, Speaker Placement and Connection Introduction Thank you for choosing a harman kardon product! This quick-start guide contains all the
focus TOuCh P10 FOR DISPLAYS: 55, 70 AND 82 ENgliSh V01.3-2014-7
 focus TOuCh P10 FOR DISPLAYS: 55, 70 AND 82 ENgliSh V01.3-2014-7 Thank you for purchasing our product. Please read this manual carefully before operation your set and retain it for future reference. FT55-P10
Please click on the Table of Contents item you are interested in to go directly to the information. Connections and Devices...5
 Please click on the Table of Contents item you are interested in to go directly to the information. Connections and Devices...5 MTS HDTV Set-Top Box General Information and Maintenance... 5 Connecting
DVB-T 730. User s Manual
 EPG Program Reservation There are 10 program timers to bring up reminder for a reserved program. 20 seconds before the start of the reserved program, a pop-up window will remind viewer. If no further instruction,
Setting up your Gateway Media Center
 Setting up your Gateway Media Center Notices 2003 Gateway, Inc. All rights reserved. Gateway, Gateway Country, the Gateway stylized logo, and the black-and-white spot design are trademarks or registered
ABOUT YOUR SATELLITE RECEIVER
 2 Satellite Receiver ABOUT YOUR SATELLITE RECEIVER This chapter gives you an overview and a description of your satellite receiver. SATELLITE RECEIVER OVERVIEW SINGLE AND DUAL MODES REMOTE CONTROL SATELLITE
E-MANUAL. Thank you for purchasing this Samsung product. To receive more complete service, please register your product at. www.samsung.
 E-MANUAL Thank you for purchasing this Samsung product. To receive more complete service, please register your product at www.samsung.com/register Model Serial No. Contents e-manual Guide Viewing the e-manual
MyM 3T. User Manual. English
 User Manual Compact unit with 2 DVB-T tuners MPEG-2 and MPEG-4 compliant 3 analogue modulators Two CI for decryption or multidecryption NICAM or A2 stereo 12-volt power supply Low power consumption MyM
19 HD Ready Digital LCD TV. Instruction Manual L19DIGB10
 19 HD Ready Digital LCD TV Instruction Manual L19DIGB10 Contents Preparation... 4 Unpacking the TV...4 Installing / Removing the Base Stand...5 Front / Top / Side View and Controls...6 Rear View and Sockets...7
COLOR TFT LCD MONITOR. User Manual
 COLOR TFT LCD MONITOR User Manual GENERAL INFORMATION Thank you for choosing our TFT LCD(liquid crystal display) monitor. This product employs integrate circuits, low power consumption, and no radiation
LED TV MONITOR (MFM TV) user manual
 user manual") TC350 TC550 TC730 LED TV MONITOR (MFM TV) user manual Thank you for purchasing this Samsung product. To receive more complete service, please register your product at www.samsung.com/register Model Serial
TC350 TC550 TC730 LED TV MONITOR (MFM TV) user manual Thank you for purchasing this Samsung product. To receive more complete service, please register your product at www.samsung.com/register Model Serial
HANTZ + PARTNER The Upgrade Company! www.hantz.com
 Quick Start Guide X3000 HD Network Media Player X3000 HD NETWORK MEDIA PLAYER POWER HANTZ + PARTNER The Upgrade Company! www.hantz.com A Get to know your HELIOS X3000 Thank you for purchasing the HELIOS
TABLE OF CONTENTS QUICK START... 1 DIAGRAM OF THE DIGITAL PHOTO FRAME... 2 KEYPAD BUTTON FUNCTIONS... 3 REMOTE CONTROL FUNCTIONS..
 TABLE OF CONTENTS QUICK START........ 1 DIAGRAM OF THE DIGITAL PHOTO FRAME... 2 KEYPAD BUTTON FUNCTIONS..... 3 REMOTE CONTROL FUNCTIONS..4 DIGITAL PHOTO FRAME NAVIGATION........5 OSD MENU FUNCTIONS..6
DVB-T VERTO. User Manual HD TERRESTRIAL DIGITAL TV STB & PLAYER MT4162
 DVB-T VERTO HD TERRESTRIAL DIGITAL TV STB & PLAYER MT4162 User Manual EN 2 Index Index...2 Overview...2 Remote Control...3 Battery installation in remote control...4 Using remote control...4 Connections...4
32FEB5714 (REF. NO.: 10090405)
") FUNAI BRANDNEW PRODUCT LOGO (revised edition 1,APR.,2010 32FEB5714 (REF. NO.: 10090405) ENGLISH Contents Safety Information...1 Getting Started...2...2 Features...2 Connect Power...3 Remote Control...4
FUNAI BRANDNEW PRODUCT LOGO (revised edition 1,APR.,2010 32FEB5714 (REF. NO.: 10090405) ENGLISH Contents Safety Information...1 Getting Started...2...2 Features...2 Connect Power...3 Remote Control...4
DVB-T2 DIGITAL TV BOX
 DVB-T2 DIGITAL TV BOX QUALITY OF DIGITAL TELEVISION MT4159 User Manual EN 2 Index Index...2 Introduction...3 Front panel...3 Rear panel...3 Remote control...4 Hardware configuration...5 Connecting tuner
E-MANUAL. Thank you for purchasing this Samsung product. To receive more complete service, please register your product at. www.samsung.
 E-MANUAL Thank you for purchasing this Samsung product. To receive more complete service, please register your product at www.samsung.com/register Model Serial No. Contents 27 Connecting via Samsung Link
Receiver Customization
 9242_13_Ch11_eng 6/11/07 9:36 AM Page 1 Receiver Customization PERSONALIZING YOUR SATELLITE RECEIVER Take a look through this chapter and you ll find out how to change settings on the receiver to make
E-MANUAL. Thank you for purchasing this Samsung product. To receive more complete service, please register your product at. www.samsung.
 E-MANUAL Thank you for purchasing this Samsung product. To receive more complete service, please register your product at www.samsung.com/register Model Serial No. Contents Quick Guide Using the Smart
Receiver Customization
 11 Receiver Customization PERSONALIZING YOUR SATELLITE RECEIVER Use the information in this chapter to customize your receiver. USING SHARED VIEW USING CALLER ID CHANGING LANGUAGES USING CLOSED CAPTIONING
E-MANUAL. imagine the possibilities
 E-MANUAL imagine the possibilities Thank you for purchasing this Samsung product. To receive more complete service, please register your product at www.samsung.com/register Model Serial No. Contents Channel
IPTV STB QUICK GUIDE. Detailed user manual download from www.my-home-television.com
 IPTV STB QUICK GUIDE Detailed user manual download from www.my-home-television.com Dolby Digital: Manufactured under license from Dolby Laboratories. Dolby and the double-d symbol are trademarks of Dolby
FPV MONITOR. User Manual
 FPV MONITOR User Manual Important Safety Instructions: Please read User Guide before using this product. Please keep User Guide for future reference. Please read the cautions to prevent possible danger
TRIAX ST-HD527 CI. Digital Combo set-top box 305013 / 305014
 TRIAX ST-HD527 CI Digital Combo set-top box 305013 / 305014 Copyright Not to be copied, used or translated in part or whole without prior consent in writing except approval of ownership of copyright and
E-MANUAL. Thank you for purchasing this Samsung product. To receive more complete service, please register your product at. www.samsung.
 E-MANUAL Thank you for purchasing this Samsung product. To receive more complete service, please register your product at www.samsung.com/register Model Serial No. Contents Quick Guides Using Smart Hub
E-MANUAL. imagine the possibilities
 E-MANUAL imagine the possibilities Thank you for purchasing this Samsung product. To receive more complete service, please register your product at www.samsung.com/register Model Serial No. Contents Channel
Fi TV Gold Quick Start Guide
 Quick Start Guide Fi TV Gold Quick Start Guide Welcome to Fi TV! We re happy that you chose EPB Fiber Optics to bring the best movies, sports, news and television programming into your home and we will
Welcome to life on. Get started with this easy Self-Installation Guide.
 Welcome to life on Get started with this easy Self-Installation Guide. Welcome to a network that s light years ahead. Welcome to life on FiOS. Congratulations on choosing Verizon FiOS! You re just a few
Getting to Know Xsight... 3. Home Screen and Everyday Use... 9. Settings... 11. PC Setup... 17. 2 www.oneforall.com
 User Manual English English Getting to Know Xsight........................................ 3 Unpacking and Setting Up Xsight............................................................. 3 Using Xsight
PDP-MONITOR (PLASMA DISPLAY PANEL)
") PDP-MONITOR (PLASMA DISPLAY PANEL) PPM42M5S PPM42M5H PPM50M5H PPM63M5H Owner s Instructions Before operating the unit, please read this manual thoroughly, and retain it for future reference. Intended for
PDP-MONITOR (PLASMA DISPLAY PANEL) PPM42M5S PPM42M5H PPM50M5H PPM63M5H Owner s Instructions Before operating the unit, please read this manual thoroughly, and retain it for future reference. Intended for
Connections and Setup
 12 Connections and Setup HOW TO CONNECT YOUR SATELLITE RECEIVER Use the information in this chapter to connect your receiver to other equipment. CONNECTING TO THE NEARBY HDTV (TV1) CONNECTING TO THE REMOTE
Using the System ORDER YOUR BELL EXPRESSVU PROGRAMMING. Page 3-1
 Using the System ORDER YOUR BELL EXPRESSVU PROGRAMMING This procedure notifies the Bell ExpressVu Customer Service Call Centre that your system is on-line and installed. You need to have your services
LED TV user manual. imagine the possibilities
 Contact SAMSUNG WORLDWIDE If you have any questions or comments relating to Samsung products, please contact the SAMSUNG customer care centre. Country Customer Care Centre Web Site EIRE 0818 717100 www.samsung.com/ie
E-MANUAL. Thank you for purchasing this Samsung product. To receive more complete service, please register your product at. www.samsung.
 E-MANUAL Thank you for purchasing this Samsung product. To receive more complete service, please register your product at www.samsung.com/register Model Serial No. Contents Quick Guide Using the Smart
Plasma TV user manual
 Contact SAMSUNG WORLDWIDE If you have any questions or comments relating to Samsung products, please contact the SAMSUNG customer care centre. Country Customer Care Centre Web Site EIRE 0818 717100 www.samsung.com
E-MANUAL. Thank you for purchasing this Samsung product. To receive more complete service, please register your product at. www.samsung.
 E-MANUAL Thank you for purchasing this Samsung product. To receive more complete service, please register your product at www.samsung.com/register Model Serial No. Contents e-manual Guide Viewing the e-manual
xxhfl3xx9 xxhfl5xx9 xxhfl7xx9
 xxhfl3xx9 xxhfl5xx9 xxhfl7xx9 Contents 10.1 Sources list 43 10.2 From standby 43 10.3 EasyLink 43 1 Setting up 4 1.1 1.2 1.3 1.4 1.5 Read safety 4 TV stand and wall mounting 4 Tips on placement 4 Power
series User Manual 28HFL5010T 32HFL5010T 40HFL5010T 48HFL5010T 55HFL5010T
 series User Manual 28HFL5010T 32HFL5010T 40HFL5010T 48HFL5010T 55HFL5010T Contents 1 Setting up 1.1 Read safety 3 1.2 TV stand and wall mounting 1.3 Tips on placement 3 1.4 Power cable 3 1.5 Antenna cable
Digital Television User Guide
 Digital Television User Guide Table of Contents THE HURONTEL HOME BUNDLE >> Finally you can receive Home Phone (with Calling Features), High Speed Fibre Optic Internet and 100% Digital TV including 1 Digital
COPYRIGHT TRADEMARKS
 COPYRIGHT This guide is proprietary to SAMSUNG Electronics Co., Ltd. and is protected by copyright. No information contained herein may be copied, translated, transcribed or duplicated for any commercial
User Manual I1010Q16DCZ
 User Manual I1010Q16DCZ Explanation, Note and Warning *Explanation: important information, which can help you better use your tablet PC. *Note: indicates that not observing the content may result in hardware
Using the INFO button (Now & Next guide)
") Using the INFO button (Now & Next guide) The display identifies the current channel and the status of certain audio-video settings. The Now & Next guide shows daily TV programme information for each channel
Using the INFO button (Now & Next guide) The display identifies the current channel and the status of certain audio-video settings. The Now & Next guide shows daily TV programme information for each channel
It s here a New Breed of TV entertainment.
 Quick Start Guide 1 2 It s here a New Breed of TV entertainment. Welcome to Fetch TV an exciting new television experience that puts you in control of the best TV, great movies, and popular interactive
Connections and Setup
 9242_14_Ch12_eng 6/11/07 9:36 AM Page 1 Connections and Setup HOW TO CONNECT YOUR SATELLITE RECEIVER Do you have a handful of cables and a head full of questions? This chapter is the perfect place to find
Receiver and Remote Controls
 9242_4_Ch2_eng 6/11/07 9:29 AM Page 1 2 Receiver and Remote Controls ABOUT YOUR SATELLITE RECEIVER This chapter helps you get to know your remote control, which lets you use all the functions of your receiver.
THE NEW GENERATION IN TECHNOLOGY. NI-3103A Alarm Clock w/fm Radio ipod & iphone Docking. Operating Instructions
 THE NEW GENERATION IN TECHNOLOGY NI-3103A Alarm Clock w/fm Radio ipod & iphone Docking Operating Instructions Table of Contents Important Safeguards... 3 Parts... 6 Controls... 6 To Set Up... 7 ipod/iphone
Digital Photo Picture Frame. Operation Manual
 Digital Photo Picture Frame Operation Manual 20070309 CONGRATULATIONS on your purchase of a Polaroid 7 LCD Digital Photo Picture Frame. Please read carefully and follow all warnings and instructions in
2005 by Mediacom Communications Corporation. All Rights Reserved. Mediacom Communications assumes no liability nor responsibility for the use of any
 2005 by Mediacom Communications Corporation. All Rights Reserved. Mediacom Communications assumes no liability nor responsibility for the use of any content, materials, or techniques included in this guide.
HDMI/DVI to VGA/Component & Audio Break out Converter
 HDMI/DVI to VGA/Component & Audio Break out Converter User Manual (HCV VA) All information is subject to change without notice. All names & trademarks are property of their respective owners. Rev.1002
VIZIO 120HZ E SERIES User Manual
 Dear VIZIO Customer, Congratulations on your new VIZIO High Definition LCD Television purchase. This User Manual covers E371VA, E421VA, E470VA and E550VA 120HZ series models, for any specific difference
/&' 79 7; /% ) &RORU 7HOHYLVLRQ (QJOLVK
 &RORU 7HOHYLVLRQ (QJOLVK") 245U Using the On Screen Displays Many features available on this TV can be accessed via the On Screen Display menu system. Use the remote control as shown below to access and adjust features as desired.
245U Using the On Screen Displays Many features available on this TV can be accessed via the On Screen Display menu system. Use the remote control as shown below to access and adjust features as desired.
BeoVision 7. Supplement
 BeoVision 7 Supplement On-screen menus This supplement contains corrections to the Guide and Reference book. The main corrections refer to the Onscreen menus, the CONNECTIONS menu and the socket panels.
Quick Start. Digital Satellite Receiver
 Quick Start Digital Satellite Receiver Support of SD (MPEG2), DVB-S system Slot for Smart Card in Conax system HDMI video output Low power consumption in Stand-by mode, below 1W Automatic Stand-By Compatible
HTT 101. HDMI/YPbPr/S-Video/AV to DVB-T. HDMI/YPbPr/S Encoder Modulator
 HTT 101 HDMI/YPbPr/S-Video/AV to DVB-T HDMI/YPbPr/S DVB Encoder Modulator TABLE OF CONTENTS 1. SPECIFICATIONS... 3 1.1 Product Overview... 3 1.2 Appearance and Description... 3 1.3 System Diagram... 4
TX-58DX902B TX-65DX902B TX-50DX750B TX-58DX750B TX-65DX750B TX-40DX700B TX-50DX700B TX-58DX700B. e HELP. English
 TX-58DX902B TX-65DX902B TX-50DX750B TX-58DX750B TX-65DX750B TX-40DX700B TX-50DX700B TX-58DX700B e HELP English Read first ehelp How to use 13 Features 4K resolution 14 Home Screen 15 Info Frame 16 Touch
Digital Satellite Receiver
 USER GUIDE Digital Satellite Receiver Models DSR207, DSR317, DSR505, and DSR530 CONTENTS IMPORTANT SAFETY INSTRUCTIONS...1 DSR BASICS SYMBOLS/ICONS...6 Front Panel...6 Back Panel...7 CONNECTING YOUR DSR...10
PLL2210W LED LCD Monitor
 PLL2210W LED LCD Monitor USER'S GUIDE www.planar.com Content Operation Instructions...1 Safety Precautions...2 First Setup...3 Front View of the Product...4 Rear View of the Product...5 Quick Installation...6
HD udta Quick-Start Guide
 HD udta Quick-Start Guide Vyve Broadband HD Set-Top Box Important Safety Instructions 1. Read these instructions. 2. Keep these instructions. 3. Heed all warnings. 4. Follow all instructions. 5. Do not
Important HP Media Center PC Updates
 Important HP Media Center PC Updates Your system uses Microsoft Windows XP Media Center Edition 2005. Before starting the system and using the Media Center setup wizard, please read this updated information
Charter Digital Cable and Charter HD Easy Install Guide
 Charter Digital and Charter HD Easy Install Guide Your guide to installing and setting up your Charter HD and Digital Charter Digital and Charter HD Easy Install Guide -888-GET CHARTER (-888-8-7) charter.com
SP1790JK 900MHz Wireless Indoor/Outdoor Speakers. User Manual INTRODUCTION FEATURES IMPORTANT SAFETY INFORMATION
 SP1790JK 900MHz Wireless Indoor/Outdoor Speakers INTRODUCTION This 900 MHz digital hybrid wireless speaker system uses the latest wireless technology that enables you to enjoy music and TV sound anywhere
For assistance, call 877-MYVIZIO (877-698-4946) or e-mail us at www.vizio.com.
 or e-mail us at www.vizio.com.") Dear VIZIO Customer, Congratulations on your new VIZIO XVT423SV/XVT473SV/XVT553SV television purchase. To get the most out of your new VIZIO HDTV, read these instructions before making any adjustments,
Dear VIZIO Customer, Congratulations on your new VIZIO XVT423SV/XVT473SV/XVT553SV television purchase. To get the most out of your new VIZIO HDTV, read these instructions before making any adjustments,
E-MANUAL. Thank you for purchasing this Samsung product. To receive more complete service, please register your product at. www.samsung.
 E-MANUAL Thank you for purchasing this Samsung product. To receive more complete service, please register your product at www.samsung.com/register Model Serial No. Contents Quick Guides Using Smart Hub
Single Day Alarm Clock with. Bluetooth and USB Play-through
 Single Day Alarm Clock with Bluetooth and USB Play-through MODEL : BSC 200 READ THIS INSTRUCTION MANUAL BEFORE OPERATING THE APPLIANCE. SAVE THIS MANUAL FOR FUTURE REFERENCE. TABLE OF CONTENTS IMPORTANT
Harmony Ultimate One User Guide
 Harmony Ultimate One User Guide Version 1 (2014-02- 11) Harmony Ultimate One User Guide Ultimate One Table of Contents About this Manual... 6 Terms used in this manual... 6 At a Glance... 6 Features...
24 Wide Screen LED Monitor with HDMI
 24 Wide Screen LED Monitor with HDMI USER MANUAL L24LE11B_MANUAL_EN_R1 Please read this manual carefully before using, and keep it for future reference. TABLE OF CONTENTS GETTING STARTED Monitor Stand
Table of Contents. System Requirement of MP3 Player:... 4. Connection and Downloading... 7. Downloading DRM10 Files... 8.
 Table of Contents Instructions... 1 Precautions... 2 System requirements... 4 System Requirement of MP3 Player:... 4 Introduction... 5 Features... 5 Charging the Battery... 6 Connection and Downloading...
VFS24/32HDIP. Public Display IP Monitor User Manual
 VFS24/32HDIP Public Display IP Monitor User Manual 2 Contents Before You Begin...4 Side Panel Control buttons...6 Connections...7 OSD Function...7 LCD monitor Mounting Guide...9 Getting started... 10 Power
55" 1080p LED Television PLED5529A-B
 PROSCAN 55" 1080p LED Television PLED5529A-B Contents Contents Caution Safety Information Unit and Accessories 2 3 4 Introduction 5-9 1. Front View 5 2. Rear View 6 3. Instruction for Wall Mount 7 4.
High Definition LCD TV. Kogan HD32 USER MANUAL
 High Definition LCD TV Kogan HD32 USER MANUAL Safety information To ensure reliable and safe operation of this equipment, please read carefully all of the instructions in this user guide, especially the
CINEMATE 1 SR DIGITAL HOME THEATER SPEAKER SYSTEM. Operating Guide Guía del usuario Guide d utilisation
 CINEMATE 1 SR DIGITAL HOME THEATER SPEAKER SYSTEM Operating Guide Guía del usuario Guide d utilisation Notice This equipment has been tested and found to comply with the limits for a Class B digital device,
EV-8000S. Features & Technical Specifications. EV-8000S Major Features & Specifications 1
 EV-8000S Features & Technical Specifications EV-8000S Major Features & Specifications 1 I. General Description EV-8000S is fully compliant with the international DVB standard and thus transmits digital
VIDEO DOOR PHONE SYSTEM
 ENGLISH VIDEO DOOR PHONE SYSTEM USER MANUAL Manual covers IH-692 Master and IH-692 Slave Monitors PRECAUTIONS BEFORE INSTALLATION Connect this unit ONLY to other compatible units. Do not connect it to
CABLE ONE ALL DIGITAL
 CABLE ONE ALL DIGITAL The world is going All Digital and so is Cable ONE. With the switch from analog to digital technology, Cable ONE will be able to add new channels, especially more HD channels, and
RCN DIGITAL CABLE USERS GUIDE
 RCN DIGITAL CABLE USERS GUIDE WELCOME Congratulations! Thanks to your new Digital Cable Service, you now have access to the most cutting-edge cable television services available, only from RCN. At RCN,
USER GUIDE 32" 50" CLASS. Full HD LED 1080p TV LC-32LB370U/LC-50LB370U. (31.5" Diagonal) (49.7" Diagonal) 1080p
 (49.7 Diagonal) 1080p") LC-32LB370U/LC-50LB370U Full HD LED 1080p TV USER GUIDE 32" 50" CLASS (31.5" Diagonal) (49.7" Diagonal) 1080p Before using your new product, please read these instructions to prevent any damage. Contents
LC-32LB370U/LC-50LB370U Full HD LED 1080p TV USER GUIDE 32" 50" CLASS (31.5" Diagonal) (49.7" Diagonal) 1080p Before using your new product, please read these instructions to prevent any damage. Contents
KTC-D500E DIGITAL TV TUNER
 KTC-D500E DIGITAL TV TUNER INSTRUCTION MANUAL C B64-3808-00/00 (E) Contents Safety precautions 3 Notes 4 Getting Started 5 Switching to Digital TV Screen ÅıÇ 5 Functions During Digital TV Screen Åı 5 Functions
Contents. e-manual Guide. Getting Started. ARC (Audio Return Channel) Viewing the e-manual. Computer Connection. Smartphone Connection
 Viewing the e-manual. Computer Connection. Smartphone Connection") SMART TV E-Manual Contents e-manual Guide Viewing the e-manual 1 Scrolling a Page 1 Using the Top Icons 1 Returning to the Home Page 1 Searching the Index 2 Searching Pages 2 Closing the e-manual 2 Jumping
SMART TV E-Manual Contents e-manual Guide Viewing the e-manual 1 Scrolling a Page 1 Using the Top Icons 1 Returning to the Home Page 1 Searching the Index 2 Searching Pages 2 Closing the e-manual 2 Jumping
Safety Instructions 1 Product Overview 2 Remote Control Unit 4 Set-top box Connections 6 Inserting CI Module & Smartcard 8
 CONTENTS PART I : INSTALLATIONS Safety Instructions 1 Product Overview 2 Remote Control Unit 4 Set-top box Connections 6 Inserting CI Module & Smartcard 8 PART II : MENU GUIDE Menu Map 9 Search Channels
Satellite HD Digital Television Recorder. User s Manual FOXSAT-HDR. The default password is 0000.
 Satellite HD Digital Television Recorder FOXSAT-HDR The default password is 0000. Notice Thank you for purchasing a Humax Foxsat-HDR (Digital Television Recorder) Your Foxsat-HDR supports freesat+ provided
User Manual 32PFH5300 32PFT5300 40PFH5300 40PFT5300 50PFH5300 50PFT5300
 Register your product and get support at series www.philips.com/welcome User Manual 32PFH5300 32PFT5300 40PFH5300 40PFT5300 50PFH5300 50PFT5300 Contents 1 My new TV 12 Games 1.1 Smart TV 3 1.2 App gallery
E-MANUAL. Thank you for purchasing this Samsung product. To receive more complete service, please register your product at. www.samsung.
 E-MANUAL Thank you for purchasing this Samsung product. To receive more complete service, please register your product at www.samsung.com/register Model Serial No. Contents Quick Guides Using Smart Hub
19 LCD TV + DVD. User Guide 1923DT. After Sales Support
 19 LCD TV + DVD User Guide 1923DT After Sales Support Now that you have purchased a quality Tevion product you can rest assured in the knowledge that as well as your 3 year parts and labour warranty you
User Manual S27D850T S32D850T
 User Manual S27D850T S32D850T The color and the appearance may differ depending on the product, and the specifications are subject to change without prior notice to improve the performance. BN46-00424A-02
Contents of the Guide
 BeoCenter 1 Guide Contents of the Guide 3 The following is an index to the contents of the separate Reference book with page references: How to set up BeoCenter 1, 4 Connect your TV cables, 5 Connect
Quick Start Guide English
 Quick Start Guide 1. Checking Accessories Quick Start Guide User s Manual Remote Control & Batteries Manual & Quick Start Guide HUMAX Wi-Fi USB Adapter (Supplied with HDR-2000T/1TB/WD) HDMI Cable Ethernet
Digital Cable TV. User Guide
 Digital Cable TV User Guide T a b l e o f C o n T e n T s DVR and Set-Top Box Basics............... 2 Remote Playback Controls................ 4 What s on TV.......................... 6 Using the OK Button..................
46 FHD LED TV USER MANUAL 46GSR3000. www.polaroidhdtv.com. www.polaroidhdtv.com USA:1-888-636-8599 USA:1-888-636-8599
 46 FHD LED TV 46GSR3000 USER MANUAL USA:1-888-636-8599 www.polaroidhdtv.com USA:1-888-636-8599 www.polaroidhdtv.com 2013 Empire Electronic Corporation. www.polaroidhdtv.com www.polaroidhdtv.com User Warranty
E-MANUAL. Thank you for purchasing this Samsung product. To receive more complete service, please register your product at. www.samsung.
 E-MANUAL Thank you for purchasing this Samsung product. To receive more complete service, please register your product at www.samsung.com/register Model Serial No. Contents e-manual Guide Viewing the e-manual