FluidSurveys v3.0. Instructions Manual
|
|
|
- Beverly Ross
- 10 years ago
- Views:
Transcription
1 FluidSurveys v3.0 Instructions Manual

2 This document is dedicated to all the clients that make FluidSurveys great :) Thank you
")
3 CONTENTS Introduction: How To Read This Manual : Creating An Online Survey How To Create An Online Survey : Creating Multi Page Surveys : Adding Pages to a Survey Re-arranging pages in a survey : Moving and Duplicating Questions : Moving Questions on a Page Moving Questions Between Pages Duplicating Questions Within a Survey : Using the Rich Text Editor : Inserting HTML into Your Survey : Inserting HTML into a Survey Obtaining HTML Code : Inserting an Image into a Survey : Inserting an Image Using the Visual Editor inserting an image using html : Inserting Videos into a Survey : Adding Multiple Languages to your Survey : Adding Languages to a Survey Translating a Survey Translating With the Bulk Interface Publishing Options for Multi-Lingual Surveys : Restoring Previous Versions of your Survey : Restoring an Entire Survey partially restoring a survey : Duplicating your Survey : Exporting your Survey Questions : Using the Bulk Editor Using Pre-Existing Bulk Lists... 34

4 12.2 Saving Custom Bulk Lists : Creating Survey Templates : Question Morphing : Finding and Replacing Text : Spell Check Spell Check Using Google Chrome, Microsoft Internet Explorer and Mozilla Firefox Online Spell Checkers : Change Text on Thank You, Quota Reached and Other Pages : Survey Name, Title & Description : Survey Name Survey title Survey Description : Change Button Text : Copying Questions from another Survey : Finding your Questions (Question List) : Pasting From Microsoft Word Pasting Directly Into the Editor Using the Paste from Word Feature in the Visual Editor : Creating an Introduction/Terms and Conditions Page : Thank you page : Changing Text of Thank you Page : Redirecting Users to an External Thank You Page : Question Numbering : Adding a Comment Box to Any Question Implementing An Other, please specify Choice Appending a Text Box to a Question : Validation Setting Up Validation For Text Response Questions Setting Up Validation For Text Response Grid Questions Character Limits Limit Values Error Messages... 50
... 42 22: Pasting From Microsoft Word... 43 22.1 Pasting Directly Into the Editor... 43 22.2 Using the Paste from Word Feature in the Visual Editor.")
5 27.6 Initial Values/Pre-Populating Text fields : Timed Surveys : Are There Limitations in Text Response Questions : Display Options : Display Side-By-Side grid questions : Upgrading Your Account & Pricing Plans : Role Management Groups : Changing Your Password : Changing Your Username & : Reporting Overview : Deleting Test Data : Exporting Survey Results : Response Viewer : Creating Crosstabs : Survey Statistics : Starting a Blank Report : Exporting Your Survey to PDF/Word : Filters : Means/Variance/Frequencies : Calculation of Percentages : Grouping Charts : Multi-Lingual Reports : Exporting to SPSS : Terminated Responses : Quota Reached : % Completion How is it Calculated? : Editing Responses Themer Insert Logo Progress Bar Modifying CSS... 89

6 57 Template Grabber (Advanced) Style for Specific Question Side by Side Display Append to Previous Applying a Theme : Basic Skipping : What is Basic Skipping? What is the difference between basic and advanced skipping? Tutorial: Example of basic skipping Checking what skip logic exists on a page Skipping based on multiple choice and dropdown questions Resetting simple skipping : Advanced Branching (part 1) : What is Advanced Branching? Tutorial Advanced Branching using two multiple choice Questions Multiple branching conditions : Advanced Branching (part 2) : Tutorial: Advanced Branching with Checkbox Questions RE-arranging branching conditions using drag and drop : Piping : What is Piping? Tutorial: Example of using piping : Piping from a multiple choice question (radio button) Piping From a Checkbox Question Piping in Custom Fields from Your Address Book : Looping : What is Looping? Tutorial: Example of Using Looping : Piping From the Point of View in Analytics : Looping (part II) : Tutorial: Example of Using Looping : Looping (part III)
... 111 64.")
7 68.1: Tutorial: Example of Using Looping : Constant Sum : What is Constant Sum? Tutorial: Example of using constant sum : Extraction : What is Extraction? Tutorial: Example of Using Extraction : Dynamic Quotas : What are Dynamic Quotas? Tutorial: Example of using constant sum : Unconditional Skips : What is Unconditional Skipping? : Me Action : What is an Me Action? : Skipping to Random Page : What is skipping to a Random Page? Tutorial: Example of using skipping to a random page : Hide/Disable Questions : What is Hide/Disable Questions? Tutorial: Example of hide/disable questions : Current Score : What is Current Score? Tutorial: Example of how to use current score : Skipping to a Question : What is skipping to A Question? Tutorial: example of how to skip to a question : Page Labels : What are Page Labels? : Tutorial: how to use page labels : Randomize Questions on a Page : What is question randomization? Tutorial: how to use randomize questions on a page

8 80: Show Branching/Skipping Info : What is Show Branching/Skipping Info? : Tutorial: How to use show branching/skipping : How to Create a Quiz What is a Quiz? Create a Quiz : Showing Correct Answers to a Respondent : Tutorial: How to show correct answers : Giving a Grade : Allow Respondents to Download Responses : Creating a Poll & 87: Embedding Poll into Website : Poll Publishing Options : Making Your Survey Live How to Make a Survey Live Modifying a Live Survey : Deleting Your Test Data How to delete test data : ing Your Survey Link Sending Out Your Survey Link Customizing Your Survey Link : Using Get Variables as Collectors/Channels : Popup Surveys Exploring the pop-up tool & 95: Embedding Your Survey (part 1) : Where can I find the IFRAME to embed code? : Sharing Your Survey on Twitter/Facebook and more : Kiosk Mode (great for ipads, Laptops, Touchscreen Devices) : Your Survey URL in Different Languages : Invites (Part 1 Sending Invites) : What is the Survey Invitation Tool? what do survey invitations contain?

9 99.3 Tutorial: Composing a Survey Invitation Sending invitations Adding Contacts Individually : Invites (Part 2 Sending Reminders) : Invites (Part 3 Importing Contacts) : Invites (Part 4 Custom Variables) : Invites (Part 5 Collectors/Channels) : Invites (Part 6 Creating Lists & Address Book) : Invites (Part 7 Unsubscribe) : Creating Invite Codes : How are invite codes distributed? : Invite Only Surveys What are invitation only surveys? Creating and Distributing Invite Codes with the Invite Tool Creating and distributing invite codes without the invite tool : Anonymous Surveys Creating an Anonymous Survey : Invites and Save & Continue Later Option : Multi-mode Surveys : Telephone Surveys : Paper Surveys Paper to Online Online to paper : Removing the Back Button How to Remove the Back Button : Save and Continue Later Activating Save and Continue Accessing a saved survey Recovering a Lost Link : Allow User to Download Responses Enabling the download responses feature : Clear Page & Save Page Buttons

10 116.1 Enabling Clear & Save Page Buttons : Exit Survey Button Enabling the Exit Survey Button : Allow Users to Review Responses Enabling the Review Responses Feature : Allow Users to Edit their Responses Enabling the edit responses feature : Auto Selection of Checkboxes How to Set Auto Selection of Checkboxes : Enabling SSL How to enable ssl : Capture IP Address & respondent location How to capture ip addresses and respondent location : Survey Quotas Implementing a Survey Quota Changing the quota filled message Implementing a quota redirect : Survey Start & End Dates : Redirecting Users to different pages : What is Redirection? redirection when a survey is terminated redirection when a survey is completed Redirection when a quota has been reached : Integration with Panels Implementing Integration with Panels : Put a Password on Your Survey : Using a master password (Access code) : Individual passwords (invite codes) : Survey Mode (once per computer, ETC ) Many Times Per Computer (No Restriction) Once Per Computer (Uses Cookies/Sessions to Identify Users) Once Per location (Restricted To One IP Address)

11 128.4 Embedded Survey Invite Codes : Receiving Notifications via Notifications based on branching conditions Notifications of Completed Submissions : Meta Tags : Changing/Translating Error Messages : Changing/Translating Standard Pages : How to Change/Translate Standard Pages : Changing/Translating Default Button Text : Section Header Exploring Section Separators Customize the Section Separator question type : Yes/No Exploring Yes/No Customize the yes/no question type : Text Response Exploring Text Response Customize the Text response question type : Checkbox Exploring Checkbox Customize the Checkbox question type : Multiple Choice Exploring Multiple Choice Customizing the multiple choice question type : Dropdown Exploring Dropdown Customizing the Dropdown Question Type : Date/Time Exploring Date/Time the forms of the date/time question type : Text Response Grid

12 141: Text Response Grid Exploring Text Response Grid the forms of the Text response grid question type : Multiple Choice Grid Exploring Multiple Choice Grid : Dropdown Grid Exploring Dropdown Grid Customizing the dropdown grid question type : Checkbox Grid Exploring Dropdown Grid Customizing the checkbox grid question type : N-atrix Question Exploring Dropdown Grid Customizing the N-Atrix question type : 3d Matrix Question Exploring 3D Matrix Customizing the 3d matrix question type : Side-by-Side Matrix (Gap Analysis) Exploring Side-By-Side Matrix Customizing the side-by-side matrix question type : Side-by-Side Matrix Advanced Exploring Side-By-Side Matrix Customizing the side-by-side matrix question type : Spreadsheet Question Exploring Spreadsheet Customizing the spreadsheet qusetion type : Constant Sum Question Exploring Constant Sum Customizing the constant sum question type : Score Display Exploring Score Display Customizing the score display question type
... 273 147.")
13 152: Ranking Question

14 INTRODUCTION: HOW TO READ THIS MANUAL Tips: Tips will use this shape and color and will give you some extra info that may be helpful to you when using the software. Tutorials: Most chapters will have a tutorial section that will guide you through an example. The explanation of what the tutorial will cover will take on this shape and color. FYI: These are For Your Information sections and will take on this shape/color. These sections will provide additional information that expands upon what was already discussed. Explanation: You ll occasionally see that in the middle of a tutorial or some other section, we will insert an explanation to explain something in more detail that is relevant to the section.


15 1: CREATING AN ONLINE SURVEY FluidSurveys provides users with a simple do it yourself platform to create online surveys & polls, gather responses and analyze data. With no software to download, an easy to use drag & drop interface and an extremely rich feature base, FluidSurveys is the ideal tool for online research. 1.1 HOW TO CREATE AN ONLINE SURVEY Creating a survey is an extremely easy process. Once you ve signed up for an account, you ll be taken directly to your dashboard. You ll see the dashboard every time you log in, and it ll display all of the surveys you have created along with their status and links to edit, style, preview, publish and analyze. Explanation 1.1: A survey that is set to live can collect responses, while a survey that is closed can only be viewed by the administrator. For a tutorial on how to set your survey to live, click here. Edit allows you to add or modify questions within the survey, Style allows you to customize the visual appearance of your survey, Preview allows you to see what your survey will look like to respondents and submit test responses, Publish allows you to deploy your survey and edit publishing and privacy settings and Analyze allows you to perform analysis on your data. When you first sign up, however, your dashboard will be empty. To create your first survey, click on the Add a Survey button.


16 FYI 1.1: If you d like to create a one question poll, click on the Go to Polls button at the bottom right. A poll is a multiple choice question that you can embed into a website. Once you select Add a Survey, you ll be asked to enter a name for your survey. Then, after clicking Create New Survey, you ll be taken to your survey editor. On the left side is you ll see your editor, where all of the question types are listed. They re separated into two sections, Basic and Advanced. On the right is your survey.

17 To add a question, simply drag it from the editor and into your survey. You can add questions in any order, and re-arrange them by using the same click-and-drag technique. When a question is selected, you can edit its contents using the left side editor. You can edit the question title, add an extra description (will appear under the title), modify choice options, add branching conditions, change display settings, etc. Once you ve added all of your questions, click on the save button at the bottom or top of your survey. You can always preview what your survey will look like by clicking on the Preview icon at the top of your screen. Note that the administrator toolbar will only appear to you when you re logged in, not to your respondents.

18 2: CREATING MULTI PAGE SURVEYS 2.1: ADDING PAGES TO A SURVEY To add a page to your survey, click on the plus sign at the bottom of your survey editor. A new page will be added directly after the current page. 2.2 RE-ARRANGING PAGES IN A SURVEY To re-arrange already existing pages in a survey, click on the page number and drag it to a new location. Tips 2.1: If your survey is going to contain branching, make sure to finalize the location of your pages before adding your conditions. Re-arranging or adding pages into your survey after branching has been implemented can compromise the integrity of the branching.


19 3: MOVING AND DUPLICATING QUESTIONS 3.1: MOVING QUESTIONS ON A PAGE With FluidSurveys drag and drop interface, it s extremely easy to move questions around on a particular page. All you have to do is select a question and drag it to a new location. 3.2 MOVING QUESTIONS BETWEEN PAGES


20 To move a question to a different page, right click on the question and select the Move To option. You will then be able to move the question to any page in the survey. It will be added to the bottom of the page you select, but you could then drag it anywhere you d like. FYI 3.1: You can also move a question by right clicking, selecting Cut and the pasting it into the new location. 3.3 DUPLICATING QUESTIONS WITHIN A SURVEY In the case that you want to leave a question in its original location but also include it somewhere else, you can duplicate it. Right click on the question, select copy and it ll be added to your clipboard so you can paste it anywhere you d like. FYI 3.2: In addition to copying and pasting questions within a survey, you can also copy a question and paste it into a new or different survey.


21 4: USING THE RICH TEXT EDITOR FluidSurveys rich text editor allows you to easily add styling to your text, insert pictures, multimedia and links into your survey, paste from Microsoft Word, etc. The rich text editor can be used when editing the survey/question title or survey/question description. To access the editor, click on the Edit HTML link that appears when trying to edit one of the fields mentioned above. The visual editor appears as a typical text editor, with actions and commands located at the top. Any changes made in the visual editor will appear in your survey.
22 TIP 4.1: If you are pasting content into your survey from Microsoft Word, it s strongly recommended that you make use of the visual editor and not paste directly into the title or description field (in the main survey editor). Microsoft Word text includes characters are not readable by FluidSurveys unless they are first processed through the visual editor. If they are simply pasted directly into the title or description field, they could slow down the loading or your survey or cause freezing.

23 5: INSERTING HTML INTO YOUR SURVEY 5.1: INSERTING HTML INTO A SURVEY HTML can be inserted directly into your survey editor, be it into a question title, description or choice field. The changes will automatically be visible in the adjoining survey. 5.2 OBTAINING HTML CODE If you re familiar with HTML code, you can insert it directly into the survey editor. However, if you re not as comfortable, you can still obtain the proper code to style choice/variable fields using the visual editor. Tutorial 5.1: In this tutorial, we ll make the choices in a multiple choice question appear bold and underlined. Typically, if we wanted to style text in a survey, we d use the visual editor. However, with question choices, this option doesn t exist. The HTML has to be entered directly into the field. If you re familiar with HTML, this shouldn t be a problem. If that s not the case, you ll have to obtain the proper code through other means. Step 1 First, create a multiple choice question with 3 choices. Step 2 To find out the HTML code required to make a choice appear bold, copy and paste the text from one of the choice fields into the extra description box. Then, select Open Visual Editor. Step 3 Apply the desired changes to the styling of the text using the visual editor, and then select the View Source button. You ll be provided with the proper HTML code to bold and underline a line of text. Paste the resulting code into the
24 Choice 1 field, and duplicate the code for the second choice. You can use this same method for any other styling code.


25 6: INSERTING AN IMAGE INTO A SURVEY 6.1: INSERTING AN IMAGE USING THE VISUAL EDITOR To insert an image into the survey title or survey description, or into a question title or question description, you can use the visual editor. The process is very simple. First, open the visual editor. Then, click on the Insert Image button from the top navigation bar menu. A pop-up will appear where you can insert the link to your image. You ll also be able to modify the size of your image, add a border or set its alignment. Explanation 6.1: In order to include an image within your survey, it will have to be hosted online. Good free hosting tools include imageshack.us and photobucket.com. Using these, you ll be able to upload your image and will be provided with a URL which you can insert into the editor.

26 6.2 INSERTING AN IMAGE USING HTML It s also possible to insert an image directly into the survey editor using HTML code. This is particularly useful if inserting in an image to be a question choice or variable, as the visual editor is not available for these fields. It s first necessary to obtain the URL of your image. To do so, it must be hosted online, either on a personal server or a free image hosting site (imageshack.us or photobucket.com). Once the image has been hosted and the URL obtained, the address can be entered into the following code: <img src= > The URL of the image would be inserted between the quotation marks, and the entire line of code would simply be entered into the desired field in the survey editor.

27 7: INSERTING VIDEOS INTO A SURVEY Videos hosted on 3 rd party websites (YouTube, Vimeo, etc) or videos hosted on your own server can be easily inserted into a survey. It s first necessary to obtain the embed code for the video. On YouTube, for example, this can be found under the video once you click the embed button. Once this code has been obtained, simply copy and paste it into the survey editor, be it into a question description, title, choice or variable, and the video will appear in the survey

28 8: ADDING MULTIPLE LANGUAGES TO YOUR SURVEY FluidSurveys allows you to quickly and easily create surveys in multiple languages. 8.1: ADDING LANGUAGES TO A SURVEY To add a language, or multiple languages, to your survey, click on the survey languages icon. A dialog box will appear where you can select the languages you d like your survey to include. To add a language, simply move it from the Available Languages side to the Selected Languages side using the arrows. FYI 8.1: You can use this same method to remove languages from a survey, only you d move languages in the opposite direction. 8.2 TRANSLATING A SURVEY Once languages have been added to a survey, they ll be listed in the dropdown box at the top of the editor. This allows you to toggle between languages quickly and easily. Each language will be a different version of the survey, so you can first compose your questions in English, then switch over to French using the dropdown, and translate them into French. Your survey would then become bilingual, and a participant would be able to choose whether they want to view it in English or French.

29 Tips 8.1: It s necessary to save your survey before switching languages. 8.3 TRANSLATING WITH THE BULK INTERFACE The bulk interface allows for the easy translating of lists, which can be particularly useful if there are many multichoice questions within the survey. The bulk interface can be used anytime a question includes a list of options, be it choices, rows or columns. Selecting bulk allows you to quickly add a list of options or variables to a question, with each line representing a new choice, row or column. The list can be translated to the other languages you ve enabled directly in the menu. FYI 8.2: It s extremely important that the choices of a question are in the same order in each version of the survey. Results are tabulated based on the location of a choice. If a choice is in one spot in the English version and then the same choice is in a different spot in the French version, the data will not be collected properly.
30 8.4 PUBLISHING OPTIONS FOR MULTI-LINGUAL SURVEYS Multi-language surveys can be deployed using a generic or language specific URL. If a generic URL is used, the respondent would be taken to the survey with the default language (the first language listed in the dropdown box). With a language specific URL, the respondent would be taken to the survey with the language listed in the web address. The various URL s can be generated on the Publishing screen, using the language dropdown box. FYI 8.3: The respondent can change languages at any point in the survey, regardless of which URL they used to gain access.

31 9: RESTORING PREVIOUS VERSIONS OF YOUR SURVEY FluidSurveys allows you to restore previous versions of your surveys. This can be very useful in the case that accidental deletions or unwanted changes are made. 9.1: RESTORING AN ENTIRE SURVEY To view and revert to a previous version of your survey, click on the View Previous Versions link at the top of the editor. A dialog will then appear listing all of the saved versions of the survey. Up to 50 versions will be available. You can first view the different versions, and if you d like to restore your survey to one of the previously saved version, click revert. 9.2 PARTIALLY RESTORING A SURVEY A situation may arise where you only want to restore parts of a survey, perhaps one or two questions. In that case, first click on the View Previous Versions link at the top of the editor. A dialog will appear with up to 50 previously saved versions. Select one, and click the View button. This will bring up a new window showing that version of the survey. You can then right click on any question, copy it, and then paste it into your actual survey.

32 10: DUPLICATING YOUR SURVEY To duplicate an existing survey, select Duplicate under the Other Actions dropdown in your account menu. A new survey will then be created with the same name, along with the phrase copy. You can change the survey name in the editor.

33 11: EXPORTING YOUR SURVEY QUESTIONS FluidSurveys allows for the export of survey questions into.doc or.pdf files. To do so, select Export from the Other Actions dropdown in your account menu. You can also access the export menu by going to the Analytics section on selecting Export from the top right. You ll then have the option of exporting the survey questions into a.doc or.pdf file. With.DOC files, the questions will remain editable and you will be able to modify the titles/formatting in a word editor. You can specify advanced options for the PDF export (show branching conditions, looping information, etc) by clicking on Show Advanced Options and checking off the desired options.

34 12: USING THE BULK EDITOR In the case that you have a long list of choices or variables, or a list that you ll be re-using often throughout the survey, it may be useful to use the bulk feature. The bulk editor automatically converts lists into choices/variables/rows, while giving you the option of saving them for use on any future question USING PRE-EXISTING BULK LISTS To access the bulk interface, click on the Bulk button when adding choices, variables, rows or columns to a question. A dialog will appear where you can enter a list. Each line will represent a choice, variable, row or column, so it s important that each item in the list is entered on a separate line. Presets, a variety of often used lists, are also included in the bulk editor. These can be accessed via the Load preset or saved bulk dropdown. Once you ve selected a preset, the list will appear in the white text box, where it can be edited. When finished, click Apply and it will be converted into a set of choices, variables, rows or columns SAVING CUSTOM BULK LISTS To create a custom bulk list, click on the Bulk button when adding choices, variables, rows or columns to a question. Once the dialog appears, write or paste your list into the text field. Make sure that each item in the list is on a separate line. Then, enter a name for your list and click apply.

35 Once saved, this bulk list will be available for use on any other question in any survey on your account. It will be placed in the Load preset or saved bulk dropdown for easy access.

36 13: CREATING SURVEY TEMPLATES It s possible to create templates from existing surveys, allowing them to be re-used in the future. To do so, open the survey from which you d like to create the template, and click on the Survey tab in your editor. Then, select Save Template. All of the questions and branching conditions will be saved in the template. The next time you create a survey, you ll have the option of using the template. FYI 13.1: If you re using a multi-user account, you can create templates and share them with others.

37 14: QUESTION MORPHING Question morphing allows you to quickly transform one question type into another without having to re-enter all of the question information, or re-create the question. To morph a question, right click on it and select Change Question Type. Then, choose the question type you d like to use and hit Morph Field.

38 15: FINDING AND REPLACING TEXT FluidSurveys includes a Find & Replace feature which can automatically locate and replace text or phrases within a survey. To use this feature, click on the Find & Replace icon at the top of the editor. A dialogue will appear allowing you to specify which text to locate, and what to replace it with. You can also specify where the changes should be made, be it in the entire survey, on just one page, or for selected (highlighted) questions.
39 16: SPELL CHECK FluidSurveys does not have a built in spell check function, however, it is still possible to spell check your survey SPELL CHECK USING GOOGLE CHROME, MICROSOFT INTERNET EXPLORER AND MOZILLA FIREFOX Google Chrome ( and Mozilla Firefox ( are two browsers with a spell check function. Using these, spelling errors will be caught within FluidSurveys and you ll be able to fix them with a simple right click ONLINE SPELL CHECKERS Another option would be to run your survey URL through an online spell checker, such as Make sure that your survey is set to live before using these tool. 17: CHANGE TEXT ON THANK YOU, QUOTA REACHED AND OTHER PAGES [Link to 131]

40 18: SURVEY NAME, TITLE & DESCRIPTION 18.1: SURVEY NAME When you first create a survey, you are prompted to enter a survey name. This is the name under which the survey will be stored in the database, and what will be included in your survey URL. After you ve created your survey, you can modify your survey name by choosing Rename from the Other Actions dropdown SURVEY TITLE The survey title is what is shown to respondents when they re submitting responses. When a survey is first created, the survey title is inherited from the survey name. It can be modified by clicking on the survey tab at the top of the editor. The survey title will appear at the top of every page SURVEY DESCRIPTION The survey description is shown under the title, at the top of every page of the survey. It can be modified by clicking on the Survey tab in the editor.
41 19: CHANGE BUTTON TEXT [Link to 133] 20: COPYING QUESTIONS FROM ANOTHER SURVEY A situation could arise where it s necessary to copy a question from one survey to another. FluidSurveys makes this very simple. As soon as you copy a question (right click and select copy), it is added to the clipboard and can be pasted into any survey. Tip 20: To make this process even easier, you could open the two surveys in two separate tabs or windows, and simply move questions between them using copy/paste.

42 21: FINDING YOUR QUESTIONS (QUESTION LIST) The FluidSurveys editor is equipped with a Question List allowing you to quickly view, and navigate to, every question in the survey. This is particularly useful for very long surveys where it would be extremely time consuming to search for a specific question page by page.

43 22: PASTING FROM MICROSOFT WORD Microsoft Word includes unique code in their text, causing problems when it is pasted directly into FluidSurveys visual editor. It can reduce the speed of your survey or prevent it from being saved. However, there are several methods to paste content from Microsoft Word into FluidSurveys problem free PASTING DIRECTLY INTO THE EDITOR One way to get around the problem is to paste the text directly into the fields of the survey editor instead of using the visual editor. With this method, none of the code unique to Word would be inserted, eliminating any problems and slowdowns. However, all formatting (styling, paragraphs, bullets, etc) would be lost, so it will be necessary to reformat the text manually USING THE PASTE FROM WORD FEATURE IN THE VISUAL EDITOR In order to maintain the text s formatting and ignore Word s unique code, the Paste from Word feature in the visual editor can be used. To open the visual editor, select the desired field in which you d like to insert text and click on the Open Visual Editor link. The Text editor will pop-up, allowing you to enter and style text. Don t paste the content from Word directly into the text field. Instead, select the Paste from Word button from the toolbar.

44 You will then be able to paste your Word content into a new dialog box, and after pressing OK, it will strip the text of any unique and unsuitable code. All of the original formatting will be maintained and you will be able to make any further changes directly in the visual editor.
45 23: CREATING AN INTRODUCTION/TERMS AND CONDITIONS PAGE Tutorial 23.1: In this tutorial, we ll show you how to use section heading type questions along with basic skipping to create an introduction and terms and conditions page. Step 1 Once you ve created a survey, you can add introductory text by using the section heading question type. This question allows you to enter a body of text into your survey without having any choices or variables attached to it. You can use it to add explanatory text at any point in your survey. description fields. To add the question, simply drag it from the sidebar into your survey, and enter your text into the question title and extra Step 2 To insert a terms and conditions section and question (requiring the respondent to agree in order to move on in the survey), you can use a checkbox question type. Drag a checkbox question from the editor into your survey, and enter your terms and conditions into the extra description field. Step 3 For the same checkbox question, create one choice and title it, Yes, I agree. Set the question to be required by un-checking the optional field in the Options section. Now, a user will have to check off the Yes, I agree box before being allowed to proceed to the next page of the survey. If they don t, they ll be shown a message informing them that they can t move forward until they check the box.
46 24: THANK YOU PAGE 24.1: CHANGING TEXT OF THANK YOU PAGE [Link to 131] 24.2: REDIRECTING USERS TO AN EXTERNAL THANK YOU PAGE [Link to 125] 25: QUESTION NUMBERING When questions are added to your survey, they are by default titled Question 1, Question 2, etc. These titles are completely customizable and don t have to include any numbers. The titles stick to the questions no matter where they are moved. So, for example, if you were to move Question 4 to be located directly after the first question in your survey, it would still be labeled Question 4. It wouldn t change to Question 2. In order to number your questions, it s highly recommended to first arrange your survey into the proper order, and then manually add numbers in front of the question titles.

47 26: ADDING A COMMENT BOX TO ANY QUESTION There are certain questions in which you not only want to ask respondents about a predefined set of variables, but you also want to give them the option of providing additional information. FluidSurveys allows for this question type in a couple of different ways IMPLEMENTING AN OTHER, PLEASE SPECIFY CHOICE An Other, please specify choice can be easily added to multiple choice and checkbox questions. Simply click the Add Other Choice button in the Choices section of the editor APPENDING A TEXT BOX TO A QUESTION The same result could be achieved by selecting the choice to which you d like to add a text field, and checking off the Add text response check box. Other question types, such as multiple choice grids, N-atrix, 3D Matrix, etc don t have the option of including an Other, please specify choice. However, it is still possible to include a text box asking for more information. First, create a question containing your variables and choices and add a text response, or text response grid, question directly beneath it.
, they ll be combined into one. Not Appended: Appended: FYI 26.")
48 When you preview your survey, these would appear as two different questions. However, if you check off the append to previous question check box under display settings (for the text response question), they ll be combined into one. Not Appended: Appended: FYI 26.2: Using the append to previous question feature, you can combine any question types, and any number of questions, together.

49 27: VALIDATION FluidSurveys allows validation to be added for text response questions. With validation, a response must adhere to the format specifications set up, otherwise it won t be accepted. Validation can be set up for phone numbers, s, postal codes, integers, letters, etc SETTING UP VALIDATION FOR TEXT RESPONSE QUESTIONS With text response questions, a validation dropdown can be found under the options section of the survey editor. Selecting an option will implement the validation for that particular question. For example, if you wanted to assure that only addresses were entered as responses, you d select the option from the dropdown 27.2 SETTING UP VALIDATION FOR TEXT RESPONSE GRID QUESTIONS With text response grid questions, validation has to be set for each variable individually. The option can be found under additional options when a variable is selected. A different validation setting could be set up for each variable CHARACTER LIMITS With validation, you can also specify a character limit/ range for the question. So, for example, you could require the response to have between 10 and 100 characters, or 5 to 25 integers, etc. To do so, select validation for letters, integers, letters & numbers or all characters. You will then be able to enter a limit length.

50 27.4 LIMIT VALUES When validation is set for integers (positive or negative), you can set up a range within which the value must reside. So, for example, if the limit value is set to between 5 and 9, a response of 3 would not be accepted while a response of 6 would be ERROR MESSAGES When a respondent attempts to enter an answer that does not adhere to the validation settings, they are shown a default message. It s possible to change this message for each question, or text field INITIAL VALUES/PRE-POPULATING TEXT FIELDS Under validation, the option to pre-populate responses is available. Whatever is entered into the Initial Value text box will be displayed to respondents when they view the survey. They will be able to change this response, or leave it in tact.
51 28: TIMED SURVEYS FluidSurveys automatically keeps track of the amount of time that it takes an individual to complete a survey. The timer starts as soon as the respondent presses the Next button on the first page and stops once the survey is submitted. To view the response times, go into the analytics menu, select responses from the top right and check off the completion time option from the columns dropdown. Tip 28.1: Because the survey timer starts after the Next button is pressed on the first page, it s recommended to include an introduction page as your first page. This way, you ll get a more accurate time of how long it took an individual to answer, as the first page of questions will be included in the time calculation. FYI 28.1: If Save & Continue is enabled on the survey, the timer will stop counting as soon as the Save button is pressed and continue as soon as the respondent returns to the URL.
52 29: ARE THERE LIMITATIONS IN TEXT RESPONSE QUESTIONS By default, a text response field in FluidSurveys has no limits. This means that a respondent can enter as many characters as they d like into the field, and they would all be stored and recorded in analytics. It is possible to implement limitations using validation, however.[link to 27]. 30: DISPLAY OPTIONS 30.1: DISPLAY SIDE-BY-SIDE A set of questions can be displayed side by side instead of being stacked vertically. To do this, enable the display side by side option, found under display settings in the editor, for both questions. The first question will then be shown on the right, and the second on the left GRID QUESTIONS FluidSurveys is equipped with a variety of grid type questions: Text Response Grid, Multiple Choice Grid, Dropdown Grid, Checkbox Grid, N-atrix and 3D Matrix. These questions have an array of display options. First Column Size This option allows you to change the size of the first column which contains the variable labels. Setting a higher percentage value will increase the size, while setting a lower percentage value will decrease the size. Make First Column Static This setting is useful if your question contains numerous columns and requires a scroll bar. If enabled, the first column containing the variable labels won t scroll; it ll always be visible to

53 respondents. Show Borders Enabling this setting will make the borders of the grid visible. Alternate Colors If this option is selected, the columns in the grid will alternate in color, making them stand out from one another.

54 31: UPGRADING YOUR ACCOUNT & PRICING PLANS If, at any point during the time you are subscribed to FluidSurveys, you decide you would like to upgrade your account, there is a quick and easy way to do it! All you would have to do is sign into your account and go to your Account Settings. In your Account Settings, you will see, on the right hand side of the box, the current plan that you are subscribed to, as well as an Upgrade button. Clicking on this button will allow you to choose a plan to upgrade to. FYI 31.1: Your Account Settings can be found by clicking on your username (beside logged in as ) in the top right hand portion of your screen. Our account plans are as follows: Free Pro (Monthly or Yearly) Ultra (Monthly or Yearly) Enterprise (Monthly or Yearly) For Further information on exact pricing plans and rates, please consult our website:
55 32: ROLE MANAGEMENT GROUPS Coming Soon Fully Revamped Role Management on FluidSurveys.com

56 33: CHANGING YOUR PASSWORD You may want to change your account password every once in a while to ensure that your account information remains secure and confidential. This is an easy process with FluidSurveys! On your main dashboard, up at the top on the right hand side, you should be able to click on your username ( logged in as: ) which will then take you to your account settings. Here you can click on Change Password and you will be taken to a new screen where you can type in your new password and done!

57 34: CHANGING YOUR USERNAME & Your address is not only used as your login for FluidSurveys; it s also used when sending out invitations for your survey. When invitations are sent out, they ll appear as coming from the address registered to your account. Because of this, it may sometimes be advantageous to change the address to something either familiar, or more aptly related to the survey content in question. With that in mind, in order to change your account information, please log into your account, select Settings from the top navigation bar, and then click on the Change your link. Enter the new address you d like to use, and click Send Confirmation . You ll be sent a confirmation , and once you ve verified the change, it will be applied to your account.
58 FYI 34 However, changing the username on an account, though possible, is not presented as an option, for the simple reason that changing that information can and will distort all offline, and especially, live surveys. A survey link essentially contains your username, and changing that, will force those links that you may have sent out to respondents to change. Therefore, it is generally not advised to change the username, but if it needs to be altered, please [email protected] 35: REPORTING OVERVIEW [Link to 90]
59 36: DELETING TEST DATA As you go through the process of creating your survey, you're likely to test it out by either sending it around to colleagues or completing it yourself. Through this process, you'll accumulate data that you might not want included in the final results. Luckily, whenever the Preview button is pressed within the Editor, the /?TEST_DATA string is appended to the end of the link. This process alerts the survey software to attach the string (Test Data) to the response generated for that one single instance. You can then quickly identify and delete the responses that were submitted as tests, preventing them from skewing your end results. If you were to visit your survey through the Publish link, or by removing the appended TEST_DATA string, then all data would be seen as Complete, rather than Test. This data is not final, however, and can still be removed, either individually or in bulk. To delete all of the responses, go to the Response page under Analyze, and select Delete All Responses from the Actions dropdown. The software will then ask for you to enter a verification string, I agree before deleting all the information. To delete an individual response, locate it in the table, right click on it, and select Delete Response.
60 FYI 101 Deleting all responses before setting a survey to live is generally a popular approach
 or IBM SPSS (Available for all Ultra+ accounts).")
61 37: EXPORTING SURVEY RESULTS Exporting survey responses is a perfect opportunity for a surveyor to begin creating large scale informative graphs within a 3 rd party application like Microsoft Excel. The results can be exported to either Microsoft Excel (in a CSV format) or IBM SPSS (Available for all Ultra+ accounts). FYI 102A program such as Microsoft Excel, OpenOffice is required when opening a CSV file Also, unlike creating a Report, you can explicitly create a filter before exporting the survey results; Doing so will only export responses that adhere to the filter. Much like other features in FluidSurveys, Exporting Responses comes with a slew of options to aid in creating the perfect exported CSV file.
62 Separate values with commas (defaults to tab-separated for Excel compatibility) Checking this option will put each question type in a separate column. Split into multiple files (if exporting more than 255 columns into Excel 2003 and earlier) Surveys with more than 255 questions may break early versions of Excel. Check this option to prevent that. The responses will be exported in multiple files. Use scores as labels (show score instead of text for multiple choice questions) Questions with custom score values are shown instead of the word (Ex: 0 instead of No). Include titles for questions with identifiers in export headers Questions with identifiers will be added as titles in the csv file. (Ex: [q1] A question?). Include identifiers in headers (for response import) Questions with identifiers will show along with the questions. Export questions on separate rows (for database import) Instead of putting questions in columns, the questions will be on rows.

63 38: RESPONSE VIEWER The most important part of any FluidSurveys survey are the responses. Thankfully, we provide an intuitive Response Viewer, which is free for all accounts. The response viewer displays all of your survey responses in a tabular format. Each response is shown in an individual row, while the questions/answers are displayed in the columns. The image above contains a plethora of information. Note that some response tables can get very large. Luckily, there is a way to specify the amount of information shown on one page. To adjust the amount of responses you wish to display at once, or to move between response pages, adjust the values as seen below. Selecting 10, 20, or 50 will display the respective amount of responses on that page. A response table contains a tremendous amount of options. For instance, right clicking on a single response will produce a dropdown window with options to explicitly alter the state of that response. Editing Response: Allow you to alter a user s response Delete Response: Delete the selected response Change Response Status: You can change the status of a response to Incomplete, Complete, Terminated, or Quota Reached Download Response:Download the response into a Adobe PDF format

64 Also, another option within the response table is the Actions dropdown (located on the top and bottom) which allows for the deletion of all responses (as seen in Section 101). Another option found in the Actions dropdown is the Import responses feature. The intent behind this option is to allow for a surveyor to easily upload responses they ve garnered through an offline survey (pen and paper survey, survey created with FluidSurveys but printed and distributed locally, etc ). When Import Responses is selected, you ll be prompted to download a CSV template of your survey. You can then populate this template with the responses that were collected, and import it back into the system. It s also possible to add responses online. If you select Add response or Add multiple responses, blank entries will be added to your response database. You can then edit these and answer the questions on behalf of respondents. In the response viewer, you also have the ability to create filters and drill down into the data. Filters allow you to alter which responses are displayed. To create a filter, click on the plus sign at the top right of your screen, and you ll be taken to the Filter Builder *link to Filter Builder section+. Make sure you specify the columns that you d like to have included in the table before creating the filter. If they aren t selected, they won t appear in the table once the filter is applied. To ensure that your responses are properly displayed, with or without a filter applied, select which column(s) you wish to appear. You can also Select All which will show every single column (response) within your survey. In addition to simply providing responses, the responses table can show IP Addresses, GET Variables, Created Date, and so forth. To understand the response table in full detail, play around with it the next time you re alone.
65 39: CREATING CROSSTABS Crosstabs, or commonly known as Cross tabulation tables, are heavily used in survey research, which makes it an ideal question type within FluidSurveys. It is, in short, the process of creating a contingency table from the multivariate frequency distribution of statistical variables. To add a Crosstabs table to your report, first create a new report (or use a pre-existing one) Once the report has been created, the crosstabs item can be added through either the button Click FYI 39Selecting here to add start one from (as seen scratch above) under or Edit Advanced Report Options and Add (as Item. seen above) will create a blank Report

66 However, either option will present the same window. In the example below, Cross-tabulation has been selected with a header, Age VS Provinces, with the Show Values and Show Percentages options selected. But, in order for the effectiveness of the crosstabs report item to show its full potential, selecting an appropriate Data Source to Compare With will bring that polish out. Once you re happy with your choice, click Save & Preview.
67 The above image shows the full potential of the crosstabs reporting item.
68 Crosstabs can, at any point, display a tremendous amount of information which can go unnoticed if each section is not known. To begin, there are blue and red percentages, which go either down the row, or across the column respectively. As an example, by looking at Yukon for Under 18, 45% of the responses in Yukon came from Under 18 year olds. But, Under 18 year olds in Yukon only make 1% of the responses for all the Provinces. In short, the red and blue 100% percentage totals are broken up between the x and y axis, which add up back to the original 100% value. But, if you d rather quickly display information into an easy to read table, then selecting only Show Values when creating the report item, will generate the table below. Note that, when exporting crosstabs to popular 3rd party applications, it is recommended that a large crosstab (as shown above) be exported into Microsoft Word, as opposed to Adobe PDF, for the sole reason that a PDF can cut off vital sections for the table.
 In this section, you ll see the survey length, the number of individuals who ve completed the")
69 40: SURVEY STATISTICS Survey statistics provide quick and effective information about a particular survey. To view statistics for your survey, click on Statistics, which is found under Analyze (Pie shaped icon) In this section, you ll see the survey length, the number of individuals who ve completed the survey, the completion rate (number of completions/number of starts), the average completion time, the estimated completion time and the average number of responses per day. The Responses per Day chart outlines the amount of responses received on a particular date. Using the image above as an example, you can see that on June 10, 2011, roughly 30 respondents completed the survey in question. Likewise, on June 05, 2011, the completion rate was closer to 60.

70 In addition, the Statistics section contains a geographical map which indicates where the majority of the responses came from. In the image above, the primary source of responses originated in Canada. 41: STARTING A BLANK REPORT As described in Section 104, it can sometimes be advantageous to start a new blank report. To do so, within the Reports section, under Analyze, click Show Advanced Options and then Start from Scratch
71 42: EXPORTING YOUR SURVEY TO PDF/WORD Creating a report within FluidSurveys can be the perfect starting point for a plethora of possible future options and analytics. A popular feature is the ability to export your reports to popular 3 rd party applications, such as Microsoft Word, Adobe PDF, Microsoft Excel, and Microsoft PowerPoint. To do so, beside your report, you will see a series of icons. From left-to-right, they are Adobe PDF, Microsoft PowerPoint, Microsoft Excel, and Microsoft Word. Simply click on one of these icons, and your report will be exported into the selected format. FYI 42Unlike the other applications, exporting to Adobe PDF will not allow you to edit the report.
72 43: FILTERS Filters allow you to drill down into your survey responses and extract more specific information. For example, if you d only like to see the results of individuals who answered Yes to a particular question, you can do so. Within each filter, you can implement multiple parameters, so you can create a filter based on several answer choices. There are a number of places within FluidSurveys where we have given the surveyor full reign of customization. Below is a list of places where Filters can be applied: Reports Responses Export Responses Within these places, you can customize the type of information displayed. To find a filter with the aforementioned sections, be on the lookout for a help save you a lot of time! symbol. It will

73 44: MEANS/VARIANCE/FREQUENCIES The mean, variances, and frequencies apply a specific type of arithmetic equation to a set of data. For instance, the mean of the data is simply the average of the values in the set. Likewise, the variance of a data set is the average of the squared differences between the values and the mean. In addition, the frequency, simply put, is the amount of times a specific set of data appeared, or in other words, the percentage. You can choose to display these values within the Reports section, under the Type: Table After clicking Save & Preview, you will be presented with the Table as seen below.

74 45: CALCULATION OF PERCENTAGES Percentages, as discussed in the previous section (109), are the frequencies of selected values by respondents. Percentages, otherwise known as frequencies, can be found on the following types of charts under Reports : Table Pie Chart Column Chart Bar Chart Line Chart Cross-tabulation Below is an example of a pie chart with the percentage option enabled. In addition to customizing the percentage value, the decimal point can be altered to allow for a deeper level of precision.
75 46: GROUPING CHARTS In short, grouping charts allows for a report to contain multiple charts, with varying degrees of information. For instance, you may wish to have a Line Chart (as seen below) with the different age groups on the X-axis and their tallied votes on the Y-axis, but then also group it with a table containing all the Canadian Provinces and their response count.

76 47: MULTI-LINGUAL REPORTS FluidSurveys is fully compatible with over 64 languages. You can add French, German, Bulgarian, or even Bengali, to your survey. There s no limit on the number of languages a survey can have, and when you create a multi-lingual survey, the subsequent reports will also have multi-lingual functionality. If for instance, your survey has both French and English language support, you ll be able to view and create reports in English and French. To do so, go into the Reports section under Analyze and select French from the dropdown, as seen below. After clicking Create Report, a newly created French report will be at your disposal. Subsequently, any new items added into the Report will be in the selected Report language. The same process can be followed for any other languages that have been added to the survey.
77 48: EXPORTING TO SPSS One of the numerous export options available in FluidSurveys is Export to SPSS. SPSS is an advanced statistical analytics program that can be used to perform further analysis on your collected data. First and foremost, before exporting results into SPSS, you ll want to make sure that your questions have the appropriate labels and that your choices have the appropriate scores associated with them. You can easily add labels to any question in your survey. By default, there is a green link that says No Identifier right next to the question title. If you click on this, you ll be able to change the label of the question. Choice options are by default scored with increasing values, beginning at 1. The first choice in a set will have a score of 1, the second a score of 2, and so on. You can modify the score of each choice by selecting the Score links underneath the Choice text field, and then assigning a custom score to each variable.
78 Once you have defined your labels and scores (i.e. coded your survey), you can proceed to the export. Head over into the Analytics section of your survey, select Export from the top right menu, and click on Export to SPSS. A.zip file containing a.sps script and a response.txt file will download. Once the file has downloaded, you ll need to make a slight modification to the script.sps file. Open it in an HTML compatible text editor (Notepad, for example), and locate the string that says /File= responses.txt. Change the responses.txt portion to reflect the actual location of the file. For example, if the file was downloaded to your Downloads folder, you d change it to: /FILE= C:\Users\Downloads\responses.txt. Save the file once and the change will be made. You ll now be able to run your script.sps file by double-clicking on it. When you do, SPSS will open and you ll see your script. Just click on the Run menu then click on Run all, and all of your response data will appear in SPSS.
79 49: TERMINATED RESPONSES A survey creator can trigger a respondent s session to be terminated using branching conditions. When this happens, the respondents is shown a Termination Message, is unable to enter further data, and has their response marked Terminated This is particularly useful in filtering out unwanted responses and making the collected data more manageable. For instance, if you were to create a survey asking respondents to provide their date of birth, but you wish to exclude all respondents who were under 18 years of age, you could use branching to send the unwanted respondents directly to the Termination Page They wouldn t be able to answer the remaining questions, and their responses would be marked Terminated. In addition, you can alter the Termination Page message ( Publish > Change Pages/Messages ) to inform the user as to why their response is not suitable (By default, the Termination Page has the same message as the Thank you page )

80 When viewing your survey responses in a tabular format (Analytics -> Responses) you ll be able to see which responses were terminated. You could then easily sort through the unwanted responses and exclude them from your final analytics. To exclude Terminated responses, in the Responses section, select the Filter button on the top right, and select, Status > Is Exactly > Terminated, and enable Negated. All the terminated responses would then be hidden from view. Tutorial 49: In this tutorial, we ll show you how to set up a Dropdown question type with a Termination Page branch to. Step 1: Double click, or drag a Dropdown question type into your survey, and fill out the question and choice fields. As an example, the question type will be filled out with a title of, What is your age? Step 2:To quickly add age groups to the newly created question, click on Bulk (as described in Section 12) and select Age from the dropdown. Step 3: Once the age categories have been applied, click on the field containing Under 18 and select, Termination Page under the Branch to dropdown Step 4: Save your survey, preview, and voila. Now, whenever a respondent selects Under 18, they will be directed to the Termination Page.

81 50: QUOTA REACHED A nifty feature within FluidSurveys is the ability to restrict the total number of responses you wish to have for a specific survey. For example, you may only want to collect 50 total responses. You can automate this process using quotas. When your survey hits 50 responses, it will automatically be closed, and the 51 st person would not be able to submit their responses. You can set up a quota for Responses as a whole (Complete+Incomplete+Terminated), or for only Completed responses. A quota can be applied to: A Survey A Question Additionally, users with an Ultra+ package have the option to create Advanced Quotas to allow for a truly unique online survey experience. With these, it s possible to create question specific quotas. For example, you could limit question 1 in your survey to 25 responses, and question 3 to 50 responses. Advanced quotas can trigger various behaviors. If the quota s been reached on a particular question, or set of questions, you could exit the respondent from the survey, terminate their survey, hide a question or do nothing *.

82 FYI 50The Quota Reached notification can be customized under the Publish menu. FluidSurveys also provides you with the ability to redirect respondents to an external quota reached page. The option can be found under, Publish > Settings > Redirection. In the example below, as opposed to displaying a customized, or the default, FluidSurveys Quota Reached page, the user will be redirected to Google. The redirect and customizable Quota Reached pages are available to all users of FluidSurveys. * Selecting the Do Nothing option when setting up an Advanced Quota can be useful when used in conjunction with Advanced Branching. For example, if you want to skip respondents to a specific page once a quota for a question has been reached, you can include this logic using the Advanced Branching interface. The original question will stay open for other respondents, but the branching will begin functioning once the quota s been reached. FYI 50: Free accounts can only receive 100 responses per survey. By becoming a paid customer, that gap is removed.
83 51: % COMPLETION HOW IS IT CALCULATED? The completion rate is calculated by comparing the number of surveys that were completed to the number that were started. For instance, if you had a two page survey and a respondent answered the first page, the second page, and then submitted their responses, the survey would be marked as Complete. Concordantly, if a respondent answered the first page, but closed the survey on the second page, the response would be marked Incomplete, as the response was neither submitted, nor completed.

84 52: EDITING RESPONSES A response can be edited by both the respondent and the survey administrator. The option allowing respondents to edit their responses is enabled by default, but can be disabled within the Publish section, under Settings. A respondent can access their survey responses and submit edits in several ways: 1. Using the invite link: If the survey was sent out using the FluidSurveys invitation tool, respondents can re-gain access to their responses through the original link they received in the invitation Using the response s unique URL: When a survey response is submitted, a unique code is appended to the end of the generic URL. This expanded URL links directly to the individual response. If respondents plan to edit their answers, they can request this URL from the administrator. The administrator can access the unique URL by going into the Response section (in Analytics), right clicking on a particular response, and selecting Edit Response. The URL for that response will appear in the browser, and they can copy and send it to the respondent. 3. Using the generic URL: If the Once per Computer restriction is enabled, respondents will be able to edit their responses every time and click on the generic survey URL (So long as they re using the same computer that they used when they first completed the survey) The survey administrator can also edit responses through the Response table found in the Analytics section. There, all of the survey responses will be displayed in a tabular format. To edit a particular response, right click on it and select the Edit Response button from the resulting dropdown. FYI 52: Please ensure that you do not have a popup blocker enabled which may block the Edit Response window from opening
.")
85 53 THEMER The survey themer allows you to seamlessly edit the appearance of your survey. You can choose to apply one of our many pre-made templates or you can customize individual elements (background, header images, fonts, colors, etc). You can even modify your survey s CSS code! To use the themer, click on the style icon and select Click here to access the Survey Themer link.

86 54 INSERT LOGO To insert a logo into your survey, click on Customize from the left side menu and select Survey Logo from the dropdown box. You will then be able to upload your survey logo and set its alignment. FYI 27.2: If a survey logo is added using the themer, it will appear at the top of every page of your survey. If you d like it to only appear on certain pages, you could insert it into a Section Heading question type.

87 55 PROGRESS BAR The progress bar appears, by default, at the top of every survey page. It lets the respondent know how much of the survey they ve completed and how much they have left. Removing the Progress Bar If you d like to completely remove the progress bar from the survey, select the Style icon from the top navigation bar and choose None in the progress bar dropdown. Enabling the Advanced Progress Bar The Advanced Progress Bar is a slight modification on the default bar as it contains animation. It shows the bar lengthening or shortening, in real time, depending on whether the respondent is moving forwards or backwards in the survey. To enable the Advanced Progress Bar, select the Style icon from the top navigation bar and choose Advanced (JavaScript Enabled) from the dropdown. FYI 55.1: Respondents will only be able to see the animation if they have JavaScript enabled.

88 Modifying Progress Bar Colors To modify the colors of the progress bar, click on the Style icon from the top navigation menu and select Click here to access the Survey Themer link. Once in the themer click on Customize from the left side menu. In the dropdown, there are three options which will allow you to edit the appearance of your progress bar. You ll be able to modify the outer and inner colors as well as the progress bar text.

89 56 MODIFYING CSS The Survey Themer allows users to edit their survey s CSS. To do so, simply select CSS from the left hand side bar and a dialog will appear displaying the CSS stylesheet for the survey. Changes can be made to the existing code, and/or custom code can be entered. FYI 27.4: Any changes made in the CSS editor will show on your survey in real time. To reset any changes, simply press the Reset button, and to confirm changes, press Apply & Close.

90 57 TEMPLATE GRABBER (ADVANCED) FluidSurveys allows users to theme their surveys in the style of an online website using the Template Grabber. If you enjoy the style of a particular web site, for instance then you can grab the coloring and formatting to style your survey. This is an advanced portion of FluidSurveys, and if you are unfamiliar with HTML or CSS, then this section may be slighter harder to follow. Nonetheless, the interface is very intuitive and straight forward. To access the Template Grabber, click on Style and then Customize your survey's template to match a specific URL. At this point, you may have a web site in mind as to which style you wish to grab, but for the sake of time, this tutorial will grab the style of Now, here is where the digging process begins. In order to fill out id of target div tag (which is simply the area in which we want to place the survey in) we need to visit the web site in question. Once at the web site, use a browser that gives you the ability to view all the CSS Elements. The image below is of Google s browser, Chrome, which allows for the ability to quickly and easily find the main content portion of their web site. In this case, ge_content is the main <div> section

91 Using the newly discovered information, input ge_content into the id of target div tag which will allow for the FluidSurveys software to remove anything within ge_content and place it in your survey. Save and once you see, Success, preview your survey to see what it presently looks like. Chances are it will not look comforting at all, but we re still not done.

92 As you can see, there is still some tweaking required. Return to the Customize survey Style section and click on the second link. And then click on CSS on the left hand side.

93 Immediately, a new popup will appear. From here, you want to remove anything that has to do with html and body for the simple reason that the style of your survey now adheres to a CSS sheet. Click Apply and Close, Save, Return to Account and Preview your survey. It looks a lot better now.
94
 On the left hand side, select Customize and scroll to the bottom, as seen in the image below, until you see your questions appear.")
95 58 STYLE FOR SPECIFIC QUESTION By default, every question type can be tailored to your various needs. Editing a question type Click on (found within either the Editor or the Survey List page). Followed by the (second link) On the left hand side, select Customize and scroll to the bottom, as seen in the image below, until you see your questions appear. The available customizable options depend from question type to question type, but the Overall design remains a constant.
96 59 SIDE BY SIDE DISPLAY In essence, side-by-side display allows for a surveyor to set two questions to reside side-by-side in a survey. By default, all question types take up 100% of the survey page, but when questions are set to reside side-by-side, then each question will take up 50% of the survey. To enable this option, click on the questions you wish to display side-by-side, and on the left hand side, under Display, select, Display Side-by-side This will turn a question type from Into
97 60 APPEND TO PREVIOUS Appending one question to another allows two questions to appear, and act, as one. For instance, there may be various question types that do not have a text response area allowing respondents to fill out a Prefer not to say or, Other, please specify choice. With the Append to feature, we could add such an option to a question. To append a question to a previous one, click on the second question (the one which you d like to be appended), and select Append to previous question under the Display section in the editor. This will cause the two questions to appear as one.
 and select save. FYI 27.")
98 61 APPLYING A THEME FluidSurveys offers a variety of pre-made templates which can be used for any survey. The templates are listed in the left hand side editor, in the Survey Themer. To apply a template, simply click on the thumbnail (this allows you to preview it in real time) and select save. FYI 27.1: Templates can be changed as many times as you d like, whether your survey is live or closed, and the changes will not affect the integrity of your data. After a theme s been applied, you can still further customize the survey appearance by modifying individual elements (fonts, colors, etc)
99 62: BASIC SKIPPING 62.1: WHAT IS BASIC SKIPPING? Basic skipping allows you to branch respondents from one page to another based on their answers to a single question. For example, if a respondent answered Yes to a question, they could be sent to Page 3, if they answered No, they could be skipped straight to Page 4. Basic skipping works based on the respondent s answers to single-answer questions such as the dropdown, multiple-choice and yes/no question types WHAT IS THE DIFFERENCE BETWEEN BASIC AND ADVANCED SKIPPING? Advanced skipping allows you to branch a respondent from one page to another based on their answers to one, or multiple, questions. The questions that trigger the branching can be on one, or several, pages. For example, one branching condition could be created based on questions on Page 1, 4, and 5. Furthermore, you can use advanced skipping to branch based on most question types (including checkbox questions and grid-type questions) TUTORIAL: EXAMPLE OF BASIC SKIPPING Tutorial 62.1 : In this tutorial, we ll show you how to set up basic skipping. In this example, we will have a 3 page survey. On page 1, we ll ask the user if they enjoyed their experience. If they say yes, we will send them to page-2 where they will be asked what they enjoyed best. If they say no, we will send them to page-3 where we will ask them why they didn t enjoy their experience. If someone ends up on page-2, we won t want them to also see page-3 and so we ll also talk about how to set up unconditional-branching in order to accomplish this behavior. Step 1: Drag in a yes/no question from the control-panel onto your survey-page. Change the title of this question so that it says Did you enjoy your experience?

100 Step 2: Add two more pages to your survey so that your survey now has 3 pages. The first page, as indicated in Step 1 will contain a yes/no question. Step 3: On page 2, drag in a text response question. Change the title of the text-response question so that it says What did you like best about your experience?
101 Step 4: On page 3, drag in a text-response question as well. Change the title of the text-response question so that it says Why did you not like your experience? Step 5: Now, go back to page 1, and click on your yes/no question. The control-panel should now switch to the options tab. At the bottom of the controlpanel, you ll see a collapsed section called Options. Click on it so that it expands. Change the dropdown menus that appear so that they indicate that the user should be sent to page 2 if they choose Yes and to page 3 if they choose no. Step 6: Save your survey and click on preview to test out what you ve done so far. As you can see, when you click on no on the first page and then press the next-button, you will be taken to page 3. Similarly if you had chosen yes on the first page and then clicked on the next-button, you would ve been taken to page 2. Please note that the skipping on that page will only take place once you click the next-button and it will not take place immediately upon choosing yes or no. For skipping that occurs upon clicking the yes or no option, check out our tutorials on dynamic skipping logic. Explanation62.1: You ll notice an interesting problem here. If you choose yes, you ll be sent to page 2 where you will be asked What did you like best about your experience? Once you answer that question and then press the next-button, you will then be taken to page 3 where you will be asked Why did you not like your experience? This, of course, is not what you intend to happen since your respondent already told you on page 1 that they liked their experience. In other words, we ll need to ensure that respondents that see page 2 of the survey do not see page 3. Step We 7: can accomplish this behavior using unconditional skipping. Go back to page 2 and then click on the page tab. On this tab, change the unconditional skip so that the user is taken to the finish page upon pressing the next-button on page 2.
102 Tip 62.1: If you ll be using advanced branching, you shouldn t use simple skipping and viceversa. While the two can be used together, generally speaking, they shouldn t be because this could lead to clashing conditions that could produce unexpected results CHECKING WHAT SKIP LOGIC EXISTS ON A PAGE On any page that contains skip logic, you ll notice a little branching icon on the top left of your survey-page in the editor. If you click on this, it ll show you the branching/skip logic that exists on that page. Tip 62.2: If your survey is going to be long, you ll benefit greatly from specifying page-labels for each of your pages. Just go to the Page tab and specify a label for that page. For more info, please see Chapter 52 on Page Labels.
103 FYI 62.1: When you re-arrange pages, the branching logic will do its best to re-arrange itself accordingly. You can re-arrange pages simply by clicking and dragging a page to a new destination location (the pages are at the bottom of your survey editor page). However, it is recommended to order your pages before adding any branching logic SKIPPING BASED ON MULTIPLE CHOICE AND DROPDOWN QUESTIONS The example supplied in section 62.3 was based on a yes/no question. Multiple choice questions and dropdown questions have a slightly different interface for specifying simple skip logic: Step 1: Drag in a dropdown question and click on one of the choices as if you were going to change it. Step 2: You ll see that you have a series of options that now open in accordion fashion. One of these is the option to specify branching that should occur upon the respondent choosing that choice RESETTING SIMPLE SKIPPING Let s say that you ve specified some simple skipping and now would like to reset it how do you do that? All you have to do is click on the dropdown menu where you specified the simple skipping and then choose the --- option. Make sure to save your survey and the simple skipping for that particular choice will be reset.
104 63: ADVANCED BRANCHING (PART 1) 63.1: WHAT IS ADVANCED BRANCHING? Advanced branching is similar to simple skipping in that it allows you to send respondents to different sections of your survey based on their answers. There are, however, several differences. With advanced branching, you can skip based on multiple conditions (multiple questions), as well as based on questions on previous pages. You can also implement dynamic on-page skipping (hide, show, disable questions), and trigger a variety of actions ( messages, terminate the survey, etc). Plus, you can implement branching on additional question types, such as text response fields, grid questions and checkbox (multi-answer) questions. All in all, advanced branching can do everything that simple skipping can + more! Tip 63.1: It s not recommended to use advanced branching and simple skipping together. If one is used, the other shouldn t. Using both could lead to clashing conditions and unexpected results TUTORIAL ADVANCED BRANCHING USING TWO MULTIPLE CHOICE QUESTIONS Tutorial 63.1: In this example, we re going to create a 4 page survey that will ask our participants a question on page 1, and another on page 2. Based on these two questions, we will send the respondents to either page 3 or page 4 using advanced branching. The questions on page 1 and 2 will help us determine if the user is in our target market. If they are, we ll send them to page 3 and if they re not, we ll send them to page 4. If they do reach page 3, we don t want them to seeing page 4, so we ll have to program the survey to take them directly to the finish page after page 3 Step 1: Step 2: Create a 4 page survey. On page 1, drag in a yes/no question and change the title of this question so that it says Have you been to our website before today?
105 Step 3: Give this yes/no question an identifier by clicking on the question itself and then clicking on the None link. Once you do this, a text-box will appear. Type in the identifier in this text box and then click anywhere outside of the text box and the identifier will be set. For this example, name your identifier yes-no FYI 63.1: Any time you want to do anything advanced with a question, make sure to give it an identifier. These identifiers are used to refer to questions when programming advanced logic conditions. The identifiers are also used for the purpose of exporting your data into Excel/CSV and SPSS. Step 4: Go to page 2 and drag in a multiple choice question. Change the title of this question so that it asks Are you male or female? Once you do this, make sure to change the choices of that multiple choice question so that the two choices are male and female. While you re in the options tab, give this question and identifier as well for this example, just call it male-female. Step 5:
106 Step 6: Step 7: Go to page 3. On this page, drag in a text response question and change the title so that it says: Congratulations, you are in our target market! What did you think of our website? Go to page 4. On this page, drag in a text response question and change the title so that it says Sorry, you are not in our target market but what did you think of our website anyway? Now go to page 2 which will be the page where you will want the branching to occur. In other words, after the user answers question 1 and question 2 you want the branching logic to take affect and either send the user to page 3 or page 4. On page 2, click on the Page tab in the control-panel. Now click on the Edit Survey Logic Rules button. This will open up the advanced branching editor. Program your conditions such that they state if * yes-no equals yes + AND * male-female equals female+ THEN [send the respondent to page 3] OTHERWISE [send the respondent to the finish page]
107 Please refer to the diagram below for details and make sure that your branching conditions look like that which is specified in the diagram below: FYI 63.2: Advanced branching and simple skipping get executed upon the user s clicking on the next-button. In other words, the branching/skipping does not occur upon the user answering a question by default. The latter type of branching/skipping can be accomplished as well using dynamic on-page skip logic. Please see the dedicated tutorial for that topic for more info. Now click on Save and click on preview to see how your survey works so far. You ll notice that the branching conditions do what they are supposed to. If the person has been to the website before and they are female (our supposed target market), then they will be sent to page-3 and if they aren t, they will be sent to page 4. Step 8:
108 In order to specify the unconditional skip condition, go to page-3 and then click on the Page tab. In the Page tab, make sure to specify that the user be unconditionally sent to the finishpage. Tip 63.2: If your survey is going to be long, you ll benefit greatly from specifying page-labels for each of your pages. Just go to the Page tab and specify a label for that page. For more info, please see Chapter 52 on Page Labels. FYI 63.3: When you re-arrange pages, the branching logic will do its best to re-arrange itself accordingly. You can re-arrange pages simply by clicking and dragging a page to a new destination location (the pages are at the bottom of your survey editor page). However, it is recommended to order your pages before adding branching logic MULTIPLE BRANCHING CONDITIONS In this tutorial we covered the concept of advanced branching. However, our branching logic only had one branching condition, alongside an otherwise condition. What if we were to implement two branching conditions alongside an otherwise condition? Let s assume that we specified the following branching conditions: Condition 1: If [male-female equals female]: Go to page 3 Condition 2: If [yes-no equals no]: Go to page 4
109 Otherwise: Go to Finish Page In this case, the first condition will be evaluated. If it evaluates as true, the user will be sent to Page-3 and no other conditions will be evaluated. If the first condition evaluates as false, the second condition will be evaluated. If the second condition is true, the user will be sent to Page- 4 and no other conditions will be evaluated. If both conditions are evaluated as false, the Otherwise condition will be executed. In other words, branching conditions will be evaluated one-by-one until one of the conditions evaluates as true then the action that corresponds to that condition will be executed. If none of the conditions evaluate as true, then the action that corresponds to the Otherwise condition will be executed. The only exception to this sequence of evaluation and execution is when there is on-page-logic. If a condition is evaluated as true that has a corresponding on-page-logic action rather than a tradition skip-to-a-page action, things are done differently. In such a case, even after the onpage-logic action is executed, the next condition is still evaluated. In other words, a traditional skip-to-page action takes the survey to another page and so the rest of the conditions cannot be executed. On-page-logic, on the other hand, doesn t take the user to another page and so the rest of the conditions on the page will still be evaluated.
110 Tip 63.3: If you ll be using advanced branching, you shouldn t use simple skipping and viceversa. While the two can be used together, generally speaking, they shouldn t be as this could lead to clashing conditions that could produce unexpected results.
111 64: ADVANCED BRANCHING (PART 2) 64.1: TUTORIAL: ADVANCED BRANCHING WITH CHECKBOX QUESTIONS Tutorial 64.1: In this example, we are going to show you how to use advanced branching with a checkbox question. We will first ask our respondents which of our four products they have used in the past. For any of our products that they have used, we will then ask specific questions with respect to their experience with that particular product. If they haven t used any of our products, we will send them to the termination page. Step 1: Create a survey and drag in a checkbox question as the first question in your survey with the following specifics: Title: Which one of our products have you used in the past? Choices: Product A, Product B, Product C, Product D
112 Step 2: Give your question an identifier. In this example, the identifier we specified is products. Step 3: Add 4 more pages to your survey by clicking the + button at the bottom of the page, such that your survey has 5 pages. One each of the pages, we will put questions that are specific to the use of each of the 4 products mentioned on page 1. Step 4: Go to page 2 of your survey and drag in a Section Heading with the following specifics: Title: Questions specific to product A. The idea is that on this page, you would put in questions that are specific to Product A.
113 Step 5: We want to put one of these section headings on each page from page 2 to page 5. In order to make the process as fast as possible, right-click on the section heading you just created and click on the duplicate button. Step 6: After the duplication you did in Step5, you ll now have two section headings on your page. Now select both of these section headings by clicking and dragging your mouse over both of them. Step 7: Once both of them are selected, right-click on either of the questions and click on duplicate again (this will save us one duplication step). Now you ll have 4 section headings.

114 Step 8: Now you can modify the duplicated section headings and get them ready for moving to their appropriate destination pages. As shown in the image below, we have clicked on the second section heading on our page and have modified it to say Questions specific to Product B. Continue the process and make sure that you have one section heading specific to each product. In other words, your four section headings will say the following:
115 Questions specific to Product A Questions specific to Product B Questions specific to Product C Questions specific to Product D Step 9: Before moving these section headings to their appropriate pages, go to each page and give it a label. Give page 2 a label of A, page 3 a label of B and so on and so forth (this will just help us identify each of these pages. If you have questions about specifying page labels, see chapter 52, which talks about them in detail. Step 10: Now go back to page A (previously known as page2) where all of our section headings are. Right click on the second one which says Questions specific to Product B and click on Move To. Step 11:


116 You ll now see a dialog pop up. Send this question to Page B (formerly known as page3). Once you re done with this, move the rest of the section headings on page A to their appropriate pages so that you ll have one such section heading on each of Page A, Page B, Page C and Page D. Step 12: Go back to the first page of your survey and click on the Page tab. Now click on the Edit Survey Logic Rules button to enter your advanced branching conditions. Step 13: Now specify your branching conditions as shown in figure shown below.
117 FYI 64.1: If you remember, advanced branching conditions will be evaluated one at a time until a condition is reached that is true or until the Otherwise condition is reached. If a true condition is reached, the Then statement corresponding to that condition will be executed. If the otherwise condition is reached, then the corresponding action will be executed. If the condition that is being executed sends the respondent to another page, then the user will be sent to that page and the rest of the conditions on the page that the respondent just left will not be evaluated.
118 Explanation 64.1: In this case, our first condition asks if the respondent has used product A. If this is true, then the respondent will be sent to page A so that we can ask him questions specific to that product. If he hasn t used product A, then we will check to see if he s used product B. If he has indeed used product B, then we will send him to page B so that we can ask him questions that are specific to product B. The same goes with the other two conditions on the page. Now if the respondent hasn t used any of our 4 products, then the otherwise condition will be reached and the corresponding action to this condition will be executed. In this case, we are sending the user to the termination page. When doing this, the respondent s response will be marked as terminated. If you want to learn more about what it means when a response is marked as terminated, check out chapter 114 that talks about this response status. Step 14: Go to Page A (previously known as page2) and click on Edit Survey Logic Rules in order to enter branching conditions specific to this page. Step 15: Enter the branching conditions as shown below. Explanation 64.2: The individuals that will land on page A will always be those who have used product A. In other words, they will be the individuals whose responses triggered the first branching condition shown in figure which means that the rest of the branching conditions in figure were not evaluated for their response. We will now need to evaluate these remaining conditions. Basically, we will have to check whether this person, who we know has used product A, has also used any of the other products in our list. In order to do this, we will reproduce all of the conditions in figure except for the first one as the first one has already been evaluated for this respondent (that s how they got to page A to begin with).
119 Explanation 64.3: You ll notice one thing that is slightly different in terms of the branching conditions that were entered for Page A in comparison to those that were entered for the first page of the survey. In the first page of the survey, the otherwise condition led the respondent to the termination page because reaching the otherwise condition would ve meant that the respondent wouldn t have used any of our products. In contrast, on page A, the otherwise condition sends the user to the finish page. We know that any respondent who reaches page A will have used product A. If they reach the otherwise condition on this page, this will mean that they haven t used products B, C, or D. If this is the case, then this respondent will not need to see any of the remaining pages in our survey and so we can safely send them to the finish page.
120 Step 16: Now go to page B and enter the following advanced branching conditions as shown in figure below: Step 17: Now go to page C and enter the following advanced branching conditions as shown in figure below:
121 FYI 64.1: In this example, the questions that we ask for each of the products that our respondent has used are very specific to the particular product. If we were going to ask the same series of questions for each of the products that our respondent had used, then it would be better to use looping. For example, if we wanted to ask them the question Would you use this product again? for each of the products that they had used, then using looping would be preferable as it would make the survey construction much faster and the analysis easier. For more information on this, please refer to the looping section RE-ARRANGING BRANCHING CONDITIONS USING DRAG AND DROP Sometimes as you re entering branching conditions, you ll realize that the order in which you ve entered them is incorrect and you ll want to move around the conditions so that some can be evaluated before others. The good news is that just as you can drag and drop questions in your survey in order to re-order them, you can drag and drop advanced branching conditions as well, as shown below.
122
123 65: PIPING 65.1: WHAT IS PIPING? Piping is defined as taking the respondent s answer to a previous question and inserting it (a.k.a piping it) into a later question. This sort of behavior will help keep your respondent more engaged and will make them feel as if the survey is customized to their particular situation. Piping is definitely recommended for anyone who d like to increase their avg. survey completion rate TUTORIAL: EXAMPLE OF USING PIPING Tutorial 65.1: In this example, we are going to show you how to use piping with text-response questions. We are going to create a two page survey where the first page will ask the respondent how much their marketing budget is, and the second page will ask the respondent how much of the that budget, do they spend in each set of categories we define. Step 1: Create a survey and put a text response question on the first page with the following specifications: Title: What is your marketing budget? Identifier: budget FYI 65.1: In order to pipe a question, it must have an identifier.
124 Step 2: Create a second page for your survey and in this page, drag in a text-response grid question type with the following specifications: Title: How much of your marketing budget (%) do you spend in each of the following categories? Variables: Internet Ads, Radio Ads, Television Ads, Magazine Ads, Newspaper Ads, Other Step 3: Now right click on the newly added text-response grid question and click on Piping Wizard.
125 Step 4: In the piping wizard, you ll see a list of fields that you ll be able to use for the purpose of piping. Drag in the budget field and drop it onto the question title on the right hand side. It may look like nothing happened but if you click on the question title field and use your right arrow key to go all the way to the right of the text box (or you could just hit the end key), you ll see that the text,, budget -- was appended to the text. Now press the save button so that the piping wizard takes in your changes. Explanation 65.1: You don t have to use the piping wizard in order to use piping. The wizard is there to help you discover the piping notation. The piping notation is simply {{ question-identifier -- where question-identifier is replace by the question identifier of the question that you d like to pipe from. As a matter of fact, after you ve used the piping wizard once, you don t have to use it ever again. Simply typing in the appropriate piping notation can be a lot faster and more convenient.


126 Step 5: Now that you know the piping notation, modify your question title: Previous: How much of your marketing budget (%) do you spend in each of the following categories?,, budget -- Change to: How much of your {{ budget }} budget (%) do you spend in each of the following categories? This change will help our question flow a lot better as the budget specified on the first page will be inserted in the middle of the question title on the second page. Step 6: Now save your survey and take it once yourself to see how the piping works.
127 65.3: PIPING FROM A MULTIPLE CHOICE QUESTION (RADIO BUTTON) Piping can also be done from multiple choice question types. To demonstrate, go back and change the first question in the survey (created in section 39.2) from a text-response to a multiple choice question type, with an other, please specify field, as shown in figure 39.9 below, and add the following choices: 0-$1 million, $1-$10 million, $10-$20 million, Other please specify. Save your survey and take it once yourself to see how it behaves. Figure below shows what happens if you choose $10-$20 million as the answer. As expected, this value gets piped into the next question.
128 Figure below shows what would happen if your respondent chose other, please specify and typed in the answer $1 billion. As expected, the value that was typed into the textbox got piped into the next question.
129 65.4 PIPING FROM A CHECKBOX QUESTION Now go back and change your question from a multiple choice question to a checkbox question (i.e. multiple answers). If the respondent chooses $1-$10 million and $10-$20 million, then those values in a comma separated format will be piped into the next question. FYI 65.2: If you don t want the answers from your checkbox question to be piped in as a comma separated list, then you should be using looping. For more information on looping, please check out the looping tutorial in chapter 66.
130 65.5 PIPING IN CUSTOM FIELDS FROM YOUR ADDRESS BOOK One of the nice features of FluidSurveys is that it allows you to pipe in custom fields that you have already uploaded into your address book. Let s say that you have uploaded the contact info for 100 people into your address book and that one of these fields is City. You could then pipe this value into a question like: How long have you lived in,, invite.city The correct value would then be inserted for each contact who responds. We won t go into too much detail about this here, but you can check chapter 76, which talks about Custom Variables, to learn more.
131 66: LOOPING 66.1: WHAT IS LOOPING? With looping, you can set your survey to loop through a series of questions for each selected choice in a checkbox (multi-answer) question type. For example, let's say you ask respondents: Which of the following hotels have you stayed at? A. Hotel 1 B. Hotel 2 C. Hotel 3 D. Hotel 4 You may want include a follow-up question asking respondents to rate their experience at each hotel that they've stayed at. This is possible using looping TUTORIAL: EXAMPLE OF USING LOOPING Tutorial 66.1: We are going to show you how to use looping with Checkbox questions. We ll create a four page survey where the first page will ask the respondent which of our services they ve used. The second page will ask the respondent how much time with the service(s), which they specified in the first page, they use. The fourth page will be used primarily has evidence that we re out of the loop Step 1: Create a survey and put a checkbox question on the first page with the following specifications: Title: Which of our following services have you used in the past? Identifier: q1 FYI 66.1: If you don t specify an identifier, you won t be able to pipe the answer of that question. In other words, specifying an identifier is required for this tutorial.

132 Step 2: Create a second page for your survey, and on this page drag in a text response question type with the following specifications: Title: How do you feel about service {{ q1 }} Step 3: Create a third page, and on this page, drag another text response question type with the following specifications: Title: Would you like to try {{ q1 }} in the future? Step 4:

133 Create a fourth page, and on this page, you can put anything that you wish, since the page will be used as a pivot point to show that the shift in looping has ended. However, for the tutorials sake, add a Dropdown question type with the days of the month. Step 5: Right click on q1, and click on the Looping link in the dropdown. In the looping wizard, you ll see a single option, First Looped Page, which allows for the option to select where the first loop begins. As you select the page (Page 2 in this case) the options grow. In addition, please select Page 3 as the Last Looped Page. Now press the Ok button so that the looping options take hold. Step 6: Now that looping has been attached to your survey, Save your survey, and click Preview : When the respondent selects the services they ve used on page 1, they ll be asked follow-up questions (whether they liked the service and whether they d use it again), for each service that was selected. Then, when they ve reached the end of their selected choices, they will be presented with the rest of the survey, which in our case asks to select a day of the month. 66.3: PIPING FROM THE POINT OF VIEW IN ANALYTICS
134 Once responses start pouring in, you will start to notice a slight difference in the Response Table when viewing it under Analyze. The wording, loop will be peppered across the columns. This, in short, indicates which options on Page 1 the user selected, and what the answers after the fact were. In addition, the Reports section will also show this information in a similar fashion. 67: LOOPING (PART II)

135 67.1: TUTORIAL: EXAMPLE OF USING LOOPING Tutorial 67.1We are going to show you how to use looping with a Multiple Choice Grid. We are going to create a four page survey where the first page will ask the respondent how satisfied with the product they were. The second page of our survey will ask the respondent how much time with the service, which they specified in the first page, they use. Step 1: Create a survey and put a Multiple Choice Grid question on the first page with the following specifications: Title: How satisfied were you with our following services? Identifier: service Choices: Very Satisfied through N/A Variables: Service 1 through 5 FYI 41.1: If you don t specify an identifier, you won t be able to pipe the answer of that question into another question on another page. In other words, specifying an identifier is required for this tutorial. Step 2: Create a second page for your survey, and on this page, drag in a text response question type with the following specifications: Title: What didn t you like about service,, service --

136 Step 3: Create a third page, and on this page, drag a Yes/No question type with the following specifications: Title: Would you consider using {{ service }} in the future? Step 4: Create a fourth page, and on this page, you can put anything that you wish, since the page will be used as a pivot point to show that the shift in looping has ended. However, for the tutorials sake, add a Dropdown question type containing the days of the month. Step 5:

137 In the looping wizard, there is a slight difference when comparing this to Section 66. Each individual choice within the Multiple Choice Grid Question Type has a trigger. For the sake of time, we only selected Unsatisfied and Very Satisfied. When these options are selected, looping will unfold. The pages we ll loop are the same as Section 66; First Looped Page: Page 2 and Page 3 as the Last Looped Page. Now press the Ok button so that the looping options take hold. Explanation 67.1: You do not have to use piping along with looping, but since looping is used primarily with the fishing of why certain options may have been selected, it could be advantageous to use the features together. If you are unsure on how to use piping, please refer to Section 39, as we have a detailed stepby-step analysis on how to accomplish such a feat. Step 6:
138 Now that looping has been attached to your survey, Save your survey, and click Preview : When the respondent selects either Unsatisfied or Very Satisfied for a service listed on Page 1, they ll be asked follow-up questions about that service (whether they d use the service again and what they disliked about the service). When they ve answered the follow-up questions for each service that they selected, they d continue on with the rest of the survey. 68: LOOPING (PART III)
 they")
139 68.1: TUTORIAL: EXAMPLE OF USING LOOPING Tutorial 68.1: In this tutorial, we re going to show you how to use looping with a Text Response Grid. We ll create a two page survey where the first page will ask the respondent to list the people they ve worked with, and the second page will ask the respondent what they thought of the person(s) they selected on page 1. Step 1: Create a survey and put a text response grid question on the first page with the following specifications: Title: List the people that you worked with Identifier: q1 Variables: 1 through 10. However, for the sake of time, we will only put 1 and 2. Subsequently, this will only create 2 text areas to type. FYI 68.1: If you don t specify an identifier, you won t be able to pipe the answer of that question into another question on another page. In other words, specifying an identifier is required for this tutorial. Step 2: Drag a Yes/No question on the second page with the following specifications:

140 Title: Did you like {{ q1 }}? Step 3: Right click on q1, and select Looping from the dropdown menu. In the looping wizard, there is a slight difference when comparing this to Section 66 and Section 67, in so far that a new checkbox option is present, Extract only unique responses. This option, though unchecked for this tutorial, allows for only unique responses to be provided within the looped question (q1). What this means is that if the respondent inputs 2 instances of John Cole in the text areas, then the looping logic will know that they re not unique, and will only take 1 of the instances. The pages we ll loop are the same as Section 40; First Looped Page:, Page 2 and Page 3 as the Last Looped Page. Finally, press the Ok button so that the looping options take hold. Step 4: Now that looping has been attached to your survey, Save your survey, and click Preview :
141 When the respondent types in the individuals they ve worked with on Page 1 and clicks next, they ll be asked, Do you like,, q1 -- (which will populate with a name). Depending on how many names were inputted into question 1, when the user clicks next, they will either be asked the same question but with a different name again, or brought directly to the Thank you page, which is the end of the survey. 69: CONSTANT SUM 69.1: WHAT IS CONSTANT SUM?

142 A constant sum question will require the answers given for a set of variables to add up to a specified value. For example, if you create a text response question with 5 variables, you can assure that the values entered for those 5 variables add up to TUTORIAL: EXAMPLE OF USING CONSTANT SUM Tutorial 69.1 In this tutorial, we ll show you how to set up a constant sum question. We ll use a text response grid question type to ask respondents what percentage of their budget was spent in a set of categories, and we ll require the inputted values to add up to 100%. Step 1: Create a survey and put a text response question on the first page with the following specifications: Title: What is your marketing budget? Identifier: budget Step 2: Create a second page for your survey, and on this page drag in a text response grid question type with the following specifications: Title: Of the ${{ budget }}, how much (in %) did you spend in the following categories? Variables: Category 1 through 4, with an Other option.

143 FYI 69.2: The $ before {{ }} has no bearing on piping other than to provide a frame of reference as to what the value is an indication of Step 3: In order to make sure that the values entered for the variables add up to 100, we must provide the Sum total. To do so, click on Options in your left hand side editor, and beside where it states, Sum, enter 100. A respondent s answers for this question will now have to add up to 100. If the total is more or less, they ll be presented with an error message.

144
145 70: EXTRACTION 70.1: WHAT IS EXTRACTION? Data extraction is the act or process of retrieving data out of a previous data source for further data processing (in the case with surveys, part of another question). Essentially, data extraction allows the selected choices from one question to appear in a following question TUTORIAL: EXAMPLE OF USING EXTRACTION Tutorial 70.1: In this tutorial, we re going to ask respondent s to select their favourite soft drinks from a list. We ll then ask a follow-up question in which only the selected soft drinks will appear as choices. Step 1: Create a survey with 2 pages, and on the first page insert a checkbox question resembling the following: Title: Which of the following soft drinks have you tried? Choices: Coca Cola Pepsi Ginger Ale Sprite Identifier: drinks Root Beer Club Soda FYI 70.1: You will need to have an identifier on questions you are going to be extracting from. With any advanced functionality, identifiers are going to be required.

146 Step 2: On the second page of the survey add a multiple choice question like the one below: Step 3: Select the multiple choice question, and click on the Extraction button in the left side editor. This button can be found under the Choices section. Step 4: Select the extraction source, meaning the question from which you d like to extract choices. The questions will be listed using their identifiers, so in our case, we ll select the drinks question.

147 This will cause all of the choices from the first question to appear in the editor, but don t worry, when the survey is being taken, only the choices selected in the first question will appear in the second question.
148 71: DYNAMIC QUOTAS 71.1: WHAT ARE DYNAMIC QUOTAS? Dynamic quotas allow for the surveyor to limit the amount of responses for a given question. If the response limit is reached for a particular question, then the survey can be exited, terminated or finished, the question can be hidden, or no action can be carried out TUTORIAL: EXAMPLE OF USING CONSTANT SUM Tutorial 71.1: In this tutorial, we re going to use dynamic quotas to limit the amount of respondents we receive from a particular age group. We ll create a question asking respondents to specify their age group, and we ll restrict the Under 18 and categories to 2 responses each. Step 1: Create a survey and include a Section Heading on the first page explaining the restrictions that are in place. FYI 71.1: A first page is not required, but it is the most common practice to provide a brief message as to what will happen if the user selects a certain response, and sees a specific path unwind. The message can, for instance, simply contain a paragraph along the lines of, If you see the Termination Page, it is because we are not accepting any more answers from the Age Category, or something to that effect. Step 2: Create a second page for your survey, and on this page drag in a Multiple Choice question with the following specifications: Title: What is your age? Identifier: age

149 Choices:Age categories. The age groups can quickly be applied by selecting Age within the Bulk feature. Step 3: Create a third page for your survey, and on this page drag in a Yes/No question type with the following specifications: Title: Have you participated in this survey before? FYI 45.2: Advanced quotas can be used on any question types. Step 4: Click on the What is your age? question found on Page 2, select the Page tab on the left hand side, and click on Edit Advanced Quotas FYI 71.3: Advanced Quotas are available to all Ultra+ Plans.
150 An Advanced Quota Wizard will appear, and here you ll be able to specify how many responses you d like to receive for a particular question or choice within a question, and the action that you d like carried out once this response limit is reached. You can also specify that type of responses that you d like to have counted towards to quota. You can choose: All, Completed, Incomplete and Terminated. All: When the number of responses for all categories, seen below, have been satisfied, then the rule is applied. Incomplete: When the number of Incomplete responses reaches the provided value, then the rule is applied. Complete: When the number of Completed responses reaches the provided value, then the rule is applied. Terminated: When the number of Terminated responses reaches the provided value, then the rule is applied. For the purpose of this tutorial, we ll set the quota at 2 Completed responses. We ll also have to specify for which question and choice we d like the quota to be set. In our case, we ll select the What is your age? question and the Under 18 choice. Now, only two respondents will be able to select the Under 18 choice and continue on through the survey. The third and subsequent respondents who select this choice will be exited from the survey. FYI 71.4: The Quota Page can be customized from the Publish settings page.

151 72: UNCONDITIONAL SKIPS 72.1: WHAT IS UNCONDITIONAL SKIPPING? Unconditional skipping will allow you to redirect your respondents to a certain page within the survey when simple branching rules are not met. Tutorial 72.1: In this tutorial, we ll show you how to implement an unconditional skip in your survey. Step 1: Create a multi-page survey with your desired questions. Click on save and navigate to the page where the unconditional branching will take place. Step 2: Click on the Page tab in the left hand side survey editor. Here you will see an option labeled Unconditionally skip to: (?), with a drop down menu beside it. This drop down menu will give you the option of skipping to each of the remaining pages in your survey, the Termination Page or the Finish Page. Choose the page to which you d like to skip respondents. FYI 72.1 Unlike advanced branching, basic skipping does not require questions to have identifiers.

152 73: ME ACTION 73.1: WHAT IS AN ME ACTION? Under your Page tab, in the survey editor, you can click on Edit Survey Logic Rules and proceed to add advanced branching logic [link] to your survey. Within advanced branching, there is an option to have an sent you (as the survey creator or admin) if a certain response criteria is met.

153 74: SKIPPING TO RANDOM PAGE 74.1: WHAT IS SKIPPING TO A RANDOM PAGE? Skipping to a random page is a branching logic rule that will send a respondent to a random page based on a previous, or set of previous, responses. You can also skip respondents to a random page within a set (for example, skip a respondent to page 4,5,6,7 or 8) TUTORIAL: EXAMPLE OF USING SKIPPING TO A RANDOM PAGE Tutorial 74.1We are going to show you how to use skipping to a random page. We are going to create a six page survey. The contents on each page, for the purpose of this tutorial, are irrelevant. However, Page 1 will have a simple Yes/No question, and when Yes is selected, the responded will be randomly skipped to either page 2, 3, 4, or 6. Step 1: Create a survey and put a text response question on the first page with the following specifications: Title: Do you like this survey? Identifier: yesno FYI 74.1: If you don t specify an identifier, you will not be able to add random page skipping. In other words, specifying an identifier is required for this tutorial.

154 Step 2: Click on the Page tab in your left side editor and select Edit Survey Logic Rules. Click on Add branching logic and input the following logic condition: If yesno - equals - Yes then Skip to a random page and the enter 2, 3, 4, 5 Now, select Save, and the branching logic will be added to your survey. When a respondent answers Yes to the Do you like this survey question, they ll be randomly taken to page 2, 3, 4 or 5.

155 75: HIDE/DISABLE QUESTIONS 75.1: WHAT IS HIDE/DISABLE QUESTIONS? A survey question can be hidden or disabled based on the answer(s) to a previous question(s). When a question is hidden, it won t appear in the survey. When it is disabled, it will appear, however it won t accept any responses TUTORIAL: EXAMPLE OF HIDE/DISABLE QUESTIONS Tutorial 49.1 In this tutorial, we ll show you how to hide/disable questions using advanced branching. We re going to create a one page survey with three questions. When the user clicks Yes on the first Yes/No question, the second question will be hidden, and when the user clicks No on the first Yes/No question, the third question will be disabled. Step 1: Create a survey and put a Yes/No question with the following specifications: Title: Have you seen the movie Annie Hall? Identifier: anniehall FYI 75.1: If you don t specify an identifier, you will not be able to add advanced branching to your survey. In other words, specifying an identifier is required for this tutorial.

156 Step 2: Drag another Yes/No question onto the page, and set up the following specifications: Title: Did you like Annie Hall? Identifier: seenanniehall Step 3: Drag a third Yes/No question onto the page with the following specifications: Title: Would you recommend the movie to your friends? Identifier: recommend Step 4: Click on the Page tab in your left side editor and select Edit Survey Logic Rules. Click on Add branching logic and input the following logic condition: If anniehall - equals - Yes then Hide a Question seenanniehall. Then, click on Add branching logic to input another condition, and enter: If anniehall - equals - No then Disable a Question recommend.

157 Select Save, and the branching conditions will be added to your survey. If a respondent selects Yes to the first question, then the second, Did you like Annie Hall?, will be hidden. If the respondent selects No to the first question, then the third, Would you recommend the movie to your friends?, is disabled.
158 76: CURRENT SCORE 76.1: WHAT IS CURRENT SCORE? Current scores are primarily used in quizzes, whereby the selected choices within a question add up to a certain value to indicate whether, for example, an A+, B or F grade was attained. By default, choices within a question will have scores assigned to them. The first choice in a question would have a score of 1, the second a score of 2, and so on. These scores are customizable, however TUTORIAL: EXAMPLE OF HOW TO USE CURRENT SCORE Tutorial 76.1: In this tutorial, we re going to show you how to grade a survey using current scores. We ll create a 2 page survey with 1 question on the first page, and an indicator as to whether the respondent scored an A+ or an F on page 2. Step 1: Create a survey and include a Multiple Choice question with the following specifications on the first page: Title: Select a number Identifier: q1 Choices: 1-10 Scale Display: Horizontal

159 Step 2: Add a 2 nd page to your survey, and drag in a Section Heading with the following specifications: Title: You got an A+ Identifier: a-plus Step 3: Drag another Section Heading question onto page 2 with the following specifications: Title: You got an A Identifier: a Step 4: Drag another Section Heading question onto page 2 with the following specifications: Title: You got an A- Identifier: a-minus Step 5: Drag another Section Heading question onto page 2 with the following specifications: Title: You got less than an A Identifier: less-than-a
160 Step 6: Click on the Page tab in your editor, and select Edit Survey Logic Rules. Once in the editor, input the logic rules as listed below: Now press Save, then Save again, and click on Preview this page.
161 When the respondent selects a value from the first question and clicks Next, the Section Header appropriately signifying the value is shown on the next page.

162 77: SKIPPING TO A QUESTION 77.1: WHAT IS SKIPPING TO A QUESTION? With FluidSurveys, you can skip respondents directly to a page containing a specific question. With this, they would bypass any questions that didn t apply to them TUTORIAL: EXAMPLE OF HOW TO SKIP TO A QUESTION Tutorial 77.1: In this tutorial, we ll show you how to skip respondents to a particular question. We ll create a multi-page survey and skip respondents to Page 2 Question 2 when they click Yes, and Page 3 - Question 3 when they click No. Step 1: Create a survey and add a Yes/No question with the following specifications on the first page: Title: Yes Goes to Page 2, No Goes Home Identifier: q1 Step 2: Add multiple pages
163 Step 3: Return to Page 1, and click on the Yes/No question. Under the options menu on the left hand side, select Page 2 when Yes is clicked, and Page 3 when No is clicked. Click Save and Preview. Now, when the user selects Yes, the survey logic will bring them to the appropriate page containing the correct question, and subsequently, when No is selected.
 or character limit. 78.2: TUTORIAL: HOW TO USE PAGE LABELS Tutorial 78.")
164 78: PAGE LABELS 78.1: WHAT ARE PAGE LABELS? Page labels are, in short, custom labels for pages within the survey. As opposed to using the default Page #, you can customize the labels. FYI 78.1: Page labels do not have a character type restriction (EX:!@#$%^&^*() or character limit. 78.2: TUTORIAL: HOW TO USE PAGE LABELS Tutorial 78.2: In this tutorial, we re going to show you how to set a page label. We ll simply change the page label for the first page on a newly created survey Create a survey and click on Page tab in the left hand side editor, with the following specifications: Page Label: 52: Page Labels Now, within the Administrator view, the Page 1 will be referred to as, 52: Page Labels

165 79: RANDOMIZE QUESTIONS ON A PAGE 79.1: WHAT IS QUESTION RANDOMIZATION? By default, questions on a survey page are held in the same place on each and every page load. However, there is an option that can do the opposite. You can randomize the questions on a survey page so that every respondent sees them in a different, and random, order TUTORIAL: HOW TO USE RANDOMIZE QUESTIONS ON A PAGE Tutorial 79.2 We are going to show you how to randomize the questions on a page. We ll Step 1: simply create 1 page with 10 questions and enable randomization. Create a survey and put a series of questions on the page: Step 2: Click on Page tab on the left hand side, and select Randomize questions on this page Click Save and Preview this page. On this first initial load, the questions will be different than the next reload. Refresh the page, and notice how the questions shift places.

166 80: SHOW BRANCHING/SKIPPING INFO 80.1: WHAT IS SHOW BRANCHING/SKIPPING INFO? By default, respondents don t know if there is branching or skipping information on a page. Enabling this option does the opposite, and informs the respondent that there is branching logic present. 80.2: TUTORIAL: HOW TO USE SHOW BRANCHING/SKIPPING Tutorial 80.2 We are going to show you how to show branching/skipping info. We ll simply add two questions, branching, and enable the option to display that branching logic rule. Step 1: Create a survey and drag a Yes/No question onto the first page with the following specifications: Title: Yes Hides question 2, No Disables question 2 Identifier: q1
167 Step 2: Drag another Yes/No question on the page with the following specifications: Title: Disable or Hidden. Which am I? Identifier: q2 Step 3: Add branching logic to the survey by clicking on Page and selecting Edit Survey Logic Rules,. Add the following condition: If q1 *equals+ Yes *then+ Hide a question - q2. Subsequently, create another branching logic rule: If q2 *equals+ No *then+ Disable a question - q2.

168 Step 4: Click on Survey tab on the left hand side, and select Show branching/skipping info. Click Save and Preview this page. The respondent will now be able to see all the branching conditions on the page.
169 81: HOW TO CREATE A QUIZ 81.1 WHAT IS A QUIZ? A quiz, in short, is a test of knowledge, especially a brief, informal written or oral test given to students. FluidSurveys allows for the administrator to quickly, easily, and efficiently, create an online quiz CREATE A QUIZ Tutorial 81.2: In this tutorial we ll show you how to set up a basic quiz. We will have a 2 page survey. On page 1, we ll ask the user a couple of basic math questions. On page 2, we will display the total of questions the respondent answered correctly. Step 1: Create a 2 page survey

170 Step 2: On page 1, drag in a Multiple Choice question type and change the title of this question so that it says, =? Title: =? Identifier: 4 Choices: 1-10 Scale Display: Horizontal In addition, set the display type to Horizontal:
171 Step 3: Duplicate the previous question 2 more times, and change the identifiers to reflect the correct answer, and the question title to be the mathematical representation of that answer. Title (Respectively): =? And =? Identifier (Respectively): 5 and 6 Step 4: In order for the Current Score question type to understand which is a wrong answer, and which is a right answer, the Score value will need to be set to 0 for all wrong choices, and 1 for the correct answers. In this case, a score of 1 should be set for choices 4, 5, 6, and 0 for the rest. Below is an example of setting =?
172 Step 5: On page 2, add the Current Score question type with the following specifications. Title: You got { s } / 3 Save and preview your survey. When the respondent selects, for instance, 4, 3, 3, t hey will see You got 1 / 3. It appears that I should work on my math skills.

173 82: SHOWING CORRECT ANSWERS TO A RESPONDENT In continuing to use the previous example, if you wish to display to the correct answers to the respondents for any question they may have answered incorrectly, it is as easy to achieve as it is to hide/show a question type. 82.1: TUTORIAL: HOW TO SHOW CORRECT ANSWERS Tutorial 81.2: In this tutorial, we ll continue with the previous example, in that page 1 contains a series of basic mathematical questions, and page 2 displays both the current score and the correct answers. Step 1: In order to save time, we re going to simply use question morphing *Link to #] and change the Multiple Choice question types into Section Headers. Therefore, select all 3 questions on page 1, right click, and select Copy

174 Step 2: Click on page 2, and right click anywhere within the Editor and click Paste. Step 3: Select a question, and in the top left corner of the Editor, select Section Header from the dropdown labeled Type
175 Step 4: Select page 4, and insert 3 Section Header question types, with the following specifications in respective order: Title(s): = 4, = 5, = 6 Identifier(s): a4, a5, a6 Step 5: The last remaining link is to apply branching logic to the quiz. We ll be using the NOT logic which will allow for the logic to remaining very simple and especially small in size. The NOT ensures that if any answer other than the right one is provided, then the answer will show itself.

176 Step 6: Create a branching logic that resembles the following:
177 Step 7: Now, when the respondent completes the survey, they will be presented with the correct answer for any question they answered incorrectly.
178 83: GIVING A GRADE [Link to 76]

179 84: ALLOW RESPONDENTS TO DOWNLOAD RESPONSES In some cases, a survey administrator may want to allow their respondents to download a hardcopy of their responses. To do so, it s as easy as First, the option to Enable respondents to download their answers must be selected. To do so, click on Publish > Settings and select the option Allow users to download/print responses upon completion of the survey, as seen below.
180 85: CREATING A POLL Unlike a survey, a poll can instantly convey to the respondent the exact results of a specific question. Therefore, in some cases, a poll may be more advantageous as opposed to something as static as a survey, which does not provide instant feedback to the respondent. To create a poll, click on Poll found at the top of your account. Once inside, you will notice that the user interface is slightly similar to Surveys, insofar that you simply click on Add Poll and away you go. Now, here is where the fun starts. Below is the screen you re presented with after clicking Add Poll FYI 85.1: The ability to create a poll comes with every account on FluidSurveys.
181 Once you ve set up your poll, click on Publish to make it live. All created polls, including those that are Closed and Live, reside in a dashboard. From the Poll List page, you can do the same type of things you can do with your surveys, such as styling, viewing results, etc. In addition, after clicking on, using the above example, Yes, the user will see the results
182 86& 87: EMBEDDING POLL INTO WEBSITE An added benefit of creating a poll is the ability to embed it directly into a web site. A poll, despite having a unique link, does not look as forthcoming as a survey. Therefore, it is generally advisable to embed a poll on a web site. To embed a poll, click on Publish. Doing so will bring you to a new page as seen below. This page contains the necessary code needed to display your poll directly on your website. Simply copy it into your site s HTML. FYI: A basic understanding of HTML is needed when implementing your poll into your web site Tip 63.1: Additionally, the code to embed a poll can also be used on numerous blogging platforms, such as WordPress.
183 88: POLL PUBLISHING OPTIONS Each poll comes with a slew of options that allow for additional customizations. Below are a series of poll options that can be modified. Poll Name Question Response Choices Response Restriction Expire Restrictions After Poll Publishing The name of the poll for personal referencing Appears as the subject of the poll Choices the respondent can select The response restrictions for the poll, which has options as seen below No Restriction The poll can be answered multiple times by the same person Restrict by cookie Only one response per computer Restrict by IP Only one response per household A response restriction can revert to the default (Restrict by cookie) after a defined amount of time Never 24 Hours Poll Results Display Options 1 Week Results for polls can be suppressed or tweaked for aesthetic reasons. Display poll results and vote totals Show both percentage and total votes for a choice Show only percentages Only show the percentage of people that voted for a choice Hide all result Do not display real-time information of the current poll statistics By default, a poll is voted on by selecting a radio button and clicking Vote. However, by enabling, replace radio buttons with links, the links

184 89: MAKING YOUR SURVEY LIVE Surveys created in FluidSurveys are, by default, closed. This means that unless an individual is logged into the survey creator s account, they will not have access to the questions. Closed mode allows the survey creator to build and test their questionnaire in a private and secure environment (Any responses submitted by the creator while the survey is closed will be marked as Test Data and can be deleted before going live) HOW TO MAKE A SURVEY LIVE In order to make a survey accessible to the public, it must be set to Live. There are two ways to do this. On your main account page there is a toggle button beside every survey. Clicking on this will change the survey status from closed to live. The same toggle button is located on the Publishing page, and the survey can be set to Live or Closed this location as well. Once your survey is set to live, you will be able to start collecting responses from the public. You can open, close and re-open your survey at any time and the data will not lose any of its integrity MODIFYING A LIVE SURVEY Once a survey is live and has gathered responses, there are certain modifications that can be made, while others should be avoided.
185 Acceptable Changes: These modifications can be made while responses are being, or have been, collected and will not affect the integrity of the data. - Changing the order of questions (Moving questions around on the page, or between pages). - Changing the wording of questions. - Add new questions. Unacceptable Changes: These modifications cannot be made while responses are being, or have been, collected as they will affect the integrity of the data. - Deleting questions: Once you delete a question, all of the responses that have been collected for that question will be cleared from the results with no possibility of recovery. - Re-arranging choices in a question: If you change the order of choices in a question, the responses will no longer correctly match up, resulting in data integrity issues. Responses are stored based on the location of the choice, not the name of the choice.

186 90: DELETING YOUR TEST DATA When the survey is in Closed mode, the administrator can still contribute responses while testing by clicking on the Preview icon. These responses are recorded in analytics but are marked as Test Data HOW TO DELETE TEST DATA Test Responses are recorded in analytics however they are easily identifiable and deleted so to not skew actual results. To delete test data, click on the Actions dropdown and select Delete all test data. Using this same method, it s also possible to delete individual test responses, or regular responses. You can either delete all, or check off selected responses and delete only those. FYI: Once a response is deleted, whether a test response or a regular response, it cannot be recovered. It s extremely important to exercise caution when deleting responses to assure that only the data you want to clear is cleared.

187 91: ING YOUR SURVEY LINK Once your survey has been created and is ready to gather responses, you can distribute your survey link. However, before doing so, it s important to make sure that your survey is finalized and set to live SENDING OUT YOUR SURVEY LINK The survey link can be found by going into the Publishing section, under the Deployment tab. Respondents will be able to gain access to your survey through that link, and you can distribute it in a variety of ways. You can post it online (on your website or a social media page), paste it into an , send it out in paper form, etc. Another method of deploying your survey is via FluidSurveys invite tool CUSTOMIZING YOUR SURVEY LINK The default URL for a survey is generated based on the account s username and the survey title, but it is possible to customize it. To do so, click on the Customize this URL link next to the Online Deployment URL field. You will then be prompted to enter a new address. FYI: The app.fluidsurveys.com/s/ portion of the URL must always be present.
188 92: USING GET VARIABLES AS COLLECTORS/CHANNELS GET Variables allow you to pre-code responses coming from specific URL s. They act very much like collectors/channels and can be very useful when sending out a survey to multiple groups as they would allow you to see which responses came from which group. [Link to 77]

189 93: POPUP SURVEYS One way to distribute a survey is via a pop-up window on your website. FluidSurveys offers this functionality on Ultra and Enterprise level accounts EXPLORING THE POP-UP TOOL In order to deploy a survey using a pop-up window, you must first proceed to the Publishing screen and click on the Create customizable popups to show this survey on your site link. Then, click on the Add new popup link. FYI 67.1: There is no limit to the amount of pop-ups a single survey or user can use. The Pop-Up Tool will feature 4 tabs: Settings, Messages, Style and Code.
190 Under the Settings tab, you ll find numerous features: Feature Function Name The identifying name of your popup. It will be visible only to you, not respondents. Identifier A custom value which prevents your pop-up from showing twice to one visitor. Enabled Dictates whether the pop-up is to be disabled or enabled Pop Over Forces the pop-up to stay in the foreground Use Standby Page Ask the user before going to the survey if they wish to take the survey after leaving your web site Display Effect Outlines how the pop-up will fade into view Language The language of the standby page Percentage Holds the value as to how many people the pop-up should be displayed to Frequency The value for how often the pop-up will display Delay How long the pop-up takes to display on your web page Postpone Length How long before the pop-up displays on your web page Once you ve entered the settings, you can simply copy and paste the automatically generated code into your website s HTML.
191 94& 95: EMBEDDING YOUR SURVEY (PART 1) As an alternate to sending out your survey link via (using the invite tool or your personal ), FluidSurveys gives you the option of embedding the survey directly into your website, so anyone who visits the site will be able to respond. There is, of course, a quick and easy way to do this using a few keys steps! FYI 94.1: The embed code used to place your survey on a website or in a blog comes standard with both the Ultra and Enterprise accounts. 94.1: WHERE CAN I FIND THE IFRAME TO EMBED CODE? In order to add the survey into your website, it s as easy as copy & paste as FluidSurveys has already done the coding work for you! Go into the Publish section of the software and on the main page, there will be a tag that says Embed Code. Beside this, there will be a text box filled with the embed code. Go ahead and highlight this code paste it directly into the HTML of your website or blog. You can manually add extra HTML code (to change the height and width, for example) directly into the code. As you go, you can refresh your website at any time to preview the changes in your survey. Example of changing/adding HTML: Within the IFRAME tags you can add height: 450px or width: 65px. Nevertheless, below is an image of the code for the IFRAME. The survey will take on the default style that we provide and the themer will allow you to dynamically modify what your survey looks like. If you have WordPress, you can take the provided code and copy and paste it into a Post or Page.

192 96: SHARING YOUR SURVEY ON TWITTER/FACEBOOK AND MORE Any survey you create can keep itself close to the pulse of Internet society with the click of a button. You can easily deploy your survey directly on any of your social networks: Twitter Facebook Digg Reddit Delicious Google Buzz To perform a social network release, click on Publish and then select which web site you wish to post on. A popup window will appear asking for your login credentials, and once the information has been inputted, you re done. It s easy as

193 97: KIOSK MODE (GREAT FOR IPADS, LAPTOPS, TOUCHSCREEN DEVICES) Deploying your survey in kiosk mode allows you to assign a short survey as an "entrance" survey. The entrance survey runs only "one time" when you first run your survey and then the torch is passed to your main survey. Your main survey will then run in a loop. The responses to the entrance survey will be pre-pended to all responses gathered in that session. When you select Use this survey in kiosk mode, a new option will appear which whereby you can select which survey you wish to have appear BEFORE the main survey. In this case, Entrance Survey will appear before the main survey.
 which allows for a survey to be deployed in those languages.")
194 98: YOUR SURVEY URL IN DIFFERENT LANGUAGES A selling point of FluidSurveys is the ability to present a survey in a number of languages (62 to be exact!) which allows for a survey to be deployed in those languages. If, for instance, your survey has English, French and German as the survey languages, then you can send respondents either an English, French or German link. To do so, click on Publish and immediately, you re given the option to select the Online Deployment URL language. From the dropdown, select the language of choice. As you ll notice, French has been selected, and the Online Deployment URL immediately switches to langfra (Indicating French)
195 99: INVITES (PART 1 SENDING INVITES) 99.1: WHAT IS THE SURVEY INVITATION TOOL? FluidSurveys comes equipped with an invitation module through which survey links can be sent to potential respondents via . Contacts can be added manually (one by one or in bulk) or imported directly from a third party address book. After the invitations are sent, the survey creator can keep track of who has received, viewed or completed the survey WHAT DO SURVEY INVITATIONS CONTAIN? Survey invitations sent with the invitation module contain a customized message and a unique survey link through which the recipient can access the survey. The link includes a unique code that can identify the respondent and can be used by the respondent to re-gain entry and edit the survey, even after it has been submitted. FYI 99.1: In order to allow respondents to re-enter the survey using their invite link, you will have to enable the setting allowing respondents to edit their survey after it has been submitted TUTORIAL: COMPOSING A SURVEY INVITATION Tutorial 99.1: In this tutorial, we will show you how to compose a survey invitation that will be sent to potential respondents. Step 1: Navigate to the Publishing Section of FluidSurveys and select the Use our invitation tool to deploy this survey via link. Tip 99.1: Before sending out your survey, make sure that it is set to Live.
196 Step 2: You can now compose the subject of your invite along with the message. Typing in a name in the Send from: field will make that name appear as the sender. If you leave this field blank, the will appear as coming from the individual to whom the account is registered. The survey link is automatically inserted into the message with html code. To move it around within your message, simply copy and paste the code wherever you d like. Figure Figure FYI 99.2: The Sent From address will always appear as the that is registered with the account, even if you change the name of who the invitation is coming from. If you d like to change the as well, you ll have to enter the new address in the Sent From field using the format <example@ .com> 99.4 SENDING INVITATIONS Once you ve composed your invitation message, you can begin sending it out to potential respondents. You can a) add contacts individually b) create and add lists c) by import contacts ADDING CONTACTS INDIVIDUALLY Adding contacts individually is a very quick and simple process. Simply scroll down to the Send To box and click on Add a Contact. Figure

197 A pop-up box will appear and you ll be able to enter the individual s name, address and however many custom fields you d like (for example, age, occupation, sex, etc). Figure Once you ve added your contacts, they ll appear in the summary box. There, you can double check if all of the addresses and names are correct, and delete contacts, if necessary.

198 100: INVITES (PART 2 SENDING REMINDERS) It can often be useful to send out reminders after your survey invitations have been sent. Perhaps individuals may have forgotten about the first , or it got lost in an overcrowded inbox, etc. Reminders can give potential respondents the little nudge they need to provide you with some valuable feedback. The process of sending reminders using FluidSurveys is fast and simple. First, from the left hand side toolbar, select the Reminders/History button. On this screen, you ll see a history of all of the survey invitations and reminders that you ve sent out. Clicking Review will show you what was written in the message, to who it was sent and the status of each contact (whether they ve completed the survey or viewed/ not viewed the survey invite). To compose a reminder, click the Compose Reminder link. You ll then be able to enter your reminder message and specify to who the reminder should be sent. To do so, click on Advanced Options, and you ll be able to select whether you want it sent to everyone, only to those who ve viewed the invite, only the ones who haven t viewed the invite, etc. Once you ve inputted your settings, click on the Send Reminders button and your reminder will be sent out.
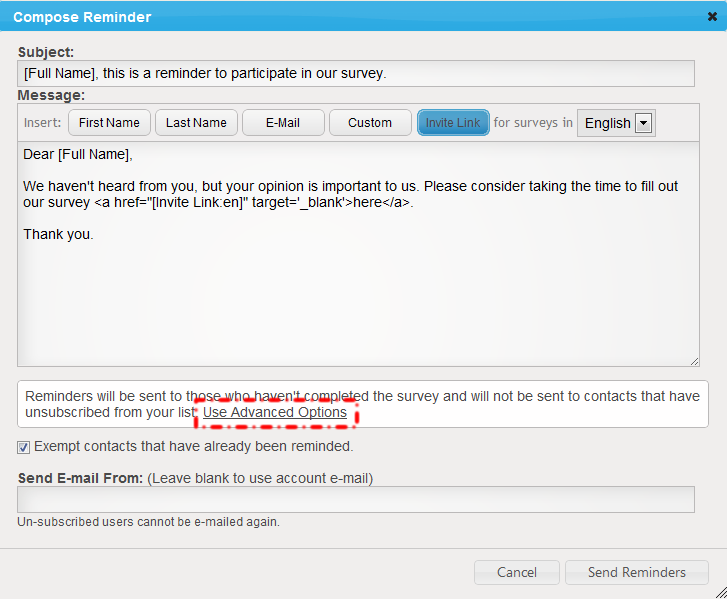
199
200 101: INVITES (PART 3 IMPORTING CONTACTS) If you have a large collection of contacts that you d like to invite to take your survey, it might not be feasible to add them individually. In this case, you could bulk import contacts from an.xls or.csv file. Address book programs (Outlook, Gmail, Lotus, etc) typically allow you to export contact lists directly into.csv or.xls, so you can either use these programs or create your own file. Explanation 101.1: In order for your contacts to upload properly, the file has to contain the two columns: Name and . Additional columns can also be imported into your FluidSurveys address book. Once you ve created your.csv or.xls file, select the Import Contacts button under the Individuals to Invite label. A pop-up will appear prompting you to select your file from your computer and upload it to FluidSurveys.com. Once you ve uploaded your contacts, they ll appear in the summary box.
201 102: INVITES (PART 4 CUSTOM VARIABLES) Custom variables allow for additional information to be uploaded with contacts, and these can then be viewed alongside their responses. Explanation 102.1: In order for your contacts to upload properly with custom fields, the file has to contain the two columns: Name and , in addition to the Custom Fields, which do not need to follow any specific order. When the.csv file has been successfully imported as outlined in Section 101, and you have been taken to the summary box, clicking on the pencil will bring up a new window providing the custom variables from the.xls or.csv file. You can then add use each custom variable when sending out invites.
202 103: INVITES (PART 5 COLLECTORS/CHANNELS) In addition to uploading custom variables, as seen in Section 102, you can go even farther and send out custom links based on these variables. For example, if you wish to send a survey to Students and Professors, but want to distinguish between the two groups. With the Invite tool, that is distinction between the two can be easily done.


203 104: INVITES (PART 6 CREATING LISTS & ADDRESS BOOK) Another option when sending out invites is to create and use lists. Lists are very useful as they can store and organize contacts in your account, and can be used to invite respondents to multiple surveys. Tutorial 104.2: In this tutorial, we ll show you how to create and send invitations to a list of contacts. In this example, we ll create our list by importing contacts from an.xls file while also adding contacts from our existing address book. Step 1: Select the Create a New List link under the Send To menu. Step 2: Enter a name for your list and click Save. Step 3: Select the Import Contacts button to import your.csv or.xls file of contacts. This process is the same as when you import contacts into the main invite interface. FYI 104.3: You can also add contacts individually into your list by clicking the Add a Contact button.

204 Step 4: Select the contact list from your computer and upload it to FluidSurveys.com. Step 5: Once your list has been uploaded, you ll see the contacts in the summary box. After double checking that everything is in order, select the Back to Message button and your list will be saved automatically. FYI 104.4: To edit this list, or any other list, simply double click the name in the left side column. Step 6: After we ve imported our contacts into the list, we can still add additional individuals. Say that we want to include people who weren t in the uploaded file, but are already in our address book. To add them, we have to go into our address book. Step 7: In the address book, every that you ve sent an invitation to in the past will be shown (unless you ve manually deleted them). To add people to an existing list, highlight the individuals and select Add selected to existing list from the other options dropdown box.


205 Step 8: Select to which existing list you d like to add the contacts to and click Append Contacts. Step 9: Once your list is ready, you can add it to your invite. Click on the Add a List button in the Send to menu and select which list you d like to add from the dropdown. Then, you can send your invitation to everyone in that list. FYI 104.5: Contacts in a list will not appear in the summary box. FYI 104.6: You can add multiple lists to one invitation, and you send invitations to lists at the same time as you send them to individually added, or imported, contacts.
206 105: INVITES (PART 7 UNSUBSCRIBE) At any point, a respondent can unsubscribe from the mailing list of your survey. When, or if, a respondent opts out of receiving any updates, you will see within the Send Reminders section, the word Unsubscribed, as seen below.
207 106: CREATING INVITE CODES It is sometimes appropriate to restrict access to your survey so only select individuals have access to it. A perfect way to do this is with invite codes : HOW ARE INVITE CODES DISTRIBUTED? Invite codes can be distributed in two ways. If the FluidSurveys invitation module is used, the invite code will automatically be appended to the invite link in the and no work on the part of the respondent is required. If the invitation module is not used, the survey creator can manually generate the invite codes for their survey (as many as necessary). They would then have to provide a unique code for each potential respondent as access to the survey would not be granted without a code.
.")
208 107: INVITE ONLY SURVEYS WHAT ARE INVITATION ONLY SURVEYS? Invitation only surveys can only be accessed by individuals who have been provided with a unique invite code. Explanation 107.1: Invite codes are randomly generated 5 character codes (composed of letters and numbers). They re different from passwords as they cannot be customized and are randomly generated for each respondent. No two invite codes would be the same CREATING AND DISTRIBUTING INVITE CODES WITH THE INVITE TOOL If the survey is to be distributed using the survey module, the process of using invite codes is very simple and painless. The first step is to go into the Publishing screen and select the Settings tab. Then, choose Other Options from the left side menu and check the box labeled Invite only (Only allow users with a valid unused invite to take the survey). Save your changes, and proceed to send out your invitations. The unique code will automatically be appended to each recipient s link, and they ll be able to access the survey using this link in their . FYI 107.1: Anyone who tries to access the survey through a method other than the link received in the invitation will be asked to enter their unique invite code. The code can be found at the end of the provided URL:
209 107.4 CREATING AND DISTRIBUTING INVITE CODES WITHOUT THE INVITE TOOL If the invite module is not going to be used to send out the survey invitations, unique codes can still be used. The first step is to enable the Invite Only feature for the survey, as seen above. Then, navigate to the Invite Screen and select Tools from the left hand side bar. This will bring you to a screen where you can generate invite codes. Specify the number of invite codes that you will need (should correspond to the number of potential respondents) and select Generate Codes. When this is pressed, all of the unique codes will appear. These will have to be sent to each potential respondent, and they will either have to be entered by the respondent prior to taking the survey or you can insert it into the survey link for them. Tips 107.1: Exporting your list of invite codes will provide you with a spreadsheet that includes all of the codes already inserted into the survey link.
210 108: ANONYMOUS SURVEYS With FluidSurveys, it s possible to create and distribute completely anonymous surveys, meaning that the system would not store any identifying data about the respondent ( address, I.P, location, etc) CREATING AN ANONYMOUS SURVEY After you ve finalized your survey questions and are ready to begin collecting data, making sure that the responses are kept anonymous is a very simple process. First, proceed to the Publishing menu and from there, select the Settings tab. You will then have the option of enabling/disabling features such as tracking the respondent location and IP address, or making the survey completely anonymous. By selecting the field labeled Make this survey anonymous, you will assure that no identifying data about the respondent is collected. FYI 108.1: Once a survey is set to be anonymous, this setting cannot be undone.
211 109: INVITES AND SAVE & CONTINUE LATER OPTION FluidSurveys is equipped with a feature which, when enabled, allows respondents to save their survey answers and continue their questionnaire at a later time. When this feature is enabled and the survey invitations are sent using FluidSurveys invite tool, a respondent can regain entry to their answers by clicking on the invite link in the original that they received. They will then be taken to the spot in the survey where they left off. FYI 109.1: If the Allow users to Edit their Responses feature is enabled, users would also be able to regain entry to their survey using the original invite link. However, they would be taken to the beginning of the questionnaire, not to the exact spot where they left off.
212 110: MULTI-MODE SURVEYS FluidSurveys allows users to distribute surveys through numerous means: Links, Invites, Embedding, and Pop-Ups. These methods can be used exclusively, or in combination, and all of the results will be entered into the same database. An individual could therefore use the invite tool, pop-up tool and embedding feature on one survey, and all the responses would be visible together in one place.
213 111: TELEPHONE SURVEYS FluidSurveys allows users to distribute surveys through numerous means: Links, Invites, Embedding and Pop-Ups. These methods can be used exclusively, or in combination, and all of the results will be entered into the same database. An individual could therefore use the invite tool, pop-up tool and embedding feature on one survey, and all the responses would be visible together in one place. A survey administrator could then, for example, enter an individual s responses into the system while asking the questions via phone.

214 112: PAPER SURVEYS FluidSurveys provides users with the flexibility to either transfer surveys from paper to an online format, or from an online format to paper PAPER TO ONLINE Transferring a survey from paper to FluidSurveys is a very simple process. With the wide range of question types available, a user can simply duplicate their survey using the question editor. It s also possible to transfer results gathered from paper surveys into the online interface, allowing the administrator to make use of analytics and export features ONLINE TO PAPER A scenario could unfold where it s necessary to create a paper copy of an online survey. To accommodate this, FluidSurveys allows users to export their online survey into either a.doc or.pdf. Users must go into the analytics interface and select the Export option from the top right corner. An option will then appear to export the survey questions into either.doc or.pdf format. Tip 112.1: Typically, it is recommended that the survey questions be exported to Microsoft Word, as they can then be edited and formatted. This possibility does not exist with.pdf exports.
215 113: REMOVING THE BACK BUTTON Survey administrators can remove the Back navigation button from the bottom of their surveys. This would prevent respondents from going backwards and editing their answers while taking a survey. As soon as the respondent presses Next, the answers they have submitted are saved and can no longer be altered HOW TO REMOVE THE BACK BUTTON In the publishing screen, under the settings tab, check off the Remove the back button from the survey option.

216 114: SAVE AND CONTINUE LATER Surveys can often be very long and detailed and therefore it s not always feasible for respondents to complete them in one sitting. FluidSurveys contains a feature that allows respondents to save their progress and come back to it at a later date ACTIVATING SAVE AND CONTINUE In the publishing screen, under the settings tab, check off the Allow user to save their survey and continue it at a later time option. There is also an option to have the Save & Continue button appear on the first page. If this feature is enabled, your survey will be equipped with a button at the bottom of every page that users can click to save their existing responses ACCESSING A SAVED SURVEY Once a survey has been saved, there are a couple of ways in which the respondent can regain entry to complete it. The first is through a unique link that is provided when the Save button is pressed. This link can either be bookmarked, copy/pasted into a document or written down on paper, but entering it into a browser will bring the respondent back to their survey and responses.
217 If, however, you accessed the survey through the invite link in an invitation (sent through fluidsurveys.com), you can regain entry to your responses by simply using this link again RECOVERING A LOST LINK If the invite is deleted and/or the survey recovery web link is lost, there is a way for the survey administrator to recover the link for the respondent so they can re-enter their survey, as long as there is a way to identify which response is which (if an identifier question was asked, s were stored, etc). If it is possible to associate the response with the respondent, then the survey administrator can go into Analytics, click on Responses, right click on the desired entry, select edit, and the URL that appears when the survey is being edited can be used by the respondent to regain entry into their survey.
218 115: ALLOW USER TO DOWNLOAD RESPONSES FluidSurveys comes equipped with a feature that allows respondents to download a copy of the survey questions and their responses, in.pdf format. This option is available upon completion of the survey ENABLING THE DOWNLOAD RESPONSES FEATURE The setting to allow respondents download a copy of the survey questions and their responses can be found on the Publishing page under the settings tab. Once this option is checked, respondents will be presented with a link of the Thank You page of the survey allowing them to download the.pdf file.
219 116: CLEAR PAGE & SAVE PAGE BUTTONS FluidSurveys allows clear and save page buttons to be added to surveys. These additional buttons are placed next to the navigation buttons at the bottom of the page. The clear page button allows a respondent to delete all of the answers from the page, regardless of the question type, while the save page button saves all of the answers on the page. FYI 116.1: By default, every time a survey respondent clicks Next on a survey, their answers on the page are saved. However, adding an additional Save button can still be very useful, particularly if there are a lot of questions on one page. It allows respondents to periodically save to protect the data against unexpected events, such as power outages, browser crashes, etc ENABLING CLEAR & SAVE PAGE BUTTONS The setting to allow survey creators to add clear page and save page buttons to their survey can be found on the Publishing screen under the Settings Tab in Display options. The buttons do not have to be added together. It s possible to only add a Save page button without including a Clear page button, or vice versa. FYI 116.2: If there are any questions marked as required, or requiring validation, the survey won t save until the conditions are met and the question is responded to in the proper format. FYI 116.3: Saved responses will appear in analytics. The survey as a whole will be marked as incomplete, but the answers that have already been provided will be visible.
220 117: EXIT SURVEY BUTTON The exit survey button allows respondents to clear all of their entered responses and exit the survey. It assures that none of their data is kept, and wipes out their entire entry from analytics. Explanation 117.1: Every time that a respondent clicks on the Next button at the bottom of a survey page, their answers to the questions they ve already responded to are saved. Even if they close their browser without submitting the survey, those answers will still appear in analytics as a partially completed survey. By clicking the Exit Survey button, however, the entire response is cleared and is no longer visible in analytics, not even as a partial response ENABLING THE EXIT SURVEY BUTTON The Exit Survey button can be added by going to the Publishing screen, opening the Settings tab, clicking Display Options and selecting the box labeled Show 'Exit Survey' button at the bottom of survey pages. FYI 117.1: The Exit Survey button can be used in conjunction with the Save & Continue and Edit Responses features. If this is done, a respondent can return to their survey even after responses have been submitted and viewed by the administrator and clear them, deleting an entire entry from the results.
221 118: ALLOW USERS TO REVIEW RESPONSES It s also possible to allow respondents to review and print their responses before clicking submit ENABLING THE REVIEW RESPONSES FEATURE This setting can be found on the Publishing page under the Settings tab. The survey administrator simply has to check the box labeled Display a button that will allow users to download a PDF to review their responses before completing the survey. Once this setting is selecting, respondents will have the option of downloading their responses at any point in their survey by pressing a button at the bottom of the page located beside the navigation buttons. The file will download in.pdf format. FYI 118.1: The Review Responses button will not appear on the first page of any survey, or on one page surveys. The Next button has to be pressed at least once for the questions and responses to be recorded. Tips 118.1: When enabling the Review Responses feature, it s also a good idea to enable the Save and continue option. Often, respondents will print out their responses in order to review them with others and do not want to submit right away, but rather, want to save their progress and return at a later time.
222 119: ALLOW USERS TO EDIT THEIR RESPONSES In addition to allowing users save their survey and continue it at a later time, a survey administrator can also allow respondents to re-enter the survey and edit their answers after they ve been submitted ENABLING THE EDIT RESPONSES FEATURE The setting allowing respondents to edit their responses after submission is available on the Publishing page under the Settings Tab. Unlike the Save and Continue feature, the respondent will not be presented with a link to regain entry to their survey. Users will only be able to edit their responses if the survey link was sent out using FluidSurveys invite tool or if the survey was set to allow just one response per computer. If either occurred, the user can simply return to the original link they used to access the survey, and they ll be able to edit their answers (as long as the edit responses feature is enabled).

223 120: AUTO SELECTION OF CHECKBOXES By default, checkboxes afford the respondent the ability to select more than one selection, whereas a multiple choice question type is the opposite. However, there are momentarily lapses during survey creation that may be advantageous to allow for the respondent to only select one option within a checkbox. For instance, if the user selects N/A or, Other, please specify, then any choices they selected before the fact, should unselect since the aforementioned options take precedence. The ability for this type of functionality is possible through, Exclusive Choice, which forces all previously selected choices to become unselected HOW TO SET AUTO SELECTION OF CHECKBOXES Deselecting checkboxes is possible by clicking the Checkbox question type, selecting the row Other, please specify: for instance, and checking Exclusive choice. What will happen, is when the user selects, Other, please specify, any other selection, including text in the text response will become deselected and blank.
224 FYI 120.1: You can, at any point, remove the Exclusive choice option by unselecting the option Once selected, when the respondent answers questions as the following: The moment, Other, please specify: is selected, Self-employed, Not employed, but looking for work, Homemaker, Student and subsequently, Example all become blank:
225 121: ENABLING SSL FluidSurveys comes equipped with SSL security for surveys. SSL is standard with the enterprise package but can be added to any account as an add-on (contact SSL will encrypt communications between the FluidSurveys server and survey respondents, adding a layer of security. It ensures that all data transferred between the web server and browser remains private and integral HOW TO ENABLE SSL SSL can be enabled by going to the Publishing Page, selecting the Settings tab, clicking on Privacy & Security from the left side menu and checking the label Enable SSL (Secure Socket Layer) Connections. Explanation 121.1: Once SSL is enabled, your survey URL will contain This confirms that the connection is secure. FYI 121.1: If you ve linked to an outside website in your survey, the connection with FluidSurveys will be secure however the connection with the other resources will not be secure. If this is the case, the in the URL will look slightly different. This could happen if you, for example, include an image hosted on another website in your survey.

226 122: CAPTURE IP ADDRESS & RESPONDENT LOCATION Survey creators have the option of automatically gathering IP addresses and location information from respondents HOW TO CAPTURE IP ADDRESSES AND RESPONDENT LOCATION These features can be found on the Publishing page, under the Settings tab, in the Privacy and Security section. To enable one or both, simply check the boxes labeled Capture IP Address and/or Track Respondent Location. Once you check the boxes, results will begin coming in with the IP address and location information. They can be viewed in analytics, in the responses view, or in the response export. In the response viewer, the information can be seen after the IP address and Location variables are selected from the dropdown. The data will appear in each response, if it was collected. If it was not collected, the IP address will appear as and the location will be blank. FYI 122.1: IP and location information can be turned off and on. When it s on, all of the responses that come in during that time will be recorded. When it s off, none of them will. However, previously recorded information will not be deleted. It will still appear in the responses. In the Statistics section of Analytics, you will also be able to see a map of where your respondents originate from.
227

228 123: SURVEY QUOTAS Survey administrators can add quotas to their surveys. This means that they can specify how many responses they d like to collect and once that number is reached, the survey is automatically closed and responses are no longer permitted IMPLEMENTING A SURVEY QUOTA Quotas can be set up by going to the Publishing page, selecting the Settings tab and clicking the Quotas and Deadlines link from the left side menu. There, a quota can be set for the number of responses and/or for the number of survey completions. Responses refers to the number of individuals who start the survey (they don t have the necessarily submit their answers at the end) while completions refers to the number of people who go through the entire survey and submit at the end. Once the quota is reached, the survey would automatically be closed and the new potential respondents would be presented with a message indicating that the quota has been filled CHANGING THE QUOTA FILLED MESSAGE The message that individuals are shown once the quota has been filled and the survey is closed can be modified by going to the Publishing page, selecting the Settings tab, choosing Change Pages/Messages from the left side menu and then clicking on Notifications.


229 123.3 IMPLEMENTING A QUOTA REDIRECT It s possible to automatically redirect individuals to a 3 rd party website once your quota has been reached. This can be done by going to the Publishing page, clicking on the Settings tab and selecting Redirection. Once there, enter the desired URL into the text field. If this feature is enabled, once the quota is filled, individuals trying to access the survey will be sent to the URL entered, bypassing all the quota filled messages.

230 124: SURVEY START & END DATES Survey administrators can set a start & end date for their survey. This feature automates the opening and closing of surveys. To specify when your survey should go live and when it should close, proceed to the Publishing page, select the Settings tab, and choose Quotas and Deadlines from the left side menu. The survey will then automatically go live and subsequently close at the specified times.

231 125: REDIRECTING USERS TO DIFFERENT PAGES 125.1: WHAT IS REDIRECTION? FluidSurveys allows you to redirect survey respondents to outside URL s in multiple scenarios: 1. when the survey is terminated, 2. when the survey is completed and 3 when the survey quota has been reached. Redirection can be set up for one, or for a combination, of these scenarios REDIRECTION WHEN A SURVEY IS TERMINATED A terminated survey occurs when a respondent is ejected from the survey before reaching the end due to one of their responses. The survey creator can specify which responses will result in a terminated survey. Step 1 The choices that will result in a terminated survey can be selected using the simple and advanced branching interfaces. For questions that can utilize simple skipping (Yes/No, Dropdown, Multiple Choice), simply select the choice that you would like to result in a terminated survey, and set it to branch to the termination page. For questions that cannot utilize simple skipping (Checkbox, Grid), the advanced branching interface will need to be used [link to advanced branching section]. Once in the advanced branching editor, select the desired question and choice, and set it to terminate the survey. Step 2 Once the responses that trigger a terminated survey have been chosen, you can specify the URL that respondents will be redirected to. This can be done by going to the Publishing screen, selecting the Settings tab, choosing Redirection from the left side menu and entering a URL in the field labeled Survey Terminated Redirect.


232 FYI 125.1: If a terminated survey redirection URL is not specified, respondents who have had their survey terminated would be presented with a blank page informing them that they re survey instance was ended REDIRECTION WHEN A SURVEY IS COMPLETED Once a respondent completes and submits a survey, you can specify a URL to which they would be redirected, bypassing the Thank You page. This can be done by going to the Publishing screen, selecting the Settings tab, choosing Redirection from the left side menu and entering a URL in the field labeled Survey Complete Redirect REDIRECTION WHEN A QUOTA HAS BEEN REACHED [Link to 127.3]

233 126: INTEGRATION WITH PANELS Panels are 3 rd party companies that allow for surveyors to pass through response data for a respondent, and have the company provide the results in a different manner. Response data for a respondent are passed from FluidSurveys to a 3 rd party panel company by taking advantage of GET Variables. To learn about GET Variables, please see Section [Link to GET Variables] IMPLEMENTING INTEGRATION WITH PANELS In order to take full advantage of panels and FluidSurveys, the survey link sent to a respondent must contain a GET variable. Many 3 rd party panel companies will provide unique identification numbers which are used to easily distinguish between the many respondents, as seen in the image below. In addition, in order for the GET Variable var to pass Therefore, when the client clicks Submit on their survey, they are brought to google.com with the variable appended at the top.

234 127: PUT A PASSWORD ON YOUR SURVEY FluidSurveys includes numerous security and privacy measures, one of which being the ability to password protect surveys. When a survey is password protected, only those who possess the password will be granted access to the questions. There are two ways to password protect a survey. The first uses a master password (the same password for every user) while the 2 nd creates a unique password for each user : USING A MASTER PASSWORD (ACCESS CODE) A master password (Access code) can be created by going to the Publishing menu, selecting the Settings tab and choosing Other Options from the left hand sidebar. Then, the field labeled Restrict Access to this survey must be checked off, and you ll be prompted to enter a code. There is no limit to what this code should be in terms of length or characters used. The respondent would then be prompted for the password (Access Code) when they navigate to your survey URL : INDIVIDUAL PASSWORDS (INVITE CODES) You can create unique passwords for each individual by using Invite Codes. Invite codes are randomly generated 5 character codes (composed of letters and numbers) which cannot be customized. No two invite codes are the same. In order to use invite codes, the first step is to go into the Publishing menu, select the Settings tab and click on the Other options link in the left hand sidebar. Then, check off the box labeled Invite only (Only allow users with a valid unused invite to take the survey).

235 Once this option is selected, a respondent would have to have a unique and unused invite code to gain access to the survey. There are two ways to generate and distribute invite codes: - Manually [Link to Invite Tool/Invite Code Tutorial] - Using the Invite Tool [Link to Invite Tool/Invite Code Tutorial]
236 128: SURVEY MODE (ONCE PER COMPUTER, ETC ) There are numerous restrictions that can be placed on a survey limiting who can contribute responses, and how many times they can contribute responses. These options can be found on the Publishing screen, under the Settings tab in the Other Options Section MANY TIMES PER COMPUTER (NO RESTRICTION) Enabling this option allows individuals to respond to the survey as many times as they d like, from any computer. There would be no restrictions placed on respondents, and every response would be recorded as a new entry in analytics. This is the default survey mode ONCE PER COMPUTER (USES COOKIES/SESSIONS TO IDENTIFY USERS) This option restricts responses to one per computer. Once an individual completes the survey, a cookie is created and no one using that same computer would be able to access the survey again. FYI 128.1: Internet browsers allow for the deletion of internet cookies, and if an individual does this, they would be able to re-take the survey (or another user would be able to take the survey) from the same computer.

237 128.3 ONCE PER LOCATION (RESTRICTED TO ONE IP ADDRESS) The most restrictive option, this setting limits survey responses to one per IP address. Typically, users in a household or organization all have the same IP address. Therefore, if you d like one response per household, this would be a good feature to use, however, if you re surveying many people in one organization, it would not be the best choice EMBEDDED SURVEY If you have a one page survey, you can embed it into a 3 rd party website, and all of the results will be recorded to fluidsurveys.com. Selecting this option will provide you with the HTML code required to embed the questionnaire. FYI 137.2: Multi-page surveys can also be embedded; however they would have to use an iframe INVITE CODES This setting prevents anyone without a valid invite code from accessing the survey. Invite codes are randomly generated 5 character codes (composed of letters and numbers). They act as a password; however, each user has to have a unique code. No two invite codes can be the same. They can be generated and distributed manually, or via the invite tool.

238 129: RECEIVING NOTIFICATIONS VIA Often times, survey creators would like to be notified as soon as they receive a response, or a particular type of response. FluidSurveys is equipped with notifications that can alert the creator of new responses that meet specific branching requirements NOTIFICATIONS BASED ON BRANCHING CONDITIONS There are cases in which it s important to be notified as soon as a certain response, or response pattern, is submitted. Perhaps there s a serious problem that you need to respond to immediately. FluidSurveys allows you to set up scenarios which if met, will trigger an immediate message sent to your . Tutorial 129.1: In this tutorial, we ll show you how to set up automatic notifications based on specific branching logic. Let s say we re carrying out a customer satisfaction survey where we ll ask respondents how happy they were with three service offerings: our product, our staff helpfulness and our warranty offerings. In the case that someone is unsatisfied with all three portions, we d like to be able to contact them immediately to see if there s anything we could do to improve their experience. Step 1 The first thing to do is to set up your questions. In this case, we ll have a simple three question survey. Step 2 Because we will be using the advanced branching interface to set up the notifications, we have to give each of our questions a question identifier. Step 3 Once our questions have identifiers, we can begin setting up our logic by selecting the Page tab in our editor, and clicking on Edit Survey Logic Rules. This is done very much like in advanced

239 skipping, with the only difference being that instead of having the logic trigger skipping, we ll have it trigger an message. In our case, let s say we want to be notified if someone selects a rating of 1 for every single question. This is how our logic would be entered: FYI 129.1: You can have any number of branching conditions that trigger an response NOTIFICATIONS OF COMPLETED SUBMISSIONS FluidSurveys can send daily updates to survey creators containing a summary of responses received in the previous 24 hour period. These updates are sent out once per day, at the end of the day. To enable this feature, proceed to the Publishing page, select the Settings tab, click on Other Options in the left hand sidebar and check off the box labeled Receive Notifications.


240 130: META TAGS In the case that you re using screen readers or devices that need additional information about your survey, or if you have internal indexers and categorization, FluidSurveys allows you to insert meta tags into your survey. To do so, proceed to the Publishing screen, select the Settings tab and click on Other Options from the left hand sidebar. Then, select the Add Meta Tag link and there you ll be able to add Meta tags. FYI 130.1: FluidSurveys does include No Index Meta tags into surveys, which will prevent your surveys from appearing in search engines. This is done so private information does not appear on public search engines.
, however, it is possible to modify them.")
241 131: CHANGING/TRANSLATING ERROR MESSAGES In the case of errors that occur during a survey, messages are presented to the respondent informing them of why they are not able to proceed. FluidSurvey s has default messages for the various errors and warnings (quota filled, survey close, question required, etc), however, it is possible to modify them. To do so, go into the Publishing Screen, select the Settings Tab, and click on Change Pages/Messages in the left hand sidebar. There, you ll have the option of modifying the text for generic messages, errors & warnings and notifications. The messages that can be changed in each section are summarized below: Generic Messages Errors & Warnings Notifications Thank You Page - This is displayed upon successful completion of a survey. Survey Closed Page - This is displayed when a survey is not live or has been closed. Save & Continue Page - This text is displayed when a respondent has saved their survey for continuation later. Question Required - Displayed above a required question when a user does not supply an answer. Termination Page - This is displayed when a survey is terminated. Quota Reached - This is displayed when a survey s quota has been reached and a new survey taker attempts to access the survey. Restriction Notification - This is displayed when a user is attempting to gain access to a restricted survey. Password Prompt - Text to go along with the box for users to enter their password if required. Unsubscription Page - Modify what the users will see when they reach the unsubscription page. Invite Only Header - Header shown on the invite only page. Invite Only Page - Modify what the users will see when they are asked to provide an invite code, when the survey is set to invite only. Invite Only Prompt - Text to go with the box asking for the user's invite code Invitation Over Used - Modify what the users will see when they try to use an invitation code multiple times. Already Completed Header - Header shown on the page displayed when a user tries to take a survey twice. Already Completed with Edit - Message shown when user visits a survey a second time, and is allowed to edit responses. Already Completed without Edit - Message shown when user visits a survey a second time, and is not allowed to edit responses.
242 FYI 131.1: If the survey is multi-lingual, select the language for which you want to change the messages using the Language dropdown found at the top left. 132: CHANGING/TRANSLATING STANDARD PAGES By default, FluidSurveys has standard preset text for things like the Thank You page, various errors and warnings, notifications, etc. As the survey creator, you always have ultimate power over what goes on in your surveys, therefore these messages are, of course, fully customizable : HOW TO CHANGE/TRANSLATE STANDARD PAGES In order to change these messages, simply go into your Publishing page and choose Change Pages/Messages. Here you will have the option of changing the following categories: Generic Messages Errors and Warnings Notifications Button Translations An example of text that can be changed is the Thank You page. By default, the text reads Thank you for taking the time to take this survey, however, sometimes this is a little too generic, and having a personalized message is more desirable. Simply go to Publish > Change Pages/Messages and you can type in your desired text into the text field. You may also want to copy and paste from a document that is already on your computer, and this is also a great option, as it saves you even more time! FYI 132.1: Every text area within Change Pages/Messages can include HTML, insofar that your customization options drip with unlimited potential
243 133: CHANGING/TRANSLATING DEFAULT BUTTON TEXT FluidSurveys allows you to modify the text found on the buttons in your survey, in every language. To do so, proceed to the Publishing page, click on the Settings tab and select Change Pages/Messages from the left hand side bar. From there, click on Button Translations. There, you ll be able to change the text featured on the following buttons: Back Next Submit Save Survey Exit Survey Clear Page Save Page Continue Review Responses Download Responses
244 134: SECTION HEADER Section Separators allow survey creators to include text within their survey without actually asking a question. It can be used to include an introduction or some explanatory text in your survey, pictures, endnotes, etc. If ever you simply need to convey a message without explicitly asking a question, then a Section Separator can satisfy such a role. It should be noted that, despite being able to provide a Section Separator with a unique identifier, you cannot attach logic branching rules to the question type EXPLORING SECTION SEPARATORS Below is a list of options available to the Section Separator Question Type. FIELD PROPERTIES Identifier: Provide a unique identifier to easily distinguish this question type. This option is None by default. Question Title: Set the title for the Section Separator which. Extra Description: If you wish to provide more information about a specific section, then you can do so within the Extra Description text area FYI 134.1: A unique identifier must only contain alphanumeric or hyphens

245 DISPLAY Display side-by-side: This option allows for you to display the question type beside another question as seen in the image to the left. By default, this option is disabled. Append to previous question: This question type will be appended to the question directly before it. By default, this option is disabled. Width: You can adjust the width based on a percentage. By default, the value is 100%. OPTIONS N/A CUSTOMIZE THE SECTION SEPARATOR QUESTION TYPE A Section Separator does not explicitly need to only convey a brief message about a section, or how to complete a task, but can be used implicitly to provide a look and feel for your survey unparalleled by any question type. By selecting display side-by-side, you can have two section headers side-by-side. Or even selecting append to previous question, you can make it look as though the Section Separator is part of the previous question.
246 135: YES/NO A Yes/No question type is the simplest question type that we have. It has a default scoring mechanism of 1 (Yes) and 2 (No), and the choices are translated to their appropriate language when multiple languages resides on a survey. Yes/No questions are perfect when you need quick and easy page skipping based on the response EXPLORING YES/NO Below is a list of options available to the Yes/No Question Type. DISPLAY Display side-by-side: This option allows for you to display the question type beside another question. By default, this option is disabled. Append to previous question: By default, this option is disabled. Width: You can adjust the width based on a percentage. By default, the value is 100%. OPTIONS Optional: Unchecking this option forces the question to be answered when the user is filling out your survey. By default, this option is enabled Yes skips to page: If the user selects Yes as an answer, then you can skip to a defined page.

247 By default, this option is disabled No skips to page: Conversely, if the user selects No as an answer, then you can jump to a defined page. By default, this option is disabled CUSTOMIZE THE YES/NO QUESTION TYPE Including multiple languages on your survey will automatically include the appropriate translation for Yes/No. Therefore, Yes/No questions by default become perfect tools as Do you agree? pivot questions. FYI 135.2: Yes/No Choices cannot be changed
248 136: TEXT RESPONSE A Text Response question type allows for surveyors to ask a user to type either the answer out, or provide specific textual information (phone number, address, etc ). Text Response questions come with text validation ranging from addresses, Currency, all the way to Percentages EXPLORING TEXT RESPONSE Below is a list of options available to Text Response Question Type. DISPLAY Multiline: Allows for the text area to have multiple lines and columns, as seen in section By default this option is disabled. Display side-by-side: This option allows for you to display the question type beside another question. By default, this option is disabled. Append to previous question: By default, this option is disabled. Width: You can adjust the width based on a percentage. By default, the value is 100%.
249 OPTIONS Optional: Unchecking this option forces the question to be answered when the user is filling out your survey. By default, this option is enabled Validation: Specific to the question. If you wish for the user to input an address, then selecting the appropriate form of validation will get those desired results. By default, this option is None Initial Value: Presents a default choice to the user. By default, this area is blank CUSTOMIZE THE TEXT RESPONSE QUESTION TYPE Enabling the Multiline option and indicating the number of columns can create the perfect storm for allowing users to fill in text, which can also be restricted to a certain amount of words. The example below has a Text Response question type with multiline enabled, 50 columns, and All Characters validation of 2000 (roughly 200 words) which will cease to accept words after that point. Tutorial 137.2: In this tutorial, we ll show you how to set up a Text Response question type with multiline, many columns and All Characters validation between 10 and 100 Step 1: Drag the Text Response question onto the Editor, and adjust the Question Title and Extra Description fields to your liking. Step 2: Click on Display, select Multiline, adjust the amount of Rows and Columns Step 3: Click on Options, select All Characters under Validation, and Limit Length of 10 to 100. Step 4: Save your product and click Preview Page
250 137: CHECKBOX The checkbox question type is a multi-answer question, as in you can select more than one answer. Checkbox choice can contain a text response (which can have Validation) beside each choice, as well as an Other, Please Specify option which is an exclusive choice (Selecting it, or typing into the text area, will automatically deselect all options and select the other). The checkbox question type allows for logic branching EXPLORING CHECKBOX Below is a list of options available to the Checkbox Question Type. DISPLAY Appearance: By default, Default (Vertical) is selected. Columns: Adjusting the amount of columns allows for By default, One column is selected. Display side-by-side: This option allows for you to display the question type beside another question. By default, this option is disabled. Append to previous question: By default, this option is disabled. Width: You can adjust the width based on a percentage. By default, the value is 100%.
251 OPTIONS Optional: Unchecking this option forces the question to be answered when the user is filling out your survey. By default, this option is enabled Randomize choices: Selecting this option will randomize the choices within the Checkbox question type on each survey refresh. By default, this option is disabled. Alphabetize choices: Choices within your Checkbox will follow alphabetization (A-Z). By default, this option is disabled Restrict number of selected choices: Restrict the number of choices a user can select before the question is disabled. By default, this option is disabled CUSTOMIZE THE CHECKBOX QUESTION TYPE Tutorial 137.2: In this tutorial, we ll show you how to set up a checkbox with an Exclusive Choice Other, please specify field Step 1: Double click, or drag the checkbox question type into your survey. To adjust the Question Title, click on the question, and change the Question Title (By default, the text area contains Question 1 ). Step 2: After adjusting the necessary Field Properties, on the left hand side, under Choices, click the button, Add Other Choice. Doing so will create a new choice, Other, please specify Step 3: However, if you want respondents to only select one choice, especially Other, please specify, then click on Other, please specify on the left hand side, and select, Exclusive Choice. Step 4: Save and preview.
252 138: MULTIPLE CHOICE The Multiple choice question type, commonly referred to as the single choice question type, allows for a user to provide one answer per question, whereas a checkbox question type allows for the user to specify more than one answer. Each choice has branching, skipping, and validation capabilities available. The display options are slightly different, in that you can change the views (Horizontal, Vertical, Combo box, Star Rating see blow ). Star Ratings, generally used for a rating between 1 and an end value, allow for the rating to exist on a horizontal star level. However, below is how a newly created default multiple choice question type looks like EXPLORING MULTIPLE CHOICE Below is a list of options available to the Multiple Choice Question Type. DISPLAY Appearance: By default, Default (Vertical) is selected. Columns: Adjusting the amount of columns allows for By default, One column is selected. Display side-by-side: This option allows for you to display the question type beside another question. By default, this option is disabled. Append to previous question: By default, this option is disabled. Width: You can adjust the width based on a percentage. By default, the value is 100%.
253 OPTIONS Optional: Unchecking this option forces the question to be answered when the user is filling out your survey. By default, this option is enabled Randomize choices: Selecting this option will randomize the choices within the Checkbox question type on each survey refresh. Choices that also have a text response, will not be affected by the randomize choices option. By default, this option is disabled. Alphabetize choices: Choices within your Checkbox will follow alphabetization (A-Z). By default, this option is disabled CUSTOMIZING THE MULTIPLE CHOICE QUESTION TYPE Below are a series of images that demonstrate how a multiple choice question can be customized. Default Appearance: Horizontal Appearance:
254 Star Rating: Combo Box:
255 139: DROPDOWN The dropdown question type is exactly what the name entails; an answer found and selected in a dropdown fashion. Also, similarly to a multiple choice question, the dropdown question type allows for only one answer EXPLORING DROPDOWN Below is a list of options available to the Dropdown Question Type. DISPLAY Display side-by-side: This option allows for you to display the question type beside another question. By default, this option is disabled. Append to previous question: By default, this option is disabled. Width: You can adjust the width based on a percentage. By default, the value is 100%. OPTIONS Optional: Unchecking this option forces the question to be answered when the user is filling out your survey. By default, this option is enabled Randomize choices: Selecting this option will randomize the choices within the Checkbox question type on each survey refresh.by
256 default, this option is disabled. Alphabetize choices: Choices within your Checkbox will follow alphabetization (A-Z). By default, this option is disabled Initial Value: Specifies if the question will load with a choice. By default, this option is disabled CUSTOMIZING THE DROPDOWN QUESTION TYPE Tutorial 139.2: In this tutorial, we ll show you how to set up a dropdown question with an Other, please specify option. Step 1: Create a dropdown question type by either double clicking, or dragging it into your survey. Step 2: Customize the look-and-feel of the question by adjusting the Display and Options on the left hand side. Step 3: Create a text response question type and perform the same steps as in Step 2.1. Step 4: Select Append to Previous Question, which will cause the text response question type to stick to the end of the dropdown question type. Step 5: Save and voila. Subsequently, instead of using a text response question type as the Other, please specify field, you can use a text response grid which will have a different aesthetic appearance on your survey. Below is the final product
257 140: DATE/TIME A Date/Time question allows for the user to select a specific year, month, day as seen below. Date/Time questions are perfect when either trying to determine when an incident happened, or even when finding the perfect time to have a meeting. The question type essentially allows for a user to record the date and time with five types of configurations; Date/Time, Date Only, Time Only, Date/Month, and Month/Year. FYI 140 Date/Time has the same branching logic type across all forms of itself EXPLORING DATE/TIME Below is a list of options available to the Date/Time Question Type. DISPLAY Display side-by-side: This option allows for you to display the question type beside another question as seen in the image to the left. By default, this option is disabled. Append to previous question: By default, this option is disabled. Width: You can adjust the width based on a percentage. By default, the value is 100%.
258 OPTIONS Optional: Unchecking this option forces the question to be answered when the user is filling out your survey. By default, this option is enabled Display Format: The question type can be altered to ask Date/Time, Date Only, Time Only, Date/Month or Month/Year. Date/Time is the default question Timezone: Enabling this feature will create a dropdown for the user to select their appropriate timezone. By default, this option is disabled THE FORMS OF THE DATE/TIME QUESTION TYPE Below are the 5 customizable forms of the date/time question type Form 1: Date/Time Will accept both the date (YYYY-MM-DD) and time (Non-Military standard time) Form 2: Date Only Will accept only the date (YYYY-MM-DD) Form 3: Time Only Will accept only the time (Non-Military standard time) Form 4: Date/Month Will accept only the date (YYYY-MM-DD) and month Form 5: Month/Year Will accept only the month and year 125: TEXT RESPONSE GRID FYI Despite not accepting military standard time, if the user enters 21:00, the question type will convert it to 9:00 pm
259 141: TEXT RESPONSE GRID In short, a Text Response Grid allows for the surveyor to ask a series of question with a set of validation types applied (Numerical, Text only, All Characters, etc ) which will present an error to the user if the validation was not adhered to. Below is a screenshot of how the text response grid looks by default. To adjust the fields to your personal preference, see the section below on the available display options EXPLORING TEXT RESPONSE GRID Below is a list of options available to the Text Response Grid Question Type. DISPLAY 1 st Column Size: Adjusts the first columns width. By default, this option is 30% Display side-by-side: This option allows for you to display the question type beside another question as seen in the image to the left. By default, this option is disabled. Append to previous question: Sticks the question to the direct question behind it. By default, this option is disabled. Width: You can adjust the width based on a percentage. By default, the value is 100%.
260 OPTIONS Randomize Variables: Selecting this option will randomize the choices within the Checkbox question type on each survey refresh. By default, this option is disabled. Alphabetize Variables: Choices within your Checkbox will follow alphabetization (A-Z). By default, this option is disabled Force Unique: Force a choice in a column to remain unique. No two options in a column can be identical. By default, this option is disabled. Sum: If a value is provided, 20 for instance, then all numerical values within the Text Response Grid must add up to that ceiling. This option is blank by default. Sum Label: By default, this option is The values should add up to,x-. Currently:,y THE FORMS OF THE TEXT RESPONSE GRID QUESTION TYPE Tutorial 141.2: In this tutorial, we ll show you how to set up a Text Response Grid question type with Force Unique enabled and Numerical Validation Step 1: Double click, or drag the text response question onto the Editor and fill out any necessary information you wish to convey. To adjust the Question Title, click on the question, and change the Question Title (By default, the text area contains Question 1 ). As an example, the question type will be filled out with a title of, Rate these colors. Step 2: Provide the variables that will be displayed by adjusting the text on the left hand side under Variables. Step 3: Click on Options and select Force Unique which will force every value in this question to be absolutely unique. No two answers can have the same value.
261 Step 4: To add numerical validation, click on one of your variable choices, and click Additional Options. Within here, you can adjust the validation, size of the number, and the error message displayed when the user commits an error. Step 5: Save, click Preview this page and voila!
262 142: MULTIPLE CHOICE GRID The Multiple Choice Grid question type is in essence a Likert question. This question type heralds in a new option, make column static, which will keep the most left column (with all the variables in question) static as you drag the scrollbar to the right EXPLORING MULTIPLE CHOICE GRID Below is a list of options available to the Multiple Choice Grid Question Type. DISPLAY Make First Column Static: Forces the first column to always be present. By default, this option is disabled. 1 st Column Size: Adjusts the first columns width. By default, this option is 30% Display side-by-side: This option allows for you to display the question type beside another question as seen in the image to the left. By default, this option is disabled. Append to previous question: The question is attached to the question which precedes it in the survey. By default, this option is disabled. Width: You can adjust the width based on a percentage. By default, the value is 100%.
263 Show Borders: Show borders around the question type. By default, this option is disabled. Alternate Background Color: Each row will be an alternate color. By default, this option is disabled. OPTIONS Randomize Variables: Selecting this option will randomize the choices within the Checkbox question type on each survey refresh. By default, this option is disabled. Alphabetize Variables: Choices within your Checkbox will follow alphabetization (A-Z). By default, this option is disabled Force Unique: No two options in a column can be identical. By default, this option is disabled.
264 143: DROPDOWN GRID Dropdown Grid is similar to its sibling, the dropdown question, in that it is still similar to a multiple choice question, with a single answer only. This is the direct opposite of a checkbox question, which can have many answers EXPLORING DROPDOWN GRID Below is a list of options available to the Dropdown Grid Question Type. DISPLAY 1 st Column Size: Adjusts the first columns width. By default, this option is 30% Display side-by-side: This option allows for you to display the question type beside another question as seen in the image to the left. By default, this option is disabled. Append to previous question: Attaches the question to the question that precedes it in the survey. By default, this option is disabled. Width: You can adjust the width based on a percentage. By default, the value is 100%.
265 OPTIONS Randomize Variables: Selecting this option will randomize the choices within the Checkbox question type on each survey refresh. By default, this option is disabled. Alphabetize Variables: Choices within your Checkbox will follow alphabetization (A-Z). By default, this option is disabled Force Unique: Force a choice in a column to remain unique. No two options in a column can be identical. By default, this option is disabled CUSTOMIZING THE DROPDOWN GRID QUESTION TYPE Step 1: Double click, or drag the Dropdown Grid question type into your survey and fill out any necessary information you wish to convey in the question type. To adjust the Question Title, click on the question, and change the Question Title (By default, the text area contains Question 1 ). As an example, the question type will be filled out with a title of, Rank these colors from 1-3: Step 2: On the left hand side, adjust the Choices (which will be the choices within the dropdown box) as 1, 2, and 3. You can quickly add these values by selecting Bulk and entering the values. Step 3: Now, adjust the Variables as, Red, Green, Blue. Again, you can quickly add these values by selecting Bulk and entering the values. Step 4: In order to keep the values unique (Only one instance of 1, 2 and 3) select Force Unique under Options. Step 5: Save and Preview the survey. You can now only rank each color with 1 unique value.
266 144: CHECKBOX GRID The Checkbox grid question type is the newest question addition in FluidSurveys, which is available under a new section labeled, Advanced Options. Similar to other grids, you have the same types of options available, such as specifying scores for answers, and forcing variables to be unique. The display options are similar to other grids in FluidSurveys EXPLORING DROPDOWN GRID Below is a list of options available to the Checkbox Grid Question Type. DISPLAY 1 st Column Size: Adjusts the first columns width. By default, this option is 30% Display side-by-side: This option allows for you to display the question type beside another question as seen in the image to the left. By default, this option is disabled. Append to previous question: Attaches the question to the question that precedes it in the survey. By default, this option is disabled. Width: You can adjust the width based on a percentage. By default, the value is 100%.
267 OPTIONS Randomize Variables: Selecting this option will randomize the choices within the Checkbox question type on each survey refresh. By default, this option is disabled. Alphabetize Variables: Choices within your Checkbox will follow alphabetization (A-Z). By default, this option is disabled Force Unique: Force a choice in a column to remain unique. No two options in a column can be identical. By default, this option is disabled CUSTOMIZING THE CHECKBOX GRID QUESTION TYPE Tutorial 144.2: In this tutorial, we ll show you how to set up a Checkbox Grid question type. Step 1: Double click, or drag the Checkbox Grid question type into your survey and fill out any necessary information you wish to convey in the question type. To adjust the Question Title, click on the question, and change the Question Title (By default, the text area contains Question 1 ). As an example, the question type will be filled out with a title of, Choose the applicable options for each of your classes: Step 2: Provide the choices that will be displayed on the top most row above the checkboxes. To do so, click on Choices on the left hand side. Step 3: Adjust the display options to meet your needs. Step 4: Save and presto, you have a survey with a Checkbox grid question type
268 145: N-ATRIX QUESTION The N-Atrix Question type allows for any question type to exist on any given row, such as text response, dropdown, checkboxes or radio buttons. A typical use for such a question type, is asking for detailed personal information where the types of questions can range between the available types (Dropdown for title, Text area for Name, or a Checkbox/Radio Button for types of phone numbers, or contact times) EXPLORING DROPDOWN GRID Below is a list of options available to N-Atrix question type. DISPLAY 1 st Column Size: Adjusts the first columns width. By default, this option is 30% Display side-by-side: This option allows for you to display the question type beside another question as seen in the image to the left. By default, this option is disabled. Append to previous question: Attaches the question to the question that precedes it in the survey. By default, this option is disabled. Width: You can adjust the width based on a percentage. By default, the value is 100% CUSTOMIZING THE N-ATRIX QUESTION TYPE Tutorial 129.2: In this tutorial, we ll show you how to set up an N-Atrix question with multiple rows.
269 Step 1: Double click, or drag the N-Atrix question type into your survey and fill out any necessary information you wish to convey. To adjust the Question Title, click on the question, and change the Question Title (By default, the text area contains Question 1 ). As an example, the question type will be filled out with a title of, Please fill in the following about yourself: Step 2: Click on Variable 1 under Variables, and adjust the question type (In this example, the Title is a dropdown field, Name is a text area, Kids? are radio buttons, and Used? is a checkbox). All of these options can be achieved within the Variables area. Step 3: Adjust the display options to meet your needs. Step 4: Save and presto, you have a survey with an N-Atrix question type.
270 146: 3D MATRIX QUESTION Similar to the N-Atrix question type, a 3D Matrix question can have different question types within each column. A 3D Matrix question is an amazing source of information when you are trying to get as much information within one question, in so far that the reports generated by responses for a 3D Matrix are broken up into pieces, as seen in the example under section EXPLORING 3D MATRIX Below is a list of options available to 3D Matrix question type. DISPLAY Make First Column Static: Forces the first column to always be present. By default, this option is disabled. 1 st Column Size: Adjusts the first columns width. By default, this option is 30% Top left Label: Attaches a label to the top left of the 3D Matrix. By default, this option is blank. Sum Label: The label, Total, will reside beside numeric validation, if any, to indicate the Total. By default, this option is Total.
271 Display side-by-side: This option allows for you to display the question type beside another question as seen in the image to the left. By default, this option is disabled. Append to previous question: Attaches the question to the question that precedes it in the survey. By default, this option is disabled. Show Borders: Outline the question type in a border for clarity. By default, this option is enabled. Alternate Background Colors: Every other Row will be a different color. By default, this option is enabled. Width: You can adjust the width based on a percentage. By default, the value is 100%. OPTIONS Randomize Variables: Selecting this option will randomize the choices within the Checkbox question type on each survey refresh. By default, this option is disabled. Alphabetize Variables: Choices within your Checkbox will follow alphabetization (A-Z). By default, this option is disabled Force Unique: Force a choice in a column to remain unique. No two options in a column can be identical. By default, this option is disabled.
272 146.2 CUSTOMIZING THE 3D MATRIX QUESTION TYPE Tutorial 146.2: In this tutorial, we ll show you how to set up a 3D matrix question with multiple rows and variables. Step 1:Double click, or drag the 3D Matrix question type into your survey and fill out any necessary information you wish to convey. To adjust the Question Title, click on the question, and change the Question Title (By default, the text area contains Question 1 ). As an example, the question type will be filled out with a title of, Tell us about your team members Step 2: Click on Column 1 under Columns, and adjust the question type (In this example, Title is a dropdown field, Name is a text area, Like? are checkboxes, and Male/Female is a radio button). All of these changes can be achieved by accessing the Column area. Step 3: Adjust the display options to meet your needs. Step 4: Save and presto, you have a survey with a 3D Matrix question type
273 147: SIDE-BY-SIDE MATRIX (GAP ANALYSIS) A Side-By-Side Matrix isn t necessarily a new question type in itself, but instead alters a 3D Matrix Question Type to suit a popular type of question on FluidSurveys; Ranked importance vs. satisfaction. Therefore, this section is primarily a mixture of 3D Matrix options appropriately arranged to provide a desired effect EXPLORING SIDE-BY-SIDE MATRIX Since a Side-By-Side Matrix is a 3D Matrix, please refer to Section 130 for a detailed list of options CUSTOMIZING THE SIDE-BY-SIDE MATRIX QUESTION TYPE Tutorial 147.2: In this tutorial, we ll show you how to set up a Side-By-Side Matrix question type with an importance vs. satisfaction scale. Step 1:Double click, or drag the 3D Matrix question type onto the Editor and fill out any necessary information you wish to convey. To adjust the Question Title, click on the question, and change the Question Title (By default, the text area contains Question 1 ). As an example, the question type will be filled out with a title of, Importance vs. Satisfaction Step 2:Click on Column 1 under Columns, and adjust the question type (In this example, Column 1 is Importance with Horizontal Radio Buttons, and Column 2 has Satisfaction with the same options as Importance ). All of these changes can be achieved by accessing the Column area. Step 3:Adjust the display options to meet your needs. Step 4:Save and presto, you have a survey with a 3D Matrix question type
274 148: SIDE-BY-SIDE MATRIX ADVANCED Using the same tutorial as Tutorial 131.2, we will make slight adjustments and apply some advanced options. Therefore, please see section for another tutorial on how to achieve the same outcome EXPLORING SIDE-BY-SIDE MATRIX Since a Side-By-Side Matrix is a 3D Matrix, please refer to Section 130 for a detailed list of options CUSTOMIZING THE SIDE-BY-SIDE MATRIX QUESTION TYPE Tutorial 148.2: In this tutorial, we ll show you how to set up a Side-By-Side Matrix question type with importance VS satisfaction with advanced options. Step 1: Leaving off from the last tutorial (Tutorial 131.2) we can customize the 3D Matrix question type to convey a stronger sense of information by adjusting various options and style settings. With that in mind, lets introduce the Visual Editor (To open the Visual Editor, click on Extra Description while the 3D Matrix is selected, and click Open Visual Editor which gingerly appears under the Extra Description text area Step 2: All columns and rows, or more specifically, text areas within FluidSurveys allow for HTML, and subsequently CSS tags. Therefore, changes within the Visual Editor will produce actual code when finished. And so, producing something as the example below becomes arbitrarily second nature, even to those that may not be strong with programming languages. Step 3: Within the Visual Editor, type the message you wish to show within a column, since we will be copying and pasting the HTML into it. Step 4: Click OK once you believe your desired affect has been achieved. Step 5: Copy and Paste the code produced in the Extra Description into Column 1, which has Importance (if using the aforementioned examples) Step 6: Save, and click Preview this page. Step 7: If you still have not received your personal maximum potential, repeat Step 3 to 6.
275 149: SPREADSHEET QUESTION Once again, we ll be using the 3D Matrix question type for its sheer power in providing a wide variety of styling options to meet every single person s needs. A spreadsheet question follows this same rule, but has a different approach. It asks the user to type all the information out, which allows for an easy understanding in a spreadsheet (Excel, etc ) EXPLORING SPREADSHEET Since a Spreadsheet Question is a 3D Matrix, please refer to Section 130 for a detailed list of options CUSTOMIZING THE SPREADSHEET QUSETION TYPE Tutorial 149.2: In this tutorial, we ll show you how to set up a 3D Matrix question type with different rows and columns. Step 1:Double click, or drag the 3D Matrix question type onto the Editor and fill out any necessary information you wish to convey. To adjust the Question Title, click on the question, and change the Question Title (By default, the text area contains Question 1 ). As an example, the question type will be filled out with a title of, Please answer the following questions for each of your team members Step 2: Click on Column 1 under Columns and change the text to your liking. However, ensure that the Type has been switched to a Text Response. Step 3: Continue editing by adding more Columns and changing the Type to Text Response Step 4: Once satisfied, Save, and Preview this page. You can continue to make changes to the question type, and continue to preview it by saving and clicking on Preview this page until you have achieved something similar to the example below.

276 150: CONSTANT SUM QUESTION Essentially, the constant sum question type is a text response grid. The constant sum question allows for the tallying of values to meet a certain ceiling. If you wish to know the financials of last year VS this year with a 100% budget ceiling, then you can set the Sum to equal EXPLORING CONSTANT SUM The constant sum question type is a Text Response Grid. To learn about the Text Response Grid, refer to section CUSTOMIZING THE CONSTANT SUM QUESTION TYPE Tutorial 150.2: In this tutorial, we ll show you how to set up a Text Response Grid with constant sum enabled. Step 1: Double click, or drag the 3D Matrix question type into the Editor and fill out any necessary information you wish to convey. As an example, the question type will be filled out with a title of, How much do you spend in each category? Step 2: Adjust the Variables to your liking Step 3: Click Options and input a value into the Sum field. Whatever value inputted will act as your ceiling, whereby all inputs for Variables must adhere to the sum of that value. Step 4: Save and Preview this page
277 151: SCORE DISPLAY In brief, the Score Display question type is essentially what it says, a score display. The question type can be used primarily for either tallying a score in an online quiz, or for calculating of financials. A Score Display comes into good use when the Score for each variable or choice in, say, a Multiple Choice question has a value. FYI 151 The Score Display question type needs to be on a separate page in order to calculate all scores leading up to that point EXPLORING SCORE DISPLAY Below is a list of options available to the Score Display Question Type. DISPLAY Display side-by-side: This option allows for you to display the question type beside another question as seen in the image to the left. By default, this option is disabled. Append to previous question: By default, this option is disabled. Width: You can adjust the width based on a percentage. By default, the value is 100%. OPTIONS N/A
278 151.2 CUSTOMIZING THE SCORE DISPLAY QUESTION TYPE Tutorial 151.2: In this tutorial, we ll show you how to set up a Text Response Grid with constant sum enabled Step 1: Double click, or drag the Checkbox question type onto the Editor and fill out any necessary information you wish to convey As an example, the question type will be filled out with a title of, =? Step 2: The choices in this example are 1, 2, and 4. By default, choices in a question type adhere to a 1, 2, 3, respective to their position. Therefore, in order to get the correct answer in the Score Display, we will need to apply the value 4 to Choice 4 and 0 to the others. Step 3: After having done so, click Save and + at the bottom to add a new page. Step 4: Double click, or drag the Score Display question type onto the editor, and click Save. Click Preview this page and select 4 when asked, =? and click Next. The Score Display box will have = 4, as opposed to 0 which is what the other incorrect choices would have given.
279 152: RANKING QUESTION In short, a ranking question is a variation of available question types which can be conformed, through the selection of Force Unique to only allow one option per option. Therefore, to get an understanding of a Ranking Question, look for any question with Force Unique as an option to enforce this ranking rule.
Creating Online Surveys with Qualtrics Survey Tool
 Creating Online Surveys with Qualtrics Survey Tool Copyright 2015, Faculty and Staff Training, West Chester University. A member of the Pennsylvania State System of Higher Education. No portion of this
Google Docs Basics Website: http://etc.usf.edu/te/
 Website: http://etc.usf.edu/te/ Google Docs is a free web-based office suite that allows you to store documents online so you can access them from any computer with an internet connection. With Google
Creating and Managing Online Surveys LEVEL 2
 Creating and Managing Online Surveys LEVEL 2 Accessing your online survey account 1. If you are logged into UNF s network, go to https://survey. You will automatically be logged in. 2. If you are not logged
2/24/2010 ClassApps.com
 SelectSurvey.NET Training Manual This document is intended to be a simple visual guide for non technical users to help with basic survey creation, management and deployment. 2/24/2010 ClassApps.com Getting
NDSU Technology Learning & Media Center. Introduction to Google Sites
 NDSU Technology Learning & Media Center QBB 150C 231-5130 www.ndsu.edu/its/tlmc Introduction to Google Sites Get Help at the TLMC 1. Get help with class projects on a walk-in basis; student learning assistants
Getting Started with SurveyGizmo Stage 1: Creating Your First Survey
 Getting Started with SurveyGizmo Stage 1: Creating Your First Survey 1. Open SurveyGizmo site (http://www.surveygizmo.com) Log in 2. Click on Create Survey (see screen shot below) 3. Create Your Survey
Where do I start? DIGICATION E-PORTFOLIO HELP GUIDE. Log in to Digication
 You will be directed to the "Portfolio Settings! page. On this page you will fill out basic DIGICATION E-PORTFOLIO HELP GUIDE Where do I start? Log in to Digication Go to your school!s Digication login
Appspace 5.X Reference Guide (Digital Signage) Updated on February 9, 2015
 Updated on February 9, 2015") Appspace 5.X Reference Guide (Digital Signage) Updated on February 9, 2015 1 TABLE OF CONTENTS 2 What is Appspace For Digital Signage... 4 3 Access Appspace... 4 4 Best Practices and Notes... 4 5 Appspace
Appspace 5.X Reference Guide (Digital Signage) Updated on February 9, 2015 1 TABLE OF CONTENTS 2 What is Appspace For Digital Signage... 4 3 Access Appspace... 4 4 Best Practices and Notes... 4 5 Appspace
Qualtrics Survey Tool
 Qualtrics Survey Tool This page left blank intentionally. Table of Contents Overview... 5 Uses for Qualtrics Surveys:... 5 Accessing Qualtrics... 5 My Surveys Tab... 5 Survey Controls... 5 Creating New
Decision Support AITS University Administration. Web Intelligence Rich Client 4.1 User Guide
 Decision Support AITS University Administration Web Intelligence Rich Client 4.1 User Guide 2 P age Web Intelligence 4.1 User Guide Web Intelligence 4.1 User Guide Contents Getting Started in Web Intelligence
NJCU WEBSITE TRAINING MANUAL
 NJCU WEBSITE TRAINING MANUAL Submit Support Requests to: http://web.njcu.edu/its/websupport/ (Login with your GothicNet Username and Password.) Table of Contents NJCU WEBSITE TRAINING: Content Contributors...
THE TOP TEN TIPS FOR USING QUALTRICS AT BYU
 THE TOP TEN TIPS FOR USING QUALTRICS AT BYU TIP #1: CREATING A SURVEY FROM A COPY AND COLLABORATING ON SURVEYS TIP #2: CREATING AND USING PANELS TIP #3: LIBRARIES AND HOW TO USE THEM TIP #4: BASIC SKIP
How to Edit Your Website
 How to Edit Your Website A guide to using your Content Management System Overview 2 Accessing the CMS 2 Choosing Your Language 2 Resetting Your Password 3 Sites 4 Favorites 4 Pages 5 Creating Pages 5 Managing
How to Use Swiftpage for ACT! by Sage
 How to Use Swiftpage for ACT! by Sage 1 Table of Contents Basics of the Swiftpage for ACT! by Sage Integration 3 How to Install Swiftpage for ACT! and Set Up Your Account...4 I. The Swiftpage Screen in
Chapter 15: Forms. User Guide. 1 P a g e
 User Guide Chapter 15 Forms Engine 1 P a g e Table of Contents Introduction... 3 Form Building Basics... 4 1) About Form Templates... 4 2) About Form Instances... 4 Key Information... 4 Accessing the Form
Module One: Getting Started... 6. Opening Outlook... 6. Setting Up Outlook for the First Time... 7. Understanding the Interface...
 2 CONTENTS Module One: Getting Started... 6 Opening Outlook... 6 Setting Up Outlook for the First Time... 7 Understanding the Interface...12 Using Backstage View...14 Viewing Your Inbox...15 Closing Outlook...17
SelectSurvey.NET Basic Training Class 1
 SelectSurvey.NET Basic Training Class 1 3 Hour Course Updated for v.4.143.001 6/2015 Page 1 of 57 SelectSurvey.NET Basic Training In this video course, students will learn all of the basic functionality
Web Portal User Guide. Version 6.0
 Web Portal User Guide Version 6.0 2013 Pitney Bowes Software Inc. All rights reserved. This document may contain confidential and proprietary information belonging to Pitney Bowes Inc. and/or its subsidiaries
Forms & Surveys. Schoolwires Centricity2
 Forms & Surveys Schoolwires Centricity2 Trademark tice Schoolwires, the Schoolwires logos, and the unique trade dress of Schoolwires are the trademarks, service marks, trade dress and logos of Schoolwires,
Using Webmail. Technical Manual: User Guide. Document Updated: 1/07. The Webmail Window. Displaying and Hiding the Full Header.
 Using Webmail Technical Manual: User Guide The Webmail Window To save an attachment: 1. Click once on the attachment name. Or, if there are multiple attachments, click the Save icon to save all attachments
Custom Reporting System User Guide
 Citibank Custom Reporting System User Guide April 2012 Version 8.1.1 Transaction Services Citibank Custom Reporting System User Guide Table of Contents Table of Contents User Guide Overview...2 Subscribe
emarketing Manual- Creating a New Email
 emarketing Manual- Creating a New Email Create a new email: You can create a new email by clicking the button labeled Create New Email located at the top of the main page. Once you click this button, a
Beginner s Guide to AIA Contract Documents Online Service for Single-Seat Users
 Beginner s Guide to AIA Contract Documents Online Service for Single-Seat Users Table of Contents Getting Started - Introducing ACD5- AIA Contract Documents New Online Service System Requirements Transitioning
SURVEYMONKEY USER MANUAL
 SURVEYMONKEY USER MANUAL 5/14/2008 User Guide for Managing Accounts, Creating, Distributing, & Analyzing Surveys within SurveyMonkey. Copyright 1999-2007 SurveyMonkey.com. All Rights Reserved. No portion
Google Sites: Creating, editing, and sharing a site
 Google Sites: Creating, editing, and sharing a site Google Sites is an application that makes building a website for your organization as easy as editing a document. With Google Sites, teams can quickly
Using Webmail. Document Updated: 11/10. Technical Manual: User Guide. The Webmail Window. Logging In to Webmail. Displaying and Hiding the Full Header
 Using Webmail Technical Manual: User Guide Webmail is supported in the following browsers: Windows Internet Explorer 6, Internet Explorer 7, Firefox 2, and Firefox 3 Mac OSX Safari 2, Safari 3, Firefox
Virtual Exhibit 5.0 requires that you have PastPerfect version 5.0 or higher with the MultiMedia and Virtual Exhibit Upgrades.
 28 VIRTUAL EXHIBIT Virtual Exhibit (VE) is the instant Web exhibit creation tool for PastPerfect Museum Software. Virtual Exhibit converts selected collection records and images from PastPerfect to HTML
QUALTRICS TIPS AND TRICKS FOR UNC-CH USERS
 QUALTRICS TIPS AND TRICKS FOR UNC-CH USERS PLEASE NOTE: This tip sheet is not intended as a step-by-step guide. It was developed to provide information that UNC users have found important to know in addition
Creating Interactive PDF Forms
 Creating Interactive PDF Forms Using Adobe Acrobat X Pro Information Technology Services Outreach and Distance Learning Technologies Copyright 2012 KSU Department of Information Technology Services This
Qualtrics Survey Software. Create an Account
 Qualtrics Survey Software Qualtrics is online survey software with the ability to create and distribute surveys, quizzes, and polls. Katz and CBA faculty, staff, and students may create accounts. There
ithenticate User Manual
 ithenticate User Manual Version: 2.0.8 Updated February 4, 2014 Contents Introduction 4 New Users 4 Logging In 4 Resetting Your Password 5 Changing Your Password or Username 6 The ithenticate Account Homepage
Computing and Communications Services (CCS) - LimeSurvey Quick Start Guide Version 2.2 1
 - LimeSurvey Quick Start Guide Version 2.2 1") LimeSurvey Quick Start Guide: Version 2.2 Computing and Communications Services (CCS) - LimeSurvey Quick Start Guide Version 2.2 1 Table of Contents Contents Table of Contents... 2 Introduction:... 3 1.
LimeSurvey Quick Start Guide: Version 2.2 Computing and Communications Services (CCS) - LimeSurvey Quick Start Guide Version 2.2 1 Table of Contents Contents Table of Contents... 2 Introduction:... 3 1.
Web Mail Classic Web Mail
 April 14 Web Mail Classic Web Mail Version 2.2 Table of Contents 1 Technical Requirements... 4 2 Accessing your Web Mail... 4 3 Web Mail Features... 5 3.1 Home... 5 3.1.1 Mailbox Summary... 5 3.1.2 Announcements...
HOW TO: A Guide to Using Qualtrics Research Suite
 HOW TO: A Guide to Using Qualtrics Research Suite 2 How this ebook can Benefit You Welcome to Qualtrics Research Suite! We are committed to your success, and want you to get the most out of your experience
What Do You Think? for Instructors
 Accessing course reports and analysis views What Do You Think? for Instructors Introduction As an instructor, you can use the What Do You Think? Course Evaluation System to see student course evaluation
Create a survey using Google Forms
 Create a survey using Google Forms You can plan events, make a survey or poll, give students a quiz, or collect other information in an easy, streamlined way with Google Forms. Google Forms can be connected
Search help. More on Office.com: images templates
 Page 1 of 14 Access 2010 Home > Access 2010 Help and How-to > Getting started Search help More on Office.com: images templates Access 2010: database tasks Here are some basic database tasks that you can
MicroStrategy Desktop
 MicroStrategy Desktop Quick Start Guide MicroStrategy Desktop is designed to enable business professionals like you to explore data, simply and without needing direct support from IT. 1 Import data from
Netigate User Guide. Setup... 2. Introduction... 5. Questions... 6. Text box... 7. Text area... 9. Radio buttons...10. Radio buttons Weighted...
 Netigate User Guide Setup... 2 Introduction... 5 Questions... 6 Text box... 7 Text area... 9 Radio buttons...10 Radio buttons Weighted...12 Check box...13 Drop-down...15 Matrix...17 Matrix Weighted...18
Shasta College SharePoint Tutorial. Create an HTML Form
 Create an HTML Form SharePoint HTML forms are based on Lists. Lists are like mini-databases inside of SharePoint that define the form s fields and stores the data submitted from the form. Before you can
HOW TO USE THIS GUIDE
 HOW TO USE THIS GUIDE This guide provides step-by-step instructions for each exercise. Anything that you are supposed to type or select is noted with various types and colors. WHEN YOU SEE THIS Click Help
ithenticate User Manual
 ithenticate User Manual Updated November 20, 2009 Contents Introduction 4 New Users 4 Logging In 4 Resetting Your Password 5 Changing Your Password or Username 6 The ithenticate Account Homepage 7 Main
Email -- Reading and Printing Email
 Email -- Reading and Printing Email Checking for New Email By default, webmail checks for new email automatically. If you want to manually check for new email, click the Check Email button. Or, click the
ithenticate User Manual
 ithenticate User Manual Version: 2.0.2 Updated March 16, 2012 Contents Introduction 4 New Users 4 Logging In 4 Resetting Your Password 5 Changing Your Password or Username 6 The ithenticate Account Homepage
DataPA OpenAnalytics End User Training
 DataPA OpenAnalytics End User Training DataPA End User Training Lesson 1 Course Overview DataPA Chapter 1 Course Overview Introduction This course covers the skills required to use DataPA OpenAnalytics
SmallBiz Dynamic Theme User Guide
 SmallBiz Dynamic Theme User Guide Table of Contents Introduction... 3 Create Your Website in Just 5 Minutes... 3 Before Your Installation Begins... 4 Installing the Small Biz Theme... 4 Customizing the
Chapter 1 Kingsoft Office for Android: A Close Look. Compatible with Microsoft Office: With Kingsoft Office for Android, users are allowed to create,
 Introduction From the globally respected software company Kingsoft, comes an extraordinary new Office software for your Android mobile or tablet device. Utilizing decades of leading innovation, Kingsoft
Introduction to Drupal
 Introduction to Drupal Login 2 Create a Page 2 Title 2 Body 2 Editor 2 Menu Settings 5 Attached Images 5 Authoring Information 6 Revision Information 6 Publishing Options 6 File Attachments 6 URL Path
SonicWALL GMS Custom Reports
 SonicWALL GMS Custom Reports Document Scope This document describes how to configure and use the SonicWALL GMS 6.0 Custom Reports feature. This document contains the following sections: Feature Overview
Abstract. For notes detailing the changes in each release, see the MySQL for Excel Release Notes. For legal information, see the Legal Notices.
 MySQL for Excel Abstract This is the MySQL for Excel Reference Manual. It documents MySQL for Excel 1.3 through 1.3.6. Much of the documentation also applies to the previous 1.2 series. For notes detailing
User Guide. Chapter 6. Teacher Pages
 User Guide Chapter 6 s Table of Contents 1. Introduction... 4 I. Enhancements... 5 II. Tips... 6 2. Key Information... 7 3. How to Add a... 8 4. How to Edit... 10 I. SharpSchool s WYSIWYG Editor... 11
SelectSurvey.NET User Manual
 SelectSurvey.NET User Manual Creating Surveys 2 Designing Surveys 2 Templates 3 Libraries 4 Item Types 4 Scored Surveys 5 Page Conditions 5 Piping Answers 6 Previewing Surveys 7 Managing Surveys 7 Survey
Outlook. Getting Started Outlook vs. Outlook Express Setting up a profile Outlook Today screen Navigation Pane
 Outlook Getting Started Outlook vs. Outlook Express Setting up a profile Outlook Today screen Navigation Pane Composing & Sending Email Reading & Sending Mail Messages Set message options Organizing Items
Website Editor User Guide
 CONTENTS Minimum System Requirements... 3 Design Your Website... 3 Choosing your Theme... 4 Choosing your Header Style... 4-5 Website Content Editor... 6 Text Editor Toolbar features... 6 Main Menu Items...
Starting User Guide 11/29/2011
 Table of Content Starting User Guide... 1 Register... 2 Create a new site... 3 Using a Template... 3 From a RSS feed... 5 From Scratch... 5 Edit a site... 6 In a few words... 6 In details... 6 Components
Google Docs A Tutorial
 Google Docs A Tutorial What is it? Google Docs is a free online program that allows users to create documents, spreadsheets and presentations online and share them with others for collaboration. This allows
Increasing Productivity and Collaboration with Google Docs. Charina Ong Educational Technologist [email protected]
 Increasing Productivity and Collaboration with Google Docs [email protected] Table of Contents About the Workshop... i Workshop Objectives... i Session Prerequisites... i Google Apps... 1 Creating
Email Marketing. User Guide. July 2012. Welcome to AT&T Website Solutions SM
 July 2012 Email Marketing User Guide Welcome to AT&T Website Solutions SM We are focused on providing you the very best web hosting service including all the tools necessary to establish and maintain a
Dynamics CRM for Outlook Basics
 Dynamics CRM for Outlook Basics Microsoft Dynamics CRM April, 2015 Contents Welcome to the CRM for Outlook Basics guide... 1 Meet CRM for Outlook.... 2 A new, but comfortably familiar face................................................................
REUTERS/TIM WIMBORNE SCHOLARONE MANUSCRIPTS COGNOS REPORTS
 REUTERS/TIM WIMBORNE SCHOLARONE MANUSCRIPTS COGNOS REPORTS 28-APRIL-2015 TABLE OF CONTENTS Select an item in the table of contents to go to that topic in the document. USE GET HELP NOW & FAQS... 1 SYSTEM
Using FileMaker Pro with Microsoft Office
 Hands-on Guide Using FileMaker Pro with Microsoft Office Making FileMaker Pro Your Office Companion page 1 Table of Contents Introduction... 3 Before You Get Started... 4 Sharing Data between FileMaker
Transitioning from TurningPoint 5 to TurningPoint Cloud - LMS 1
 Transitioning from TurningPoint 5 to TurningPoint Cloud - LMS 1 A Turning Account is a unique identifier that is used to tie together all software accounts and response devices. A Turning Account is required
COGNOS 8 Business Intelligence
 COGNOS 8 Business Intelligence QUERY STUDIO USER GUIDE Query Studio is the reporting tool for creating simple queries and reports in Cognos 8, the Web-based reporting solution. In Query Studio, you can
Content Author's Reference and Cookbook
 Sitecore CMS 6.2 Content Author's Reference and Cookbook Rev. 091019 Sitecore CMS 6.2 Content Author's Reference and Cookbook A Conceptual Overview and Practical Guide to Using Sitecore Table of Contents
Google Drive Create, Share and Edit Documents Online
 Revision 3 (1-31-2014) Google Drive Create, Share and Edit Documents Online With Google Drive, you can easily create, share, and edit documents online. Here are a few specific things you can do: Convert
SoftChalk. Level 1. University Information Technology Services. Training, SoftChalk Level Outreach, 1 Learning Technologies and Video Production
 SoftChalk Level 1 University Information Technology Services Training, SoftChalk Level Outreach, 1 Learning Technologies and Video Production Page 1 of 49 Copyright 2013 KSU Department of University Information
LETTERS, LABELS & EMAIL
 22 LETTERS, LABELS & EMAIL Now that we have explored the Contacts and Contact Lists sections of the program, you have seen how to enter your contacts and group contacts on lists. You are ready to generate
Blackboard 1: Course Sites
 Blackboard 1: Course Sites This handout outlines the material covered in the first of four workshops on teaching with Blackboard. It will help you begin building your Blackboard course site. You will learn
Chapter 3 ADDRESS BOOK, CONTACTS, AND DISTRIBUTION LISTS
 Chapter 3 ADDRESS BOOK, CONTACTS, AND DISTRIBUTION LISTS 03Archer.indd 71 8/4/05 9:13:59 AM Address Book 3.1 What Is the Address Book The Address Book in Outlook is actually a collection of address books
Using Webmail. Document Updated: 9/08. Technical Manual: User Guide. The Webmail Window. Displaying and Hiding the Full Header.
 Using Webmail Technical Manual: User Guide Webmail is supported in the following browsers: Windows Internet Explorer 6, Internet Explorer 7, Firefox 2, and Firefox 3 Mac OSX Safari 2, Safari 3, Firefox
Intro to Web Development
 Intro to Web Development For this assignment you will be using the KompoZer program because it free to use, and we wanted to keep the costs of this course down. You may be familiar with other webpage editing
Salesforce Customer Portal Implementation Guide
 Salesforce Customer Portal Implementation Guide Salesforce, Winter 16 @salesforcedocs Last updated: December 10, 2015 Copyright 2000 2015 salesforce.com, inc. All rights reserved. Salesforce is a registered
Intellect Platform - Tables and Templates Basic Document Management System - A101
 Intellect Platform - Tables and Templates Basic Document Management System - A101 Interneer, Inc. 4/12/2010 Created by Erika Keresztyen 2 Tables and Templates - A101 - Basic Document Management System
css href title software blog domain HTML div style address img h2 tag maintainingwebpages browser technology login network multimedia font-family
 technology software href browser communication public login address img links social network HTML div style font-family url media h2 tag handbook: id domain TextEdit blog title CANAJOHARIE CENTRAL SCHOOL
How to Use Swiftpage for Microsoft Excel
 How to Use Swiftpage for Microsoft Excel 1 Table of Contents Basics of the Swiftpage for Microsoft Excel Integration....3 How to Install Swiftpage for Microsoft Excel and Set Up Your Account...4 Creating
Advanced Training Reliance Communications, Inc.
 Reliance Communications, Inc. 603 Mission Street Santa Cruz, CA 95060 888-527-5225 www.schoolmessenger.com Contents Contents... 2 Before you Begin... 4 Advanced Lists... 4 List Builder... 4 Create a List...
User s manual 1. Introduction 2. Installation & Requirements 3. Your Tom s Planner account & login 4. Open & Save 5. Grid 6. Blue timeline 7.
 User s manual 1. Introduction 3 2. Installation & Requirements 3 3. Your Tom s Planner account & login 4 4. Open & Save 4 5. Grid 6 Rows and groups 6 Columns 7 Time blocks 10 Icons 10 Comments 11 Dependencies
Traffic Management App. User Guide
 Traffic Management App User Guide content section one Introduction 2 Logging In 2 section two Creating a new Traffic Management Plan 4 Identifying the location 4 Associating with a non-streetworks or unplanned
Vodafone Business Product Management Group. Hosted Services Announcer Pro V4.6 User Guide
 Vodafone Business Product Management Group Hosted Services Announcer Pro V4.6 User Guide Vodafone Group 2010 Other than as permitted by law, no part of this document may be reproduced, adapted, or distributed,
OWA - Outlook Web App
 OWA - Outlook Web App Olathe Public Schools 0 Page MS Outlook Web App OPS Technology Department Last Revised: May 1, 2011 Table of Contents MS Outlook Web App... 1 How to Access the MS Outlook Web App...
Microsoft Access 2010 Part 1: Introduction to Access
 CALIFORNIA STATE UNIVERSITY, LOS ANGELES INFORMATION TECHNOLOGY SERVICES Microsoft Access 2010 Part 1: Introduction to Access Fall 2014, Version 1.2 Table of Contents Introduction...3 Starting Access...3
CMS Training Manual. A brief overview of your website s content management system (CMS) with screenshots. CMS Manual
 with screenshots. CMS Manual") Training A brief overview of your website s content management system () with screenshots. 1 Contents Logging In:...3 Dashboard:...4 Page List / Search Filter:...5 Common Icons:...6 Adding a New Page:...7
Training A brief overview of your website s content management system () with screenshots. 1 Contents Logging In:...3 Dashboard:...4 Page List / Search Filter:...5 Common Icons:...6 Adding a New Page:...7
CDyWeb Content Management System (CCMS) V3.3. User Manual
 V3.3. User Manual") CDyWeb Content Management System (CCMS) V3.3 User Manual Page 1 Table of Contents Table of Contents...2 1. Finding your way...3 2. Page editing...4 2.1 Changing order...4 2.2 Add a page...5 2.3 Edit Page...9
CDyWeb Content Management System (CCMS) V3.3 User Manual Page 1 Table of Contents Table of Contents...2 1. Finding your way...3 2. Page editing...4 2.1 Changing order...4 2.2 Add a page...5 2.3 Edit Page...9
How To Write A Cq5 Authoring Manual On An Ubuntu Cq 5.2.2 (Windows) (Windows 5) (Mac) (Apple) (Amd) (Powerbook) (Html) (Web) (Font
 (Windows 5) (Mac) (Apple) (Amd) (Powerbook) (Html) (Web) (Font") Adobe CQ5 Authoring Basics Print Manual SFU s Content Management System SFU IT Services CMS Team ABSTRACT A summary of CQ5 Authoring Basics including: Setup and Login, CQ Interface Tour, Versioning, Uploading
Adobe CQ5 Authoring Basics Print Manual SFU s Content Management System SFU IT Services CMS Team ABSTRACT A summary of CQ5 Authoring Basics including: Setup and Login, CQ Interface Tour, Versioning, Uploading
Quick Start Guide to. ArcGISSM. Online
 Quick Start Guide to ArcGISSM Online ArcGIS Online Quick Start Guide ArcGIS SM Online is a cloud-based mapping platform for organizations. Users get access to dynamic, authoritative content to create,
Introduction to Microsoft Access 2003
 Introduction to Microsoft Access 2003 Zhi Liu School of Information Fall/2006 Introduction and Objectives Microsoft Access 2003 is a powerful, yet easy to learn, relational database application for Microsoft
Introducing our new Editor: Email Creator
 Introducing our new Editor: Email Creator To view a section click on any header below: Creating a Newsletter... 3 Create From Templates... 4 Use Current Templates... 6 Import from File... 7 Import via
This document is provided "as-is". Information and views expressed in this document, including URLs and other Internet Web site references, may
 This document is provided "as-is". Information and views expressed in this document, including URLs and other Internet Web site references, may change without notice. Some examples depicted herein are
UNIVERSITY OF CALGARY Information Technologies WEBFORMS DRUPAL 7 WEB CONTENT MANAGEMENT
 UNIVERSITY OF CALGARY Information Technologies WEBFORMS DRUPAL 7 WEB CONTENT MANAGEMENT Table of Contents Creating a Webform First Steps... 1 Form Components... 2 Component Types.......4 Conditionals...
The Smart Forms Web Part allows you to quickly add new forms to SharePoint pages, here s how:
 User Manual First of all, congratulations on being a person of high standards and fine tastes! The Kintivo Forms web part is loaded with features which provide you with a super easy to use, yet very powerful
6. If you want to enter specific formats, click the Format Tab to auto format the information that is entered into the field.
 Adobe Acrobat Professional X Part 3 - Creating Fillable Forms Preparing the Form Create the form in Word, including underlines, images and any other text you would like showing on the form. Convert the
New Online Banking Guide for FIRST time Login
 New Online Banking Guide for FIRST time Login Step 1: Login Enter your existing Online Banking User ID and Password. Click Log-In. Step 2: Accepting terms and Conditions to Proceed Click on See the terms
Infoview XIR3. User Guide. 1 of 20
 Infoview XIR3 User Guide 1 of 20 1. WHAT IS INFOVIEW?...3 2. LOGGING IN TO INFOVIEW...4 3. NAVIGATING THE INFOVIEW ENVIRONMENT...5 3.1. Home Page... 5 3.2. The Header Panel... 5 3.3. Workspace Panel...
RADFORD UNIVERSITY. Radford.edu. Content Administrator s Guide
 RADFORD UNIVERSITY Radford.edu Content Administrator s Guide Contents Getting Started... 2 Accessing Content Administration Tools... 2 Logging In... 2... 2 Getting Around... 2 Logging Out... 3 Adding and
The Electronic Voting System - EVS
 The Electronic Voting System - EVS The electronic voting system is based on the MSU surveys application. Its primary purpose is to allow the MSU community to vote on a variety of issues, membership or
Create a New Database in Access 2010
 Create a New Database in Access 2010 Table of Contents OVERVIEW... 1 CREATING A DATABASE... 1 ADDING TO A DATABASE... 2 CREATE A DATABASE BY USING A TEMPLATE... 2 CREATE A DATABASE WITHOUT USING A TEMPLATE...
Web Mail Guide... Error! Bookmark not defined. 1 Introduction to Web Mail... 4. 2 Your Web Mail Home Page... 5. 3 Using the Inbox...
 Powered by Table of Contents Web Mail Guide... Error! Bookmark not defined. 1 Introduction to Web Mail... 4 1.1 Requirements... 4 1.2 Recommendations for using Web Mail... 4 1.3 Accessing your Web Mail...
Using the Cisco OnPlus Scanner to Discover Your Network
 Using the Cisco OnPlus Scanner to Discover Your Network Last Revised: October 22, 2012 This Application Note explains how to use the Cisco OnPlus Scanner with the Cisco OnPlus Portal to discover and manage
Learn About Analysis, Interactive Reports, and Dashboards
 Learn About Analysis, Interactive Reports, and Dashboards This document supports Pentaho Business Analytics Suite 5.0 GA and Pentaho Data Integration 5.0 GA, documentation revision February 3, 2014, copyright
Webmail User Guide. The Webmail Window. Logging In to Webmail. Displaying and Hiding the Full Header. Printing an Email. Composing a New Email
 Webmail User Guide Rev: November, 2012 Webmail is supported in the following browsers: Windows Internet Explorer 6, Internet Explorer 7, Firefox 2, and Firefox 3 Mac OSX Safari 2, Safari 3, Firefox 2,