Note: Complete setting-up and maintenance instructions are found in the Setting-up guide, which is also enclosed with the BeoSound 9000.
|
|
|
- Johnathan Webster
- 7 years ago
- Views:
Transcription
1 B E O S O U N D The BeoSound 9000 is the ultimate music entertainment centre, an impressive CD player with a built-in radio. A technological revelation, a masterpiece of craftsmanship as well as a decative piece of art. The system can be placed anywhere you want music in traditional placements; on a table hanging on a wall, in a novel, iginal placement; on the specially designed, vertical stand. All in all, the choice is entirely up to you. The BeoSound 9000 represents a new and visual way of experiencing music. Please refer to the quick guide on pages 8-9 to experience what you see is what you hear User s guide

2 2 This User s guide describes the operation of the BeoSound Each function described in this guide is accompanied by a set of buttons, situated either to the far left right of the page, which refer to the buttons on the BeoSound 9000 closeup operation panel. F most functions, inserts with step-by-step guidance to the Beo4 remote control are also included. These sets of buttons will guide you through the operations step-by-step. The BeoSound 9000 may be used with various types of active Bang & Olufsen loudspeakers, it may be used as a music centre in a Bang & Olufsen AV system. This guide applies to both situations. Note: Complete setting-up and maintenance instructions are found in the Setting-up guide, which is also enclosed with the BeoSound Be sure to keep the Setting-up guide. You will need it f cleaning and maintenance instructions, and when you move rearrange your BeoSound 9000 setup in the future.

3 C O N T E N T S 3 Complete list of contents and page references 4 What you see is what you hear... 6 Principles of operation 7 Close-up operation panel 8 Quick guide to daily operations 10 Beo4 remote control 11 Using the Compact Disc player 12 Loading CDs 13 Positioning CDs 14 CD playback 16 Switching displays 17 Choosing a sequence of discs 18 Playing CDs and tracks in random der 19 Programming a series of tracks f one CD 20 Playing edited CDs 21 Naming CDs 22 Listing CDs 23 Using the radio 24 Presetting radio stations 25 Clearing presets 25 Radio program list 26 Fine tuning a radio station 26 Mono/stereo reception 27 Naming radio programs 28 Playing radio programs 29 Switching displays 31 Using the Timer 32 Programming Timers 34 Checking clearing Timers 35 Switching the Timer function to on off 36 Setting and using the built-in clock 37 Nice to know about Timers 39 Nice to know 40 Adjusting sound 42 Playing auxiliary sources 43 Music throughout the house 44 From audio to video vice versa

4 4 W H A T Y O U S E E I S W H A T Y O U H E A R Your BeoSound 9000 is versatile, beautiful, and responsive... BeoSound 9000 can be compared to a piece of art and will light up any living room. Its principle is What you see is what you hear It mirrs your personal musical and artistic taste. BeoSound 9000 conveys a strong visual expression design-wise and represents an iginal statement. BeoSound 9000 gives you perfect sound reproduction and changes tracks and CDs at an unbelievable pace. You will experience 6 Compact Discs as one piece of music virtually one CD. Your BeoSound 9000 is designed f both remote control operation via Beo4 and close-up operation via the BeoSound 9000 operation panel.

5 5
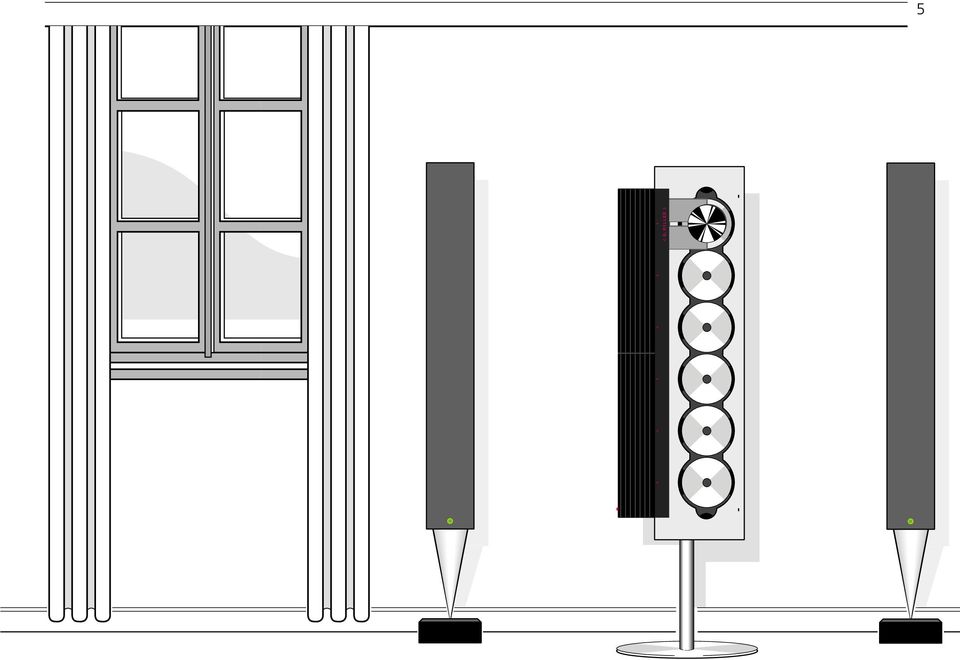
6 6 P R I N C I P L E S O F O P E R A T I O N Operation Panel Whether you place BeoSound 9000 on a table, vertically hizontally on the wall on the specially designed BeoSound 9000 stand, you can adjust the position of the operation panel in der to facilitate your operation of the BeoSound Please refer to the setting-up guide f instructions of how to remove and replace the operation panel. Radio The BeoSound 9000 radio only becomes visible when it is being used. The display lights up with radio program infmation. TREBLE RESET TIMER ON/OFF RANDOM CD TUNE RADIO A. AUX BASS MUTE CHECK EDIT PAUSE AM/FM P. NO. SELECT EDITING BALANCE VOL LOUDNESS VOL CLOCK CLEAR NAMING CLEAR NAMING CLEAR Load button The LOAD button is situated in a low position on the BeoSound Direct CD selection button A selection button is situated next to all 6 Compact Disc compartments in a low position on the BeoSound Press this button to play the CD in the compartment. Compact Disc player The BeoSound 9000 contains 6 Compact Disc compartments and a carriage moves between compartments and enables CD playback. You move the carriage by pressing the direct CD selection button next to the CD compartment. When you switch the BeoSound 9000 to stand-by, the carriage will always situate itself next to the operation panel and the CD compartment number 1. If you choose to place the BeoSound 9000 vertically, the carriage will move to the top end of BeoSound If you choose to place the BeoSound 9000 hizontally, the carriage will situate itself next to the operation panel. Mains switch Stand-by button The STAND-BY button is situated in a low position on the BeoSound Socket f headphones

7 C L O S E - U P O P E R A T I O N P A N E L 7 General functions f close-up operation The buttons and and are included in all the sections of buttons which are illustrated below. These buttons are used together with primary and secondary functions f radio, CD, timer and sound: : Accepts and stes operations and outcomes STEP BUTTONS and : Change programs and change identify values f radio tuning, program numbering, CD, timer and sound adjustment functions. Primary and secondary CD functions The buttons give access to CD functions: CD: Plays the CDs. PAUSE: Pauses playback. SELECT and EDITING: Programming sequences of discs and tracks. RANDOM and EDIT: Operate special random and edited play functions f the CDs. NAMING: Names discs and sequences. CLEAR: Clears programmed values. Primary and secondary radio functions The buttons give access to radio functions: RADIO: Plays the radio. TUNE, AM/FM and P.NO.: Tune in to stations and number them. NAMING: Names stations. CLEAR: Clears stations. Stand-by function The button switches the BeoSound 9000 to stand-by. A. AUX function The button enables you to switch on extra audio equipment. TREBLE RESET TIMER ON/OFF RANDOM CD TUNE RADIO A. AUX BASS MUTE CHECK EDIT PAUSE AM/FM BALANCE VOL SELECT EDITING P. NO. LOUDNESS VOL CLOCK CLEAR NAMING CLEAR NAMING CLEAR Sound adjustment functions The buttons give access to sound adjustment functions: VOL and VOL : Raise and lower the volume level. MUTE: Mutes activates the loudspeakers. TREBLE, BASS, BALANCE and LOUDNESS: Regulate the sound from the loudspeakers. RESET: Resets the settings f sound to their default settings. Timer functions The buttons give access to timer functions: TIMER: Sets timers f when the BeoSound 9000 should begin to play switch off. ON/OFF: On off decides where a timer will be heard executed. CHECK: Checks your timers. CLEAR: Clears your timers. CLOCK: Sets displays the inbuilt clock. Status display The display keeps you infmed about what the BeoSound 9000 is doing and ongoing operations. E.g. playing a CD sequence named GLENN MILLER (see above display).

8 8 Q U I C K G U I D E T O Direct CD selection buttons Load button Loading and playing CDs CD PAUSE CD Press to raise the glass do Press again to lower the glass do Press to play a CD Press to step through CD tracks Press to pause playback Press to resume playback You press the LOAD button to raise the glass do and you will now be able to load your CDs. If the carriage is situated over the CD compartment where you want to load a new CD, simply press the direct selection button next to another CD compartment to make the carriage move to this compartment. Press the appropriate buttons as shown to the left to start playback and step through the tracks on the CD where the carriage is situated. If you wish to step through the tracks on another CD, you can either step through all the tracks on the current CD and continue to press the button, the carriage will move to the next CD compartment you can press the direct selection button next to the CD you want to hear. See page 12 f further infmation about loading CDs and pages f further infmation about CD playback

9 D A I L Y O P E R A T I O N S 9 TREBLE RESET TIMER ON/OFF RANDOM CD TUNE RADIO A. AUX BASS MUTE CHECK EDIT PAUSE AM/FM BALANCE VOL SELECT EDITING P. NO. LOUDNESS VOL CLOCK CLEAR NAMING CLEAR NAMING CLEAR Close-up of the BeoSound 9000 operation panel The buttons used f your daily operations are highlighted on the panel. Switching on and playing the radio To switch on and play the radio, simply press the buttons shown to the right. You can step through your radio programs and on the display you will be able to see which radio station you have selected. On the display you will see the indication RADIO followed by a program number a program name if you have named the particular program. See pages f further infmation Press to turn on the radio Press to step through radio programs RADIO Volume adjustments and switching off The volume level can be turned up down at any time by pressing the VOL VOL volume buttons. To switch off the BeoSound 9000, press the red stand-by button on the operation panel. Press to raise the volume Press to lower the volume Press to switch to stand-by VOL VOL

10 10 B E O 4 R E M O T E C O N T R O L Using the Beo4 The BeoSound 9000 CD-player is operated from a distance via the Beo4 remote control. The Beo4 step-by-step operating sequences are shown as inserts framed in boxes throughout this user s guide. The Beo4 remote control operates all the primary functions in the BeoSound 9000 such as switching on the radio the CD player, changing radio programs, CD tracks CDs. It also selects programs CDs to be played, adjusts sound functions, pauses playback and finally switches to stand-by. The Beo4 remote control also enables you to select specific tracks on CDs, select sequences of specific discs to be played, search fward and backward on CDs, switch on the random der playback and edited der playback functions as well as select auxiliary equipment. Note: Please refer to the Beo4 User s guide f further infmation about the Beo4 principles of operation. In der to perfm certain functions with Beo4, you have to add to the Beo4 list of functions. Throughout this user s guide you will be infmed when such an addition is called f. Please refer to your Beo4 User s guide and the chapter Customizing your Beo4 f further instruction. Nice to know In the step-by-step operating sequences, the buttons on the Beo4 and cues in the display will be illustrated like this: CD GO LIST Rectangular buttons f e.g. sources, numbers, and volume regulation Buttons incpated in the large star-shaped button f stepping up down and fwarding and rewinding A small, round GO button incpated in the large star-shaped button which stes, accepts and executes control operations Coloured buttons incpated in the star-shaped button f special functions The double-button means press repeatedly on LIST TV LIGHT RADIO SAT DVD CD V TAPE RECORD A TAPE TEXT 0 MENU GO RANDOM Cues in the Beo4 display LIST EXIT STOP The Beo4 remote control is not a standard component of the BeoSound Beo4 is available as an optional extra from your Bang & Olufsen dealer.

11 U S I N G T H E C O M P A C T D I S C P L A Y E R Loading CDs 13 Positioning CDs 14 CD playback 16 Switching displays 17 Choosing a sequence of discs 18 Playing CDs and tracks in random der 19 Programming a series of tracks f one CD 20 Playing edited CDs 21 Naming CDs 22 Listing CDs

12 12 U S I N G T H E C O M P A C T D I S C P L A Y E R The CD must be loaded with the text side facing you. Hold the CD by its edges and insert the CD (top section). To unload the CD, hold it by its edges and push the CD a little fward to release it. CD Press to raise the glass do Press to lower the glass do Press to lower the do and start playing Loading CDs Pressing the load button raises the glass do. You can remove the CDs from their compartments and load the CDs you want to play. Always load the CD with the text side facing you and push the CD into place! Press the load button again to lower the glass do. You can also press the CD button to lower the do and the CD where the carriage is situated will start playing at once. The carriage will situate itself in various positions depending on the placement you have chosen f your BeoSound Please refer to the Setting-up guide f further infmation concerning placement. If the glass do is open and the carriage is placed over a CD you want to remove, simply move the carriage to another position by pressing the direct CD selection button next to a compartment. CD tt ss BEO4 Press to play a CD Press tt to move the carriage up to the right Press ss to move the carriage down to the left Alternatively, key in the CD compartment number you want the carriage to move to. Nice to know The carriage registers whether the CD compartments you ask f are empty not, and until the glass do is opened again, it will remember the state of the compartments. If you leave the glass do open, it will close automatically after 5 minutes. If BeoSound 9000 is left paused stopped f me than 30 minutes, it automatically switches to stand-by.

13 13 Positioning CDs By positioning your individual CDs, you create your own design with a particular collection of CDs on BeoSound When you load CDs on the BeoSound 9000, you can adjust their positions manually so that f example the graphical design and the text on the actual CD present themselves to your satisfaction. When you have loaded a CD and pushed it in place in a CD compartment, you adjust the position of the CD manually. Then you move the carriage to this particular CD and access the positioning function f CDs in der to ste the position you have chosen. Please refer to the procedure to the right of this page. If you ste a position f each CD, the BeoSound 9000 will now remember these positions. No matter how many times you remove and reload the CDs, the individual CDs will be returned to these positions every time they stop turning*. If you wish to change cancel the positions of your CDs while still in the positioning function, you press the CLEAR button instead of to cancel the position you have already chosen. *Note: Some particular CDs do not contain the infmation which is required by the BeoSound 9000 in der to ste positions f CDs. Therefe you may experience that the position you have attempted to ste f a CD is not adhered to by the BeoSound You will of course still be able to play the CD in question. Load and adjust a CD manually Then press the direct CD selection button next to this CD to move the carriage to the CD Press to save the position f the CD while it is playing Press to ste the position you chose f the CD when it was loaded Repeat this procedure f all the CDs you have loaded If you want to clear the position f a CD, move the carriage to the CD in question Press to access the positioning function to clear the position SELECT SELECT SELECT SELECT Press to clear the position CLEAR

14 14 > Using the Compact Disc player CD playback CD PAUSE CD VOL VOL MUTE Press to play a CD Press to play the next track on a CD Press to play the same track again press twice to play the previous track Press to pause playback Press to resume playing Press to raise the volume Press to lower the volume Press to silence the speakers Press again to recall the sound Press to switch to stand-by When you press the CD button on the operation panel, the CD where the carriage is situated starts to play. You can also start playback by pressing the button in the CD section of buttons. If you want to play a specific CD, simply press the direct CD selection button placed next to the CD compartment. The carriage moves to the CD you have chosen, and playback starts. While a CD is playing, you can step through the tracks by pressing the step buttons. When you have stepped through the tracks of one CD, pressing the step button will start playback of the first track on the next CD. You can now step through the tracks of this CD. When your first CD has finished playing, the carriage automatically moves to the next CD you have loaded and starts playing this new CD. After 12 hours of uninterrupted playing, the BeoSound 9000 stops. If you choose to hear another source, the CD player switches off automatically. Nice to know When you play your BeoSound 9000 CD player, a tiny red indicat is lit beside all the CD compartments where you have loaded a CD. If you f example choose a sequence of discs to be played, only the indicats next to the CDs you have chosen will be lit even though you have loaded six CDs.

15 15 BEO4 CD Press to start playback of a CD Press to search fward on a disc Press to search backward Press to change tracks on a CD STOP Press to pause playback tt Press to change to the next previous disc Press to switch to stand-by ss 1 through 6 Press to choose a disc number directly LIST 1 through 9 Press list to display TRACK* to choose a specific track Press to choose a track number Press to choose a track directly *Note: In der to display TRACK on Beo4, you have to add this function to its list of functions, please refer to your Beo4 user s guide and the chapter Customizing your Beo4 f further instruction.

16 16 > Using the Compact Disc player Switching displays CD Press to play a CD Press repeatedly to change the CD display indication The display can give you three different types of infmation about the CD being played: Name of CD Name* Number of CD and track Number of CD and elapsed track time Number of CD and track To switch from one display to the other, you must press the button repeatedly while the CD is playing. Number of CD and elapsed time of the current track in minutes and seconds Your chosen display indication f the CD player will remain on the display panel and only disappear temparily when you undertake another operation on the BeoSound 9000 operation panel. Then the infmation which accompanies this operation will appear on the display f a sht period of time. *Note: You have to name the CD befe a name appears on the display, please refer to page 21 f further infmation about naming.

17 17 Choosing a sequence of discs You can make BeoSound 9000 play your favourite CDs in a particular sequence. Every time a CD is included in the sequence, the red indicat next to the CD compartment lights up. The CDs you have chosen will start playing in numerical der. The CD sequence will be played continuously f up to 12 hours unless you switch BeoSound 9000 to stand-by. If you want to, you can override the chosen disc sequence and listen to a CD not included in the sequence. Simply press the direct CD selection button next to the CD you want to hear, and playback will start immediately. You can also choose to leave out a CD which has already been included in the sequence but only if you are still in the SELECT option*. You press the direct CD selection button again next to a CD you have already included. *Note: The SELECT option lasts f 25 seconds from when you pressed SELECT. If you press a direct selection button after the SELECT option has ended, the disc you chose will start playback immediately and override your sequence. When it has finished playing, BeoSound 9000 will continue playing the sequence you chose befe. Press to start playback of a CD Press SELECT and SELECT DISC will appear on the display Press the direct CD selection buttons next to the CDs you want to include Press SELECT to start clearing a sequence and play all six CDs Press to clear the sequence CD SELECT SELECT CLEAR BEO4 LIST 1 through 6 Press LIST to display SELECT* Key in the disc numbers you want to include LIST 0 Press LIST to display SELECT to start clearing a disc sequence and play all six CDs Press 0 ( nil ) to clear the sequence *Note: In der to display SELECT on Beo4, you have to add this function to the Beo4 list of functions, please refer to your Beo4 user s guide and the chapter Customizing your Beo4 f further instruction.

18 18 > Using the Compact Disc player Playing CDs and tracks in random der CD RANDOM RANDOM Press to start playing CD Press to display RANDOM ON and cut in the random play function Press twice to display RANDOM OFF and cancel the random play function The random play function plays CDs and tracks on individual CDs in a random der. Also chosen CDs and track series can be played in random der. If you continue playing the same CDs track series, you will find that the tracks are played in a different der each time the CDs track series are played. You can choose to combine the RANDOM function with the EDIT function and play your favourite tracks in a random der. You have to activate the functions one after the other. You can also combine these two functions with SELECT and thus choose to play only your favourite tracks from f instance two CDs in random der. Please refer to the chapters Programming a series of tracks f one CD and Playing edited CDs on pages with respect to further details of the EDIT function. With respect to choosing CDs, please refer to the chapter Choosing a sequence of discs on page 17. Note: If you cancel the random play function while a CD is playing, all the tracks beyond the current track number will be played in chronological der, even if they have already been played while the random play function was cut in. The function remains ON until you cancel it even in stand-by. LIST GO BEO4 Press LIST to display RANDOM Press to start random der playback immediately LIST Press LIST until RANDOM is displayed Press to cancel random der playback

19 19 Programming a series of tracks f one CD You can program your BeoSound 9000 to play your favourite tracks on a CD. First you scan the CD you want to edit. The first 15 seconds of each track on this CD will be played. On the display the track number you are currently playing will appear. During this 15-second playback, you must include the particular track in the series by pressing the button exclude the track by pressing the button. As soon as you press either the the button, the next track on the CD starts playing*. The BeoSound 9000 memizes the specific track series you have chosen, but if you want to hear it again the next time you load this particular CD, you must use the edit function which allows you to play your edited track series. If you do not choose the edit function, the CD will be played in full. See the chapter on Playing edited CDs on the following page f further details. If you happen to make a mistake change your mind while you are choosing your tracks, just press the EDITING button again and start over. Press to play CD Press to scan the CD EDITING? appears on the display Press to start scanning the tracks Press to include a track number in the series Press to exclude a track number from the series EDITING appears on the display when you have included excluded the last track Press to accept the track series CD EDITING Repeat this procedure until you have chosen your favourite tracks and your track series is complete. You have now composed your own personal track series on one CD *Note: If you do not choose whether you want to include exclude a track within the 15 second playback, the CD player will include the track automatically. If you choose to leave EDITING befe you have scanned, accepted excluded all the tracks on the CD, the remaining tracks will be regarded as excluded from the track series. Nice to know If you have named CDs and named a large number of track series f individual CDs which, in all, include 200 CDs, the display will read CD LIST FULL and you will have to clear some of your entries on the list to program new ones, see how to on page 22. To clear a track series Choose the CD whose track series you want to clear Press to access the programming option Press to clear the track series altogether EDITING CLEAR

20 20 > Using the Compact Disc player Playing edited CDs CD EDIT EDIT Press to start playback of a CD Press to display EDIT ON and start edited playback Press twice to play a CD in full and cancel EDIT EDIT OFF appears on the display The edit function enables you to play the track series you have chosen from individual CDs, that is your edited CD. BeoSound 9000 memizes the series you chose, so that you can hear them again and again. Just press EDIT when you have loaded the CDs, you have chosen tracks f, and you will be able to enjoy your favourite tracks from these CDs. Please refer to the chapter on Playing CDs and tracks in random der f further instructions of how to combine EDIT and RANDOM on page 18. Nice to know If you cancel the edited playback function while an edited CD is playing, all tracks beyond the current programmed track number will be played. The EDIT function remains ON until you cancel it even in stand-by. You can also combine your edited playback with the RANDOM function and play your favourite tracks in a random der. LIST GO BEO4 Press LIST to display EDIT* Press to start edited playback LIST Press LIST until EDIT is displayed Press to cancel edited playback *Note: In der to display EDIT on Beo4, you have to add the function to the Beo4 list of functions, please refer to the Beo4 user s guide and the chapter Customizing your Beo4.

21 21 Naming CDs You can give a sht name of your own choice to the CDs in your private CD collection and name the track series you have programmed on individual CDs. You can name the individual CDs when you start playback. If you have already entered a name, this name will appear on the BeoSound 9000 display panel. You write the name of your CD CD track series by pressing the buttons and the button. Follow this procedure until you have chosen your last character and you must ste the name. The name can consist of up to 12 characters, including numbers. If you have not given a name to the CD, the track number, track time elapsed time will appear on the display instead. BeoSound 9000 allows you to ste 200 entries which include names and/ track series f CDs. Press to play CD Press to access the naming function Press to reveal the characters numbers one by one Press to move to next character position Press to ste the name Press while you are naming CDs track series in der to automatically ste the name and exit the naming function CD NAMING CD Note: If you make a mistake change your mind while you are naming your CD track series, just press the NAMING button again and start over press CLEAR to clear what has been keyed in. To clear a name, follow this procedure Press to access the naming function Press to clear the name NAMING CLEAR Then, Press to return to nmal source operation CD
22 22 > Using the Compact Disc player Listing CDs CD NAMING NAMING CLEAR CD Press to play CD Press to access the naming list CD LIST appears briefly, the name of the current CD appears Press to list the names one by one and return to names further up the list Press to clear a name while the appropriate name is displayed Press to return to nmal source operation All the CDs you have named programmed track series on can be displayed one by one without you even having to load these CDs. The list is useful if you want to quickly leaf through all the CDs which are included on the CD list. If a CD has not been named but a track series has been programmed on it, it will appear on the CD list as e.g. DISC 3 indicating the number it has been assigned on the list. However, a CD can of course both have a name and a programmed track series attached in which case only the name will appear. If you attempt to name program track series f me than 200 CDs the display will read CD LIST FULL, and you will have to clear an entry befe you can add another. Note: If the carriage is situated on a CD which has been given a name the CD has been edited, the name number of this CD will appear on the display when you access the list. If the CD under the carriage is unknown, the CD list will appear on the display and you have to press the buttons to get a name number displayed. You can clear an entry on the CD list while you are leafing through the list. If you choose to clear a CD entry, you will clear the name you may have given the particular CD and the track series you may have programmed as well as the position you may have programmed f the CD.
23 U S I N G T H E R A D I O Presetting radio stations 25 Clearing presets 25 Radio program list 26 Fine tuning a radio station 26 Mono/stereo reception 27 Naming radio programs 28 Playing your radio programs 29 Switching displays Note: Proper FM and AM aerial connections must be made to the BeoSound 9000 in der f the radio to pick up the stations available in your area. Please refer to the Setting-up guide f details about aerial connections.
24 24 U S I N G T H E R A D I O Presetting radio stations RADIO TUNE AM/FM P.NO. Press to turn on the radio Press to start the tuning function Press to select AM FM, switches from one to the other, check display f an indication of which one you have chosen Press to search f a radio station up down the frequency band Press to accept the station you have found Press to change the displayed program number Press to select a program number up down Press to ste your new radio program STORED appears on the display To be able to use the radio, you must first tune in to the radio stations you want to ste and ste them on program numbers of their own*. You can ste up to 60 radio stations and if you like, you can give them a sht name which you choose yourself. You press the TUNE button to start presetting your radio stations. Once you have pressed TUNE, presetting a radio station is like having a conversation with the BeoSound 9000 display. The display will prompt you to take action. In der to reveal options other than those already on the display, press the buttons. Pressing the button accepts any infmation that is currently shown on the display. All in all, the tuning procedure takes you through five stages (see further explanation on the right of this page) Press TUNE to start the tuning function 2. Select the band where you want to search f radio stations AM FM. 3. Search f a radio station by pressing. The searching stops at the first station which produces an acceptable signal. If this is not the station you want, just press again to continue searching. 4. When you have found a station, ste it on a program number of its own. The display automatically offers you a vacant program number, but you may select another one if you like. If the station you have found has been sted already, the program number where the station has been sted appears on the display. 5. Finally, you must ste your new radio program along with the infmation you have given to it. Note: If a station needs fine tuning, you wish to switch between mono and stereo sound on radio programs, please refer to page 26. *Note: You can change the program number of your radio program any time also without being in the process of tuning. Simply press P.NO. to change a current number and follow the procedure to the left of this page. Similarly, you can also name a radio station with a sht name of your own choice, please refer to page 27 f further instruction.
25 25 Clearing presets... If you want to cancel one of your radio presets, you can do so via the CLEAR button. See how to clear a program to the right... When the program number has been cleared, CLEARED will appear on the display. Press to turn on the radio Press to search f program number RADIO Press to clear the program Press to confirm the clearing of the radio program CLEAR Document your radio presets here:
26 26 > Using the radio Fine tuning a radio station RADIO TUNE TUNE Press to turn on the radio program you want to fine tune Press to start the fine tuning function Press to fine tune your program towards a higher lower frequency If the radio station is not tuned in clearly enough, it may be because the station needs to be fine tuned. The fine tuning function enables you to move slowly through the frequencies, to detune a station slightly because of noisy reception. Once you have fine tuned your program, you can choose a different program number f your radio program if you like befe you ste it. Please refer to Presetting radio stations on page 24 f further infmation. Press to accept your fine tuned program Press again to ste program and program number Just follow the instructions to the left, and listen carefully as you proceed... Mono/stereo reception RADIO TUNE TUNE TUNE Press to turn on the relevant radio program Press to choose MONO STEREO Press to switch from stereo to mono Press to ste your new tuning on the program number If you have tuned in to an FM station broadcasting a stereo signal, this signal will be sted along with the radio program. Your BeoSound 9000 automatically switches to mono if the stereo signal is not strong enough to produce an acceptable stereo sound. However, you can overrule this automatic function if you wish and select mono manually. See how to do it on the left of this page. The choices f the settings are indicated on the displays stereo mono sound
27 27 Naming radio programs You can name all the radio programs you have sted. Choosing a name is completely up to you. This may help you remember a program not only by its program number but by a particular name. When you are listening to a radio program, its name will appear on the display. Once you have completed writing your name, you ste the name and it will appear every time you choose this program again. If you happen to make a mistake change your mind while you are naming a radio station, just press the NAMING button again and start over. If you want to clear the name after you have keyed it in, press CLEAR instead of and the name you have keyed in will be erased. The name may contain up to 12 characters, including numbers If you have left the naming function and want to clear the name, just press NAMING again and CLEAR to clear the name in question. Press RADIO to leave the naming function and the name will be cleared. If you do not name your programs, the station s own name may appear instead, provided such a name is being transmitted by the radio station itself*. *Note: Such a name can only be transmitted if your BeoSound 9000 is equipped with the RDS facility. Press to turn on the radio program you want to name Press to start the naming function The first of the twelve character positions blinks, indicating that you can start writing a name Press to reveal the characters one by one Press to reveal previously shown characters Press to move to the next character position Press to ste the name of the radio station NAMING will appear on the display Press to ste the name and exit the naming function You can press RADIO at any time to ste and exit the naming function To clear a name Press to access the naming function RADIO NAMING RADIO NAMING CLEAR Press to clear the name
28 28 > Using the radio Playing your radio programs RADIO Press to turn on the radio Press to step through your radio programs In der to turn on the radio simply press the RADIO button. The program you were listening to last starts playing and it will be indicated on the display which radio program is playing. RADIO BEO4 Press to turn on the radio Press to switch to stand-by If you have given a name to the radio program, the display will read out that name. Press to step through your radio programs To switch between programs, you use the step buttons. If you keep either the step button the step button pressed down, you will step through your programs quickly and continuously. 1 through 9 Key in the program number you want to hear Press to switch to stand-by If you select another source, the radio switches off automatically. To switch off the entire system, press the standby button.
29 29 Switching displays The display can give you four different types of infmation about the radio program you are listening to: Program name RDS* Radio text infmation* Program number Radio frequency Program name indication Radio text infmation Press to turn on the radio Press repeatedly to change the radio display indication RADIO To switch from one display to the other, you press the button repeatedly while the radio program in question is playing. Program number indication Radio frequency indication The infmation you have chosen to display will remain on the BeoSound 9000 display until you choose another one of the displays illustrated to the right on this page. The display e.g. program name will of course disappear temparily if you choose to e.g. step through your other radio programs the appropriate infmation will appear on the display. Radio text switches back and fth between program name and radio text infmation. *Note: RDS is a facility which enables a radio station to transmit either the name of the radio program you are listening to other radio text infmation. Please refer to page 27 f further infmation about RDS.
30 30 N O T E S
31 U S I N G T H E T I M E R Programming Timers 34 Checking clearing Timers 35 Switching the Timer function to on off 36 Setting and using the built-in clock
32 32 U S I N G T H E T I M E R Programming Timers TIMER Press to start programming timers Press to choose a source f your Timer choose a Timer standby Press to accept the Timer Then program when you want the Timer to start and stop Press repeatedly until you have found the exact time f starting a Timer play Press to accept start Repeat the procedure with the and buttons and to program the exact time f stopping a Timer To program a SINGLE DATE Timer... Press to display the date you want to program a Timer f Press to accept the selection Press to ste your Timer programming and return to nmal source operations Please refer to the following page to program a DAYS Timer You can program your BeoSound 9000 to start stop playing at an appointed time throughout your day and week without you even having to be there to control the process. The Timer Play function can, f example, wake you up in the mning to the sound from either your favourite CD radio program*. The Timer Stand-by function enables you to program the BeoSound 9000 to switch off automatically f example after you leave f wk in the mning. Once you have pressed the TIMER button to get started, programming a new Timer is just like having a conversation with the display The BeoSound 9000 memizes up to 15 such programming entries and you can program timers which are carried out once timers which are carried out throughout the week, please refer to the next page f infmation about How often?. *Note: When you program a Timer on RADIO, TV SAT, you will have to choose the program where you want to program a timer play. You can only choose already sted RADIO programs. When you choose a program f RADIO, the program you listened to last will appear. F TV and SAT program 1 will appear as your first option. If you happen to change your mind while you are programming, just press a source button, CD radio, to exit the timer programming function. While you are programming a Timer, pressing the CHECK button will take you back one step in the programming sequence. Note: When TIMER STORED is displayed you cannot step back, pressing CHECK will start the checking function, see page 34 if you want to check clear a Timer. Nice to know The BeoSound 9000 has a built-in 24-hour clock. This means that the display reads, f example, 14:45 f a quarter to three. In der f the Timers to be executed crectly, the clock must be set to the crect time (see page 36). F a Timer Stand-by programming all the BeoSound 9000 needs to know, is at what time you want it to stop playing, and how often, SINGLE DATE DAYS. As soon as you choose a stand-by timer, you will jump straight to the display which prompts you to choose when the Timer should stop.
33 If you only want to program a timer play standby once, choose this option... When you want to program a weekly timer as a timer play timer stand-by, choose this option... How often?... The BeoSound 9000 can be programmed to carry out a Timer once on a specific date SINGLE DATE, on fthcoming, selected weekdays DAYS. Display the date when you want to program your timer... When you press and this cue appears on the display, you can press to ste the timer you can change the display by pressing the buttons to display TIMER EXIT? and exit the timer programming function without sting it. Press to accept exit. Ste your timer by pressing and you will no longer be able to change use the CHECK function to step back in your programming sequence. See page 34 if you want to clear it... Fill in the days when you want to program the timer. If you do not choose any days, the option to choose Monday, MON?, will appear again. When you have considered Sunday press befe you have included excluded all the days of the week, this display will prompt you to ste your timer programming. If you do not want to ste the Timer, press another source button to exit the function press the buttons to display TIMER EXIT and press to exit the timer programming function without sting your Timer. Press to ste your weekly timer programming and you will now no longer be able to change it step back in the programming sequence. See page 34 if you want to clear it... If you choose SINGLE DATE, the cue DATE and today s date in the display prompts you to choose a date within the next year (1-31). Please refer to the sequence of buttons on p.32 and the displays on the far left of this page f further guidance (1). F an explanation of the abbreviations of months please refer to page 36. If you choose DAYS, the display will prompt you to fill in the weekdays on which you want the system to carry out the Timer: MON f Monday TUE f Tuesday WED f Wednesday THU f Thursday FRI f Friday SAT f Saturday SUN f Sunday Press the button to include the particular day on the display in your timer programming exclude the day by pressing the button. As soon as you have pressed either the button, the next day will be displayed. Then repeat the process of including excluding all the days of the week. You can also choose to include e.g. MON and TUE and press to ste your timer without considering the remaining days. Finally, when you have pressed to accept your choice of days, appears on the display with the first letters of the days you accepted (M,T,W,T,F,S,S,) and undersces ( _ ) f the days you did not choose. Please refer to the displays to the left of this page f further guidance (2).
34 34 > Using the timer Checking clearing Timers CHECK CLEAR Press to check your timers Press to see timer programming number, source and program number of individual timer entries Press repeatedly to display the details of a particular programming When the display reads? Press to display NEXT? to see your next timer programming entry Press to see your next entry If there are no me entries, NO MORE, will appear on the display Press clear while infmation regarding a timer programming is displayed on the display CLEARED will appear on the display after pressing CLEAR You can look up each Timer programming entry to check its contents cancel it completely. On the displays (as illustrated to the right) the following infmation will appear: The timer s number on the list of timers together with source and program number Times f starting and stopping Date f the timer days it is programmed to perfm a timer play timer stand-by When you have displayed all the details of a particular Timer programming, you can choose to see the next Timer programming to check clear it. Press the buttons to reveal the display NEXT and press to accept it. Display of timer programming entries in numerical der with source and program number, clearing is possible... Display of times f starting and stopping, clearing is possible... Display of days which the timer is programmed f. If it is a one-off timer programming, the date of the timer will be displayed. Clearing is possible You can choose to clear a timer by pressing CLEAR when you are displaying and checking the details of it. If you press CLEAR to clear a timer, the display will briefly read CLEARED and the Timer will be cancelled.
35 35 Switching the Timer function to on off The timers you have programmed into the BeoSound 9000 can all be executed with without activating the loudspeakers which are either directly connected to the BeoSound 9000 are connected to it via BeoLink*. The timer ON/OFF function decides whether a Timer play can be heard on the loudspeakers. In der to hear your Timer Play programming entries you must activate the loudspeakers in the room rooms where you want music by switching the timer function to ON. If you set the timer function to OFF, the speakers will be muted. So if you choose to set the speakers next to your BeoSound 9000 to OFF, but set your extra speakers in your bedroom to ON, the Timer Play will be carried out and you will hear it through your extra speakers in your bedroom. However, if all timer functions on the speakers next to the BeoSound 9000 as well as on all your BeoLink connected systems are set to OFF, a timer will not be activated. Press to cut in press again to cut out the loudspeakers When you first press ON/OFF TIMER ON TIMER OFF will appear on the display accding to the setting you have previously made ON/OFF *Please refer to page 43 f infmation about BeoLink.
36 36 > Using the timer Setting and using the built-in clock CLOCK Press to call up the built-in clock Press to set time, date/month year Press to accept the changes and reveal the next display Repeat this setting procedure f date/month and year If you want to make use of the Timer function, you must first make sure that the built-in clock in the BeoSound 9000 has been set to the crect time, date and year. You can check the clock on the display to ensure that it is set crectly. If this is not the case you can change the setting in the process. See how to the left on this page... When setting the clock, the display shows the time, the date, CLOCK CLOCK CLOCK When you have set changed the year, the display now reads CLOCK? Press to ste your new setting of the clock Press to show the clock Press to see the date and year To display the clock permanently Press when Date and Year is displayed and change the display to time and ON e.g. 14:40 ON press again to cancel the permanent showing of the clock e.g. 14:41 OFF. You can also set the BeoSound 9000 to show the clock permanently even when the system is in stand-by. The display of the clock will of course be interrupted by the messages which follow other functions operations but it will return to displaying the clock. Note: If you happen to make a mistake change your mind while you are setting the clock, just press CHECK and start over. Nice to know If you choose to display the clock permanently, the time and ON appears on the display e.g. 12:30 ON. After a sht while ON will disappear and the time remains on the display You can press CLOCK again to display Date and Year. and the year Note: The display writes 14:45 f a quarter to three pm. and it writes JAN f January FEB f February MAR f March APR f April MAY f May JUN f June JUL f July AUG f August SEP f September OCT f October NOV f November DEC f December Note: When radio text infmation is displayed, it is not possible to display the clock.
37 37 LIST GO GO BEO4 Press LIST to display CLOCK on Beo4 Press to see the time Press again to see the date and year Nice to know about timers When you have programmed a Timer, make sure that the timer indication is on which will indicate that the loudspeakers will be activated. If this is not the case, your Timer will not be carried out. Please refer to page 35 f further infmation. If you use the BeoSound 9000 in a fully integrated Bang & Olufsen AV system (see pages 44-45), you have to set the Timer function to ON OFF via the TV. The display on the BeoSound 9000 will read TV OPERATED. If BeoSound 9000 is connected with BeoVision Avant, you must set e.g. timer play via the TV. If you press TIMER CHECK on the BeoSound 9000, the display will infm you that the function is TV OPERATED and you must program check the function via the TV. If your BeoSound 9000 is connected with a BeoVision Avant in a fully integrated system, TREBLE, BASS, BALANC E and LOUDNESS are TV OPERATED. Please refer to your TV user s guide f further infmation. If your BeoSound 9000 is BeoLink connected with a BeoVision TV set other than BeoVision Avant, you can program timer play stand-by on BeoSound 9000 f CD, RADIO, TV, SAT, V.TAPE.
38 38 N O T E S
39 N I C E T O K N O W Adjusting sound 42 Playing auxiliary sources 43 Music throughout the house 44 From audio to video vice versa
40 40 N I C E T O K N O W Adjusting sound TREBLE BASS Press to access the treble adjustment function Press to access the bass adjustment function You can adjust the sound to suit your personal taste and you can ste the adjustment as a permanent setting if you like. BEO4 Press to raise lower the volume BALANCE LOUDNESS RESET Press to access the balance adjustment Press to raise lower the treble bass levels; adjust the balance between the left and the right speaker Press to see the status of the loudness adjustment function LOUDNESS ON LOUDNESS OFF. Press LOUDNESS again to change the setting Press to accept all sound levels SOUND? appears on the display Press to ste all sound levels If you have not sted your sound adjustments... Press to reset the sound levels to their previously sted settings All you have to do is press the relevant buttons on the panel and use the buttons to adjust the sound. The treble and bass levels can be raised lowered as you like and you can alter the balance, that is, the distribution of sound emerging from the loudspeakers to suit your listening position. The BeoSound 9000 also features a loudness function which you can cut in out as you like, please refer to the following page f further infmation about loudness. You can press RESET any time to reset the sound levels to their iginal settings. However, if you want to turn your adjustment into a permanent setting of the BeoSound 9000, just press, and the display reads SOUND?. Then press one last time to ste your new sound setting. and LIST GO LIST LIST GO LIST tt ss Press volume up and down at the same time to mute speakers, press again to activate speakers Press to display A.SETUP* to adjust sound Press to reveal BASS, TREBLE LOUDNSS Press to adjust the treble bass levels set loudness to on off Press to display S.STORE to ste your adjustments Press to reveal SPEAKER and adjust balance Press to adjust the balance between the left and the right speaker To ste your balance adjustment Press LIST repeatedly to display A.SETUP*, press GO, now press LIST to display S.STORE and press GO to ste your adjustment. *Note: In der to display A.SETUP on Beo4, you have to add this function to the Beo4 list of functions, please refer to the Beo4 User s guide and the chapter Customizing your Beo4 f further instruction.
Contents of the Guide
 BeoCenter 1 Guide Contents of the Guide 3 The following is an index to the contents of the separate Reference book with page references: How to set up BeoCenter 1, 4 Connect your TV cables, 5 Connect
Introducing the hard disc recorder and Beo4, Daily use, Advanced operation, Preference settings, Set up the hard disc recorder, On-screen menus,
 HDR 2 Guide Contents 3 Introducing the hard disc recorder and Beo4, 4 Find out how to operate the hard disc recorder with the Beo4 remote control and bring up the menus on your television screen. Daily
How to use your music system, 4 Find out how to switch on and operate sources, such as CD, radio or DVD via the close-up operation panel
 BeoCenter 2 Guide Contents 3 This Guide explains how to operate your BeoCenter 2. It will guide you through the operations available for your system. All instructions regarding setting-up and the Socket
B E O L I N K 1 0 0 0
 BEOLINK 1000 2 The Beolink 1000 remote control gives access to all the primary functions in a Bang & Olufsen system, including audio and video products and special functions such as light control. This
User s guide. BeoCenter AV5 is an audio/video system with a built-in CD player and a FM Radio.
 I N T R O D U C I N G B E O C E N T E R A V 5 1 BeoCenter AV5 is an audio/video system with a built-in CD player and a FM Radio. The BeoCenter AV5 delivers excellent sound and picture quality. As the speakers
Digital Radio/DAB+/FM RDS digital clock radio with dual alarm Operating instruction
 381SE1D-A Digital Radio/DAB+/FM RDS digital clock radio with dual alarm Operating instruction GB Contents Controls... 2-3 Using the clock radio for the first time... 4 Operating your clock radio... 5 Selecting
BeoVision 7. Supplement
 BeoVision 7 Supplement On-screen menus This supplement contains corrections to the Guide and Reference book. The main corrections refer to the Onscreen menus, the CONNECTIONS menu and the socket panels.
Controls (front) 1. Loudspeaker 2. Light button 3. Band button 4. Auto tune button 5. Alarm button 6. LCD display
 1. Loudspeaker 2. Light button 3. Band button 4. Auto tune button 5. Alarm button 6. LCD display") GB Contents Controls... 2-4 Mains operation... 5 Operating your radio... 6 Selecting a station DAB... 7 Display modes DAB... 8 Finding new stations - DAB... 9 Secondary services DAB... 9 Manual tuning
GB Contents Controls... 2-4 Mains operation... 5 Operating your radio... 6 Selecting a station DAB... 7 Display modes DAB... 8 Finding new stations - DAB... 9 Secondary services DAB... 9 Manual tuning
CD / DAB / FM Digital Sound System with dock for ipod and iphone
 Enjoy Listening ROBERTS CD / DAB / FM Digital Sound System with dock for ipod and iphone Please read this manual before use Contents Introduction...2-9 Sound 00 Sound System features...3 Controls and connections...4-5
An explanation of symbols in the Guide and Reference book TV LIST. Buttons on the Beo4 remote control. Display on the Beo4 remote control
 BeoVision 6 Guide The Guide and the Reference book This Guide contains information about the daily use of your Bang & Olufsen product. The Reference book contains information about more advanced operation
PG-01instruction manual
 PG-01instruction manual DIGITAL RADIO fairbank house ashley road altrincham WA14 2DP united kingdom t: +44 (0)161 924 0300 f: +44 (0)161 924 0319 e: sales@intempodigital.com www.intempodigital.com PG-01
CR9986 ROBERTS. Dual Alarm CD Clock Radio. Sound for Generations. Please read this manual before use
 ROBERTS Sound for Generations CR9986 Dual Alarm CD Clock Radio Please read this manual before use Contents Contents... Controls... - Switching on and setting the time... 4 Listening to the radio... 5 Compact
The Guide and the Reference book
 BeoVision 7 Guide The Guide and the Reference book This Guide contains information about the daily use of your Bang & Olufsen product. The Reference book contains information about connecting and operating
/&' 79 7; /% ) &RORU 7HOHYLVLRQ (QJOLVK
 &RORU 7HOHYLVLRQ (QJOLVK") 245U Using the On Screen Displays Many features available on this TV can be accessed via the On Screen Display menu system. Use the remote control as shown below to access and adjust features as desired.
245U Using the On Screen Displays Many features available on this TV can be accessed via the On Screen Display menu system. Use the remote control as shown below to access and adjust features as desired.
BOSSCOM DAB/FM Tuner Compatible with B&O Remote Controls
 BOSSCOM DAB/FM Tuner Compatible with B&O Remote Controls User Manual Everyday control with Beo4, Beo5, Beo6 Everyday control with Beolink 1000 Special commands, used only by initial installation Special
BOSSCOM DAB/Internet Radio. DAB+/FM/ Internet Radio & Media Player Modified for use with B&O remotes only. Installation Manual
 BOSSCOM DAB/Internet Radio DAB+/FM/ Internet Radio & Media Player Modified for use with B&O remotes only Installation Manual Getting Started 3 Control or Control... 3 Connection to Bang & Olufsen Equipment
RD-27 ROBERTS. FM RDS/DAB digital radio with. Sound for Generations. Please read this manual before use
 ROBERTS RD-7 Sound for Generations FM RDS/DAB digital radio with Please read this manual before use Contents Controls... Battery operation... 3 Mains operation... 3 Operating your radio - DAB... 4 Selecting
PERSONAL music center II
 PERSONAL music center II Owner s Guide Guía de usario Notice d utilisation Français English INTRODUCTION Thank you By choosing a Bose PERSONAL music center II, you have opened the door to a variety of
PR-D9W. GB Version 1
 PR-D9W Version 1 Table of contents Important safety instructions... 2-3 Introduction... 4 Controls... 5-8 Using your weather alert radio for the first time... 9 Operating your radio Search tuning AM/FM...
BeoLab 5 Guide 3506377 GB V SØL GUIDE OMSLAG UDV d i P 5 BEOLAB
 BeoLab 5 Guide This product fulfils the conditions stated in the EEU directives 89/336 and 73/23. CAUTION: To reduce the risk of electric shock, do not remove cover (or back). No User-serviceable parts
Getting to Know Xsight... 3. Home Screen and Everyday Use... 9. Settings... 11. PC Setup... 17. 2 www.oneforall.com
 User Manual English English Getting to Know Xsight........................................ 3 Unpacking and Setting Up Xsight............................................................. 3 Using Xsight
ATS-505. GB Version 1
 ATS-505 GB Version 1 Control Locations Power/Sleep Power On/off/Alarm off/sleep function Display Switch between radio frequency and time while radio is power on Mode Mode set up (please see below mode
Owner s Manual AWM910 JENSEN AWM910 COMPACT DISC PLAYER RADIO CD COMPACT MUSIC SYSTEM MUTE AUX BAND AUX IN PUSH PUSH PWR VOL ALARM T/F AUD SPK A SPK B
 AWM910 Owner s Manual COMPACT DISC PLAYER PUSH 1 2 3 4 5 6 RPT SCAN RDM H M PUSH PWR VOL ALARM SET ON/OFF EQ T/F AUD RADIO CD COMPACT MUSIC SYSTEM MUTE AUX BAND CD AUX IN A B A+B JENSEN AWM910 Thank You!
RD-11 ROBERTS. FM RDS/DAB digital radio with. Sound for Generations. Please read this manual before use
 ROBERTS Sound for Generations RD- FM RDS/DAB digital radio with Please read this manual before use Contents Controls... Battery operation... 3 Mains operation... 3 Operating your radio - DAB... 4 Selecting
Operation Manual for Users
 Operation Manual for Users Model No.: FLTAMFMRCD!!!!!!!!!! ATTENTION!!!!!!!!!! THE RESET BUTTON MUST BE PRESSED TO ENSURE PROPER OPERATION. SEE INSTRUCTION MANUAL Table of Contents Table of Contents ---------------------------------------------------------------------------------------------
ROBERTS. Enjoy Listening. DAB / FM / CD Stereo Clock Radio with CD Bookmark. Please read this manual before use
 ROBERTS Enjoy Listening DAB / FM / CD Stereo Clock Radio with CD Bookmark Please read this manual before use Contents Sound 38 clock radio features...2 Controls... 3-4 Using your clock radio for the fi
DAB1001. Wireless Digital Radio Interface. Installation & User Guide
 DAB1001 Wireless Digital Radio Interface Installation & User Guide Contents Contents... 2 Introduction... 3 Contents of Package... 4 Installation... 5 Product Overview... 5 Installation Procedure... 5
Powmascables. User manual. BOSSCOM Internet-Radio. For Bang & Olufsen Controlled 12818090. by B&O Remote Control. Powmascables
 User manual BOSSCOM Internet-Radio For Bang & Olufsen Controlled 12818090 by B&O Remote Control Everyday Control with Beo4, Beo5, Beo6 Everyday Control with BeoLink 1000 Select Maneuvering in menus Maneuvering
Owner's Manual for your BMW Business CD Car Radio. For your listening enjoyment.
 Owner's Manual for your BMW Business CD Car Radio. For your listening enjoyment. 2n This Owner's Manual is intended to familiarize you with the details of your BMW car radio. In addition, we recommend
Meridian Digital Telephones
 Ntel Knowledge Netwk Meridian Digital Telephones M3902 M3903 M3904 Quick Reference Guide Enterprise Voice Solutions Customer Documentation While you are away from your desk: Call Fward 38 Contents M3902,
Meridian Digital Telephones
 Ntel Knowledge Netwk Meridian Digital Telephones M3902 M3903 M3904 Quick Reference Guide Enterprise Voice Solutions Customer Documentation While you are away from your desk: Call Fward 38 Contents M3902,
DAB / FM RDS / SD Digital Radio Recorder with PausePlus
 ROBERTS Enjoy Listening DAB / FM RDS / SD Digital Radio Recorder with PausePlus Please read this manual before use Contents Controls... 2-3 Battery operation...4 Using the AC adaptor...5 Operating your
DR 70 Portable Digital DAB+ and FM Radio Receiver User Manual English Please read carefully before using this product
 DR 70 Portable Digital DAB+ and FM Radio Receiver User Manual Please read carefully before using this product 15 1 Table of Contents 1 Table of Contents... 16 2 Safety Instructions:... 17 3 Specification:...
Table of Contents Function Keys of Your RF Remote Control Quick Setup Guide Advanced Features Setup Troubleshooting
 Congratulations on your purchase of the AT&T U-verse TV Point Anywhere RF Remote Control. This product has been designed to provide many unique and convenient features to enhance your AT&T U-verse experience.
User Guide. Plaza HDR S freesat digital HD TV recorder
 User Guide Plaza HDR S freesat digital HD TV recorder CONGRATULATIONS on buying a Manhattan Plaza HDR S freesat receiver. This high performance unit lets you record and watch the best of digital TV and
Tiny Audio C3. English TINY AUDIO C3. Please read carefully before using this product
 English TINY AUDIO C3 Please read carefully before using this product 1 Safety Instructions: 1. Do not use this radio near water. 2. Clean with dry cloth. 3. Do not block any ventilation openings. 4. Do
ROBERTS RC9907. Sound for Generations. 3 Band Radio Cassette Recorder. Please read this manual before use
 ROBERTS Sound for Generations Mains ROBERTS RC 9907 3 Band Ra dio Cassette Re corder with Programmable Clock Alarm FM 88 94 96 100 104 106 108 MHz MW LW 540 600 800 100 0 12 00 160 0 khz 150 160 180 200
WHAT ELSE CAN YOUR HOME PHONE DO?
 visit a Telstra store 13 2200 telstra.com/home-phone WHAT ELSE CAN YOUR HOME PHONE DO? Everything you need to know about the features that make your home phone more helpful, flexible and useful C020 FEB16
Touch Nightball DAB Radio
 Touch Nightball DAB Radio DAB/FM Radio Alarm Clock Nightball DRAFT 1.indd 1 7/11/07 17:13:21 co n t e n t s Introducing the Touch Nightball DAB Radio 3 What is DAB Digital Radio? 3 Where to put your radio
UVO SYSTEM QUICK REFERENCE GUIDE
 UVO SYSTEM QUICK REFERENCE GUIDE Congratulations on the Purchase of your new UVO system! Your new UVO system allows you to enjoy various audio and multimedia features through the main audio system. For
Controls. LCD Display. Tuning Up Time Set and Station Scan
 PR-D8 GB Revision 3 1 1 2 4 5 7 9 10 12 14 16 18 20 22 24 25 26 27 29 31 33 35 36 37 38 Controls Stereo Built-in Microphone (Left Channel) LCD Display Stereo Built-in Microphone (Right channel) Power/Auto
INSTRUCTIONS Please read all instructions carefully before using
 Car Multimedia System XM-2DTSB79 AUX IR MIC RESET USB INSTRUCTIONS Please read all instructions carefully before using Touch calibration If touch calibration error occurs, you can adjust the touch coordinate
MVS - Mini Video Speaker
 MVS - Mini Video Speaker Mini Clock Radio Night Vision Hidden Camera User Manual Spy Tec www.spytecinc.com GETTING STARTED Components Features Powering Up the Device Micro SD Memory Card for Data Storage
DAB/FM personal digital radio with OLED display
 DAB/FM personal digital radio with OLED display ROBERTS Enjoy Listening Please read this manual before use Contents Controls... 3-4 Using the AC adaptor... 5-6 Keylock function... 7-8 Navigation... 9-10
Mini Hi-Fi Component System
 3-860-707-14(1) Mini Hi-Fi Component System Operating Instructions Owner s Record The model and serial numbers are located on the rear panel. Record the serial number in the space provided below. Refer
Getting Started With the Multi-Room DVR System
 CH+ CH + GUIDE POWER VOL Ñ VOL + INFO CH Ñ EXIT LIST L AUDIO R VIDEO SELECT Getting Started With the Multi-Room DVR System Multi-Room Digital Video Recording (MR-DVR) System Record all of your favorite
In-Car Digital Radio Adaptor User Guide
 S1000-DAB In-Car Digital Radio Adaptor User Guide Table of Content INTRODUCTION... 1 CONTENTS OF PACKAGE... 2 INSTALLATION...3 OVERVIEW OF CONTROLS AND CONNECTORS... 5 STARTING UP THE SYSTEM... 7 USING
DVB-T 730. User s Manual
 EPG Program Reservation There are 10 program timers to bring up reminder for a reserved program. 20 seconds before the start of the reserved program, a pop-up window will remind viewer. If no further instruction,
BeoLab 1. User s guide
 BeoLab 1 User s guide Legal notice: CAUTION RISK OF ELECTRIC SHOCK DO NOT OPEN CAUTION: To reduce the risk of electric shock, do not remove cover (or back). No User-serviceable parts inside. Refer servicing
Intercom and Music System Operation & User s Guide
 Intercom and Music System Operation & User s Guide dmc1 System Master dmc1 System Master with dmc1 iplay Dock for ipod - MP3 Player & Player USA & Canada (800) 421-1587 & (800) 392-0123 (760) 438-7000
DVR GUIDE. Using your DVR/Multi-Room DVR. 1-866-WAVE-123 wavebroadband.com
 DVR GUIDE Using your DVR/Multi-Room DVR 1-866-WAVE-123 wavebroadband.com Table of Contents Control Live TV... 4 Playback Controls... 5 Remote Control Arrow Buttons... 5 Status Bar... 5 Pause... 6 Rewind...
B E O L A B P E N T A
 BEOLAB PENTA 2 For the UK market only: IMPORTANT! The wires in the mains lead supplied with this apparatus are coloured in accordance with the following code: BLUE: NEUTRAL BROWN: LIVE As the colours of
OneRemote ipod Dock for Bang & Olufsen Type 30012601 Operates any ipod, including Touch and iphone
 OneRemote ipod Dock for Bang & Olufsen Type 30012601 Operates any ipod, including Touch and iphone Beo4 and Beo5 are remote control terminals from Bang & Olufsen. OneRemote supplies interface modules that
ROBERTS. Enjoy Listening. DAB/FM RDS digital portable radio. Please read this manual before use
 ROBERTS Enjoy Listening DAB/FM RDS digital portable radio Please read this manual before use Contents Controls... 2-3 Battery operation...4 Using the AC adaptor...5 Operating your radio - DAB...6 Selecting
Classroom Setup... 2 PC... 2 Document Camera... 3 DVD... 4 Auxiliary... 5. Lecture Capture Setup... 6 Pause and Resume... 6 Considerations...
 Classroom Setup... 2 PC... 2 Document Camera... 3 DVD... 4 Auxiliary... 5 Lecture Capture Setup... 6 Pause and Resume... 6 Considerations... 6 Video Conferencing Setup... 7 Camera Control... 8 Preview
Important Safety Instructions
 PR-D7 GB Revision 1 Important Safety Instructions 1. Read these instructions. 2. Keep these instructions. 3. Heed all warnings. 4. Follow all instructions. 5. Do not use this apparatus near water. 6. Clean
CR9971 2 Band Auto Set Dual Alarm Clock Radio ROBERTS. Sound for Generations. Please read this manual before use
 ROBERTS Sound for Generations CR9971 2 Band Auto Set Dual Alarm Clock Radio Please read this manual before use Contents Contents... 1 Controls...2-5 Switching on... 6 Setting the time manually... 6 Setting
M&S SYSTEMS Model MC602 Master Unit. Owner's Guide
 M&S SYSTEMS Model MC602 Master Unit This booklet contains the information you need to get the most from your musical intercom system. It also tells you what to do if your system develops operating problems,
CABLE ONE ALL DIGITAL
 CABLE ONE ALL DIGITAL The world is going All Digital and so is Cable ONE. With the switch from analog to digital technology, Cable ONE will be able to add new channels, especially more HD channels, and
Radio BMR100 INSTRUCTION MANUAL. ENGLISH (Original instructions)
") ENGLISH (Original instructions) INSTRUCTION MANUAL Radio BMR00 WARNING: For your personal safety, READ and UNDERSTAND before using. SAVE THESE INSTRUCTIONS FOR FUTURE REFERENCE. Symbols The following show
ENGLISH (Original instructions) INSTRUCTION MANUAL Radio BMR00 WARNING: For your personal safety, READ and UNDERSTAND before using. SAVE THESE INSTRUCTIONS FOR FUTURE REFERENCE. Symbols The following show
Model No.: MR-140. REMARK: FINISH SIZE IS 145x210mm. Effected 31 / May / 07
 Model No.: MR-0 HI-POWER x Watts INT RPT RDM 6 This product is sold and serviced exclusively by Prospec Electronic Inc. and must be returned to Prospec for in and out of warranty repairs. It can not be
H203D 中文 GB Version 1
 H203D 中 GB文 Version 1 Contents Installing batteries... 4 Using the AC adapter (not supplied)... 5 Setting the clock... 6-7 Updating your radio - DAB... 8 Selecting a station - DAB... 9 Secondary services
Multimedia. User Guide
 Multimedia User Guide Copyright 2006 Hewlett-Packard Development Company, L.P. Microsoft and Windows are U.S. registered trademarks of Microsoft Corporation. The information contained herein is subject
Part 2. Copyright 1998 Philips Consumer Communications L.P. All rights reserved. Printed in Mexico. Issue 1AT&T 848229506
 2 User's Manual for Two-Line Digital Answering System Telephone with Speakerphone 1872 Fold open this paper for information about this telephone's installation and operation. Please read Part 1 Important
Retro Style Turntable With CD/Radio/USB/SD/MP3/WMA and Vinyl-to-MP3 Encoding
 Retro Style Turntable With CD/Radio/USB/SD/MP3/WMA and Vinyl-to-MP3 Encoding PTCD8U INSTRUCTION MANUAL LOCATION OF CONTROLS 1) DUST COVER 2) DIAL POINTER 3) LEFT SPEAKER 4) LCD DISPLAY 5) FM STEREO LED
THE NEW GENERATION IN TECHNOLOGY. NI-3103A Alarm Clock w/fm Radio ipod & iphone Docking. Operating Instructions
 THE NEW GENERATION IN TECHNOLOGY NI-3103A Alarm Clock w/fm Radio ipod & iphone Docking Operating Instructions Table of Contents Important Safeguards... 3 Parts... 6 Controls... 6 To Set Up... 7 ipod/iphone
DAB2+ Dear Customer, Congratulations with your new Argon DAB2+
 Dear Customer, Quality has always been our driving force and founding Argon Audio is a natural extension of this philosophy. We have 20 years' experience in creating and specifying high quality products,
ROBERTS CRD-37. Sound for Generations. DAB / FM RDS / CD Clock radio with MP3 / WMA playback facility. Please read this manual before use
 ROBERTS Sound for Generations CRD-37 DAB / FM RDS / CD Clock radio with MP3 / WMA playback facility Please read this manual before use Contents CRD-37 Clock Radio features... Controls... 3-4 Using your
User s Guide EKT-824
 User s Guide EKT-824 The Communiqué Telephone Station Table of Contents Introduction 3 About This Guide 3 The Basics Answering and Making Calls 4 Answering an External Call 4 Answering an Internal Call
ABOUT YOUR SATELLITE RECEIVER
 2 Satellite Receiver ABOUT YOUR SATELLITE RECEIVER This chapter gives you an overview and a description of your satellite receiver. SATELLITE RECEIVER OVERVIEW SINGLE AND DUAL MODES REMOTE CONTROL SATELLITE
VideoMate V200/V200F Analog Standalone TV Box Start Up Guide
 VideoMate V200/V200F Analog Standalone TV Box Start Up Guide Compro Technology, Inc. www.comprousa.com 1 Table of Contents About This Guide... 3 VideoMate V200/V200F TV Box Contents... 4 Install V200/V200F
WR-22 中文 GB Version 1
 WR-22 中 GB文 Version 1 1. 2. Important safety instructions Read these instructions. Keep these instructions. GB 3. 4. 5. 6. 7. 8. 9. Heed all warnings. Follow all instructions. Do not use this apparatus
ŠkodaAuto CAR RADIO BEAT SIMPLY CLEVER
 ŠkodaAuto CAR RADIO BEAT SIMPLY CLEVER Contents 1 Contents Radio....................................... Radio - Overview............................. Important information........................ Anti-theft
ROBERTS. Enjoy Listening. DAB / FM RDS Digital Clock Radio with large display. Please read this manual before use
 ROBERTS Enjoy Listening DAB / FM RDS Digital Clock Radio with large display Please read this manual before use Contents Controls... -3 Using the clock radio for the fi rst time...4 Operating your clock
BeoLink Media Installation Guide
 Table of contents BeoLink Media Installation Guide 1. INTRODUCTION 2 2. THE BEOLINK MEDIA SOLUTION 2 3. INSTALLATION OVERVIEW 4 4. CONNECTING HOMECENTER MEDIA TO A TV 5 BEOVISION TV WITH SCART - Y/C INPUT
Hi! Let s get started.
 Hi! Let s get started. What s in the Box Roku player Remote control 2 x AAA batteries for remote A/V cable RCA Power adapter Get to know your roku A Front view B C F Back view D E A B C D E F Status light
RCR-22 AM/MW 2 bands Digital Clock Radio instruction manual
 RCR-22 AM/MW 2 bands Digital Clock Radio instruction manual Important safety instructions 1. Read and understand all safety and operating instructions before the radio is operated. 2. Retain instruction:
UNIVERSAL REMOTE CONTROL GUIDE
 UNIVERSAL REMOTE CONTROL GUIDE Service provided by We Keep You Connected Your new AT6400 AllTouch Infrared (IR) Universal Remote Control (remote) is a true universal remote, functioning as four remotes
Bang & Olufsen says goodbye and hello
 PRESS RELEASE 1/5 Bang & Olufsen says goodbye and hello In a few months, Bang & Olufsen will terminate the audio masters BeoSound 9000 and BeoSound 3200, which have become true icons of Danish design.
MODEL: MEMPHIS FM STEREO RADIO OPERATING INSTRUCTIONS
 MODEL: MEMPHIS CD/USB/SD PLAYER WITH TURNTABLE. ENCODING TO USB AND SD CARD. FM STEREO RADIO OPERATING INSTRUCTIONS PLEASE READ THIS USER MANUAL COMPLETELY BEFORE OPERATING THIS UNIT AND RETAIN THIS BOOKLET
ReSound Unite TV FREQUENTLY ASKED QUESTIONS. Setup & Configuration. Use & Operation. Troubleshooting
 Tip for use of FAQ: Click on questions to go to answer. Setup & Configuration How do I pair the hearing aids to the Unite TV?... 2 What is the latency of the streamed signal?... 2 Does the Unite TV use
DAB+ Digital Alarm Clock Radio with Dock for iphone
 DAB+ Digital Alarm Clock Radio with Dock for iphone BCR33DABIP The Gold Technical Support Line: 1902 215 259 (Charges will apply at $2.95 per minute) www.bushaustralia.com.au Safety Instructions Ensure
Charger / Magnum, Grand Caravan, Avenger, Nitro, (Journey and Caliber 2009 only) Chrysler:
 Chrysler:") MyGIG Multimedia System with GPS Navigation Detailed Information Availability 2008-09 Model Year Vehicles Dodge: Charger / Magnum, Grand Caravan, Avenger, Nitro, (Journey and Caliber 2009 only) Chrysler:
MyGIG Multimedia System with GPS Navigation Detailed Information Availability 2008-09 Model Year Vehicles Dodge: Charger / Magnum, Grand Caravan, Avenger, Nitro, (Journey and Caliber 2009 only) Chrysler:
MyGIG Multimedia System with GPS Navigation
 MyGIG Multimedia System with GPS Navigation Detailed Information Availability 2008-09 Model Year Vehicles Dodge: Charger / Magnum, Grand Caravan, Avenger, Nitro, (Journey and Caliber 2009 only) Chrysler:
INSTRUCTION MANUAL K100C
 INSTRUCTION MANUAL K100C MP3/WMA CD PLAYER WITH AM/FM RADIO BEFORE USE Before operating the unit, please read this manual thoroughly and retain it for future reference 1. OPERATING INSTRUCTIONS ---------------------------------------------
Hi, let s get started. Sound Rise Wireless Speaker & Alarm Clock
 Hi, let s get started. Sound Rise Wireless Speaker & Alarm Clock Welcome to your new Sound Rise! We created Sound Rise for music lovers like you. Start the day with your favorite tunes, rock out while
Kiva Technology User s Manual
 2009 Kiva Technology User s Manual For Support Contact Call Center (816) 235-2000: Monday Friday 7:00 am 7:00 pm ILE Support E-Mail: ILESupport@UMKC.EDU URL: http://www.umkc.edu/is/cts/ilesupport/ctssupporttext.asp
Anti Shock CD / USB / SD Card Reader / Remote Control Player RM-CD
 Anti Shock CD / USB / SD Card Reader / Remote Control Player RM-CD DESCRIPTION OF CONTROLS: POWER: ON: Press Power button to switch on the power. OFF: Press and hold to switch off the power. CD / USB /
ROBERTS. Enjoy Listening. DAB/FM RDS digital portable radio. Please read this manual before use
 ROBERTS Enjoy Listening DAB/FM RDS digital portable radio Please read this manual before use Contents Controls... -3 Battery operation...4 Using the AC adaptor...5 Operating your radio - DAB...6 Selecting
Bluetooth FM transmitter User Manual
 Bluetooth FM transmitter User Manual Thank you in earnest that you choose and buy Bluetooth FM transmitter from us! Please browse all details of this manual before using it to get best playing effect.
Hello! Let s get started.
 Hello! Let s get started. What s in the Box Roku player Enhanced remote control 2 x AA batteries for remote A/V Cable Power adapter Get to know your roku B A Front view C D G Back view E F H A B C D E
TechniSat HDFV Freesat HD Digital Receiver. Owner s Manual
 TechniSat HDFV Freesat HD Digital Receiver Owner s Manual Dear Customer, Welcome and thank you for choosing TechniSat Digital s HDFV Digital Freeview HD Receiver for your TV entertainment. This product
DX-395. FM/AM/SW1/SW2 PLL Synthesized Receiver OWNER S MANUAL. Cat. No. 20-225. Please read before using this equipment.
 20-225.fm Page 1 Wednesday, August 4, 1999 10:07 AM Cat. No. 20-225 OWNER S MANUAL Please read before using this equipment. DX-395 FM/AM/SW1/SW2 PLL Synthesized Receiver 20-225.fm Page 2 Wednesday, August
B R O W N U N I V E R S I T Y
 B R O W N U N I V E R S I T Y Barus & Holley Auditorium Audiovisual System Reference Manual Submitted by: HB Communications Inc. 60 Dodge Ave. North Haven, Connecticut 06473-0689 (203) 234-9246 (800) 922-2776
Rider's Manual Audio system BMW Professional 2000
 Rider's Manual Audio system BMW Professional 2000 BMW Motorrad The Ultimate Riding Machine Motorcycle data/dealership details Motorcycle data Dealership details Model Person to contact in Service department
DAB / FM Radio & MP3 Player DR 306 USER MANUAL
 DAB / FM Radio & MP3 Player DR 306 USER MANUAL I Safety Instructions 1. Always connect the device with the originally provided power supply. Please do not use other similar objects. Meanwhile, the original
HP Bluetooth Pendant Headphones User Guide
 HP Bluetooth Pendant Headphones User Guide Copyright 2008 Hewlett-Packard Development Company, L.P. Windows and Windows Vista are either trademarks or registered trademarks of Microsoft Corporation in
Pocket DAB & FM Radio with Speaker
 Pocket DAB & FM Radio with Speaker P MODEL: GDPRDAB USER MANUAL 1 Welcome 2 Your DAB Digital Radio 2.1 In The Box 2.2 Front View 2.3 Rear View 3 Quick Setup 3.1 Power On and Autoscan 3.2 Changing DAB Stations
INSTRUCTION MANUAL RM-5750. AM/FM Digital Alarm Clock Radio
 INSTRUCTION MANUAL RM-5750 AM/FM Digital Alarm Clock Radio Fig. 1 CAUTION: THE APPARATUS SHALL NOT BE EX- POSED TO DRIPPING OR SPLASHING. NO OBJECTS FILLED WITH LIQUIDS, SUCH AS VASES, SHALL BE PLACED
Smart Music Control Application CONTENTS. Smart Music Control Application. User Guide CONTENTS 1 GETTING STARTED 1 MEDIA PLAYER MODE 1
 Smart Music Control Application JVC KENWOOD Corporation Smart Music Control Application User Guide CONTENTS CONTENTS 1 GETTING STARTED 1 How to Install Smart Music Control App 1 Preparing the Music Player