R O A D S M I T H TRIKE CONVERSIONS BY THE TRIKE SHOP
|
|
|
- Meghan Preston
- 7 years ago
- Views:
Transcription
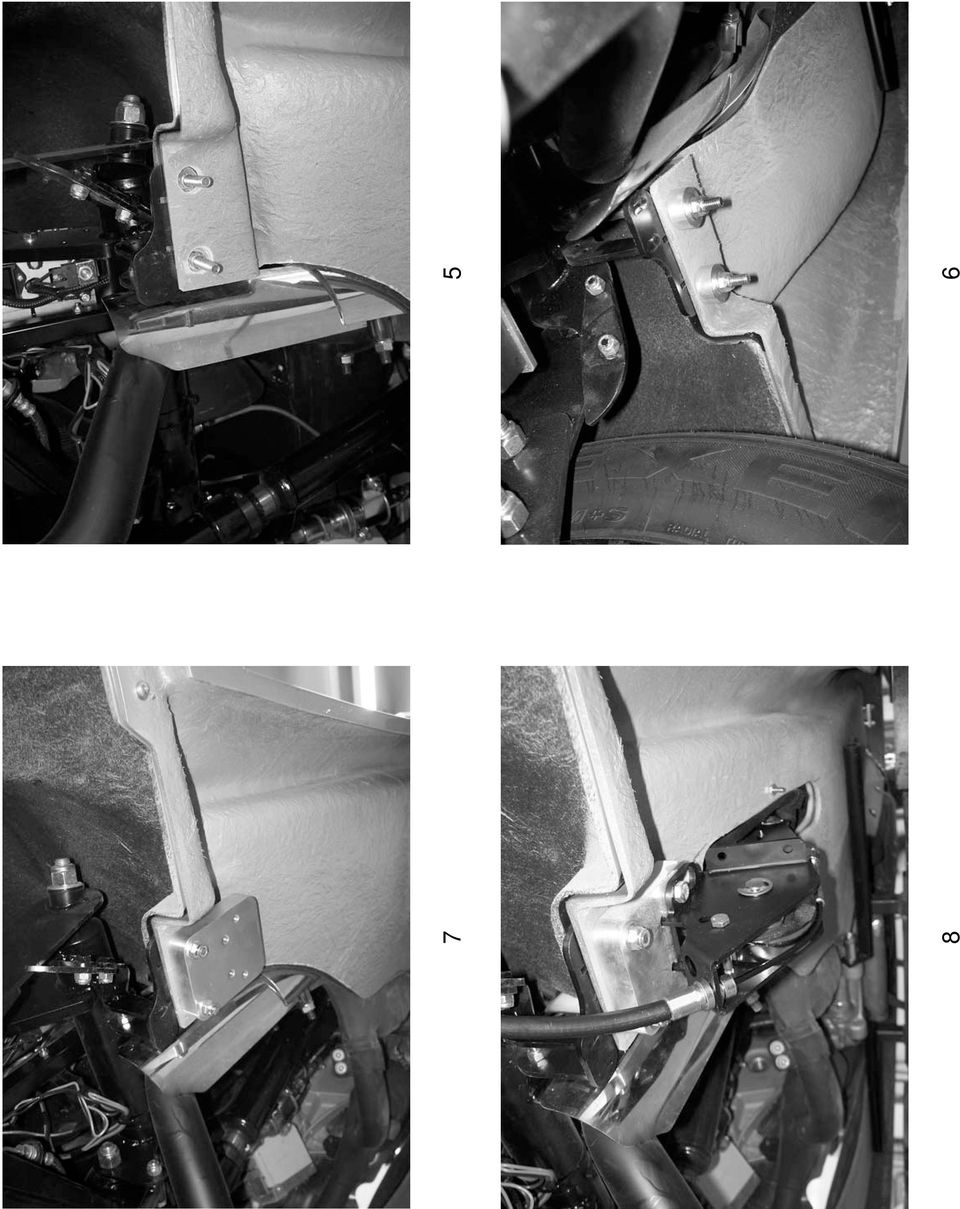
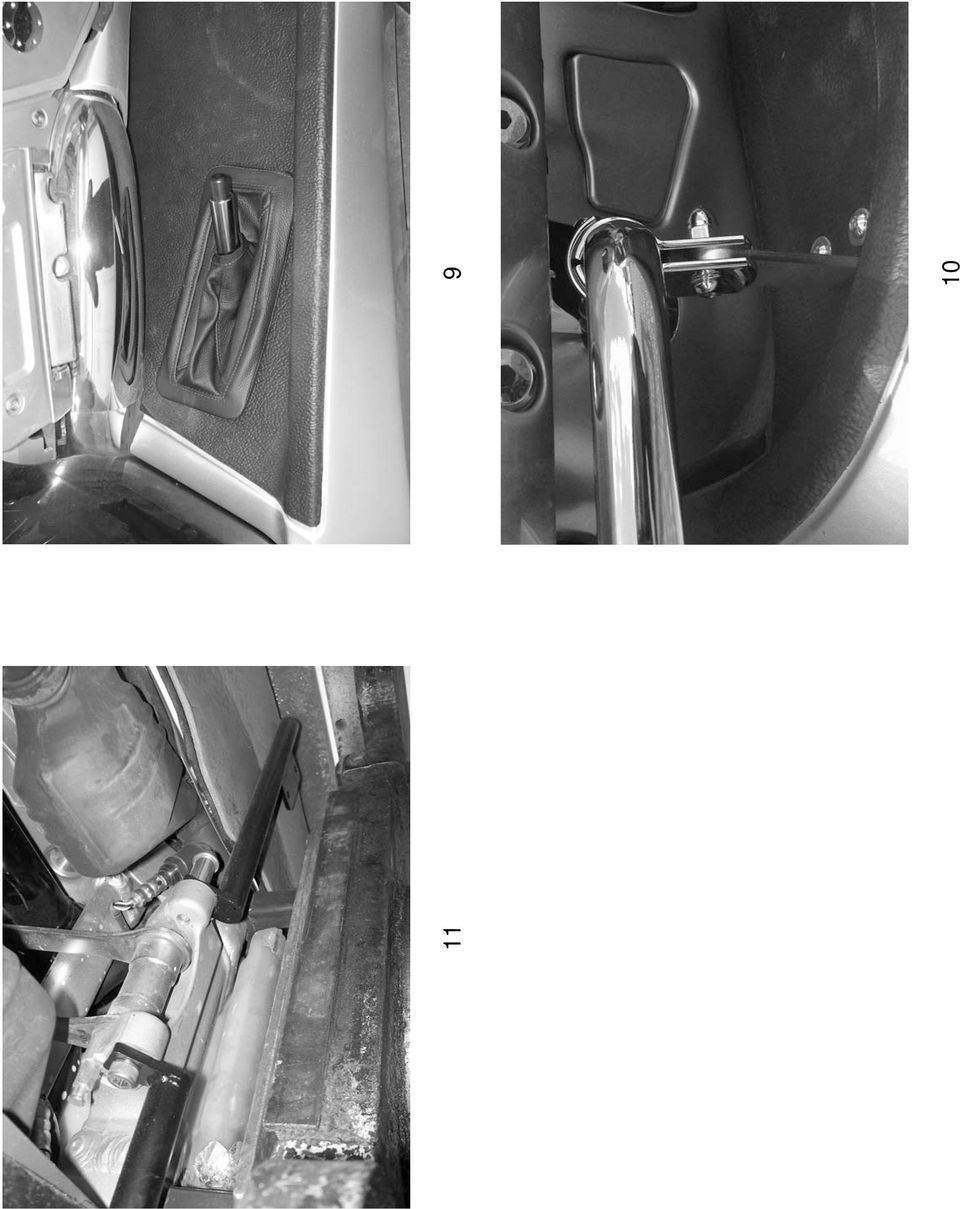
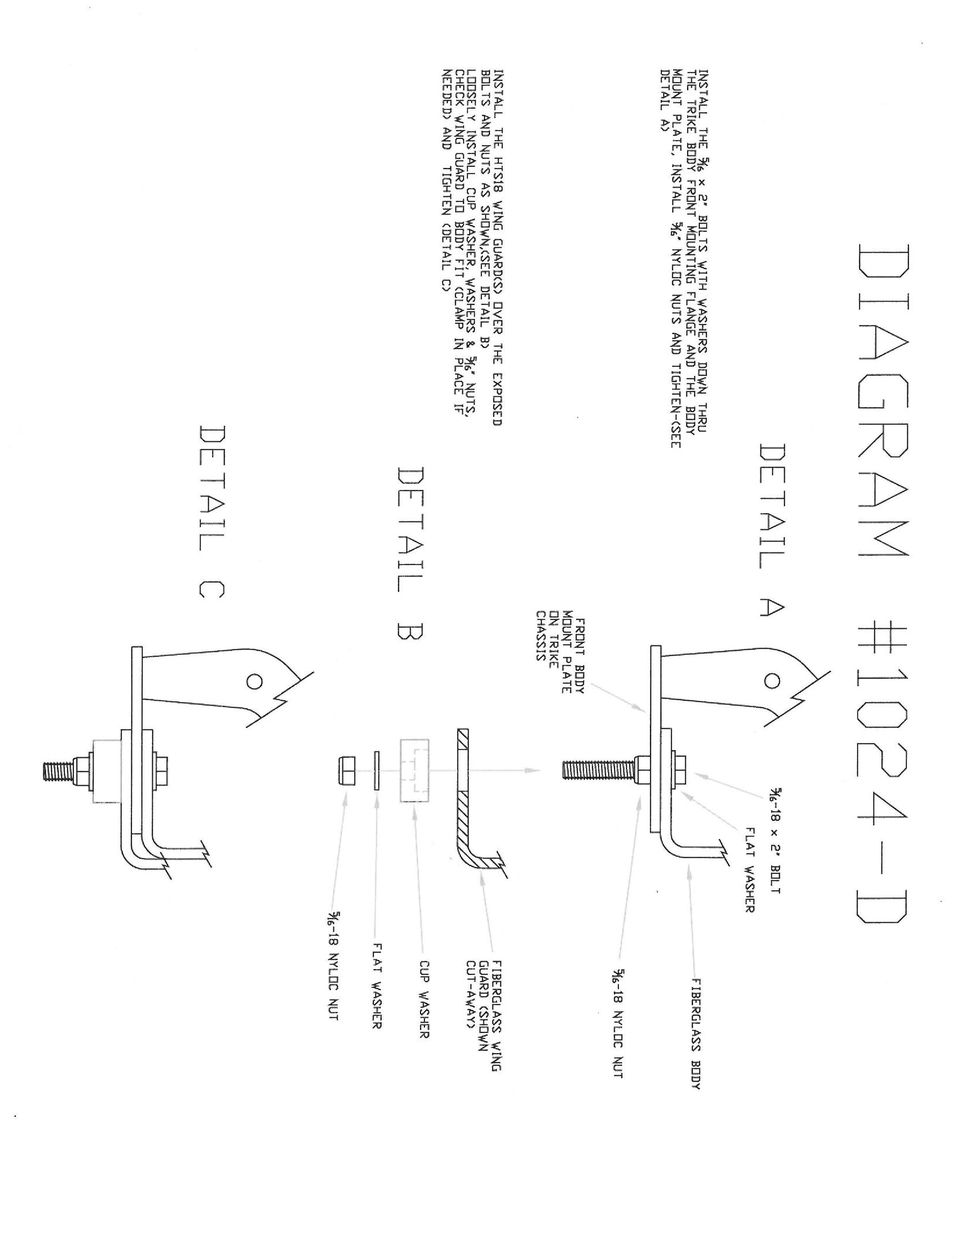
1 R O A D S M I T H TRIKE CONVERSIONS BY THE TRIKE SHOP Please thoroughly review the instructions before and during installation. Keep in mind that this product was designed to be installed by trained dealer technicians. If you are a do-ityourselfer, be patient, trust your common sense, and if necessary call your dealer or contact The Trike Shop at if you run into any problems you cannot solve. APPLICATION: HTS1800 trike conversion PRODUCT: HTS1800: WingGuards VERSION: 2 GENERAL NOTES: Please don t attempt any shortcuts. Remove and securely tie off the side stand switch in the up position. Discard the screw. Zip tie to keep it away from hot/moving parts Remove and discard the side stand and hardware Remove and discard the center stand- save the two mounting bolts only. The bolt on the right side is a LEFT hand thread. To help prevent scratching, it is recommended to tape off the body in the general area that the wing guards will contact, removing tape when practical, before final installation. Remove and discard the (4) front body mounting bolts (if already in place) Replace them with the 5/16 x 2 fully threaded bolts from the wing guard kit. Install bolt from top down, with washers on the fiberglass side only. (diagram #1024-D) Install the nylock nuts and tighten them, then loosen them 1/2-3/4 turn. Remove the rubber boots from the engine guard tubes and bend the tangs in Remove the boot only- use a razor blade to cut the rubber trim at the end of the boots Install the 3-piece tube clamps onto the crash bars in replacement of the boots If unpainted wing guards were ordered, the protective plastic insert must be installed after painting To install the plastic insert: Clamp the plastic insert to the wing guard After ensuring the insert is tight against the Wing Guard, drill through (13/64 ) the fiberglass WingGuard using the 3 pre-drilled, counter-sunk holes in the plastic insert as a guide Install and tighten the provided black flat-head Phillips screws If unpainted wing guards were ordered and the trike is equipped with the optional parking brake, using the pre-cut opening in the right fiberglass WingGuard as a guide, cut the lever opening in the plastic insert and Install the parking brake lever boot. The boot is directional, install it accordingly. Install the front mounting L brackets through the slot(s) in the WingGuard(s) and fasten with provided hardware (diagram #1030-D) NOTE: Use anti-seize as directed in diagram #1030-D NOTE: Install the 5/16 thick spacer plate on the right side only

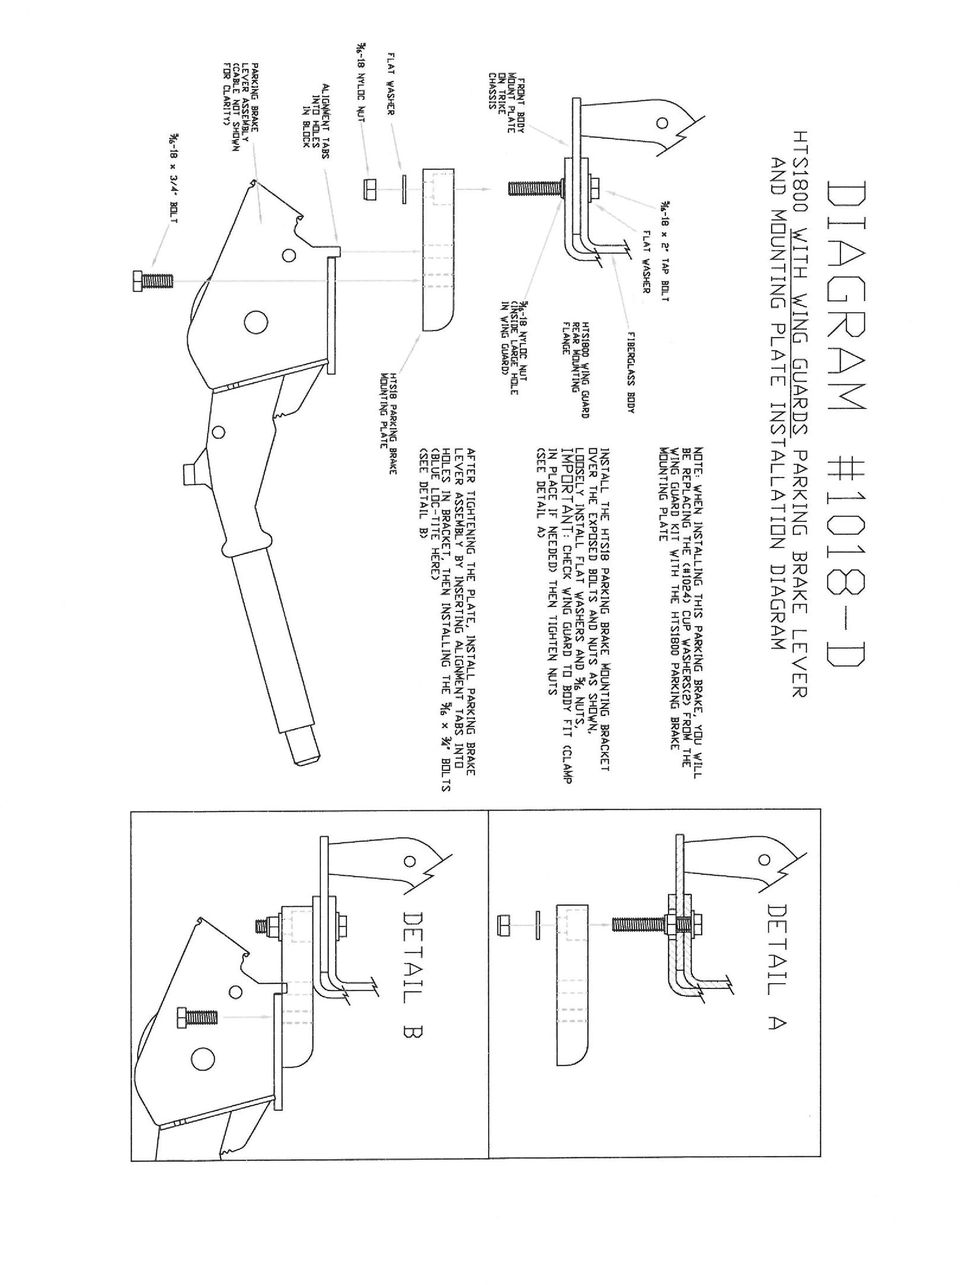
2 APPLICATION: HTS1800 trike conversion PRODUCT: HTS1800: WingGuards VERSION: 2 GENERAL NOTES: Please don t attempt any shortcuts. Set the WingGuards in place (supporting the front) and against the trike body Starting from the outside, align the WingGuard with the body, clamp in place and drill up (17/64 ) through the pre-drilled hole in the WingGuard. Install the ¼ hardware and tighten. While holding (clamping) the wing guard against the body, and being satisfied with the alignment, install the cup washers, flat washers and nylock nuts onto the body mount bolts and tighten (diagram #1024-D) If trike has the optional parking brake, install the parking brake bracket mounting plate (#A ) in place of the two right side cup washers (diagram #1018-D) Install the front mounting L brackets on to the tube clamps (diagram #1030-D) Using the 1/2 x 1 ¼ stainless steel button-head bolts and nuts, tighten the bolts just enough to allow movement of the brackets. Adjust the WingGuards to achieve a roughly uniform gap between them and the bike- focusing mainly on the front view. Tighten all front mounting bracket hardware securely Install the center mounting brackets (with the flag-end facing forward) When tightening them down, keep the flag-end flush with the bottom of the Wing Guard Use the two bolts that were saved from the center stand (remember the bolt on the right side is a LEFT hand thread), use the provided spacer on the right side bolt Drill up through the Wing Guard (9/32 ) using the hole in the center supports as a guide Install and tighten the provided 1/4 X 1 Black Phillips head screws. Install the screws from the top, with the nuts underneath If installing this WingGuard kit with the optional parking brake, install the parking brake bracket/lever/cable assembly now (diagram #1018-D and parking brake lever installation instructions)
 the wing guard against the body, and being satisfied with the alignment, install the cup washers, flat washers and nylock nuts onto the body mount bolts and tighten (diagram")
3

4
5
6
7
8

1. Lay out 2 pieces of 7/8" tubing and mark for bending as shown. Remember that the bend is in the shaded area as shown below in Figure 1.
 MINI BIKE PLANS Page 1 INTRODUCTION Before starting to build your Mini-Bike, be sure that you have all the parts shown on the material list. You will note that tubing has been used in the construction.
FRONT BUMPER INSTALLATION INSTRUCTIONS 2007-2011 DODGE / MERCEDES SPRINTER
 Aluminess Products Inc 9402 Wheatlands Ct. #A Santee, CA 92071 619-449-9930 FRONT BUMPER INSTALLATION INSTRUCTIONS 2007-2011 DODGE / MERCEDES SPRINTER Please read before beginning Stainless steel hardware
INSTRUCTIONS THOROUGHLY BEFORE BEGINNING***************
 Bill of Materials: RAC0012 Green Wing Aerodynamic Skirt Kit Item Part Number Description Quantity 1 RMC0218 Gen 2 Trailer Skirt Roadside 1 2 RMC0219 Gen 2 Trailer Skirt Curbside 1 3 RMC0041 Trailer Skirt
StructureScan Installation
 StructureScan Installation Contents Your StructureScan box is packed with the LSS-1 black box, a Power cable, StructureScan transducer, mounting bracket, 15 foot (4.5m) ethernet cable and a hardware kit.
PRS X-axis E-chain installation: For tools with a 12 Z-Axis
 PRS X-axis Energy Chain (Echain) Installation Page -1- PRS X-axis E-chain installation: For tools with a 12 Z-Axis This kit is compatible with PRS Shopbots that have an X-axis cutting area of 96 to 144.
LG G5 Chassis Brace Gen 5 Camaro THE MOST POWERFUL HEADERS ON THE PLANET Brought to you by LG Motorsports 972-429-1963
 LG G5 Chassis Brace Gen 5 Camaro THE MOST POWERFUL HEADERS ON THE PLANET Brought to you by LG Motorsports 972-429-1963 Thank you for purchasing LG Motorsports products for your Gen 5 Camaro. Parts Inventory:
Rollator Cane and Brake Replacement SAFETY SUMMARY (CONTINUED)
") Rollator Cane and Replacement Assembly, Installation and Operating Instructions SAVE THESE INSTRUCTIONS NOTE: Check ALL parts for shipping damage. If shipping damage is noted, DO NOT use. Contact Carrier/Dealer
Rollator Cane and Replacement Assembly, Installation and Operating Instructions SAVE THESE INSTRUCTIONS NOTE: Check ALL parts for shipping damage. If shipping damage is noted, DO NOT use. Contact Carrier/Dealer
DYNA RIDER FOOTBOARD KIT
 -J0 REV. 0-0-0 DYNA RIDER FOOTBOARD KIT GENERAL Kit Number 000 Models For model fitment information, see the P&A Retail Catalog or the Parts and Accessories section of www.harley-davidson.com (English
MUSTANG II IFS COMPLETE PARTS PACKAGE
 MUSTANG II IFS COMPLETE PARTS PACKAGE Your Southern Rods & Parts Mustang II IFS Parts Package contains the following items: 1 pr) Upper Control Arms (2023) 1) Upper Arm Bolt Kit (MP-001-A) 1 pr) Lower
DETACHABLE WINDSHIELD AND DOCKING HARDWARE KIT
 -J00 REV. 00-- DETACHABLE WINDSHIELD AND DOCKING HARDWARE KIT GENERAL Kit Number -A, 0-, -, 0-, -, - 0, -0 Models These kits fit and later FXST, FXSTB, FXSTC, and and later FXDWG Harley-Davidson model
TRANS-05, Torque Tube Removal, Rebuilding, and Installation
 TRANS-05, Torque Tube Removal, Rebuilding, and Installation Tools Metric Wrench Set Metric Socket Set Jack Stands (6 minimum) Floor Jack 8mm Cheesehead socket (also referred to as 12 point internal socket
VW Caddy W21-760-3503 INSTALLATION INSTRUCTIONS
 Unit 626 Kilshane Avenue, North West Business Park, Ballycoolin, Dublin 15, Ireland Telephone: +353 1 8612 632, Fax: +353 1 8612 647, email: sales@driveriteltd.com www.driveriteltd.com VW Caddy W21-760-3503
SHOP NOTES METAL SHAPER FOR YOUR SHOP
 SHOP NOTES METAL SHAPER FOR YOUR SHOP A METAL SHAPER is indispensable for certain machining operations where flat surfaces must be produced within very close limits, such as machining flats on castings,
www.cornholesupplies.com
 www.cornholesupplies.com How To Build Regulation Cornhole Boards Home of the Original Cornhole Bags and Boards Supply List: 1-4' X 8' Piece of Plywood (pre sanded) 4-2" X 4" X 8' Studs (2 by 4s make sure
AstroSystems Digital Setting Circles for Zhumell, GSO, Apertura and Astro-Tech
 AstroSystems Digital Setting Circles for Zhumell, GSO, Apertura and Astro-Tech Components 1 Sky Commander Digital Setting Circle Computer 2 Encoders 10,000 step 1 Sky Commander Digital Setting Circle Manual
Modular Locomotive System Instruction Manual for HBK8 George Body Kit
 Modular Locomotive System Instruction Manual for HBK8 George Body Kit Roundhouse Engineering Co. Ltd. Units 6-10 Churchill Business Park. Churchill Road, Wheatley. Doncaster. DN1 2TF. England. Tel. 01302
INSTALLATION INSTRUCTIONS
 Turbo Tube Slide INSTALLATION INSTRUCTIONS C A U T I O N Do not climb on the outside of the slide This slide is designed for home use only, not for Public Playgrounds PlayCore, Inc. 2004 Copyrighted Material.
NOTE WARNING. Electric Leveling Motor Brake Replacement Instructions ELECTRIC LEVELING MOTOR BRAKE REPLACEMENT INSTRUCTIONS. Content.
 ELECTRIC LEVELING MOTOR BRAKE REPLACEMENT INSTRUCTIONS Content Contents Inspection 1 Installation 2 System Test 5 Inspection is not required for boots with metal clamps (FIGURE 4) or boots with an extra
LU6X-130 Instructions and Parts List (including LU6X Basic) Operating Instructions
 Operating Instructions") LORTONE LU6X-130 Item # 061-092 LU6X Basic Item # 061-090 LU6X-130 Instructions and Parts List (including LU6X Basic) Operating Instructions Introduction The LU6X is one the most versatile pieces of equipment
LORTONE LU6X-130 Item # 061-092 LU6X Basic Item # 061-090 LU6X-130 Instructions and Parts List (including LU6X Basic) Operating Instructions Introduction The LU6X is one the most versatile pieces of equipment
CHROME FRONT BRAKE MASTER CYLINDER KIT
 -J075 REV. 009-0-0 CHROME FRONT BRAKE MASTER CYLINDER KIT GENERAL Kit Number 5-99D, 5-99D Models These Chrome Master Cylinder Kits are designed to replace the original equipment front brake master cylinder
LYCOMING O-360. Engine Installation
 Engine Installation SECTION 4 Carburetor Heat Box Carb. Heat Box, hole at the bottom is the hot air exit when carb heat is not used. SECTION 4 - Page 1 of 13 Push Pull cable P/N 05-14084 Qty = 1 Length=7ft.
SPIRAL STAIR KIT INSTALLATION MANUAL
 SPIRAL STAIR KIT INSTALLATION MANUAL Effective January 1, 2014 If you have any questions, please call the location that your Stair Kit was purchased from: Broomall, Pennsylvania 1-800-52-7427 Ontario,
EZ-Steer Assisted Steering System
 EZ-Steer Assisted Steering System Installation Instructions Platform Kit P/N 53059-54 Case IH CVX 1135 CVX 1145 CVX 1155 CVX 1170 CVX 1190 CVX 1195 CVX 135 CVX 145 CVX 155 CVX 175 CVX 195 New Holland TVT
Installation Guide 2010 BMW S1000RR Full Exhaust System
 Installation Guide 2010 BMW S1000RR Full Exhaust System!! THIS PRODUCT IS DESIGNED FOR USE IN CLOSED COURSE RACING AND IS NOT INTENDED FOR HIGHWAY USE!! Congratulations on the purchase of your new TaylorMade
S OUNTING INSTRUCTION M M o u n t i n g k i t 2 &
 M O U N T I N G I N S T R U C T I O N S instructions This document is protected by copyright. The SICK AG company retains this right. Reproducing this document in whole or part is only permissible within
Standard Sleep Pod Side Entry Assembly Instructions
 Standard Sleep Pod Side Entry Assembly Instructions www.podtime.co.uk enquiries@podtime.co.uk Working House Ltd How to assemble your pod Pod assembly onsite is a relatively simple exercise for two people
Important: Please read these instructions carefully and completely before starting the installation. TITAN Fuel Tanks
 TITAN pt. no.: 03 0000 0120 Important: Please read these instructions carefully and completely before starting the installation. TITAN Fuel Tanks INSTALLATION INSTRUCTIONS G e n e r a t i o n V Extended
How To Replace A Reverse Osmosis Water Tank
 ALL MODELS REVERSE OSMOSIS WITH NONAIRGAP FAUCET 1. Read all instructions carefully before starting installation. 2. Find the cold water line beneath your sink. The cold water is typically on the right.
Gravity Racing Challenge STEM Team Competition Open Class High School Division Car Assembly Plans And Rules
 Gravity Racing Challenge STEM Team Competition Open Class High School Division Car Assembly Plans And Rules 1 Table Of Contents Introduction...Page 3 Floorboard...Page 4 Step One Steering Stop Installation...Page
Traditional Sonar and DSI Sonar Installation
 Traditional Sonar and DSI Sonar Installation This document covers the installation of the transducer and display unit installation, which includes connecting the unit to power and installing the unit on
SPRITE and BIGFOOT DESKTOP CNC MACHINE KIT ASSEMBLY INSTRUCTIONS
 SPRITE and BIGFOOT DESKTOP CNC MACHINE KIT ASSEMBLY INSTRUCTIONS README FIRST: Thank you for purchasing your MyDIYCNC Desktop CNC Machine Kit. We hope this versatile and innovative machine brings you many
MGB Chrome Bumper Conversion
 MGB Chrome Bumper Conversion Installation Instructions For 1974 1/2-1980 MGB This kit requires cutting, welding, and painting. Professional installation recommended. Note: Every MGB body is slightly different
Check for deteriorated, shifting or missing tie-down pads. Replace if needed.
 C C 0 5 C H A S S I S F R A M E Chassis Frame Overview The Blue Bird Vision s chassis frame consists of two main C-channel rails which run the entire length of the bus, and several different kinds of cross
AZEK Rail Install Guide
 TRIM MOULDING DECK PORCH RAIL PAVERS AZEK Rail Install Guide Installing AZEK Rail with CableRail by Feeney... 1 Installing CableRail by Feeney for AZEK Rail... 7 Installing AZEK Rail Stairs with CableRail
RadianceRail Installation Guide
 RadianceRail Installation Guide Installing RadianceRail with CableRail by Feeney... 2 Installing CableRail by Feeney for RadianceRail... 7 Installing RadianceRail Stairs with CableRail by Feeney... 10
92-00 Civic/ 94-01 Integra/ 93-97 Del Sol/ 92-95 CRX Rear Kit Part No. 75540
 92-00 Civic/ 94-01 Integra/ 93-97 Del Sol/ 92-95 CRX Rear Kit Part No. 75540 www.airliftperformance.com MN-514 (06409) NPR 4762 Please read these instructions completely before proceeding with installation
Step 1. Item 6. Item 1
 Voltage Regulators QD3/T350 Motor Replacement Kit Kit Number 57A63675100B Service Information S225-50-35 Contents General..................................... 1 Parts Supplied...............................
ILLUSTRATED PARTS LIST
 TW400 WITH 390cc HONDA ENGINE 390cc 2 WHEEL DRIVE UTILITY VEHICLE ILLUSTRATED S LIST 390cc 2WD B O D Y D I A G R A M 390cc 2WD F R A M E D I A G R A M 390cc 2WD D R I V E T R A I N D I A G R A M DESCRIPTION
Drive shaft, servicing
 Volkswagen Passat B6 - Drive shaft, servicing Стр. 1 из 41 40-7 Drive shaft, servicing Drive shafts, overview I - Assembly overview: Drive axle with CV joint VL100 40-7, Drive axle with CV joint VL100,
6 inch A-Arm Lift Kit WARNING: 16-018/16-019. installation instructions. will fit CLUB CAR DS. included:
 Revised May 205 6-08/6-09 6 inch A-Arm Lift Kit will fit CLUB CAR DS installation instructions included: Rear Lift Blocks Main Suspension Assembly Spindles A-Arms Rear Shock Mounting Plates U-Bolts WARNING:
Pulleys and Belt. Install the Major Accessory and Pulley. Install the Motor Pulley NOTE. Align the Motor Pulley and the Tool Pulley NOTE
 Pulleys and Belt Pulley Guard - 505862 Install the Major Accessory and Pulley 1. Place the short end of the mounting base holes, and insert - but don t tighten - the setscrews. If the Major Accessory has
SLACK PERFORMANCE KARTS
 SLACK PERFORMANCE KARTS SET UP GUIDE Thank you for purchasing a 2013 Slack Axiom Chassis. Performance Mfg. strives to provide you with the very best chassis and components on the market today. Your satisfaction
FRONT TURN SIGNAL RELOCATION KIT
 -J0 REV. 00-0-0 FRONT TURN SIGNAL RELOCATION KIT GENERAL Kit Number -0 Models This kit fits 00 and later Dyna model motorcycles (except FXDSE), relocating the front turn signal from the handlebars to the
M-2004-MBA Brake Duct Kit 2013 BOSS 302, Mustang GT and California Special INSTALLATION INSTRUCTIONS
 Please visit www.fordracingparts.com for the most current instruction information.!!! PLEASE READ ALL OF THE FOLLOWING INSTRUCTIONS CAREFULLY PRIOR TO INSTALLATION. AT ANY TIME YOU DO NOT UNDERSTAND THE
CUSTOM AUXILIARY FORWARD LIGHTING KIT
 -J0 REV. 0--0 CUSTOM AUXILIARY FORWARD LIGHTING KIT GENERAL Kit Number -0, 0000 Models This Custom Auxiliary Lighting Kit adds lamps and turn signals to 00 and later FLHX model motorcycles. Additional
Installation Instructions:
 Portable Guardrail System Model Numbers: 7900060, 7900061, 7900062, 7900063 Installation Instructions: Portable Guardrail System This instruction is intended to meet the Manufacturer s Instructions requirement
1.00 IN (25.4 MM) DIAMETER BATWING MINI-APE HANDLEBAR KITS
 DIAMETER BATWING MINI-APE HANDLEBAR KITS") REV. 04-09-09.00 IN (5.4 MM) DIAMETER BATWING MINI-APE HANDLEBAR KITS GENERAL Kit Numbers 57474-, 57485- Models For model fitment information, see the P&A retail catalog or the Parts and Accessories section
REV. 04-09-09.00 IN (5.4 MM) DIAMETER BATWING MINI-APE HANDLEBAR KITS GENERAL Kit Numbers 57474-, 57485- Models For model fitment information, see the P&A retail catalog or the Parts and Accessories section
majestic install ation guide barcelona three sided enclosure 24mm surface mounted wall channels and underframe to base
 majestic install ation guide barcelona three sided enclosure 24mm surface mounted wall channels and underframe to base These Instructions are for a left and right handed unit. The diagrams show a left
MFH-5057 Ford Small-Block V-8 Fresh Water Cooling Kit Instructions
 MFH-5057 Ford Small-Block V-8 Fresh Water Cooling Kit Instructions MONITOR PRODUCTS, INC. 15400 Flight Path Dr Brooksville, FL 34604 Tel: 1-800-334-4591 or 352-544-2620 Sales: ext 201 Technical Support:
Small Flat Panel Lift Arm FSA-1004 and KSA-1004
 I N S T A L L A T I O N I N S T R U C T I O N S Small Flat Panel Lift Arm FSA-1004 and KSA-1004 The Lift Arm is an accessory that can be used with a broad range of Small Flat Panel Displays. The allows
Vinyl Brick Mould Field Installation Instructions All Vinyl and Vinyl Clad Windows
 Vinyl Brick Mould Field Installation Instructions All Vinyl and Vinyl Clad Windows Viewed from the exterior. IMPORTANT: Please read before you begin installation. TABLE OF CONTENTS AND TOOL / MATERIAL
R O A D M A S T E R, I N C.
 R O A D M A S T E R, I N C. ROADMASTER, Inc. 6110 NE 127th Ave. Vancouver, WA 98682 6 13 11 MOUNTING BRACKET KIT Cable Tab 14 12 7 15 9 Cable Tab 360-896-0407 fax 360-735-9300 www.roadmasterinc.com ITEM
Installation Instructions GOOSENECK MOUNTING KIT Chevrolet/GMC 1500/2500/3500 All except 4-door Crew-Cab
 GOOSENECK MOUNTING KIT Equipment Required: Fastener Kit: F Wrenches: 3/4, 7/8, 15/16 Drill Bits: 1/4 Other Tools: Drill WARNING: Under no circumstances do we recommend exceeding the towing vehicle manufacturers
1500 Follow Spot Yoke
 = 1500 Follow Spot Yoke Rev 1.1 2004 City Theatrical, Inc. Getting Started with the City Theatrical Follow Spot Yoke Congratulations on the purchase of your City Theatrical Follow Spot Yoke. The City Theatrical
R O A D M A S T E R, I N C.
 R O A D M A S T E R, I N C. 11 10 20 12 4 18 19 1 2 13 16 ITEM QTY NAME MATERIAL 1...2... 1/2" x 3 1/2" BOLT... 350103-00 2...2... 1/2" x 2" BOLT... 350097-00 3...6... 1/2" x 1 1/2" BOLT... 350095-00 4...2...
2008 ACCORD - Front Knuckle/Hub/Wheel Bearing Replacement (page 18-13)
") 2008 ACCORD - Front Knuckle/Hub/Wheel Bearing Replacement (page 18-13) Exploded View Special Tools Required Ball joint remover, 28 mm 07MAC-SL0A202 Hub dis/assembly tool 07GAF-SD40100 Bearing driver attachment,
2008 ACCORD - Front Knuckle/Hub/Wheel Bearing Replacement (page 18-13) Exploded View Special Tools Required Ball joint remover, 28 mm 07MAC-SL0A202 Hub dis/assembly tool 07GAF-SD40100 Bearing driver attachment,
Dave s Sheet Metal Bending Brake
 Dave s Sheet Metal Bending Brake I started building a Zenith CH601XL from plans in mid January 2006. After several failed attempts to bend the rudder spar I ended up going to a local sheet metal shop for
BUILT-IN DISHWASHER INSTALLATION INSTRUCTIONS
 BUILT-IN DISHWASHER INSTALLATION INSTRUCTIONS PLEASE READ COMPLETE INSTRUCTIONS BEFORE YOU BEGIN LEAVE INSTALLATION INSTRUCTIONS AND USER'S GUIDE WITH OWNER ALL ELECTRIC WIRING AND PLUMBING MUST BE DONE
Regency Decorative CBU s Models 3308R, 3312R, 3316R, & 3313R Installation Instructions
 Regency Decorative CBU s Models 3308R, 3312R, 3316R, & 3313R Installation Instructions U.S.P.S. APPROVED Thank you for your purchase of Regency Decorative CBU s manufactured by Salsbury Industries. We
Installation Guide for the TJ LCG PRO Suspension System (Low Center of Gravity) Available 4 or 5
 Available 4 or 5") INSTALLATION GUIDE Installation Guide for the TJ LCG PRO Suspension System (Low Center of Gravity) Available 4 or 5 Take every precaution to make this installation a safe procedure. Make safety the number
INSTALLATION GUIDE Installation Guide for the TJ LCG PRO Suspension System (Low Center of Gravity) Available 4 or 5 Take every precaution to make this installation a safe procedure. Make safety the number
INSTRUCTION. Industrial Sewing Machines. No. 010012. First published : June 1997 Second edition : March 2001
 INSTRUCTION Industrial Sewing Machines First published : June 1997 Second edition : March 2001 No. 010012 INTRODUCTION Thank you for your purchasing Kansai Special's DLR Series. Read and study this instruction
Solstice/Sky Water Pump Replacement
 Solstice/Sky Water Pump Replacement The water pump on the Solstice/Sky is starting to need replacement on some vehicles. This guide will help in replacing the water pump while the engine is still in the
M128 SERVICE MANUAL- M128 MODEL #S-11 MANUAL CAN OPENER
 SERVICE MANUAL- M128 MODEL #S-11 MANUAL CAN OPENER 1 Model S-11 Can Opener Assembly Procedure The Model S-11 can opener will be assembled according to the following procedure: I. Model S-11 Handle and
FLOE DOCK STEPS FOR ROLL-IN AND SECTIONAL DOCKS ASSEMBLY & INSTALLATION INSTRUCTIONS KIT P/N 510-42000-00 KIT P/N 510-42010-00 KIT P/N 510-42015-00
 FLOE DOCK STEPS FOR ROLL-IN AND SECTIONAL DOCKS ASSEMBLY & INSTALLATION INSTRUCTIONS KIT P/N 0-000-00 KIT P/N 0-00-00 KIT P/N 0-0-00 TOOLS REQUIRED () /" WRENCHES OR SOCKETS TAPE MEASURE TORQUE WRENCH
CETAC Z-Drive Assembly
 CETAC Z-Drive Assembly Replacement Guide Manual Part Number 610144 Rev 1, 2012 CETAC Technologies, Printed in USA Overview This guide describes the necessary steps to replace the Z-drive assembly on your
Fixtures - Parts - Accessories to shampoo bowls
 Page 1??? - For what brand of bowl do you need parts??? Find out by looking on the bottom of the bowl, between the front and strainer, where molded in the bottom is the brand and model number. For example,
Panel Track Installation Guide
 Panel Track Installation Guide We make it easy! BTG 493361 EN_0510 Before starting Your new Blinds To Go panel track is custom made to your specifications from the finest materials available. To ensure
Seismic Installation for Attic Storage System
 Your Performance Partner Seismic Installation for Storage System CONTENTS SSafety Precautions................................. 2 Required Tools..................................... 2 Parts and Fastener
Gripper Kit for the Boe-Bot Robot (#28202)
") 599 Menlo Drive, Suite 100 Rocklin, California 95765, USA Office: (916) 624-8333 Fax: (916) 624-8003 General: info@parallax.com Technical: support@parallax.com Web Site: www.parallax.com Educational: www.stampsinclass.com
599 Menlo Drive, Suite 100 Rocklin, California 95765, USA Office: (916) 624-8333 Fax: (916) 624-8003 General: info@parallax.com Technical: support@parallax.com Web Site: www.parallax.com Educational: www.stampsinclass.com
PEDAL CAR - GO CART ASSEMBLY & OPERATING INSTRUCTIONS
 PEDAL CAR - GO CART 42822 ASSEMBLY & OPERATING INSTRUCTIONS 3491 Mission Oaks Blvd., Camarillo, CA 93011 Visit our Web site at: http://www.harborfreight.com Copyright 2000 by Harbor Freight Tools. All
Owners & Installation Manual for the Sheridan, Mountainair, Pine Valley and Old Forge Ceiling Fan Family
 Owners & Installation Manual for the Sheridan, Mountainair, Pine Valley and Old Forge Ceiling Fan Family Part of the Kiva Lighting Family Custom Lighting and Fans Since 1992 1312 12th St NW Albuquerque,
DIY CABINET REFACING INSTALLATION GUIDE
 DIY CABINET REFACING INSTALLATION GUIDE CABINET REFACING INSTALLATION Are you ready to reface your outdated cabinets? This guide will show you how to install your new Facelifters Cabinet Refacing Products
POLEMOUNT FIELD FIX ASSEMBLY INSTRUCTIONS
 POLEMOUNT FIELD FIX ASSEMBLY INSTRUCTIONS Polemount Field Fix Support If you have any questions or incur any problems installing or using the new Polemount, please use Miovision s Support System by emailing
GPS AutoSteer System Installation Manual
 GPS AutoSteer System Installation Manual Supported Vehicles John Deere Sprayers 4720 4630 4730 4830 AutoTrac Ready PN: 602-0227-01-A LEGAL DISCLAIMER Note: Read and follow ALL instructions in this manual
Wiper Motor Marinco 2.5. Installation Instructions
 Wiper Motor Marinco 2.5 Installation Instructions Wiper Motor Marinco-2.5 The Marinco 2.5 Wiper Motor Offers the Following Features: Fully sealed base and housing which allows installation in outdoor wet
Black Wolf POCKET BILLIARD TABLE INSTALLATION MANUAL. SERVICE DEPARTMENT P.O. BOX 68 BRISTOL, WI 53104
 Black Wolf TM POCKET BILLIARD TABLE INSTALLATION MANUAL www.brunswickbilliards.com SERVICE DEPARTMENT P.O. BOX 68 BRISTOL, WI 53104 51-905710-000 SEPTEMBER 2010 NOTE: Please use the instructions in this
INTRODUCTION INTERLOCK KIT K-8110
 INTRODUCTION INTERLOCK KIT K-8110 This manual provides instructions for safe installation of the InterLock Kit onto a General Electric (GE) panel. The back plate sits securely on the face of the panel
Router Table Plans. www.bobsplans.com
 www.bobsplans.com Router Table Plans Increase the capabilities of your router with this weekend project. Features a sliding fence with EZ-Mount clamps. These clamps are simple to make and grip tightly
How To: Retrofit the Morimoto Mini D2S bi-xenon Projectors
 How To: Retrofit the Morimoto Mini D2S bi-xenon Projectors Warning: By reading this document I agree that it is only intended to be used as an educational guide. The Retrofit Source Inc. makes no guarantee
INSTRUCTIONS. FLHR/C/S (Road King) FRONT END LOWERING KIT 1WARNING -J03242 REV. 10-19-04. General. Removal (Left and Right Forks) Kit Number 54614-05
 FRONT END LOWERING KIT 1WARNING -J03242 REV. 10-19-04. General. Removal (Left and Right Forks) Kit Number 54614-05") INSTRUCTIONS -J04 REV. 0-9-04 General FLHR/C/S (Road King) FRONT END LOWERING KIT This kit is designed for installation on 00 and later FLHR/C/S Model Motorcycles. Road King models use the conventional
INSTRUCTIONS -J04 REV. 0-9-04 General FLHR/C/S (Road King) FRONT END LOWERING KIT This kit is designed for installation on 00 and later FLHR/C/S Model Motorcycles. Road King models use the conventional
INSTRUCTION BOOK FOR. Single Monitor Video Conference Cart
 INSTRUCTION BOOK FOR Single Monitor Video Conference Cart Procedure 1. Remove contents from cartons and examine for damaged or missing parts. The keys for the cabinet doors are tied to the outside of the
TOYOTA TUNDRA 2015 Billet Grille w/led DRL
 TOYOTA TUNDRA 2015 Billet Grille w/led DRL Part Number: 00016-34088 Accessory Code: BG3000 Conflicts Models 1794 and Platinum Kit Contents Item # Quantity Reqd. Description 1 2 LED DRL 2 1 Driver Box 3
How To Install Your Frameless Shower Enclosure
 How To Install Your Frameless Shower Enclosure a) Installing Single Frameless Door Side Mounted Wall Hinges b) Installing Frameless Door with In-Line Panel c) Installing Frameless Door Between In-Line
Installation Manual. SKU# 21000 series (Base Rails) SKU# 22000 series (Overhead Racks)
 SKU# 22000 series (Overhead Racks)") Installation Manual SKU# 21000 series (Base Rails) SKU# 22000 series (Overhead Racks) Welcome to the world of TracRac! We re delighted that you have chosen TracRac, the ultimate sliding truck rack system.
Installation Manual SKU# 21000 series (Base Rails) SKU# 22000 series (Overhead Racks) Welcome to the world of TracRac! We re delighted that you have chosen TracRac, the ultimate sliding truck rack system.
Figure 2 The fan and shroud also needs to be removed for access to the four a/c compressor bolts and removal of the compressor from the top.
 Here are some pictures to show what s required when replacing the A/C compressor, expansion valve and receiver/drier on a 2001 Volvo V70. Even if you don t replace these A/C parts these pictures can help
Guide for Modified Assembly: Lightning McQueen. By: Collin Patterson, University of Delaware. Materials and Tools:
 Guide for Modified Assembly: Lightning McQueen By: Collin Patterson, University of Delaware Materials and Tools: PVC o 40 inches of 1 in diameter PVC o 25 inches of ¾ in PVC o 4 x 1 in elbows o 2 x ¾ in
Front axle components, overview
 just a test. Front axle components, overview 40-1 General Information Load bearing components and parts of the suspension must not be welded or straightened. Vehicles without drive axle must not be moved,
Contractors Guide Central Inverter System Installation
 Contractors Guide Central Inverter System Installation Step By Step Procedures 2,200 Watt/VA 6 Step Installation 1. Mount Bottom Cabinet 2. Mount Top Cabinet 3. Install Batteries 4. Install Conduit 5.
Lathe Milling Attachment
 Lathe Milling Attachment By L C. MASON BY CLEVERLY stacking cold-rolled flat stock together, T-slots and slide for this lathe milling attachment are made without costly machinery. In fact, only two tools,
Trundle Bed Plans (For Use Under Twin or Full-Size Standard Length Beds)
") Bunk Beds Unlimited Trundle Bed Plans (For Use Under Twin or Full-Size Standard Length Beds) On the following pages we have included all of the necessary drawings and requirements for a Modified twin-size
Bunk Beds Unlimited Trundle Bed Plans (For Use Under Twin or Full-Size Standard Length Beds) On the following pages we have included all of the necessary drawings and requirements for a Modified twin-size
VW GOLF Mk4 TDI FRONT MOUNTING INTERCOOLER INSTALLATION INSTRUCTIONS
 VW GOLF Mk4 TDI FRONT MOUNTING INTERCOOLER INSTALLATION INSTRUCTIONS Tools required: 10mm/13mm socket and 3/8 drive ratchet with extension Torx T20/25/30 screwdrivers or bits Phillips head screwdriver,
DYI INNOVA LIGHT BAR
 H U R D U S E W www.hurdusew.com PATRICK HURD: phurd99@gmail.com Southwest Florida phurd99@gamai.com www.hurdusew.com PARTS NEEDED All the parts were purchased at Home Depot Total Cost: 224.51 All parts
2740 Whitten Rd Bldg 103 Memphis, TN 38133 Telephone 901-380-9290 Email Bwilliams@Dieselcare.net
 Fuel Injection Pump Replacement REMOVAL Diesel Care & Performance Inc 1. Disconnect negative battery terminal. 2. Remove throttle linkage. Fuel Injection Pump Bracket 3. Remove injection pump bracket.
Go-kart for little race-drivers
 Go-kart for little race-drivers Drill and drive. Go-kart What it lacks in speed, it more than makes up for in fun: the go-kart will excite little race-drivers. 1 Introduction It s only a go-kart, but it
1958-64 WINDOW CHANNEL, WEATHERSTRIP & WHISKER STRIP REPLACEMENT FOR 2-DOOR SEDANS
 By Denny Williams Photos by Denny Williams 1958-64 WINDOW CHANNEL, WEATHERSTRIP & WHISKER STRIP REPLACEMENT FOR 2-DOOR SEDANS Denny Williams - Technical Writer Denny is first and foremost a dyed-in-thewool
TECHNICAL MANUAL FOR THE STAND ALONE BELT DRIVE ENCODER SYSTEM
 INTERNATIONAL LIFT EQUIPMENT LTD London Office Leicester Office Units 1&2 Wanlip Road Highams Park Ind Estate Syston Larkshall Road Leicester London Leicestershire E4 9JD LE7 1PD Telephone 0208 5279669
INSTRUCTIONS TLE/TLE-ULTRA SIDECAR ATTACHMENT KIT 1WARNING -J00803 REV 07-15-03. General PRE-INSTALLATION MODIFICATIONS. Longer Clutch Cable
 INSTRUCTIONS -J0080 REV 07-5-0 Kit Number 8766-99A TLE/TLE-ULTRA SIDECAR ATTACHMENT KIT ONLY FLT Model Harley-Davidson Motorcycles are suitable for sidecar use. Consult your Harley-Davidson Dealer. Use
Speed-Mat Rectangle Cutter
 Speed-Mat Rectangle Cutter 1 Honeycomb baseboard. 2 Left hold down. 14 3 Bottom hold down. 4 4 Left / right rule. 8 5 8 5 Left / right rule pointer. 1 6 Top / bottom rule. 7 Top / bottom rule pointer.
FTC 2015-2016 DIY Mountain Build Guide
 FTC 2015-2016 DIY Mountain Build Guide Assembly Instructions Check out the DIY2015-2016 Prints and BoM for individual part details. Release 1.0 9/10/15 Page 1 This guide and Bill of Materials are for constructing
16 April 2012 1032011-F 1994-2002 Dodge Adjustable Track bar with Relocation Bracket 1
 16 April 2012 1032011-F 1994-2002 Dodge Adjustable Track bar with Relocation Bracket 1 BD Adjustable Track Bar w/bracket Dodge 2500-3500 4WD Models 1994-2002 Dodge 1500 4WD Model 1994-2001 P/N# 1032011-F