AcroPlot Matrix AcroPlot Matrix
|
|
|
- Randolph Shaw
- 7 years ago
- Views:
Transcription

1 AcroPlot Matrix AcroPlot Matrix software enables you to easily view, comment, modify and print an extensive list of file types like PDF, DWF, TIFF, PLT, and more, that are associated with the architecture, engineering, construction, and manufacturing design workflows in today's business environment. With a streamlined interface that makes it easy to use, yet very powerful, AcroPlot Matrix doesn't get in the way of getting work done. Users can quickly open and add comments or stamps to files, insert, reorder, rotate, or delete pages, and even merge various file types into a single PDF or DWF. Printing files to scale at full or reduced sizes that are dimensionally accurate is now possible in AcroPlot Matrix by using the "Custom Scale" option in the printing dialogue window. While other PDF and DWF software applications only print to either "No Scale" or "Reduce to Printable Area", AcroPlot Matrix provides the functionality to define a true reduction percentage so that output to any printer at any scale is now possible -- half-size prints are now quick, easy and accurate. AcroPlot Matrix is quickly becoming the preferred software application for PDF communication across entire organizations because it is so flexible and easy to use, as well as, cost effective to deploy. It works well in all departments like administrative, estimating, accounting, legal, parts, maintenance, etc.! More --> User Guide 2014

2 Table of Contents Our Products...4 Style Conventions...7 AcroPlot Matrix Overview...9 System Requirements...10 Installation...11 System Administrator Info...12 Sharing Settings With Other Users...13 How Do I...? (Quick Start Guide)...14 Open a File...15 Pan and Zoom...18 Display Panes...21 Rotate Pages...23 Delete Pages...26 Insert Pages...29 Add Annotations...34 Erase Objects...37 Select Multiple Objects to Modify or Erase...39 Add a Measurement to Scale...40 Edit Measurement Labels...43 Work With Styles...45 Work With Stamps...47 Set the Default Stamps...50 Attach a File to a Page...51 Using the Interface...58 Menus...65 File Menu...66 New Document Export To Image...76 Print...82 Document Properties...89 Description...90 Security...93 Fonts...95 Initial View...96 Edit Menu...99 Search Edit Styles Menu View Menu Rulers, Guides and Grids Document Menu Crop Pages Comments Menu Show Comments Tools Menu Basic Tools Zoom Tools Comment and Markup Tools Measuring Tools Link Tools Help Menu...161

3 Toolbars File Toolbar Standard Toolbar Zoom Toolbar Rotate Toolbar Find Toolbar Link Toolbar Markup and Comments Toolbar Style and Formatting Toolbar Shape Tools Measure Toolbar Menu Bar Snap Toolbar and Settings Navigation Toolbar Panes Bookmarks Pane Page Thumbnails Pane Comments Pane Attachments Pane Stamps Creation and Customization Creating Stamps Modifying Existing Stamps Adding PDF Form Fields to Stamps Adding Custom Scripts to Stamps Troubleshooting Why do I get Black Boxes When Printing to a Postscript Printer? Why can I not Select Multiple Objects? Measurements and Accuracy Technical Support Copyrights and Trademarks Revision History...256


4 Our Products Thank you for using the AcroPlot family of software products. We believe that CADzation software solutions are some of the most powerful applications for converting engineering documents into PDF, DWF, or Image files. Since 2001, CADzation has been providing thousands of clients high quality conversion solutions that also result in the smallest file sizes for PDF and DWF. CADzation was the first company to support lines merge functionality when converting from AutoCAD DWG files to PDF, and is also the first company to provide conversion to both PDF and DWF from the same software application. However, we are never resting on our past accomplishments and are constantly looking for ways to improve our programs. We can best accomplish this with your help. So, please feel free to comment on our software or provide any suggestions for new features or improvements. The best way to do this is through our online support desk at AcroPlot Pro & AcroPlot Matrix AcroPlot Pro is the next generation in digital CAD conversion software. With the capability to convert an extensive list of file formats to PDF, DWF, and images AcroPlot Pro will serve as a nexus for CAD Professionals everywhere. AcroPlot Pro also includes the AcroPlot Matrix program for markup and editing of PDF files.. Input Formats: DWG, DXF, DOC, TXT, RTF, XLS, BMP, CALS, JPG, GIF, TIFF, PLT and more. Output Formats: PDF, DWF, BMP, CALS, JPG, GIF, GP4, PNG, TIFF AcroPlot Pro is has been one of the most advanced CAD to PDF solution available on the market since More --> AcroPlot Matrix software enables you to easily view, comment, modify and print an extensive list of file types like PDF, DWF, TIFF, PLT, and more, that are associated with the architecture, engineering, construction, and manufacturing design workflows in today's business environment. With a streamlined interface that makes it easy to use, yet very powerful, AcroPlot Matrix doesn't get in the way of getting work done. Users can quickly open and add comments or stamps to files, insert, reorder, rotate, or delete pages, and even merge various file types into a single PDF or DWF. Printing files to scale at full or reduced sizes that are dimensionally accurate is now possible in AcroPlot Matrix by using the "Custom Scale" option in the printing dialogue window. While other PDF and DWF software applications only print to either "No Scale" or "Reduce to Printable Area", AcroPlot Matrix provides the functionality to define a true reduction percentage so that output to any printer at any scale is now possible -- half-size prints are now quick, easy and accurate. AcroPlot Matrix is quickly becoming the preferred software application for PDF communication across entire organizations because it is so flexible and easy to use, as well as, cost effective to deploy. It works well in all departments like administrative, estimating, accounting, legal, parts, maintenance, etc.! More -->


5 AcroPlot Auto takes conversion one step further and allows you to automatically convert entire drives to PDF or DWF on a continuous basis or at a scheduled time each day. Create watched project folders for AcroPlot Auto to monitor at various intervals and create updated PDF, DWF, or TIFF files daily.more --> AcroPlot Auto does provide for the same high quality image output as AcroPlot Repro so many of our Reprographics customers have found it useful to use AcroPlot Auto to watch folders and convert the files automatically and then load the image files into their Reprographics program. AcroPlot Repro - CADzation's AcroPlot line of software has always been able to produce some of the highest quality PDF files on the market. But when enabling the lines merge in PDF files the software that does the final rendering (Ghostscript or Adobe) to create the output for the plotters have had a hard time converting the large format files because they are not optimized for large format drawings. AcroPlot Repro solves this problem. Faster processing, better dithering, and the ability to actually convert files at higher dpi (which currently Ghostscript seldom does) means you can now create the same high quality output on your plotter as you see in the PDF file.more --> Since Several of our products are included in each other here is a table of the basic features. Features AcroPlot Pro AcroPlot Auto AcroPlot Matrix Batch convert AutoCAD to X PDF Batch convert Word to PDF X X Batch convert AutoCAD to PDF, DWF, and Images X X Batch convert Excel to PDF, DWF, and Images Batch convert PDF to DWF or Images Batch convert DWF to PDF and Images Batch convert Images to PDF and DWF Batch convert PLT files to PDF, DWF, and Images Includes the PDF-XChange for AcroPlot Pro Printer Driver to print to PDF from any Windows Application. Includes AcroPlot Matrix for markup and editing of PDF files as well as converting DWF, PLT, and Image files to PDF. X X X X X X X X X X X X X X X X X AcroPlot Repro

6 Converts PLT, PDF, and DWF files to High Quality TIFF files for plotting. X Watches folders and converts entire drives of supported files to PDF, DWF, and Images. X X


7 Style Conventions The topics in this Help system are designed to give you concise overviews of the software's functions and step-by-step procedural information. In the course of this instruction you'll encounter a number of conventions: Words in bold text refer to parts of the user interface. For example, "Click Rotate Page." You'll notice that some words are underlined and highlighted in blue. Clicking on one of these links will take you to a screen with additional information. "Choose" and the ">" symbol are used to refer to opening menus. For example, "Choose File > Save" means open the File menu and select the Save icon. "Press Alt+Ctrl" means press and hold the Alt key as you press the Control key. To "hover over" something means to move the cursor over it and linger there to get additional information. To "Drag" something means to move cursor over it, hold down the left mouse button, and drag the mouse. Release the mouse button to stop. In addition many of the screen shots are annotated with special symbols that, when hovered over, displays a window with further details on the subject matter. Try it below: Example Hover Over This Displays some more detail, the exact location of the topic in question and sometimes more pictures. Another Detailed Topic

8 With another picture to help explain this topic

9 AcroPlot Matrix Overview Common tasks for getting the information you need include: Use the Contents tab to quickly navigate to Help on the major functions. Click a folder to view information about the topics in each section. in this section provides an easy way to navigate to any topic in a section. Underneath each folder in the Contents is a list of topic files. Click a topic to view its information. Use the Index tab for a full and complete "textbook-like" index. Click a keyword to view its corresponding topic. If several topics reference the same keyword, select the topic to view from a popup menu. Use the Search tab to look for information in the system on any word or phrase you type in. To search for an exact phrase, put double quotes around it (for example "delete comments"). You can also search for words or phrases within the current topic by pressing Ctrl+F. If you are new to our software, we'd like to refer you to the topics in the AcroPlot Matrix Quick Start Guide. This Help file will introduce you to the top level menu and toolbar interfaces as well as common tasks to get you familiar quickly with the basic skills and program navigation.

10 System Requirements Fully supported on 32 and 64 bit versions of Windows XP, Windows Vista, Windows 7, Windows 8, Windows 8.1, Server 2003, Server 2008, and Server You should also have the latest Windows updates and service packs installed for your operating system. 160 MB of free disk space on the C: drive. 1 GB of RAM minimum. (4 GB or higher strongly recommended.) Pentium 1 GHz or better processor minimum. (Pentium 1.8 GHz or higher recommended.) 1024 x 768 with 256 colors video display minimum.

11 Installation AcroPlot Matrix is installed as part of the AcroPlot Pro software suite. For installation instructions please see the AcroPlot Pro help file.

12 System Administrator Info

13 Sharing Settings With Other Users See Import All Settings from Data File and Export All Settings from Data File


14 How Do I...? (Quick Start Guide) The features and tools of AcroPlot Matrix are extensive. This section of the document is designed to quickly get you up and running with the basic functions so you can be creating merged documents, markup drawings, comment sheets, and customized PDF files in just a few minutes from now. Once you are familiar with the basic tools you can delve into the full version of the Help Documentation's advanced features, settings and tools of AcroPlot Matrix and customize it to your liking. Let's Get Started! This section includes Frequently Matrix program. Asked Questions (FAQs) on basic functions and commands for use in the AcroPlot

15 Open a File How do I open a PDF, DWF, PLT, or image file? AcroPlot Matrix can open and view multiple file types like PDF, DWF, PLT, and image files. For non-pdf file types, the file will automatically be converted to PDF for you when you open them in AcroPlot Matrix. For most situations, you can use the File > Open methods to view the files. In some cases, you may need more advanced options for a particular file type at which time you can use the File > New Document menu. From the Main Menu: File > Open command will display the File Dialog box so you can browse to a file on your computer. File > Recent Files command will list your recently opened files. File > Open from URL command will allow you to open a file on the internet. From the File Toolbar:

16 Click on the Open File Button and then the File Open Dialog will appear to allow you to browse to a file. Select the dropdown arrow to the right of the Open File Button icon to select from a list of recently opened files. From the Right Mouse Click: N/A From Keyboard Shortcuts: Ctrl+"O" will display the File Dialog box so you can browse to a file on your computer. From One of the Panes: N/A.

17 Warning: If you drag and drop from Windows Explorer into one of the Panes it will be append the file to the end of the current document. Other Methods: Double Left Mouse Click on the main window area before any files are open to start the File Open Dialog. Drag and drop from Windows Explorer into the Main Window before any files are open. If the PDF, DWF, PLT, or image file type has been associated with AcroPlot Matrix, double click on the file from Windows Explorer to open it. If you would like to associate a particular file type with AcroPlot Matrix you can use the Edit > File Associations menus.


18 Pan and Zoom How do I pan and zoom around the document? Below is a quick overview of the various menus and tools for panning and zooming around the document. For a more in depth discussion of each tool please see the Pan and Zoom Functions section. From the Main Menu: View Menu The View Menu contains some of the basic Zoom options on it along with a "Zoom To" Menu that allows you to type in the zoom percentage that you would like. Tools > Zoom Tools Menu The Tools > Zoom Tools Menu contains some of the more advanced Zoom Tools. From the Standard and Zoom Toolbars: The Standard and Zoom Toolbars have the various zoom functions on it. The Hand Tool is used for panning and the other icons are pretty much self explanatory.


19 From the Right Mouse Click: If you right-click your mouse button in the document window, will invoke options to select the Hand Tool for panning and the various zoom tools. There is also a Zoom Tools Submenu that has some additional shortcuts to the various zoom tools. From Keyboard Shortcuts: Zoom In - Ctrl+ Num+ Zoom Out - Ctrl+ Num- Actual Size - Ctrl+0 Fit Page - Ctrl+1 Fit Width - Ctrl+2


20 From the Pages Panes: Grab the center of the red box in the active page screenshot and drag it around. Click outside the red box to move the zoom to that area. Other: Scroll Bars Vertical scroll will move from page to page. Mouse Wheel The pan and zoom methods described below of for most default wheel mouse configurations in Microsoft Windows. If some of the keyboard and wheel combinations perform differently on your computer, then you may need to make some driver settings modifications in the control panel for your device. CTRL + Roll the wheel = Zoom In or Out SHFT + Roll the wheel = Pan Left or Right


21 Display Panes How do I display the layers, fields, comments, and attachment panes? When AcroPlot Matrix is opened for the first time, not all of the panes are displayed. For easy navigation within the project, the Bookmarks and Pages panes may be displayed. From the Main Menu: Panes can be displayed by going to the View menu and clicking Bookmarks or Page Thumbnails. You can also display panes that list Layers, Fields, Comments, and Attachments. From the View menu, click Other Panes > then select the pane you wish to display. From Keyboard Shortcuts: Bookmarks Pane Display -- ALT + V + B

22 Page Thumbnails Pane Display -- ALT + V + P Layers Pane Display -- ALT + V + O + L Fields Pane Display -- ALT + V + O + F Comments Pane Display -- ALT + V + O + C Attachment Pane Display -- ALT + V + O + A Note: The above commands will add the selected pane to the panes panel on the left side of the main window. If the pane has already been displayed, then these commands will simply bring that pane the forefront. An easier method to make a pane move to the forefront is to click the tab at the bottom of panes panel. View: Other Panes From the main menu > View > Other Panes to Display panes for Layers, Fields, Comments, and Attachments. Panes Group By default panes are displayed in a group on the left side of the screen. To access each pane, click on the associated tab.
23 Rotate Pages How do I rotate a page or pages? There are two separate Rotate commands in AcroPlot Matrix that do different things. The Rotate Current Page (Green arrows on the toolbar) command will rotate the page permanently and will be saved that way in the file. The Rotate Current View (Red arrows on the toolbar) command will rotate the pages temporarily to allow you to view or add annotations. The rotation of the pages will NOT be saved in the file since this command is only rotating what is being displayed on the screen. From the Main Menu: Document > Rotate Pages brings up a dialog box where a page or sets of pages can be rotated all at once. From the Toolbar: Rotate Current Page Clockwise or counter clockwise. Rotates the current page only. Rotated pages will maintain their orientation when the file is saved.
24 Rotate Current View All page views are rotated. Used to change viewing orientation for easier reading and to input annotations and comments at a different 90 degree angle increments. The rotated views will NOT be saved in the file. From the Right Mouse Click: On a thumbnail in the Pages Pane brings up a dialog box where a page or sets of pages can be rotated all at once. From Keyboard Shortcuts:
25 Ctrl + Shift + R From the Pages Panes: See Right Mouse Click above
26 Delete Pages How do I delete a page or pages? Documents can be modified by inserting, adding and deleting pages. The procedures below explain the different methods for deleting or removing pages a document. From the Main Menu: With a thumbnail in the Pages pane selected, Edit > Delete This will delete the selected items Document > Delete Pages: Will display a dialog box where a page or sets of pages can be deleted at once.
27 From the Toolbar: N/A From the Right Mouse Click: On a thumbnail in the Pages pane, Will display a dialog box where a page or sets of pages can be deleted all at once. From Keyboard Shortcuts: Ctrl + Shift + D Delete key From the Pages Pane: See Right Mouse Click above. or Quickest way 1. Select the page(s) to be deleted (Hold the Ctrl key down to select multiple pages) 2. Press Delete on your keyboard 3. Confirm the deletion Note: Selecting from the Bookmarks pane will only delete the bookmark and NOT the page.
28

29 Insert Pages How do I insert pages? With AcroPlot Matrix, documents can be created from existing files and then by customizing the document, removing or inserting pages or files from other sources. This section explains the procedures for adding or inserting pages to an existing document. From the Main Menu: From the Document menu there are three commands for inserting pages or files. Each one brings up a different dialog box for inserting pages or files: Insert Multiple Files... Insert Specific Pages from PDF... Insert Empty Pages... From the Toolbar: N/A From the Right Mouse Click: On a thumbnail in the Pages pane, Will display the dialog box for Insert Specific Pages from PDF where a page or sets of pages can be inserted all at once (see #2 above).
30 From Keyboard Shortcuts: Ctrl + Shift + I From the Pages Pane: See Right Mouse Click above. Other Methods: Files can also be added by using the drag-and-drop method from Windows Explorer to any visible pane. The resulting pages will then be added to the document.

31 Insert Multiple Files Insert pages and files from single or multiple files Specify what page order to insert them into
32 Insert Specific Pages Insert specific or all pages from a PDF Or right click in the Pages pane and select Insert Pages... Or use the shortcut keys Ctrl+Shift+I Insert Empty Pages
33 Add a blank page to use as a book spacer or to paste information into.

34 Add Annotations How do I add annotations? Drawings in AcroPlot Matrix can be "marked up" using annotations. These objects include sticky notes, text tools, arrows, lines, shapes, polylines, polygons, clouds, attachments and freehand pencil drawing. From the Main Menu: Tools > Comment and Markup Tools From the Toolbar:
35 This is the easiest and preferred way to access the annotation tools. From the Right Mouse Click: A sticky note can be quickly added from the Right Mouse Click menu. From Keyboard Shortcuts: ALT + T + C + various From One of the Panes: N/A Procedure: Input an Annotation Example - Circle/Oval 1. Select an annotation object to insert 2. Format the annotation using the annotation Properties toolbar Border and fill color, line style, opacity, etc.
36 3. Draw the annotation at the desired location to call attention to something 4. Add a comment to further explain the details of the markup (optional) To display the Pop-Up Note: Activate the Select Tool Double click the annotation or Right click the annotation > Open Pop-Up Note

37 Erase Objects How can I erase objects from a PDF document? The main function of AcroPlot Matrix is to be able to markup and comment on objects within the pages of a PDF. As such, you can erase annotations that you add, pencil objects, and measurements but not the original geometry of the PDF. You could draw a white object over the information that you want to "erase" in the PDF, but note that this does not actually remove or redact, as it is commonly called, the underlying geometry. A future version of AcroPlot Matrix will allow some editing of the underlying geometry as well. Using the Eraser Tool to Erase Pencil Objects. There is an Eraser Tool but it's only use is to erase annotations specifically created using the Pencil tool in AcroPlot Matrix. By selecting this tool you can hold down the mouse and move over the portions of a pencil annotation that you would like to remove/erase from the page. Using the Select Tool and the Delete Button to Erase Annotations, Text, and Measurements By using the Select Tool and selecting an object you can then use the Delete key or right-click the mouse and use the Cut option to erase the selected annotation. Drawing a White Object to "Hide" the Underlying Geometry of the PDF. There are probably many reasons or uses for this trick. Here are just a few: What if you wanted to call attention to a dimension that needs to be changed? Or if there's just too much stuff in the way to insert the markup you want? This trick assumes the background of the document is white. Use whatever color the background is. 1. Simply draw a shape, in this case a rectangle, over the area you want to make disappear. 2. Set the fill and border colors to white (or whatever the background color is)

38 3. There are actually 2 white rectangles used here. One to cover the existing dimensions and one to cover up the real text created by the new dimension. Then the label of the new dimension label was edited to indicate the desired value.
39 Select Multiple Objects to Modify or Erase The current version of AcroPlot Matrix does not allow you to Select Multiple Objects to modify or delete at once. This page will be removed or updated when a version of the software is released that has the multi-object selection functionality enabled.
40 Add a Measurement to Scale How do I add a measurement and set the scale? First, the basics of how to draw a linear measurement: Procedure: 1.Click the Distance Tool on the Measurement toolbar 2.Click a point to measure from 3.Click a point to measure to *You should be able to find snap points at the ends of objects 4.Click a 3rd time to place the dimension line parallel to the object being measured PDF s are often generated to simply fit inside the dimensions of the page size. So, how can you find the length or area of an object that doesn't already have a dimension? Procedure: First, the actual scale needs to be determined. 1.Click the Distance Tool on the Measurement toolbar
41 2.Set the scale to 1 inch. = 1 foot. in the formatting toolbar. 3.Draw a dimension on an object that has a known measurement (longer dimensions will be more accurate) 4.Note the new distance number. In this case 5.79 = 32 ft. 5.Divide that number by the known distance 5.79 / 32 =.1809 (more digits to the right of the decimal will be more accurate) 6.This will be your X in. = 1 ft. scale 7. Click the Distance Tool again 8.Enter.1809 into the first scale box 9.Now draw a measurement along a known dimension to verify the correct scale
42 Using the same scale factor you can now accurately dimension or measure any object on this page. Note: The scale may be different on each page. Please see the following Troubleshooting Topic about "Measurements and Accuracy" for more information.
43 Edit Measurement Labels How do I edit labels generated by the measurement tools? Procedure: 1. After using the Distance Tool to input a new dimension right-click on it and select the Edit Label command. 2. Fill in the box with the desired text. Click OK. 3. This text is appended to the beginning of the generated text. There is no way to simply edit the text generated by the Distance Tool. However, there is a work-around for hiding the generated text.
44
45 Work With Styles What are the styles all about and how do I work with them? Styles are stored format settings for text tools and shapes and objects that can be accessed quickly. This is useful for quickly changing formatting options without having to set each property every time. Object & Shape Styles Color Line Style Line Thickness End of Line Shape Transparency Text Styles Font Font Size Font Style Justification Color Note: The above settings are for the text only. The shapes around the text are controlled by the Objects and Shape Styles. Note: Styles are global to each group. Selected Styles will apply to all objects. Individual objects can be formatted by selecting the object and using the associated formatting toolbar.

46 Procedure: To select a style to use: 1. Click the Styles dropdown arrow 2. Select from one of the preset styles 3. To add styles select Show Font Styles Palette or Show Drawing Styles Palette at the bottom of the dropdown menus See Edit Styles for more information on editing existing styles or creating new styles.

47 Work With Stamps How do I work with stamps? Stamps are pre-made graphics, included with AcroPlot Matrix, which can be used in the markup of a document. From the Main Menu: Tools > Comment and Markup Tools > Stamp Tool Quickly inputs the visible stamp selected from the dropdown list From the Toolbar: The Stamps toolbar includes 2 default stamps and a dropdown list of available stamps. To configure the stamps that will be available select Show Stamps Palette at the bottom of the dropdown list.
48 Then check the library that you would like to be available. Procedure: To insert a stamp: 1.Select the stamp. 2.Click a location in the drawing. 3.Click the stamp to move or change size. Note: To insert a stamp at an angle other than horizontal use the Rotate View buttons. For more information see the sections on Rotating Pages and Rotating Views.
49 Default Stamps Place holders for stamps that are used often Stamps Dropdown List Displays the currently selected stamp Click the arrow to select from a list of stamps

50 Set the Default Stamps How do I set the two default stamps? The first two stamps on the Stamps toolbar are place holders for stamps that are used often. They can be changed at any time to suit your needs for commenting. Procedure: To set the default stamps right-click on one of the stamps and select from the visible stamps list. That stamp will now be available with one-click until you change the default setting for this stamp. Click the link for more information on How to Work with Stamps.
51 Attach a File to a Page Not only can you create markups and comments on a page but you can also attach files. From the Main Menu: Document > Attach a File... From the Toolbar: Procedure: Place the pin icon on the page by clicking the desired location. From the file browser select the file to be attached. Click on the pin icon to insert a comment or description about the attached file.

52 Right Click Menu If the file is a PDF, it is opened in a new tab within AcroPlot Matrix. Otherwise the program attempts to open the embedded file in the associated software application with this warning:
53 Opens Windows Explorer and prompts the user to save the file at the desired location. Opens a dialog box to enter or edit the description of the attached file. Similar to clicking on the pin and entering data into the comment box.
54 Opens the pop-up note for review, input or editing. Same as clicking on the pin. Relocates the pop-up note to the original position if the note has been moved. Deletes the attachment and any notes that were associated with it.
55 Adjusts the layer stacking order of the attachment graphic. Example: Using the Forward One or To Foreground command. Sets the current property settings for an attachment callout as the default appearance. Example: A file attachment has been included in a page. The properties are set to a red pin graphic. If the Styles are set to a specific selection (blue in this case) and you want all attachment graphics to be the color red, then use the Set Current Appearance as Default command. Note: This only applies to the color and not the actual graphic.
56 Applies the Default Appearance color to the active attachment callout. Launches the dialog box to set Appearance and General properties for the selected markup. For an attachment the icon, fill color and opacity settings can be set here. The Advanced button includes the default settings as well as the ability to Lock these settings for the callout. The General panel includes the Author and Subject properties for the attachment, which can be edited here.
57

58 Using the Interface AcroPlot Matrix is a simple yet sophisticate application for viewing, commenting, editing, and printing PDF, DWF, PLT, and image files. Below is a screen shot of the AcroPlot Matrix software application that contains callouts of its various parts. By selecting any of the numbers, the page will automatically jump to its corresponding description. File Toolbar File Toolbar
59 Menu Bar Most commands can be accessed through the toolbars, however if you prefer, you may use the pulldown menus. There are a few commands available in the menus that are not available elsewhere. See the Menu section for further details. Standard Toolbar Standard Toolbar Zoom Toolbar Zoom Toolbar Comments And Markup Toolbar Markup and Comments Toolbar Rotate Pages Toolbar Rotate Pages Toolbar
60 Find Toolbar Find Toolbar Link Toolbar Link Toolbar Measure Toolbar Measure Toolbar Properties Toolbar Property settings for the current command will be displayed here. Example - Cloud Tool: Show Tabs
61 These options are displayed when multiple files are open. Show All Tabs displays a list of all open files. The checkmark denotes the file that is currently visible and active in the client work area. To switch files, click on the desired tab or select from this list. Show All Tab Thumbnails displays large views of all open files. Click on a thumbnail to make that file current and visible in the client work area. Pane Toolbar Different tools will be displayed in this toolbar depending on which pane is visible. See the Panes section for further details. Panes

62 Panes that can be viewed here are: Bookmarks, Pages Thumbnails, Comments, Fields, Layers and Attachments. To add additional Panes click the View > Other Panes then select from the choices displayed. See the Panes section for further details. Pane Tabs Toggle the visible pane by clicking on the desired pane tab. See the Panes section for further details. Snap Toolbar Toggle snap off and on. Set object snap settings.
63 Snap Toolbar Page Size Displays the real-world size of the current page. Navigation Toolbar Navigate between pages of the current document. Navigation Toolbar View Navigation Move back and forth between views. See the File Toolbar for more information.
64 Client Work Area This is the Main Client Work Area where most of the input is done.
65 Menus Most of the AcroPlot Matrix tools can be found in either the menus or toolbar buttons, so it's your choice on which method to use. Although most of the commonly used commands can be found on the toolbars, the AcroPlot Matrix menu system covers just about every command available. This section will cover the commands found in the menus. Corresponding toolbar commands will be noted with a link to that toolbar button section.
66 File Menu Launches the Open File dialog box to browse for files on your computer. Launches the dialog box for opening a document from a URL.

67 Opens the submenu for quickly accessing recently opened files. Saves the active document. Opens the dialog box to save the active document with a different file name or location.
68 Saves a copy of the active document while leaving the original file active. Opens the New Document submenu. See New Document...
69 Opens your default client with the active document attached. The subject line is automatically populated with the file name. Closes the active file. If the file has changed you will be prompted to save the file before closing. Closes all open files. If any of the files have changed you will be prompted to save each file before closing.
70 See Export to Image. See the Print section for more information. Displays a dialog box to set properties for the document itself. There are several Categories (Description, Security, Fonts, and Initial View) where properties can be edited. See: Document Properties Description Settings Security Settings Fonts Initial View Settings This command copies the full file path name to the clipboard.
71 This command opens Windows Explorer to the folder containing the active document. Closes AcroPlot Matrix. If changes have been made to any of the open documents, then you will be prompted to save the file(s) before closing.
72 New Document... The end result will always be a PDF file when saving from AcroPlot Matrix. However, documents can be created by importing several different formats including: a Blank Page, Text File, RTF, Image, Scanned, DWF or PLT files. Create a Blank Page using the setting in this dialog box. Select a single file, multiple files or complete folders to add.
73 Opens the file browser to locate a RTF file.
74 Select a single image file, multiple image files or complete folders to add.
75 Opens the file browser with the Autodesk Drawing formats filter selected. Opens the file browser with the HPGL formats filter selected.
76 Export To Image Individual pages or complete files can be exported as many types of images by using the Export To Image command. Pages Range Select which Pages or Views to export. The Selected Pages option will be available if more than one page is selected in the Pages Pane.

77 Subset Use this dropdown to select only the Odd or Even pages for export. Check the Reverse Order box if you wish to export the files in descending order. This may effect the file names depending on your Macro settings for the File Name. Save As Save the image as any of the types listed in the dropdown list. Options Several image properties are available for customization of the saved file.

78 The properties may be different depending on the Image Type. Destination Folder Click the Browse button to locate and set the folder where the exported file will be saved.
79 File Name The filename may be typed into this box or you may use the Macros to set procedures to automatically name the exported file. Multiple macros may be used in combination. Export Mode Select an option from this dropdown list to save multiple images to separate files or save them all in a single file. Page Zoom
80 Use this area to set the size of the exported file. The dimensions (in pixels) of the image will change in the preview window as you edit the Zoom factor number. Resolution Use this dropdown list to change the resolution of the exported image. Page Background Use this color selector to change the background color of the exported image.
81 Export Click the Export button to finalize and save the image to the selected folder. Cancel Click the Cancel button to abort the image export.
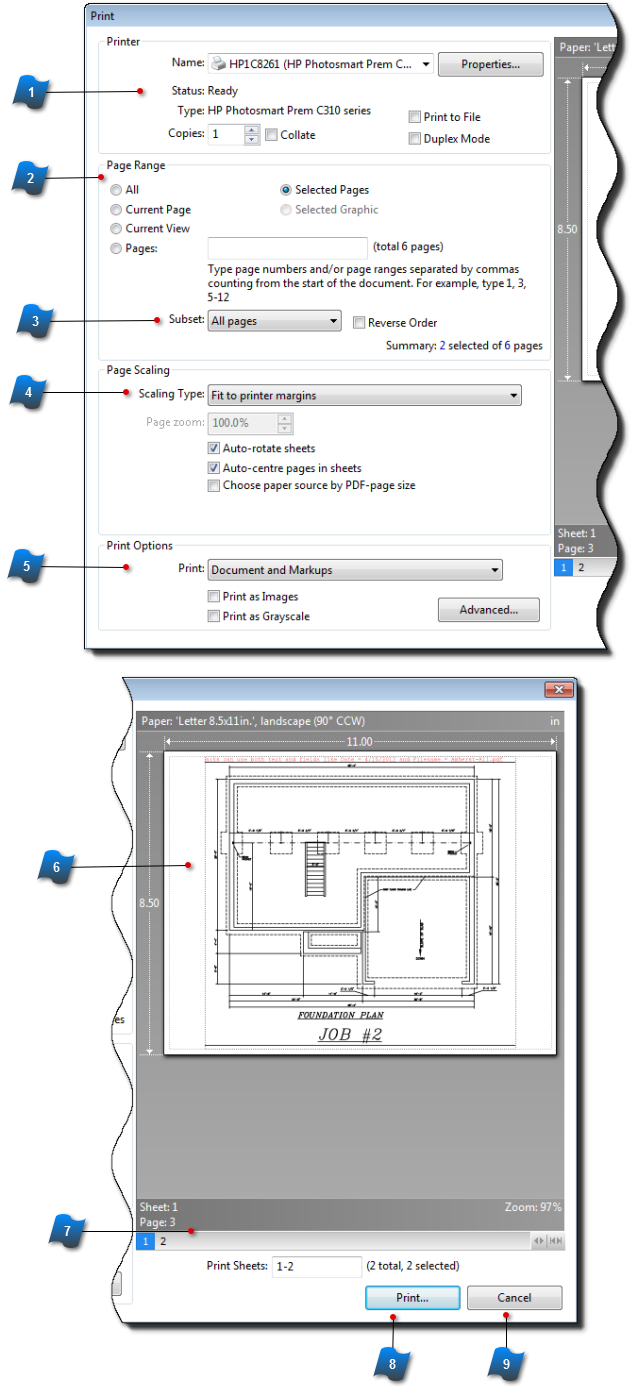
82 Print NOTE: If printing to a Postscript based printer you should select the "Print As Images" option since Postscript does not support most of the transparency and blending modes that PDF does. For more information please see the Troubleshooting->Why do I get Black Boxes When Printing to a Postscript Printer? section.
83
84 Basic Printer Properties Start by selecting the printer or device to print to. Use the Properties button to access the device's settings such as: orientation, paper type, paper size, and paper source. Page Range Select which Pages or Views to export. The Selected Pages option will be available if more than one page is selected in the Pages Pane. Subset Use this dropdown to select only the Odd or Even pages to print.. Check the Reverse Order box if you wish to export the files in descending order.
85 Page Scaling Documents and files can be printed all on one page or a single file can be printed or tiled across several pages. Using the combinations of scaling type, zooming and rotation, documents can be printed in any number of ways. Select a Page Scaling method from the dropdown list. Some of the properties below the list will change depending on what type of Page Scaling is chosen. Print Options Use the Print Options dropdown list to select what items to print.
86 Click the Advanced button to access additional settings for text, embedded fonts, images and gradient fills. Check the box to print Notes and Popups. Preview Window

87 View a representation of what the final printout will look like. This view also displays the page size. Preview Controls Click the numbered boxes to scroll through the previews of each page to be printed. This area also indicates which pages will be printed on each sheet. In this case page 3 of the active document will be printed on the first sheet. Print Click the Print button to finalize and print the documents. Cancel Click the Cancel button to abort the printing operation.
88

89 Document Properties The Document Properties window displays the last viewed panel when launched. This screen displays document properties for Description, Security, Fonts, and the Initial View.

90 Description Categories Panel Select the category from this pane to change property views.

91 File Info Displays basic information about the active document. Locate File Click this button to open Windows Explorer at this file's location. Document Info
92 The Document Info section displays basic properties of the active document. Information may be edited or added by typing into the text boxes. Click the OK button to save the new info. To access and edit additional document properties click the Additional Metadata... button.

93 Security Security The Security pane detects the existing security settings for active document. Security settings can be changed by selecting Password Security from the Security Method dropdown list which displays the Password Security Settings dialog box. To set Password Security edit the desired properties and click the OK button.
94 Permission Detail This section displays information about what functions are allowed for the active document.
95 Fonts The Fonts pane displays the fonts used in this document.

96 Initial View Layout and Magnification This section controls how the document appears when it's opened. Navigation View
97 Page Layout Magnification Set the desired zoom factor for the document when it's opened. Open to Page:
98 Set document to open to a specific page automatically. Show in Title Show just the file name or the longer document title in the tab of the document. Interface Options These settings control how most PDF viewing applications will appear when opening the PDF file.

99 Edit Menu Use the Undo command to undo any input or editing using any of the Markup & Comment toolbar tools. Use the Redo command to redo actions that were just undone. The Undo command will not work on functions like Rotate or Edit Styles. Undo history will be maintained in the current session until the document or application is closed. Standard Cut, Copy and Paste commands.
100 Deletes the selected object. The Find command on the Edit menu simply displays the Search toolbar, if it's not already visible, and highlights the input box. To quickly find a word or phrase type in the search term and select the Enter key. For additional options use the Search command. See Search for detailed information. This command will import a.dat file into AcroPlot Matrix that contains Preference settings from another user or a backup of a previous installation. See Export All Settings to Data File...
101 This command will create and save a.dat file which contains all of the AcroPlot Matrix user Preference settings. Most of the data comes from the many settings created in the Preference dialog box. Other users of AcroPlot Matrix can import these settings for use in their program. See Import All Settings from Data File... This command resets all of the settings to the initial install defaults. Opens the "Preferences" area for modifying the behaviors and default settings in AcroPlot Matrix. See Edit Styles Opens "Set Program Associations" screen where you can set certain file types to automatically open in AcroPlot Matrix when they are double-clicked on from the Desktop, Windows Explore, etc.
102
103 Search The Search function can look in the active document or all open documents and any other PDF files in the folders specified. Filters can be set on what to look for, how to look, and where to look. Search Term Input Type in the word or phrase you are looking for here. Start Search
104 After typing in your search term hit Enter or click the Search Now button. Search Options Select the search location filters here and whether to restrict to the Whole Word or Case-Sensitive. Where to Search The Search function can look in the active document or all open documents and any other PDF files in the folders specified in the dropdown list. Click the <Browse...> command at the bottom of the dropdown list to narrow the selection to a specific folder.
105 Search Results Displays the search results.

106 Edit Styles Menu AcroPlot Matrix keeps a library of preset styles for drawing objects and fonts. This allows you to quickly add comments with pre-formatted properties and settings. For Drawing Styles: color, line style, line thickness and the shape at the end of an arrow type line. For Font Styles: font, color, size, bold, italicized, and justification. Click either the Font Style list or the Drawing Style list on the Markup toolbar, make a selection and the associated objects will all use the preset properties. Properties can always be changed using the Properties toolbar before or after input.
107 This is where Drawing Styles can be edited or created. To create a new Drawing Style: Click the Add button Type in a descriptive name for the style Set the line color Choose a line type Choose a line thickness Select the shape that occurs at the end of the line Place the style anywhere in the list by using the Move Up or Move Down buttons Click the Save button The new Drawing Style can now be selected from the Drawing Styles dropdown list. This is where Font Styles can be edited or created. To create a new Font Style: Click the Add button Type in a descriptive name for the style Select a font Choose a font size Set optional properties for bold, italicized, underlined, or cross-out
108 6. Select the default text justification 7. Place the new style anywhere in the list by using the Move Up or Move Down buttons 8. Click the Save button The new Font Style can now be selected from the Font Styles dropdown list. You can make "Global Styles" available to users on a network or multiple users on the same machine. Global Styles are available for all users on a machine and are always listed first. You would need Admin rights to edit these styles. Typically saved under Settings\Global folder in the Application directory. You can make "Global Styles" available to users on a network or multiple users on the same machine. Global Styles are available for all users on a machine and are always listed first. You would need Admin rights to edit these styles. Typically saved under Settings\Global folder in the Application directory. Use this function to restore the User Styles to the initial install defaults.
109 View Menu Displays the menu to toggle visibility for individual toolbars. By default all toolbars are visible. To turn off a toolbar from being displayed, uncheck the box next to the toolbar label.
110 Displays the Bookmarks pane. See Bookmark Pane for additional information. Displays the Pages pane.

111 See Page Thumbnails pane for additional information. Displays the list of Panes that can be visible in the Panes Panel. Click on a selection from this list to make that pane visible. Note: The Bookmark and Page Thumbnails panes are listed on the main View menu as these are the most commonly used panes.
112 See the Comments Pane and Attachments Pane for additional information on those specific topics. Zooms active page to 100%. Zooms active page to fit entirely in the work area. Zooms the active page so that the entire width is visible in the work area. Vertical scrolling may be required to view the entire page. Launches a dialog box to either type in a zoom percentage or select a setting from the dropdown list. Also includes the Actual Size, Fit Page, and Fit Width commands.
113 Displays a grid which can be used to snap objects to.
114 Displays any user input Guide Lines. Guides are user input lines used to help line up drawing objects or create areas for callouts. Guides can be used to snap objects to. To create Guide lines click, hold and drag the mouse from inside either the vertical or horizontal rulers to the desired location. Note: Rulers must be displayed in order to create Guides. Displays vertical and horizontal rulers along the left and top edges of the main work area.
115 The units are displayed according to the settings in Edit > Preferences > Measurement. This is also the location to set Grid and Guide settings. Note: Rulers must be displayed in order to create Guides. Displays the same menu as the Snap Toolbar when the Settings button is clicked.

116 See Snap Toolbar for more information.

117 Rulers, Guides and Grids Right-click on either the vertical or horizontal ruler to display this menu which includes most of the settings from the Edit > Preferences > Measurement dialog box along with some Guide and Snap editing commands. Measurement Units Quickly set or change the measurement units used in the rulers.

118 Show Rulers Toggle to either show or hide the rulers that appear at the top and left side of the main work area. Shortcut Key -- CTRL+R Show Grid Toggle to either show or hide the gridlines in the main work area. Shortcut Key -- CTRL+' Show Guides

119 Toggle to show or hide Guidelines within the main work area. Shortcut Key -- CTRL+; Add New Page Guides Opens a dialog box to add multiple guides along an array or add multiple guides to multiple pages at once. Delete Guides on Current Page Deletes all guidelines on the current page.
120 Delete All Page Guides Deletes all guidelines from all pages. Snap Click this command to toggle the ability to snap to objects ON and OFF. Hover over Snap to access the toggles for the different snap objects. Shortcut Key -- CTRL+SHIFT+; Setup Measurement Launches the Preference dialog box with the Measurement panel active.
121

122 Document Menu Launches the dialog box to insert pages into the current document from other files. Pages can be inserted from a single file or from several files at once. All pages in the selected files will be added to the current document. Select where in the current document to insert the pages. If you want to insert only certain pages use the Insert Specific Pages from PDF command.
123 Launches the dialog box to insert selected pages from one document into the current document. Browse for the file that contains the desired pages. Pages can be inserted from another document already open. Select the document from the dropdown list. Select the pages to be inserted. Type in a page range or individual page numbers. From the dropdown list select to insert all of pages, just the odd pages or just the even pages. Select where in the current document to insert the pages.
124 Launches a dialog box to insert blank, empty pages. These pages can be used to insert attachments, notes, markups or signatures along with other actions as well. Select the size of the page to insert from the dropdown list or create a custom size. Choose either portrait or landscape orientation. Select how many pages to insert. Select where in the current document to insert the pages.
125 Launches the dialog box to extract pages from the active document. Select which pages to extract. Choose what to do with the extracted pages - Delete them, save each page to a separate file, or save all the extracted pages into one new file. Extracted pages can be deleted from the active document and saved into one of the new formats at the same time. If new files are being created, then select the new file location and naming method.
126 This function saves time by extracting (deleting) pages and inserting pages at the same time. Launches the Windows Explorer file browser for selecting the file that contains the replacement pages. With the new file selected the Replace Pages dialog box prompts for the page(s) that will be replaced and the page(s) in the new file to replace it with. You may replace a range of pages with the same amount of pages from the new file.
127 Launches the dialog box to help Delete multiple pages at once. To Delete a single page, select the page from the Pages pane or the Bookmark pane and press the Delete key, or choose Delete from the Edit menu, or select Current Page from this Delete Pages dialog box. To Delete multiple pages at once, enter the page range or select from the dropdown list. Launches the dialog box for Rotating Pages. Pages saved using this function will be saved with the new rotation. Select the Direction of rotation from the dropdown list.
128 Choose the page range to rotate. Pages can easily be rotated based on their existing orientation. Launches the dialog box for cropping pages. Use the Crop Box to visually select an area of the page to clip to. Move the handles in the work area to the desired region to be displayed.
129 About Box Types: A PDF describes the content and appearance of one or more pages. There can be up to 5 different descriptions in a PDF that relate to its page size. These are called the page boxes: The Crop Box defines the region to which the page contents are to be clipped. The Bleed Box determines the region to which the page contents needs to be clipped when output in a production environment. The Trim Box defines the intended dimensions of the finished page. The Art Box can define a region within a page that is of special interest. The Media Box (not used here) is used to specify the width and height of the page. (Actual Page Size)
130 Launches the Resize Pages dialog box. Individual pages or a range of pages can be resized. Resize by a percentage amount or type in exact dimensions. Option to Keep Page Aspect Ratio. (see Note below the check box) The drawing will be scaled according to the new page size. Displays the sub-menu for Signing the active document.
131 Starts the process of attaching a file to the page. See How Do I Attach a File to a Page for details.

132 Crop Pages Sometimes you may want to show only a certain region of the page or modify it to a standard size. Use the Crop Pages feature to accomplish this. Crop Margins This is the area to set the regions and margins of the area to crop. Show Boxes

133 A check mark here will display all of the boxes (see Box Type) in the main work area. If not checked the main work area will only display the currently selected Box Type. Box Type AcroPlot Matrix can define four different Box Types in regard to a PDF. The Crop Box is the default and is most commonly used. About Box Types: A PDF describes the content and appearance of one or more pages. The exact size of that page is not as straightforward as you might think. There can be up to 5 different descriptions in a PDF that relate to its size. These are called the page boxes: The Crop Box defines the region to which the page contents are to be clipped. The Bleed Box determines the region to which the page contents needs to be clipped when output in a production environment. The Trim Box defines the intended dimensions of the finished page. The Art Box can define a region within a page that is of special interest. The Media Box (not used here) is used to specify the width and height of the page. (Actual Page Size) Margin Controls
134 Manually set the exact required margins from the edges. Dragging the handles in the work area will display the new margins here. Margin Units Set the margin units in any of the displayed choices. Constrain Proportions Checking this box forces all fields to match the setting for the one being edited. Note: This rule only applies to entering data into the margin control boxes. Dragging the box in the work area does not follow this rule.
135 Set To Zero Resets all margin controls to zero. This also works as an Undo function after the page has been cropped and you wish to reset the margins back to show the full page. Reset To Original This function reverts to the original margins when the Crop Pages dialog box was opened for this cropping session. Example: Say this page has already been cropped but it's still not quite right. You can open the Crop Page feature again and move the crop box around to adjust the region. If you want to start back with the crop box you started with click the Revert to Original button. If you want to completely undo the whole crop and view the whole page click the Set to Zero button. Set To White Margins Automatically sets all four margins in to eliminate as much white or blank space as possible around the edged.

136 Page Range Set the page(s) to be cropped. Multiple pages may be cropped to the same margins at the same time. Remove White Spaces This function automatically invokes the Set to White Margins feature and closes the dialog box. OK Button Click to complete cropping. Work Area Preview and work area. Drag the handles (little white grips at corners) to define boxes.
137 Handles The little white grips in the corners are the drag handles. Grab these with the mouse and drag corners or lines to the desired locations.

138 Comments Menu Flattening the comments removes all properties from the comments and make them part of the PDF page. This is useful to prevent other Users from editing or modifying any comments or annotations when viewing the PDF. NOTE: Flatten Comments function does not prepare the PDF for faster printing/plotting in that it is not a prepress transparency utility for print production. Please see AcroPlot Repro software for PDF processing and production plotting. Launches a dialog box to Create a PDF output report of all the comments for the PDF document. Output format file types are PDF, RTF, TXT, and HTML.
139 Displays the Show Comments... sub-menu. Comments can be imported from a different PDF file. PDF Form data can also be imported via a FDF or XFDF file. Comments can be exported or saved to a FDF or XFDF file.
140 Opens a list view of all the comments contained in the PDF document. This can also be invoked by going to VIEW > OTHER PANES > COMMENTS

141 Show Comments Opens a list view of all the comments contained in the PDF document. This can also be invoked by going to VIEW > OTHER PANES > COMMENTS
142 This will hide all the comments / markups from being displayed in the current PDF document. However, comments / markups will still be printed. To prevent comments / markups from being printed, be sure to set the "Print Options" when printing from "Document and Markups" to "Document." Shortcut: CTRL + SHFT + 8 This will enable the display of any comments / markups that exist in the PDF document. Shortcut: CTRL + 8
143 Expands to the sub-menu for filtering the type of comments / markups to display. Sets document to display all comments and markups. Sets document to display only "Notes" type comments and markups. Sets document to display only "Drawing Markups" type comments and markups. Sets document to display only "Text Editing" type comments and markups.
144 Sets document to display only "Stamps" type comments and markups. Sets document to display only "Attachments" type comments and markups.. Displays the content of all "Pop-up" comments within the document. Resets all "Pop-up" comments to normal status.

145 Tools Menu Tools Menu Selecting the tools menu provides access to the various subsets of functions for navigation, zooming, commenting, measuring, and adding links to documents. See the Basic Tools section for the Hand Tool, Snapshot Tool, and the Selection Tool.
146 See the Zoom Tools section for the Zoom In, Zoom Out, and Loupe Tools. See the Comment & Markup Tools section for the Stamps submenu, Sticky Note Tool, Notation Tools, Text Highlighting Tools, Drawing and Markup Tools, Show Stamps Palette, Show Comment and Markup Toolbar, and Show Comments List.
147 See the Measuring Tools section for the Distance, Perimeter, and Area Tools.
148 See the Link Tools section for creating links within PDF documents.

149 Basic Tools Selecting the "Hand Tools" changes the screen cursor to a "Hand" icon which enables the user to use the left mouse button to drag the display in any direction. This action is very similar to sliding a piece of paper around on a table or desktop. Selecting the "Snapshot Tool" will change the screen cursor to the "Camera" icon which enables the user to copy the current document display to the virtual clipboard for pasting a bitmap into the same or another application. Left mouse click will select and copy the entire page thereby activating the selection area with control grips. Each time the selection area is resized or moved a new display copy is captured to the virtual clipboard. The default bitmap resolution is 72 DPI. To modify the resolution for "Snapshot Images" go to: EDIT > PREFERENCES > SNAPSHOT TOOL
150 Selecting the "Select Tool" will change the screen cursor from an arrow to a vertical text cursor when it is hovered over text that is selectable. Using the left mouse button, you can select text to copy to the virtual clipboard or use one of the Comment & Markup commands to add a highlight or underline markup. Please note that not all text rendered to PDF is selectable and this will be indicated by the cursor not changing from an arrow when hovering over the text. If a PDF was created with "Text as Graphics" enabled, then the text with the PDF file is not selectable for copying or highlighting.

151 Zoom Tools Increases the magnification of the display with each left mouse click. Decreases the magnification of the display with each left mouse click. Invokes an active zoom window that is linked to a zoom region. The zoom region can be moved and resized to change what is being displayed in the zoom window.

152 Invokes an active zoom window that contains a control region that can be moved and resized. When moving the control region the display is updated. Pan and Zoom Tool also contains controls to navigate to different pages and in a multi-paged document, preset zoom levels, and the Snapshot Tool.

153 Comment and Markup Tools See Stamp Tool in the Comment and Markup Toolbar section for additional information.
154 See Sticky Note Tool in the Comment and Markup Toolbar section for additional information. See Typewriter Tool in the Comment and Markup Toolbar section for additional information. See Text Box Tool in the Comment and Markup Toolbar section for additional information. See Text Callout Tool in the Comment and Markup Toolbar section for additional information.
155 See Highlight Text Tool in the Comment and Markup Toolbar section for additional information. See Cross Out Text Tool in the Comment and Markup Toolbar section for additional information. See Underline Text Tool in the Comment and Markup Toolbar section for additional information. See Arrow Tool in the Shapes Toolbar section for additional information.
156 See Line Tool in the Shapes Toolbar section for additional information See Rectangle Tool in the Shapes Toolbar section for additional information See Circle/Ellipse Tool in the Shapes Toolbar section for additional information See Polyline Tool in the Shapes Toolbar section for additional information See Polygon Tool in the Shapes Toolbar section for additional information See Cloud Tool in the Shapes Toolbar section for additional information See File Attachment Tool in the Shapes Toolbar section for additional information
157 See Pencil and Eraser Tool in the Markup and Comments Toolbar section for additional information See Pencil and Eraser Tool in the Markup and Comments Toolbar section for additional information This command displays the Stamps Palette for organizing stamps. Same as clicking the Stamps dropdown and selecting Show Stamps Palette at the bottom of that window. See Working With Stamps for additional information. Toggles the display of the Comments and Markup toolbar. The default is checked (visible).
158 Displays the Comments Pane in the Panes Panel area. If the Comments Pane is not yet active, this command will activate it and bring it to the forefront. If the Comments Pane is already active, this command simply brings it to the forefront.

159 Measuring Tools Find distances between points, perimeter measurements and area information. Please see the Measure Toolbar section for detailed information on these topics. See Distance Tool in the Measure toolbar section. See Perimeter Tool in the Measure toolbar section. See Area Tool in the Measure toolbar section. Toggles the display of the Measuring Toolbar.

160 Link Tools See Rectangle Link Tool in the Link Toolbar section for detailed information on this topic. See Quadrilateral Link Tool in the Link Toolbar section for detailed information on this topic. Toggles the display of the Links Toolbar.
161 Help Menu This command displays the AcroPlot Matrix Help file (the file you are currently viewing). This command runs a script to check that your version of AcroPlot Matrix is the latest version according to the CADzation website. Click this link to access the CADzation's Technical Support website page. Information and help on this page include: Additional Help Manuals Registration and Licensing Questions Frequently Asked Questions Knowledge Base

162 Clicking this link takes you directly to CADzation.com, CADzation's Home Page. Click this command to take you directly to the Purchase page of the CADzation website.
163 Displays the About dialog box for the AcroPlot Matrix software. Includes version numbers, build dates, copyright information and some useful links.

164 Toolbars Most of the AcroPlot Matrix tools can be found in either the menus or toolbar buttons. Toolbar button commands are generally faster to access with less clicks. The following pages will cover the commands in each toolbar.
165 File Toolbar Open File Open an existing document Select the dropdown arrow to the right of the Open File Button icon to select from a list of recently opened files Save File Save the active document Print Print the active document
166 Send By the active document Opens your client with the active document attached. Views Forward/Back As you navigate through pages in your open files AcroPlot Matrix saves each view. Use these buttons to quickly browse through any views that were created by zooming, scrolling or panning. Actions Undo/Redo Undo or Redo any actions that were performed during this session.

167 Standard Toolbar Pan Tool Selecting the "Hand Tools" changes the screen cursor to a "Hand" icon which enables the user to use the left mouse button to drag the display in any direction. This action is very similar to sliding a piece of paper around on a table or desktop. Snapshot Tool Selecting the "Snapshot Tool" will change the screen cursor to the "Camera" icon which enables the user to copy the current document display to the virtual clipboard for pasting a bitmap into the same or another application. Left mouse click will select and copy the entire page thereby activating the selection area with control grips. Each time the selection area is resized or moved a new display copy is captured to the virtual clipboard. The default bitmap resolution is 72 DPI. To modify the resolution for "Snapshot Images" go to: EDIT > PREFERENCES > SNAPSHOT TOOL

168 Select Tool Selecting the "Select Tool" will change the screen cursor from an arrow to a vertical text cursor when it is hovered over text that is selectable. Using the left mouse button, you can select text to copy to the virtual clipboard or use one of the Comment & Markup commands to add a highlight or underline markup. Please note that not all text rendered to PDF is selectable and this will be indicated by the cursor not changing from an arrow when hovering over the text. If a PDF was created with "Text as Graphics" enabled, then the text with the PDF file is not selectable for copying or highlighting.
 Zoom Percentage Select from the dropdown or type in a percentage")
169 Zoom Toolbar Zoom In Tool Click on the drawing or draw a box around an area to Zoom in Zoom Out Tool Click on the drawing or draw a box around an area to Zoom out Zoom Actual Size Zoom to 100% Fit Page Fit entire page into the viewing window Fit Width Fits the view to the width of the page (no horizontal scrolling) Zoom Percentage Select from the dropdown or type in a percentage number
170

171 Rotate Toolbar Quickly rotate current page Same as Menu item Document > Rotate Pages Will save pages in the rotated state Rotate Pages Counter Clockwise Rotate pages in the counter clockwise direction 90 degrees Pages will be saved in the rotated view Rotate Pages Clockwise Rotate pages in the clockwise direction 90 degrees Pages will be saved in the rotated view

172 Find Toolbar The Find toolbar will quickly search for the entered search word or term within a PDF document containing actual text. For a more detailed search function please see the Search command. Find Previous Will try to find the search term moving up the document. "Search for" Input Box Enter a word or term to search for in this input box. Find Next Will try to find the search term moving down the document.

173 Link Toolbar The Link Tools are used to input hyperlinks to: Go to a page in this document Go to a page in another document Open a web link Open a file Rectangular Link Tool Draw a rectangle to insert a hyperlink. To create the rectangle click and drag a box shape. After input the rectangle may be resized by dragging the handles at the corners. For the example above a Note was added to give the end user an explanation of this area. After inputting the rectangle the property dialog box is displayed to enter a link and format the display of the rectangle.
174 Click the Add button to select the type of link to be input. Input the actual hyperlink or set the properties of the dialog box according to the type selected. Use either the Link Properties > Appearance tab in the dialog box or the formatting toolbar to format the border color, border line type, border line thickness and highlight mode.
175 The Highlight Mode sets the effect of the link shape when the user is at a left-mouse button down position. The end user will be taken to the desired location, page or document when the link rectangle is clicked. Quadrilateral Link Tool Draw any 4 sided object to insert a hyperlink. There are 2 methods for inputting a Quadrilateral shape: 1. Start by clicking and dragging a rectangle, then dragging the corner handles to create the desired 4-sided shape. 2. Start by clicking a starting location for a line segment then click a second location to create the first line. Click again to create a second line segment then click once more to create the third line segment. At that point the final line is automatically created back to the original starting point to create a 4-sided object. After inputting the quadrilateral shape the property dialog box is displayed to enter a link and format the display of the quadrilateral.
176 Click the Add button to select the type of link to be input. Input the actual hyperlink or set the properties of the dialog box according to the type selected. Use either the Link Properties > Appearance tab in the dialog box or the formatting toolbar to format the border color, border line type, border line thickness and highlight mode. The Highlight Mode sets the effect of the link shape when the user is at a left-mouse button down position. The end user will be taken to the desired location, page or document when the link quadrilateral is clicked.

177 Markup and Comments Toolbar This toolbar contains all the fun stuff. Make notes and comments. Edit text. Draw shapes, arrows and callouts. Attach files and input stamps. Most tools can be formatted by color, font, lines, and other properties depending on the tool being used. Sticky Note A tool to input a quick note for a general or specific location. Click in the document where the "Sticky Note" will be located and immediately following a window will pop up to enter the message in the sticky note. Typewriter Tool This tool is used to insert text on a single line. The "Typewriter Tool" is similar to inserting a piece of paper in a manual typewriter and typing on it. Click on the document where text is to be entered and begin typing. Right -click for formatting options within each area of typed text.

178 Text Box Tool The Text Box tool is used to insert text in a formatted multi-line box. Click and drag a box to the desired size and enter text in it. Right -click for formatting options within each area of typed text. TIP: This tool can be used to wipeout or overwrite existing text by setting the background color to white and the border color to none. Please note that this method does not remove the text under the comment / markup. Text Callout Tool Text in a formatted mulit-line box with a pointer. Similar to the Text Box tool with the ability to add a pointer. Click to locate the endpoint of the callout arrow and then drag away from that point to locate the callout text location. Symbols Tool Click the icon to display a dropdown selection to input a special symbol.

179 Text Callout Styles The formatting of Text Callouts can be quickly set using pre-set styles from the dropdown box. Choose from pre-set styles. Affects all Text Callout tools. After input, objects can be individually styled using the formatting toolbar or using the Select tool, right-clicking the object and selecting Properties See Working With Styles for additional information.
180 Highlight Text Tool Similar to using a highlighter pen, you can highlight text within a document. Please note that if the document was created via a scanned image or with "text as graphics", then highlighting with this tool is not possible. TIP: To highlight scanned text, use the "Rectangle Tool" and set the background transparency to the desired percentage to create a similar effect. Cross Out Text Tool Use the "Cross Out Text Tool" to draw a line through the middle of text (Strike-out). Please note that if the document was created via a scanned image or with "text as graphics", then crossing out text with this tool is not possible. TIP: To strike-out scanned text, use the "Line Tool" and draw a line through the text to create a similar effect. Underline Text Tool Use the "Underline Text Tool" to underline text. Please note that if the document was created via a scanned image or with "text as graphics", then underlining text with this tool is not possible. TIP: To underline scanned text, use the "Line Tool" and draw a line under the text to create a similar effect. Objects and Shapes Tools See Shapes Toolbar for detailed info. Arrow Line Rectangle Circle Polyline Polygon Cloud Attachments Tool Attach files directly to the drawing. When the end user double-clicks on the pin, the file will open in the appropriate program. See How Do I Attach a File to a Page for detailed information on this subject.
181 Pencil and Eraser Tool The Pencil Tool is used to draw freehand objects. Use the eraser to edit the pencil input. Objects and Shapes Styles The formatting of Shape Callouts can be quickly set using pre-set styles from the dropdown box.

182 Choose from pre-set styles. Affects all Object and Shape tools. After input, objects can be individually styled using the formatting toolbar or using the Select tool, right-clicking the object and selecting Properties Rotate Current View For adding annotations at a different angle. Stamps, annotations and callouts are always input horizontally as you are viewing the page. To input vertically or upside-down, use this rotate tool then input your object. Note: The drawings will not save the rotated view using this tool. Stamp Tool The "Stamp Tool" is similar to the rubber stamp and ink pad method of applying a standardized annotation to a document. Use the "Stamps Palette" pulldown the tool bar to select different stamps. AcroPlot Matrix supports both static and dynamic stamps. Please see "Stamps Creation and Customizations" for additional information.
183 Two custom stamps are visible for quickly inputting most often used stamps A library of stamps are available from the dropdown box Different stamp collections can be displayed Click on Show Stamps Palette at the bottom of the dropdown screen to customize this display See the Work With Stamps section for additional information.
184 Style and Formatting Toolbar The Styles dropdowns set the style for all objects in their group. When you select an object to input, a style and formatting toolbar is then displayed. Options will be different depending on what tool you have selected. You may set the properties first then input the object or select an object that's already been input and then change the style properties. Using the Select Tool on an existing object then right-clicking will bring up a Properties Dialog box where you can edit the same properties as the Styling Toolbar. Style and Formatting Toolbar The style options will vary depending on the annotation being input. This example shows the formatting for the Cloud tool. Fill Color Select the color for the inside of the shape.

185 Stroke Color Select the color for the outline or border of the shape. Border Style Select the line style for the Border or outline of the shape. Border Width
186 Select or input (points) the width or the thickness of the Border or outline. Opacity Select or input the percentage of Opacity or transparency for the shape. Blending Mode The Blending Mode defines how the selected colors of the object to be input react with the existing colors of the page.
187 Keep Tool Selected With this button highlighted the selected tool will remain active for multiple inputs. Use this feature for quickly inputting several objects. If this button is not selected, the tool will have to be selected from the toolbar again to be formatted and input.

188 Shape Tools A variety of shapes can be drawn on a page to highlight, callout, detail and markup a drawing. These shapes can be prestyled using Styles or can be individually styled using the shape properties or formatting toolbar that is displayed when a shape is selected. In addition, notes or comments can be attached to shapes to further detail the purpose of the callout. Click the callouts below to see examples of each shape tool. Arrow Tool Line Tool Example: Thick line used as a highlight for graphic text. Rectangle Tool

189 Formatting Example: Green thick border with semi-transparent red fill. Circle/Ellipse Tool Polyline Tool Used to draw multi-segmented single object lines. Polygon Tool Used to draw any closed shape.
190 Cloud Tool Use the Cloud Tool to call out revisions, additions or deletions. File Attachment Tool Files can be attached to pages within a document. This is useful for including more information than can be comfortably displayed. See the How Do I Attach a File to a Page section for detailed information.
191 Measure Toolbar Find distances between points, perimeter measurements and area information. Distance Tool Click between 2 points to calculate the distance between. While selected or active information about this measurement is displayed in a box. Notes: Properties for the distance tool are set using the Distance Tool formatting toolbar (see example below). The default scale is set to 1 = 1. To learn how to set the actual scale for this page see How to Add a Measurement to Scale The size of the arrows are controlled by the line thickness property.
192 Perimeter Tool Draw lines onto objects to determine the length of the perimeter. This is basically a multi-line distance tool. Use existing snap points and objects. Right-click and select "complete" to end the input at the desired location. While active or selected the perimeter information will be displayed in a box. Hovering over a perimeter line will also display the perimeter distance. Notes: Properties for the Perimeter Tool are set using the Perimeter Tool formatting toolbar. The default scale is set to 1 = 1. To learn how to set the actual scale for this page see How to Add a Measurement to Scale The size of the arrows are controlled by the line thickness property. Area Tool Draw an area to find out the square footage (or whatever your units of measure are set to). Use existing snap points and objects. Right-click and select "complete" to end the input at the desired location.
193 While active or selected the area information will be displayed in a box. Hovering over an area will also display the area distance. Notes: Properties for the Area Tool are set using the Area Tool formatting toolbar. The default scale is set to 1 = 1. To learn how to set the actual scale for this page see How to Add a Measurement to Scale
194 Menu Bar File See File Menu for detailed information on the commands listed in this menu. Edit See Edit Menu for detailed information on the commands listed in this menu.
195 View See View Menu for detailed information on the commands listed in this menu. Document
196 See Document Menu for detailed information on the commands listed in this menu. Comments See Comments Menu for detailed information on the commands listed in this menu. Tools See Tools Menu for detailed information on the commands listed in this menu.
197 Help See Help Menu for detailed information on the commands listed in this menu.
198 Snap Toolbar and Settings Most objects generated within the AcroPlot Matrix program can be "snapped" or connected to specific points, existing objects, grid lines or guide lines. Using the Snap Settings in this toolbar menu can control how, when and where input objects are able or snap to other objects, or not, as the case may be. For related information regarding these topics please see the Rulers, Guides and Grids topic covered under the View Menu. Properties for Grid lines and Guides (spacing, color, units, thresholds, etc.) can be set in the Edit Menu > Preferences > Measurement location. Toggles visibility of the Grid lines.
199 Toggles visibility of the Guide lines. Guide lines are created by dragging your cursor from either of the rulers out into the work area. (purple lines below) Toggles the visibility of the horizontal and vertical rulers at the top and left edges of the work area. Units for the rulers can be set in the Edit Menu > Preferences > Measurement area. See Measurement Setup for more information.
200 Toggles the ability for objects to be snapped to Grid lines. Note: Grid lines must be visible to be able to snap to them. Toggles the ability for objects to be snapped to Guide lines. Note: Guide lines must be visible to be able to snap to them. Toggles the ability for objects to be snapped to other objects. Note: AcroPlot Matrix will automatically find most applicable snap points for graphical objects. Expands the Snap Object Settings menu for the ability to select which snap locations to have available. Toggle Snaps Toggle whether objects will snap to guides, grids or objects regardless of any other settings.
201 Toggle whether objects will have end points available to snap to. Toggle whether objects will have mid points available to snap to. Toggle whether objects will have mid points available to snap to. Toggle whether objects will have the ability to snap to the edges of other objects. When "Snap to Annotations Only" is enabled, the functionality for snapping is limited to the annotation and comment objects that exist within the document or drawing. Snapping to existing objects within the document or drawing are ignored. This can help speed up commenting / annotating a document or drawing that may have complex line work or a hatch pattern with thousands of tiny objects that would otherwise be snap choices.

202 Navigation Toolbar The Navigation Toolbar is another method for moving from page to page, and view to view within the active document. First Page Move to the first page in the active document. Previous Page Move to the previous page in the active document. Current Page Displays the current page number of the active document. Total Pages Displays the total number of pages for the active document. Next Page Move to the nextt page in the active document.
203 Last Page Move to the last page in the active document. Previous View Change to the previous view of the active document. See the File Toolbar for more information. Next View Change to the next view of the active document. See the File Toolbar for more information.
204 Panes Panes are the tabbed windows usually found docked along the left side of main client area. During the course of normal workflow the Bookmarks and Pages panes are usually visible. There are four other panes that may also be displayed: Layers, Comments, Fields, and Attachments. Any of the panes can be added to this group by selecting the View menu > Other Panes. The Bookmark and Page Thumbnails panes are listed on the main View menu as these are the most commonly used panes. The panes group, or individual panes, can be docked to any side of the main client area. Panes can also float anywhere on the screen. Procedure: How to dock the group of panes to the right side of the screen: Click and drag the group by the title bar. A blue square will appear. Keep dragging to the right until the blue square snaps to the edge of the screen. This also works for the top and bottom of the screen. Release the mouse button anywhere on the screen to float the group. When you are happy with the placement release the mouse button to dock or float the group of panes. To dock or float a single pane, follow the instructions above except grab the pane by the tab at the bottom instead of the header.
205 Panes can also be stacked so that both panes are visible at the same time. Drag the pane by the lower tab to either the top or bottom part of the group area.

206 Bookmarks Pane The Bookmarks Pane displays bookmarks from the active PDF document open in AcroPlot Matrix. Both the Bookmarks and Page Thumbnail Panes make it easy to navigate between pages of an open document. To display the Bookmarks Pane go to the View Menu > Bookmarks. Boookmarks List The main view displays the list of Bookmarks for the active document. By default, clicking on a line item displays the selected bookmark page view in the main work area.

207 Drag and drop the items to change the order of the list or to create a hierarchy system (parent/child nodes). Expand/Collapse Bookmarks When Bookmarks have a parent/child relationship use these commands to expand or collapse all nodes. Expanded example. Click on the - sign to collapse the node. Collapsed example: Click on the + sign to expand the node. Zoom In/ Zoom Out Clicking these controls make the bookmark text larger or smaller. Zoomed In
208 New Bookmark Click the New button to create a new Bookmark. For example: The Elevations bookmark was created to provide grouping for the elevation drawings for this document. Edit Bookmark Use the Edit command to change the Appearance or the Action of the Bookmark.
209 The default action of a Bookmark is to display the associated page in the main work area. Click the Add button to add or edit the actions with these commands: Delete Bookmark Deletes the selected bookmark. Ensure Visibility of Corresponding Bookmark Selecting a bookmark first and then choosing Ensure Visibility of Corresponding Bookmark, ensures this will be where the document is opened to each time the document is opened. This is helpful when a document contains several bookmarks and you need to save the place last viewed. Note: "Ensure Visibility of Corresponding Bookmark" should not be confused with "Initial View" that is located in "Document Properties," because it only saves the place you were within the document on the PC it was being viewed on. If the document is transferred to another PC or ed, then the last place of viewing is not maintained.

210 Page Thumbnails Pane The Page Thumbnails Pane displays small bookmark images from the active PDF document open in AcroPlot Matrix. Both the Bookmarks and Page Thumbnail Panes make it easy to navigate between pages of an open document. To display the Page Thumbnails Pane go to the View Menu > Page Thumbnails. Thumbnail List
211 The main area where the actual thumbnail images are listed. Clicking on a thumbnail will display the associated page in the main work area. Zoom In/ Zoom Out Clicking these controls make the thumbnail images larger or smaller. Zoom Out example: Print Prints the active document. See Printing in the File Menu section for additional information. Export to Image Exports pages in the active document to image files.
212 See Export as Image File in the File Menu section for additional information.

213 Comments Pane The Comments Pane provides an organized place to view, edit and locate notes and comments within the annotations of the active document. To display the Comments Pane go to the View Menu > Other Panes > Comments. Comments List
214 This area displays a list of all the comments from the active document. Clicking on an entry displays the actual annotation and comment in the main work area. Double-clicking on an entry displays the Note dialog box for that annotation. By default the entry displays 3 line of information. To see more information in the list entry click the small dropdown arrow in the lower right corner of each entry. Expand/Collapse All Comments Used to quickly Expand or Collapse all comments in the list. Collapse All example: Next/Previous Comment Used to scroll through the list of comments. Next scrolls down, Previous scrolls up. Add Reply
215 This command adds a reply to the selected comment. Properties Launches the Properties dialog box for the specific annotation used for the selected comment. Example: The first Rectangle annotation was selected while clicking the Properties button which brings up the settings for this specific rectangle object. Delete Comment Deletes the selected comment. Summarize Comments Launches a dialog box to create summarized comment reports. See Summarize Comments in the Comments Menu section for more information.
216 Group By: Displays a dropdown box with choices on how to group the listed comments.

217 Attachments Pane The Attachments Pane is used to quickly locate, view, add and edit files attached to the active document. To display the Attachments Pane go to the View Menu > Other Panes > Attachments. <TODO>: Insert description text here... And don't forget to add keyword for this topic Attachments List The list of attachments included in the active document. Click on the link under the Name column to open the file. PDF files will open in the main work area. Other file types will try to open in the program they were created in. Use the scroll bar at the bottom to see several more columns of information to the right: Name
218 Description Modified Date File Size Compressed File Size Location See Attach a File to a Page for more information on Attachments. Open Attachment Opens the selected file. This is the same as clicking on the link under the Name column. Save Attachment Saves the selected attachment to an external file. Add New Attachment Adds a new file attachment to the active document. Attachments added here will not be associated with any page and is simply listed in this list. Delete Attachment Deletes the selected attachment from the active document.

219 Stamps Creation and Customization Stamps enable Users to easily apply a comment to a document in a way that is similar to a rubber stamp. The purpose of this section is to assist AcroPlot Matrix Users in creating, modifying, and customizing stamps used in commenting and annotating files. AcroPlot Matrix comes with several sets of stamps installed and it is easy to modify these stamps or create or import new stamps into the program. This section is organized into four parts as listed below: Creating Stamps Modifying Existing Stamps Adding PDF Form Fields to Stamps Adding Custom Scripts to Stamps For more information on working with stamps, CADzation recommends the book "All About PDF Stamps & Paperless Workflows" by Thom Parker. Go to Site ->

220 Creating Stamps Creating Stamps for Import into the AcroPlot Matrix Program Creating stamps can be accomplished using a variety of methods which include graphic editing programs, CADD applications, and scanned images. AcroPlot Matrix will accept the following file types for import as a stamp: PDF, BMP, GIF, ICO, PBM, PGM, PPM, JBIG, JBIG2, JPEG, WBMP, JNG, PCX, DCX, TGA, DNG, and TIFF. Each file type has its own characteristics and properties for file size, speed of use, transparency, and appearance. Please use whichever format works best for your particular needs. In the example below, we will demonstrate how to create a stamp using Microsoft Word 2007 and print the stamp graphic to a PDF file for import into AcroPlot Matrix as a stamp. 1. Launch Microsoft Word and select the Insert tab at the top of the ribbon bar 2. Select the Shapes pulldown and choose the rectangle shape.

221 3. Draw a rectangle to the desired shape and size. Right-click on the rectangle to adjust border and fill properties. 4. Draw a rectangle to the desired shape and size. Right-click on the rectangle to adjust border and fill properties.

222 Note: By setting the Fill color property to No Color the inside of the stamp will be transparent. 5. On the Insert tab select the Text Box option to draw an area for text within the stamp rectangle. Format text as desired and add as many elements as needed to meet the design criteria for the stamp. 6. Save the file. In this example, we named the file the same as the stamp DRAFT_COPY.docx and save it to a folder called Stamps.

223 7. Now that the file has been saved, print it to a PDF using the PDF-XChange for AcroPlot Pro Windows system printer. If you are planning on creating several stamps in the same Word file, then be sure to only create one stamp per page because when importing the PDF into AcroPlot Matrix each page is determined to be a single stamp. 8. Save the PDF-XChange for AcroPlot Pro Windows system printer output file to a folder with an appropriate name. In this example we named the file DRAFT_COPY.pdf ".

224 9. Launch AcroPlot Matrix and either open an existing PDF (Not the stamp PDF) or a blank PDF [ FILE > NEW DOCUMENT > FROM BLANK PAGE ] 10. Open the Show Stamps Palette [ TOOLS > COMMENT AND MARKUP TOOLS > SHOW STAMPS PALETTE ]

225 11. Select the Create New Collection to define a new list of stamps and enter the category name. 12. Choose the From PDF button.

226 13. Browse to the DRAFT_COPY.pdf stamp that was just created from Microsoft Word, enter the stamp description in the Title area, and select the OK button. 14. Now the PDF stamp is part of the stamps collection in AcroPlot Matrix. Close the Stamps Palette and test your new stamp.
 and that it can be place")
227 15. Looks Good! Note how the stamp is transparent (No Fill Color use in Microsoft Word) and that it can be place anywhere in the file being viewed in AcroPlot Matrix. All done. Now go make some more stamps.

228 Modifying Existing Stamps The stamp collections that are installed as a part of AcroPlot Matrix can be modified by opening the stamp source files, changing the stamp text, and then saving the file with the new modifications. Not all stamp source files in PDF applications can be modified in this way. The stamp source files in AcroPlot Matrix have been created in such a way that they contain interactive or fillable PDF fields which allow these types of modifications. In the example below, we will demonstrate how to modify the text in an existing stamp in AcroPlot Matrix. 1. Launch AcroPlot Matrix and open a stamps collection source file found in: Windows 7 or Vista C:\Users\[UserName]\AppData\Roaming\Tracker Software\PDF-XChange Viewer\2.0\Stamps Windows XP C:\Documents and Settings\[UserName]\Application Data\Tracker Software\PDF-XChange Viewer\2.0\Stamps 2. Depending on the settings in your AcroPlot Matrix, the parts of the file that are changeable may or may not be highlighted in light blue. To enable form field highlighting, go to EDIT > PREFERENCES > FORMS and select the Highlight All Form Fields checkbox and then select the Apply button. This setting is not needed to edit the stamps PDF, but it does assist in quickly determining which parts of the stamp are changeable.

229 3. Select whichever stamp needs to be modified and make sure the Hand Tool is selected so you can click on the text to begin editing. In the example below, we will change the word APPROVED to CHANGED. 4. When done modifying the stamp select FILE > SAVE and then FILE > CLOSE to exit editing the AcroPlot Matrix stamp source file.

230 5. Now open a file in AcroPlot Matrix and apply the modified stamp. Very cool!

231 Adding PDF Form Fields to Stamps Adding form fields to PDF files makes them interactive and is also a way to add automated functionality to stamps in AcroPlot Matrix. While some PDF files contain form fields that allow Users to enter and modify data while viewing the file, PDF files used as stamps will execute scripts and render the form fields static upon bringing the stamp into a file. Once the stamp is applied, no text modifications can be made to the stamp. The stamp is stamped. In the example below, we will demonstrate how to add fields to the DRAFT COPY stamp created earlier that will automatically enter the "User Name" and "System Date' when stamping a document. A PDF editor capable of creating forms is needed and is beyond the scope of functionality for AcroPlot Matrix. It is also important to note that fields can only be added to stamps that have already been imported the stamps palette in AcroPlot Matrix. You must import the stamp thru AcroPlot Matrix before adding any form fields to the PDF file. 1. Launch AcroPlot Matrix and open the DRAFT_COPY.pdf stamp file created earlier. It will have an auto generated name similar to the one seen here. Windows 7 or Vista C:\Users\[UserName]\AppData\Roaming\Tracker Software\PDF-XChange Viewer\2.0\Stamps Windows XP C:\Documents and Settings\[UserName]\Application Data\Tracker Software\PDF-XChange Viewer\2.0\Stamps 2. Select DOCUMENT > CROP PAGES and select the Remove White Spaces button to automatically remove the unused area around the stamp. Save file and close AcroPlot Matrix.
232 3. Launch a PDF application that is capable of creating PDF forms and open the DRAFT_COPY.pdf stamp file that has the auto generated file name. 4. To start forms editing select FORMS > ADD or EDIT FIELDS.

233 5. A message may appear to auto-create form fields in the DRAFT_COPY.pdf file. Select NO. 6. Select the Field Tool to draw a field on the stamp file.

234 7. Draw the text field so that it is the same length as the line or as shown below. 8. Select the Preview button and enter some sample text for font style formatting and then select the Edit Layout button when done.
235 9. Right-click on the Text1 field and select Properties

236 10. Right-click on the Text1 field and select Properties and then select the Appearance tab to modify the field properties for font style, text size and color. Note: Setting the Font Size to Auto will make longer user names fit to the field length automatically. 11. Select the Calculate tab, choose the Custom calculation script radio button and then the associated Edit button. 12. Enter the following script into the JavaScript Editor and select OK then Close Text Field Properties:
.replace(/ \b(\w)/g, function(word,cfst){return cfst.touppercase()}); 13.")
237 // Test name for null and empty value if((identity.name!= null) &&!/^\s*$/.test(identity.name)) event.value = identity.name; else event.value = identity.loginname.replace(/\./g," ").replace(/\./g," ").replace(/ \b(\w)/g, function(word,cfst){return cfst.touppercase()}); 13. Right-click on the Text1 field and select Copy and then using the keyboard enter Ctrl+V to paste a duplicate field. Reposition the field and right-click on it to open the Properties.

238 14. Select the General tab and change the name from Text1 to Date1.
).toString(); AFDate_FormatEx(\"mmm dd, yyyy\"); 16.")
239 15. Select the Calculate tab, choose the Custom calculation script radio button and then the associated Edit button. Enter the following script into the JavaScript Editor and select OK then Close Text Field Properties: event.value = (new Date()).toString(); AFDate_FormatEx("mmm dd, yyyy"); 16. Save the file and exit the PDF editing application. 17. Launch AcroPlot Matrix and test the stamp. When the stamp is applied the scripts will execute and automatically enter the Login ID if the User Name in the EDIT > PREFERENCES > IDENTITY is empty. If the login name for the PC is for example, will.munson, then the script will reformat the text to Will Munson.

240 If the user needed to have the stamp apply a totally different name, then by going to EDIT > PREFERENCES > IDENTITY and entering the desired name into the Name field will result in an automatic override of the login ID and use the exact value found in the Name field. New stamp result with Name field value modified to William J. Munson.
241 Adding Custom Scripts to Stamps Adding Custom Scripts to Stamps that Invoke Entry Dialogue Boxes Sometimes it is more convenient to have a dialogue box appear which allows the user to input the User Name and a specific date when applying a stamp to a document. By utilizing a Java script that is written invoke a user input dialogue box, it is possible to manually enter any User Name and Date each time the stamp is applied. In the example below, we will modify the Java scripts used in the previous example "Adding PDF Form Fields to Stamps" to add the dialogue box functionality for user inputs. While many of the steps for field creation are the same, there are some additional details that need to be captured so that the Java scripts run correctly. 1. Launch a PDF application that is capable of creating PDF forms and open the DRAFT_COPY.pdf stamp file that has the auto generated file name. 2. To start forms editing select FORMS > ADD or EDIT FIELDS.

242 3. Right-click on the Text1 field and select Properties. 4. Select the Calculate tab, choose the Custom calculation script radio button and then the associated Edit button. Enter the following script into the JavaScript Editor and select OK then Close Text Field Properties:
243 Text1 Java Script if(event.source.forreal && (event.source.stampname == "ENTER_PAGE_TEMPLATE_ID_HERE")) { var rgempty = /^\s*$/; var cname = null; var cdfltname = event.value; while((cname==null) rgempty.test(cname)) { cname = app.response({cquestion:"please Enter a Name", ctitle:"cadzation Stamp Data Entry", // Optional cdefault:cdfltname, // Optional clabel:"name:" // Optional }); } } if((cname==null) rgempty.test(cname)) { app.alert("please enter a Name",1); cdfltname =""; } // Set Name Value event.value = cname;

244 5. Since this type of Java script code is dependent on the exact page in the PDF source file, it is necessary to discover and append the script with the Page Template ID in the PDF. Page Template ID s vary from PDF to PDF and can be discovered by closing Forms Editing and selecting the Page Templates function. Adobe Acrobat 9 ADVANCED > DOCUMENT PROCESSING > PAGE TEMPLATES Adobe Acrobat 8 ADVANCED > FORMS > PAGE TEMPLATES Highlight and copy all the characters from the beginning to the = sign. In the case for our example that would be: 3f94238e-0acc-42e1-ad0f68e3daa86a8b 6. Go back into Forms Editing and insert the Page Template ID into the Java script and replace the text ENTER_PAGE_TEMPLATE_ID_HERE with the actual ID 3f94238e-0acc-42e1-ad0f68e3daa86a8b and be sure that it is enclosed in quotes as shown below.
) { var rgempty = /^\s*$/; // Aquire Date Value, var cdate = null; var cdfltdate = null; if((event.")
245 7. Repeat steps 4 thru 6 for the Date1 field with the Java script provided below. The Java script for the Date1 field is a different script than the Text1 script. So, please only copy it from below. Date1 Java Script if(event.source.forreal && (event.source.stampname == "ENTER_PAGE_TEMPLATE_ID_HERE")) { var rgempty = /^\s*$/; // Aquire Date Value, var cdate = null; var cdfltdate = null; if((event.value!= null) &&!rgempty.test(event.value) && util.scand("mmm dd, yyyy",event.value)) cdfltdate = event.value; else cdfltdate = util.printd("mmm dd, yyyy",new Date()); while((cdate==null) rgempty.test(cdate) (null == util.scand("mmm dd, yyyy",cdate))) { cdate = app.response({cquestion:"please Enter the Date", ctitle:"cadzation Stamp Data Entry", // Optional cdefault:cdfltdate, // Optional clabel:"date:" // Optional });

246 if((cdate==null) rgempty.test(cdate) (null == util.scand("mmm dd, yyyy",cdate))) { app.alert("please enter date as \"mmm dd, yyyy\"\n\nex: May 18, 2010",1); if(cdate!= null) cdfltdate = cdate; } } 8. Close Forms Editing, save the PDF file and Exit. 9. Launch AcroPlot Matrix and test the stamp. When the stamp is applied the first dialogue box that appears allows the user to accept the system date or enter a different one:

247 The next dialogue box requests a User Name. Any text can be entered which will be applied to the stamp. Below is how the stamp will appear when applied to the document. Please remember that when a stamp with custom scripts is use, the text cannot be modified after the stamp is place in the document. The stamp text is rendered static when applied. If you need to make changes to the information that was entered at the time the stamp was applied, then you will need to delete the stamp and enter the corrected information with a new one.
248 Done.
249 Troubleshooting This section describes some commonly asked questions and troubleshooting information.

250 Why do I get Black Boxes When Printing to a Postscript Printer? The PDF format contains complex transparencies and blending modes of various objects. Unfortunately Postscript does not support the vast majority of these so in order to properly print to a Postscript driver you must select the Print As Image option in our Print Dialog box in AcroPlot Matrix. We do expect to support doing this behind the scenes like Adobe Acrobat and Reader does in future versions but it likely will not be until after the major new release comes out in the fall of The programmers are simply swamped as it is with the new release. You can also use the Advanced Button to set the output DPI for the Print As Image option.
DWGSee Professional User Guide
 DWGSee Professional User Guide DWGSee is comprehensive software for viewing, printing, marking and sharing DWG files. It is fast, powerful and easy-to-use for every expert and beginners. Starting DWGSee
WHAT S NEW IN WORD 2010 & HOW TO CUSTOMIZE IT
 WHAT S NEW IN WORD 2010 & HOW TO CUSTOMIZE IT The Ribbon... 2 Default Tabs... 2 Contextual Tabs... 2 Minimizing and Restoring the Ribbon... 3 Customizing the Ribbon... 3 A New Graphic Interface... 5 Live
AutoDWG DWGSee DWG Viewer. DWGSee User Guide
 DWGSee User Guide DWGSee is comprehensive software for viewing, printing, marking and sharing DWG files. It is fast, powerful and easy-to-use for every expert and beginners. Starting DWGSee After you install
Microsoft Word 2010. Quick Reference Guide. Union Institute & University
 Microsoft Word 2010 Quick Reference Guide Union Institute & University Contents Using Word Help (F1)... 4 Window Contents:... 4 File tab... 4 Quick Access Toolbar... 5 Backstage View... 5 The Ribbon...
Excel 2007 Basic knowledge
 Ribbon menu The Ribbon menu system with tabs for various Excel commands. This Ribbon system replaces the traditional menus used with Excel 2003. Above the Ribbon in the upper-left corner is the Microsoft
Internet Explorer 7. Getting Started The Internet Explorer Window. Tabs NEW! Working with the Tab Row. Microsoft QUICK Source
 Microsoft QUICK Source Internet Explorer 7 Getting Started The Internet Explorer Window u v w x y { Using the Command Bar The Command Bar contains shortcut buttons for Internet Explorer tools. To expand
Creating Interactive PDF Forms
 Creating Interactive PDF Forms Using Adobe Acrobat X Pro Information Technology Services Outreach and Distance Learning Technologies Copyright 2012 KSU Department of Information Technology Services This
DWFTM. Tips &Tricks. Publish View & Print Review & Mark Up
 DWFTM Tips &Tricks Publish View & Print Review & Mark Up Sharing complex design information has never been easy. Since design files are large, sending sheet sets and 3D models to printers or sharing work
K e y b o a r d s h o rt c ut s
 Keyboard shortcuts Mouse navigation Middle button (wheel) Click + drag = pan Double-click = re-center view Left button Click = tool operation Click + spacebar = pan Shift + click + drag = multi-select
Snagit 10. Getting Started Guide. March 2010. 2010 TechSmith Corporation. All rights reserved.
 Snagit 10 Getting Started Guide March 2010 2010 TechSmith Corporation. All rights reserved. Introduction If you have just a few minutes or want to know just the basics, this is the place to start. This
WebViewer User Guide. version 2.1.0. 2002-2015 PDFTron Systems, Inc. 1 of 13
 WebViewer User Guide version 2.1.0 2002-2015 PDFTron Systems, Inc. 1 of 13 Table of Contents Introduction Desktop HTML5 Toolbar Menu Toolbar Buttons Page Navigation Display Modes Tool Modes Annotation
SMART Ink 1.5. Windows operating systems. Scan the following QR code to view the SMART Ink Help on your smart phone or other mobile device.
 SMART Ink 1.5 Windows operating systems User s guide Scan the following QR code to view the SMART Ink Help on your smart phone or other mobile device. Trademark notice SMART Ink, SMART Notebook, SMART
Chapter 23: Drafting in Worksheet View
 Chapter 23: Drafting in Worksheet View Worksheet View is a powerful, 2D production drafting module. Here you can find all of the drawing and editing tools needed to create fast, accurate, detailed working
GoodReader User Guide. Version 1.0 GoodReader version 3.16.0
 GoodReader User Guide Version 1.0 GoodReader version 3.16.0 Contents Operating GoodReader 1 Send PDF files to Your ipad 2 Copy Files with itunes 2 Copy Files to a Cloud Service 5 Download Files from the
Top 10 PDF Tips. Top Ten Functions In ecopy PDF Pro Office
 Top 10 PDF Tips Top 10 PDF Tips Top Ten Functions In ecopy PDF Pro Office This Guide describes how to perform the top ten functions in ecopy PDF Pro Office used by office knowledge workers to manipulate
Software User's Guide
 Software User's Guide Brother QL-series The contents of this guide and the specifications of this product are subject to change without notice. Brother reserves the right to make changes without notice
Welcome to CorelDRAW, a comprehensive vector-based drawing and graphic-design program for the graphics professional.
 Workspace tour Welcome to CorelDRAW, a comprehensive vector-based drawing and graphic-design program for the graphics professional. In this tutorial, you will become familiar with the terminology and workspace
PowerPoint 2007: Basics Learning Guide
 PowerPoint 2007: Basics Learning Guide What s a PowerPoint Slide? PowerPoint presentations are composed of slides, just like conventional presentations. Like a 35mm film-based slide, each PowerPoint slide
Appointment Scheduler
 EZClaim Appointment Scheduler User Guide Last Update: 11/19/2008 Copyright 2008 EZClaim This page intentionally left blank Contents Contents... iii Getting Started... 5 System Requirements... 5 Installing
IT Quick Reference Guides Using Windows 7
 IT Quick Reference Guides Using Windows 7 Windows Guides This sheet covers many of the basic commands for using the Windows 7 operating system. WELCOME TO WINDOWS 7 After you log into your machine, the
BIGPOND ONLINE STORAGE USER GUIDE Issue 1.1.0-18 August 2005
 BIGPOND ONLINE STORAGE USER GUIDE Issue 1.1.0-18 August 2005 PLEASE NOTE: The contents of this publication, and any associated documentation provided to you, must not be disclosed to any third party without
6. If you want to enter specific formats, click the Format Tab to auto format the information that is entered into the field.
 Adobe Acrobat Professional X Part 3 - Creating Fillable Forms Preparing the Form Create the form in Word, including underlines, images and any other text you would like showing on the form. Convert the
Banner Document Management Suite (BDMS) Web Access Help
 Web Access Help") May 10 th, 2011 Banner Document Management Suite (BDMS) Web Access Help Division of Information Technology AppXtender Web Access Help: For questions regarding AppXtender Web Access, please contact the
May 10 th, 2011 Banner Document Management Suite (BDMS) Web Access Help Division of Information Technology AppXtender Web Access Help: For questions regarding AppXtender Web Access, please contact the
Sharing Presentations, Documents, and Whiteboards
 Chapter 19 19 Sharing Presentations, Documents, and Whiteboards Your user role in an event determines your level of sharing. Whichever role you take, the following table describes the basic tasks associated
Microsoft PowerPoint 2010
 Microsoft PowerPoint 2010 Starting PowerPoint... 2 PowerPoint Window Properties... 2 The Ribbon... 3 Default Tabs... 3 Contextual Tabs... 3 Minimizing and Restoring the Ribbon... 4 The Backstage View...
Done. Click Done to close the Capture Preview window.
 The Capture Preview window allows you to preview, edit, and customize a screen capture before it is saved to a file, inserted into your document, attached to an e-mail, or sent to a variety of other Output
Embroidery Fonts Plus ( EFP ) Tutorial Guide Version 1.0505
 Tutorial Guide Version 1.0505") Embroidery Fonts Plus ( EFP ) Tutorial Guide Version 1.0505 1 Contents Chapter 1 System Requirements.................. 3 Chapter 2 Quick Start Installation.................. 4 System Requirements................
Embroidery Fonts Plus ( EFP ) Tutorial Guide Version 1.0505 1 Contents Chapter 1 System Requirements.................. 3 Chapter 2 Quick Start Installation.................. 4 System Requirements................
Introduction to dobe Acrobat XI Pro
 Introduction to dobe Acrobat XI Pro Introduction to Adobe Acrobat XI Pro is licensed under the Creative Commons Attribution-NonCommercial-NoDerivatives 4.0 International License. To view a copy of this
Microsoft Publisher 2010 What s New!
 Microsoft Publisher 2010 What s New! INTRODUCTION Microsoft Publisher 2010 is a desktop publishing program used to create professional looking publications and communication materials for print. A new
Microsoft Word 2013 Tutorial
 Microsoft Word 2013 Tutorial GETTING STARTED Microsoft Word is one of the most popular word processing programs supported by both Mac and PC platforms. Microsoft Word can be used to create documents, brochures,
Adobe Acrobat 6.0 Professional
 Adobe Acrobat 6.0 Professional Manual Adobe Acrobat 6.0 Professional Manual Purpose The will teach you to create, edit, save, and print PDF files. You will also learn some of Adobe s collaborative functions,
User Guide. DYMO Label TM v.8
 User Guide DYMO Label TM v.8 Copyright 2009 Sanford, L.P. All rights reserved. Revised 6/12/09. No part of this document or the software may be reproduced or transmitted in any form or by any means or
Brava 5.3 X Client User
 Brava 5.3 X Client User Guide Table Of Contents Help Contents...1 New Features in this Release...3 What is CSF?...5 Why CSF?...7 All Toolbars...9 Viewing Tools...11 Magnification Tools...11 Zoom and Pan
Basic Microsoft Excel 2007
 Basic Microsoft Excel 2007 The biggest difference between Excel 2007 and its predecessors is the new layout. All of the old functions are still there (with some new additions), but they are now located
Software for Producing Rack Layouts and Purchase Orders
 1 Software for Producing Rack Layouts and Purchase Orders Welcome to RackTools: software that makes it simple and quick to specify Middle Atlantic Products. RackTools has been designed with one purpose
Ohio University Computer Services Center August, 2002 Crystal Reports Introduction Quick Reference Guide
 Open Crystal Reports From the Windows Start menu choose Programs and then Crystal Reports. Creating a Blank Report Ohio University Computer Services Center August, 2002 Crystal Reports Introduction Quick
Windows XP Pro: Basics 1
 NORTHWEST MISSOURI STATE UNIVERSITY ONLINE USER S GUIDE 2004 Windows XP Pro: Basics 1 Getting on the Northwest Network Getting on the Northwest network is easy with a university-provided PC, which has
Task Force on Technology / EXCEL
 Task Force on Technology EXCEL Basic terminology Spreadsheet A spreadsheet is an electronic document that stores various types of data. There are vertical columns and horizontal rows. A cell is where the
Basic Excel Handbook
 2 5 2 7 1 1 0 4 3 9 8 1 Basic Excel Handbook Version 3.6 May 6, 2008 Contents Contents... 1 Part I: Background Information...3 About This Handbook... 4 Excel Terminology... 5 Excel Terminology (cont.)...
Sharing Files and Whiteboards
 Your user role in a meeting determines your level of file sharing. The type of files you can share include documents, presentations, and videos. About Sharing Files, page 1 Changing Views in a File or
Software User's Guide
 BROTHER QL-500/550/650TD/1050/1050N Software User's Guide QL-500 QL-650TD QL-550 QL-1050/1050N 1 Contents Contents....................................................................................2................................................................................4
Generative Drafting. Page 1 1997 2001 DASSAULT SYSTEMES. IBM Product Lifecycle Management Solutions / Dassault Systemes
 Generative Drafting Page 1 Tutorial Objectives Description This Tutorial is an introduction to Generative Drafting. Message To show how CATIA V5 allows the user to automatically generate associative drafting
NDA-30141 ISSUE 1 STOCK # 200893. CallCenterWorX-Enterprise IMX MAT Quick Reference Guide MAY, 2000. NEC America, Inc.
 NDA-30141 ISSUE 1 STOCK # 200893 CallCenterWorX-Enterprise IMX MAT Quick Reference Guide MAY, 2000 NEC America, Inc. LIABILITY DISCLAIMER NEC America, Inc. reserves the right to change the specifications,
Microsoft Access 2010 handout
 Microsoft Access 2010 handout Access 2010 is a relational database program you can use to create and manage large quantities of data. You can use Access to manage anything from a home inventory to a giant
NDSU Technology Learning & Media Center
 1 NDSU Technology Learning & Media Center QBB 150C 231-5130 www.ndsu.edu/its/tlmc Creating a Large Format Poster (Plot) Using PowerPoint 2013 Posters should be designed and created in a manner that best
Create a Poster Using Publisher
 Contents 1. Introduction 1. Starting Publisher 2. Create a Poster Template 5. Aligning your images and text 7. Apply a background 12. Add text to your poster 14. Add pictures to your poster 17. Add graphs
Rick and Tim s Thirty Dirty Tricks for Acrobat 8
 Rick and Tim s Thirty Dirty Tricks for Acrobat 8 PREFERENCES 1) Copy Encircled Text into Sticky Notes If you frequently use sticky notes to indicate major re-writes to text, this tip may save you some
How To Create A Document On A Pc Or Macbook
 ApplicationXtender 6.5 Document Manager User Guide (version 1.0) CCS Computing and Communications Service June 2013 Table of Contents OVERVIEW... 3 Logging in to AppXtender Document Manager... 4 Changing
Introduction to Word 2007
 Introduction to Word 2007 You will notice some obvious changes immediately after starting Word 2007. For starters, the top bar has a completely new look, consisting of new features, buttons and naming
Foxit PhantomPDF Express for HP User Manual
 1 Copyright 2016 Foxit Corporation. All Rights Reserved. No part of this document can be reproduced, transferred, distributed or stored in any format without the prior written permission of Foxit. Anti-Grain
Microsoft Word 2010 Tutorial
 1 Microsoft Word 2010 Tutorial Microsoft Word 2010 is a word-processing program, designed to help you create professional-quality documents. With the finest documentformatting tools, Word helps you organize
Excel 2007: Basics Learning Guide
 Excel 2007: Basics Learning Guide Exploring Excel At first glance, the new Excel 2007 interface may seem a bit unsettling, with fat bands called Ribbons replacing cascading text menus and task bars. This
Microsoft Word 2010 Prepared by Computing Services at the Eastman School of Music July 2010
 Microsoft Word 2010 Prepared by Computing Services at the Eastman School of Music July 2010 Contents Microsoft Office Interface... 4 File Ribbon Tab... 5 Microsoft Office Quick Access Toolbar... 6 Appearance
Browsing and working with your files and folder is easy with Windows 7 s new look Windows Explorer.
 Getting Started with Windows 7 In Windows 7, the desktop has been given an overhaul and makeover to introduce a clean new look. While the basic functionality remains the same, there are a few new navigation
PDF Expert Enterprise User guide
 PDF Expert Enterprise User guide 2012 Readdle Inc. 2 INTRODUCTION 3 CHAPTER 1: DOCUMENT VIEWING AND MANAGING IN PDF EXPERT ENTERPRISE 4 Reading and working with PDF documents 4 Managing files and folders
Microsoft Office PowerPoint 2013
 Microsoft Office PowerPoint 2013 Navigating the PowerPoint 2013 Environment The Ribbon: The ribbon is where you will access a majority of the commands you will use to create and develop your presentation.
PowerPoint 2007 Basics Website: http://etc.usf.edu/te/
 Website: http://etc.usf.edu/te/ PowerPoint is the presentation program included in the Microsoft Office suite. With PowerPoint, you can create engaging presentations that can be presented in person, online,
ZebraDesigner Pro. User Guide. 13857L-003 Rev. A
 ZebraDesigner Pro User Guide 13857L-003 Rev. A 2 2011 ZIH Corp. The copyrights in this manual and the software and/or firmware in the printer described therein are owned by ZIH Corp. and Zebra s licensors.
Table of Contents. Part I Welcome. Part II Introduction. Part III Getting Started. Part IV The User Interface. Part V Quick Start Tutorials
 Contents I Table of Contents Part I Welcome 5 Part II Introduction 5 1 Overview... 5 2 Product... Levels 5 3 Technical... Support 6 4 Copyright... 7 Part III Getting Started 7 1 Installation... 7 2 Register...
Communicate: In Print
 Communicate: In Print A simple guide Work areas Communicate: In Print has two different modes in which to edit your documents: Create and Adjust modes. These are easily interchangeable and the toolbars
Foxit Reader Quick Guide
 I Contents Foxit Reader Contents... II Chapter 1 Get Started... 1 Foxit Reader Overview... 1 System Requirements... 1 Install Foxit Reader... 2 Uninstall Foxit Reader... 2 Update Foxit Reader... 2 Workspace...
In this session, we will explain some of the basics of word processing. 1. Start Microsoft Word 11. Edit the Document cut & move
 WORD PROCESSING In this session, we will explain some of the basics of word processing. The following are the outlines: 1. Start Microsoft Word 11. Edit the Document cut & move 2. Describe the Word Screen
Instructions for Creating a Poster for Arts and Humanities Research Day Using PowerPoint
 Instructions for Creating a Poster for Arts and Humanities Research Day Using PowerPoint While it is, of course, possible to create a Research Day poster using a graphics editing programme such as Adobe
PowerPoint 2013: Basic Skills
 PowerPoint 2013: Basic Skills Information Technology September 1, 2014 1 P a g e Getting Started There are a variety of ways to start using PowerPoint software. You can click on a shortcut on your desktop
ImageNow User. Getting Started Guide. ImageNow Version: 6.7. x
 ImageNow User Getting Started Guide ImageNow Version: 6.7. x Written by: Product Documentation, R&D Date: June 2012 2012 Perceptive Software. All rights reserved CaptureNow, ImageNow, Interact, and WebNow
Excel 2003 A Beginners Guide
 Excel 2003 A Beginners Guide Beginner Introduction The aim of this document is to introduce some basic techniques for using Excel to enter data, perform calculations and produce simple charts based on
Handout: Word 2010 Tips and Shortcuts
 Word 2010: Tips and Shortcuts Table of Contents EXPORT A CUSTOMIZED QUICK ACCESS TOOLBAR... 2 IMPORT A CUSTOMIZED QUICK ACCESS TOOLBAR... 2 USE THE FORMAT PAINTER... 3 REPEAT THE LAST ACTION... 3 SHOW
Florence School District #1
 Florence School District #1 Module 2: SMART Board Basics and Beyond 1 SMART Board Software and Beyond In SMART Notebook software, you can create or open SMART Notebook software (.notebook) files. After
Perfect PDF 8 Premium
 Perfect PDF 8 Premium Test results ( gut Good, sehr gut very good) refer to versions 7, 6 and 5 of Perfect PDF. Professionally create, convert, edit and view PDF, PDF/A and XPS files Perfect PDF 8 Premium
Introduction to Microsoft Excel 2010
 Introduction to Microsoft Excel 2010 Screen Elements Quick Access Toolbar The Ribbon Formula Bar Expand Formula Bar Button File Menu Vertical Scroll Worksheet Navigation Tabs Horizontal Scroll Bar Zoom
PLAY VIDEO. Close- Closes the file you are working on and takes you back to MicroStation V8i Open File dialog.
 Chapter Five Menus PLAY VIDEO INTRODUCTION To be able to utilize the many different menus and tools MicroStation V8i offers throughout the program and this guide, you must first be able to locate and understand
FaxFinder Fax Servers
 FaxFinder Fax Servers Models: FF130 FF230 FF430 FF830 Client User Guide FaxFinder Client User Guide Fax Client Software for FaxFinder Series PN S000460B, Version B Copyright This publication may not be
Linkage 3.2. User s Guide
 Linkage 3.2 User s Guide David Rector Wednesday, April 06, 2016 Table of Contents Table of Contents... 2 Installation... 3 Running the Linkage Program... 3 Simple Mechanism Tutorial... 5 Mouse Operations...
Guide To Creating Academic Posters Using Microsoft PowerPoint 2010
 Guide To Creating Academic Posters Using Microsoft PowerPoint 2010 INFORMATION SERVICES Version 3.0 July 2011 Table of Contents Section 1 - Introduction... 1 Section 2 - Initial Preparation... 2 2.1 Overall
MS Word 2007 practical notes
 MS Word 2007 practical notes Contents Opening Microsoft Word 2007 in the practical room... 4 Screen Layout... 4 The Microsoft Office Button... 4 The Ribbon... 5 Quick Access Toolbar... 5 Moving in the
Layout Tutorial. Getting Started
 Getting Started Layout Tutorial This tutorial will explain how create a layout template, send views to a layout page, then save the document in PDF format. In this tutorial you will learn about: Creating
Excel 2007 A Beginners Guide
 Excel 2007 A Beginners Guide Beginner Introduction The aim of this document is to introduce some basic techniques for using Excel to enter data, perform calculations and produce simple charts based on
3D Viewer. user's manual 10017352_2
 EN 3D Viewer user's manual 10017352_2 TABLE OF CONTENTS 1 SYSTEM REQUIREMENTS...1 2 STARTING PLANMECA 3D VIEWER...2 3 PLANMECA 3D VIEWER INTRODUCTION...3 3.1 Menu Toolbar... 4 4 EXPLORER...6 4.1 3D Volume
What is new in WiseImage
 Additional RAM support for 64-bit OS Now WiseImage installed on Windows 64-bit is able to use up to 3.5 3.7 GB of RAM, whereas the previous versions of WiseImage could not use more than 1.5 GB of RAM.
FastTrack Schedule 10. Tutorials Manual. Copyright 2010, AEC Software, Inc. All rights reserved.
 FastTrack Schedule 10 Tutorials Manual FastTrack Schedule Documentation Version 10.0.0 by Carol S. Williamson AEC Software, Inc. With FastTrack Schedule 10, the new version of the award-winning project
Customizing forms and writing QuickBooks Letters
 LESSON 15 Customizing forms and writing QuickBooks Letters 15 Lesson objectives, 398 Supporting materials, 398 Instructor preparation, 398 To start this lesson, 398 About QuickBooks forms, 399 Customizing
PDF Expert for ipad User guide
 PDF Expert for ipad User guide 2011 Readdle Inc. 2 Contents Introduction Chapter 1: Copying documents to PDF Expert USB file transfer using itunes File Sharing Saving attachments from Mail and other ipad
Operating Instructions (For Document Manager and Document Viewer)
") Operating Instructions (For Document Manager and Document Viewer) Software Model No. DP-C262/C322 Editing Documents General Description System Requirements Document Management Menus Explanation Basic Operations
Operating Instructions (For Document Manager and Document Viewer) Software Model No. DP-C262/C322 Editing Documents General Description System Requirements Document Management Menus Explanation Basic Operations
Introduction to MS WINDOWS XP
 Introduction to MS WINDOWS XP Mouse Desktop Windows Applications File handling Introduction to MS Windows XP 2 Table of Contents What is Windows XP?... 3 Windows within Windows... 3 The Desktop... 3 The
Geocortex HTML 5 Viewer Manual
 1 FAQ Nothing Happens When I Print? How Do I Search? How Do I Find Feature Information? How Do I Print? How can I Email A Map? How Do I See the Legend? How Do I Find the Coordinates of a Location? How
Avigilon Control Center Web Client User Guide
 Avigilon Control Center Web Client User Guide Version: 4.12 Enterprise OLH-WEBCLIENT-E-E-Rev2 Copyright 2013 Avigilon. All rights reserved. The information presented is subject to change without notice.
Epson Brightlink Interactive Board and Pen Training. Step One: Install the Brightlink Easy Interactive Driver
 California State University, Fullerton Campus Information Technology Division Documentation and Training Services Handout Epson Brightlink Interactive Board and Pen Training Downloading Brightlink Drivers
Digital Pen & USB Flash Drive. User Guide. December 2006 1
 Digital Pen & USB Flash Drive User Guide December 2006 1 Table of Contents Introduction...4 The Digital Pen Up Close...5 The Pen...5 Installing Your Digital Pen's Batteries...6 The USB F lash Receiver...7
Introduction To Microsoft Office PowerPoint 2007. Bob Booth July 2008 AP-PPT5
 Introduction To Microsoft Office PowerPoint 2007. Bob Booth July 2008 AP-PPT5 University of Sheffield Contents 1. INTRODUCTION... 3 2. GETTING STARTED... 4 2.1 STARTING POWERPOINT... 4 3. THE USER INTERFACE...
Sage Abra SQL HRMS Reports. User Guide
 Sage Abra SQL HRMS Reports User Guide 2010 Sage Software, Inc. All rights reserved. Sage, the Sage logos, and the Sage product and service names mentioned herein are registered trademarks or trademarks
Microsoft Word 2010 Tutorial
 Microsoft Word 2010 Tutorial GETTING STARTED Microsoft Word is one of the most popular word processing programs supported by both Mac and PC platforms. Microsoft Word can be used to create documents, brochures,
Excel 2003 Tutorial I
 This tutorial was adapted from a tutorial by see its complete version at http://www.fgcu.edu/support/office2000/excel/index.html Excel 2003 Tutorial I Spreadsheet Basics Screen Layout Title bar Menu bar
SnagIt Add-Ins User Guide
 Version 8.1 User Guide By TechSmith Corp. User Guide User Guide Contents User s Guide 1 Overview...1 Word, PowerPoint, and Excel Add-Ins...2 Outlook Add-In...2 Internet Explorer / Windows Explorer Add-In...2
TUTORIAL 4 Building a Navigation Bar with Fireworks
 TUTORIAL 4 Building a Navigation Bar with Fireworks This tutorial shows you how to build a Macromedia Fireworks MX 2004 navigation bar that you can use on multiple pages of your website. A navigation bar
Software User's Guide
 PT-18R/PT-2430PC/PT-9600/ PT-9700PC/PT-9800PCN Software User's Guide The contents of this guide and the specifications of this product are subject to change without notice. Brother reserves the right to
Finding and Opening Documents
 In this chapter Learn how to get around in the Open File dialog box. See how to navigate through drives and folders and display the files in other folders. Learn how to search for a file when you can t
Contents. Overview...2. License manager Installation...2. Configure License Manager...3. Client Installation...8. FastLook Features...
 Technical Support All technical support must be done through the Report-a-Problem feature located under the Help menu. Please use this feature to access your Priority Maintenance subscription to update