System Requirements Free USB 2.0 port Windows XP Windows Vista Windows 7 (32 / 64 bit or later version)
|
|
|
- Edmund Lloyd
- 7 years ago
- Views:
Transcription
1 0

2 Contents 1. Introduction Preparation... 3 Package Contents... 3 Scanner Overview Installation & Operation Initial Setup Power on the Scanner Scan an Original Power off the Scanner Connecting to a Computer How to connect the scanner to a computer Disconnecting the scanner from a computer Maintenance Cleaning the Roller of the scanner Calibrating the scanner Cleaning the Image Sensor Troubleshooting Frequently Asked Questions Arcsoft BizScanner Install BizScanner Run BizScanner Start to use BizScanner System requirements Specifications

3 1. Introduction Congratulations on your purchase of the scanner. Now you can scan and store your printed photos directly to your memory card or flash disk without connecting to any computer. If you want to store your photos directly into your computer, just connect the scanner with SD card to the computer. Before you install and operate the product, please take a few minutes to read through this manual. It provides proper instructions for you to install, operate and maintain the product. Precautions Keep the product out of direct sunlight. Direct exposure to the sun or excessive heat may cause damage to the unit. Do not install the product in a humid or dusty place. Be sure to use the proper AC power source. Place the product securely on an even, flat surface. Tilted or uneven surfaces may cause mechanical or paper-feeding problems. Retain the product box and packing materials for shipping purposes. System Requirements Free USB 2.0 port Windows XP Windows Vista Windows 7 (32 / 64 bit or later version) 2

4 2. Preparation Package Contents Scanner CD QSG Roller Cleaning Tool Sensor Cleaning Swab Calibration Card AC Power Adapter USB cable 3

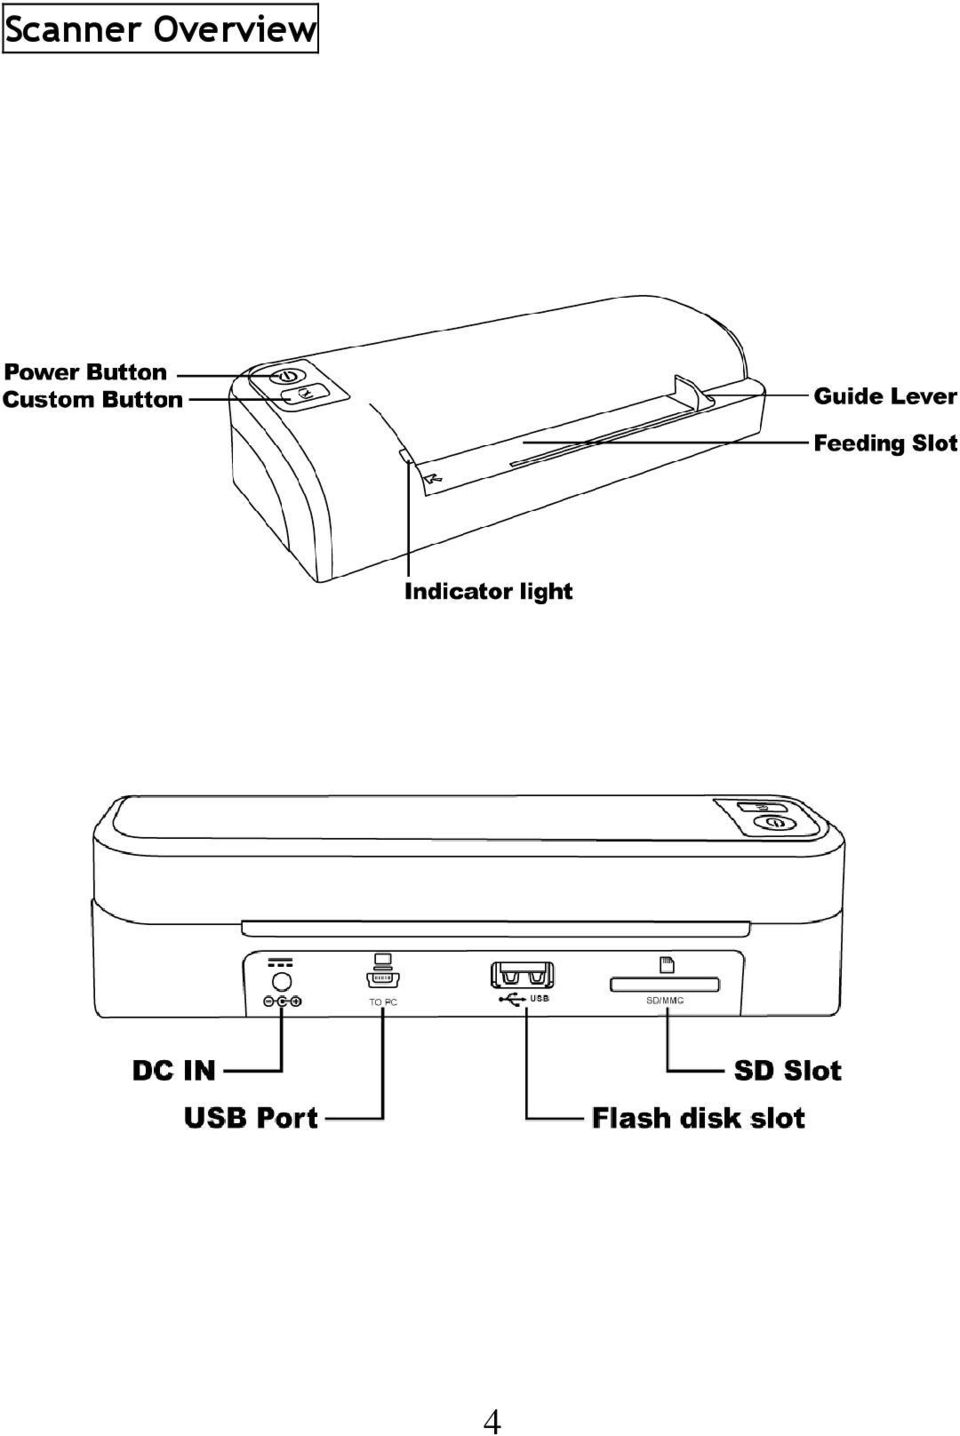
5 Scanner Overview 4
6 3. Installation & Operation 3.1 Initial Setup 1. Connect the plug on the power adapter cable to the power connector on the scanner. 2. Plug the power adapter into a power outlet. 3. Insert a memory card into the memory card slot or a flash disk into the flash disk slot. Note : The SD card is the high priority when you insert the SD card and flash disk together. 5

7 3.2 Power on the Scanner 1. Press and hold the Power button for about 0.5 seconds. The power indicator green light blinks. 2. Wait until the power indicator stops blinking then change to orange and stays on to indicate the scanner is ready. 6

8 The indicator light patterns represent function status as follows: Light Function Status 1. Green Blinks The scanner is power on and initiating. 2. Orange Steadily on The scanner is ready for use. 3. Orange Blinks Continuously 4. Red Blinks Initializing system and memory card. Please wait until the initialization process is complete before using the scanner. Busy scanning and storing image files. Please wait until the process is complete before scanning another original. Sensor cleaning in progress. Please wait until the process is complete before performing any operations. Paper jam. Press the Custom button for about 0.5 seconds; the scanner will back out the original so you can remove it from the input slot. Memory card error. Remove the memory card to clear this error status. Calibration failed. Error indication only. 5. No light The scanner is powered off. 7

9 3.3 Scan an Original 1. Insert your photo or name card with the side to be scanned facing upward and in correct orientation, place the left edge of the original against the left edge of the feed slot, and then adjust the guide lever so that it is against the right side of the original. Do not apply any force to the original. 2. Gently push the original into the feeding slot and let go when it begins to feed into the slot. 3. When the scan is completed, the scanner will automatically create a folder titled Photo1 on your memory card or flash disk, which will hold the first 9999 scans. Then Photo2 folder will be created for the next 9999 scans, and so on. (Each scanned image is given a file name with the prefix scan followed by a 4- digit sequential number in the order the images are stored. For example, IMG 0001.jpg, IMG 0002.jpg, etc.) Note: Do not remove the memory card or disconnect the power supply while the indicators are blinking. This scanner only supports output images in JPEG (.jpg) format, and the date/ time attribute will not be added. If the memory card is near full (lower than 1MB), the power indicator light blinks. Use another card or delete some files on it if necessary. Insert only one original at a time, and insert the next original only when the previous one is done and the blinking has stopped, otherwise the scanner may malfunction. 8

10 3.4 Power off the Scanner After all originals were scanned, press and hold the power button until the indicator blank. Now you can safely disconnect the power and remove the memory card or flash card from the scanner. Important: 1. Insert only one photo at a time, and insert the next one only when the previous one is done, and the indicator light stops blinking. Otherwise, the scanner may malfunction. 2. The acceptable paper size is 2 x 2 ~ 4 x Do not use the following types of originals for scanning; otherwise the scanner may malfunction or cause the original to jam in the slot. Originals thicker than 0.5mm Originals with either side shorter than 50mm(below 2 ) Originals with lots of black or dark colors Originals with dark colors surrounding the edges Transparencies(filmstrips, celluloid, etc.) Printed images (pictures on newspapers, magazines, etc.) Soft and thin materials (thin paper, cloth, etc.) Originals that exceed or below the acceptable size 4. The scanner has a built-in cropping function that is capable to detect and crop the edges of an original. 9

11 The max cropping size is 1.5mm per edge, as illustrated below: 5. If the photo is incautiously skew in the feeding slot, the four edges of the scanned image will become dark as illustrated. 10

12 4. Connecting to a Computer You may use the scanner as a memory card reader by connecting it to the computer through the USB cable, so that you can freely copy, paste or delete files to and from the memory card. The images in the card can also be downloaded to the computer by other computer devices. 4.1 How to connect the scanner to a computer 1. Connect the plug on the power adaptor cable to the power connector on the scanner. 2. Insert a memory card or flash disk that contain your scanned images into the memory card slot. 3. Connect the mini end of the USB cable (included with scanner) to the Mini USB connector on the scanner. 11

13 4. Power on your PC, and then connect the large end of the USB cable to a USB port on your PC. 5. Press and hold the Power button for 0.5 seconds. 6. When the scanner connects successfully with a computer, a Removable Disk (F) (F represents the removable drive letter) will be shown in Windows Explorer. If a memory card or flash disk is inserted to the scanner, the Removable Disk will be replaced with the name of the memory card or flash disk. 7. After your scan, a folder titled PHOTO1 is added to the memory card or flash disk and the scanned image will be saved in JPEG file format. Each scanned image is given a file name with the prefix scan followed by a 4- digit sequential number in the order the images are stored. For example, IMG0001.jpg, IMG0002.jpg. If the file name reaches IMG9999.jpg in the Photo1 folder, a new folder titled Photo2 will automatically be created to store subsequent new files, and so on. 8. You can now view or edit the files on the memory card or flash disk using your own graphic editing software. 12

14 4.2 Disconnecting the scanner from a computer 1. On the Windows System Tray, click the hardware removal icon. 2. Click the Safely remove USB mass Storage device message with the corresponding Drive. 3. When the Safe to Remove Hardware message appears, you can safely remove the scan engine s USB cable. 13

15 5. Maintenance 5.1 Cleaning the Roller of the scanner If the scanned image has lines or photo has dust, clean the roller by supplied roller cleaning tool. Using only the recommended and supplied tools. Follow the instructions of Cleaning the Roller on the preceding section to clean the roller. 1. Connect the power supply to the scanner. 2. Insert the SD card or flash disk. 3. Press and hold the power button for about 0.5 seconds to power the scanner on. 4. Press the Custom button and release immediately. 5. Place the supplied roller cleaning tool on the feeding slot. 6. The cleaning tool will be brought into the feeding slot automatically, and the cleaning process will begin. 7. When the cleaning process is completed, the cleaning tool will be ejected from the feeding slot. 14

16 5.2 Calibrating the scanner If the scanned image color looks unnatural, the scan engine may need calibrating in order for the sensor to resume its original precision. To calibrate the scan engine: 1. Connect the power supply to the scanner. 2. Insert the SD card or flash disk and move the guide lever to the end of right side. 3. Press and hold the power button for about 0.5 second to power the scanner on. 4. Press and hold the Custom button until the indicator LED blinks. 5. Insert the calibration card to the feed slot in 5 seconds. 6. The scanner starts calibrating. 7. The calibration chart will move and stop some time then reject when calibrate done. Notice : Always keep the calibration card clean and avoid dirty, scrape or wrinkle that will affect the calibrating result. 15

17 5.3 Cleaning the Image Sensor If the scanned image looks fuzzy or there are strange stripes on it, the image sensor may need cleaning in order for the sensor to resume its original clean. To clean the image sensor: 1. With the scanner powered off and disconnected from the power supply, insert the sensor cleaning swab into one end of the input slot. 2. Gently slide the sensor cleaning swab back and forth from one end of the input slot to the other five or six times consecutively. 3. Remove the sensor cleaning swab, store it in a safe place and protect it from dust. 16

18 6. Troubleshooting If you have problems with the operation of the product, please check the following troubleshooting hints. 6.1 Frequently Asked Questions Question: There are strange lines on the scanned image, or the image is not clear. Answer: Check the following: Are there scratches on the original, or is the original clean? Remove any stains or dust from the original before scanning. Has the scanner been used for a long period of time without cleaning and calibration? Follow the instructions for "Cleaning the Scanner" and Calibrating the Scanner", and then try again. Question: The original gets stuck halfway in the feeding slot. Answer: Press the Custom button. The scanner will back out the original so you can remove the jammed original from the output slot. Question: The status indicator blinks rapidly and no scan is possible. Answer: Check the following: Is the memory card inserted properly into the memory card slot? Re-insert the card and try again. Is the SD card locked (set to write-protect)? Unlock the card. Is the memory card full? The indicator blinks when the free space on the memory card is below 1MB. Use another card if necessary. Make sure the memory cards are in FAT or 17

19 FAT32 file formats only, not NTFS or any other file format. Did you insert the next original before the scanning process of the previous one was completed? Power the scanner off and back on and try again. Make sure that you scan the next original only after the scanning process of the previous one has completed. Does the length of the original exceed the maximum acceptable size? Question: The scanner feels warm to the touch. Answer: It is normal for the scanner to emit a small amount of heat (around degrees Celsius) after prolonged use. However, if there are strange odors coming from the scanner or the scanner feels hot to the touch, disconnect the scanner immediately from the power supply or the computer. Question: Photo with dark edge cropping problem Answer: For a very darkedge(edges) photo, the scanner will not read the dark portion and will be cropped away. This kind of photo is not suitable for scanning. 18
 after prolonged use.")
20 7. Arcsoft BizScanner This simple application uses advanced OCR technology and scans the images of your business cards. It quickly and easily captures contact information from business cards and adds it to the application's database, saving you a great deal of time and effort by eliminating the need to manually type in names, phones, and other key information. BizScanner also provides convenient tools for you to manage all business cards. With just a few clicks, you can synchronize the application's database with other programs, such as Microsoft Office Outlook and so on. 7.1 Install BizScanner 1. Insert the installation CD into the CD-ROM drive and click BizScanner and start to install BizScanner. 19


21 2. Follow the installation wizard step by step. 3. Install completely. 20
22 7.2 Run BizScanner There are several ways that you can launch BizScanner: Double click BizScanner icon on the desktop or right-click the icon and select open. Click Start-> All Programs-> ArcSoft BizScanner-> BizScanner. 21
23 7.3 Start to Use BizScanner 1. Input Business Cards Input - Switch to "Input Business Cards" to quickly and easily capture contact information from business cards. 1.1 Input business cards main screen: 22
24 1. 2 Toolbar The Toolbar provides the following functions for you to input business card images: Import from BizCard Scanner - Import images of business cards from a professional BizCard scanner. Before using this function, make sure that a BizCard scanner is properly connected to your computer. Import - Import existing images of business cards from your local disk. Choose "Import from Folder" or "Import from Files" from the drop-down list. Language - Select the language of the business card from the drop-down list. BizScanner recognizes multilingual business cards. Thumbnail Display Displays thumbnails of all imported business cards. Select a thumbnail and detailed contact information of that card is displayed. To remove a specific business card before importing it to the database, click the Delete icon located on the bottom right corner of the selected thumbnail. 23
25 Contact Information Displays detailed information of the selected business card. Any characters that do not appear correct are highlighted. Modify any information and select a category for that card from the drop-down list. If the card does not fit into any of the existing categories, use the "New Category" button to create one. The thumbnail of the active business card is also displayed in this area. Use the "Rotate Left" or "Rotate Right" button if the image is not properly placed. When all information of the business card is correct, click "Confirm" to add it to the database. 24
26 2. Manage Business cards Manage - Switch to "Manage Business Cards" to manage the application's database and preview all imported business cards. 2.1 Manage business cards main screen: 25
27 2.2 Toolbar The toolbar provides several functions for you to manage the database. - Send selected business cards as attachments. For each card, the original image and a vcard file are attached. Export - Export the selected business cards as a specified format as listed in the drop-down list. vcard - Export the selected business cards as vcard files, a file format standard for electronic business cards. They can be exchanged in various ways. Outlook Address Book - Add contact information of the selected business cards into the address book of Microsoft Office Outlook. JPEG - Export the original images of the selected business cards as JPEG files. Excel - Export the contact information of the selected business cards and save it to a CSV file, a file format used for the digital storage of data structured in a table of lists. 26
28 Backup & Restore - Select "Backup" from the drop-down list to save the selected business cards as a backup. If you delete any card by mistake, use "Restore" from the drop-down list and import all backup cards to the database. Search - Sort business cards by keywords. BizScanner searches all business cards and displays the results in the Card Display area. Category Categorizes all business cards into different groups when importing. Select each category to see all cards under that group in the Card Display area. Use the following buttons to manage these categories: New Category - Click to create a new category. Enter the name of the new category and press "Enter" to confirm. Newly-added categories are placed before the category named "Others." Delete Category - Click to remove the selected category. BizScanner s default categories cannot be deleted. 27
29 Card Display Provides two modes for you to preview all business cards. More than one card can be selected at the same time. List View - Displays detailed information in a table format. and website addresses are displayed in hyperlink format. Click to send an or visit the website. 28
30 Thumbnail View - Displays business cards as thumbnails to provide a direct way of viewing contact information. In each view, you can also right-click the business card to display an additional menu: Move to Category - Move the selected business card to another category. 29
31 Edit - Modify the details of the business card in the pop-up window. You can also double-click the business card to go to the Edit screen. The main screen is as follows: After editing the card, click "Confirm" to save your modifications. Use the "Previous" and "Next" buttons to navigate to any card you want to modify. Repeat the editing process. When done, click "OK" to save your modifications and close the Edit window; or you can click "Cancel" to quit without saving the modifications that have not been confirmed. Delete - Remove the selected business card from the BizScanner s database. 30
32 7.4 System requirements 1. Windows XP/ Vista/ Windows 7 2. Pentium IV 2.4 GHz or equivalent AMD Athlon MB free hard drive space required for program installation MB DDR RAM or above bit color display at 800x600 with DirectX 3D support 6. DirectX 9.0c or above 31
33 8. Specifications Scanner type Carriage Boot on time Memory card slot Button Acceptable paper Size PC connectivity Scan resolution Scan color depth Output format Auto crop Color match Calibration Input Power consumption Dimension Sheet-fed scanner module/single page Color CIS (4 inch) Less then 7 seconds SD / SDHC / Flash Disk 2 (Power / Custom) 2 x 2 ~ 4 x 6 Acts like removable storage device 300 dpi Color 48bit Color 24bit (JPEG) Yes Yes Yes USB 2.0 5V / 2A L175 x H42 x W74 mm Specifications are subject to change without prior notice. 32
34 This symbol on the product or in the instructions means that your electrical and electronic equipment should be disposed at the end of its life separately from your household waste. There are separate collection systems for recycling in the EU. For more information, please contact the local authority or your retailer where you purchased the product. 33
How To Use A Brother Ql700
 User's Guide QL-700 Be sure to read and understand this guide before using the machine. We recommend that you keep this guide nearby for future reference. www.brother.com US ENG ver.0 Thank you for purchasing
This Quick User Guide helps you install and get started with IRISCard Anywhere 5 and IRISCard Corporate 5 scanners.
 This Quick User Guide helps you install and get started with IRISCard Anywhere 5 and IRISCard Corporate 5 scanners. The software delivered with these scanners is: - Cardiris Pro 5 and Cardiris Corporate
Magic Wand Portable Scanner
 Magic Wand Portable Scanner PDS-ST470-VP User Manual Table of Contents 1. Key Features... 3 2. Functional Parts... 3 3. Explanation of the Status Icons... 5 4. Using the Scanner... 5 4.1. Charging up the
Point of view HDMI Smart TV dongle Mini RF Keyboard
 Point of view HDMI Smart TV dongle Mini RF Keyboard English Contents Contents... 1 General notices for use... 2 Disclaimer... 2 Box Contents... 2 1. HDMI TV dongle... 3 1.1. Product display... 3 1.2. Instructions
Lenovo Miix 2 8. User Guide. Read the safety notices and important tips in the included manuals before using your computer.
 Lenovo Miix 2 8 User Guide Read the safety notices and important tips in the included manuals before using your computer. Notes Before using the product, be sure to read Lenovo Safety and General Information
Table of Contents. 1. Overview... 3. 1.1 Materials Required. 3 1.2 System Requirements. 3 1.3 User Mode 3. 2. Installation Instructions..
 Table of Contents 1. Overview..... 3 1.1 Materials Required. 3 1.2 System Requirements. 3 1.3 User Mode 3 2. Installation Instructions.. 4 2.1 Installing the On Call Diabetes Management Software. 4 2.2
Table of Contents. System Requirement of MP3 Player:... 4. Connection and Downloading... 7. Downloading DRM10 Files... 8.
 Table of Contents Instructions... 1 Precautions... 2 System requirements... 4 System Requirement of MP3 Player:... 4 Introduction... 5 Features... 5 Charging the Battery... 6 Connection and Downloading...
Magic Wand Portable Scanner with Auto-Feed Dock. PDSDK-ST470-VP-BX2 User Manual
 Magic Wand Portable Scanner with Auto-Feed Dock PDSDK-ST470-VP-BX2 User Manual Table of Contents 1. KEY FEATURES... 2 2. FUNCTIONAL PARTS...2 3. EXPLANATION OF THE STATUS ICONS... 4 4. GETTING STARTED...
1. Check the Accessories
 This Quick User Guide helps you get started with the IRIScan Book Executive 3 scanner. This scanner is supplied with the software applications Readiris Pro 14 (Windows and Mac ), IRIScan Direct and IRISCompressor
SOFTWARE MANUAL. Please ensure that you read the instruction manual carefully before use. About software
 SOFTWARE MANUAL Please ensure that you read the instruction manual carefully before use Software Notes The attached software is a camera driver and image editing software tool for Windows. Under no circumstances
Caplio Utility for Windows
 Caplio Utility for Windows Operation Manual English To ensure correct use of the product, read this manual carefully before use. Keep the manual handy for future use. Introduction Thank you for purchasing
Penpower WorldocScan. User's Guide
 Penpower User's Guide Version: V1.0 Release: July 2008 Penpower Technology Ltd. Software User License Agreement You are licensed to legally use this software program ( the Software ) by Penpower Technology
Digital Photo Frame Instruction Manual
 Digital Photo Frame Instruction Manual Model 3FMPF210BK8-R Table of Contents SAFETY INFORMATION... 4 PACKAGE CONTENTS... 4 SPECIFICATIONS SUMMARY... 5 DPF INTRODUCTION... 6 QUICK START... 8 OPERATION
EPSON SCANNING TIPS AND TROUBLESHOOTING GUIDE Epson Perfection 3170 Scanner
 EPSON SCANNING TIPS AND TROUBLESHOOTING GUIDE Epson Perfection 3170 Scanner SELECT A SUITABLE RESOLUTION The best scanning resolution depends on the purpose of the scan. When you specify a high resolution,
MG2400 series. Online Manual. Troubleshooting. English
 MG2400 series Online Manual Troubleshooting English Contents Troubleshooting................................................... 5 Problems with Printing.....................................................
reflecta Super 8 Scanner
 reflecta Super 8 Scanner User Manual 1 FEDERAL COMMUNICATIONS COMMISSION (FCC) STATEMENT This Equipment has been tested and found to comply with the limits for a class B digital device, pursuant to Part
How To Use An Easypad On A Pc Or Macbook Or Ipad (For Pc)
") User Guide Congratulations on your new EasyPad 1000. Please follow the instructions in this manual carefully. Statement: If the final version of this product has any differences from the description of
User Guide Congratulations on your new EasyPad 1000. Please follow the instructions in this manual carefully. Statement: If the final version of this product has any differences from the description of
1. Open the battery compartment as shown in the image.
 This Quick User Guide helps you get started with the IRIScan Book 3 scanner. This scanner is supplied with the software applications Readiris Pro 12, IRIScan Direct and IRISCompressor. Corresponding Quick
Digital Persona Fingerprint Reader Installation
 Digital Persona Fingerprint Reader Installation The link to download the Fingerprint Reader Software for AXIS-ACH is http://corpcu.com/fingerprint-reader-software This will begin the download for the drivers.
fi-7160/ fi-7260/ fi-7180/ fi-7280 Getting Started Image Scanner Checking the Components P3PC-4252-01EN
 P3PC-4252-01EN fi-7160/ fi-7260/ fi-7180/ fi-7280 Getting Started Image Scanner Thank you for purchasing the fi-7160/fi-7260/fi-7180/fi-7280 color image scanner. This manual describes the preparation required
HP Scanjet G4000 series. User Guide
 HP Scanjet G4000 series User Guide Contents 1 How to use the scanner...2 Where to get additional information...2 Accessibility...2 How to use the HP Photosmart software...3 Front panel and accessories
Maxtor OneTouch User's Guide
 EXTERNAL HARD DRIVE Maxtor OneTouch User's Guide TM II P/N:20259600 i Contents 1 Introduction................................................. 1 Maxtor OneTouch II Drive Components............................
QUICK START GUIDE. Aleratec 1:3 Blu-ray/DVD/CD LightScribe Duplicator SA. Part No. 260201
 QUICK START GUIDE Aleratec 1:3 Blu-ray/DVD/CD LightScribe Duplicator SA Part No. 260201 Welcome! Congratulations on your purchase of an Aleratec 1:3 Blu-ray/DVD/CD LightScribe Duplicator SA, considered
Deposit Direct. Getting Started Guide
 Deposit Direct Getting Started Guide Table of Contents Before You Start... 3 Installing the Deposit Direct application for use with Microsoft Windows Vista... 4 Running Programs in Microsoft Windows Vista...
HP 22-in-1 Media Card Reader
 HP 22-in-1 Media Card Reader Introduction This document describes how to install the HP 22-in-1 Media Card Reader into an HP Workstations adapter bracket, and then install the media card reader and bracket
DENON DJ Music Manager
 DENON DJ Music Manager DENON DJ Music Manager has the functions described below Creation and updating of databases Playback function Editing of file data Searching for files Creation and updating of playlists
ViviCam 25 Digital Camera User s Manual
 ViviCam 25 Digital Camera User s Manual 2010 Sakar International, Inc. All rights reserved. Windows and the Windows logo are registered trademarks of Microsoft Corporation. All other trademarks are the
Micro Cam Software. User Manual V1.3
 Micro Cam Software User Manual V1.3 CONTENT CHAPTER 1: MICRO CAM SOFTWARE INSTALLATION AND CONNECTION... - 1-1.1 SOFTWARE MICRO CAM INSTALLATION... - 1-1.2 WIRED DEVICE CONNECTION... - 4-1.3 SOFTWARE OPERATION
Chapter 1 Downloading Images to Your Computer (Windows)
") Software User Guide For the safe use of your camera, be sure to read the Safety Precautions thoroughly before use. Types of software installed on your computer varies depending on the method of installation
Software User Guide For the safe use of your camera, be sure to read the Safety Precautions thoroughly before use. Types of software installed on your computer varies depending on the method of installation
Point of View SmartTV-500 Center - Android 4.2. General notices for use...2 Disclaimer...2 Box Contents...2
 Point of View SmartTV-500 Center - Android 4.2 English Table of Contents General notices for use...2 Disclaimer...2 Box Contents...2 1.0 Product basics...3 1.1 Buttons and connections... 3 1.2 Connecting
SMART BOARD USER GUIDE FOR PC TABLE OF CONTENTS I. BEFORE YOU USE THE SMART BOARD. What is it?
 SMART BOARD USER GUIDE FOR PC What is it? SMART Board is an interactive whiteboard available in an increasing number of classrooms at the University of Tennessee. While your laptop image is projected on
MOBILE INTERNET HUAWEI E220 3G USB MODEM
 MOBILE INTERNET HUAWEI E220 3G USB MODEM With this modem you can easily: Access the internet Send or receive text messages Manage contacts The E220 package box contains the following items: One E220 HSDPA
Quick Start Guide Vodafone Mobile Broadband USB Stick. Designed for Vodafone
 Quick Start Guide Vodafone Mobile Broadband USB Stick Designed for Vodafone Welcome to the world of mobile communications 1 Welcome 2 Set up your USB Stick 3 Start the software 4 Software overview (Microsoft
Media Backup Storage Device. Operation Manual
 Media Backup Storage Device CGA-02540 - Black CGA-02541 - White Operation Manual 20061201 Page 1 of 23 CONGRATULATIONS on your purchase of a Polaroid media backup storage device. Please read carefully
ViviCam F127 Digital Camera
 ViviCam F127 Digital Camera User Manual 2009-2012 Sakar International, Inc. All rights reserved. Windows and the Windows logo are registered trademarks of Microsoft Corporation. All other trademarks are
PA500II Enterprise Mobile Computer
 PA500II Enterprise Mobile Computer - PA500II - Quick Reference Guide 400891G Version 1.0 PA500II Product Introduction & Accessory Kit After opening the box, ensure the following accessories for the PA500II
HP WEBCAM 3100 HP WEBCAM 3110 USER S GUIDE
 HP WEBCAM 3100 HP WEBCAM 3110 USER S GUIDE Version 1.0.EN Part number: 603528-001 Copyright 2010 Hewlett-Packard Development Company, L.P. The information contained herein is subject to change without
ActiView. Visual Presenter Image Software User Manual - English
 ActiView Visual Presenter Image Software User Manual - English Date: 05/02/2013 Table of Contents 1. Introduction... 3 2. System Requirements... 3 3. Install ActiView - Windows OS... 4 4. Install ActiView
3.5'' SATA to USB 3.0 & esata External Hard Drive Enclosure U SER S MANUA L
 3.5'' SATA to USB 3.0 & esata External Hard Drive Enclosure U SER S MANUA L Package Contents: 3.5'' SATA to USB 3.0 & esata External Hard Drive Enclosure 1 3.5" HDD Enclosure 2 Power Adapter 3 USB 3.0
Windows XP Home Edition / Windows XP Professional
 Windows XP Home Edition / Windows XP Professional COOLPIX5000/995/885/775 This manual is for those users of the COOLPIX5000/995/885/ 775 who are running Nikon View 4 (Version4.3.1) under Windows XP Home
3.5 Dual Bay USB 3.0 RAID HDD Enclosure
 3.5 Dual Bay USB 3.0 RAID HDD Enclosure User Manual August 11, 2011 v1.1 MFG Part # MT2U3-MP BARCODE Introduction 1 Introduction 1.1 System Requirements 1.1.1 PC Requirements Minimum Intel Pentium III
Anoto pendocuments. User s Guide
 Anoto pendocuments User s Guide Copyright 1997 2009 Anoto AB. All rights reserved. Anoto, Magic Box and the Anoto logotype are trademarks owned by Anoto AB. All other trademarks are the property of their
WUA-0605 300Mbps Wireless USB Network Adapter
 WUA-0605 300Mbps Wireless USB Network Adapter User Manual V1.0 Certification FCC CE FCC Statement This equipment has been tested and found to comply with the limits for a Class B digital device, pursuant
NetDisk & NetDisk Mini
 HANTZ + PARTNER The Upgrade Company! www.hantz.com Quick Install Guide For Windows 2000 / XP Software Version 2.3 NetDisk & NetDisk Mini Powered by Technology www.ximeta.de HANTZ + PARTNER The Upgrade
Scan2CRM for ACT! User Guide
 Scan2CRM for ACT! User Guide APPENDIX Warranty... I Notice to user...ii Publication...III Trademarks...IV Version 9.50 - Supports ACT! by Sage for windows, ACT! 2007 (Version 9) and above. This publication
Wolverine Data PASS Portable Scanner User Manual V1.0
 Wolverine Data PASS Portable Scanner User Manual V1.0 Table of Contents 1. Before Using the PASS Battery Powered Portable Scanner ------- 2 Having difficulty using this product? -------------------------------------
Install Device Drivers and Toolkit for Windows 7
 Install Device Drivers and Toolkit for Windows 7 The USB driver is required for all installations to assure that the computer communicates with the digitizer. Note: Installation instructions for Windows
INTERACTIVE WHITEBOARD. Owner s Manual
 INTERACTIVE WHITEBOARD Owner s Manual Table of Contents What s In The Box... 2 QOMO Whiteboard System Requirements... 3 Introduction... 4 Whiteboard Software Features... 5 How to Install Hardware... 6
Wireless Optical Mouse
 Wireless Optical Mouse User s Manual Model PD950P FCC STATEMENT PD950P This device complies with part 15 of FCC Rules. Operation is subject to the following two conditions: (1) this device may not cause
500/600/1000. User Manual June 2011 Rev. 061311. 1 v061311
 500/600/1000 User Manual June 2011 Rev. 061311 1 v061311 http://shopping.netsuite.com/digitalcheck TABLE OF CONTENTS Contents Radio Frequency Interference... 3 About the SB Scanner... 3 SB Scanner Equipment...
Checking the Package Contents. Installing the Printer Software. Connecting. Unpacking the. the Printer. Printer. Attaching
 Installing the Printer Software Checking the Package Contents Connecting the Printer Unpacking the Printer Installing the Ink Cartridges Plugging in the Printer Attaching the Printer Parts 4032216-00 EUL
Start Here USB. (802.11) (Ethernet)
 (Ethernet)") Start Here 1 USB 802.11 Ethernet USB cable users: Do not connect the USB cable until Section A. USB A USB Wireless (802.11) or wired (Ethernet) network users : you must follow the instructions in this
Start Here 1 USB 802.11 Ethernet USB cable users: Do not connect the USB cable until Section A. USB A USB Wireless (802.11) or wired (Ethernet) network users : you must follow the instructions in this
Action Camcorder Rollei Youngstar USER MANUAL
 Action Camcorder Rollei Youngstar USER MANUAL Mounting Accessories 1 Functions This user's manual has referred to the latest information we had when this user s manual was made. The screen display and
SOFTWARE INSTALLATION AND USB/i.LINK CONNECTION GUIDE
 SOFTWARE INSTALLATION AND USB/i.LINK CONNECTION GUIDE ENGLISH LYT1155-001A COPYRIGHT 2003 VICTOR COMPANY OF JAPAN, LTD. M3D8 Printed in Japan 0403-FO-ID-VP This document explains the basic information
Recovers Lost or Deleted Pictures from: Any Memory Card Type Any Brand Using Any Mass Storage Reader
 Recovers Lost or Deleted Pictures from: Any Memory Card Type Any Brand Using Any Mass Storage Reader Reader and Media not included Image Recovery - Recovers lost or deleted image files (JPEG, TIFF and
Perfection V800 Photo/V850 Pro User's Guide
 Perfection V800 Photo/V850 Pro User's Guide Contents Perfection V800 Photo/V850 Pro User's Guide... 7 Scanner Basics... 8 Scanner Parts Locations... 8 Scanner Parts... 8 Scanner Buttons and Lights...
HP Scanjet Professional 1000 Mobile Scanner. User Guide
 HP Scanjet Professional 1000 Mobile Scanner User Guide ii Contents 1 Scanner overview... 3 Scanner hardware... 3 Scanner front panel buttons... 3 Scanner software... 4 How to scan with the HP Scanjet 1000
EnVivo 4 GB Aluminum MP3 Player
 User Manual EnVivo 4 GB Aluminum MP3 Player With Clipper, Display & Voice Recording Electrical and electronic equipment (EEE) contains materials, parts and substances, which can be dangerous to the environment
User Manual. 2 Bay Docking Station
 FANTEC MR-CopyDU3 User Manual 2 Bay Docking Station With One Touch Backup (OTB) and Copy Function Hardware: PC and Notebooks, Macintosh USB 1.1, USB 2.0 or USB 3.0 interface Features: 2,5 or 3,5 SATA I,II,III
How To Use An Epson Scanner On A Pc Or Mac Or Macbook
 Perfection V550 Photo User's Guide Contents Perfection V550 Photo User's Guide... 7 Scanner Basics... 8 Scanner Parts Locations... 8 Scanner Parts... 8 Scanner Buttons and Lights... 12 Changing the Power
In this chapter you will find information on the following subjects:
 17 1. From XP to Vista Microsoft, the creator of Windows, has published various versions of the Windows operating system over the past two decades. Windows Vista is the latest version, the successor to
For customers in USA This device complies with Part 15 of the FCC rules. Operation is subject to the following two conditions:
 User manual For customers in North and South America For customers in USA This device complies with Part 15 of the FCC rules. Operation is subject to the following two conditions: (1) This device may not
TurningPoint PC FAQ. Why do I get the message that indicates my receiver is not licensed to work with TurningPoint?
 TurningPoint PC FAQ TurningPoint PC Version 4.2 The following FAQs have been provided for your convenience. If you have additional support questions, please feel free to contact Turning Technologies Tech
Carry it Easy. User Guide
 Carry it Easy User Guide User Manual Version 3.2 2004-2010 CoSoSys Ltd. Carry it Easy User Manual Table of Contents Table of Contents... I 1. Introduction... 1 2. System Requirements... 1 3. Installation...
Additional Requirements for ARES-G2 / RSA-G2. One Ethernet 10 Base T/100 Base TX network card required for communication with the instrument.
 TA Instruments TRIOS Software Installation Instructions Installation Requirements Your TRIOS Instrument Control software includes all the components necessary to install or update the TRIOS software, as
Basic Specifications. Electrical. EPSON Perfection 3170. Color EPSON MatrixCCD TM line sensor. device Effective pixels
 Scanner Parts Document table Power cord Document cover Transparency unit (TPU) under lid Web Transparency unit (TPU) connector TPU indicator light e-mail Carriage and lamp (in the home position) USB port
Digital Photo Picture Frame. Operation Manual
 Digital Photo Picture Frame Operation Manual 20070309 CONGRATULATIONS on your purchase of a Polaroid 7 LCD Digital Photo Picture Frame. Please read carefully and follow all warnings and instructions in
FAQ Sprint 3G/4G USB Modem U300
 Page 1 of 5 FAQ Sprint 3G/4G USB Modem U300 Q: What is the Sprint 3G/4G USB Modem U300? A: The U300 USB modem provides broadband access via Sprint s 3G and 4G networks when plugged into USB port on a PC
DVR 410 Digital Video Camera User s Manual
 DVR 410 Digital Video Camera User s Manual 2009 Sakar International, Inc. All rights reserved. Windows and the Windows logo are registered trademarks of Microsoft Corporation. All other trademarks are
User Guide HD-WLU3R1 DriveStation Duo
 User Guide HD-WLU3R1 DriveStation Duo EN 35011790 ver.01 Front Panel Layout Power LED Power On: blue RAID Maintenance: purple Power Off: off Access LEDs Access: blinking green Failure: red Rebuild: blinking
1. System Requirements
 BounceBack Data Transfer 14.2 User Guide This guide presents you with information on how to use BounceBack Data Transfer 14.2. Contents 1. System Requirements 2. Attaching Your New Hard Drive To The Data
Load Bulletin ADP, Inc. Dealer Services 1950 Hassell Road Hoffman Estates, IL 60169-6308
 Load Bulletin ADP, Inc. Dealer Services 1950 Hassell Road Hoffman Estates, IL 60169-6308 Make sure the media label contains this number: NP-ASP-AE1.0 ADP Network Phone ASP Assistant Enterprise Loading
7. Computer System Minimum Requirement. 31 8. Troubleshooting. 32. PortableCapture Pro Software Introductions...33
 Table of Contents EN 1. Precaution. 3 2. Preparation..6 Standard Accessories 6 Part Names & Functions..7 3. key features..... 8 4. Use the Microscope.....9 Install Battery... 9 Insert a MicroSD Card...
Organizing & Editing Digital Photos
 P a g e 1 Organizing & Editing Digital Photos ABOUT THIS CLASS This class is designed to show you how to transfer your photos from your digital camera to your computer, organize them for easy access in
3M Occupational Health and Environmental Safety 3M E-A-Rfit Validation System. Version 4.2 Software Installation Guide (Upgrade) 1 P age
 1 P age") 3M Occupational Health and Environmental Safety 3M E-A-Rfit Validation System Version 4.2 Software Installation Guide (Upgrade) 1 P age Contents Important Information Read First... 3 Software Download...
3M Occupational Health and Environmental Safety 3M E-A-Rfit Validation System Version 4.2 Software Installation Guide (Upgrade) 1 P age Contents Important Information Read First... 3 Software Download...
Refer to the Troubleshooting section first if you experience a problem with the product.
 D3 Station Your product comes with a quick start guide and a user s manual. Following the instructions and precautions of this manual will ensure easier and more enjoyable use of your D3 Station External
McAfee Encrypted USB Hard Disk Non-Bio Quick Start Guide
 McAfee Encrypted USB Hard Disk Non-Bio Quick Start Guide COPYRIGHT Copyright 2010 McAfee, Inc. All Rights Reserved. No part of this publication may be reproduced, transmitted, transcribed, stored in a
Windows Vista /Windows 7 Installation Guide
 Windows Vista / 7 Installation Guide Before you can use the machine, you must set up the hardware and install the driver. Please read the Quick Setup Guide and this Windows Vista / 7 Installation Guide
CardReader 100 Scanner Copyright 2003 Visioneer, Inc. Visioneer and Visioneer logo are registered trademarks of Visioneer, Inc. All rights reserved.
 1 of 34 CardReader 100 Scanner Copyright 2003 Visioneer, Inc. Visioneer and Visioneer logo are registered trademarks of Visioneer, Inc. All rights reserved. 2 of 34 Using Online Help... 3 What is the Visioneer
Surf it Easy. User Guide
 Surf it Easy User Guide User Manual Version 1.1 2004 CoSoSys SRL Surf it Easy User Manual Table of Contents Table of Contents... I 1. Introduction... 1 2. System Requirements... 2 3. Installation... 2
Printer Support Guide. FedEx Ship Manager Software
 Printer Support Guide FedEx Ship Manager Software Printer FAQs Installing Printer Drivers How do I download and install the Zebra printer drivers? To download and install the current Zebra printer drivers
User Guide Software Version 2.1.0
 Intel Solid State Drive Firmware Update Tool User Guide Software Version 2.1.0 Order Number: 322570-007US Intel disclaims all express and implied warranties, including without limitation, the implied warranties
MAXTOR ONETOUCH III MINI EDITION FOR WINDOWS VISTA. User s Guide
 MAXTOR ONETOUCH III MINI EDITION FOR WINDOWS VISTA User s Guide MAXTOR ONETOUCH III MINI EDITION WINDOWS VISTA USER S GUIDE Contents Windows Installation Introduction...................................................
ViviCam 5024 Digital Camera
 ViviCam 5024 Digital Camera Owner Manual 2009 Sakar International, Inc. All rights reserved. Windows and the Windows logo are registered trademarks of Microsoft Corporation. All other trademarks are the
Simple Computer Backup
 Title: Simple Computer Backup (Win 7 and 8) Author: Nancy DeMarte Date Created: 11/10/13 Date(s) Revised: 1/20/15 Simple Computer Backup This tutorial includes these methods of backing up your PC files:
User s Guide DS-620 DS-720D. Version A USA
 User s Guide DS-620 DS-720D Version A USA Using the documentation Thank you for buying a Brother machine! Reading the documentation will help you make the most of your machine. Symbols and conventions
PU-USBX. USB over Ethernet Extender OPERATION MANUAL
 PU-USBX USB over Ethernet Extender OPERATION MANUAL Safety Precautions Please read all instructions before attempting to unpack or install or operate this equipment, and before connecting the power supply.
Using These Manuals. How to Use the. Software User Guide. Display examples: 1. Understanding How to Use Your Camera.
 Software User Guide For the safe use of your camera, be sure to read the Safety Precautions thoroughly before use. Types of software installed on your computer varies depending on the method of installation
PRINTER DRIVER GUIDE (KODAK 305 Photo Printer)
") PRINTER DRIVER GUIDE () Microsoft, Windows, Windows XP, Windows Vista and Windows 7 are registered trademarks of Microsoft Corporation in the United States and/or other countries. Adobe, Adobe Photoshop
PRINTER DRIVER GUIDE () Microsoft, Windows, Windows XP, Windows Vista and Windows 7 are registered trademarks of Microsoft Corporation in the United States and/or other countries. Adobe, Adobe Photoshop
TABLE OF CONTENTS QUICK START... 1 DIAGRAM OF THE DIGITAL PHOTO FRAME... 2 KEYPAD BUTTON FUNCTIONS... 3 REMOTE CONTROL FUNCTIONS..
 TABLE OF CONTENTS QUICK START........ 1 DIAGRAM OF THE DIGITAL PHOTO FRAME... 2 KEYPAD BUTTON FUNCTIONS..... 3 REMOTE CONTROL FUNCTIONS..4 DIGITAL PHOTO FRAME NAVIGATION........5 OSD MENU FUNCTIONS..6
OPTEKA DIGITAL PICTURE FRAME
 User Guide Table of Contents Introduction... 3 Main Features... 3 Getting Started... 4 Package Contents... 4 Installing your unit... 5 Connecting to a PC... 5 Operation... 5 Controls... 6 Using your Remote
Fiery E100 Color Server. Welcome
 Fiery E100 Color Server Welcome 2011 Electronics For Imaging, Inc. The information in this publication is covered under Legal Notices for this product. 45098226 27 June 2011 WELCOME 3 WELCOME This Welcome
NOTICE WELCOME MESSAGE
 WELCOME MESSAGE Thank you for choosing the U-Print CDP78 CD/DVD Printer. The U-Print is compact and extremely easy to use, giving you the ability to customize your CDs and DVDs by directly printing onto
1.0. User s Guide & Manual USB 2.0 FLASH DRIVE
 1.0 USB 2.0 FLASH DRIVE User s Guide & Manual Index Introduction 1 CHAPTER1 Features & Specifications 2 CHAPTER2 System Requirements 4 CHAPTER3 Getting Started Installation of the Windows 98SE Driver 5
Windows 10.1 Tablet (UB-15MS10 and UB-15MS10SA) FAQ December 2014
 FAQ December 2014") Windows 10.1 Tablet (UB-15MS10 and UB-15MS10SA) FAQ December 2014 Navigation... 2 Question 1: What are charms used for?... 2 Question 2: How do I navigate while using a mouse or trackpad?... 3 Question
Windows 10.1 Tablet (UB-15MS10 and UB-15MS10SA) FAQ December 2014 Navigation... 2 Question 1: What are charms used for?... 2 Question 2: How do I navigate while using a mouse or trackpad?... 3 Question
User Guide for Windows 10
 User Guide for Windows 10 System requirements E10684 First Edition July 2015 To facilitate a smoother transition from your previous operating system, read the system requirements below before upgrading
User Guide HUAWEI UML397. Welcome to HUAWEI
 User Guide HUAWEI UML397 Welcome to HUAWEI 1 Huawei UML397 4G LTE Wireless Modem User Manual CHAPTER 1 BEFORE USING YOUR UML397 WIRELESS MODEM ABOUT THIS USER MANUAL...4 WHAT S INSIDE THE PRODUCT PACKAGE...4
BrightLink Pro. Quick Reference. BrightLink Interaction. BrightLink Pro Features. 1 Turning on and Calibrating the Projector
 BrightLink Pro BrightLink Interaction Three interactive modes are available: Whiteboard mode Quick Reference This card will help you get started using your BrightLink Pro interactive projector. Use one
HP Personal Media Drive User s Guide
 HP Personal Media Drive User s Guide The only warranties for HP products and services are set forth in the express warranty statements accompanying such products and services. Nothing herein should be
i -CEN S USER S Manual 2007. 08. 13.
 i -CEN S i -CEN'S USER S Manual 2007. 08. 13. i -CEN S Table of Contents Overview of i-cen S software... 4 1 Introduction of i-cen S... 4 2 Key Features... 5 3 Key Benefits... 5 4 System Specification...