Instructions for installation and operation IKI wood-burning stoves. Before you begin installing the stove, pay attention to the following points:
|
|
|
- Jewel Ball
- 7 years ago
- Views:
Transcription
1 Instructions for installation and operation IKI wood-burning stoves Before you begin installing the stove, pay attention to the following points: Read through this installation manual before you begin the installation of the heater Beware of the sharp edges of the stainless steel mesh. Use a long- sleeved shirt and protective gloves during the installation The warranty does not cover defects caused by faulty installation or misuse of the stove IKI-Kiuas Ltd. technical support Tel: jari@ikikiuas.com IKI-Kiuas Oy Hakaniemenkatu HELSINKI ikikiuas@ikikiuas.com List of contents Page 2 Installation Page 3 Pictures of the installation Page 4 Safety distances Page 5 - Instructions for installation - Instructions for bathing Page 6 and 7 Instructions for sweeping Page 8 - Warranty - Requirements for water quality - Contact information

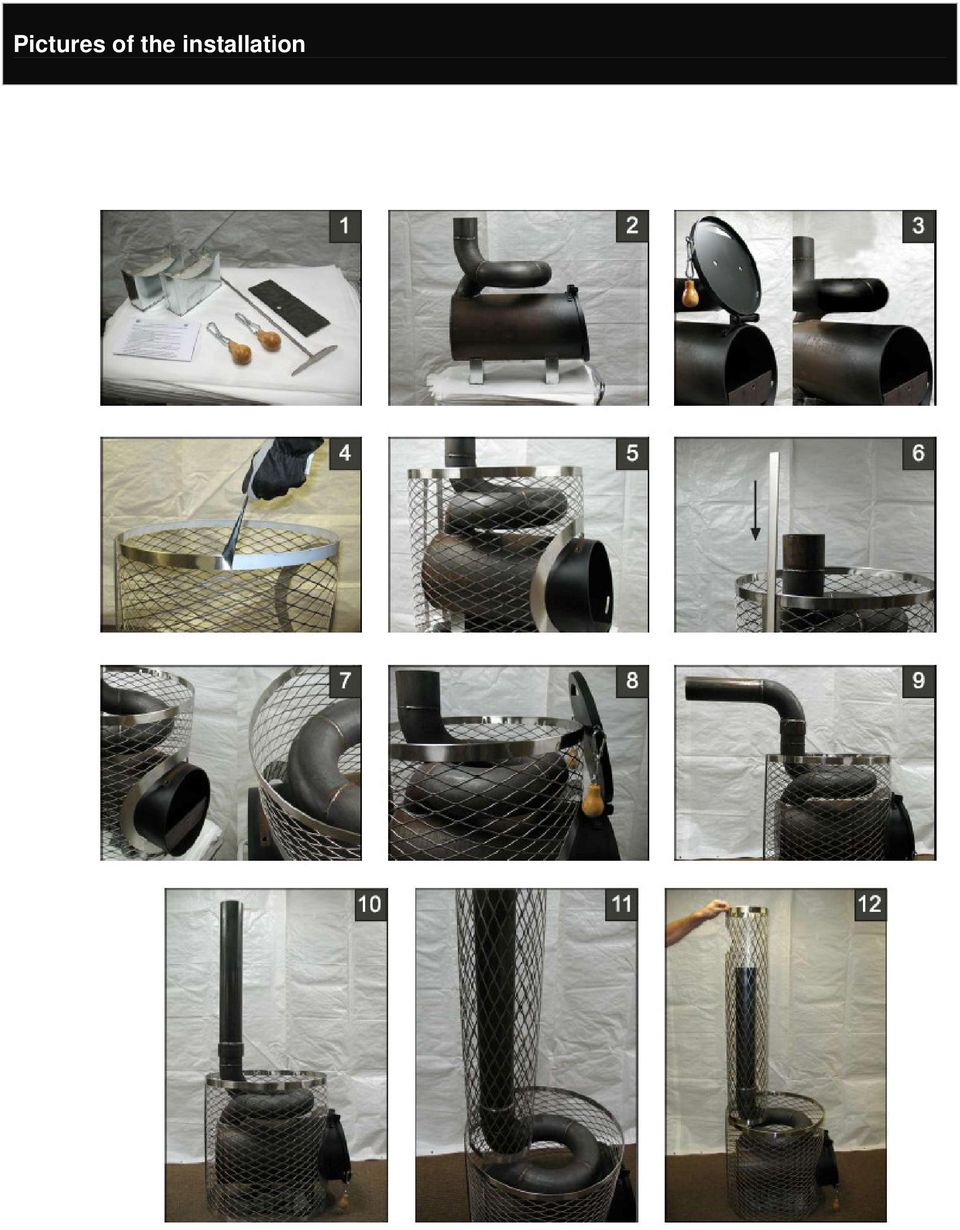
2 Installation of Original IKI and Maxi IKI stoves 1. Check that all the necessary parts for the stove are included in the delivery: 2 concrete legs, 2 wooden handles for the door, fire plate, soot trowel (Picture 1). 2. Position the fire box on top of the two supporting legs on a steady fireproof surface close to the stove's final placement (Picture 2). Pay attention to the required safety distances. 3. Detach the door of the fire box from it's hinges. 4. Remove the protective plastic coverings from all the parts of the stainless steel mesh frame (Picture 4). Pull the attachment strip off from the back of the mesh frame and remove the protective covering from the strip as well. 5. Fit the mesh frame around the fire box (Picture 5) and reattach the metal strip to the back of the frame (Picture 6). There should be approximately 5 cm of empty space left between the spiral fire pipe and the mesh frame (Picture 7). This will later be filled with stones. 6. Put the fire plate in its place in the front of the fire box. The plate will stop soot and cinders from falling out and also directs combustion air. 7. Make sure that the fire box is level. Reattach the door to the fire box (Picture 8). The door should lean back against the mesh frame and not fall down on its own. 8. Attach the flue connecting pipe to the chimney (Picture 9). 9. Carefully pile the stones inside the mesh frame one by one. We recommend olivine, olivine-dolerite and peridotite stones smaller than 10 cm in diameter. The stones should not be placed too tightly together to allow for free air flow between the stones. Note that the use of soapstone and natural stones is allowed only on the outer edges and on the top of the stove where they do not come into contact with the fire box. Installation of Mini IKI, Semi IKI, Original IKI Plus and Maxi IKI Plus stoves These stoves have a separate fire box and fire pipe and two pieces of stainless steel mesh frame. Follow steps 1 9 as described above with the Original IKI and Maxi IKI stoves. Note that the flue connecting pipe must be fitted to the chimney before the stones are piled in. When the stones have been piled in to the lower part of the stove, continue with the following steps: 1. The fire pipe extension must be measured and cut to correct length according to the safety distances. Attach the fire pipe to the connection opening in the fire box (Picture 10). 2. Fit the mesh frame around the extended fire pipe (Picture 11). 3. The stones should be piled to the upper part of the mesh frame one by one making sure that the stones cover the fire pipe evenly on all sides. (Picture 12). The frame starts to set to place when there are about 10 cm of stones inside it. It is recommended that there are two people working together during this process, one to hold the frame, the other piling in the stones. 4. If the chimney is located directly on top of the stove, the upper mesh frame can be turned upside down so that the exit hole for the 90-degree pipe is hidden in to the lower part of the stove and is not visible.

3 Pictures of the installation
4 Safety distances Safety distances to inflammable structures are measured from the mesh frame outwards: At the back In the front Upwards To the sides min. 100 mm min. 500 mm min mm min. 100 mm Note that the safety distances can be reduced by 50% using protective sheathing or by 75% with doublesheathing. You can use 7 mm thick light fibre-reinforced cement plate or 1 mm thick stainless steel protective sheath. Both require a 30 mm air gap between the sheath and the inflammable surface. Double sheathing can be obtained using two layers of protective sheathing. The sheaths can be attached to one another with a 30 mm air gap in between the two and another 30 mm gap between the sheath and the surface that requires protection. The area between the fire box and the mesh frame must be fully covered by stones. The smoke pipe can also be covered by stainless steel mesh and laden with stones. This reduces safety distances to inflammable surfaces by 50% to 500 mm upwards and 250 mm to the sides.

5 Instructions for installation IKI wood-burning stove can be installed into a) a brick flue b) ceramic flue or c) an air-ventilated flue. With any other type of flue, please contact the manufacturer to discuss compatibility. We recommend installing a damper to adjust draught in the flue. IKI stoves have no ash box or grate. Mini IKI and Semi IKI both have a "nose" hatch for controlling draught, Original IKI and Maxi IKI do not require this feature. In privately-used saunas in recreational use, the chimney must be swept every three years. Privately-used saunas as well as communally-used saunas in frequent use require sweeping once a year. The diameter of the outer surface of the pipe is 115 mm. Storing combustible materials (such as fuels) close to the fire space is forbidden. All sootfires, even exhausted ones, must be reported to the fire authorities. Heat up the stove once before bathing to burn off protective oil solvents. Note that afterwards you need to air the sauna room well. Instructions for bathing The heating time for IKI stoves is about one hour depending on the size of the room and its ventilation. The recommended bathing temperature is degrees Celsius. When adding more wood into the fire during bathing, lightly sweep the existing embers towards the fire plate in the front of the fire space. Pile wood on top of the embers in the front and middle of the fire space. We recommend filling the fire space no more than 2/3rds full of wood (see picture below). Throwing water on the stove increases the temperature and the humidity in the sauna. The top of the pillar of stones creates more heat, while the sides create a gentler steam. Throwing seawater on the stove is forbidden. NOTE that the stove door may change color after a while in use and the paint may wear off. The door can be repainted with heatproof paint that can withstand temperatures up to 600 degree Celsius. Before painting the door, the surface must be polished and wiped clean of all traces of oily substances.

6 Instructions for sweeping Wear a long-sleeved shirt and protective gloves while dismantling, sweeping and assembling the stove. Original IKI and Maxi IKI 1. Detach the smoke pipe. 2. Spray or pour water into the pipe and use a sweeping brush to clean the inside of the smoke pipe. Note that the spiral smoke pipe requires a brush that bends. 3. Use the trowel to scrape the soot from the fire space into a container. If you are using water, place a large bucket in front of the door before you pour in the water. Dismantling, sweeping and assembling the stove should take about minutes all in all.

7 Mini IKI, Semi IKI, Original IKI Plus and Maxi IKI Plus OPTION 1 Remove flue connecting pipe OPTION 2 Remove the stones from the upper mesh frame until you reach the connection to the smoke pipe. Detach the pipes. If the sweeping brush is short, continue removing the stones from the upper part of the mesh frame. When you no longer reach the stones from above, slide the frame upwards and start removing the stones from underneath it. Remove the upper mesh frame and detach the pipe. Sweep the fire pipe following the directions given above with the Original IKI and Maxi IKI. Dismantling, sweeping and assembling the stove takes 1 2 hours all in all.

8 Warranty Warranty period The warranty period is one year from the day of delivery. The warranty covers Finland only. Quality guarantee During the warranty period any defects that appear in the heater's raw materials or are production-based will be replaced or fixed free of charge. Throwing sea water on the heater is forbidden. The warranty does not cover color changes, slipping or hair-line fractures in the stones, which do not affect the use or the safety of the heater. Damage occurred while shipping needs to be recorded in the waybill when the product is received or within 7 days of delivery. Shipping damage must also be reported to the shipping company s last contact. The damaged part needs to be stored for inspection. Insurance compensates for the new part, which will be delivered by a public transporter. In all issues concerning warranty contact the store the product was bought from. This instruction for installation and operation manual is given to the owner/user of the stove after installation. Requirements for water quality Water property Effects Recommendation Humus concentration Color, taste, precipitates <12 mg/l Iron concentration Color, smell, taste, precipitates <0,2 mg/l Hardness: most important substances are manganese (Mn) and lime, i.e. calsium (Ca) Precipitates Mn: <0,05 mg/l Ca: <100 mg/l Chlorinated water Risk to health Use is completely forbidden Seawater Fast corrosion Use is completely forbidden Contact information IKI-Kiuas Ltd. IKI-KIUASKAUPPA /Sales Hakaniemenkatu Helsinki Business hours: Mon-Fri tel fax mail ikikiuas@ikikiuas.com Technical support tel mail jari@ikikiuas.com Production and storage Pälkäneentie Helsinki Pick-up times: Mon-Fri 9-17 tel fax mail timo@ikikiuas.com

version 1.0 Made by NARVI Oy Finland Kota Kuru 14 and 20 sauna heaters Installation, user and maintenance instructions
 version 1.0 Made by NARVI Oy Finland Kota Kuru 14 and 20 sauna heaters Installation, user and maintenance instructions GB GB 2 GB Content 1.1 Technical data 4 2. Before you install the sauna heater 5 2.1
MAGNUM Original Sauna Stove 6.6 kw 9.0 kw 10.5 kw MAGNUM Cenik and Lite Sauna Stoves 6.6 kw 9.0 kw 10.5 kw Use and Installation
 MAGNUM Original Sauna Stove 6.6 kw 9.0 kw 10.5 kw MAGNUM Cenik and Lite Sauna Stoves 6.6 kw 9.0 kw 10.5 kw Use and Installation With Finlandia and Magnum RC Control Centers Use and installation manual
Chimneys in Thatched Properties
 Chimneys in Thatched Properties Compliance with Building Regulations when installing or repairing a chimney or re-thatching a roof that abuts a chimney The increasing problem of thatch fires Over the last
TECHNICAL DESCRIPTION
 FIREPLACES, STOVES AND FIREBOXES TO BUILD IN (WITHOUT FORCED VENTILATION AND WATER HEAT EXCHANGER) TECHNICAL DESCRIPTION The fireplaces of Prity are intended for heating of private houses and public premises
SRP Pricelist 2015 Including VAT. Stoves for every home
 SRP Pricelist 2015 Including VAT Stoves for every home Valid from 01-10-2015 UK Contents Contura Stoves C400 Series... 2-4 C500 Series... 5-9 C600 Series... 10-13 C700 Series... 14-15 C800 Series... 16-17
Schlüter -KERDI-BOARD Substrate, structural panel, bonded waterproofing
 Substrate, structural panel, bonded waterproofing The universal substrate for tiles Perfect covering No matter whether you work with mosaics or large format tiles, an absolutely level substrate with straight
Owner's Manual & Assembly Instructions
 Owner's Manual & Assembly Instructions PM01 BASE KIT Model No. FDN1014 717090311 CAUTION: SOME PARTS HAVE SHARP EDGES. CARE MUST BE TAKEN WHEN HANDLING THE VARIOUS PIECES TO AVOID A MISHAP. FOR SAFETY
How to build a Pizza Oven in 4 days
 How to build a Pizza Oven in 4 days Preparation day (slab) 1. Foundation 1500 deep x 1300 wide x 75mm deep Required 20 bags cement pre mix. If you already have a concrete base, you save this prep day DAY
NOTE! READ INSTRUCTIONS FULLY BEFORE INSTALLING OR OPERATING.
 INSTALLATION AND OPERATION GUIDE FOR HARGROVE GAS LOGS PROPANE GAS ADEQUATE FIREPLACE VENTILATION IS REQUIRED FOR SAFETY. GAS LOGS MUST BE INSTALLED BY PERSONNEL QUALIFIED FOR INSTALLING GAS APPLIANCES.
INSPIRE 40/45/55 INSTRUCTIONS OPERATING APPROVED FOR USE IN SMOKE CONTROL AREAS WHEN BURNING DRY WOOD LOGS OR AUTHORISED FUELS. Inspire 40 Inspire 45
 INSPIRE 40/45/55 APPROVED FOR USE IN SMOKE CONTROL AREAS WHEN BURNING DRY WOOD LOGS OR AUTHORISED FUELS OPERATING INSTRUCTIONS Inspire 40 Inspire 45 Inspire 55 www.heta.dk Installation and Operating Instructions
Boston, Venice, Kodiak. Enviro Wood Fireplace Inserts
 Boston, Venice, Kodiak Enviro Wood Fireplace Inserts Why buy an Enviro Wood Insert? Up to 84.7% Efficiency - EPA approved and up to 84.7% efficiency - Enviro makes highly efficient wood inserts to help
B. DEFINITIONS LINING OLD CHIMNEYS A. INTRODUCTION C. REASONS FOR LINING
 LINING OLD CHIMNEYS A. INTRODUCTION The most appealing focal point in any room must be the fireplace. Be it an open fire, closed stove or roomheater, the leaping flames and glowing coals are the real heart
FREESTANDING CLEAN AIR WOODBURNER
 Please read this booklet and keep for future reference for the safe installation of your: FREESTANDING CLEAN AIR WOODBURNER This fire conforms with Ecan Requirements All installations must be in accordance
Installation Instructions
 Installation Instructions Pedestal Models FS 500 LE FS 800 LE Insert Models IS 500 LE IS 800 LE Pecan Engineering Pty Ltd 13 Acorn Road Dry Creek South Australia 5094 Email info@pecan-eng.com.au Phone:
Reverse combustion log-fired boiler CBI-II / CBB 15 E. User Guide 300019729-001-C
 EN Reverse combustion log-fired boiler CBI-II / CBB 15 E User Guide 300019729-001-C . Contents 1 Used symbols...........................................................................3 2 Important recommendations...............................................................3
INSTRUCTION FOR ASSEMBLY. 150x180 v Traditional sauna cabin
 INSTRUCTION FOR ASSEMBLY 150x180 v Traditional sauna cabin 1. SAUNA PLAN 1800 LIGHT UNDER THE BENCH VENTILATION OUTLET UPPER BENCH 600 1500 LOWER BENCH 400 700 1656 956 HEATER 366 381 690 815 Light switch
SEE HOW TO MAKE LIME PLASTER WHY USE LIME? PATTI STOUTER, BUILD SIMPLE INC. FEBRUARY 2013
 SEE HOW TO MAKE LIME PLASTER PATTI STOUTER, BUILD SIMPLE INC. FEBRUARY 2013 WHY USE LIME? Lime plaster forms a light, clean, and durable surface that is resistant to weather and mold. A thin layer attaches
Fire Damage. To Help Prevent. a Guide
 a Guide To Help Prevent Fire Damage Fire damage in your home can be costly and emotionally devastating. The damage caused by the flames and smoke can destroy a lifetime of memories in a matter of minutes.
(This report is endorsed) Industrivej 20, 9900 Frederikshavn, Danmark
 Industrivej 20, 9900 Frederikshavn, Danmark") Spectrum Laboratories Ltd is accredited by International Accreditation New Zealand (formerly Telarc). The tests reported herein have been performed in accordance with the terms of our accreditation. This
Spectrum Laboratories Ltd is accredited by International Accreditation New Zealand (formerly Telarc). The tests reported herein have been performed in accordance with the terms of our accreditation. This
MoME/ MoARD/ GTZ-Sustainable Utilization of Natural Resources for Improved Food Security Program. Manual for Production of a Household Rocket Stove
 MoME/ MoARD/ GTZ-Sustainable Utilization of Natural Resources for Improved Food Security Program Manual for Production of a Household Rocket Stove Tikikil Ministry of Agriculture and Rural Development
D O U B L E / D O U B L E H A W K 4 C E
 D O U B L E / D O U B L E H A W K 4 C E M U L T I F U E L C L E A N B U R N S T O V E Installation and Operating Instructions An accredited competent person must carry out the installation of this appliance;
GNOME PELLET E.I. Pellet Heater Owner's Manual Installation and Operating Instructions. Please read this entire manual before installation.
 Pellet Heater Owner's Manual Installation and Operating Instructions Please read this entire manual before installation. Save these instructions. SAFETY NOTICE HEATER MUST BE PROPERLY INSTALLED AND MAINTAINED
Screen Melts. Introduction. Selecting Screen Material. Prefire Before Using. Spalling. Kiln Shelf
 Introduction There are two terrific reasons for melting glass through screens. First because screen melts produce uniquely intricate patterns not possible any other way and second because it does it using
50AI01oe 02/15. Labko GRP cesspools. Instructions for installation, operation and maintenance
 02/15 Labko GRP cesspools Instructions for installation, operation and maintenance Reliable solutions Wastewater treatment systems Contents 1 LABKO CESSPOOLS... 3 1.1 GENERAL... 3 1.2 IMPORTANT TO KNOW
OWNER S MANUAL FOR THE PATIO SAUNA
 OWNER S MANUAL FOR THE PATIO SAUNA CONGRATULATIONS! You are about to install the world s leading portable sauna. No other sauna manufacturer can offer you the features and owner support that Saunatec,
PRE-ASSEMBLED INSTALLATION INSTRUCTIONS FOR PACB SERIES COAL FIRED OVENS
 PRE-ASSEMBLED INSTALLATION INSTRUCTIONS FOR PACB SERIES COAL FIRED OVENS OVENS MANUFACTURED BY: EARTHSTONE OVENS-6717 SAN FERNANDO RD GLENDALE CA 91201 TELEPHONE: 800-840-4915 818-553-1134 FAX: 818-553-1133
MANUAL PX4 ENGLISH. Nimbus Combi NIMC-90N NIMC-105N NIMC-120N Super Nimbus Combi ELECTRIC SAUNA HEATER / STEAM GENERATOR
 MANUAL Nimbus Combi NIMC-0N NIMC-105N NIMC-120N Super Nimbus Combi NIMC-0N NIMC-180N Congratulations on your purchase of a SAWO heater/steam generator. Please read the manual carefully before using the
TFL CUSTOM FIREPLACES WITH MASONRY BRICK LININGS. standard INSTALLATION SPECIFICATION INTO TIMBER FRAMING
 6.CW.1A TFL CUSTOM FIREPLACES WITH MASONRY BRICK LININGS wood or gas standard INSTALLATION SPECIFICATION INTO TIMBER FRAMING The Fireplace Ltd is able to design and fabricate custom brick open masonry
MANUAL PX4 MINI COMBI. www.sawo.com info@sawo.com MNC-30NS MNC-30NSB MNC-30NSF
 MINI COMBI MNC-30NS MNC-30NSB MNC-30NSF MANUAL MNC-3NS MNC-3NSB MNC-3NSF Congratulations on your purchase of a SAWO heater/steam generator. Please read the manual carefully before using the product. The
SPECIFICATION & INSTALLATION GUIDE FOR MASPORT LE4000 PROVINCIAL INSERT FIRE, NEW ZEALAND MODEL
 SPECIFICATION & INSTALLATION GUIDE FOR MASPORT LE4000 PROVINCIAL INSERT FIRE, NEW ZEALAND MODEL Manufactured in New Zealand by: GLEN DIMPLEX AUSTRALASIA LIMITED PO Box 58-473 Botany Auckland 2163 Ph: 0800
McDonald s Kitchen Cleaning Instructions. Prepared for: Employees of McDonald s
 McDonald s Kitchen Cleaning Instructions Prepared for: Employees of McDonald s Prepared By: Aracelly Arana TECM 2700 MWF 10-10:50 May 9, 2014 Table of Contents Table of Contents Table of Contents... iii
SIBIR MANUAL V110 KE. English page 5 RKE - 1D 822 70 66-02
 SIBIR MANUAL RKE - 1D V110 KE English page 5 822 70 66-02 2 1 A. Flue tube E. Adapter I. Thermostat B. Flue baffle F. Burner base J. Lever arm C. Control knob G. Lamp glass D. Fuel gauge H. Lamp glass
INSTALLATION GUIDE FOR GIROLAMI CAMINETTI OVEN
 Dear Customer, Congratulation for buying a Girolami Caminetti oven. You have made the right choice in purchasing a product from the world leader producer of wood fired ovens. With a perfect installation,
INSTALLATION RECOMMENDATIONS. Outdoor Rubber Tiles
 INSTALLATION RECOMMENDATIONS Outdoor Rubber Tiles Prior to Installation: The Outdoor Rubber Tiles and accessory transition pieces intended for this installation have been shipped to you via a freight carrier
Installation Instructions
 GC 3 (THREE OVEN) Installation Instructions REMEMBER: when replacing a part on this appliance, use only spare parts that you can be assured conform to the safety and performance specification that we require.
CHARISMA SHOWER/TUB DOOR INSTALLATION INSTRUCTIONS
 CHARISMA SHOWER/TUB DOOR INSTALLATION INSTRUCTIONS IMPORTANT DreamLine reserves the right to alter, modify or redesign products at any time without prior notice. For the latest up-to-date technical drawings,
North Carolina FFA Association Agricultural Mechanics Career Development Event
 North Carolina FFA Association Three (3) of the following Agricultural Mechanics Performance Skills will be selected for the state competition. North Carolina FFA Association Agricultural Mechanics Performance
T H A N K Y OU F O R Y OUR P U R C H A S E O F A N E S S E N T I A V A N I T Y, P L E A S E R E A D T H E S E V A N I T Y C A R E A N D I N S T A L L
 T H A N K Y OU F O R Y OUR P U R C H A S E O F A N E S S E N T I A V A N I T Y, P L E A S E R E A D T H E S E V A N I T Y C A R E A N D I N S T A L L AT I O N I N S T R U C T I O N S C A R E F U L LY CAR
CORROSION ENGINEERING RESIN-BASED POLYMER CONCRETES AND GROUTS
 AN ERGONARMOR COMPANY TECHNICAL INFORMATION SPECIFICATION FOR INSTALLATION 07/11 SUPERSEDES 04/00 PAGE 1 OF 6 CORROSION ENGINEERING RESIN-BASED POLYMER CONCRETES AND GROUTS 1. SCOPE 1.1 This specification
CORNER FRIDGE REFRIGERATION UNIT INSTALLATION AND OPERATION INSTRUCTIONS
 CORNER FRIDGE REFRIGERATION UNIT INSTALLATION AND OPERATION INSTRUCTIONS D E F Y I N G C O N V E N T I O N Congratulations on your new Corner Fridge Your new corner fridge may have different functions
Chimney systems ICOPAL WULKAN C/CI/C-eko/CI-eko
 INSTALLATION MANUAL Chimney systems ICOPAL WULKAN C/CI/C-eko/CI-eko Ventilated Notified entity Building Technical and Research Institute Prague notification no. 1020 This instruction refers to double-layer
http://waterheatertimer.org/troubleshoot-rheem-tankless-water-heater.html
 http://waterheatertimer.org/troubleshoot-rheem-tankless-water-heater.html TECHNICAL SERVICE DEPARTMENT Removal, Cleaning, & Reinstallation of the Burner Assembly For models 74 & GT199 Required tools -
INSTALLATION AND OPERATIONS GUIDE FOR GRAND CANYON GAS LOG SYSTEMS
 INSTALLATION AND OPERATIONS GUIDE FOR GRAND CANYON GAS LOG SYSTEMS Installation and service must be provided by a qualified installer, service agency or gas supplier Grand Canyon Gas Logs, logs are made
FIRES WITHOUT COMPROMISE EXCEPTIONAL FIRES JETMASTER INSET STOVE. Installation, Operating and Servicing Instructions JETMASTER MK6
 FIRES WITHOUT COMPROMISE EXCEPTIONAL FIRES JETMASTER INSET STOVE Installation, Operating and Servicing Instructions JETMASTER MK6 Please leave these instructions with the customer SERIAL NUMBER..... Contents
Beautifully Traditional
 Arcade 800mm Single Sliding Door Quadrant - nickel Arcade 900mm Single Sliding Door Quadrant - nickel ARC48 ARC49 INSTALLATION INSTRUCTIONS A www.arcadebathrooms.com IMPORTANT - Please read before installation
Wood Burning Safety Guide
 Wood Burning Safety Guide CONTENTS Burning Wood Safely...5 Chimney and Stovepipe Cleaning...8 Chimneys for Wood Stoves...1 Cleaning System...8 Clearances...5 Creosote...8 Disposal of Ashes...8 Draft...2
Triple Threat 3-in-1 Game Table 3 IN 1 GAME TABLE
 NG0M Triple Threat 3-in- Game Table 3 IN GAME TABLE Thank 3 in Y Game Table Thank you for your purchase of our product. We work around the clock and around the globe to ensure that our products maintain
MY HOME IN A HOUSING BLOCK A GUIDE FOR RESIDENTS
 MY HOME IN A HOUSING BLOCK A GUIDE FOR RESIDENTS -KESKUSTA One half of Finns live in housing blocks, which is a safe and comfortable way to live. Welcome a board! Buildings and the Finnish climate There
USER MANUAL and INSTALLATION MANUAL
 InisMor USER MANUAL and INSTALLATION MANUAL Inis Mor User manual. Congratulations on the purchase of your Inis Mor back boiler stove. When fitted and operated correctly, you should enjoy many years, trouble
Rapide Inline Ceiling Extractor Fan, White Fascia 41800040590. Rapide Inline Ceiling Extractor Fan, Chrome Fascia 41800040580
 Any Queries Call : 08000 23 23 23 Rapide Inline Ceiling Extractor Fan, White Fascia 41800040590 Rapide Inline Ceiling Extractor Fan, White Fascia Illuminated 41800040670 Rapide Inline Ceiling Extractor
STR-600 Plate Dryer. 1. What it s meant for?
 STR-600 Plate Dryer 1. What it s meant for? Device is meant for water damage drying on local wetted areas. The device suits best for different stone type structures, such as concrete, brick structures
HOW-TO LAY HARDBOARD OR PLYWOOD FLOOR OVERLAY
 HOW-TO HOW-TO LAY HARDBOARD OR PLYWOOD FLOOR OVERLAY Most floor coverings, if laid over uneven wooden floors, will wear unevenly and look unsightly. The answer is to cover the old boards with hardboard
VC 104+ Rigid Grade / Rigid Grade Imagine VC 104 Rigid Grade Commercial Customised
 Page 1 of 6 instructions VC 104+ Rigid Grade / VC 104+ Rigid Grade Imagine / (for the rest of this document referred to as VC 104) can be applied to new and used trucks and trailers with painted rigid
RE-3 : SOLID TOP RANGE RANGE TOP ONLY
 VULCAN ELECTRIC SOlid top oven range MODEL: RE-3 - SOLID TOP oven Range RE-3T - SOLID range top only ON CABINET BASE RE-3 : SOLID TOP RANGE Model Re-3T : Solid TOP RANGE TOP ONLY Index: General Data 2
More heat, longer life.
 More heat, longer life. 2014 Dear friends, W e live in snowy, cold Siberia, where heat is especially valued. Therefore, we find it natural to treat such a seemingly conservative and simple thing as a stove
CERTIFICATE NAME OF PRODUCT MANUFACTURER PRODUCT DESCRIPTION CERTIFICATION PROCEDURE. No VTT C-6044-10 Date of issue 11.10.2010, Updated July 1, 2011
 CERTIFICATE NAME OF PRODUCT No VTT C-6044-10 Date of issue 11.10.2010, Updated July 1, 2011 H-CONTROL REFLEX+ reflective insulating vapour control layer for roof and wall applications MANUFACTURER ACTIS
K2 STONE NATURAL VENEER
 INTRODUCTION WHAT IS K2 NATURAL THINSTONE VENEER? Natural K2 Stone veneer is real stone, cut 1 inch thick, making it light enough to be installed as a veneer. Sometimes referred to as thin veneer, thin
BUTTERFLY SHOWER DOOR INSTALLATION INSTRUCTIONS
 BUTTERFLY SHOWER DOOR INSTALLATION INSTRUCTIONS IMPORTANT DreamLine reserves the right to alter, modify or redesign products at any time without prior notice. For the latest up-to-date technical drawings,
MAJESTIC. OUTDOOR / INDOOR WOOD FIREPLACES Model: ODSR36A OWNERS INSTALLATION & OPERATING INSTRUCTIONS. KEEP THESE INSTRUCTIONS FOR FUTURE REFERANCE.
 MAJESTIC OUTDOOR / INDOOR WOOD FIREPLACES Model: ODSR36A OWNERS INSTALLATION & OPERATING INSTRUCTIONS. KEEP THESE INSTRUCTIONS FOR FUTURE REFERANCE. CONTENTS Part 1: Safety Information Part 2: Installation
Installation Instructions
 Installation Instructions READ BEFORE INSTALLING UNIT For Low Profile Window Air Conditioner INSTALLATION WARNINGS AND CAUTION Carefully read the installation manual before beginning. Follow each step
Building Condition Assessment Report
 Building Condition Assessment Report Asset C3c - Oak Terrace Cottage 121 Address Riverview Lands, 2601 Lougheed Highway, Coquitlam, BC. V5C 4J2 Construction Year Size (Gross Floor Area) 1920. 2,553 Sq.Ft.
This will also provide you with the knowledge to insure long life for your Investment
 CONDUIT PIPE DRYING This Presentation will guide you to why systems fail! This will also provide you with the knowledge to insure long life for your Investment Drainable and Dryable System Design Trough
Ravelli Camino Insert Wood Pellet Burning Heater. Wood Pellet Fire Installation Specifications. Safety testing of the
 Ravelli Camino Insert Wood Pellet Burning Heater Fire shown installed with a non-combustible floor - no hearth required Ravelli Camino Insert Wood Pellet Fire Installation Specifications Safety testing
OUTDOOR GAS FIREPLACE USER GUIDE North America 630165_2 EF5000. www.escea.net
 OUTDOOR GAS FIREPLACE USER GUIDE North America 630165_2 EF5000 www.escea.net Any service work carried out on this appliance must only be done by a recognised escea technician or authorized personnel. The
556/586 NEW NEW. One step closer to the fire. www.contura.eu
 001 556/586 NEW NEW One step closer to the fire www.contura.eu 378 MILJÖMÄRKT 1 Closer to the fire with large glass side panels NEW! The new Conturas 556/586 feature large glass side panels to enhance
XONYX Solid Surface Owner's Manual
 XONYX Solid Surface Owner's Manual 1. IMPORTANT SAFETY CAUTION: Never allow children to use the bath/shower cabin without adult supervision to avoid accidents. CAUTION: Physically challenged people must
IMPORTANT INSTRUCTIONS & OPERATING MANUAL. Houston 50 Inch Electric Wall Mounted Fireplace Black / White
 IMPORTANT INSTRUCTIONS & OPERATING MANUAL Houston 50 Inch Electric Wall Mounted Fireplace Black / White Model Number:MFE5050BK Model Number:MFE5050WH Read these instructions carefully before attempting
Across America. Wood & Coal Brochure
 Across America Wood & Coal Brochure Rev. Sep. 2011 Bay Series... A series of well built high heat performers featuring decorative side windows and full view glass door with airwash system to help keep
STENCA PIPE. High quality pipe insulation. www.stenca.com
 STENCA PIPE High quality pipe insulation WELCOME TO STENCA TRADING - Global focus with local service Stenca Trading offers optimal solutions for the offshore, marine, refineries and cogeneration industry.
PNEUMATIC - HIGH PRESSURE FLAT-FORM HEAVY LIFTING BAGS
 PLEASE READ AND UNDERSTAND THIS MANUAL BEFORE USING SAVA LIFTING BAGS PNEUMATIC - HIGH PRESSURE FLAT-FORM HEAVY LIFTING BAGS & INFLATION ACCESSORIES SAFETY, OPERATION AND MAINTENANCE INSTRUCTIONS NON-COMPLIANCE
Stove-boiler for solid fuels 12-30 KW Directions for use and assembling
 Stove-boiler for solid fuels 12-30 KW Directions for use and assembling February 7, 2012 Contents 1 Technical data 2 1.1 Boiler properties TEMY PLUS 12-30 KW......................... 3 1.2 On Product............................................
Euro Oak Installation
 STYLE TIMBER FLOOR Bring your life in style Euro Oak Installation Before Starting Installation Your floor has been manufactured with the best possible care. However we would still advise you to check the
Profiles for floors of same height Cerfix Projoint
 PROFILPAS S.P.A. VIA EINSTEIN, 38 35010 CADONEGHE (PADOVA) ITALY TEL. +39 (0)49 8878411 +39 (0)49 8878412 FAX. +39 (0)49-706692 EMAIL: INFO@PROFILPAS.COM s for floors of same height Cerfix Projoint Application
Decree of the Ministry of the Environment on fire safety of ventilation systems
 THE NATIONAL BUILDING CODE OF FINLAND MINISTRY OF THE ENVIRONMENT Housing and Building Department Decree of the Ministry of the Environment on fire safety of ventilation systems Adopted in Helsinki, 18
FRONT BUMPER INSTALLATION INSTRUCTIONS 2007-2011 DODGE / MERCEDES SPRINTER
 Aluminess Products Inc 9402 Wheatlands Ct. #A Santee, CA 92071 619-449-9930 FRONT BUMPER INSTALLATION INSTRUCTIONS 2007-2011 DODGE / MERCEDES SPRINTER Please read before beginning Stainless steel hardware
HALE PET DOOR INSTALLATION INSTRUCTIONS HALE STANDARD PANEL MODEL
 HALE PET DOOR INSTALLATION INSTRUCTIONS HALE STANDARD PANEL MODEL Please read these instructions carefully and completely before attempting to install Hale Pet Doors; they will guide you through the steps
Make sure oven is OFF. Never remove parts or touch the fan unless the oven is OFF.
 Morning Cleaning The following start-up procedures MUST be completed before using the oven. The procedures may be completed at night after the oven has completed the clean cycle, or in the morning BEFORE
www.regency-fire.com GAS STOVES woo GAS STOVES
 www.regency-fire.com GAS STOVES woo GAS STOVES Why choose Regency? Beautiful Home Heating Solutions Regency Fireplace Products was founded over 35 years ago with a mission to produce the finest fireplace
Boiler Plan II Table of Contents
 Cover Page Table Of Contents Introduction Parts List Additional Materials Assembly instructions Drawings 1-15 Boiler Plan II Table of Contents Introduction This will be a very rewarding project, if you
Make your own glass jewellery, anyone can do it!
 User manual Make your own glass jewellery, anyone can do it! INTRODUCTION With the HotPot you can melt glass in a microwave to create jewellery or glass components for jewellery and other creative purposes.
plumbing products guide
 plumbing products guide radiator pipe guide & seals A significant development in the drive to reduce air leakage and heat loss. Installations such as that shown are all too common. The detail is poorly
This Limited Warranty is valid for domestic kitchen use and is subject to the terms and conditions stated in this folder.
 Kitchen Everyday life at home puts high demands on a kitchen, which is why we test our kitchens thoroughly to ensure that they can take being exposed to heavy weights, high temperatures and everyday use.
INSTALLATION INSTRUCTIONS for Bifold Doors (JII103)
") Thank you for selecting JELD-WEN products. Attached are JELD-WEN s recommended installation instructions for premium composite, hollow and solid core molded Bifold Doors. Bifolds are designed for fast
Thank you for selecting JELD-WEN products. Attached are JELD-WEN s recommended installation instructions for premium composite, hollow and solid core molded Bifold Doors. Bifolds are designed for fast
SunMor SM-V30 Solar Water Heater Installation Manual
 SunMor SM-V30 Solar Water Heater Installation Manual Rev. 1.02 Congratulations on the purchase of your new SunMor SM-V30 from Nature s Comfort LLC! You must read this entire instruction manual before beginning
Stainless Steel Sink Work Center With Portable Sink, Colander and Cutting Board
 SKU: 463780 / QK09 Owner s Manual Stainless Steel Sink Work Center With Portable Sink, Colander and Cutting Board THANK YOU for selecting American Standard the benchmark of fine quality for over 00 years.
CARE DURING CONSTRUCTION OF HOUSE:
 In addition, your heater is equipped with a sliding shut off damper with a wooden handle, as well as a by-pass channel with a pivoting weighted handle. OWNER MANUAL ALBIECORE HEATER OPERATING AND MAINTENANCE
1 DESCRIPTION OF THE APPLIANCE
 1 DESCRIPTION OF THE APPLIANCE 1.1 INTRODUCTION The cast iron SF boilers are a valid solution for the present energetic problems, since they can run with solid fuels: wood and coal. These series of boilers
Instructions for installation and use 7800-7900. Designed by Monica Ritterband
 Instructions for installation and use 7800-7900 Designed by Monica Ritterband Morsø 7840, 7843, 7848, 7850, 7870, 7890 Morsø 7940, 7943, 7948, 7950, 7970, 7990 Morsø 7848 Morsø 7943 EN 13240 NS 3058-3059
OPERATION, MAINTENANCE & WARRANTY INFORMATION FOR YUNCA WOOD BURNERS.
 MARCH 2016 OPERATION, MAINTENANCE & WARRANTY INFORMATION FOR YUNCA WOOD BURNERS. MONTE BASE MONTE EURO MONTE LEG WEGJ 2000 HOBSON OSCAR XANDER THIS APPLIANCE SHOULD BE MAINTAINED AND OPERATED AT ALL TIMES
CHARNWOOD SLX45 Multi-Fuel Roomheater with Boiler
 CHARNWOOD SLX45 Multi-Fuel Roomheater with Boiler Operating and Installation Instructions C H A R N W O O D B i s h o p s W a y, N e w p o r t, I s l e o f W i g h t P O 3 0 5 W S, U n i t e d K i n g
HIGH QUALITY COMPONENTS
 Eco reen Line HIGH QUALITY COMPONENTS that distinguish Eco reen Line series of devices 1. The lambda probe it performs a function of an oxygen sensor (O ) in the exhaust gasses, providing constant diagnostic
Commissioning of Heat Producing Appliances Burning Solid Fuel
 Building Control Technical Guidance Leaflet No. 15 This leaflet is one of a series produced by the Hertfordshire Building Control Technical Forum Commissioning of Heat Producing Appliances Burning Solid
AKRAPOVIC SLIP-ON EXHAUST SYSTEM for the HONDA CB1000R
 Installation instructions: *502131* AKRAPOVIC SLIP-ON EXHAUST SYSTEM for the HONDA CB1000R Congratulations on purchasing an Akrapovic exhaust system. Please read these installation instructions carefully.
SPREFIX SPRAY INSULATION _ in the marine market.
 SPREFIX SPRAY INSULATION _ in the marine market. A self-adhesive glass or stone wool, sprayed directly onto surface.. Easily applied to wood, steel, plastic or other surfaces without any mechanical fasteners
I N S T A L L A T I O N I N S T R U C T I O N S F O R T H E H i l k o i l Energy S aving Hot Water Kit
 I N S T A L L A T I O N I N S T R U C T I O N S F O R T H E H i l k o i l Energy S aving Hot Water Kit IMPORTANT: These installation instructions are meant to be used as a guide for woodstove owners and
TOBY DVR5 OIL CONTROL & SAFETY VALVE
 TOBY DVR5 OIL CONTROL & SAFETY VALVE TECHNICAL HANDBOOK Principle of Operation The Toby DVR5 Oil Control Valve is a multi function unit for maintaining a constant oil level, regulating the oil flow and
Attachment G-1: Pit Latrine Diagram. Fig E.1a: Pit Latrine. Fig E.1b: Plan View of Twin Pits
 Attachment G-1: Pit Latrine Diagram Fig E.1a: Pit Latrine Fig E.1b: Plan View of Twin Pits Fig E.1c: Section of a water-sealed pan Fig E.1d: 3D view of Overflow Pipe Fig E.1e: 2D view of Overflow Pipe
Horizontal Mini Blinds Installation Guide
 Horizontal Mini Blinds Installation Guide We make it easy! BTG 468298 EN_ rev0614 For more safety information: 1-866-662-0666 or.www.healthcanada.gc.ca/blindcords Before starting Your new Blinds To Go
TARIFF CODE and updates standard
 TARIFF CODE and updates standard No HS CODE AHTN CODE PRODUCT DESCRIPTION PRODUCT TYPE STANDARDS IDENTIFIED 7207 Semi finished products of iron or non alloy steel Containing by weight less than 0.25% of
Resurfacing Concrete. Page 1 of 5
 Resurfacing Concrete Materials List QUIKRETE Concrete Resurfacer (No. 1131) (see calculator on page 5 for quantity needed) QUIKRETE Concrete and Stucco Wash (No. 8601) QUIKRETE Concrete Sealer (No. 8800)