RCR-10. GB Revision 2
|
|
|
- Britton Barber
- 7 years ago
- Views:
Transcription
1 RCR-10 Revision 2

2 Made for ipod means that an electronic accessory has been designed to connect specifically to ipod respectively, and has been certified by the developer to meet Apple performance standards. Apple is not responsible for the operation of this device or its compliance with safety and regulatory standards. Please note that the use of this accessory with ipod may affect wireless performance. ipod, ipod classic, ipod nano, ipod shuffle, and ipod touch are trademarks of Apple Inc., registered in the U.S. and other countries. 1

3 Table of contents Important safety instructions Introduction... 5 Controls Remote control functions Using the radio for the first time Operating your radio AM/FM Setting up the tuning step increment Display modes FM FM range setting FM Stereo (auto) / mono Presetting stations / Recalling a preset station in AM/FM modes ipod docking Setting the time format / date format Setting the clock time Setting the alarm clock When the alarm sounds / Cancelling alarms / Snooze Auto off timer Time zone setting / Daylight saving time Display & Audio setup Specifications

4 Important Safety Instructions 1. Read and understand all safety and operating instructions before the radio is operated. 2. Retain instruction: The safety and operating instructions should be retained for future reference. 3. Heed warnings. All warnings on the appliance and operating instructions should be followed. 4. Follow all operations and use instructions. 5. Water and moisture: The appliance should not be used near water. Do not use near a bathtub, washbowl, laundry tub, kitchen sink, wet basement, swimming pool, etc. 6. Unplug the radio from the AC power outlet before cleaning. Use only a damp cloth for cleaning the exterior of the radio. 7. Do not place the radio on an unstable cart, stand, bracket or table. The radio may fall, causing serious personal injury and damage to the radio. 8. Ventilation: This radio should be situated so that its location or position does not interfere with its proper ventilation. For example, the radio should not be used on a bed, sofa, rug or other soft surfaces that may block the ventilation openings. It should not be placed in a built-in situation like a cabinet that may reduce air flow through the ventilation openings. 9. Power sources; The radio should be operated only from the type of power source indicated on the marking label. If you are not sure of the type of power supply to your home, consult your radio dealer or power company. 10. Mains adaptor: The mains adaptor should be positioned so it is not walked on, pinched, or items placed on top of it. Pay particular attention to wires at plugs, convenience receptacles, and the point where they exit from the unit. Unplug the mains adaptor by gripping the adaptor, not the wire. Operate the radio using only the current type of power source indicated. If you are not sure of the type of power source supply to your home, consult your dealer or local power company. 11. Do not overload wall outlets or extension cords. This can result in a risk of fire or electrical shock. Never insert objects of any kind into the radio through opening. The objects may touch dangerous voltage points or short out parts. This could cause a fire or electrical shock. 12. If the radio is left unattended and unused for long periods of time, unplug it from the wall outlet. This will prevent damage caused by lightning or power line surges. 13. If the radio is left unattended and unused for a long period of time, remove the batteries. The batteries may leak and damage furniture or your radio. (US version only) 3

5 14. Do not attempt to service the receiver yourself. Removing the cover may expose you to dangerous voltage, and will void the warranty. Refer all servicing to authorized service personnel. Refer all servicing to authorized service personnel. 15. Never push objects of any kind into this radio through opening as they may touch dangerous voltage points or short-out parts that could result in a fire or electric shock. 16. Apparatus shall not be exposed to dripping or splashing and no objects filled with liquids, shall be placed on the apparatus. 17. For outdoors use, to avoid electric shock, use battery only during a raining day or the weather is wet. 18. The power plug should be close to the radio, and easy to be approached that during the emergency, to disconnect the power from the radio, just unplug the power plug from the AC power slot. 19. Notice: The changes or modifications not expressly approved by the party responsible for compliance could void the user s authority to operate the equipment. 4

6 Introduction The Sangean RCR-10 FM / AM Digital Tuning Clock Radio provides the following range of features: Radio for AM and FM (with RDS) broadcasts. 10 radio station presets (5 for AM and 5 for FM). Equipped with tone control (bass/treble), loudness compensation and bass reflex tube to enhance the sound performance Easy to read LCD display with adjustable backlight and illuminated buttons matching the light of LCD display. Two alarm timers with snooze feature to wake you to either buzzer, radio alarm, or ipod. Adjustable sleep timer which can be set to turn the clock radio off after between 15 and 120 minutes. A 3.5mm stereo Auxiliary Input socket for playing audio from MP3 players, ipod devices or other audio equipment. Radio control clock display when in standby. Super capacitor or batteries for power backup. Atomic WWVB/JJY/DCF/MSF controlled clock with selectable time zone. ipod cradle plays and charges ipods. 5

7 Controls ipod Universal Dock adjuster ipod Dock connector Preset 4 / Play/pause Preset 5 / Fast Forward Tuning/Seek/Select control Info / Menu Alarm 2 Alarm 1 9. Snooze / dimmer 10. Source 11. Standby / Sleep timer 12. Volume / Tone control 13. Preset 1 / Folder Down 14. Preset 2 / Folder Up 15. Preset 3 / Back Forward 6

8 Controls 16. LCD display 17. Remote control sensor 18. Speaker 7

9 Controls 19. FM antenna 20. Aux In 21. Line Out 22. Headphone 23. AC in 8

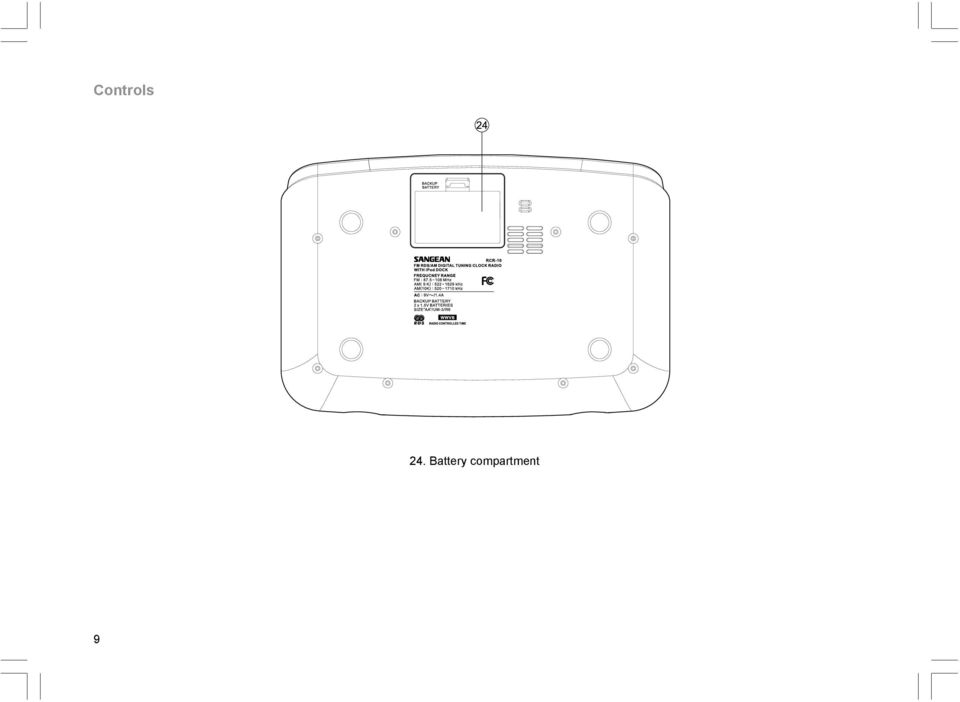
10 Controls 24. Battery compartment 9
11 Display icons A. Radio controlled time icon(atomic radio controlled clock icon) B. PM indicator C. Time display D. Sleep timer icon E. Alarm 1 icon F. Alarm 2 icon G. Frequency / information for station display H. RDS icon I. Backup battery capacity indicator 10

12 Remote control a. Back forward b. Repeat one / all / folder c. Tuning up d. Folder up / preset up e. Folder down / preset down f. Tuning down g. Mute h. Snooze / dimmer i. Tone j. Volume down k. Volume up l. Repeat random m. Select n. Fast forward o. Play / pause p. Source q. Menu r. Standby / Sleep timer 11

13 Remote control functions Many functions of the RCR-10 clock radio can be operated using the remote control. Some operations require a longer press of the button. In this case simply keep your finger held on the remote control button for 2-3 seconds until the display on the radio shows that the command has been accepted. Before the first operation: please remove the small transparent foil from the battery holder to activate the battery. Remote control battery replacement 1. Open the battery holder by pulling the holder out in direction shown. 2. Remove battery from holder. 3. Replace battery (CR2025 or equivalent) ensuring that the positive side of the battery faces you with holder positioned as shown. 4. Replace the battery holder. IMPORTANT: The batteries should not be exposed to excessive heat such as sunshine, fire or the like. After use, disposable batteries should if possible be taken to a suitable recycling center. On no account should batteries be disposed of by incineration. 12

14 Using the radio for the first time Using the AC power adaptor The AC power adaptor required for this unit should be 9 volts AC at 1.4A. Insert the adaptor plug into the AC socket on the rear of the radio. Plug the adaptor into a standard mains socket outlet. The AC adaptor should be disconnected from the main supply when not in use. Backup battery operation (for US version only) 1. Remove the battery cover on the bottom of the unit. 2. Insert two UM-3 (AA size) batteries into the spaces in the compartment. 3. Take care to ensure all batteries are inserted with correct polarity as shown inside the compartment. Replace the battery cover. 4. When the low battery capacity indicator shows on the display please replace the batteries immediately. 5. When the radio is used as clock radio or as an alarm, please always keep the batteries inserted. 13

15 Operating your radio Search tuning AM/FM 1. Press the Standby button to switch on your radio. 2. Press the Source button as needed until the AM or FM band is selected. 3. Press and release the Tuning control to carry out an auto-tune. Your radio will scan up the AM/FM band from the currently displayed frequency and will stop scanning automatically when it finds a station of sufficient strength After a few seconds the display will update. The display will show the frequency of the signal found. 5. To find other station, press and release the Tuning control as before. 3,5 6. When the end of the waveband is reached your radio will recommence tuning from the opposite end of the waveband. 7. Use the Volume control to adjust the sound level as required. 8. To switch off your radio press the Standby button. 7 14

16 Manual tuning AM/FM 1. Press the Standby button to switch on your radio. 2. Press and release the Source button to select AM or FM radio mode. 3. Rotate the Tuning control to tune to a station. The FM frequency will change in steps of 100kHz/50kHz and AM frequency will change in steps of 10kHz/9kHz When the end of the waveband is reached your radio will recommence tuning from the opposite end of the waveband. 5. Use the Volume control to adjust the sound level as required

17 Setting up the tuning step increment 1. Press and hold the Info/menu button to enter the menu setting when the radio source is in AM/FM mode. 2. Rotate the Tuning control until FM xxkhz or AM xxkhz appears on the display, and press and release the Tuning control to enter the step increment setting. 3. Rotate the Tuning control to select 100kHz/200kHz for FM radio, and 9kHz/10kHz for AM radio. Then press and release the Tuning control to confirm the setting. 2,3 16

18 Display modes FM Your radio has a range of display options for FM radio mode. 1. Repeatedly press and release the Info/menu button to view the RDS information of the station you are listening to. a. Station name Displays the name of the station being listened to. b. Program type Displays the type of station being listened to such as Pop, Classic, News, etc. c. Radio text Displays radio text messages such as new items etc. d. Stereo/Mono Displays the radio broadcasting is in Stereo or Mono mode. e. Year / Day Displays the year and day of the week according to the date setting of your radio. f. Date / Day Displays the date and day of the week according to the date setting of your radio. g. Frequency Displays the frequency of the FM for the station listened to. 17

19 FM range setting FM range are different from countries to countries. It is necessary to adjust FM range to allow the radio to work properly. 1. Press and hold the INFO/MENU button to enter the menu setting. 2. Rotate the TUNING control till the range of FM shows on the display (refer to the picture in the right). Press the control to select the desired FM range. FM range setting is then completed. The available FM range is as following: for the common area (default) for Japan for Eastern European countries and Russia for some of China area and European countries 2 FM stereo (auto) / mono If the FM radio station being listened to has a weak signal some hiss may be audible. It is possible to reduce this hiss by forcing the radio to play the station in mono rather than stereo. 1. Press the Source button as needed to select the FM radio mode display and tune to the required FM station as previously described. 2. Rotate the Tuning control until the FM Stereo / mono setting shows on the display. If the setting is Auto press the Tuning control to switch to Mono mode to reduce the hiss. 3. To return to Auto (stereo) mode press and release the Tuning control to alter the setting, so that the radio will switch back to Auto mode. 18
 76-90 for Japan 64-108 for Eastern European countries and Russia 76-108 for some of China area and European countries 2 FM")
20 Presetting stations in AM/FM mode There are 5 preset stations each for AM and FM radio. They are used in the same way for each waveband. 1. Press the Standby button to switch on your radio. 2. Press the Source button to select the desired waveband. Tune to the required radio station as previously described. 3. Press and hold the required Preset button (1 to 5) until the display shows P4 for example after the frequency. The station will be stored using the preset number. Repeat this procedure for the remaining presets as you wish Preset stations which have already been stored may be overwritten by following the above procedure if required. Recalling a preset in AM/FM mode 3 1. Press the Standby button to switch on your radio. 2. Select the required waveband by pressing the Source button. 3. Momentarily press the required Preset button to cause your radio to tune to one of the stations stored in the preset memory. Note: the remote control can only recall preset stations. Presetting stations can t be operated by remote control. 19

21 ipod docking Your radio has an ipod docking facility which allows you to play digital audio files and soundtracks held on your ipod directly. Your radio uses the ipod Universal Dock adjustor developed for use with ipods. Recent models of ipod are supplied with Universal Dock Adapter inserts which ensure correct alignment of the ipod with the electrical connector. Important: The radio does not support ipod 3rd generation (build ). To avoid possible damage to your ipod, do not use your ipod with the product without the correct adapter fitted to the radio. Docking you ipod by dock adjuster This unit comes with the ipod dock adjuster. ipod adaptors are not supplied. 1. Press and turn the ipod dock adjuster dial to move slide door backward until end. 2. Carefully place your ipod onto the cradle. 3. Turn the ipod dock adjuster dial to move slide door forwards until holding your ipod. 20
22 Charging your ipod 1. Place the ipod onto the Universal Dock Adjuster into the ipod docking compartment. Press the STANDBY button to switch on your radio. 2. Press SOURCE button until ipod shows on the display. Your radio is able to recharge your ipod s internal battery when the source is Aux In, ipod or Standby mode. Your ipod won t be charged under AM mode. 2 21
23 Navigating your ipod To navigate your ipod menus to make selections or to change settings, you should use your ipod controls. The radio controls can be used for Menu / Select, Previous / Next, Fast Rewind / Fast Forward and Play / Pause functions. 1. Use the Menu button to navigate to higher level menus on your ipod. 2. Rotate the Tuning/Seek/Select control as required to move up or down a menu screen on your ipod. 3. Press the Tuning/Seek/Select control to choose the highlighted on screen menu item. If this item is a lower level menu item, you May then navigate further using the Tuning/Seek/Select control. Playing an audio file on your ipod 1. When you have found the required item, use the Tuning/Seek/Select control on the radio to start the ipod playing. 2. Adjust the volume to the required setting using the Volume control on your radio. 3. To pause playback press the Play/Pause button. To resume playback press the Play/Pause button again. 4. ipods do not have a Stop button (they use the Pause function). To play an alternative selection, use the ipod menus to make the selection using the Play/Pause button to stop playing the current item if needed. 5. If it was previously playing, your ipod will switch on and continue playing from where it was previously stopped. 22
24 Search function 1. Press and release either the Fast-Forward or Back-forward button to start playing the next or previous track. Your RCR-10 works with the following models of ipod: 2. While the ipod is playing, press and hold the Fast-Forward or Back-forward buttons to move through the current file or track, and then release the button when the desired point in the file or track is reached. 23
25 Clock and Alarms Setting the time format The clock display used in stand-by mode and on the playing mode screens can be set to 12 or 24 hour format. The selected format is then also used when setting the alarms. 1. Press and hold the Info/menu button to enter the menu setting. 2. Rotate the Tuning control until CLOCK XXH appears on the display, then press and release the Tuning control to enter the setting and the setting of time format begins to flash. 3. Rotate the Tuning control to select either 12 or 24 hour format. Press and release the Tuning control to confirm your choice of clock format. The display will then revert to the previous menu. 2,3 If the 12 hour clock format is chosen, the radio will then use the 12 hour clock for the setting of alarms with a PM indicator. Setting the date format 1. Press and hold the Info/menu button to access the menu setting. 2. Rotate the Tuning control until DATE FORMAT shows on the display. Press and release the Tuning control to enter the date format setting. 3. Rotate the Tuning control to select the required date format. Press and release the Tuning control to confirm your choice of date format. The display will then revert to the previous menu. 24
26 Setting the clock time Radio-controlled clock Your RCR-10 has three options to set up its clock time: Radio-controlled clock, FM Radio Data System (RDS) and Manual setting. When the unit is first plugged in, the radio will automatically synchronize its clock time with the Radio-controlled clock signal received while the radio is in power off mode. 1. To set up the clock time using the Radio-controlled clock function, press and hold the Info/menu button when the unit is in power off mode. 2. Rotate the Tuning control until a clock symbol appears on the display. Press and release the Tuning control to enter the setting. 3. Rotate the Tuning control until DCF77 (European version), WWVB (US version), JJY40/60 (Japan version) or MSF (UK version) appears on the display. Press and release the Tuning control to confirm the setting. And the clock time of the radio will set up automatically to the Radio-controlled clock time. 2,3 4. If the radio-controlled clock signal is being received by the radio, the radio-controlled time icon will flash on the display at an internal of 1 second. If the radio is not receiving any radio-controlled clock signal, the radio-controlled time icon will flash at an interval of 3 seconds. 5. The radio will synchronize its clock time on the hour. If the radio time has been synchronized with radio-controlled clock time, the radio-controlled time icon will stay on the LCD display and the radio will keep synchronizing its clock time every odd hour on the hour. If the radio is receiving the radio-controlled clock signal but is not yet synchronized to the radio-controlled clock time, it will synchronize its clock time at every hour on the hour. 25
27 Manual setting When choosing manual setting as the clock time setting of your radio, the radio-controlled clock and Radio Data System (RDS) function will both be disabled. 1. Press and hold the Info/menu button. 2. Rotate the Tuning control until a clock symbol appears on the left side display, then press and release the Tuning control to enter the setting. Rotate the Tuning control until MANUAL appears on the display, then press and release the Tuning control to select the setting. 3. Rotate the Tuning control until CLOCK appears on the display. Press and release the Tuning control to enter the setting The hour setting on the display will begin flashing. Rotate the Tuning control to select the desired hour, and press and release the Tuning control to confirm the setting. Then rotate the Tuning control to select the desired minute, and press and release the Tuning control to confirm the setting. 3,7 5. Rotate the Tuning control until DATE appears on the display. Press and release the Tuning control to enter the setting. 6. Rotate the Tuning control to select the desired year, and press and release the Tuning control to confirm the setting. Then rotate the Tuning control to select the desired month, and press and release the Tuning control to confirm the setting. Then rotate the Tuning control to select the desired date. Press and release the Tuning control to confirm the setting and the radio will beep once. 26
28 Radio Data System (RDS) When you set the clock time using the RDS function, your radio will synchronize its clock time whenever it tunes to a radio station using RDS with CT signals. 1. When tuning to a station transmitting RDS data, press and hold the Info/menu button. 2. Rotate the Tuning control until a clock symbol appears on the display. Press and release the Tuning control to enter the setting. 3. Rotate the Tuning control until RDS CT appears on the display. Press and release the Tuning control to confirm the setting. The clock time of the radio will set up automatically according to the RDS data received. 2,3 4. When the action is completed, the RDS icon will appear on the LCD display indicating the radio time is RDS clock time. The radio cock time will be valid for 5 days each time the radio time is synchronized with RDS CT. 27
29 Setting the alarm clock Your RCR-10 has two alarms which can each be set to wake you to AM/FM radio, buzzer alarm or ipod. The alarms may be set while the unit is in standby mode or while playing. 1. Before setting an alarm ensure that the clock time is set. Press and hold the Alarm 1 button to enter the alarm 1 setting. 2. The hour setting of alarm 1 will begin to flash. Rotate the Tuning control to select the required alarm hour, and press and release the Tuning control to confirm the setting. Rotate the Tuning control to select the required alarm minute, and press and release the Tuning control to confirm the setting Then the display will show the frequency options for the alarm. The alarm options are as follows: ONCE the alarm will sound once DAILY the alarm will sound everyday WEEKDAY the alarm will sound only on weekdays WEEKEND the alarm will sound only at weekends Press and release the Tuning control to confirm the setting. 28
30 4. Rotate the Tuning control to choose the required alarm type, and then press and release the Tuning control to confirm the setting. The alarm can be set to buzzer, ipod, FM or AM. When radio mode is selected, the radio frequency and the preset number on the display will begin to flash. Rotate the Tuning control to adjust the required radio frequency or the required preset number for the radio alarm, then press and release the Tuning control to confirm the setting. Note: If the alarm type selected is ipod but your ipod is not docked when the alarm is sounding, the buzzer alarm will be used instead. 5. Rotate the Tuning control to choose the required sound level for the alarm. Press and release the Tuning control to confirm the setting. 6. The alarm has now been set. Press and release the Tuning control again, and the radio will revert to normal display. Active alarms are shown using alarm indicator on the display. When the alarm sounds To cancel a sounding alarm, press and hold the Alarm 1 or Alarm 2 button until the alarm indicator on the display disappears. When the buzzer alarm activates, the alarm will start softly and gradually increase in level. It will sound for 1 minute and silence for 1 minute in repetition for 60 minutes unless cancelled. The radio will sound non-stop at the selected time for up to 60 minutes for other alarm types. When the radio alarm is activated, the alarm will go off in Humane Waking System. It will increase its volume in 0.5increments from 0 to your set volume. 29
31 Disabling / cancelling alarms To disable an active alarm, either press and release the Standby button, or press and hold the according alarm button to cancel the alarm. Snooze 1. When the alarm sounds, press any button other than the Standby button will silence the alarm for 5 minutes. SNOOZE will appear on the display To adjust the silence time for the snooze timer, press and hold the Info/menu button to enter the menu setting. 3. Rotate the Tuning control until SNOOZE X appears on the display, then press and release the Tuning control to enter the setting. Rotate the Tuning control to adjust the silence time from 5, 10, 15 and 20 minutes for the snooze timer To cancel the snooze timer while the alarm is suspended, press and release the Standby button. 30
32 Sleep timer Your radio can be set to turn off automatically after a preset time has elapsed. The Sleep Timer setting can be adjusted between 15, 30, 45, 60, 90 and 120 minutes. 1. Press and hold the Standby button to enter the Sleep Timer setting. SLEEP XX will show on the display. 2. Keep pressing the Standby button and the Sleep Timer options will start switching on the display. Stop until the required Sleep Timer setting appears on the display. The setting will be saved and the LCD will return to normal display. 1-2,4 3. Your radio will switch off automatically after the preset Sleep Timer has elapsed. The Sleep Timer icon will show on the display indicating an active Sleep Timer. 4. To cancel the Sleep Timer function before the preset time has elapsed, simply press and release the Standby button to turn the unit off manually. 31
33 Time zone setting Your RCR-10 can set up the time zone for its radio clock time. 1. Press and hold the Info/menu button to enter the menu setting. 2. Rotate the Tuning control until TIME ZONE appears on the display. Press and release the Tuning control to enter the setting. 3. Rotate the Tuning control to choose the Time zone setting for your area, then press and release the Tuning control to confirm the setting. 4. Press and release the Info/menu button and the LCD will revert to the normal display. 2,3 Note: When switching on the radio after a power disconnection, you will need to complete the time zone setting before the normal operation of the radio. 32
34 Daylight Saving Time 1. Press and hold the Info/menu button to enter the menu setting. 2. Rotate the Tuning control until DST XX appears on the display. Press and release the Tuning control to enter the setting Rotate the Tuning control to choose +1H to set the clock 1 hour faster, and press and release the Tuning control to confirm the setting. 4. To set the clock back from D.S.T., choose OFF and then press and release the Tuning control
35 Display & Audio setup Dimmer control The brightness of the display may be adjusted. If you use the unit in the bedroom, you may prefer a higher brightness level than the standard setting. 1. Press and release the Snooze/Dimmer button repeatedly to adjust the brightness level of the LCD display. The backlight level will change with 8 different illumination levels so that you can see the effect of the change. 2. Stop when the desired backlight level is selected. Tone control You can adjust the bass and treble of the sound of your RCR-10 to enhance the tone while listening. 1. First ensure your radio is switched on. Press and release the Volume control to enter the tone control setting The bass value will appear on the display. Rotate the Volume control to adjust between +5~-5, and press and release the Volume control to confirm the setting. 3. Then the treble value will appear on the display. Rotate the Volume control to adjust between +5~-5, and press and release the Volume control to confirm the setting. 34
36 Loudness You can get compensation on lower and higher frequency for your RCR-10 by adjusting the Loudness function. 1. Press and hold the Info/menu button to enter the menu setting. 2. Rotate the Tuning control until LOUD ON/OFF appears on the display. Press and release the Tuning control to enter the setting. 3. Rotate the Tuning control to choose ON to turn on the Loudness function, then press and release the Tuning control to confirm the setting. 4. To turn off the Loudness function, select OFF and press and release the Tuning control to confirm the setting
37 Auxiliary input socket A 3.5mm stereo Auxiliary Input socket is provided on the rear of your radio to permit an audio signal to be fed into the unit from an external audio device such as ipod, MP3 or CD player. 1. Repeatedly press and release the SOURCE button until AUX IN is displayed. 2. Connect an external audio source (for example, ipod, MP3 or CD player) to the Auxiliary Input socket. 3. Adjust the volume setting on your ipod, MP3 or CD player to ensure an adequate signal level from the player, and then use the Volume control on the radio as needed for comfortable listening. 3 Headphone socket A 3.5mm stereo Headphone Socket is provided on the rear of your radio for use with headphones. Inserting a plug automatically mutes the internal loudspeaker. IMPORTANT: Excessive sound pressure from earphones and headphones can cause hearing loss. 36
38 Line out socket The radio can be used as a separate tuner by connecting the input to Hi-Fi system, or using this input to make recording in stereo from audio program. Software version The software display cannot be altered and is just for your reference. 1. Press and hold the Info/menu button to enter the menu setting. 2. Rotate the Tuning control until VER 0.XX appears on the display to view the software version of your radio. 2 37
39 Specifications Power Requirements Mains AC 9V~/1.4A Frequency Range FM: MHz AM: khz (US version) khz (European version) Circuit Features Loudspeaker: ohm x 2 full range Output Power: 3W+3W Headphone socket: 3.5mm dia stereo Auxiliary socket: 3.5mm dia stereo Line out socket: 3.5mm dia stereo Back-up Battery 2 x 1.5V Size AA / UM-3 / R6 Aerial System FM Wire aerial If at any time in the future you should need to dispose of this product please note that: Waste electrical products should not be disposed of with household waste. Please recycle where facilities exist. Check with your Local Authority or retailer for recycling advice. (Waste Electrical and Electronic Equipment Directive) 38
PR-D9W. GB Version 1
 PR-D9W Version 1 Table of contents Important safety instructions... 2-3 Introduction... 4 Controls... 5-8 Using your weather alert radio for the first time... 9 Operating your radio Search tuning AM/FM...
RCR-22 AM/MW 2 bands Digital Clock Radio instruction manual
 RCR-22 AM/MW 2 bands Digital Clock Radio instruction manual Important safety instructions 1. Read and understand all safety and operating instructions before the radio is operated. 2. Retain instruction:
DAR-101. GB Version 1
 DAR-101 Version 1 Table of contents Important security notice... 2-3 Introduction... 4 Controls and connections... 5-9 Battery operation... 10 Using the AC adaptor / Charging the batteries... 11 Setting
Important Safety Instructions
 PR-D7 GB Revision 1 Important Safety Instructions 1. Read these instructions. 2. Keep these instructions. 3. Heed all warnings. 4. Follow all instructions. 5. Do not use this apparatus near water. 6. Clean
Digital Radio/DAB+/FM RDS digital clock radio with dual alarm Operating instruction
 381SE1D-A Digital Radio/DAB+/FM RDS digital clock radio with dual alarm Operating instruction GB Contents Controls... 2-3 Using the clock radio for the first time... 4 Operating your clock radio... 5 Selecting
WR-22 中文 GB Version 1
 WR-22 中 GB文 Version 1 1. 2. Important safety instructions Read these instructions. Keep these instructions. GB 3. 4. 5. 6. 7. 8. 9. Heed all warnings. Follow all instructions. Do not use this apparatus
Controls (front) 1. Loudspeaker 2. Light button 3. Band button 4. Auto tune button 5. Alarm button 6. LCD display
 1. Loudspeaker 2. Light button 3. Band button 4. Auto tune button 5. Alarm button 6. LCD display") GB Contents Controls... 2-4 Mains operation... 5 Operating your radio... 6 Selecting a station DAB... 7 Display modes DAB... 8 Finding new stations - DAB... 9 Secondary services DAB... 9 Manual tuning
GB Contents Controls... 2-4 Mains operation... 5 Operating your radio... 6 Selecting a station DAB... 7 Display modes DAB... 8 Finding new stations - DAB... 9 Secondary services DAB... 9 Manual tuning
Radio BMR100 INSTRUCTION MANUAL. ENGLISH (Original instructions)
") ENGLISH (Original instructions) INSTRUCTION MANUAL Radio BMR00 WARNING: For your personal safety, READ and UNDERSTAND before using. SAVE THESE INSTRUCTIONS FOR FUTURE REFERENCE. Symbols The following show
ENGLISH (Original instructions) INSTRUCTION MANUAL Radio BMR00 WARNING: For your personal safety, READ and UNDERSTAND before using. SAVE THESE INSTRUCTIONS FOR FUTURE REFERENCE. Symbols The following show
AM/FM ALARM CLOCK RADIO
 AM/FM ALARM CLOCK RADIO Instruction Manual JL-206 Please read this manual carefully before operating and save it for future reference. Have a question? Please visit http:// INTRODUCTION Thank you for purchasing
Controls. LCD Display. Tuning Up Time Set and Station Scan
 PR-D8 GB Revision 3 1 1 2 4 5 7 9 10 12 14 16 18 20 22 24 25 26 27 29 31 33 35 36 37 38 Controls Stereo Built-in Microphone (Left Channel) LCD Display Stereo Built-in Microphone (Right channel) Power/Auto
User Guide. CR-111IP Clock radio with dock for ipod
 User Guide CR-111IP Clock radio with dock for ipod IMPORTANT SAFETY INFORMATION CAUTION! RISK OF ELECTRIC SHOCK DO NOT OPEN TO REDUCE THE RISK OF ELECTRIC SHOCK DO NOT REMOVE COVER (OR BACK) This symbol
CR9971 2 Band Auto Set Dual Alarm Clock Radio ROBERTS. Sound for Generations. Please read this manual before use
 ROBERTS Sound for Generations CR9971 2 Band Auto Set Dual Alarm Clock Radio Please read this manual before use Contents Contents... 1 Controls...2-5 Switching on... 6 Setting the time manually... 6 Setting
CR9986 ROBERTS. Dual Alarm CD Clock Radio. Sound for Generations. Please read this manual before use
 ROBERTS Sound for Generations CR9986 Dual Alarm CD Clock Radio Please read this manual before use Contents Contents... Controls... - Switching on and setting the time... 4 Listening to the radio... 5 Compact
ATS-505. GB Version 1
 ATS-505 GB Version 1 Control Locations Power/Sleep Power On/off/Alarm off/sleep function Display Switch between radio frequency and time while radio is power on Mode Mode set up (please see below mode
THE NEW GENERATION IN TECHNOLOGY. NI-3103A Alarm Clock w/fm Radio ipod & iphone Docking. Operating Instructions
 THE NEW GENERATION IN TECHNOLOGY NI-3103A Alarm Clock w/fm Radio ipod & iphone Docking Operating Instructions Table of Contents Important Safeguards... 3 Parts... 6 Controls... 6 To Set Up... 7 ipod/iphone
H203D 中文 GB Version 1
 H203D 中 GB文 Version 1 Contents Installing batteries... 4 Using the AC adapter (not supplied)... 5 Setting the clock... 6-7 Updating your radio - DAB... 8 Selecting a station - DAB... 9 Secondary services
RD-11 ROBERTS. FM RDS/DAB digital radio with. Sound for Generations. Please read this manual before use
 ROBERTS Sound for Generations RD- FM RDS/DAB digital radio with Please read this manual before use Contents Controls... Battery operation... 3 Mains operation... 3 Operating your radio - DAB... 4 Selecting
CD / DAB / FM Digital Sound System with dock for ipod and iphone
 Enjoy Listening ROBERTS CD / DAB / FM Digital Sound System with dock for ipod and iphone Please read this manual before use Contents Introduction...2-9 Sound 00 Sound System features...3 Controls and connections...4-5
Single Day Alarm Clock with. Bluetooth and USB Play-through
 Single Day Alarm Clock with Bluetooth and USB Play-through MODEL : BSC 200 READ THIS INSTRUCTION MANUAL BEFORE OPERATING THE APPLIANCE. SAVE THIS MANUAL FOR FUTURE REFERENCE. TABLE OF CONTENTS IMPORTANT
DAB+ / FM Tuner Model: TU-201
 DAB+ / FM Tuner Model: TU-201 Instruction Manual www.pulse-audio.co.uk 1 Safety Information The lightning bolt within a triangle is intended to alert the user to the presence of dangerous voltage levels
PORTABLE ALARM CLOCK. Dual Alarm. FM Radio. Wake-up Sounds. USB Phone Charger G-1CR
 G-BUZZ PORTABLE ALARM CLOCK Dual Alarm FM Radio Wake-up Sounds USB Phone Charger G-1CR Welcome Alarm clocks can be boring. Get ready to shake things up with your new G-BUZZ. Slap the snooze for more ZZZ
RD-27 ROBERTS. FM RDS/DAB digital radio with. Sound for Generations. Please read this manual before use
 ROBERTS RD-7 Sound for Generations FM RDS/DAB digital radio with Please read this manual before use Contents Controls... Battery operation... 3 Mains operation... 3 Operating your radio - DAB... 4 Selecting
MODEL NPB-252 PORTABLE CD MP3 RADIO PLAYER
 MODEL NPB-252 PORTABLE CD MP3 RADIO PLAYER PLEASE READ THIS USER MANUAL COMPLETELY BEFORE OPERATING THIS UNIT AND RETAIN THIS BOOKLET FOR FUTURE REFERENCE. WARNING TO PREVENT FIRE OR SHOCK HAZARD, DO NOT
ROBERTS. Enjoy Listening. DAB / FM RDS Digital Clock Radio with large display. Please read this manual before use
 ROBERTS Enjoy Listening DAB / FM RDS Digital Clock Radio with large display Please read this manual before use Contents Controls... -3 Using the clock radio for the fi rst time...4 Operating your clock
User Guide. DAB-109CR DAB Digital Radio alarm clock
 User Guide DAB-109CR DAB Digital Radio alarm clock IMPORTANT SAFETY INFORMATION CAUTION! RISK OF ELECTRIC SHOCK DO NOT OPEN TO REDUCE THE RISK OF ELECTRIC SHOCK DO NOT REMOVE COVER (OR BACK) This symbol
INSTRUCTION MANUAL RM-5750. AM/FM Digital Alarm Clock Radio
 INSTRUCTION MANUAL RM-5750 AM/FM Digital Alarm Clock Radio Fig. 1 CAUTION: THE APPARATUS SHALL NOT BE EX- POSED TO DRIPPING OR SPLASHING. NO OBJECTS FILLED WITH LIQUIDS, SUCH AS VASES, SHALL BE PLACED
DAB / FM RDS / SD Digital Radio Recorder with PausePlus
 ROBERTS Enjoy Listening DAB / FM RDS / SD Digital Radio Recorder with PausePlus Please read this manual before use Contents Controls... 2-3 Battery operation...4 Using the AC adaptor...5 Operating your
DAB Radio. Instruction Manual L55DAB10
 DAB Radio Instruction Manual L55DAB10 L55DAB10_IB_110810_Zell.indd 1 L55DAB10_IB_110810_Zell.indd 2 Contents Unpacking...5 Product Overview...6 Top View... 6 Rear View... 6 Power Source...7 Battery Power...
DAB+ Digital Alarm Clock Radio with Dock for iphone
 DAB+ Digital Alarm Clock Radio with Dock for iphone BCR33DABIP The Gold Technical Support Line: 1902 215 259 (Charges will apply at $2.95 per minute) www.bushaustralia.com.au Safety Instructions Ensure
MODEL: MEMPHIS FM STEREO RADIO OPERATING INSTRUCTIONS
 MODEL: MEMPHIS CD/USB/SD PLAYER WITH TURNTABLE. ENCODING TO USB AND SD CARD. FM STEREO RADIO OPERATING INSTRUCTIONS PLEASE READ THIS USER MANUAL COMPLETELY BEFORE OPERATING THIS UNIT AND RETAIN THIS BOOKLET
User Guide. DCR1401B/G Crescendo DAB alarm clock radio
 User Guide DCR1401B/G Crescendo DAB alarm clock radio IMPORTANT SAFETY INFORMATION CAUTION! RISK OF ELECTRIC SHOCK DO NOT OPEN TO REDUCE THE RISK OF ELECTRIC SHOCK DO NOT REMOVE COVER (OR BACK) This symbol
DAB2+ Dear Customer, Congratulations with your new Argon DAB2+
 Dear Customer, Quality has always been our driving force and founding Argon Audio is a natural extension of this philosophy. We have 20 years' experience in creating and specifying high quality products,
Jumbo Display AM/FM Clock Radio
 Model T236 Jumbo Display AM/FM Clock Radio For additional information, online registration, and exclusive special offers visit our website: Questions? Contact Customer Service at 1-800-888-4491 Table of
Owner s Manual AWM910 JENSEN AWM910 COMPACT DISC PLAYER RADIO CD COMPACT MUSIC SYSTEM MUTE AUX BAND AUX IN PUSH PUSH PWR VOL ALARM T/F AUD SPK A SPK B
 AWM910 Owner s Manual COMPACT DISC PLAYER PUSH 1 2 3 4 5 6 RPT SCAN RDM H M PUSH PWR VOL ALARM SET ON/OFF EQ T/F AUD RADIO CD COMPACT MUSIC SYSTEM MUTE AUX BAND CD AUX IN A B A+B JENSEN AWM910 Thank You!
Register your product and get support at. www.philips.com/welcome AS111. User manual
 Register your product and get support at www.philips.com/welcome AS111 User manual Contents 1 Important 4 Safety 4 English 2 Your docking speaker for AndroidTM 5 Introduction 5 What's in the box 5 Overview
AM / FM Tuner + RDS. Model: TU-101. www.pulse-audio.co.uk
 AM / FM Tuner + RDS Model: TU-101 www.pulse-audio.co.uk 1 Safety Information The lightning bolt within a triangle is intended to alert the user to the presence of dangerous voltage levels within the product
Prescott. CD Alarm Clock Radio INSTRUCTION MANUAL
 1215205 Prescott CD Alarm Clock Radio INSTRUCTION MANUAL Important Safety Instructions CAUTION RISK OF ELECTRIC SHOCK DO NOT OPEN The lightning flash with arrowhead symbol, within an equilateral triangle
HOME THEATER SYSTEM. Instruction Manual. Model ASR150. Please read the instruction manual carefully before using your unit.
 SURROUND SOUND HOME THEATER SYSTEM Instruction Manual Model ASR150 Please read the instruction manual carefully before using your unit. For support visit : www.1800customersupport.com GENERAL TABLE OF
Retro Radio. Operation Guide. Operation Guide. Guía de funcionamiento Guia de Operação. Guide d utilisation Betriebsanleitung.
 Retro Radio Operation Guide Guida Operativa Operation Guide Guide d utilisation Betriebsanleitung Guía de funcionamiento Guia de Operação GB View Quest Retro DAB+ Operation Guide 2 View Quest Retro DAB+
ROBERTS. Enjoy Listening. DAB/FM RDS digital portable radio. Please read this manual before use
 ROBERTS Enjoy Listening DAB/FM RDS digital portable radio Please read this manual before use Contents Controls... -3 Battery operation...4 Using the AC adaptor...5 Operating your radio - DAB...6 Selecting
DAB & FM RADIO Installation Manual
 Size: 105x145mm 105g copper paper DAB & FM RADIO Installation Manual Model: 10798 10799 10800 10801 Thank you for purchasing this AGK DAB/FM radio. Please read the instructions and warnings carefully before
Instruction Manual CMP332DB CMP332DP
 Instruction Manual CMP332DB CMP332DP Table of contents Care & maintenance... 2 Disposal information... 2 Rechargeable battery disposal... 2 Accessories included...3 Overview of controls...3 Getting started...
CMP30. User Manual. www.audac.eu
 CMP30 User Manual www.audac.eu 2 Index Introduction 4 Precautions 5 Safety requirements 5 Caution servicing 5 EC Declaration of Conformity 5 Waste of Electrical and Electronic Equipment (WEEE) 6 Caution
DUAL ALARM CLOCK SPEAKER SYSTEM
 snooze dimmer Now Playing 1:03-2:30 DF-H22, DK-H22, DM-H22 DUAL ALARM CLOCK SPEAKER SYSTEM for ipod All I Want To Be Keith LuBrant alm. reset sleep IMPORTANT Read before proceeding If you have any questions
ROBERTS CRD-37. Sound for Generations. DAB / FM RDS / CD Clock radio with MP3 / WMA playback facility. Please read this manual before use
 ROBERTS Sound for Generations CRD-37 DAB / FM RDS / CD Clock radio with MP3 / WMA playback facility Please read this manual before use Contents CRD-37 Clock Radio features... Controls... 3-4 Using your
ROBERTS. Enjoy Listening. DAB/FM RDS digital portable radio. Please read this manual before use
 ROBERTS Enjoy Listening DAB/FM RDS digital portable radio Please read this manual before use Contents Controls... 2-3 Battery operation...4 Using the AC adaptor...5 Operating your radio - DAB...6 Selecting
Model ipl10 stereo alarm clock to charge your ipod or iphone
 Model ipl10 stereo alarm clock to charge your ipod or iphone QUESTIONS? Visit www.ihomeaudio.com WELCOME Thank you for choosing the ipl10 from ihome. This user guide will get you up and running quickly
ROBERTS CRD-39. Sound for Generations. FM RDS/DAB digital radio with. Please read this manual before use
 ROBERTS Sound for Generations Please read this manual before use CRD-39 FM RDS/DAB digital radio with Contents Controls... 2-4 Mains operation...5 Operating your radio - DAB...6 Selecting a station - DAB...7
STANDBY SCAN PRESET ALARM ENTER SNOOZE MODE INFO/MENU. User Guide. DR1402 DAB Radio
 STANDBY SCAN PRESET MODE INFO/MENU ALARM ENTER SNOOZE User Guide DR1402 DAB Radio IMPORTANT SAFETY INFORMATION CAUTION! RISK OF ELECTRIC SHOCK DO NOT OPEN TO REDUCE THE RISK OF ELECTRIC SHOCK DO NOT REMOVE
FM clock radio with charge + play for iphone or ipod
 Model ipl22 FM clock radio with charge + play for iphone or ipod QUESTIONS? Visit www.ihome.com FCC Information This device complies with Part 15 of the FCC Rules, operation is subject to the following
DIGITAL ALARM CLOCK RADIO
 DIGITAL ALARM CLOCK RADIO INSTRUCTION MANUAL For information and support, www.lenco.eu CR3302 LENCO ENG FM ONLY IM 98 x1 1 11/5/2009 9:14:35 CAUTION RISK OF ELECTRIC SHOCK DO NOT OPEN WARNINGS ATTENTION
XPanel V2. Remote Control Panel. User Manual. XILICA Audio Design
 XPanel V2 Remote Control Panel User Manual XILICA Audio Design Important Safety Instructions 1. READ THESE INSTRUCTIONS All the safety and operating instructions should be read before the product is operated.
Albrecht DR314. DAB/DAB+/FM Radio 1.) User Manual
 User Manual") Albrecht DR314 DAB/DAB+/FM Radio 1.) User Manual -1- Important Safety Notes TO PREVENT FIRE OR SHOCK HAZARD, DO NOT USE THIS PLUG WITH AN EXTENSION CORD, RECEPTACLE OR OTHER OUTLET UNLESS THE BLADES CAN
Albrecht DR314 DAB/DAB+/FM Radio 1.) User Manual -1- Important Safety Notes TO PREVENT FIRE OR SHOCK HAZARD, DO NOT USE THIS PLUG WITH AN EXTENSION CORD, RECEPTACLE OR OTHER OUTLET UNLESS THE BLADES CAN
ALTEC LANSING ONE YEAR LIMITED WARRANTY (TWO-YEAR LIMITED WARRANTY IN THE EUROPEAN UNION AND ASIA)
") User s guide The lightning flash with arrowhead, within an equilateral triangle, is intended to alert the user to the presence of uninsulated dangerous voltage within the product s enclosure that may be
User s guide The lightning flash with arrowhead, within an equilateral triangle, is intended to alert the user to the presence of uninsulated dangerous voltage within the product s enclosure that may be
ATS-909X. GB Version 1
 ATS-909X GB Version 1 Important safety instructions 1. Read and understand all safety and operating instructions before the radio is operated. 2. Retain instruction: The safety and operating instructions
Altec Lansing Moondance Home Digital Speaker System and Alarm Clock for ipod M302 User Guide
 Altec Lansing Moondance Home Digital Speaker System and Alarm Clock for ipod M302 User Guide Welcome Thank you for purchasing the Altec Lansing Moondance Home speaker system. Designed specifically to work
AM/FM PLL Clock/Table Radio
 12-1632.fm Page 1 Wednesday, May 10, 2000 10:57 AM Cat. No. 12-1632 OWNER S MANUAL Please read before using this equipment. AM/FM PLL Clock/Table Radio 12-1632.fm Page 2 Wednesday, May 10, 2000 10:57 AM
DAB1001. Wireless Digital Radio Interface. Installation & User Guide
 DAB1001 Wireless Digital Radio Interface Installation & User Guide Contents Contents... 2 Introduction... 3 Contents of Package... 4 Installation... 5 Product Overview... 5 Installation Procedure... 5
Doorbell Intercom Security System
 Doorbell Intercom Security System POWER IN USE OFF A B C LOCK CALL TALK Installation Guide Model WHDB-301 EXPLANATION OF GRAPHIC WARNING SYMBOLS This symbol is intended to alert the user to the presence
DR 70 Portable Digital DAB+ and FM Radio Receiver User Manual English Please read carefully before using this product
 DR 70 Portable Digital DAB+ and FM Radio Receiver User Manual Please read carefully before using this product 15 1 Table of Contents 1 Table of Contents... 16 2 Safety Instructions:... 17 3 Specification:...
12-Volt 10-Amp Regulated Power Supply
 22-506.fm Page 1 Friday, August 6, 1999 12:55 PM Cat. No. 22-506 OWNER S MANUAL Please read before using this equipment. 12-Volt 10-Amp Regulated Power Supply 22-506.fm Page 2 Friday, August 6, 1999 12:55
AZATOM. Home-Hub. Radio Alarm Docking Station with Bluetooth Lightning Version USER MANUAL. www.azatom.com
 AZATOM Home-Hub Radio Alarm Docking Station with Bluetooth Lightning Version USER MANUAL www.azatom.com Contents Important Safety Instructions... 2 Safety... 2 Warning... 2 Identifying the Parts... 3 Main
INSTRUCTION MANUAL CD/MP3 PLAYER WITH FM RADIO AND USB READER
 English INSTRUCTION MANUAL CD/MP3 PLAYER WITH FM RADIO AND USB READER Please read and follow these instructions before using your unit. OVERVIEW OF THE PLAYER 1 2 3 10 8 4 5 6 9 7 11 12 13 14 15 16 17
DX-395. FM/AM/SW1/SW2 PLL Synthesized Receiver OWNER S MANUAL. Cat. No. 20-225. Please read before using this equipment.
 20-225.fm Page 1 Wednesday, August 4, 1999 10:07 AM Cat. No. 20-225 OWNER S MANUAL Please read before using this equipment. DX-395 FM/AM/SW1/SW2 PLL Synthesized Receiver 20-225.fm Page 2 Wednesday, August
Model ip38 Portable Stereo Alarm Clock Speaker Case for your ipod / iphone. Questions? Visit www.ihomeaudio.com
 Model ip38 Portable Stereo Alarm Clock Speaker Case for your ipod / iphone Questions? Visit www.ihomeaudio.com Table of Contents ip38 Quick Start Controls and Indicators Getting Started with your ip38
PG-01instruction manual
 PG-01instruction manual DIGITAL RADIO fairbank house ashley road altrincham WA14 2DP united kingdom t: +44 (0)161 924 0300 f: +44 (0)161 924 0319 e: sales@intempodigital.com www.intempodigital.com PG-01
DAB Adapter 2+ Dear Customer,
 Dear Customer, Quality has always been our driving force and founding Argon Audio is a natural extension of this philosophy. We have 20 years' experience in creating and specifying high quality products,
Introduction and Contents
 Introduction and Contents Thank you for buying this Bush product, which is designed to give you many years of trouble-free service. You may already be familiar with using a similar unit, but please take
SOUNDDOCK DIGITAL MUSIC SYSTEM. Owner s Guide Guía de usuario Notice d utilisation
 SOUNDDOCK DIGITAL MUSIC SYSTEM Owner s Guide Guía de usuario Notice d utilisation TAB 8 TAB 7 TAB 6 TAB 5 TAB 4 TAB 3 TAB 2 English IMPORTANT SAFETY INSTRUCTIONS Please read this owner s guide Please take
user s manual Battery Case model #: SPB3200 Battery Case Charger for Samsung Galaxy S 4
 user s manual model #: SPB3200 Charger for Samsung Galaxy S 4 What s Included Unpack the battery case and make sure all accessories are put aside so they will not be lost. hello. USB to Micro USB Cable
GCR1880DAB Digital Alarm Clock Radio User Guide
 GCR0DAB Digital Alarm Clock Radio User Guide IMPORTANT: Please read all instructions carefully before use and keep for future reference. Introduction Thank you for buying this Goodmans Digital Alarm Clock
IMPORTANT SAFETY INSTRUCTIONS. When using this electronic device, basic precautions should always be taken, including the following:
 IMPORTANT SAFETY INSTRUCTIONS When using this electronic device, basic precautions should always be taken, including the following: 1. Read all instructions before using the product. 2. Do not use this
DAB/FM personal digital radio with OLED display
 DAB/FM personal digital radio with OLED display ROBERTS Enjoy Listening Please read this manual before use Contents Controls... 3-4 Using the AC adaptor... 5-6 Keylock function... 7-8 Navigation... 9-10
FUTURE CALL PICTURE CARE PHONE MODEL: FC-1007 USER MANUAL
 FUTURE CALL PICTURE CARE PHONE MODEL: FC-1007 USER MANUAL Please follow instructions for repairing if any otherwise do not alter or repair any parts of device except specified. IMPORTANT SAFETY INSTRUCTIONS
INSTRUCTION MANUAL PLEASE READ ALL THE INSTRUCTIONS COMPLETELY BEFORE USE AND SAVE THIS MANUAL FOR FUTURE REFERENCE
 INSTRUCTION MANUAL PLEASE READ ALL THE INSTRUCTIONS COMPLETELY BEFORE USE AND SAVE THIS MANUAL FOR FUTURE REFERENCE m Before Use Please read IMPORTANT SAFETY INSTRUCTIONS on page 10 before use. It is important
EOSP-500 Dual Zone Streaming Music Player User Manual
 EOSP-500 Dual Zone Streaming Music Player menu User Manual TM commercial wireless audio Thank You For Choosing Eos Wireless! We hope you will get much enjoyment from your wireless audio system. Please
SP1790JK 900MHz Wireless Indoor/Outdoor Speakers. User Manual INTRODUCTION FEATURES IMPORTANT SAFETY INFORMATION
 SP1790JK 900MHz Wireless Indoor/Outdoor Speakers INTRODUCTION This 900 MHz digital hybrid wireless speaker system uses the latest wireless technology that enables you to enjoy music and TV sound anywhere
ROBERTS RC9907. Sound for Generations. 3 Band Radio Cassette Recorder. Please read this manual before use
 ROBERTS Sound for Generations Mains ROBERTS RC 9907 3 Band Ra dio Cassette Re corder with Programmable Clock Alarm FM 88 94 96 100 104 106 108 MHz MW LW 540 600 800 100 0 12 00 160 0 khz 150 160 180 200
DUALIT KITCHEN RADIO INSTRUCTION MANUAL GB 10/06
 DUALIT KITCHEN RADIO INSTRUCTION MANUAL GB 10/06 CONTENTS SAFETY PRECAUTIONS... 3 / 4 PACKAGE CONTENTS... PARTS AND CONTROLS... RADIO HOUSING CONTROLS INPUTS AND OUTPUTS QUICK START... SETTING UP... CLOCK
ROBERTS. Enjoy Listening. DAB / FM / CD Stereo Clock Radio with CD Bookmark. Please read this manual before use
 ROBERTS Enjoy Listening DAB / FM / CD Stereo Clock Radio with CD Bookmark Please read this manual before use Contents Sound 38 clock radio features...2 Controls... 3-4 Using your clock radio for the fi
INSTRUCTION MANUAL PLEASE READ ALL THE INSTRUCTIONS COMPLETELY BEFORE USE AND SAVE THIS MANUAL FOR FUTURE REFERENCE
 INSTRUCTION MANUAL PLEASE READ ALL THE INSTRUCTIONS COMPLETELY BEFORE USE Ver. 2.0 AND SAVE THIS MANUAL FOR FUTURE REFERENCE Table of Contents Unpacking... 3 About the CCRadio-EP... 4 Quick Start Guide...
SAFETY PRECAUTIONS. FCC Information
 SAFETY PRECAUTIONS FCC Information This device complies with Part 15 of the FCC rules. Operation is subject to the following two conditions: (1)This device may not cause harmful interference, and (2)This
Dual Alarm Clock with USB Charging & Night Light
 Model T128 Dual Alarm Clock with USB Charging & Night Light For additional information, online registration, and exclusive special offers please visit our website: Introduction Thank you for selecting
IMPORTANT SAFETY INSTRUCTIONS
 IMPORTANT SAFETY INSTRUCTIONS Before you install or use the apparatus, you must read and understand these Important Safety Instructions. At all times when using the apparatus you must follow these Important
Big Button Plus 20200
 Big Button Plus 20200 Congratulations on your selection of the Big Button Plus 20200 from Northwestern Bell Phones. This quality telephone, like all Genuine BELL products, has been designed to give you
Control Location. Replacing Battery
 Functions - Normal Time with PM Indicator - 12/24 hour selectable - Dual Alarm, Snooze, Sleep Timer Green LED Backlight display - Month and Date Display - Thermometer (32oF - 122-F) - AM/FM Radio Receiver
ANI-9005. Instruction Manual DIGITAL INDOOR/OUTDOOR TV ANTENNA OMNI-DIRECTIONAL WITH AMPLIFIER INTRODUCTION:
 INTRODUCTION: This is a specially designed new concept antenna for digital indoor, outdoor analogue, and terrestrial HDTV broadcasting reception. It is the best solution for home reception and digital
ENGLISH (Original instructions) Job Site DAB Radio BMR101. INSTRUCTION MANUAL IMPORTANT: Read Before Using.
 Job Site DAB Radio BMR101. INSTRUCTION MANUAL IMPORTANT: Read Before Using.") ENGLISH (Original instructions) Job Site DAB Radio BMR0 INSTRUCTION MANUAL IMPORTANT: Read Before Using. ENGLISH (Original instructions) Symbols The following show the symbols used for the equipment. Be
ENGLISH (Original instructions) Job Site DAB Radio BMR0 INSTRUCTION MANUAL IMPORTANT: Read Before Using. ENGLISH (Original instructions) Symbols The following show the symbols used for the equipment. Be
DBT-003 FM/DAB+ Radio with Bluetooth Receiver
 DBT-003 FM/DAB+ Radio with Bluetooth Receiver User Manual : English Contents Important Safety Precautions... 3 Features and Controls... 4 Listening to your radio...5-6 Storing and Recalling Stored Stations...
Intercom and Music System Operation & User s Guide
 Intercom and Music System Operation & User s Guide dmc1 System Master dmc1 System Master with dmc1 iplay Dock for ipod - MP3 Player & Player USA & Canada (800) 421-1587 & (800) 392-0123 (760) 438-7000
Panasonic. Proprietary Telephone for Electronic Modular Switching System MODEL NO. KX-17030. Illustrated Model: White 1
 Panasonic Proprietary Telephone for Electronic Modular Switching System MODEL NO. KX-17030 Illustrated Model: White 1 KX-T7030 is compatible with all of the Panasonic Electronic Modular Switching Systems
NS-HDRAD_14-1417_MAN_V4_ENG.fm Page 1 Friday, December 12, 2014 12:13 PM
 V4 FINAL FOR PRINT NS-HDRAD_14-1417_MAN_V4_ENG.fm Page 1 Friday, December 12, 2014 12:13 PM USER GUIDE HD Radio Tabletop NS-HDRAD Before using your new product, please read these instructions to prevent
User Guide Digital AM/FM Clock Radio
 User Guide Digital AM/FM Clock Radio NS-CLOPP2 Before using your new product, please read these instructions to prevent any damage. NS-CLOPP2 Insignia NS-CLOPP2 Digital AM/FM Clock Radio Contents Introduction..............................................
Retro Style Turntable With CD/Radio/USB/SD/MP3/WMA and Vinyl-to-MP3 Encoding
 Retro Style Turntable With CD/Radio/USB/SD/MP3/WMA and Vinyl-to-MP3 Encoding PTCD8U INSTRUCTION MANUAL LOCATION OF CONTROLS 1) DUST COVER 2) DIAL POINTER 3) LEFT SPEAKER 4) LCD DISPLAY 5) FM STEREO LED
DUAL ALARM CLOCK RADIO WITH AUTO TIME SET
 DUAL ALARM CLOCK RADIO WITH AUTO TIME SET USER MANUAL JCR-230 PLEASE READ THIS USER MANUAL COMPLETELY BEFORE OPERATING THIS UNIT AND RETAIN THIS BOOKLET FOR FUTURE REFERENCE. WARNING TO PREVENT FIRE OR
Controls. Opening the cover
 BTS-102 GB 2013 CSR plc and its group companies. The aptx mark and the aptx logo are trademarks of CSR plc or one of its group companies and may be registered in one or more jurisdictions. The Bluetooth
DAB DIGITAL RADIO MODEL: CANVAS USER MANUAL
 DAB DIGITAL RADIO MODEL: CANVAS USER MANUAL 1 Welcome 2 Your DAB Digital Radio 2.1 In The Box 2.2 Front View 2.3 Top View 2.4 Rear View 3 Quick Setup 4 Features POWER button 4.5 FM mode choosing menu options
Operation Manual for Users
 Operation Manual for Users Model No.: FLTAMFMRCD!!!!!!!!!! ATTENTION!!!!!!!!!! THE RESET BUTTON MUST BE PRESSED TO ENSURE PROPER OPERATION. SEE INSTRUCTION MANUAL Table of Contents Table of Contents ---------------------------------------------------------------------------------------------
Digital Photo Picture Frame. Operation Manual
 Digital Photo Picture Frame Operation Manual 20070309 CONGRATULATIONS on your purchase of a Polaroid 7 LCD Digital Photo Picture Frame. Please read carefully and follow all warnings and instructions in
Weather Radio Alarm Clock
 1200093 User s Guide Weather Radio Alarm Clock Thank you for purchasing your Weather Radio Alarm Clock from RadioShack. Please read this user s guide before installing, setting up, and using your new weather