Spectrum Plus 8.9 Query Training End User Training Guide
|
|
|
- Daniella Lawrence
- 7 years ago
- Views:
Transcription
1 August 2009 Version 2.0
2 Table of Contents INTRODUCTION... 4 TRAINING FOCUS... 4 PSFIN WEB QUERY... 4 QUERY TRAINING TOPICS... 4 WEB QUERY OVERVIEW... 5 INTRODUCTION TO WEB QUERY FOR PSFIN V NAVIGATION... 6 THREE OPTIONS IN WEB QUERY... 6 WORKING WITH EXISTING QUERIES... 6 PUBLIC VS. PRIVATE QUERIES... 7 SEARCHING FOR A PREDEFINED QUERY... 7 EDITING AN EXISTING QUERY... 8 RUNNING AN EXISTING QUERY TO HTML... 9 RUNNING AN EXISTING QUERY TO EXCEL... 9 SCHEDULING A QUERY TO RUN SAVING YOUR QUERY TO A FAVORITES LIST ACTIVITY 1 - RUN AND SAVE EXISTING QUERY CREATING A BASIC QUERY CREATE A NEW QUERY CHOOSE THE PRIMARY RECORD ADD FIELDS TO THE QUERY MODIFY FIELD HEADINGS CHANGE THE COLUMN ORDER CHANGE THE OUTPUT ORDER REVIEW THE SQL STATEMENT SAVE THE QUERY RUN THE QUERY PRINT QUERY TURN ON THE DISTINCT OPTION MODIFY TRANSLATE FIELDS ACTIVITY 2 CREATE BASIC QUERY SELECTION CRITERIA ADDING CRITERIA TO A QUERY EDIT CRITERIA PROPERTIES EQUAL CONDITION TYPE IN LIST CONDITION TYPE LIKE CONDITION TYPE BETWEEN CONDITION TYPE IS NULL CONDITION TYPE USING BOOLEAN OPERANDS IN EXPRESSIONS USING GROUPING CRITERIA WITH BOOLEAN OPERANDS REORDERING EXPRESSION CRITERIA USING EFFECTIVE DATES IN EXPRESSIONS ACTIVITY 3 CREATE QUERY WITH SELECTION CRITERIA RUN TIME PROMPTS GSU_Query_Training.doc 2

3 DEFINING MULTIPLE PROMPTS USING BETWEEN CONDITION TYPE WITH PROMPTS ACTIVITY 4 CREATE QUERY WITH RUN TIME PROMPTS AGGREGATE FUNCTIONS GROUPING IN AGGREGATE FUNCTIONS HAVING CRITERIA ACTIVITY 5 CREATE QUERY WITH AGGREGATE FUNCTION WORKING WITH MULTIPLE TABLES JOINS CREATING RECORD HIERARCHY JOINS CREATING RELATED RECORD JOINS CREATING ANY RECORD JOINS CREATING LEFT OUTER JOINS ACTIVITY 6 CREATE QUERY WITH MULTIPLE TABLES FINDING DATA IN PSFIN V KEY RECORDS IN PSFIN V ENTITY RELATIONSHIP DIAGRAMS (ERDS) GSU_Query_Training.doc 3
.")
4 Introduction Training Focus This guide has been developed for use by the University System of Georgia and Georgia State University. It is designed to meet the following specifications related to training you to use Web Query in PeopleSoft Financials v8.9: Explain the fundamental concepts of using Web Query Teach how to edit and create PeopleSoft queries Provide a hands-on activity based format for training This training guide is designed to be used in an instructor-led training session. In order to gain access to Query Manager, which is required to edit and create queries in the PSFIN v8.9 database, please complete the Spectrum Plus User Access Request Form on the Spectrum website (see below), have your CRT Member sign it, and send or fax it to the Spectrum Plus security administrator (information is on the form). PSFIN Web Query This course centers on using the Web Query Tool that is part of your PSFIN v8.9 database. No additional tools need to be installed on your workstation. Topics This class covers beginner and advanced query topics. The following topics are covered in this class: Introduction Web Query Overview Creating a Basic Query Selection Criteria Run Time Prompts Aggregate Functions Working with Multiple Tables Finding Data in PSFIN 8.9 Entity Relationship Diagrams (ERDs) GSU_Query_Training.doc 4

5 Web Query Overview Introduction to Web Query for PSFIN v8.9 This class will introduce you to the basic concepts of the PeopleSoft Financials v8.9 Web Query tool. Query is a graphical tool that allows you to easily retrieve the specific data you want from the PeopleSoft system by specifying the records, fields, and criteria to be applied to the search. Query results can then be viewed via several methods. You can use Web Query in the following ways: Display data in a grid (on the Run tab) Run queries as a separate process (Run to HTML) Download query results to an Excel spreadsheet Forward results to another user Serve as a data source for Crystal Reports Create a data source for PeopleSoft nvision reports GSU_Query_Training.doc 5
 Run queries as a separate process (Run to HTML) Download query results to an Excel spreadsheet")

6 Navigation To get to the web query tool, select Reporting Tools > Query from the main menu. Three Options in Web Query Query Manager: Allows you to view, run, and modify an existing query, or create a new query Query Viewer: Allows you to only view and run existing queries Schedule Query: Allows you to schedule a run time for standard queries Working with Existing Queries An existing query is one that already exists in your database. You can search for and view predefined queries through either the Query Manager or Query Viewer. For this class, we will be using the Query Manager. Pre-defined queries can be ones that are BOR-delivered, institution-developed, or private queries that you created. GSU_Query_Training.doc 6


7 Public vs. Private Queries Anyone can use a public query Only the person who created a private query can use it It is important to not make changes to any query that you did not create. If you want to change a public query, save it under a different name before making any changes. Always save your private version that you create from a public query with a unique name. We recommend using your initials as the first portion of the query name (i.e. DWK_QUERY) Most GSU employees will only have access to create/save private queries. When you search for queries from the Query Manager Search page, PeopleSoft automatically lists all private queries you created. Only you will see these. Public queries are listed after private queries. If you run a public query and do not receive results, it is possible that you may not have authorization to some of the data used in that query. Searching for a Predefined Query Query Manager opens up to the Find an Existing Query selection. To search for a query, enter the first part of its name in the begins with field and press the Search button (Basic Search). GSU_Query_Training.doc 7


8 Advanced Search: If you want to search for a query with different parameters, click the Advanced Search link. Here you can search on Query Name, Description, Uses Record Name, Uses Field Name, Access Group Name, Folder Name, Query Type, and Owner. When you find the query you want to run, you can do any of the following from the Search Results page: Edit it Run it to HTML Run it to Excel Schedule it to run at a specific time Editing an Existing Query It is important that you do not change any query that you did not create. If you want to make changes to a query, save it under a different name before making any changes. When you choose to edit a public query, you may receive a message indicating that the query is read-only, and the Save button has been disabled. Instead, you would perform a Save As. This system displays the Fields tab of the query, where your first action is to click the Save As link. Give the query a new name (include your initials), change the description if needed, and make the query a Private query. After clicking OK, notice that your query name has changed. The original GSU_Query_Training.doc 8


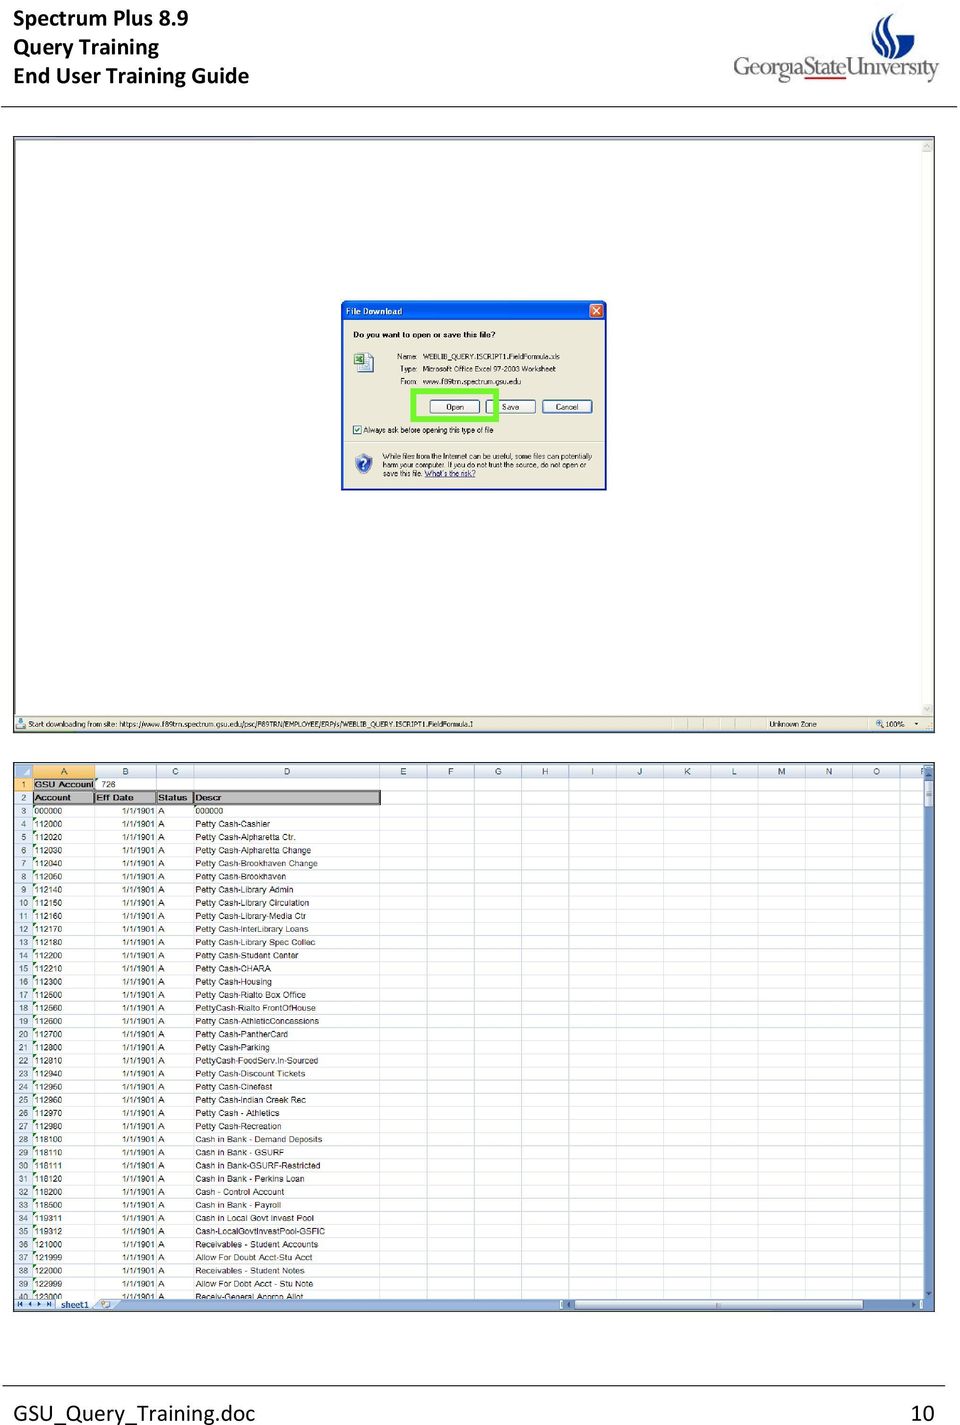
9 public query has not changed though. Now, you can edit your saved query. Running an Existing Query to HTML To run the existing query to HTML, click the HTML link. From there you may expand the HTML page to View All results or scroll through your results 100 at a time. You may also download your results to an Excel Spreadsheet and/or Comma Separated Value (CSV) Text File. Running an Existing Query to Excel To run the existing query directly to Excel, click the Excel link. You may receive a message whether you want to Open or Save the file. If you choose to save the file, just click the Open button to view your query when your download is complete. GSU_Query_Training.doc 9

10 GSU_Query_Training.doc 10
11 Scheduling a Query to Run To schedule your query to run at a specific time, click the Schedule link. Query Manager interacts with the PeopleSoft Process Scheduler to let users perform this function. The Schedule Query page submits a process request which enables you to specify such variables as where to run the process and in what format to generate the output based on a run control ID. The Process Scheduler Request page enables you to set the server, run date and time, how often the process runs, output type, and format. You can go to the Report Manager to see the resulting query after it has run. Steps for Scheduling a Query: Reporting Tools > Query > Query Manager Locate the query and click its Schedule link Select or add a new Run Control ID Enter any values you may be prompted for On the Schedule Query page, the Query Name appears. Input a description and click the OK button Click on the Run Icon. This will take you to the Process Scheduler Request page. Leave the Server Name blank If you want this query to run on a recurring schedule, select a schedule in the Recurrence drop-down field. In the Run Date field, choose the first date you want this query to run. If you have chosen to run this on a recurring schedule, the Run Time will default according to your recurrence selection. If not, input the time you want your query to run. Under Format, select the output for your query (TXT, HTM, XLS). To indicate a specific folder in Report Manager for your query to be housed in, click the Distribution link and select the folder in the Folder Name drop-down field. If you have the authority, you can send your query results to another user through the Distribution link. o Click the Distribution link. o Add a row for each person you want to send results to o Leave the ID Type as User and input or lookup the User ID o Click the OK button. On the Process Scheduler Request page, click the OK button. To retrieve your Query results: Reporting Tools > Report Manager If you saved your query to a particular folder, click the Explorer tab. o Locate your query and click its link o Select your output file If you did not save your query to a particular Report Manager folder, select the Administration tab. o Locate your query and click its link (or click the Detail link and select your output file) GSU_Query_Training.doc 11

12 Saving Your Query to a Favorites List For those queries that you run on a consistent basis, you can create a Favorites list so that you do not have to search for the query each time you want to run it. You can add both public and private queries to your Favorites list. To save a query as a favorite: Reporting Tools > Query > Query Manager Locate the query you want to save as a favorite Select it by clicking in its Select box until a green checkmark appears In the Action drop down box, choose Add to Favorites and click the Go button. GSU_Query_Training.doc 12


13 You should see all of your favorite queries under the heading of My Favorite Queries on both the Query Manager and Query Viewer pages. GSU_Query_Training.doc 13

14 Activity 1 - Run and Save Existing Query Activity 1A 1. Navigate to the Query Manager. 2. Search for a query that begins with GSU_SPEED. 3. Click to edit the GSU_SPEEDTYPE query. 4. Save the query as XXX_SPEEDTYPE (XXX = your initials) Private. 5. You are now able to edit the query. Activity 1B 1. Navigate to the Query Manager. 2. Search for a query that begins with XXX_SPEED. 3. Run the XXX_SPEEDTYPE query to HTML. 4. View the Results. 5. Close the output window. 6. Run the XXX_SPEEDTYPE query to Excel. 7. View the Results. 8. Close the output window. 9. Add XXX_SPEEDTYPE to Favorites. GSU_Query_Training.doc 14

15 Creating a Basic Query To build a new query, perform the following steps: Task Create the new query Choose the primary record Add fields to the query Modify Field Headings, if necessary Change the column order, if necessary Set or change the output order, if necessary Review the SQL statement generated Save the query Run the query Print the query Navigation/Comments Reporting Tools > Query > Query Manager > Create New Query Search for record and click Add Record Select the fields (checkmark) and click the Fields tab On Fields tab, select Edit button of field; select Text for Heading and insert new Field Heading On Fields tab, click the Reorder/Sort button; enter new column order On Fields tab, click the Reorder/Sort button; enter sort order; for Descending, click the Descending checkbox Go to the View SQL tab Click the Save button; enter Query name, description and folder; Indicate if query is private or public; enter definition; click OK Preview the query by clicking the Run tab Print your results by running the query from the Query Manager or Query Viewer page Additional basic query options include: Option Turn on the Distinct option Modify Translate Fields Navigation/Comments From any page except the Run page, click on the Properties link; select the Distinct option On Fields tab, select Edit button of field; select either Short or Long for Translate Value The following pages in this section will show you in detail how the GSU_SPEEDTYPE query was created. GSU_Query_Training.doc 15

16 Create a New Query To create a new query, first go to Query Manager and select the Create New Query link. Note: You can also access the Create New Query link from any page in Query Manager except the Run page. GSU_Query_Training.doc 16

 of the Record in the Search by field and click the Search button.")
17 Choose the Primary Record A record is the table that holds the data for which you are searching. To find the appropriate record, enter the name (or first part of the name) of the Record in the Search by field and click the Search button. When searching for a record, you can also use the Advanced Search page. Click on the Advanced Search link. Here you can specify the following when searching for a record: Record Name Description Uses Field Name Access Group Name Also with Advanced Search, you are not limited to the criteria of begins with. To see which fields are contained within the record before selecting it, click the Show Fields link. Here you can see all of the record s fields. Click the Return button to go back to the Find an Existing Record page. To select the record to add to your query, click the Add Record link. Once you have added your primary record, the system takes you to the Query page. GSU_Query_Training.doc 17

18 Add Fields to the Query From the Query page, select the fields you want included from your primary record for your query. Select a field by clicking in the Select checkbox. You may select all fields by clicking the Check All Fields button. GSU_Query_Training.doc 18

19 After you have added all of your fields, go to the Fields tab. Here, you can see all of the fields you have added to your query. GSU_Query_Training.doc 19

20 Modify Field Headings The Field Heading is what is displayed at the top of your column. To change this, click the Edit button for that field. The Edit Field Properties page is displayed for that field. To change the field heading, you can select one of the following: No Heading: The column will not have a heading RFT Short: The column heading is the short name from the record definition RFT Long: The column heading is the long name from the record definition Text: The column heading is the text that you have entered in the text box The default Field Heading for all fields is RFT Short. To input your own field heading, select Text and input your new heading in the Heading Text field and click OK. Whenever you change the Field Heading, the new modified heading is reflected on the Fields page, in the Heading Text column. GSU_Query_Training.doc 20

21 Change the Column Order If necessary, you can change the order in which your columns are displayed. From the Fields page, click the Reorder/Sort button. Under Column, you can see how the columns are currently ordered. In the New Column fields, you can enter the new column number to reorder the columns. Columns left blank or assigned a zero are automatically assigned a number. When you click OK to return to the Fields page, you will see the new order of the columns. GSU_Query_Training.doc 21
22 Change the Output Order In addition to reordering columns, you can also change the sort order of your results. From the Fields page, click the Reorder/Sort button. In the New Order By column, you can enter the new sort order. Enter a 0 to remove a sort order. If the field is the first sort order, enter 1, and the system sorts rows based on this field first. To designate the second sort field, enter 2, and so on. Select the Descending option to sort fields in descending order. Once you apply a sort order, you will see this indicated in the Ord column on the Fields page. GSU_Query_Training.doc 22
23 Review the SQL Statement To view the underlying SQL code of your query, click the View SQL tab. The system displays the underlying SQL code that Query Manager generates based on your query definition. To copy the SQL statement, highlight the text of the statement and copy it. You can then paste it into another application if desired. GSU_Query_Training.doc 23
24 Save the Query You can save a query at any time after you have selected one record and at least one field for it. You can save your query from any Query Manager page, except for the Run page, by clicking the Save button. When saving your query, you must enter some basic information: Query: Enter a short name for your query, using your initials (i.e. XXX_QUERY_NAME). It is important that there are no spaces in this name (use an underscore _ to represent a space) Description: Enter an appropriate description for the query Folder: If you want to save the query to a specific query folder, enter the folder name here. Query Type: Leave the Query Type as User. Owner: Select whether your query is Public or Private Private Queries: Only the User ID that created the query can open, run, modify, or delete the query Public Queries: Any user with access to the records used by the query can run, modify, or delete the query (Note: Only super users have the ability to save Public queries) Definition: You can use this field for a more detailed description or special notes for your query. GSU_Query_Training.doc 24
25 Run the Query To preview the query, select the Run tab. From here, you can return to any of the Query Manager tabs to make changes to your query. From there, you can View All, Rerun the Query, or Download your results to Excel. Print Query To print the results of your query from the Run tab, download your results to Excel and print the results. You can also run any saved query from the Query Manager or Query Viewer to either HTML or Excel, and then print the results. GSU_Query_Training.doc 25
26 Turn on the Distinct Option The distinct option selects only unique rows based on the fields selected. To use the distinct option for a query, select the Properties link from any page but the Run page. Then select the Distinct option. GSU_Query_Training.doc 26
27 Modify Translate Fields Translate Values are codes that you can use in order to display your query results differently: N = None - displays the code value in the output S = Short - displays the 10 character XLAT short name based on the effective date L = Long - displays the 30 character XLAT long name based on the effective date When you change the Translate Value to either Short or Long, you will also have different effective date options: Current Date - Uses the current date as the comparison date to determine the effective row for the XLAT description Field - Uses a date field in the table as the comparison date to determine the effective row for the XLAT description Expression - Uses a query defined expression as the comparison date to determine the effective row for the XLAT description If a field has a translate value associated with it, either an N, S, or L will be listed under the XLAT column on the Fields tab. To change a translate value, click the Edit button for that field. Select the Translate Value option and the effective date method. Click OK to return to the Fields page. GSU_Query_Training.doc 27
28 Activity 2 Create Basic Query Activity 2A 1. Create a query against the LEDGER table that lists all ledger balances in the system 2. Add the following fields so that the columns appear in this order: BUSINESS_UNIT, LEDGER, ACCOUNT, FUND_CODE, DEPTID, PROGRAM_CODE, CLASS_FLD, BUDGET_REF, PROJECT_ID, FISCAL_YEAR, ACCOUNTING_PERIOD, POSTED_TOTAL_AMT. 3. Change the following field Headings to RFT Long: BUSINESS_UNIT, DEPTID, BUDGET_REF, FISCAL_YEAR, ACCOUNTING_PERIOD. 4. Sort the results by FISCAL_YEAR, ACCOUNTING_PERIOD, DEPTID, and ACCOUNT. 5. Save the query as XXX_LEDGER (XXX = your initials) - Private. 6. View the SQL. 7. Run the query. 8. Add XXX_LEDGER to Favorites. GSU_Query_Training.doc 28
29 Selection Criteria To selectively retrieve the data you want in query, you define selection criteria. Selection criteria refine your query by specifying conditions that the retrieved data must meet. Because your PeopleSoft database stores data in tables, you can identify every individual piece of data by saying what column (field) and row (record) it is in. When you create a query, select the data that you want by specifying which columns and rows you want the system to retrieve. If you run the query after selecting the fields, the system retrieves all the data in those columns; that is, it retrieves data from every row in the table or tables. This may be much more data than what you really need. You select the rows of data you really need by adding selection criteria to the query. The selection criteria serves as a test that the system applies to each row of data in the tables that you are not querying. If the row passes the test, the system retrieves it; if the row does not pass the test, the system does not retrieve it. In most cases, a selection criterion compares the value in one of a row s fields to a reference value. In other situations, you might compare the value to the value in another field or to a value that the user enters when running the query. GSU_Query_Training.doc 29
30 Adding Criteria to a Query There are several ways to add criteria in Web Query: Funnel icon on the Query page Funnel icon on the Fields page Add Criteria button on the Criteria page Funnel icon on the Query page GSU_Query_Training.doc 30


31 Funnel icon on the Fields page Add Criteria button on the Criteria page In most cases for this class, we will be using the funnel icon on the Fields page to add criteria. To modify criteria, go to the Criteria page. GSU_Query_Training.doc 31

32 Edit Criteria Properties When adding criteria to a query, you will see the following edit criteria properties: 1. Choose Expression 1 Type/Expression 1: Expressions are made up of two components: Expression Type and Value. For Expression 1, valid expression types are Database field and Query Expression. The expression type specified drives the expression value selected. This is the left expression in the criteria. 2. Operand/Condition Type: The Operand (or Condition Type) indicates how Expression 1 relates to Expression 2 (i.e., Equal to, Between, In List, etc.). 3. Choose Expression 2 Type/Expression 2: For Expression 2, valid expression types are: Database field, Constant, Prompt, Query Expression, or SubQuery. This is the right expression in the criteria (as noted on the Criteria page). Comparison/Expression 1 Values The following value types may be used for the Expression 1: Value Type Field Expression Action The value in the selected field is compared to the value in another field, usually a field in another record component. The value in the selected field is compared to an expression that you enter, which PeopleSoft Query evaluates once for each row before comparing the result to the value in the selected field. GSU_Query_Training.doc 32
33 Operands/Condition Types The following Operands/Condition Types may be used: Operand Return Values Expression Types Equal To The value in the selected record exactly matches the comparison value. Constant, Field, Prompt, Expression, SubQuery Greater Than The value in the record field is greater than the comparison value. Constant, Field, Prompt, Expression, SubQuery Less Than The value in the record field is less than the comparison value. Constant, Field, Prompt, Expression, SubQuery In List The value in the selected record field matches one List of the comparison values in a list. Between The value in the selected record falls between two comparison values. The range is inclusive. Constant - Constant; Constant - Expression; Field - Constant; Field - Field; Expression - Constant; Expression - Field; Exists Like Is Null In Tree This operator is different from the others, in that it does not compare a record field to a comparison value. The comparison value is a SubQuery. If the SubQuery returns any data, PeopleSoft Query returns the corresponding row. The value in the selected field matches a specified string pattern. The comparison value may be a string that contains wildcard characters. The selected record field does not have a value in it. You do not specify a comparison value for this operator. Key fields, required fields, character fields, and numeric fields do not allow null values. The value in the selected record field appears as a node in a tree created with PeopleSoft Tree Manager. The comparison value for this operator is a tree or branch of a tree that you want PeopleSoft Query to search. Note: Each Operand has a corresponding Not value. Expression - Expression SubQuery to check for the existence of the value in another table Similar to equal - makes use of wildcards No value in the field. Searches for existence of row within a tree node GSU_Query_Training.doc 33
34 Comparison/Expression 2 Values The following value types may be used for the Expression 2: Value Type Field Expression Constant Prompt SubQuery In List Action The value in the selected field is compared to the value in another field, usually a field in another record component. The value in the selected field is compared to an expression that you enter, which PeopleSoft Query evaluates once for each row before comparing the result to the value in the selected field. The value in the selected field is compared to a single fixed value. Note: A list of constants is available only for fields that have translate values or an assigned prompt table. The value in the selected field is compared to a value that you enter when running the query. The value in the selected field is compared to the data that is returned by a SubQuery. The value in the selected field is compared to a list of values that you enter. This value type is available only when the selected operators is in list or not in list. Current Date The value in the selected field is compared to the current date on the database server. Tree Option The value in the selected field is compared to a selected set of tree nodes. This value type is available only when the selected operator is in tree or not in tree. Effective Sequence Used on some effective-dated records, the effective sequence is a sequencing number that is provided to further refine the effective date. The next sections will describe how to use these expressions and conditions to define selection criteria for the GSU_SPEEDTYPE query. GSU_Query_Training.doc 34
35 Equal Condition Type This is the most commonly used Condition Type. It will select rows that match the exact value for a particular field. To add an Equal To condition type: 1. On the Fields page, click the funnel icon (add criteria) for the field you want to specify criteria. 2. The Edit Criteria Properties page displays. 3. Leave the Expression 1 Type as Field. In the Expression 1 - Choose Record and Field group box, you should see the field you want to specify criteria. 4. For Condition Type, select equal to. 5. Choose your Expression 2 Value Type and define it. GSU_Query_Training.doc 35
36 In List Condition Type The In List condition type is used for fields for which you may want to retrieve rows which match any one of a list of values. This is an easier method of using the OR operand for the same field with different values that satisfy the criteria. When you select In List as your comparison value, the Edit List page appears. Use this page to build a list of values for Web Query to compare to the value from the first expression. (After you have created such a list, you can also use this page to select from the list.) GSU_Query_Training.doc 36
37 To add a comparison value to the list, click the Look Up button on the Edit List page. This displays the Edit List page, which dynamically reflects which record is used. List Members: Lists the values that have been selected using the Add Value button. (Note: the grid, containing the selected value, appears when a value is selected.) To delete a value, select the checkbox to the left of the appropriate List Members value and click the Delete Checked Values button. Value: To add a value, enter it into the Value text box and click the Add Value button. The value appears in the List Members grid. To select from a list of values, click the Search button to display the Select a Constant page. Click the Look Up button to display the Look Up page. Enter part of a value in the text box. The system automatically adds a wild card to the end of the entry, which enables you to do a partial search. Click the Look Up button to display the list of values that corresponds to the search criteria. Select the desired value from the list by clicking its associated link. The Select a Constant page appears again. Click OK. The selected value appears in the List Members grid. Add Prompt: Select to add one or more prompts to the list so that users can enter the comparison values when they run the query. Note: The prompts must be defined before you select them. If no prompts have been defined, you will receive an error message. OK: Click to accept the values that are listed in the List Members grid. You will return to the Edit Criteria Properties page, where the selected values are displayed in the Edit List page. Cancel: Click to return to the Edit Criteria Properties page without saving selections. GSU_Query_Training.doc 37
38 Like Condition Type The Like condition types retrieves data containing fields that match specified portions of a character string. This condition type uses wild card characters. PeopleSoft supports two standard wild cards; individual database platforms may support additional or different wild cards. Wild Card Definition % Retrieves any values which meet the criteria preceding or succeeding the wild card. For example: C% > finds any string beginning with the letter C %C > finds any string ending with the letter C %C% > finds any string containing the letter C _(underscore) Replaces one character to facilitate retrieving any values which meet the criteria following the wild card. For example: _ones > finds any value ending in ones, such as Jones, Cones, Tones. Because this wild card is limited to replacing a single character, the expression would not retrieve Stones. A query using the % wild card (%ones) should be used to retrieve Stones. Wild cards may be combined in the same expression. To add a like expression: 1. On the Fields page, click the funnel icon (add criteria) for the field you want to specify criteria. 2. The Edit Criteria Properties page displays. 3. Leave the Expression 1 Type as Field. In the Expression 1 - Choose Record and Field group box, you should see the field you want to specify criteria. 4. For Condition Type, select like. GSU_Query_Training.doc 38
39 Between Condition Type The Between condition type selects fields with a value between two specified values. Between expressions establish an inclusive range where upper and lower values, as well as in between values are searched by the expression. This is often used with dates. To add a Between expression: 1. On the Fields page, click the funnel icon (add criteria) for the field you want to specify criteria. 2. The Edit Criteria Properties page displays. 3. Leave the Expression 1 Type as Field. In the Expression 1 - Choose Record and Field group box, you should see the field you want to specify criteria. 4. For Condition Type, select between. 5. Choose the value types in the Choose Expression 2 Type box and define Expression 2. GSU_Query_Training.doc 39
40 Is Null Condition Type Is Null expressions identify fields with no value in the field. Null values are not synonymous with zeros in numeric fields or blanks/spaces in character fields. Only certain fields accept null as a valid field value: Long Character, Image, Date, Time, and Date/Time. To use an Is Null expression: 1. On the Fields page, click the funnel icon (add criteria) for the field you want to specify criteria. 2. The Edit Criteria Properties page displays. 3. Leave the Expression 1 Type as Field. In the Expression 1 - Choose Record and Field group box, you should see the field you want to specify criteria. 4. For Condition Type, select is null. 5. No value is needed for Expression 2. GSU_Query_Training.doc 40

41 Using Boolean Operands in Expressions When you specify two or more selection criteria for a query, you must tell Web Query how to coordinate the different criteria. When your query includes multiple criteria, link them using AND, AND NOT, OR, or OR NOT. When you link two criteria with AND, a row must meet the first and second criterion for Web Query to return it. When you link two criteria with OR, a row must meet the first or the second criterion, but not necessarily both. By default, Web Query assumes that you want rows that meet all of the criteria that you specify. When you add a new criterion, Web Query displays AND in the Logical column on the Criteria tab. To link the criterion using one of the other options instead, select the required option from the drop-down list. To use Boolean Operands: 1. Add criteria to your query. 2. Go to the Criteria page. 3. To change the Boolean Operand, change the selection in the Logical drop-down box for that field. GSU_Query_Training.doc 41
42 Using Grouping Criteria with Boolean Operands When your query includes multiple criteria, Web Query checks the criteria according to the rules of logic: it evaluates criteria that are linked by ANDs before those that are linked by ORs. When all the criteria are linked by ANDs, this order always returns the correct results. When you include one or more ORs, however, this is not always what you want. For example, let s say you want to query all SpeedTypes with a Department like 15% AND Program OR Class If you use the following selection criteria without Grouping Boolean Operands, you may get more results than expected: This set of criteria returns a list of all SpeedTypes for Departments like 15% and Program equals or Class equals (regardless of the Department and/or Fund). The reasoning for this is that Web Query evaluates criteria in order of appearance. GSU_Query_Training.doc 42
43 What you really want Web Query to evaluate the OR before the AND. When a list of criteria includes parentheses, Web Query evaluates the criteria inside the parentheses before the criteria outside the parentheses. This is called Grouping. To Group Criteria: 1. Click the Group Criteria button on the Criteria page. The Edit Criteria Grouping page appears. 2. Use the edit boxes to enter parentheses for the criteria needed. A parenthesis appears at the beginning of the Expression 1 column for the first row that you selected and at the end of the Expression 2 column for the last row that you selected. 3. In the example above, notice that the AND operator precedes the parentheses, while the OR operator is located within the parentheses. You can add as many parentheses as needed. On the Criteria tab, the opening parenthesis appears just before the field name and the closing parenthesis appears just after the comparison value. For example, the following set of criteria returns the result you want: GSU_Query_Training.doc 43
44 See how it looks on the Criteria page. Now see the results: GSU_Query_Training.doc 44

45 Reordering Expression Criteria It is important to order the criteria for a query correctly to maximize performance. As a general rule, you should enter criteria in the order of the table. However, if you enter your criteria out of order and need to move an expression component, click the Reorder Criteria button, enter the new positions for the criteria on the Edit Criteria Ordering page, and click OK. GSU_Query_Training.doc 45
46 Using Effective Dates in Expressions Effective dated records include the field EFFDT. This field is used to give an historical perspective to the field values, and to determine which value is valid for use at a particular point in time. If a query uses an effective-dated record, the developer will be prompted to choose a default value for processing the effective date in the query. When you use a PeopleSoft application for day-to-day processing, you usually want the system to give you the currently effective rows of data - the rows where the effective date is less than or equal to today s date. You do not want to see the history rows, which are no longer accurate, nor do you want to see future-dated rows, which are not yet in effect. When you query an effective-dated table, however, you may want to see some rows that are not currently in effect. You might want to see all the rows, regardless of their effective dates. Or you might want to see the rows that were as of some date in the past. When you choose the record that has EFFDT as a key field, Query Manager automatically creates the default criteria and adds that criteria to the Criteria page. This criteria is used to specify which row of data Web Query retrieves for each item in the table. The default is the currently effective row. Defaults are: Expression 1 Record Alias.EFFDT Condition Type EFFDT <= Expression 2 Current Date Effective Sequence Last Valid Effective Date Options include: Effective Date Option Description Current Date Uses the current system date from the server Constant Uses a specific date value entered in the query design process Field Prompts the developer to enter a specific record and date field First Effective Date Returns the row with the lowest (oldest) effective date value Last Effective Date Returns the row with the highest (newest) effective date value No Effective Date Does not use the effective date logic Option We will create a new query using the SPEEDTYPE_DTL record to show how Effective dates are managed. GSU_Query_Training.doc 46
47 Add an effective dated record. View the Criteria page. GSU_Query_Training.doc 47
48 Activity 3 Create Query with Selection Criteria Activity 3A 1. Update your XXX_LEDGER for ACTUALS Ledger balances for your Department or Departments. 2. Save the query as XXX_YYYYYYYYY_LEDGER (XXX = your initials, YYYYYYYYY = your Department) - Private. 3. Add select criteria where LEDGER = ACTUALS 4. Add select criteria for your Department or Departments. 5. Save the query. 6. View the SQL. 7. Run the query. GSU_Query_Training.doc 48
49 Run Time Prompts Adding a prompt lets you further refine a query when you run it. For example, suppose that you want to change a query so that you could prompt the user to enter a value for the Department. Before you add the prompt, the query always retrieves rows for all accounting periods based on a defined constant value on which to make a comparison. Adding a prompt to the query enables the user to enter any Department, and then the query s results are based on the value provided when running the query. If the field for which you are prompting has an associated prompt table (even if it is the Translate Table), the Edit Table drop-down list box shows its name. Prompt Tables don t always default correctly, and may be difficult to find. For example, we could add a run time prompt on Department to the GSU_SPEEDTYPE query. We will call the resulting query GSU_SPEEDTYPE_DEPT for GSU SpeedTypes by Department. Defining a Run Time Prompt 1. On the Fields page, click the Funnel Icon (add criteria) for the field you want to specify criteria. 2. The Edit Criteria Properties page displays. 3. Leave the Expression 1 Type as Field. In the Expression 1 - Choose Record and Field group box, you should see the field you want to specify criteria. 4. For Condition Type, select equal to or like. Like allows for wildcards (%). 5. In the Choose Expression 2 Type group box, select Prompt. 6. In the Expression 2 - Define Prompt group box, select the New Prompt link. 7. The following fields are on the Run Time Prompt Parameter Page: a. Field: this is the field you are specifying the criteria for b. Type: this indicates what type of field it is c. Format: this specifies the field format; over a dozen formats are available including name, phone, SSN, and zip code d. Length: this indicates the field length GSU_Query_Training.doc 49
50 e. Decimals: this defines the number of decimals that are allowed f. Edit Type: this defines the type of field edit for the specified field. No Table Edit is typically the default. g. Heading Type: Select a heading type for the prompt from the values in the table below. h. Heading Text: Displays the label for the text box where you enter the comparison value. i. Unique Prompt Name: This is a default value that Query Manager generates for globalization j. Prompt Table: If the edit type is Prompt Table, you can select a prompt table to use. If the edit type is Translate Table, the value in the drop-down list box determines the values used. Typically, you will want to use No Table Edit. 8. Update the Heading Type, Edit Type, and Prompt, if necessary. Populate the Prompt Table to enable search (magnifying glass) capability when using a run time prompt. Note that the default Prompt Table is not always the correct prompt table, nor do all Fields in the system have a correlating Prompt Table. 9. Click OK to return to the Edit Criteria Properties page. 10. Click OK to return to the Fields page. When you now run the query, you are prompted to enter a Department value. Notice that the search capability works, and you may use a wildcard. GSU_Query_Training.doc 50
51 Defining Multiple Prompts You can add more than one prompts to your query. You may add multiple prompts through the Prompts tab or through the Fields tab as you did with a single run time prompt. You may use any number of Condition Types to allow for different constraints on your run time prompts. The above criteria will create the following dialog box before executing the query: GSU_Query_Training.doc 51

52 Using Between Condition Type with Prompts Sometimes, you may need to add the Prompt before you can use it as a select criteria. For example, if you want the user to be able to enter a From and To value when using the Between condition type. Adding Between condition type with prompts: 1. On the Prompts page, click the Add Prompt button. 2. Select the Field Name for which you wish to prompt. 3. Adjust the Header Type and Heading Text to enable a From prompt. 4. Typically, you do not want to modify the Character, Format, Unique Prompt Name, Length, or Decimals fields. 5. Select the Edit Type you wish to choose. 6. Search for and Select the correct Prompt Table (Note, this may be more difficult that you think ). 7. Click OK to return to the Prompts page. 8. Repeat steps 1-7 to enable a To prompt. GSU_Query_Training.doc 52


53 9. After adding all of your prompts, Edit Criteria to allow the From and To prompts to be used as expressions when using the Between condition type. 10. Click OK to return to the Criteria page. 11. Change the Boolean Operands if needed. The above criteria will create the following dialog box before executing the query: Note, there are no Prompt Tables on the From Class or To Class fields. GSU_Query_Training.doc 53
54 Activity 4 Create Query with Run Time Prompts Activity 4A 1. Edit your XXX_YYYYYYYYY_LEDGER query to be run for a range of Departments and/or Accounts. 2. Save the query as XXX_LEDGER_DEPT_ACCT (XXX = your initials) Private. 3. Modify the DEPTID selection criteria to incorporate the following properties a. Condition Type = like b. Expression 2 Type = Prompt 4. Add a new Prompt (:1) with the following properties by clicking the New Prompt hyperlink in the Define Prompt box: a. Field = DEPTID b. Heading Type = Text c. Heading Text = Department d. Do not change the Character, Format, Unique Prompt Name, Length, or Decimals fields. e. Edit Type = No Table Edit f. Prompt Table = DEPT_BU_VW 5. Add a new Prompt (:2) for From Account by clicking the Add Prompt button on the Prompts page. Choose the following properties: a. Field = Account b. Heading Type = Text c. Heading Text = From Account d. Do not change the Character, Format, Unique Prompt Name, Length, or Decimals fields. e. Edit Type = No Table Edit f. Prompt Table = blank 6. Add a new Prompt (:3) for To Account by clicking the Add Prompt button on the Prompts page. Choose the following properties: a. Field = ACCOUNT b. Heading Type = Text c. Heading Text = To Account d. Do not change the Character, Format, Unique Prompt Name, Length, or Decimals fields. e. Edit Type = No Table Edit f. Prompt Table = blank 7. Add selection criteria for Account by clicking the Add Criteria button on the Criteria page. Choose the following properties: a. Choose Expression 1 Type = Field GSU_Query_Training.doc 54
55 b. Record Alias.Fieldname = A.ACCOUNT c. Condition Type = between d. Choose Expression 2 Type = Expr-Expr e. Define Expression / Expression = :2 f. Define Expression / Expression 2 = :3 8. Save the query. 9. View the SQL. 10. Run the query entering your Department(s) and Accounts from to (for all Revenues). 11. Run the query entering your Department and Accounts from to (for all Expenses). In the future, it may be prudent to add additional selection/prompt criteria to this query to enable the user to enter the Fiscal Year and/or Accounting Period to query. GSU_Query_Training.doc 55
56 Aggregate Functions In a normal query, each row that Web Query retrieves corresponds to an individual row in the table you are querying. Sometimes though, what you want is a summary of the information in multiple rows. An aggregate function is a special type of clause that returns a single value based on multiple rows of data. When your query includes one or more aggregate function, Web Query collects related rows and displays a single row that summarizes their contents. The following Aggregate Functions are available: Aggregate Function Sum Count Min Max Average Action Adds the values from each row and displays the total Counts the number of rows Checks the value from each row and returns the lowest one Checks the value from each row and returns the highest one Adds the values from each row and divides the result by the number of rows For example, suppose you would like to know the Account balance by Fund posted to the ACTUALS Ledger for your Department. You would create a query that selects the Fund and Account and Sum of the Posted Total Amount field from the Ledger table where Ledger is equal to ACTUALS and Department is equal to your Department. Without aggregate functions, you would most likely retrieve multiple rows for each account. If you use the Sum aggregate function, you will get a single row for each Fund and Account combination with the summarized amount for all the rows. To use an aggregate function: 1. Create a new query. 2. Add the record and fields. 3. Click the Edit button on the field you want to apply the aggregate to. The Edit Field Properties page displays. 4. Select the appropriate Aggregate in the Aggregate group box. 5. Click OK. GSU_Query_Training.doc 56

57 Once you have added an aggregate function to a query, you can see the function under the Agg Column on the Fields page. GSU_Query_Training.doc 57
58 Grouping in Aggregate Functions When using an aggregate function for a field in a query, Web Query automatically groups by all other fields selected for a query. If selecting Fund and Account, and summing the Posted Total Amount, the query will group the result by the first two fields. Therefore, a row for each unique combination of the first three fields will be retrieved with a summation of posted total amount for each combination. To see how PeopleSoft performs the grouping, view the SQL created. GSU_Query_Training.doc 58
59 HAVING Criteria SQL does not support the use of aggregate functions in WHERE clauses. Therefore, after you have applied an aggregate function to a field, you cannot use that field in your selection criteria, which corresponds to a SQL WHERE clause. When you want to select rows based on the results of an aggregate function, Query Manager enables you to create HAVING criteria. In SQL, a HAVING clause is similar to a WHERE clause for rows of data that have been aggregated into a single row of output. The system evaluates WHERE clauses by looking at the individual table rows before they are grouped by the aggregate function, and then it evaluates HAVING clauses after applying the function. So if you want to check the value that is returned by the function, you must define a HAVING criterion. When you click the Add Criteria icon from the Fields or Query page for an aggregate field, new criteria is added to the Having tab instead of the Criteria tab. Add selection criteria using the Having tab in the same way that you add selection criteria using the Criteria tab. GSU_Query_Training.doc 59
60 Activity 5 Create Query with Aggregate Function Activity 5A 1. Create a query to display the number of active Departments in the system. 2. Add the DEPT_TBL record. 3. Check the DEPTID field. 4. On the Fields page, Edit Field Properties on the DEPTID field to use the Count Aggregate Function. 5. Add selection criteria to only select EFF_STATUS = A. 6. Save Query as XXX_DEPT_COUNT (XXX = your initials) Private. 7. View the SQL. 8. Run the query. GSU_Query_Training.doc 60
61 Working with Multiple Tables When writing queries, it is simple to retrieve information from one table. In many cases however, you want to retrieve information from more than one table, or specify criteria in your query from a second table. In those cases, you need to link at least two tables in one query. There are two methods to selecting data from multiple tables: Joins and Unions. Joins A join enables you to retrieve data from two or more records, or specify criteria from more than one record. Whenever you perform a join, the records involved are linked based on the common fields, typically the keys to the table. Query Manager enables you to create queries that include multiple-table joins. Joins retrieve data from more than one table, presenting the data as if it came from one table. PeopleSoft Query links the tables, based on common columns, and links the rows on the two tables by common values in the shared columns. Joins are what make relational databases relational. Using joins, you define relationships among fields when you query the records, not when you create the records. Because PeopleSoft records are highly normalized (they each describe one type of entity), you can easily use Query Manager to create joins. The procedure for joining tables differs depending on how the tables that are being joined are related to each other. Query Manager recognizes three types of joins: Record Hierarchy Related Record Any Record In Web Query, predefined joins can be generated from either a hierarchical or related record. Since the links between these records are predefined, you don t have to link the records manually. Joins can also be manually created through the Join Any Record menu option. This allows you to join any record to another record, but often you must specify the fields on which the records are joined. GSU_Query_Training.doc 61
62 Creating Record Hierarchy Joins A record hierarchy join joins a parent table to a child table. (A child table is a table that uses all of the same key fields as its parent, plus one or more additional keys.) The parent/child relationship is specified using the Parent Record Name option in PeopleSoft Application Designer. To create a record hierarchy join: 1. Select the primary record for your query and select the appropriate fields and criteria. 2. Go to the Query page and click the Hierarchy Join link. a. All of the records that have a parent/child relationship with your selected record appear. GSU_Query_Training.doc 62
63 3. Select the second record for the join. The join is reflected on the Query page. Notice that your primary record is preceded by A, and the related record is preceded by B. 4. Select the field and add any criteria for the second record. 5. Look at the SQL statement that is created by joining the two tables: GSU_Query_Training.doc 63
64 GSU_Query_Training.doc 64
65 Creating Related Record Joins In a Related Record Join, you can automatically join two records based on a relationship that has been predefined in the record designer. For example, if a field has a prompt table defined for it, Web Query displays a join link to the right of the shared field. To create a Related Record Join: 1. Select the primary record for your query and select the appropriate fields and criteria. 2. From the Query page, click the related record join link (if available, to the right of the field name. 3. From the Select Join Type page, select the Standard Join option and click OK. GSU_Query_Training.doc 65
66 4. The join is reflected on the Query page. 5. View the SQL Statement. The following example shows that you can join the VOUCHER table and the DISTRIB_LINE table through a Record Hierarchy Join; and then join the DEPTID_BUGL_VW table to the DISTRIB_LINE table through a Related Record Join. GSU_Query_Training.doc 66
67 Creating Any Record Joins Using Query Manager, you can create a join between two records (any record join) by selecting your initial primary record, defining its output fields and associated criteria, and then returning to the Record page to select the second record. When you return to the Records page, you will see the link Join Record rather than Add Record to the right of all listed record names. If you have the Enable Auto Join preference selected in the Query Preferences page, Web Query automatically attempts to join the new record to the existing record by looking for matching columns on the two records. To navigate to the Query Preferences dialog, click the Preferences link. Auto Join first checks for a parent-child relationship between the base and join record. If one exists, a hierarchical join will be done. If no parent-child relationship exists, the Auto Join then attempts to join on all matching key fields (excluding EFFDT and EFFSEQ). Note: This does not always produce a correct join. GSU_Query_Training.doc 67
68 To create an Any Record Join: 1. Add your primary record, select your fields and add any criteria. 2. Go to the Records tab. 3. Locate and select the record you want to join to your primary one by clicking the Join Record link. The Select Join Type page appears. GSU_Query_Training.doc 68

69 4. Verify the Join to filter and get additional fields (Standard Join) radio button is selected in the Join Type group box. 5. Click the record link in the Join Record group box. The Auto Join Criteria page displays. 6. Once you select the table to join to, PeopleSoft provides you with automatic join criteria. Most of the time, you will always select the criteria provided. These automatic criteria elements are based upon key fields in each table that is needed to appropriately join the tables. There may be times when the automatic join criteria are not correct or may not produce a correct join. For example, look at the criteria in the picture below. The first join criteria A.BUSINESS_UNIT = B.BUSINESS_UNIT does not make sense because BUSINESS_UNIT is not a key field on the VENDOR record. You may want to delete this criteria. GSU_Query_Training.doc 69

70 7. Click the Add Criteria button. This takes you back to the Query page. 8. Select the fields and add any additional criteria for record you just joined. 9. The criteria to establish the join can be further modified on the Criteria page. As stated in step 6, we will delete the join on LEDGER. GSU_Query_Training.doc 70
71 10. The criteria to establish the join can be further modified on the Criteria page. As stated in step 6, we will delete the join on BUSINESS_UNIT. 11. View the SQL. GSU_Query_Training.doc 71
72 Creating Left Outer Joins Web Query enables you to easily create a left outer join. In a left outer join, all rows of the first (left) record are present in the result set, even if no matches are in the joining record. For example, if you want to see a list of all departments that have SpeedTypes. When performing a standard join of the DEPT_TBL and the SPEEDTYP_TBL, all departments without a SpeedType will be removed from the query results. When performing a Left Outer Join, all departments will be listed; if the department does not have a SpeedType, those fields will simply be blank. To create a Left Outer Join: 1. Add your primary record, select your fields and add any criteria. 2. Go to the Records tab. 3. Locate and select the record you want to join to your primary one by clicking the Join Record link. The Select Join Type page appears. GSU_Query_Training.doc 72

73 4. Verify the Join to get additional fields only (Left outer Join) radio button is selected in the Join Type group box. 5. Click the record link in the Join Record group box. The Auto Join Criteria page displays. 6. Once you select the table to join to, PeopleSoft provides you with automatic join criteria. 7. Click the Add Criteria button. This takes you back to the Query page. 8. Select the fields and add any additional criteria for record you just joined. GSU_Query_Training.doc 73
Query. Training and Participation Guide Financials 9.2
 Query Training and Participation Guide Financials 9.2 Contents Overview... 4 Objectives... 5 Types of Queries... 6 Query Terminology... 6 Roles and Security... 7 Choosing a Reporting Tool... 8 Working
Human Resources (HR) Query Basics
 Query Basics") Human Resources (HR) Query Basics This course will teach you the concepts and procedures involved in finding public queries, creating private queries, and running queries in PeopleSoft 9.1 Query Manager.
Human Resources (HR) Query Basics This course will teach you the concepts and procedures involved in finding public queries, creating private queries, and running queries in PeopleSoft 9.1 Query Manager.
Advanced Query for Query Developers
 for Developers This is a training guide to step you through the advanced functions of in NUFinancials. is an ad-hoc reporting tool that allows you to retrieve data that is stored in the NUFinancials application.
PeopleSoft Query Training
 PeopleSoft Query Training Overview Guide Tanya Harris & Alfred Karam Publish Date - 3/16/2011 Chapter: Introduction Table of Contents Introduction... 4 Navigation of Queries... 4 Query Manager... 6 Query
REP200 Using Query Manager to Create Ad Hoc Queries
 Using Query Manager to Create Ad Hoc Queries June 2013 Table of Contents USING QUERY MANAGER TO CREATE AD HOC QUERIES... 1 COURSE AUDIENCES AND PREREQUISITES...ERROR! BOOKMARK NOT DEFINED. LESSON 1: BASIC
SES Project v 9.0 SES/CAESAR QUERY TOOL. Running and Editing Queries. PS Query
 SES Project v 9.0 SES/CAESAR QUERY TOOL Running and Editing Queries PS Query Table Of Contents I - Introduction to Query:... 3 PeopleSoft Query Overview:... 3 Query Terminology:... 3 Navigation to Query
Lesson 07: MS ACCESS - Handout. Introduction to database (30 mins)
") Lesson 07: MS ACCESS - Handout Handout Introduction to database (30 mins) Microsoft Access is a database application. A database is a collection of related information put together in database objects.
Lesson 07: MS ACCESS - Handout Handout Introduction to database (30 mins) Microsoft Access is a database application. A database is a collection of related information put together in database objects.
Introduction to Microsoft Access 2013
 Introduction to Microsoft Access 2013 A database is a collection of information that is related. Access allows you to manage your information in one database file. Within Access there are four major objects:
Web Intelligence User Guide
 Web Intelligence User Guide Office of Financial Management - Enterprise Reporting Services 4/11/2011 Table of Contents Chapter 1 - Overview... 1 Purpose... 1 Chapter 2 Logon Procedure... 3 Web Intelligence
Microsoft Access 3: Understanding and Creating Queries
 Microsoft Access 3: Understanding and Creating Queries In Access Level 2, we learned how to perform basic data retrievals by using Search & Replace functions and Sort & Filter functions. For more complex
Introduction to Microsoft Access 2010
 Introduction to Microsoft Access 2010 A database is a collection of information that is related. Access allows you to manage your information in one database file. Within Access there are four major objects:
PeopleTools 8.51 PeopleBook: PeopleSoft Query
 PeopleTools 8.51 PeopleBook: PeopleSoft Query August 2010 PeopleTools 8.51 PeopleBook: PeopleSoft Query SKU pt8.51tpsq-b0810 Copyright 1988, 2010, Oracle and/or its affiliates. All rights reserved. Trademark
Welcome to the topic on Master Data and Documents.
 Welcome to the topic on Master Data and Documents. In this topic, we will look at master data in SAP Business One. After this session you will be able to view a customer record to explain the concept of
Access Queries (Office 2003)
") Access Queries (Office 2003) Technical Support Services Office of Information Technology, West Virginia University OIT Help Desk 293-4444 x 1 oit.wvu.edu/support/training/classmat/db/ Instructor: Kathy
Access Queries (Office 2003) Technical Support Services Office of Information Technology, West Virginia University OIT Help Desk 293-4444 x 1 oit.wvu.edu/support/training/classmat/db/ Instructor: Kathy
Microsoft Excel 2010 Part 3: Advanced Excel
 CALIFORNIA STATE UNIVERSITY, LOS ANGELES INFORMATION TECHNOLOGY SERVICES Microsoft Excel 2010 Part 3: Advanced Excel Winter 2015, Version 1.0 Table of Contents Introduction...2 Sorting Data...2 Sorting
Budget Process using PeopleSoft Financial 9.1
 Section 14 Budget 14.1 Budget Overview Each council must prepare a yearly operating budget and, in many cases, multiple budgets to respond to the needs of the council and the legal requirement to expend
Query 4. Lesson Objectives 4. Review 5. Smart Query 5. Create a Smart Query 6. Create a Smart Query Definition from an Ad-hoc Query 9
 TABLE OF CONTENTS Query 4 Lesson Objectives 4 Review 5 Smart Query 5 Create a Smart Query 6 Create a Smart Query Definition from an Ad-hoc Query 9 Query Functions and Features 13 Summarize Output Fields
COGNOS Query Studio Ad Hoc Reporting
 COGNOS Query Studio Ad Hoc Reporting Copyright 2008, the California Institute of Technology. All rights reserved. This documentation contains proprietary information of the California Institute of Technology
BID2WIN Workshop. Advanced Report Writing
 BID2WIN Workshop Advanced Report Writing Please Note: Please feel free to take this workbook home with you! Electronic copies of all lab documentation are available for download at http://www.bid2win.com/userconf/2011/labs/
CORE Oklahoma. State of Oklahoma COR118 Accounts Payable Inquiry and Reporting Manual. Revised: October 1, 2007
 State of Oklahoma COR118 Accounts Payable Inquiry and Reporting Manual COR118 Accounts Payable Inquiry and Reporting Page 1 of 48 Authorized by: [_CORE_] Original Issue: [11/17/2003] Maintained by: [ Accounts
Microsoft Office. Mail Merge in Microsoft Word
 Microsoft Office Mail Merge in Microsoft Word TABLE OF CONTENTS Microsoft Office... 1 Mail Merge in Microsoft Word... 1 CREATE THE SMS DATAFILE FOR EXPORT... 3 Add A Label Row To The Excel File... 3 Backup
Crystal Reports Payroll Exercise
 Crystal Reports Payroll Exercise Objective This document provides step-by-step instructions on how to build a basic report on Crystal Reports XI on the MUNIS System supported by MAISD. The exercise will
Results CRM 2012 User Manual
 Results CRM 2012 User Manual A Guide to Using Results CRM Standard, Results CRM Plus, & Results CRM Business Suite Table of Contents Installation Instructions... 1 Single User & Evaluation Installation
PeopleSoft Tips TABLE OF CONTENTS GUIDE
 PeopleSoft Tips NOTE: This document is designed to be used online and has a number of embedded links to processes and additional information. We discourage the printing of manuals as they are updated frequently
Sage Abra SQL HRMS Reports. User Guide
 Sage Abra SQL HRMS Reports User Guide 2010 Sage Software, Inc. All rights reserved. Sage, the Sage logos, and the Sage product and service names mentioned herein are registered trademarks or trademarks
Toad for Data Analysts, Tips n Tricks
 Toad for Data Analysts, Tips n Tricks or Things Everyone Should Know about TDA Just what is Toad for Data Analysts? Toad is a brand at Quest. We have several tools that have been built explicitly for developers
Configuration Manager
 After you have installed Unified Intelligent Contact Management (Unified ICM) and have it running, use the to view and update the configuration information in the Unified ICM database. The configuration
Ohio University Computer Services Center August, 2002 Crystal Reports Introduction Quick Reference Guide
 Open Crystal Reports From the Windows Start menu choose Programs and then Crystal Reports. Creating a Blank Report Ohio University Computer Services Center August, 2002 Crystal Reports Introduction Quick
Chapter 5. Microsoft Access
 Chapter 5 Microsoft Access Topic Introduction to DBMS Microsoft Access Getting Started Creating Database File Database Window Table Queries Form Report Introduction A set of programs designed to organize,
Work with the MiniBase App
 Work with the MiniBase App Trademark Notice Blackboard, the Blackboard logos, and the unique trade dress of Blackboard are the trademarks, service marks, trade dress and logos of Blackboard, Inc. All other
Kaseya 2. Quick Start Guide. for VSA 6.3
 Kaseya 2 Custom Reports Quick Start Guide for VSA 6.3 December 9, 2013 Agreement The purchase and use of all Software and Services is subject to the Agreement as defined in Kaseya s Click-Accept EULA as
Human Resources Intermediate Query 9.1
 Human Resources Intermediate Query 9.1 Version Date: July 2012 COPYRIGHT & TRADEMARKS Copyright 1998, 2011, Oracle and/or its affiliates. All rights reserved. Oracle is a registered trademark of Oracle
Business Objects 4.1 Quick User Guide
 Business Objects 4.1 Quick User Guide Log into SCEIS Business Objects (BOBJ) 1. https://sceisreporting.sc.gov 2. Choose Windows AD for Authentication. 3. Enter your SCEIS User Name and Password: Home Screen
Mastering Mail Merge. 2 Parts to a Mail Merge. Mail Merge Mailings Ribbon. Mailings Create Envelopes or Labels
 2 Parts to a Mail Merge 1. MS Word Document (Letter, Labels, Envelope, Name Badge, etc) 2. Data Source Excel Spreadsheet Access Database / query Other databases (SQL Server / Oracle) Type in New List Mail
Sample- for evaluation purposes only. Advanced Crystal Reports. TeachUcomp, Inc.
 A Presentation of TeachUcomp Incorporated. Copyright TeachUcomp, Inc. 2011 Advanced Crystal Reports TeachUcomp, Inc. it s all about you Copyright: Copyright 2011 by TeachUcomp, Inc. All rights reserved.
OUTLOOK 2003: HOW TO GET OUT OF EMAIL JAIL
 OUTLOOK 2003: HOW TO GET OUT OF EMAIL JAIL In this course, you will learn: Some techniques to avoid reaching your mailbox limit The best place to store your saved messages aka Personal Folders efficiently
Creating a Database in Access
 Creating a Database in Access Microsoft Access is a database application. A database is collection of records and files organized for a particular purpose. For example, you could use a database to store
Cognos Introduction to Cognos
 Cognos Introduction to Cognos Administration and Finance Information Systems Management TTAT Table of Contents What is Cognos?...1 Report Access..3 Accessing Cognos..6 Welcome Page.7 Access Reports...8
Business Objects. Report Writing - CMS Net and CCS Claims
 Business Objects Report Writing - CMS Net and CCS Claims Updated 11/28/2012 1 Introduction/Background... 4 Report Writing (Ad-Hoc)... 4 Requesting Report Writing Access... 4 Java Version... 4 Create A
Data Warehouse. Business Objects
 Data Warehouse Business Objects Power User: Querying [DW POWER USER] The data warehouse, at Booth, is used to store, retrieve and create reports for data at Booth. The first release of the warehouse contains
Education Solutions Development, Inc. APECS Navigation: Business Systems Getting Started Reference Guide
 Education Solutions Development, Inc. APECS Navigation: Business Systems Getting Started Reference Guide March 2013 Education Solutions Development, Inc. What s Inside The information in this reference
Aras Corporation. 2005 Aras Corporation. All rights reserved. Notice of Rights. Notice of Liability
 Aras Corporation 2005 Aras Corporation. All rights reserved Notice of Rights All rights reserved. Aras Corporation (Aras) owns this document. No part of this document may be reproduced or transmitted in
Click to create a query in Design View. and click the Query Design button in the Queries group to create a new table in Design View.
 Microsoft Office Access 2010 Understanding Queries Queries are questions you ask of your database. They allow you to select certain fields out of a table, or pull together data from various related tables
GP REPORTS VIEWER USER GUIDE
 GP Reports Viewer Dynamics GP Reporting Made Easy GP REPORTS VIEWER USER GUIDE For Dynamics GP Version 2015 (Build 5) Dynamics GP Version 2013 (Build 14) Dynamics GP Version 2010 (Build 65) Last updated
Data Tool Platform SQL Development Tools
 Data Tool Platform SQL Development Tools ekapner Contents Setting SQL Development Preferences...5 Execution Plan View Options Preferences...5 General Preferences...5 Label Decorations Preferences...6
How To Download Nvision Reports In Awnsoft Peoplesoft Report Manager And Nvision Operating Reports In Excel
 Objectives By the end of this exercise you will be able to: Locate you reports in the Report Manager Share your reports with other individuals Content 1. Overview of Report Manager 2. Month End nvision
User Guide. Trade Finance Global. Reports Centre. October 2015. nordea.com/cm OR tradefinance Name of document 8/8 2015/V1
 User Guide Trade Finance Global Reports Centre October 2015 nordea.com/cm OR tradefinance Name of document 2015/V1 8/8 Table of Contents 1 Trade Finance Global (TFG) Reports Centre Overview... 4 1.1 Key
The Welcome screen displays each time you log on to PaymentNet; it serves as your starting point or home screen.
 PaymentNet Cardholder Quick Reference Card Corporate Card ffwelcome to PaymentNet The Welcome screen displays each time you log on to PaymentNet; it serves as your starting point or home screen. PaymentNet
Advanced BIAR Participant Guide
 State & Local Government Solutions Medicaid Information Technology System (MITS) Advanced BIAR Participant Guide October 28, 2010 HP Enterprise Services Suite 100 50 West Town Street Columbus, OH 43215
Designing Adhoc Reports
 Designing Adhoc Reports Intellicus Enterprise Reporting and BI Platform Intellicus Technologies info@intellicus.com www.intellicus.com Designing Adhoc Reports i Copyright 2010 Intellicus Technologies This
SPSS: Getting Started. For Windows
 For Windows Updated: August 2012 Table of Contents Section 1: Overview... 3 1.1 Introduction to SPSS Tutorials... 3 1.2 Introduction to SPSS... 3 1.3 Overview of SPSS for Windows... 3 Section 2: Entering
Parameter Fields and Prompts. chapter
 Parameter Fields and Prompts chapter 23 Parameter Fields and Prompts Parameter and prompt overview Parameter and prompt overview Parameters are Crystal Reports fields that you can use in a Crystal Reports
SonicWALL GMS Custom Reports
 SonicWALL GMS Custom Reports Document Scope This document describes how to configure and use the SonicWALL GMS 6.0 Custom Reports feature. This document contains the following sections: Feature Overview
ENTERPRISE DATA WAREHOUSE PRODUCT PERFORMANCE REPORTS USER GUIDE EXTERNAL. Version: 1.0
 ENTERPRISE DATA WAREHOUSE PRODUCT PERFORMANCE REPORTS USER GUIDE EXTERNAL Version: 1.0 September 2004 Table of Contents 1.0 OVERVIEW...1 1.1 Product Performance Overview... 1 1.2 Enterprise Data Warehouse
The LSUHSC N.O. Email Archive
 The LSUHSC N.O. Email Archive Introduction The LSUHSC N.O. email archive permanently retains a copy of all email items sent and received by LSUHSC N.O. Academic email users. Email items will be accessible
Note: With v3.2, the DocuSign Fetch application was renamed DocuSign Retrieve.
 Quick Start Guide DocuSign Retrieve 3.2.2 Published April 2015 Overview DocuSign Retrieve is a windows-based tool that "retrieves" envelopes, documents, and data from DocuSign for use in external systems.
Business Objects InfoView Quick-start Guide
 Business Objects InfoView Quick-start Guide Last Modified: 10/28/2015 The latest PDF version of this document can be found at: http://www.calpolycorporation.com/docs/finance/boeinfoviewquickstart.pdf What
Business Warehouse Reporting Manual
 Business Warehouse Reporting Manual This page is intentionally left blank. Table of Contents The Reporting System -----------------------------------------------------------------------------------------------------------------------------
Unit 10: Microsoft Access Queries
 Microsoft Access Queries Unit 10: Microsoft Access Queries Introduction Queries are a fundamental means of accessing and displaying data from tables. Queries used to view, update, and analyze data in different
Using SQL Server Management Studio
 Using SQL Server Management Studio Microsoft SQL Server Management Studio 2005 is a graphical tool for database designer or programmer. With SQL Server Management Studio 2005 you can: Create databases
Kuali Basics. Reference and Training Guide. Kuali Financial System Kuali Enterprise Workflow. Belongs to: Version 20110802
 Kuali Basics Reference and Training Guide Kuali Financial System Kuali Enterprise Workflow Belongs to: Version 20110802 Table of Contents edoc Fundamentals...1 About edoc Routing... 1 What is Ad Hoc Routing?...
Dispatch Board Maintenance. User Guide
 Dispatch Board Maintenance User Guide Davisware 514 Market Loop West Dundee, IL 60118 Phone: (847) 426-6000 Fax: (847) 426-6027 Contents are the exclusive property of Davisware. Copyright 2015. All Rights
Cal Answers Analysis Training Part I. Creating Analyses in OBIEE
 Cal Answers Analysis Training Part I Creating Analyses in OBIEE University of California, Berkeley March 2012 Table of Contents Table of Contents... 1 Overview... 2 Getting Around OBIEE... 2 Cal Answers
QUICK REFERENCE GUIDE
 QUICK REFERENCE GUIDE Reporting Tools for Purchase Orders October 31, 2015 Reporting Tools for Purchase Orders When there are questions about the status or details of purchase orders, SWIFT provides several
Creating and Managing Online Surveys LEVEL 2
 Creating and Managing Online Surveys LEVEL 2 Accessing your online survey account 1. If you are logged into UNF s network, go to https://survey. You will automatically be logged in. 2. If you are not logged
Intellicus Enterprise Reporting and BI Platform
 Designing Adhoc Reports Intellicus Enterprise Reporting and BI Platform Intellicus Technologies info@intellicus.com www.intellicus.com Copyright 2013 Intellicus Technologies This document and its content
MS Access Lab 2. Topic: Tables
 MS Access Lab 2 Topic: Tables Summary Introduction: Tables, Start to build a new database Creating Tables: Datasheet View, Design View Working with Data: Sorting, Filtering Help on Tables Introduction
ADP Workforce Now V3.0
 ADP Workforce Now V3.0 Manual What s New Checks in and Custom ADP Reporting Grids V12 Instructor Handout Manual Guide V10171180230WFN3 V09171280269ADPR12 2011 2012 ADP, Inc. ADP s Trademarks The ADP Logo
Microsoft Query, the helper application included with Microsoft Office, allows
 3 RETRIEVING ISERIES DATA WITH MICROSOFT QUERY Microsoft Query, the helper application included with Microsoft Office, allows Office applications such as Word and Excel to read data from ODBC data sources.
Copyright EPiServer AB
 Table of Contents 3 Table of Contents ABOUT THIS DOCUMENTATION 4 HOW TO ACCESS EPISERVER HELP SYSTEM 4 EXPECTED KNOWLEDGE 4 ONLINE COMMUNITY ON EPISERVER WORLD 4 COPYRIGHT NOTICE 4 EPISERVER ONLINECENTER
VDF Query User Manual
 VDF Query User Manual Page 1 of 25 Table of Contents Quick Start... 3 Security... 4 Main File:... 5 Query Title:... 6 Fields Tab... 7 Printed Fields... 8 Task buttons... 9 Expression... 10 Selection...
What is a database? The parts of an Access database
 What is a database? Any database is a tool to organize and store pieces of information. A Rolodex is a database. So is a phone book. The main goals of a database designer are to: 1. Make sure the data
Tutorial 3. Maintaining and Querying a Database
 Tutorial 3 Maintaining and Querying a Database Microsoft Access 2010 Objectives Find, modify, and delete records in a table Learn how to use the Query window in Design view Create, run, and save queries
Microsoft Office 2010
 Access Tutorial 3 Maintaining and Querying a Database Microsoft Office 2010 Objectives Find, modify, and delete records in a table Learn how to use the Query window in Design view Create, run, and save
LexisNexis TotalPatent. Training Manual
 LexisNexis TotalPatent Training Manual March, 2013 Table of Contents 1 GETTING STARTED Signing On / Off Setting Preferences and Project IDs Online Help and Feedback 2 SEARCHING FUNDAMENTALS Overview of
TheFinancialEdge. Journal Entry Guide
 TheFinancialEdge Journal Entry Guide 101811 2011 Blackbaud, Inc. This publication, or any part thereof, may not be reproduced or transmitted in any form or by any means, electronic, or mechanical, including
Logi Ad Hoc Reporting Report Design Guide
 Logi Ad Hoc Reporting Report Design Guide Version 11.2 Last Updated: March, 2014 Page 2 Table of Contents INTRODUCTION... 4 What is Logi Ad Hoc Reporting?... 5 CHAPTER 1 Getting Started... 6 Learning the
DbSchema Tutorial with Introduction in SQL Databases
 DbSchema Tutorial with Introduction in SQL Databases Contents Connect to the Database and Create First Tables... 2 Create Foreign Keys... 7 Create Indexes... 9 Generate Random Data... 11 Relational Data
Consider the possible problems with storing the following data in a spreadsheet:
 Microsoft Access 2010 Part 1: Introduction to Database Design What is a database? Identifying entities and attributes Understanding relationships and keys Developing tables and other objects Planning a
Add a New ChartField Job Aid
 Add a New ChartField Job Aid A The purpose of this job aid is to provide instructions to ChartField Request preparers on how to initiate a request in EFS to create a brand new value for any of the following
DIIMS Records Classifier Guide
 DIIMS Records Classifier Guide Featuring Content Server 10 Second Edition, November 2012 Table of Contents Contents 1. DIIMS Overview... 3 1.1 An Overview of DIIMS within the GNWT... 3 1.1.1 Purpose of
How To Create A Powerpoint Intelligence Report In A Pivot Table In A Powerpoints.Com
 Sage 500 ERP Intelligence Reporting Getting Started Guide 27.11.2012 Table of Contents 1.0 Getting started 3 2.0 Managing your reports 10 3.0 Defining report properties 18 4.0 Creating a simple PivotTable
Enterprise Reporting Advanced Web Intelligence Training. Enterprise Reporting Services
 Enterprise Reporting Advanced Web Intelligence Training Enterprise Reporting Services Table of Contents Chapter Page 1 Overview 4 2 Web Intelligence Access 8 3 BI Launch Pad Navigation 12 4 Nested Query
Access 2010: Creating Queries Table of Contents INTRODUCTION TO QUERIES... 2 QUERY JOINS... 2 INNER JOINS... 3 OUTER JOINS...
 Access 2010: Creating Queries Table of Contents INTRODUCTION TO QUERIES... 2 QUERY JOINS... 2 INNER JOINS... 3 OUTER JOINS... 3 CHANGE A JOIN PROPERTY... 4 REMOVING A JOIN... 4 CREATE QUERIES... 4 THE
Business Portal for Microsoft Dynamics GP 2010. User s Guide Release 5.1
 Business Portal for Microsoft Dynamics GP 2010 User s Guide Release 5.1 Copyright Copyright 2011 Microsoft. All rights reserved. Limitation of liability This document is provided as-is. Information and
MICROSOFT ACCESS STEP BY STEP GUIDE
 IGCSE ICT SECTION 11 DATA MANIPULATION MICROSOFT ACCESS STEP BY STEP GUIDE Mark Nicholls ICT Lounge P a g e 1 Contents Task 35 details Page 3 Opening a new Database. Page 4 Importing.csv file into the
Aspen Gradebook - Teacher
 Aspen Gradebook - Teacher Gradebook Setup You can use the teacher Gradebook in Staff View to enter and track assignments, and grades in your course sections. To begin using the gradebook you ll need to
Searching in CURA. mindscope Staffing and Recruiting Software www.mindscope.com
 Searching in CURA CURA Technical Support Email: cura_support@mindscope.com Phone: 1.888.322.2362 x 555 Searching in CURA Page 2 Table of Contents SEARCHING... 3 QUICK LOOK-UP SEARCH... 3 Option 1: By Last
Data Access Studio User Manual
 Data Access Studio User Manual Table Of Contents Overview... 1 User Guide Structure... 2 ReportsNow Company Information... 3 Office Locations... 3 Trademarks... 3 Getting Started... 4 Sign into Data Access
Exploring Microsoft Office Access 2007. Chapter 2: Relational Databases and Multi-Table Queries
 Exploring Microsoft Office Access 2007 Chapter 2: Relational Databases and Multi-Table Queries 1 Objectives Design data Create tables Understand table relationships Share data with Excel Establish table
Configuring Data Masking
 Configuring Data Masking Intellicus Web-based Reporting Suite Version 4.5 Enterprise Professional Smart Developer Smart Viewer Intellicus Technologies info@intellicus.com www.intellicus.com Copyright 2009
SAP Business Intelligence ( BI ) Financial and Budget Reporting. 7.0 Edition. (Best Seller At Least 43 copies Sold)
 Financial and Budget Reporting. 7.0 Edition. (Best Seller At Least 43 copies Sold)") SAP Business Intelligence ( BI ) Financial and Budget Reporting 7.0 Edition (Best Seller At Least 43 copies Sold) November 2011 Table of Contents Log In... 3 Initial Variable Screen... 5 Multiple / Single
SAP Business Intelligence ( BI ) Financial and Budget Reporting 7.0 Edition (Best Seller At Least 43 copies Sold) November 2011 Table of Contents Log In... 3 Initial Variable Screen... 5 Multiple / Single
TheEducationEdge. Export Guide
 TheEducationEdge Export Guide 102111 2011 Blackbaud, Inc. This publication, or any part thereof, may not be reproduced or transmitted in any form or by any means, electronic, or mechanical, including photocopying,
Salary and Planning Distribution (SPD) Ad-Hoc Reporting Tool
 Ad-Hoc Reporting Tool") Salary and Planning Distribution (SPD) Ad-Hoc Reporting Tool Georgia Institute of Technology HRMS 8.8 Systems Training Copyright Georgia Institute of Technology 2004 Table of Contents Getting Started...3
Salary and Planning Distribution (SPD) Ad-Hoc Reporting Tool Georgia Institute of Technology HRMS 8.8 Systems Training Copyright Georgia Institute of Technology 2004 Table of Contents Getting Started...3
The first thing to do is choose if you are creating a mail merge for printing or an e-mail merge for distribution over e-mail.
 Create a mail or e-mail merge Use mail or e-mail merge when you want to create a large number of documents that are mostly identical but include some unique information. For example, you can use mail merge
PeopleSoft Version: 9.0. PeopleSoft Query Training
 PeopleSoft Version: 9.0 PeopleSoft Query Training I. INTRODUCTION...3 OVERVIEW...3 OBJECTIVES...3 II. REVIEWING THE TYPES OF QUERIES...4 III. BASIC QUERY CONCEPTS...5 OVERVIEW...5 RUNNING A QUERY: BROWSER...5
Microsoft Access Rollup Procedure for Microsoft Office 2007. 2. Click on Blank Database and name it something appropriate.
 Microsoft Access Rollup Procedure for Microsoft Office 2007 Note: You will need tax form information in an existing Excel spreadsheet prior to beginning this tutorial. 1. Start Microsoft access 2007. 2.
3.GETTING STARTED WITH ORACLE8i
 Oracle For Beginners Page : 1 3.GETTING STARTED WITH ORACLE8i Creating a table Datatypes Displaying table definition using DESCRIBE Inserting rows into a table Selecting rows from a table Editing SQL buffer
Client Marketing: Sets
 Client Marketing Client Marketing: Sets Purpose Client Marketing Sets are used for selecting clients from the client records based on certain criteria you designate. Once the clients are selected, you
Mail Merge Creating Mailing Labels 3/23/2011
 Creating Mailing Labels in Microsoft Word Address data in a Microsoft Excel file can be turned into mailing labels in Microsoft Word through a mail merge process. First, obtain or create an Excel spreadsheet