INDEX Automatic Mechanical watches Page 5 Tide watches - Analogue Page 9 Digital watches Page 13 Analogue / Digital watches Page 19 Day/Date/Time
|
|
|
- Dora Gibbs
- 7 years ago
- Views:
Transcription
1

2
3 INDEX Automatic Mechanical watches Page 5 Tide watches - Analogue Page 9 Digital watches Page 13 Analogue / Digital watches Page 19 Day/Date/Time watches Page 23 Strap changing Instructions Page 25 Adjusting Stainless steel straps Page 26 Recommended usage table & testing Page 28 Warranty and care procedures Page 30 3

4

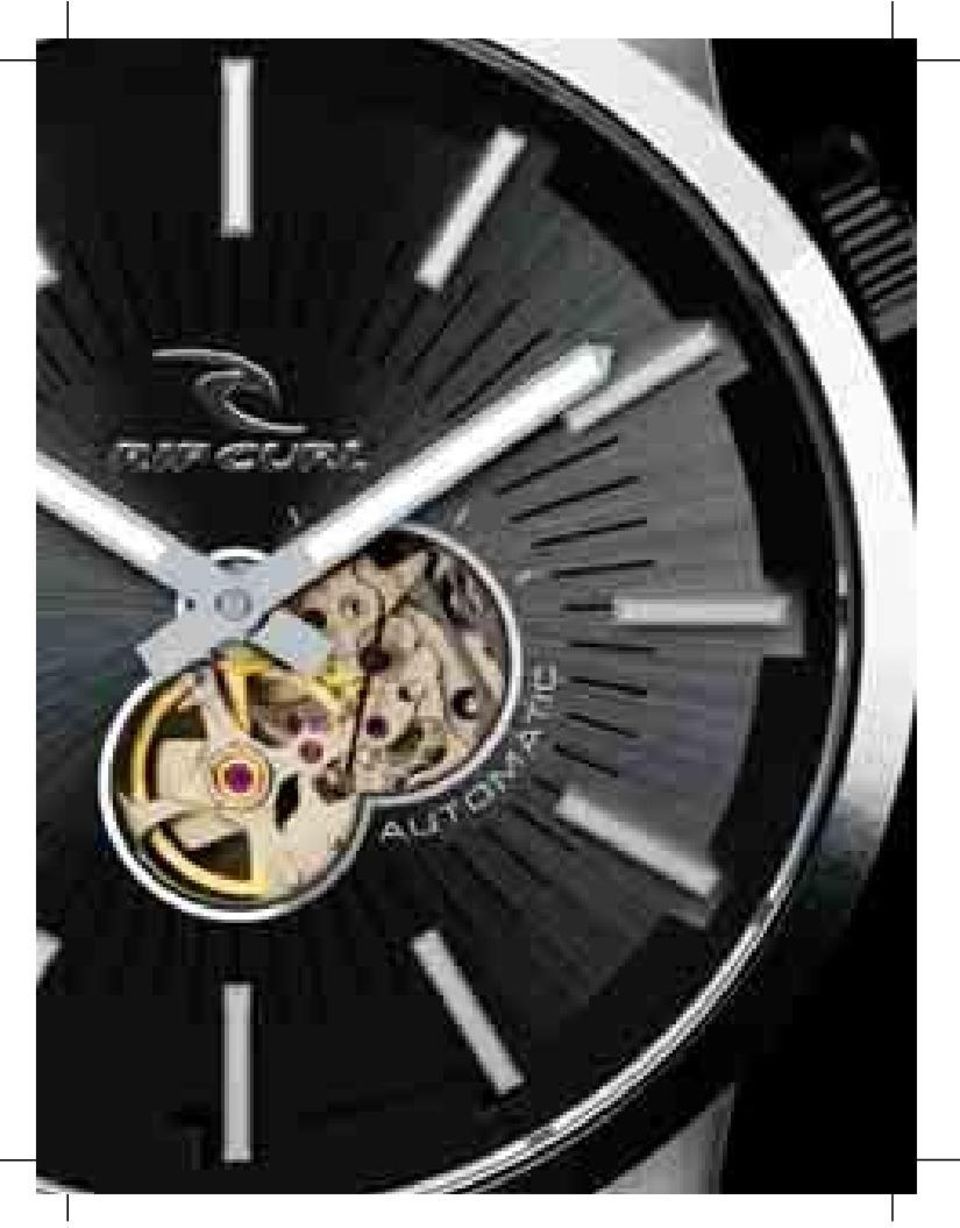
5 AUTOMATIC MECHANICAL WATCHES A B Crown A B Screw Crown GETTING THE WATCH STARTED Automatic mechanical watches do not require a battery. There are 2 methods of starting your watch. 1. You can wind the watch turning the crown in a clockwise direction approximately 15 times. Make sure you don t over wind it. NOTE : If your Automatic watch has a screw crown you 1 st must undo the screw in a counterclockwise direction prior to winding the crown in a clockwise direction. 2. You can also wind your watch by swinging your arm. We recommend you 1 st wind the watch to get it started and then by wearing the watch you will continue to give power to the watch. NOTE : * When you take your watch off the power reserve is approx 24 to 36 hours. 5

6 SCREW CROWN (if applicable) To change the time settings, the screw crown of your watch must first be unscrewed, as follows Make sure your watch is completely dry; 2. Turn the crown counterclockwise/towards you (fig.1); 3. With crown completely unscrewed (fig.2 ), it can be pulled out to set your watch. 4. After setting, push crown back in fully, then carefully screw the crown in slowly to reseal your watch (fig.3). Never force the screw. IMPORTANT! For your watch to be properly sealed, the crown must be fully screwed in. Never unscrew the crown when your watch is in water or is wet. SETTING THE TIME Pull the crown out to position B. Turn the hour/minute hands in a clockwise direction to set the time. WARNING! For your watch to be properly sealed, the crown must be fully pushed in. Never pull the crown out when the watch is in water or is wet. 6

7

8

9 ANALOGUE TIDEMASTER SETTING PROCEDURE Time setting Pull the crown out to the 2 nd click position, change the time, push crown back in fully. Date setting Pull the crown out to the 1 st click position. Turn the crown clockwise to set date, then push crown back in fully. NOTE: The calendar will not move back by turning the crown counter-clockwise. NOTE: Do not set the date calendar between 9:00p.m. and 1:00a.m. Otherwise, it may not change properly. It is necessary to adjust the date on the first day after a 30-day month and February. WARNING! For your watch to be properly sealed, the crown must be fully pushed in. Never pull out the crown when your watch is in water or is wet. 9

10 SETTING THE TIDE FUNCTION - CENTRAL HAND The tide cycle takes place over one revolution of the dial in 12 hours 25 minutes and 14 seconds. High tide corresponds to the "12 o'clock" position and low tide corresponds to the opposite position, hence "6 o'clock". Hold Button B for 3 seconds until you hear a beep. Press B again to set the state of the local tide. Holding B enables rapid setting to be performed. After 3 seconds without pressing on B, a beep indicates exit from setting mode. SETTING THE TIDE RANGE (MOON PHASES) - SUB DIAL AT 10 O CLOCK The tide range counter performs one revolution in 29 days 12 hours and 44 minutes. Hold Button A for 3 seconds until you hear a beep. Press A again to set the tide range corresponding to the moon phase. Holding A enables rapid setting to be performed. After 3 seconds without pressing on A, a beep indicates exit from setting mode. Important: Tidemaster watches must not be used for navigation at any time. Tidemaster watches approximate the tides based upon average intervals and lunar cycles. Local tide conditions can vary from their indicated display. 10
 - SUB DIAL AT 10 O CLOCK The tide range counter performs one revolution in 29 days 12 hours and 44 minutes. Hold Button A for 3 seconds until you hear a beep.")
11

12

13 DIGITAL WATCHES * Please make sure your watch matches the display shown. LIGHT START / STOP MODE LAP / RESET DESCRIPTION OF MODES & FUNCTIONS There are FIVE modes of operation. By depressing the MODE button, there is a visual indication of what function has been chosen. [ ] Normal Time: The display shows hour in 24hr Military time or in AM & PM, minute, second, month, date and day of week. To enable or disable key tone when in [TIME 1] mode press the LAP/RESET repeatedly and the (KEY) symbol will appear or disappear. [ ] Stop watch (Chronograph) with lap memory: Your chronograph will count in 100th of a second from 0 to 23 hours, 59 minutes, 59 seconds. In [CHRONO] mode, simply push the START/STOP button to commence and stop the Chronograph. Then push the LAP/RESET button firmly to reset to 0 while the Chronograph is stopped. Note that when the Chronograph is running, the ( ) symbol will flash. To record a Lap-time push the LAP/RESET button while the Chronograph is running. The digits will stop to show the lap-time and the accumulated time. To recall previous lap memory push the LIGHT button while the Chronograph is stopped. Push the LIGHT button again and next lap will display. 13
![[ ] Normal Time: The display shows hour in 24hr Military time or in AM & PM, minute, second, month, date and day of week.](/docs-images/41/22500414/images/page_13.jpg "To enable or disable key tone when in [TIME 1] mode press the LAP/RESET repeatedly and the (KEY) symbol will appear or disappear.")
14 Push START/STOP or LAP/RESET button to exit and go back to the Chronograph screen. Notes: 1. To view the current time and date, while the Chronograph is running, simply press the MODE button 3 times. The Normal Time screen will appear and the ( ) symbol will flash to show that the Chronograph is still running. 2. If there is no key operation for 30 seconds, The Chronograph screen will be exit and returned to Normal Time screen automatically. 3. The Chronograph screen will display the accumulated time in Minutes, Seconds and 1/100 Seconds until the accumulated time is less than 1 hour, after which the screen will display Hours, Minutes and Seconds. 4. There are total of 10 lap memories. Lap L will be shown if lap number is larger than 9. The last lap memory will be overwritten by the latest lap whereas the first 9 laps will be kept unchanged. [ ] Timer Mode: There are 3 modes of timer: ( ) Count Down- Stop, ( ) Count Down-Repeat or ( ) Count Down- and Up, each with a preset value up to 23 hrs, 59 min, 59 sec. In ( ) Modes, simply push the START/STOP to commence and stop the Timer. Then push the LAP/RE- SET to reset to the preset value while the timer is stopped. Note that the ( ) symbol will appear on Count Down - and Up Timer mode only. When the Count Up is running the ( ) symbol will flash. Notes: 1. To view the current time and date, while the Timer is running, simply press the MODE button 2 times. The Normal Time screen will appear and the ( ) symbol will show that the Timer is still running. 2. If there is no key operation for 30 seconds, the Timer screen will be exit and returned to Normal Time screen automatically. 3. A chime sounds for 30 seconds if the Timer is counted down to 0 normally. 4. If preset value is less than 1 minute, and count-down repeat is 14

15 selected, a chime sounds for 1 second only each time the Timer is counted down to The Timer will be stopped and reset automatically with a chime sounds for 30 seconds, if it is counted up to the maximum (23 hrs, 59min, 59sec). [ ] Alarm Mode: By choosing a time, an alarm will sound each day at the preset time. The alarm is a strong chime and can be immediately shut off by pushing any button or will automatically shut off after 30 seconds. There are 4 independent daily alarms. Press the START/ STOP button to select the alarm. Notes : If there is no key operation for 30 seconds, The Alarm screen will be exit and returned to Normal Time screen automatically. DUAL TIME FUNCTION: This function is very useful should you travel away from home to another time zone. In the [TIME] mode, simply push the START/STOP to toggle the Time1 / Time2 displays. Then hold the START/STOP button for 2 seconds to choose the default display time. LIGHT FUNCTION: In any MODE you can simply push the LIGHT button and the whole screen will light up and stay on for 3 seconds. If auto light function is ON, the whole screen will light up and stay on for 3 seconds if any key is pressed. SETTING INSTRUCTIONS All instructions start from ( TIME 1 )Normal Time mode. Use the MODE button to find the function you wish.(note: You have 30 seconds to complete each setting, if longer is taken the watch automatically returns to the prior setting and you must start again.) 15
![[ ] Alarm Mode: By choosing a time, an alarm will sound each day at the preset time.](/docs-images/41/22500414/images/page_15.jpg "The alarm is a strong chime and can be immediately shut off by pushing any button or will automatically shut off after 30 seconds. There are 4 independent daily alarms.")
16 SETTING NORMAL TIME AND DATE: Press firmly the LIGHT button to enter the time setting. Auto light function will be set first. Select ON/OFF with START/STOP or LAP/RESET until correct.select ON and the ( AEL ) will appear. Push MODE to set the chime. Select ON/OFF with START/ STOP or LAP/RESET until correct. Select ON and the ( ) will appear. Push MODE to set the 12/24 format. Select 12-HR (normal AM/PM time display) or 24-HR (military time display) with START/STOP or LAP/RESET until correct. Push MODE to set the Hour. Advance or decrease the Hour with START/ STOP or LAP/RESET until correct. (For quick change, hold in the button) Push MODE to set the Minute. Advance or decrease the Minute with START/STOP or LAP/RESET until correct. Push MODE to set the Seconds. Advance or decrease the Seconds with START/STOP or LAP/RESET until correct. Push MODE to set the Year. Advance or decrease the Year with START/ STOP or LAP/RESET until correct. Push MODE to set the order of month and day ( ) display. Select ( ) or ( ) with START/STOP or LAP/RESET until correct. Push MODE to set the Month. Advance or decrease the Month with START/ STOP or LAP/RESET until correct. Push MODE to set the Day. Advance or decrease the Day with START/ STOP until correct. When all new settings are done, you must push the LIGHT button to save. [ ] SETTING TIMER: From Normal Time mode push the MODE button 2 times. Press firmly the LIGHT button. The Timer-Type will flash. Select [ ] Count Down-Stop, [ ] Count Down-Repeat or [ ] Count Down - and Up with START/STOP or LAP/RESET until correct. Push MODE the Hour will flash. Advance or decrease the Hour with START/ STOP or LAP/RESET until correct. (For quick change, hold in the button) 16
 Push MODE to set the Minute.")
17 Push MODE the Minute will flash. Advance or decrease the Minute with START/STOP or LAP/RESET until correct. Push MODE the Seconds will flash. Advance or decrease the Seconds with START/STOP or LAP/RESET until correct. When all new settings are done, you must push the LIGHT button to save. [ ] SETTING ALARM TIME: From Normal Time mode push the MODE button 3 times. Press the START/STOP button to select the alarm to be set. Press firmly the LIGHT button. The Hour will flash. Advance or decrease the Hour with START/STOP or LAP/ RESET until correct (For quick change, hold in the button) Push MODE the Minute will flash. Advance or decrease the Minute with START/STOP or LAP/RESET until correct. When all new settings are done, you must push the LIGHT button to save. ALARM ON / OFF: When setting your alarm anytime, the Alarm will automatically default to the ( ) position. To switch your alarm OFF ( - - ) (or ON again later) when in [ALARM] mode press LAP/RESET repeatedly and the alarm signal ( ) will appear or disappear. SETTING DUAL TIME: In the Normal Time mode, push the START/STOP to toggle the Time1 / Time2 displays. Hold the START/STOP button for 2 seconds to choose Time2 as the default display time. Press firmly the LIGHT button to enter Time2 setting mode. Advance or decrease the time difference between Time2 and Time1 with START/STOP or LAP/RESET until correct. When all new settings are done, you must push the LIGHT button to save. 17
![[ ] SETTING ALARM TIME: From Normal Time mode push the MODE button 3 times. Press the START/STOP button to select the alarm to be set. Press firmly the LIGHT button. The Hour will flash.](/docs-images/41/22500414/images/page_17.jpg "Advance or decrease the Hour with START/STOP or LAP/ RESET until correct (For quick change, hold in the button) Push MODE the Minute will flash.")
18

19 ANALOGUE DIGITAL WATCHES * Please make sure your watch matches the display shown. Light/Reset A B Start/Stop Crown Mode Sleep DESCRIPTION OF MODES & FUNCTIONS TIME, DATE, ALARM, STOPWATCH AND LIGHT ANALOGUE TIME To change time 1. Pull the crown out fully 2. Turn the hands to the exact time 3. Push the crown back in. WARNING! For your watch to be properly sealed, the crown must be fully pushed in. Never pull the crown out when the watch is in water or is wet. In Normal Time mode Press SLEEP button to ON/OFF the digital display screen. Light Function In any MODE you can simply push the LIGHT button and the whole screen will light up and stay on for 3 seconds. 19

20 Setting Normal Time and Date. In Normal Time Mode Press the MODE button three times and you will then be in the normal time setting screen. The Seconds will be flashing, push START/STOP to set the seconds to zero. Push LIGHT/RESET the Hour will be flashing, push START/ STOP to set the Hour.(You can select 12HR or 24HR format). If you set 12HR format make sure you set the hour to the correct time ie PM P. Push LIGHT/RESET the Minutes will be flashing, push START/STOP to set the Minutes. Push LIGHT/RESET the Month will be flashing, push START/STOP to set the Month. Push LIGHT/RESET the Date will be flashing, push START/STOP to set the Date. Push LIGHT/RESET the Day will be flashing, push START/STOP to set the Day. Push MODE to finish the setting. Note: Due to this watch having no year setting function it means the calendar will never expire, but it also means, on leap year March 1 st, you need to correct the day. Setting The Daily Alarm In Normal Time Mode Press the MODE button twice to enter the daily alarm mode. Push LIGHT/RESET the Hour will be flashing, push START/ STOP to set the Hour. The alarm on indicator will automatically appear. If you are using 12HR format make sure you set your alarm to the correct time ie PM P. Push LIGHT/RESET the Minutes will be flashing, push START/STOP to set the Minutes. Push LIGHT/RESET to finish the setting. Push MODE to exit daily alarm mode. NOTE: In Daily Alarm mode you can Push START/STOP to turn on or off the hourly chime and daily alarm. 20

21 Chronograph Mode. (Stopwatch) In Normal Time Mode Press the MODE button once to enter the Chronograph mode. Push START/STOP to start the Chronograph Push START/STOP to stop the chronograph. Push LIGHT/RESET to reset the chronograph to zero Using the Chronograph Lap Function. In Normal Time Mode Press the MODE button to enter the Chronograph mode. Push START/STOP to start the Chronograph. Push LIGHT/RESET to stop the chronograph s 1 st Lap Push LIGHT/RESET to restart the chronograph and it will have continued the count and now will display the full time elapsed. Push START/STOP to completely stop the Chronograph. Push LIGHT/RESET to reset the chronograph to zero. 21
22
23 DAY/DATE/TIME WATCHES To Change time: 1.Pull crown out fully to point C. 2.Turn crown to move hands to the correct time. 3.Push crown back in fully to point A. To Change Date: (If applicable) 1.Pull crown out to point B; 2.Turn crown clockwise to current date (For some models, please turn counterclockwise.) 3.Push crown back in fully to point A. The Date will automatically change just before midnight. To Change Day: (If applicable) 1.Pull crown out to point B; 2.Turn crown counterclockwise to current day (For some models, please turn clockwise.) 3.Push crown back in fully to point A. The Day will automatically change just before midnight. Crown C B A WARNING! For your watch to be properly sealed, the crown must be fully pushed in. Never pull out the crown when your watch is in water or is wet. 23
24
25 LEATHER / PU STRAPS To Change Your Strap: To change your watch strap use a pin or paperclip to gently push the solid pins through the case pin holes. At the same time, carefully pull on the strap until the bar releases. When fitting your new strap ensure the bars are seated well by tugging on both ends before you wear your watch. Note: Rip Curl leather straps are made of the finest oiled leather for long life. But despite other s claims, real leather cannot be made 100% waterproof. Don t wear leather in any water. For water use, replace your leather strap with a suitable waterproof rubber or velcro strap, Stainless Steel Straps are waterproof. 25
26 STAINLESS STEEL STRAPS BAND LENGTH ADJUSTMENT: Major Adjustments to the length of your strap must be made by removing the correct amount of metal links to fit your wrist. Links should be taken out as evenly as possible from both sides. 1. Note the direction of the small engraved arrows on the back of strap links. 2. Use a thumb tack firmly push out the first split-pin in the direction of the arrow. Fig.1 3. Pull out the split pin fully. The strap now comes apart. Repeat this step for each link to be removed. Fig.2 4. Now align the two ends of the strap and replace the pin in the opposite direction of the arrow. Be sure to note the correct end of the split pin to insert. Fig.3 5. Firmly press the pin back into place using a hard object. Next lightly tap the pin fully into place. Fig.4 Repeat steps 2 to 5 on other side of band 26
27 Minor adjustments: After the correct fit has been achieved final adjustments or changes can be made as follows: 1. Use a thumb tack slowly insert into the spring bar hole at the clasp. (fig. 5) Join will release. 2. Move the spring bar to the desired hole for the perfect fit. (fig. 6). Be sure to align both ends of the spring bar in the same set of holes. Fig.5 Fig.6 27
28 Recommended Usage Table & Testing 100M / 330ft - Suitable for Water Sports. eg. Surfing, Snorkelling, Swimming, Water Skiing. 200M / 660ft - Suitable for Water Sports. eg. Surfing, Snorkelling, Swimming, Water Skiing, Scuba Diving to standard legal depths. Rip Curl watches are tested to the highest industry standards with the best Swiss pressure testing equipment and are purpose built for Surfing! NOTE : All Industry standards watch testing is done to an overpressure situation in a static laboratory environment and does not signify a diving depth. See recommended usage table. Due to the fact that Surfing is in no way a static sport there are influences that can effect a watches ability to keep water out. eg : Frequent temperature changes, salt water and big wipeouts can diminish the longevity of the watches rubber seals. To keep your watch in peak condition for Surfing we recommend every 24 months you have your watch seals replaced and fully tested at the Rip Curl Watch Service Centre. (See page 33 for contact details.) RIP CURL PTY. LTD. assumes no responsibility for any loss, or any claims by third parties that may arise through the use of this watch. 28
29
30 Rip Curl Watch Care Procedures Only use your watch for approved sports as detailed on page 28. Do not operate buttons under water. If watch is exposed to salt water, rinse thoroughly in freshwater and wipe dry with a soft cloth. Do not clean watch with spray cleaners, thinners or other such volatile agents. Do not wear leather bands in water. Never try to open the watch. Have batteries changed by Rip Curl technicians. Avoid exposing your watch to extreme temperatures. Should moisture appear inside the watch, have it checked by Rip Curl technicians. Though Rip Curl watches are produced to high standards avoid dropping the watch and rough treatment. Avoid exposing the watch to gasoline, cleaning solvents, aerosol sprays, paint etc as chemical reactions with such agents will destroy seals, case and finish. Avoid magnetic fields as they may effect the time keeping of your watch. 30
31 FIVE YEAR LIMITED WARRANTY See reverse for USA warranty info. For warranty service please send you watch DIRECTLY to Rip Curl by certified mail. See page 33 for contact details. NOTE: This warranty is void if the watch is opened by anyone other than the Rip Curl Watch Service Centre. Five Years on Movements from the date of purchase. (NOTE : A Movement is the part inside the Watch that makes it work, but it does not include the Crown, sometimes called the Winder) Two Years on Waterproof from the date of purchase. (NOTE : We recommend all Watches be serviced, resealed and tested for waterproofness every 2 years as heat, salt and other elements will diminish waterproofness over time. Have this done at the Rip Curl Watch Service Centre and we will then issue a new warranty for another 2 years. Cost for the service and resealing will be given upon request.) One Year on Batteries from the date of purchase. (NOTE : Rip Curl s watch warranty service centre can replace all batteries and at the same time will reseal and test the watch functions and waterproofness. We will then issue a new one year warranty on the new battery,waterproofness and workmanship. Cost for battery changing will be given upon request.) Not covered by any warranty is the glass, band and case. Also not covered is damage caused by general wear and tear or any accidental damage. All warranty claims MUST be sent with a purchase receipt clearly showing the purchase date. The warranty book is not proof of purchase without a purchase receipt. eg. A purchase receipt is the cash register receipt or your credit card statement. NOTE : Rip Curl reserves the right to repair or replace, with an equivalent style, any warranty watch. 31
32 FIVE YEAR LIMITED WARRANTY For warranty service please send you watch DIRECTLY to Rip Curl. See below for details. NOTE: This warranty is void if the watch is opened by anyone other than the Rip Curl Watch Service Centre. Five Years on Movements from the date of purchase. (NOTE : A Movement is the part inside the Watch that makes it work, but it does not include the Crown, sometimes called the Winder) Two Years on Water resistance from the date of purchase. NOTE : We recommend all Watches be serviced, resealed, and tested for water resistance every 2 years, as heat, salt, and other elements will diminish water resistance over time. Have this done at the Rip Curl Watch Service Center, and we will then issue a new warranty for another 2 years. (Cost for the service and resealing to be provided upon request.) One Year on Batteries from the date of purchase. (NOTE : Rip Curl s watch warranty service centre can replace all batteries and at the same time will reseal and test the watch functions and water resistance. We will then issue a new one year warranty on the new battery,water resistance and workmanship. Cost for battery changing will be given upon request.) Not covered by any warranty is the glass, band and case. Also not covered is damage caused by general wear and tear or any accidental damage. All warranty claims MUST be sent with a purchase receipt clearly showing the purchase date. The warranty book is not proof of purchase without a purchase receipt. eg. A purchase receipt is the cash register receipt or your credit card statement. NOTE : Rip Curl reserves the right to repair or replace, with an equivalent style, any warranty watch. 32
33 Warranty and Service Enquires : Australia Rip Curl Pty Ltd Watch Service Centre 101 Surfcoast Hwy, Torquay, Vic Tel: Fax: Hours: 9am to 5.30 pm Mon-Fri E.S.T. service_centre@ripcurl.com.au New Zealand Rip Curl NZ Watch Service Centre 58 Apollo Drive, Mairangi Bay, Auckland, 0632 Phone: (09) Fax.: (09) Hours: 8.30am 5.00pm Mon Fri servicecentre@ripcurl.co.nz Brazil RC Brazil LTDA Watches, Wetsuits and Eyewear Service Centre Av. Miguel Estefno, 4544 Enseada, Guarujá SP Cep: Brazil Tel: (13) and Fax: (13) Horário: Segunda à Sexta das 9:00 às 18:00 horas. tecnico@ripcurl.com.br Peru The Search SAC Calle Las oropendolas 329 San Isidro Lima- Peru Tel: jsegala@ripcurl.com.pe thesearch@ripcurl.com.pe Contact: Juan Segala. USA Rip Curl USA Watch Service Center 3030 Airway Ave Costa Mesa, CA USA Tel: Fax: Hours: 9am to 5:30pm MON-FRI service_center@ripcurl.com Europe Rip Curl Europe Watch repair & technical centre, 407 Avenue de la Tuilerie, Hossegor. France Tel : Fax: watchdept@ripcurl-europe.com Thailand Rip Curl (Thailand) 13/16 Vipavadeerangsit Rd. Tungsonghong, Laksi Bangkok, Thailand, Phone : Fax : service_center@ripcurl.co.th Canada Rip Curl Dollarton Hwy North Vancouver, BC V7H 3B2 Canada Phone: Fax: Toll Free Phone: (866) elabrecque@ripcurl.com 33
34 Portugal Ourtime Watch Lab, Lda Rua Dr. Barbas de Albuquerque, N. 13 Vila de Rei Bucelas Phone: (+351) Fax: (+351) Indonesia Rip Curl Indonesia Watch Service Centre Jl. Sunset Road 69 Kuta, Bali Indonesia Tel ext 401 Fax service_centre@ripcurl.co.id Chile RIP CHILE S.A. San Ignacio, 1101, 3 Piso Centro Empresarial Buena Ventura Quilicura Santiago, Chile Tel: Fax: teresapg@ripcurl.cl Spain Rip Curl Europe Watch repair & technical centre, 407 Avenue de la Tuilerie, Hossegor. France Tel : Fax: watchdept@ripcurl-europe.com South Africa Rip Curl South Africa 232 Matthews Meyiwa (Stamfordhill Road) Durban, 4001, South Africa Tel: Fax: nicholas.baldwin@ripcurlsa.co.za Argentina Cristobal Colon Watch Service Centre Saenz Valiente 2248 (1640) Martinez, Buenos Aires - Argentina Tel/Fax: ripcurl@cristobalcolon.com Malaysia Wicked Wave Sdn Bhd No. 12 Jalan PJU 3/49 Sunway Damansara Technology Park Petaling Jaya Selangor Malaysia Tel: (603) Fax: (603) England Watch Service Centre 407 av. de la Tuilerie HOSSEGOR FRANCE Tel : Fax : watchdept@ripcurl-europe.com *Check RIPCURL.COM for more world wide service centre details. 34
35 TO BE RETURNED WITH ANY WARRANTY CLAIM NOTE: For any warranty claim proof of purchase must be attached. ie) sales receipt or credit card statement clearly showing the date of purchase. Senders Name: Return Address: Contact Phone: BH AH FAX Brief description of fault: 35
36 A-U-S1
37
38
FIVE YEAR LIMITED WARRANTY
 Thank your choosing Rip Curl. Your new Rip Curl watch has been designed and built to the highest quality and durability standards. Instructions for your watch can be found at www.ripcurl.com/watch-instructions.
Caseback markings. w MB 119 CAL 0T10 SR927W. Accurist Watches Logo Model Number Calibre Number Battery Number
 Caseback markings w MB 119 CAL 0T10 SR927W Accurist Watches Logo Model Number Calibre Number Battery Number How to use these instructions This booklet contains setting instructions for the Accurist Chronograph
INSTRUCTION MANUAL GUeSS WATCheS
 INSTRUCTION MANUAL Guess Watches WOMENS CONGRATULATIONS ON OWNING YOUR NEW GUESS WATCH. DEVELOPED FROM ADVANCED ELECTRONICS TECHNOLOGY, THE MOVEMENT IS MANUFACTURED FROM Congratulations THE BEST QUALITY
Instructions and care
 Instructions and care watch care Skagen suggests the following solutions for cleaning metal and crystal surfaces: 3:1 solution of ammonia based window cleaner to water 4:1 solution of rubbing alcohol to
INSTRUCTIONS FOR ANALOGUE QUARTZ AND MECHANICAL WATCHES
 INSTRUCTIONS FOR ANALOGUE QUARTZ AND MECHANICAL WATCHES Your watch is one of the following six types of analogue quartz and mechanical watches. Before using your new watch, please read the instructions
PULSAR ANALOGUE QUARTZ WATCH WITH WORLD TIME, ALARM AND CHRONOGRAPH
 1 2 PULSAR ANALOGUE QUARTZ WATCH WITH WORLD TIME, ALARM AND CHRONOGRAPH Cal. N94J FEATURES This is a multi-functional watch featuring the world time, alarm and chronograph. The mode changes simply by turning
Regatta Master Watch_W012. Watch Instructions
 Regatta Master Watch_W012 Watch Instructions This watch comes with a 2 year warranty. For warranty issues please contact your nearest stockist. Proof of purchase required. 1.0 Introduction The watch is
Fox 40 Whistle Watch USER MANUAL 609-0700
 Fox 40 Whistle Watch USER MANUAL 609-0700 CONTENTS BUTTONS AND FEATURES... 3 OPERATING THE WATCH... 4 STOPWATCH MODE... 5 COUNTDOWN MODE... 6 ALARM MODE... 7 BATTERY REPLACEMENT... 8 CARE AND MAINTENANCE...
INSTRUCTION MANUAL AND WARRANTY
 INSTRUCTION MANUAL AND WARRANTY THANK YOU FOR CHOOSING AN INVICTA TIMEPIECE Long ago, we set out to continue Invicta s original 1837 mission to offer magnificent Swiss timepieces at modest prices. In doing
TABLE OF CONTENTS ENGLISH 1-08 ESPAÑOL 00-00 FRANCAIS 00-00 ITALIANO 00-00 DEUTSCH 00-00 JAPANESE 00-00
 TABLE OF CONTENTS ENGLISH 1-08 ESPAÑOL 00-00 FRANCAIS 00-00 ITALIANO 00-00 Português 00-00 Magyar 00-00 DEUTSCH 00-00 JAPANESE 00-00 2009 Oakley, Inc. U.S. Patent(s) Pending. 12 GAUGE INSTRUCTION MANUAL
Interactive guide online at www.victorinoxswissarmy.com
 1 4 7 2 5 8 3 6 9 Interactive guide online at www.victorinoxswissarmy.com 2 VICTORINOX SWISS ARMY INSTRUCTIONS FOR USE I. GENERAL INFORMATION Disposal of used batteries 3 Water resistance 4 Meter/bar correlation
VIBRATION WATCH with:
 Vibration Alarm won't disturb others. Beep Alarm option VIBRATION WATCH with: Auto Reload Countdown Timer can be set for seconds, minutes & hours. Use for reminders such as medical conditions, medication,
ENGLISH ANALOG. 2 Hand Analog K62-132. 2 Hand Analog. 3 Hand Analog VX51E / R1063.2 / 9T33. Palindrome Too
 ANALOG ENGLISH 2 Hand Analog K62-132 Time Setting 1. Push button to move hands. 2. Set to correct time. FRONT BACK PUSHER BUTTON FOR TIME ADJUSTMENT 2 Hand Analog Time Setting 1. Pull crown out to position
CITIZEN QUARTZ ALARM CHRONOGRAPH. Model No. AI3XXX Cal. No. 6870 INSTRUCTION MANUAL CTZ-B6813
 CITIZEN QUARTZ ALARM CHRONOGRAPH Model No. AI3XXX Cal. No. 6870 2. Mode (Display Function) Switching This watch is equipped with 8 modes consisting of time, alarm 1, alarm 2, chronograph, 0-position check,
TISSOT TWOTIMER SETTING INSTRUCTIONS
 TISSOT TWOTIMER SETTING INSTRUCTIONS The Twotimer is available in many different styles, in both round and rectangular cases but the setting instructions are identical for all. 1 of 5 26-03-2011 13:49
CITIZEN QUARTZ NAVIHAWK. Model No. JNOXXX Caliber No. C300 INSTRUCTION MANUAL CTZ-D6758. Main Functions
 CITIZEN QUARTZ NAVIHAWK Model No. JNOXXX Caliber No. C300 INSTRUCTION MANUAL CTZ-D6758 This combination watch can display the time in 30 cities of the world with a simple operation. In addition to the
pantone 186C Customer Service Toll Free: 1-866-746-7794 Fax: 1-954-985-1828 www.swisslegend.com
 pantone 186C Customer Service Toll Free: 1-866-746-7794 Fax: 1-954-985-1828 www.swisslegend.com THE SWISS LEGEND STORY The word Legend was first used in the English language in the 14th Century and has
One Year Limited Guarantee on VIOLET Watches
 One Year Limited Guarantee on VIOLET Watches Your Violet watch is guaranteed for a period of one year from the date of purchase against all defects in materials or workmanship. This does not apply to normal
To start the watch, first pull the stopper as shown in the image at the right, in the direction of the arrow
 Start up & Strap Adjusting P. 1 Instructions P. 2 Date time function Ice-Watch setting P. 3 Chronograph (with date) time function Ice-Watch setting P. 4-5 Warranty P. 6 ENGLISH Start up & Strap adjusting
You have chosen a Hublot watch; you are about to enter a whole new world
 ENGLISH ENGLISH You have chosen a Hublot watch; you are about to enter a whole new world Every piece cultivates its distinction, to assert its powerful and incredible personality every time. Yet this
Introduction. Your TAG Heuer. Your new TAG Heuer watch has all the technical features of an authentic sports watch:
 Introduction Your TAG Heuer Congratulations on your purchase of a TAG Heuer watch. You have made an excellent choice in selecting the ultimate in technical innovation, precision and endurance high-performance
VIBRATION WATCH with: Vibration Alarm (won't disturb others). Beep Alarm (optional) Electro-Luminescent (EL) back light (for viewing display at
. Beep Alarm (optional) Electro-Luminescent (EL) back light (for viewing display at") VIBRATION WATCH with: Vibration Alarm (won't disturb others). Beep Alarm (optional) Electro-Luminescent (EL) back light (for viewing display at night). Second Clock (great when traveling in a different
VIBRATION WATCH with: Vibration Alarm (won't disturb others). Beep Alarm (optional) Electro-Luminescent (EL) back light (for viewing display at night). Second Clock (great when traveling in a different
Current Split tim e. Stopwatch OSLO SILVER 30 OPERATING INSTRUCTIONS
 OSLO SILVER 30 OPERATING INSTRUCTIONS THANK YOU for buying the Oslo Silver 30 Thirty Lap Memory Stopwatch. Your purchase brings you a reliable, World-Class Timer which measures performance for a wide array
EX 2. User Manual NM-704.1. www.newbalance-watch.com
 EX 2 901 User Manual NM-704.1 www.newbalance-watch.com 1 Design of the Watch Thank you for purchasing this watch. Please read this manual thoroughly before using the watch! [EL] EL Button To turn on the
JUNGHANS MEGA ALARM-CHRONO W 615.33
 JUNGHANS MEGA ALARM-CHRONO W 615.33 reset set + mode set GB Contents Page 1. Wireless technology 52 53 2. Readiness for use 54 55 3. Automatic time synchronisation 56 4. Functions 57 4.1. Base mode 58
CITIZEN QUARTZ Analog Alti-Meter. Model No. AY6 Caliber No. 7240 INSTRUCTION MANUAL CTZ-B6771
 CITIZEN QUARTZ Analog Alti-Meter Model No. AY6 Caliber No. 7240 INSTRUCTION MANUAL CTZ-B6771 display from measurement to display of altitude is approximately 5 seconds (in continuosly altimetry mode).
Innhold: EE-avfall (elektrisk og elektronisk avfall)
") EE-avfall (elektrisk og elektronisk avfall) Elektroniske klokker er EE-avfall. EE-avfall kan leveres gratis til alle butikker som selger til svarende typer produkter uten krav om å kjøpe nytt. Du trenger
EE-avfall (elektrisk og elektronisk avfall) Elektroniske klokker er EE-avfall. EE-avfall kan leveres gratis til alle butikker som selger til svarende typer produkter uten krav om å kjøpe nytt. Du trenger
IMPORTANT NOTE: Please select the timing function you wish to use by pressing button B. Then, proceed as described in these instructions.
 OSLO SILVER 2.0 OPERATING INSTRUCTIONS THANK YOU for buying the Oslo Silver 2.0 Twin Chronograph and Countdown Timer. Your purchase brings you a reliable, World-Class Timer with separate modes for Lap
HEART RATE + CALORIE MONITOR
 S7 S7 HEART RATE + CALORIE MONITOR SB4065IS01SPORB.indd 1 TABLE OF CONTENTS INTRODUCTION 1 HOW TO USE THIS MANUAL 1 ACTIVATING THE WATCH FROM POWER DOWN MODE 1 WARNINGS & CAUTIONS 2 CARE & MAINTENANCE
Radio BMR100 INSTRUCTION MANUAL. ENGLISH (Original instructions)
") ENGLISH (Original instructions) INSTRUCTION MANUAL Radio BMR00 WARNING: For your personal safety, READ and UNDERSTAND before using. SAVE THESE INSTRUCTIONS FOR FUTURE REFERENCE. Symbols The following show
ENGLISH (Original instructions) INSTRUCTION MANUAL Radio BMR00 WARNING: For your personal safety, READ and UNDERSTAND before using. SAVE THESE INSTRUCTIONS FOR FUTURE REFERENCE. Symbols The following show
Quickster Chrono Foot G10-212 User s Manual
 Quickster Chrono Foot G-212 User s Manual 6 7 13 4 1 4 1 3 2 1 4 3 2 Display and functions Hour hand Minute hand Seconds hand (direct-drive) Calendar 4-minute counter -second counter Match phase counter
INSTRUCTIONS FOR USE. Cal. ETA 988.333 9¾ x 11½ Cal. ETA 988.432 11 x 11½. English
 INSTRUCTIONS FOR USE Cal. ETA 988.333 9¾ x 11½ Cal. ETA 988.432 11 x 11½ English Summary English... Pages 3-18 2 1. Description 1.1 Using the crown A characteristic feature of your multifunction watch
Instruction Manual. Traveler Pocket Alarm. iii
 Instruction Manual Traveler Pocket Alarm iii Table of Contents Crafted for Life............................................. 2 Watch Components........................................... 3 General Features
Airplane Mode (Hold down about 4 seconds.) Start/Stop. Split/Reset. Airplane Mode (Hold down about 4 seconds.) Enabling/Disabling the Alarm
 Start/Stop. Split/Reset. Airplane Mode (Hold down about 4 seconds.) Enabling/Disabling the Alarm") MA14-E 2014 CASIO COMPUTER CO., LTD. Bluetooth connection (Approximately 0.5 seconds) Alarm Mode Calendar Mode Stopwatch Mode Airplane Mode (Hold down about 4 ) Airplane Mode (Hold down about 4 ) Start/Stop
MA14-E 2014 CASIO COMPUTER CO., LTD. Bluetooth connection (Approximately 0.5 seconds) Alarm Mode Calendar Mode Stopwatch Mode Airplane Mode (Hold down about 4 ) Airplane Mode (Hold down about 4 ) Start/Stop
CAL. 7T62, YM62 ALARM & CHRONOGRAPH
 ENGLISH CL. 7T2, YM2 LRM & CHRONOGRPH TIME/CLENDR Hour, minute and small second hands Date displayed in numerals Measures up to 0 minutes in 1/5 second increments. Split time measurement SINGLE-TIME LRM
The Abingdon Co. Jackie. Product Information, Manual and Warranty
 The Abingdon Co. Jackie Product Information, Manual and Warranty Revision 3 2 Dear Friend, 3 Welcome to the Abingdon family. Thank you for purchasing your Abingdon watch. I hope it helps you navigate for
Instruction manual for Firstline FCS12000CH
 Instruction manual for Firstline FCS12000CH Contents Introduction... 2 Safety Awareness... 3 Safety Awareness... 4 Name of Parts... 5 Name of Parts... 6 Remote Controller Preparation... 7 Operation of
VERTECH II OPERATION AND SETUP SKI FEATURES SKI AND ALPIN OPERATION
 Ft Ft VERTECH II SKI AND ALPIN ADJUST OPERATION AND SETUP START/ STOP ADJUST SKI FEATURES V E R T A L T I USA Records vertical meters skied Counts number of runs skied aximum, current, and average rate
RETAIL REPAIR PRICE LIST
 Table of Contents BATTERY SUPPLY & FITTING... 1 WATER RESISTANT PRESSURE TEST... 1 MINOR SERVICE... 1 CASE REPAIRS... 2 GLASSES... 2 HANDS... 3 DIALS... 3 BAND REPAIRS... 3 ADDITIONAL LINKS FOR RETAIL
LCD BacPac. User Manual + Warranty Info
 LCD BacPac User Manual + Warranty Info Firmware Update To determine if a firmware update is required, please follow these steps: With the camera fully charged, attach the LCD BacPac to camera and power
AERIS F10. Watch Free Dive Gauge. Operating Manual. (cover art provided separately)
") AERIS F10 Watch Free Dive Gauge Operating Manual (cover art provided separately) CONTENTS WARRANTY, NOTICES... 6 NOTICE - STORAGE AND INITIAL ACTIVATION... 7 FULL LCD... 8 INTRODUCTION AND GENERAL FEATURES
AERIS F10 Watch Free Dive Gauge Operating Manual (cover art provided separately) CONTENTS WARRANTY, NOTICES... 6 NOTICE - STORAGE AND INITIAL ACTIVATION... 7 FULL LCD... 8 INTRODUCTION AND GENERAL FEATURES
PULSE USER MANUAL. heart rate monitor. measure your heart rate for a better, healthier you! JoinWeGo.com
 PULSE USER MANUAL heart rate monitor measure your heart rate for a better, healthier you! JoinWeGo.com CONTENTS Welcome to WeGo 1 Key Functions 2 Watch Reset 2 General Operations 3-7 All Modes 3 HRM 3
vements ATCH MO W 4. 4. WATCH MOvEMENTS
 4. WATCH MOVEMENTS 4. WATCH MOVEMENTS 4.1 WATCH MOVEMENTS QUARTZ MODELS MAIN COMPONENTS A Hour Hand B Minute Hand C Second Hand D Crown 4.1 WATCH MOVEMENTS Description of the display and control buttons
EKG-Accurate Heart Rate with Maximum Heart Rate Indicator + Chronograph Timer
 English... 1 Français... 20 español... 44 EKG-Accurate Heart Rate with Maximum Heart Rate Indicator + Chronograph Timer English 1 Contents Activating Your MIO Sport 1 Quick Start 1 Before Using Your MIO
Digital Heart Rate Monitor
 W-248 843-095002-02 EU 2009 Timex Group, USA, Inc. TIMEX, TRIATHLON and NIGHT-MODE are registered trademarks of Timex Group USA, Inc. INDIGLO is a registered trademark of Indiglo Corporation in the US
OPERATING INSTRUCTIONS
 SCUDERI FERRRI OROLOGI OPERTING INSTRUCTIONS STNDRD 2- ND 3-HND MODELS Includes SF 101watch models STNDRD DTE DISPLY MODELS Includes SF 101 and SF 102 watch models Table of Contents NLOG CHRONOGRPHS 1/1
Information is Power. triax c5 features
 Information is Power By measuring intensity (heart rate) and duration (time) you can avoid over training, help prevent injury, and maximize your chances of achieving your goals. triax c5 features Adjustable
Tympanic Thermometer
 Tympanic Thermometer Tympanic Thermometer Owner s Manual Version 1.0 May, 2013 IMPORTANT SAFETY INSTRUCTIONS READ THIS BEFORE USING The following basic safety precautions should always be taken. 1. Close
RCR-22 AM/MW 2 bands Digital Clock Radio instruction manual
 RCR-22 AM/MW 2 bands Digital Clock Radio instruction manual Important safety instructions 1. Read and understand all safety and operating instructions before the radio is operated. 2. Retain instruction:
Thank you for your purchase of a Kenneth Cole New York watch. Register your watch today at: www.genevawatchgroup.com
 1 Thank you for your purchase of a Kenneth Cole New York watch. Register your watch today at: www.genevawatchgroup.com 2 Kenneth Cole New York is manufactured using the highest quality materials and craftsmanship.
SensorMaster II: Instruction Manual
 SensorMaster II: Instruction Manual roject no: 431 Version: 6.0 File name: 431MN061.CDR repared by C.K Lau Copyright: Latitude Limited Date: 8 Jan, 2003 130 mm 130 mm 90 mm saddle wire folding line Size
Converse 320. Userfriendly Guide
 Converse 0 Userfriendly Guide Return Diversion Minder On Off At a glance IMPORTANT Next Inserts a space in a number when storing numbers in the memory. Clear Used to edit numbers when pre-dialling or when
AM/FM PLL Clock/Table Radio
 12-1632.fm Page 1 Wednesday, May 10, 2000 10:57 AM Cat. No. 12-1632 OWNER S MANUAL Please read before using this equipment. AM/FM PLL Clock/Table Radio 12-1632.fm Page 2 Wednesday, May 10, 2000 10:57 AM
USER MANUAL TIME SETTING
 Display TIME SETTING A B C = /0 sec. J I H G D F E SET Chrono automatic A B D H E I C G F SET Retrograde A G C = / min. D E I H B F A: Minutes counter (60 minutes) A: minutes counter (60 minutes) A: Minutes
DX-395. FM/AM/SW1/SW2 PLL Synthesized Receiver OWNER S MANUAL. Cat. No. 20-225. Please read before using this equipment.
 20-225.fm Page 1 Wednesday, August 4, 1999 10:07 AM Cat. No. 20-225 OWNER S MANUAL Please read before using this equipment. DX-395 FM/AM/SW1/SW2 PLL Synthesized Receiver 20-225.fm Page 2 Wednesday, August
To suit Daikin FDY "F" Series and FD "F" Series. (and other models incorporating BRC1B62/52 Remote Controller)
") OPERATION MANUAL Split System Ducted Air Conditioner To suit Daikin FDY "F" Series and FD "F" Series AIR CONDITIONER A hr o C (and other models incorporating BRC1B62/52 Remote Controller) Dear Owner, Thank
OPERATION MANUAL Split System Ducted Air Conditioner To suit Daikin FDY "F" Series and FD "F" Series AIR CONDITIONER A hr o C (and other models incorporating BRC1B62/52 Remote Controller) Dear Owner, Thank
How To Program An Autodialer
 GJD HYL005 GSM Autodialer Instruction Manual Please read these instructions before you start the installation Features: LCD display. Programmable 9 x 32 digit phone numbers for each trigger. 10 second
AN500T, AN1000, AN1000T, AN1500, AN1500T AN2000, AN2000T
 Product Instruction Manual Accona AN500T, AN1000, AN1000T, AN1500, AN1500T AN2000, AN2000T Panel heater v16.5/5 Version 3.2 Jan 2015 Contents 1. Important safety points 2. Installation 2.1. Wall mounting
GSM AD05 Slave GSM Auto Dialer- Instruction Manual
 GSM AD05 Slave GSM Auto Dialer- Instruction Manual Please read these instructions before you start the installation Features LCD display Programmable 9 x 32 digit phone numbers for each trigger. 10 second
Reizen Atomic Talking Analog Alarm Clock Item #706810. Instruction Manual
 Reizen Atomic Talking Analog Alarm Clock Item #706810 Instruction Manual 1 Instruction Manual of Atomic Analog Talking Clock (Single-Band) S2 (Alarm Hour) S1 (Talking+Snooze+Lamp) S4 (Alarm Volume+Off)
Reizen Atomic Talking Analog Alarm Clock Item #706810. Instruction Manual
 Reizen Atomic Talking Analog Alarm Clock Item #706810 Instruction Manual S1 (Talking + Snooze + Lamp) S2 (Alarm Hour) S4 (Alarm Volume + Off) S3 (Alarm Minute) S7 (Time Zone: P,M,C,E) S5 (Wave) S8 (DST
SCORPION. micron security products
 SCORPION 4120 6020 & 8020 USER INSTRUCTIONS Thank you for purchasing a Quality Micron Security Alarm Controller. Micron product is manufactured to exacting quality standards. We understand the importance
HAIR CLIPPER. Model No. HC5150 HC5150 2. 3.
 All technical modifications reserved. 09/08. TSC 08.0634 HAIR CLIPPER 2. 3. 1. Model No. HC5150 4. 10/UK/HC5150 Version 03/10 Part No. T22-29458 REMINGTON is a Registered Trade Mark of Spectrum Brands,
Your Simple Guide to Battery. www.firstalertpro.com. Replacement. Customer Care: 1-800-852-0086. www.firstalertpro.
 Previous Menu Your Simple Guide to Battery www.firstalertpro.com Replacement p e t s ts ep -by Customer Care: 1-800-852-0086 FA/1565 9/00 www.firstalertpro.com Table of Contents: page Introduction...............................
AD-01 Slave Auto Dialer. Owner s Manual
 AD-01 Slave Auto Dialer Owner s Manual AD-01 Slave Manual.indd 1 10/15/2009 10:20:44 AM 2 AD-01 Slave Manual.indd 2 10/15/2009 10:20:44 AM Features: Programmable entry/exit delay time; select up to 9 (32
Quick Guide. S610i S610i
 COMPLETE HR Displays your heart rate as bpm and % of HR max, average heart rate and exercise duration. Allows you to set 5 exercise sets for interval training with HR target zones and recovery calculation.
06MAR THU 12:38.28. User Manual
 06MAR THU 12:38.28 88.2% 28.0C User Manual 1.0 General Guide Thank you for purchasing your new ADC. We recommend reading this manual, and practicing the operations before using your ADC in the field. The
Digital Heart Rate Monitor
 W-246 811-095000-02 NA 2008 Timex Group, USA, Inc. TIMEX and NIGHT-MODE are registered trademarks of Timex Group USA, Inc. INDIGLO is a registered trademark of Indiglo Corporation in the US and other countries.
User manual TAB-10C010-232
 User manual TAB-10C010-232 Congratulations on the purchase of your new tablet! This manual contains important safety and operating information in order to prevent accidents! Please read this manual thoroughly
Printed in China. Issue 4 AT&T 12/11. Message Guard is a registered trademark of Advanced American Telephones.
 www.telephones.att.com 2011 Advanced American Telephones. All Rights Reserved. AT&T and the AT&T logo are trademarks of AT&T Intellectual Property licensed to Advanced American Telephones, San Antonio,
Instructions for Using the Watch Works Tool Kit to Change a Watch Battery
 Instructions for Using the Watch Works Tool Kit to Change a Watch Battery Click on this link http://www.allamericanwatches.com/site/626101/product/e2306-a to purchase the Watch Battery Replacement Tool
Wireless Indoor/ Outdoor Thermometer
 Wireless Indoor/ Outdoor Thermometer Owner s Manual Please read before using this equipment. ˆ Contents FCC Information... 3 FCC Declaration of Conformity... 5 Preparation... 5 Installing Batteries...
Owner s Manual Forerunner 205/305
 Owner s Manual Forerunner 205/305 GPS-enabled trainer for runners 2006 2008 Garmin Ltd. or its subsidiaries Garmin International, Inc. 1200 East 151st Street, Olathe, Kansas 66062, USA Tel. (913) 397.8200
owner s manual EDGE 200 GPS-ENABLED CYCLING COMPUTER December 2012 190-01368-00_0B Printed in Taiwan
 EDGE 200 GPS-ENABLED CYCLING COMPUTER owner s manual December 2012 190-01368-00_0B Printed in Taiwan Getting Started warning Always consult your physician before you begin or modify any exercise program.
Approach S3 Owner s Manual
 Approach S3 Owner s Manual December 2012 190-01467-00_0C Printed in Taiwan All rights reserved. Under the copyright laws, this manual may not be copied, in whole or in part, without the written consent
Microwave Meter. Instruction Manual
 Microwave Meter 840046 Instruction Manual Microwave Meter 840046 Copyright 2009 by Sper Scientific ALL RIGHTS RESERVED Printed in the USA The contents of this manual may not be reproduced or transmitted
Wireless Home Security System Product Manual (Model #80355)
") Wireless Home Security System Product Manual (Model #80355) Installation Instructions During set-up, if no key is pressed for 15 seconds it will come out of the setup mode and you will have to start over.
Wireless Home Security System Product Manual (Model #80355) Installation Instructions During set-up, if no key is pressed for 15 seconds it will come out of the setup mode and you will have to start over.
CAD-05 Kit GSM Auto Dialer. Owner s Manual
 CAD-05 Kit GSM Auto Dialer Owner s Manual CAD-05 Kit Manual.indd 1 Warnings: This device complies with Part 15 of the FCC rules, Operation of this device is subject to the following conditions: 1. This
Replacement Instructions. Warning: During this procedure, keep small parts away from children.
 apple ibook G4 Memory Card Replacement Instructions Follow the instructions in this sheet carefully. Failure to follow these instructions could damage your equipment and void its warranty. Note: Written
ExStik TM ph Waterproof Meters
 User Guide ExStik TM ph Waterproof Meters Models PH100 & PH110 Patent Pending ExStik TM Description Front Panel Controls 1. Battery compartment cap 2. LCD Display 3. MODE / HOLD button 4. CAL / RECALL
OARTEC SIMULATOR TRAINING MONITOR USER MANUAL Version 1.05
 OARTEC SIMULATOR TRAINING MONITOR USER MANUAL Version 1.05 Contents Features Getting Started Technical Functions Software Updates Training Modes Just Row Mode Time and Distance Workouts Workout Memory
hearing systems Remote Control WatchPilot TM 2 User Guide
 hearing systems Remote Control WatchPilot TM 2 User Guide Welcome to the Phonak world of communication! Congratulations on choosing WatchPilot2. The WatchPilot2 is a convenient and discreet remote control.
e 1 0 0 I N S T RUC TION M ANU A L
 e 1 0 0 I N S T RUC TION M ANU A L The Empire Digital Level Accuracy, Readability, Durability one FEATURES: Easy to read back light Display reads right side up even if the level is upside down Audio beep
Trek Sensor 2.0 Cycling Computer Owners Manual. Precautions. Main Unit/Accessories
 Trek Sensor 2.0 Cycling Computer Owners Manual Congratulations and thank you for purchasing your Trek Cycling Computer. Before operation please read this instruction manual carefully and retain it for
NÜVE SANAYİ MALZEMELERİ İMALAT VE TİCARET A.Ş. OT 020 BENCH TOP STEAM STERILIZER USER S MANUAL
 NÜVE SANAYİ MALZEMELERİ İMALAT VE TİCARET A.Ş. OT 020 BENCH TOP STEAM STERILIZER USER S MANUAL NÜVE SANAYİ MALZEMELERİ İMALAT VE TİCARET A.Ş. Esenboğa Yolu 22 km Akyurt - ANKARA / TURKEY Tel : (00 90 312)
INSTRUCTION MANUAL CUSTOMER SERVICE CONTACTS
 INSTRUCTION MANUAL CUSTOMER SERVICE CONTACTS EN Suunto Oy Phone +358 9 875870 Fax +358 9 87587301 Suunto USA Phone 1 (800) 543-9124 Canada Phone 1 (800) 776-7770 European Call Center Phone +358 2 284 11
WALL MOUNTED SPLIT TYPE AIR CONDITIONER
 WALL MOUNTED SPLIT TYPE AIR CONDITIONER MANUAL 8 OM-G12-ACSON CONTENTS - Operating Guide page 1 - G12 Remote Controller Indication page 2 - Indicator Lights page 4 - Installation of Aroma page 5 - Auto
TABLE OF CONTENTS 1. GENERAL INFORMATION...6 1.1. CHECKLIST...7 1.2. GETTING STARTED...7 1.3. SUUNTO T6 FEATURES...8 1.4. CARE AND MAINTENANCE...
 EN CUSTOMER SERVICE CONTACTS Global Help Desk +358 2 284 11 60 Suunto USA Phone +1 (800) 543-9124 Canada Phone +1 (800) 776-7770 Suunto website www.suunto.com COPYRIGHT This publication and its contents
DUO 1025 DUO 1025 DUAL-USE HEART RATE MONITOR
 DUO 1025 DUO 1025 DUAL-USE HEART RATE MONITOR TABLE OF CONTENTS INTRODUCTION HOW TO USE THIS MANUAL WARNINGS & CAUTIONS CARE & MAINTENANCE CUSTOMER SUPPORT WATCH FUNCTIONS KEYS AND THEIR FUNCTIONS ACQUIRING
USER GUIDE. notebook security DEFCON 1# ultra combination cable lock
 notebook security DEFCON 1# ultra combination cable lock USER GUIDE Visit our Website at www.targus.com/ Features and specifications subject to change without notice. 2006 Targus Group International, Inc.
WIRELESS ALARM SYSTEM WITH TELEPHONE AUTO DIALER
 BAT.LOW AC WIRELESS ALARM SYSTEM WITH TELEPHONE AUTO DIALER THE SYSTEM THAT CALLS YOU! Our WIRELESS ALARM SYSTEM WITH TELEPHONE AUTO DIALER is designed to allow you to create your own security system.
SECURITY SYSTEM MANUAL
 SECURITY SYSTEM MANUAL CONTACT NUMBERS: Phase 3 Security 403-783-2199 Technical Difficulties, Account Updates, & Any Other Inquiries: Consolidated Monitoring 1-800-232-7290 False Alarms & Holiday Procedures
PR-2500 Portable Receiver. Owner s Manual
 PR-2500 Portable Receiver Owner s Manual CONTENTS The PR-2500, battery charger, and belt clip. (figure 1) Figure 1 Warning This device complies with Part 15 of the FCC rules, operation of this device is
DR 70 Portable Digital DAB+ and FM Radio Receiver User Manual English Please read carefully before using this product
 DR 70 Portable Digital DAB+ and FM Radio Receiver User Manual Please read carefully before using this product 15 1 Table of Contents 1 Table of Contents... 16 2 Safety Instructions:... 17 3 Specification:...
White Industries Rear Hub Instructions
 White Industries Rear Hub Instructions Tool required: 2mm allen/hex wrench, 19mm socket, 20mm socket, and mallet. 1. Loosen the set screws located in the adjusting collar by using a 2mm allen wrench inserted
PAC1 Door Access Controller
 PAC1 Door Access Controller Series 2 IMPORTANT DIFFERENCES FROM SERIES 1 1. A PACDL data logger revision 4.0 or higher attached to the DLOG terminal is able to program all features (i.e. times, relay type,
AM / FM Tuner + RDS. Model: TU-101. www.pulse-audio.co.uk
 AM / FM Tuner + RDS Model: TU-101 www.pulse-audio.co.uk 1 Safety Information The lightning bolt within a triangle is intended to alert the user to the presence of dangerous voltage levels within the product
GSM Alarm System User Manual
 GSM Alarm System User Manual For a better understanding of this product, please read this user manual thoroughly before using it. Quick Guider After getting this alarm system, you need to do the following
Printed in China. Issue 1.2 AT&T 03/07. Advanced American Telephones. AT&T and the AT&T logo are trademarks of AT&T Knowledge Ventures, licensed to
 2007 Advanced American Telephones. All rights reserved. AT&T and the AT&T logo are trademarks of AT&T Knowledge Ventures, licensed to Advanced American Telephones. Printed in China. Issue 1.2 AT&T 03/07
Important Safety Instructions
 PR-D7 GB Revision 1 Important Safety Instructions 1. Read these instructions. 2. Keep these instructions. 3. Heed all warnings. 4. Follow all instructions. 5. Do not use this apparatus near water. 6. Clean