Inverter 2000W with 55Amp Inverter Charger (38326) Owner s Manual
|
|
|
- Felix Cox
- 7 years ago
- Views:
Transcription
1 Version 1.1 Inverter 2000W with 55Amp Inverter Charger (38326) Owner s Manual 1
")
2 For safe and optimum performance, the Nature Power Inverter 2000W with 55Amp Inverter Charger must be used properly. Carefully read and follow all instructions and guidelines in this manual and give special attention to the CAUTION and WARNING statements. PLEASE KEEP THIS MANUAL FOR FUTURE REFERENCE Disclaimer While every precaution has been taken to ensure the accuracy of the contents of this guide, Nature Power assumes no responsibility for errors or omissions. Note as well that specifications and product functionality may change without notice. Important Please be sure to read and save the entire manual before using your Nature Power Inverter- Charger. Misuse may result in damage to the unit and/or cause harm or serious injury. Read manual in its entirety before using the unit and save manual for future reference. Product Numbers 32326: Inverter 2000W with 55Amp Inverter Charger Page 2

3 Table of Contents 1. INTRODUCTION PRODUCT DESCRIPTION INSTALLATION UNIT OPERATION TROUBLESHOOTING SPECIFICATIONS WARRANTY Page 3

4 1. INTRODUCTION Thank you for purchasing the Nature Power Inverter 2000W with 55Amp Inverter Charger. With our state of the art, easy to use design, this product will offer you reliable service by providing AC power and 5V USB power for your home, cabin, boat, RV or Trailer and recharge your battery automatically when utility AC is available. The Nature Power Inverter 2000W with 55Amp Inverter Charger can run many AC-powered appliances when you need AC power anywhere. The 5V USB power can charge many USB-powered devices. The multi-stage battery charger will charge different type of batteries. This manual will explain how to use this unit safely and effectively. Please read and follow these instructions and precautions carefully. IMPORTANT SAFETY INFORMATION This section contains important safety information for the Nature Power Inverter 2000W with 55Amp Inverter Charger. Please read ALL instructions before use. The Nature Power Inverter 2000W with 55Amp Inverter Charger contains no user-serviceable parts. See Warranty section for how to handle product issues. WARNING: FIRE AND/OR CHEMICAL BURN HAZARD Do not cover or obstruct any air vent openings and/or install in a zero-clearance compartment. WARNING: FAILURE TO FOLLOW THESE INSTRUCTIONS CAN RESULT IN DEATH OR SERIOUS INJURY When working with electrical equipment or lead acid batteries, have someone nearby in case of an emergency. Study and follow all the battery manufacturer s specific precautions when installing, using and servicing the battery connected to the inverter. Wear eye protection and gloves. Avoid touching your eyes while using this unit. Keep fresh water and soap on hand in the event battery acid comes in contact with eyes. If this occurs, cleanse right away with soap and water for a minimum of 15 minutes and seek medical attention. Batteries produce explosive gases. DO NOT smoke or have an open spark or fire near the system. Keep unit away from moist or damp areas. Avoid dropping any metal tool or object on the battery. Doing so could create a spark or short circuit which goes through the battery or another electrical tool that may create an explosion. WARNING: Shock Hazard. Keep away from children! Avoid moisture. Never expose unit to snow, water etc. Unit provides 120 Vac, treat the GFCI output socket the same as regular wall AC sockets at home. WARNING: Explosion hazard! DO NOT use the unit in the vicinity of flammable fumes or gases (such as propane tanks or large engines). AVOID covering the ventilation openings. Always operate unit in an open area. Prolonged contact to high heat or freezing temperatures will decrease the working life of the unit. FCC INFORMATION This equipment has been tested and found to comply with the limits for a Class B digital device, pursuant to part 15 of the FCC Rules. These limits are designed to provide reasonable protection against harmful interference in a residential installation. This equipment generate, uses and can radiate radio frequency energy and, if not installed and used in accordance with the instructions, may cause harmful interference to radio communications. However, there is no guarantee that interference will not occur in a particular installation. If this equipment does cause harmful interference to radio or television reception, which can be determined by turning the equipment off and on, the user is encouraged to try to correct the interference by one or more of the following measures: Reorient or relocate the receiving antenna. Increase the separation between the equipment and the receiver. Connect the equipment into an outlet on a circuit different from that to which the receiver is Page 4

5 connected. Consult the dealer or an experienced radio/tv technician for help. LIMITATIONS ON USE Do not use in connection with life support systems or other medical equipment or devices. 2. PRODUCT DESCRIPTION The Nature Power Sinewave Inverter-Charger includes the items list below. Inverter-Charger base unit (one of the following models) 32326: Inverter 2000W with 55Amp Inverter Charger Owner s manual 3. INSTALLATION WARNING: Nature Power recommends that all wiring be done by a certified technician or electrician to ensure adherence to the applicable electrical safety wiring regulations and installation codes. Failure to follow these instructions can damage the unit and could also result in personal injury or loss of life. CAUTION: Before beginning unit installation, please consider the following: The unit should be used or stored in an indoor area away from direct sunlight, heat, moisture or conductive contaminants. When placing the unit, allow a minimum of three inches of space around the unit for optimal ventilation. Understanding the unit features AC Output Front Panel AC Wiring Compartment: AC Output Port 1 & 2 AC Output strain relief AC Ground AC Output strain relief AC Input port USB Output Status Indicator Display On/Off button Select button AC Output Port 3 (GFCI) DC Input Rear Panel Fan opening DC Input Terminals Page 5

6 Preparing for Installation Typical Wiring block diagram of the Power Inverter: Output: AC Output Port 1-3 & USB Inverter-Charger (32326) DC Disconnect Switch Fuse or Circuit Breaker 12 V Battery Bank Input: AC Source Branch Breaker 12V Battery Bank: The use of deep cycle battery is highly recommended for power inverter application For battery size, you need to identify what you wish to operate, and for how long. NATURE POWER recommends that you purchase as much battery capacity as possible. See more on Battery Run time and Load in Section 4. Fuse or Circuit Breaker: DC-rated fuse or DC-rated circuit breaker connected along the DC positive line is required. For 32326, select a fuse or circuit breaker with a minimum of 300 Adc Based on the size of your 12V Battery Bank, determine the overall short circuit current rating of the battery bank from the battery manufacturer. The fuse or circuit breaker chosen has to be able to withstand the short circuit current that may be generated by the battery bank Disconnect Switch: Select a DC Disconnect Switch with the same or higher rating of the selected fuse or circuit breaker. The DC Disconnect Switch is used to disconnect the DC power between the unit and the battery bank during service, maintenance or trouble shooting. DC Input and Grounding Cable: Use of low resistance wire is required for all the DC connections between the unit and the battery bank. For 32326, use minimum #2/0 AWG wire with maximum cable length of 5 feet. Important: The unit is grounded through the ground stud of the unit located near the DC Input terminal. For the grounding cable connected between the unit s chassis and the earth ground, use a matching cable size as used on the DC Input Cable section. AC Input Source and Branch Breaker: Standard AC Input wire is required for all the AC connections between the AC source & the AC Input port, and the AC Output ports to load. A 30A branch circuit breaker is required to connect between AC Input source and unit s AC Input port. Important: Follow the electrical and or building code when you connect the unit to any AC source. Installing the Inverter-Charger System WARNING: Electrical Shock Hazard The unit On/Off switch does not disconnect the DC power from the battery. Use the DC Disconnect Switch or disconnect the DC input cables connection to disconnect the DC power from the battery before working on any circuits connected to the unit. Failure to follow these instructions can result in death or serious injury. Page 6

7 Installation: Choose an appropriate mounting location. For indoor use, the unit can be mounted in any direction except with the DC Input panel facing downwards. Use the mounting template below to mark the positions of the mounting screws. Drill the 4 mounting holes and place the Inverter-Charger in position and fasten the unit to the mounting surface. Chassis Grounding Connection: DANGER: The unit chassis has to be grounded properly. Never operate the Inverter- Charger without proper grounding. Failure to do so will result in death or serious injury. Connect the grounding cable s ring terminal to the unit ground screw. Connect the other side of the cable to the common grounding point. DC Input Connection: CAUTION: Reversing the DC Input terminal will damage the unit and it cannot be repaired. Damage caused by reverse polarity connection is not covered by the warranty. Connect one end of the negative DC input cable to the Inverter-Charger DC negative terminal. Connect the other end of the negative DC input cable to the battery negative terminal. Make sure the Disconnect Switch is in the OFF position. Connect one end of the positive DC input cable to the Power Inverter DC positive terminal. Connect the other end of the positive DC input cable to one of the terminals of the Disconnect Switch. Connect a DC input cable between the other terminal of the Disconnect Switch and one side of the terminal of the fuse holder. Connect a DC input cable between the other terminal of the fuse holder and the battery positive terminal. Install the selected fuse to the fuse holder. Turn Disconnect Switch to ON position. AC Input Connections: Warning: Please double check on the location of the AC input port located inside the wiring compartment. Misconnecting to the AC output port inside the same compartment will blow the unit and may catch fire. Before making any AC Input and output connection, please be sure the AC Input Source is not energized and the DC disconnect switch is OFF. Important: A 30A branch breaker (not provided) is required to connect between the AC source and the Inverter-Charger. Remove AC compartment cover by unscrewing the two screws located at the front of the AC compartment cover. Connect the AC Input L wire between the unit s AC Input port and the branch breaker terminal. Connect the AC Input N wire between the unit s AC Input port and the AC source N terminal. Page 7

8 AC Output Connections: CAUTION: Please be sure that the AC Input source is not energized before making any AC Input and Output connection and that the DC disconnect switch is turned OFF. The AC Output connection has three types of configurations: 1) Use of the provided GFCI AC socket for AC load: This configuration does not require AC Output installation. Plug in the AC load to the provided GFCI output socket. During the by-pass mode, the AC output is limited to 20A for 2000W model (32326). 2) Hardwire AC Output with GFCI protection: This configuration is for AC hardwire connection with a load that requires GFCI protection. During by-pass mode, the AC output is limited to 20A for 2000W model (32326). Remove AC compartment cover located on the front panel of the unit. Hardwire the AC load to the AC Output port 2. Please verify the L and N connection between the AC load and the AC Output port. 3) Hardwire AC Output without GFCI protection: This configuration is for AC hardwire connection with a load that does not require GFCI protection and maximizes the by-pass mode current to the rating of the branch breaker installed (maximum 30A). Remove AC compartment cover located on the front panel of the unit. Hardwire the AC load to the AC Output port 1. Please verify the L and N connection between the AC load and the AC Output port. Note: During Battery Power Mode, all AC output is limited to 16.6A for 2000W model (32326). Remote Display Connection: The Remote Display on the unit is detachable. To install the remote to different location, an optional 6 pin standard RJ12 cable (not provided) is required. Remove the 2 screws at the front of the Display Panel and remove the small RJ12 cable. Install the optional RJ12 standard cable to your desired location. Please note polarity. Connect one end of the RJ12 cable to the unit and the other end of the cable to the Display Panel. Please note polarity. Test the Inverter-Charger connection: Switch DC disconnect switch to ON. Switch the Branch circuit breaker to ON. The LED on display will turn on. If AC input source is available, Status LED turns green. This indicates the unit is running in by-pass mode meaning AC output is running from the AC input source. LED located at the GFCI will also turn ON Disconnecting the AC input source by turning OFF the 30A branch breaker will change the Status LED on the Display to amber. Both AC output and 5V USB are now available. Plug in a small AC load like a 40W table lamp or small appliance to the AC socket to verify AC is available. The unit is successfully installed and functioning properly. Test the GFCI monthly: Use the following instruction to perform a monthly test of the GFCI to ensure the GFCI is functioning properly. Turn unit on and plug a small AC load (e.g. 40W light bulb) to the GFCI. Check that the AC load is ON. Press Test button and observe a clicking sound. Check that the AC load is turned off. Press RESET button and check that the AC load is back ON again. Page 8
 Hardwire AC Output with GFCI protection: This configuration is for AC hardwire connection with a load that requires GFCI protection.")
9 4. UNIT OPERATION Auto Backup Mode (Factory default setting): The unit is fully automatic. When utility power is available, the unit is running in AC bypass mode. AC output is supplied from the utility. The internal AC charger is ON and will automatically top up the battery bank that is connected to the unit. When there is a power failure from the utility or an AC source is not available, the unit will run on battery power and the unit will generate sinewave AC output to maintain and operate the load continuously. Non-Backup Mode Same as Auto Backup Mode but when there is a power failure of the utility or the AC input source is not available, the inverter will not turn ON automatically. You are required to manually turn ON the inverter. Understanding the Display Function: Status LED Display LED Display Function/Status Green (solid) Green Ful By-Pass Mode. Battery is fully charged Green (flashing) OFF bul By-Pass Mode. Battery charging in progress and is in BULK mode OFF abs By-Pass Mode. Battery charging in progress and is in ABSORPTION mode Amber (solid) Green 12.5 Battery Mode, inverter is running, display shows battery voltage in DC volts Amber 0.80 Battery Mode, inverter is running, display shows output power in kw (800W as shown) Amber (flashing) Battery Mode and AC Input is detected and AC output will switch to By- Pass mode within 20 seconds Red (solid) OFF E01-E12 Unit has shutdown. Display shows error code (See error code reference chart below) Understanding the Power and Select push button function A beep sound will occur every time when the Power or Select button is trigger. Power button function: Turns unit On/Off. Press and hold for 1 second to turn unit ON or OFF Select button function: Check unit setting: Press once to check or verify unit s present set functions Page 9

10 Understanding the Error Code Code Condition Corrective Action E01 Input battery voltage is too low and unit has shutdown Recharge battery immediately and restart unit E02 Input battery voltage is too high and unit has shutdown Check battery voltage or determine if any external charger is connected to the battery bank E03 AC output is overloaded or short Check load connected to the output. E04 circuited and unit has shutdown Internal temperature is too high and unit has shutdown Reduce load and restart the unit Turn unit off and wait for 15 minutes before restarting. Check if any object has blocked the air flow of the unit E05 Input battery voltage is low and warning occurs Recharge battery as unit will shutdown shortly E06 AC output has sensed high and is Reduce load close to shutdown limit E07 Internal temperature is high and is close to shutdown limit Reduce load and check if any ventilation of the unit is blocked E08 Not used E09 Not used E10 Battery Charging voltage too high Check battery setting E11 Battery bad Battery did not accept charge E12 Internal transfer switch temperature is high and shutdown occurs Reduce load and check if any ventilation of the unit is blocked AC Load on Inverter Although the Power Inverter can provide high surge power up to two times the rated output power, some high surge loads like sump-pumps, heavy duty motors etc. may still trigger the inverter protection system even though the load falls within the power rating of the inverter. A higher power Inverter-Charger is required for these appliances. Estimate Run time on Load Following run times are estimates for reference, based on using different battery bank sizes. Actual run times may vary. Estimate run time on different 12V Battery Bank Size 60AH 120AH 180AH 240AH 300AH AC Load 50 W 11 hrs. 22 hrs. 33 hrs. 44 hrs. 55 hrs. 100 W 5 hrs hrs. 17 hrs. 23 hrs. 29 hrs. 200 W 2.5 hrs. 5 hrs. 8 hrs. 11 hrs hrs. 500 W 49 mins 2 hrs. 3 hrs. 4 hrs. 5 hrs W 15 mins 49 mins 1.5 hrs. 2 hrs. 2.5 hrs W 8 mins 27 mins 49 mins 1 hr 1.5 hrs 2000 W N.R. 15 mins 34 mins 49 mins 1 hrs 2500 W N.R. 11 mins 25 mins 37 mins 49 mins 3000 W N.R. N.R. 17 mins 27 mins 37 mins Note: N.R. - Not Recommended Page 10

11 5. FEATURE SETTING To understand more about the unit features, read the following section and follow the instructions to make changes to the desired setting. Default Factory Setting: In (Inverter): In1- inverter enabled in standby mode with load sense off Cu (Charger): 55A charger enabled (55A for 32326) AL (Alarm): AL1 alarm enabled Sd (UV shutdown): SdL Under voltage shutdown set to low setting bat (Battery type): FLo Flooded typed Cb (Maximum current): Cb3 Maximum Shore Power Current draw is 30A Understanding the Unit Settings Inverter Setting In0 Inverter is disabled, unit will not provide backup function when utility power is not available In1 Inverter is set to standby mode with power save mode OFF. Unit will provide backup function when utility power is not available In2 Inverter is set to standby mode with power save mode ON. Unit will provide backup function only when utility power is not available AND the load connected to the output is >10W. Note: Unit will turns ON every 10 s to check on the power consumption. Charger Current Setting 5A 40A 5A 55A Bulk/Float current setting: 32326: 5A/1.5A, 15A/3A, 35A/4A, 55A/6A Battery Type and Voltage Setting (Bulk/Absorption/Float) FLo Flooded: 14.4V / 14.4V / 13.5V GEL GEL: 14.2V / 14.2V / 13.8V AG AGM: 14.3V / 14.3V / 13.4V Fi Fixed: 13.5 Vdc fixed voltage Battery Under Voltage Setting SdL Battery under voltage setting is set to LOW (setting used for normal operation) Under voltage alarm: 11.0 Vdc Under voltage alarm recovery: 11.3 Vdc Under voltage shutdown: 10.5 Vdc Under voltage recovery: 12.0 Vdc SdH Battery under voltage setting is set to HIGH (setting to avoid battery over discharge when connected to car start battery) Under voltage alarm: 12.1 Vdc Under voltage alarm recovery: 12.3 Vdc Under voltage shutdown: 11.8 Vdc Under voltage recovery: 12.6 Vdc Alarm Setting AL0 Fault and warning audible alarm is disabled. Display panel only shows error code and audible alarm will not sound. AL1 Audible alarm will sound when fault or warning occurs. Maximum Shore Power Current Draw Setting AC Load Current Charger Current Cb1 Set the maximum current draw from shore power to 15A. The maximum current draw from unit is set to match with the shore power circuit breaker rating to avoid tripping of the shore power circuit breaker during the by-pass mode. Battery charging current will automatically reduce when there is a high demand on AC load during the by-pass mode. >11Aac 5 Adc Page 11

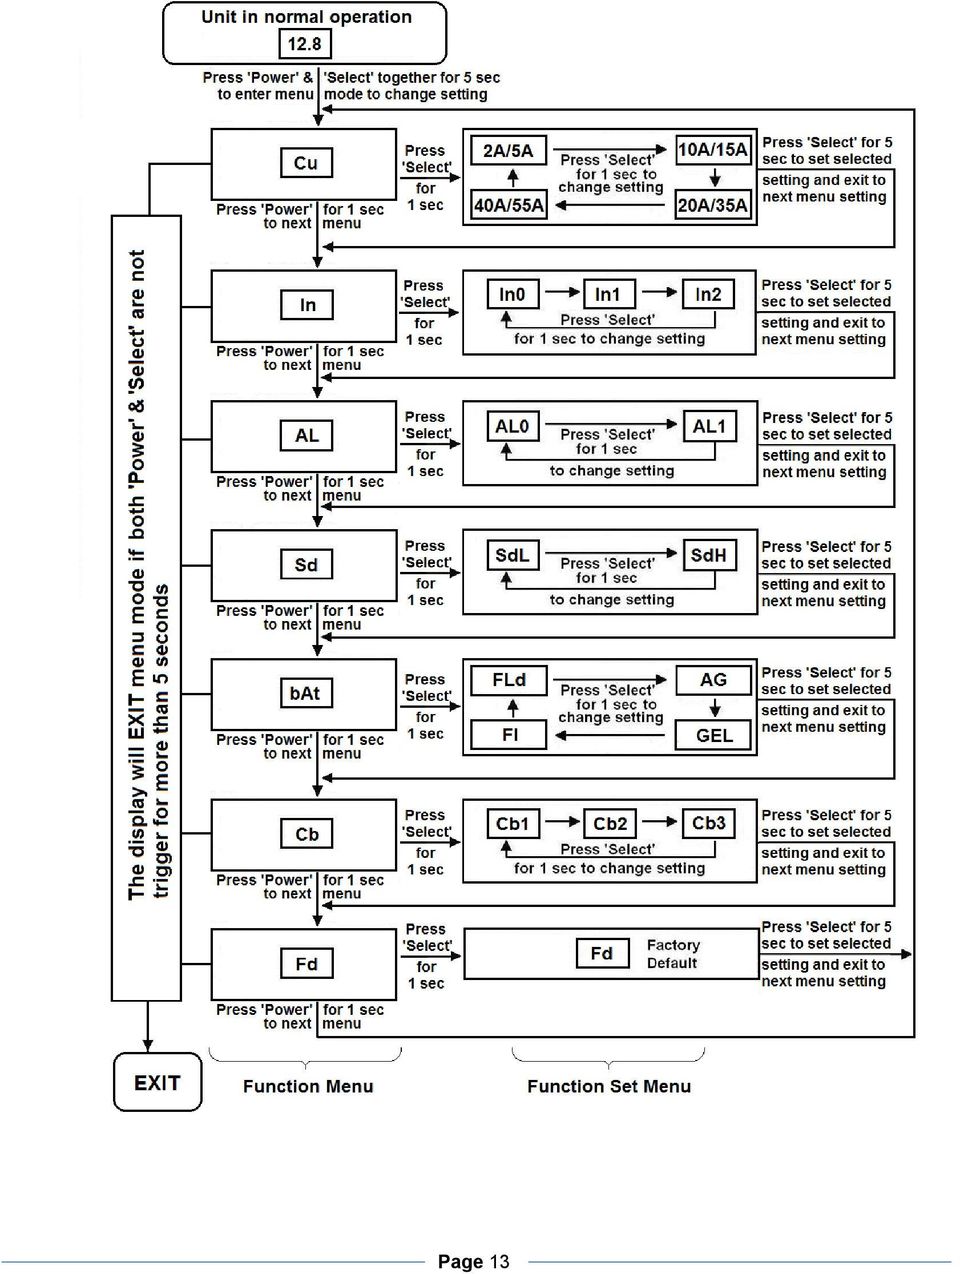
12 Cb2 Cb3 Fd >6Aac and <11Aac 15 Adc >1Aac and <6Aac 35 Adc <1Aac 55 Adc Same as above. Set the maximum current draw from shore power is 20A >16Aac 5 Adc >11Aac and <16Aac 15 Adc >6Aac and <11Aac 35 Adc <6Aac 55 Adc Same as above. Set the maximum current draw from shore power is 30A >26Aac 5 Adc >21Aac and <26Aac 15 Adc >16Aac and <21Aac 35 Adc <16Aac 55 Adc Manufacturing Default Setting Reset all settings to manufacturing default settings (55A for 32326, In1, AL1, SdL, Flo, Cb3) Understanding the Charger De-rating Current: The charger current will be de-rated when the environment temperature reaches 60 C (140 F) or the internal temperature reaches the pre-set values. Unit De-rated Values Internal Temperature >90 C (194 F) Maximum charger will de-rated to half >95 C (203 F) Charger current reduced to 5A <85 C (185 F) Charger current recover back to set value Environment Temperature >60 C (140 F) Charger current reduced to 5A >55 C (131 F) Charger current recover back to set value Enter Function Menu for unit setting: To enter unit Function Menu, press and hold Power and Select button together for about 5 seconds until a beep is sounded. When you are in Function Menu: Press Power button for 1 second to toggle between different Functions Menu like Cu, In, AL, Sd, bat, Cb and Fd etc. Press Select button for 1 second to enter Individual Function Set Menu and you can make change to the settings. The unit will EXIT the Main Menu automatically if Power and Select buttons is not trigger for more than 5 seconds. When you are in Individual Function Set Menu: Press Select button for 1 second to toggle between different setting values. Press Select button for 5 seconds to set selected setting and exit to next Main Menu See more details on flow chart below. Page 12
 Understanding the Charger De-rating Current: The charger current will be de-rated when the environment temperature reaches 60 C (140 F) or")
13 Page 13
14 6. TROUBLESHOOTING To troubleshoot the unit, please note the error code displayed on the main unit and review Understanding the Error Codes in section 4. Problem Symptom Solution No output voltage. And The unit is off Turn unit ON by following the instruction in Section 4 to turn unit ON Status LED is off. No power to unit Check DC fuse, Disconnect switch (if installed) and check if Branch breaker is No AC output. Status LED is Green No Output. Status LED is in Amber 7. SPECIFICATIONS GFCI is tripped GFCI is tripped Check error code on display Check AC Load Sense setting Note: Specifications are subject to change without notices. either blown or turned OFF Check load and reset the GFCI Check load and reset the GFCI Verify the error condition and make correction AC Load connected must be below the AC Load sense setting Specification Inverter AC Output Power 2000W AC Output Current 16.6A AC Surge Power (Peak) 4000W AC Output Voltage/Frequency 120 VAC / 60 Hz AC Output Waveform Sinewave (<3% THD) Nominal DC Input Voltage 12.5 VDC No Load battery draw < 1.5 ADC DC Input Voltage operating range VDC Under Voltage Alarm 11.0/12.1 VDC Under Voltage Alarm Recovery 11.3/12.3 VDC Under Voltage Shutdown 10.5/11.8 VDC Under Voltage Recovery 12.0/12.6 VDC Over Voltage Shutdown 15.5 VDC USB USB Port 5V, 750 ma AC Transfer Switch Transfer Time < 30 ms Transfer Relay Rating 30A AC Input Source Setting 15, 20, 30A AC Output Port 1 (HW Connector) 30A AC Output Port 2 (HW Connector, GFCI, CB) 20A AC Output Port 3 (GFCI & CB) 20A Display Display Panel Port RJ12 Inverter Mode Input Voltage, Output Power Charger Mode Status & Battery voltage Charger Charging Voltage Range VDC Float Voltage Range VDC Charger Current (max) 55 ADC Charger Current Setting 5,15,35,55 Page 14

 Storage Temperature -20 C to 60 C (-4 F to 140 F) Relative Humidity 5-90% noncondensing Operating Altitude Up to 9,843ft")
15 Battery Type Gel, Flooded, AGM, Fixed Charge Control Bulk/Absorption/Flooded Efficiency >80% Safety and Environmental Conformance Conforms to UL 458 Certified to CSA C22.2 no Agency Markings cetlus Operating Temperature 0 C to 40 C (32 F to 104 F) Storage Temperature -20 C to 60 C (-4 F to 140 F) Relative Humidity 5-90% noncondensing Operating Altitude Up to 9,843ft (3000m) above sea level Weights and Dimensions Weights 38326: 14.5 lbs (6.6 kg) Dimensions 9.0 x 18.8 x 4.5 ( 230 x 478 x 114 mm) 8. WARRANTY One Year Limited Warranty The limited warranty program is the only one that applies to this unit, and it sets forth all the responsibilities of Nature Power. There is no other warranty, other than those described herein. Any implied warranty of merchantability of fitness for a particular purpose on this unit is limited in duration to the duration of this warranty. This unit is warranted, to the original purchaser only, to be free of defects in materials and workmanship for one year from the date of purchase without additional charge. The warranty does not extend to subsequent purchasers or users. Manufacturer will not be responsible for any amount of damage in excess of the retail purchase price of the unit under any circumstances. Incidental and consequential damages are specifically excluded from coverage under this warranty. This unit is not intended for commercial use. This warranty does not apply to damage to units from misuse or incorrect installation/connection. Misuse includes wiring or connecting to improper polarity power sources. If you are experiencing any problems with your unit, please contact our customer service department at info@naturepowerproducts.com or Phone before returning product to retail store. After speaking to a customer service representative, if products are deemed non-working or malfunctioning, the product may be returned to the purchasing store. If such a unit is returned less than one year from the purchase date, manufacturer will repair the unit or, at its discretion, replace it, free of charge. If the unit is repaired, new or reconditioned replacement parts may be used, at manufacturer s discretion. A unit may be replaced with a new or reconditioned unit of the same or comparable design. The repaired or replaced unit will then be warranted under these terms for the remainder of the warranty period. The customer is responsible for the shipping charges on all returned items. Limitations: This warranty does not cover accessories, such as adapters and batteries, damage or defects result from normal wear and tear (including chips, scratches, abrasions, discoloration or fading due to usage or exposure to sunlight), accidents, damage during shipping to our service facility, alterations, unauthorized use or repair, neglect, misuse, abuse, failure to follow instructions for care and maintenance, fire and flood. Nature Power Inverters are Made in China. Customer Service: Info@naturepowerproducts.com Website: Page 15

Home Solar Kit 1800. Owner s Manual. Model: HS 1800-60
 Home Solar Kit 1800 Owner s Manual Model: HS 1800-60 1. INTRODUCTION Thank you for purchasing the KISAE Home Solar Kit. With our state of the art, easy to use design, this product will offer you reliable
Home Solar Kit 1800. Owner s Manual. Model: HS 1800-60
 Home Solar Kit 1800 Owner s Manual Model: HS 1800-60 For safe and optimum performance, the Home Solar Kit must be used properly. Carefully read and follow all instructions and guidelines in this manual
AM/FM Emergency Weather Radio/Light With Hand Crank Back-Up Power
 VEC173 ONE YEAR LIMITED WARRANTY PROGRAM This limited warranty program is the only one that applies to this product, and it sets forth all the responsibilities of Vector Manufacturing, regarding this product.
12 Volt 30 Amp Digital Solar Charge Controller
 12 Volt 30 Amp Digital Solar Charge Controller User s Manual WARNING Read carefully and understand all INSTRUCTIONS before operating. Failure to follow the safety rules and other basic safety precautions
user s manual Battery Case model #: SPB3200 Battery Case Charger for Samsung Galaxy S 4
 user s manual model #: SPB3200 Charger for Samsung Galaxy S 4 What s Included Unpack the battery case and make sure all accessories are put aside so they will not be lost. hello. USB to Micro USB Cable
Wireless Indoor/ Outdoor Thermometer
 Wireless Indoor/ Outdoor Thermometer Owner s Manual Please read before using this equipment. ˆ Contents FCC Information... 3 FCC Declaration of Conformity... 5 Preparation... 5 Installing Batteries...
User s Manual Before using the inverter, you need to read and save the safety instructions.
 User s Manual Before using the inverter, you need to read and save the safety instructions. STI SERIES (STI200, STI300, STI500, STI700, STI1000) Power Frequency Pure Sine Wave Inverter The information
How To Use A Power Supply Unit (Upu)
") BRAVER UPS (Uninterruptible Power System) User s Manual Safety CAUTION! This UPS utilizes voltages that may be hazardous. Do not attempt to disassemble the unit. The unit contains no user replaceable parts.
BRAVER UPS (Uninterruptible Power System) User s Manual Safety CAUTION! This UPS utilizes voltages that may be hazardous. Do not attempt to disassemble the unit. The unit contains no user replaceable parts.
Mini Power Bank and Charger
 Mini Power Bank and Charger Owner s Manual Please read before using this equipment. Your charger is ETL listed to UL standards and meets all applicable FCC standards. WARNING: To reduce the risk of fire
Battery Power Inverters
 Battery Power Inverters Renogy 500W 1000W 2000W Pure Sine Wave Inverter Manual 2775 E. Philadelphia St., Ontario, CA 91761 1-800-330-8678 1 Version 1.1 Important Safety Instructions Please save these instructions.
This equipment has been tested and found to comply with the limits for a Class B digital device, pursuant to part 15 of the FCC Rules.
 Power Max Level 2 Charging Station en Installation and Operating Instructions This equipment has been tested and found to comply with the limits for a Class B digital device, pursuant to part 15 of the
3000W Power Inverter
 3000W Power Inverter OWNER S MANUAL Model number-4573000 TO REDUCE THE RISK OF INJURY, USER MUST READ AND UNDERSTAND THIS INSTRUCTIONAL MANUAL. THIS MANUAL CONTAINS IMPORTANT INFORMATION REGARDING THE
VLT Series 300 Watt True Sine Wave Inverter
 VLT Series 300 Watt True Sine Wave Inverter PURE SINE WAVE INVERTER I ON 0 OFF REMOTE CONTROL AC OUTPUT POWER STATUS Vout Vin Models VLT12-300 VLT24-300 300 Watt VLT Series Inverter - 1 - TABLE OF CONTENTS
Installation/Operator Manual For use with WFCO ULTRA III Power Center Model WF-8712P and WF-8725P
 Installation/Operator Manual For use with WFCO ULTRA III Power Center Model WF-8712P and WF-8725P Distributed in the U.S.A. and Canada by CHENG USA, INC. Sales (574) 294-8997 Warranty Service (877) 294-8997
XC120 XC180. Owner's Guide Conforms to / Conforme à UL std. 458, Toll Free 1 866 295 6775. www.powerbright.com
 WARNING: This Unit employs Components that tend to produce arcs or sparks To prevent fire or explosion, do not install in compartments containing batteries or flammable materials - SHOCK HAZARD. DO NOT
Weather Radio Alarm Clock
 1200093 User s Guide Weather Radio Alarm Clock Thank you for purchasing your Weather Radio Alarm Clock from RadioShack. Please read this user s guide before installing, setting up, and using your new weather
Residential Gateway (RG) Battery Backup REV B
 Battery Backup REV B") Residential Gateway (RG) Battery Backup REV B Save this user manual This manual contains important instructions regarding the installation and operation of this device. Read this manual thoroughly before
Residential Gateway (RG) Battery Backup REV B Save this user manual This manual contains important instructions regarding the installation and operation of this device. Read this manual thoroughly before
Online UPS. PowerWalker VFI 1000R/1U
 Online UPS PowerWalker VFI 1000R/1U Manual Uninterruptible Power Supply System Table of Contents 1. Important Safety Warning... 1 1-1. Transportation... 1 1-2. Preparation... 1 1-3. Installation... 1 1-4.
User s Manual AURORA 1.2K/2.2K
 User s Manual AURORA 1.2K/2.2K Uninterruptible Power System Safety CAUTION This UPS utilizes voltages that may be hazardous. Do not attempt to disassemble the unit. The unit contains no user serviceable
OWNER'S MANUAL. Model 20-1050CUL AC Power Inverter/Charger System OM/A96283 REV. A
 OWNER'S MANUAL Model 20-1050CUL AC Power Inverter/Charger System OM/A96283 REV. A Table of Contents Section 1 Introduction... 1 Section 2 Installing the 20-1050CUL... 4 Section 3 Installing the IFM1 Interface
Installation and Operation Manual Back-UPS BX800CI-AS/BX1100CI-AS
 + Installation and Operation Manual Back-UPS BX800CI-AS/BX1100CI-AS Inventory Safety and General Information bu001c This unit is intended for indoor use only. Do not operate this unit in direct sunlight,
Daker DK 1, 2, 3 kva. Manuel d installation Installation manual. Part. LE05334AC-07/13-01 GF
 Daker DK 1, 2, 3 kva Manuel d installation Installation manual Part. LE05334AC-07/13-01 GF Daker DK 1, 2, 3 kva Index 1 Introduction 24 2 Conditions of use 24 3 LCD Panel 25 4 Installation 28 5 UPS communicator
7 High-Resolution Digital Photo Frame
 TM 16-1003 User s Guide 7 High-Resolution Digital Photo Frame One demo photo included, as illustrated Please read this user s guide before using your new photo frame. Package contents Photo Frame AC Adapter
Installation and Operating Instructions (for chargers shown below)
") Installation and Operating Instructions (for chargers shown below) For additional information please call our Technical Support Group 800.742.2740 PRO CHARGING SYSTEMS, LLC 1551 Heil Quaker Boulevard,
Installation and Operating Instructions (for chargers shown below) For additional information please call our Technical Support Group 800.742.2740 PRO CHARGING SYSTEMS, LLC 1551 Heil Quaker Boulevard,
Amps Per Bank. Total Output. Battery System. Model Name. 6 amps 12 amps 10 amps 20 amps 30 amps 40 amps 15 amps 30 amps 45 amps
 Model Name Total Output Amps Per Bank Battery System Pro XL Dual Pro XL Pro SE Dual Pro SE Three Bank Pro SE Four Bank Pro SE Pro Charger Dual Pro Charger Three Bank Pro Charger 6 amps 12 amps 10 amps
Alarm Clock USER GUIDE
 Alarm Clock USER GUIDE Jazwares, Inc. 2012 CONTENTS Please read the instructions along with the Alarm Clock carefully before you use it, so that you can operate it conveniently. WELCOME & Warnings Page
USER S MANUAL. MaxPower 400-600 UPS. Uninterruptible Power System 28-2MAXPO0018
 USER S MANUAL MaxPower 400-600 UPS Uninterruptible Power System 28-2MAXPO0018 IMPORTANT SAFETY INSTRUCTIONS SAVE THESE INSTRUCTIONS This manual contains important instructions for models MaxPower 400 and
Installation and Operation Back-UPS 1250, 1300, 1500
 Installation and Operation Back-UPS 1250, 1300, 1500 Inventory bu001a Safety and General Information This unit is intended for indoor use only. Do not operate this unit in direct sunlight, in contact with
3 WATT LED SPOTLIGHT Model No. SLM - 3801
 3 WATT LED SPOTLIGHT Model No. SLM - 3801 OWNER'S MANUAL Customer Service Tel: 1-800-268-3319 Superex Canada Ltd, Toronto,M2H 3B8 Made in China Table of Contents A). Important Safety Instructions B). Charging
ST Series POWER SUPPLIES USER INSTRUCTIONS
 Introduction These instructions detail the installation and operation requirements for the ST20 & ST35 power supplies. These have been designed for operation in RV s providing a DC power system, with optional
Advantium 2 Plus Alarm
 ADI 9510-B Advantium 2 Plus Alarm INSTALLATION AND OPERATING INSTRUCTIONS Carefully Read These Instructions Before Operating Carefully Read These Controls Corporation of America 1501 Harpers Road Virginia
User Manual 1K/2K/3K Online UPS
 User Manual 1K/2K/3K Online UPS Uninterruptible Power Supply System Table of Contents 1. Important Safety Warning... 1 1-1. Transportation... 1 1-2. Preparation... 1 1-3. Installation... 1 1-4. Operation...
NEWTECH PRO 1-2-3 KVA ONLINE UNINTERRUPTIBLE POWER SUPPLY USER MANUAL
 NEWTECH PRO 1-2-3 KVA ONLINE UNINTERRUPTIBLE POWER SUPPLY USER MANUAL info@tuncmatik.com / www.tuncmatik.com Table of Contents 1. Important Safety Warning 2 1-1. Transportation 2 1-2. Preparation 2 1-3.
Back-UPS Pro 1300/1500 Installation and Operation
 Back-UPS Pro 1300/1500 Installation and Operation Inventory Safety Do not install the Back-UPS in direct sunlight, in excessive heat, humidity, or in contact with fluids. Connect the battery bu059a bu058a
User Manual. Hybrid 1KW-5KW INVERTER / CHARGER. Version: 1.1
 User Manual Hybrid 1KW-5KW INVERTER / CHARGER Version: 1.1 Table of Contents ABOUT THIS MANUAL... 1 Purpose... 1 Scope... 1 SAFETY INSTRUCTIONS... 1 INTRODUCTION... 2 Product Overview... 3 INSTALLATION...
CHARGING SYSTEMS INTERNATIONAL
 CHARGING SYSTEMS INTERNATIONAL INSTALLATION AND OPERATING INSTRUCTIONS FOR THE FOLLOWING BATTERY CHARGING SYSTEMS: MODELS MAX AMPS/BANK NO. OF BANKS BATTERY SYSTEM PRO XL 6 1 12 DUAL PRO XL 6 2 12/24 PRO
OWNER S MANUAL. Model AE150/AE300/AE500 1.5AMP MULTI-USE SMART BATTERY CHARGER READ ENTIRE MANUAL BEFORE USING THIS PRODUCT
 Model AE150/AE300/AE500 MULTI-USE SMART BATTERY CHARGER Certified by Californiia BCS Regulations AE300E AE500E 5AMP MULTI-USE AUTOMOTIVE BATTERY CHARGER 3AMP MULTI-USE SMART BATTERY CHARGER AE500E 5AMP
Operation Manual. Smart-UPS C. Uninterruptible Power Supply. Tower 1000/1500 VA. 120/230 Vac. su0813a
 Operation Manual Smart-UPS C Uninterruptible Power Supply Tower 1000/1500 VA 120/230 Vac su0813a Product Description The APC by Schneider Electric Smart-UPS is a high performance uninterruptible power
Installation and Operation Guide for PD4100 Series Power Control Centers
 Installation and Operation Guide for PD4100 Series Power Control Centers Extended warranties are available for purchase at www.progressivedyn.com Member Thank you for selecting Progressive Dynamics as
Alarm Clock USER GUIDE
 Alarm Clock USER GUIDE Jazwares, Inc. 2010 1 CONTENTS Please read the instructions along with the alarm clock carefully before you use it, so that you can operate it conveniently. WELCOME, Safety Tips
BTX180 Wireless Bluetooth Speaker
 BTX180 Wireless Bluetooth Speaker User Manual 2012 Kinivo LLC. All rights reserved. Kinivo is a trademark of Kinivo LLC. Bluetooth word mark and the Bluetooth logo are registered trademarks of Bluetooth
User Guide. Soft-Touch TM Bluetooth Laser Mouse N2953
 Soft-Touch TM Bluetooth Laser Mouse 410-XXXXXXXXXXX 1 YEAR LIMITED WARRANTY: We pride ourselves on the quality of our products. For complete warranty details and a list of our worldwide offices, please
NFC Communication Tray Model: HHX-IT3-Z
 INSTRUCTION MANUAL NFC Communication Tray Model: HHX-IT3-Z ENGLISH CONTENTS Introduction...3 Important safety information...4 Know your unit...6 Transferring data to the PC...7 Care and maintenance...8
2GB MP3 Player USER GUIDE
 DO NOT FORMAT UNIT under FAT. 2GB MP3 Player USER GUIDE Jazwares, Inc. 2010 CONTENTS Please read the instructions along with the MP3 Player carefully before you use it, so that you can operate it conveniently.
Atomic Alarm Clock model 13131W2
 Instruction Manual Atomic Alarm Clock model 13131W2 CONTENTS Unpacking Instructions... 2 Package Contents... 2 Product Registration... 2 Features & Benefits... 3 Clock Setup... 4 Atomic Clock... 5 Set
StructureScan HD Module. Installation Guide ENGLISH. www.bandg.com www.simrad-yachting.com www.lowrance.com
 StructureScan HD Module Installation Guide ENGLISH www.bandg.com www.simrad-yachting.com www.lowrance.com Disclaimer As Navico is continuously improving this product, we retain the right to make changes
Installation and Operating Instructions (for chargers shown below)
") Installation and Operating Instructions (for chargers shown below) For additional information please call our Technical Support Group 800.742.2740 PRO CHARGING SYSTEMS, LLC 1551 Heil Quaker Boulevard,
Installation and Operating Instructions (for chargers shown below) For additional information please call our Technical Support Group 800.742.2740 PRO CHARGING SYSTEMS, LLC 1551 Heil Quaker Boulevard,
Back-UPS 650 VA 120 V with AVR (BX650CI-LM)
") Back-UPS 650 VA 120 V with AVR (BX650CI-LM) Overview Do not install the unit in direct sunlight, in areas of excessive heat or humidity, or in contact with fluids ON/OFF button Battery connector Circuit
Back-UPS 650 VA 120 V with AVR (BX650CI-LM) Overview Do not install the unit in direct sunlight, in areas of excessive heat or humidity, or in contact with fluids ON/OFF button Battery connector Circuit
ITC-BTTN Cellular Bluetooth Gateway. Owner s Manual 1
 ITC-BTTN Cellular Bluetooth Gateway Owner s Manual 1 2 Table of Contents Introduction...3 Package Contents...3 XLink Connections Diagram...4 Setup...5 Pairing your Bluetooth Cell Phone to the XLink...6
2013 VTech Printed in China 91-009656-000 US
 Rechargeable Power Pack User s Manual 2013 VTech Printed in China 91-009656-000 US INTRODUCTION The Rechargeable Power Pack makes it easier than ever to keep the InnoTab 3 or InnoTab 3S charged and ready
Installation and Operation Guide for PD4000 Series Power Control Center
 Extended warranties are available for purchase at www.progressivedyn.com Installation and Operation Guide for PD4000 Series Power Control Center Member Thank you for selecting Progressive Dynamics as your
Solar Home System. User Manual. AEH-SHS01-10W2L Solar Home System 2 Lamps
 Solar Home System User Manual AEHSHS0110W2L Solar Home System 2 Lamps All rights reserved Specifications subject to change without prior notice 2 Dear Customer, Thank you for purchasing Schneider Electric
MANUAL. * Supply plugs may differ to suit your wall socket. EN 3. Continue to press the MODE-button to combine charging program with charging options.
 MX MANUAL CONGRATULATIONS to the purchase of your new professional switch mode battery charger. This charger is included in a series of professional chargers from CTEK SWEDEN AB and represents the latest
4.3-inch Back-Up Camera
 TM 4.-inch Back-Up Camera Model No.: PKC0BU4 Owner s Manual and Warranty Information Read these instructions completely before using this product. Retain this Owner s Manual for future reference. INTRODUCTION
Manual Ranging MultiMeter
 Owner s Manual Manual Ranging MultiMeter Model 82345 CAUTION: Read, understand and follow Safety Rules and Operating Instructions in this manual before using this product.! Safety! Operation! Maintenance!
12 Volt 30 Amp Digital Solar Charge Controller Installation & Operation Manual
 12 Volt 30 Amp Digital Solar Charge Controller Installation & Operation Manual This 30Amp charge controller is designed to protect your 12Volt Lead-acid or Gel-cell battery from being overcharge by solar
www.ringautomotive.co.uk Instructions: Retain these instructions for future reference SmartChargePro35 RSCPR35-12v, 2 / 8 / 16 / 35A
 SmartChargePro7 RSCPR7-12v, 7A SmartChargePro10 RSCPR10-12v, 10A SmartChargePro15 RSCPR15-12v, 15A SmartChargePro25 RSCPR25-12v, 2 / 6 / 12 / 25A SmartChargePro35 RSCPR35-12v, 2 / 8 / 16 / 35A SmartChargePro50
READ FIRST! Universal Car/Air Adapter User Manual
 AutoAir Manual 1/9/03 2:03 PM Page 1 READ FIRST! Universal Car/Air Adapter User Manual Congratulations! Your new Kensington Universal Car/Air Adapter is a highly efficient Universal Car/Air Adapter for
Installation & Operation Manual
 GET CONNECTED Installation & Operation Manual DEVICE INTEGRATION AND CHARGING KIT TranzIt USB IS32 Note to Readers, The information contained within the following documentation is subject to change without
Model 70A00-1. GSM Cellular Communications Center
 Home Automation, Inc. Model 70A00-1 GSM Cellular Communications Center Operation Manual Document Number 70I00-1 Rev A August, 2009 Contents Description... 1 Use with security systems...1 Everyday use...2
BroadBand PowerShield. User Manual
 BroadBand PowerShield User Manual 990-0375G 12/2006 Chapter 1 General Information The PowerShield provides a power source for broadband telephony and other DC applications. Safety This Safety Guide contains
MCR1900 Media Converter 19-Slot Chassis
 MCR1900 Media Converter 19-Slot Chassis Installation Guide Part #5500304-11 Copyright Statement This document must not be reproduced in any way whatsoever, either printed or electronically, without the
HM-W536 Install Guide
 HM-W536 Install Guide 9/13/2013 IMPORTANT SAFETY INSTRUCTIONS Warning - When using electrical devices, basic safety precautions should be followed to reduce the risk of fire, electrical shock or injury.
Powerware 5110 UPS User s manual
 Powerware 5110 UPS 2005 Eaton Corporation All Rights Reserved The contents of this manual are the copyright of the publisher and may not be reproduced (even extracts) unless permission granted. Every care
Owner s Manual. Not suitable for mobile applications. Important Safety Instructions 2. Quick Installation 3. Basic Operation 4. Storage & Service 7
 Register online today for a chance to win a FREE Tripp Lite product! www.tripplite.com/warranty Owner s Manual Internet Office & BC Personal UPS Systems Not suitable for mobile applications. Important
OWNER S MANUAL 2.5/3.0 ACS PANEL (ADVANCED CONTROL SYSTEM) 7725 Lougheed Highway Burnaby, BC V5A 4V8 Canada
 7725 Lougheed Highway Burnaby, BC V5A 4V8 Canada") 2.5/3.0 ACS PANEL (ADVANCED CONTROL SYSTEM) OWNER S MANUAL 7725 Lougheed Highway Burnaby, BC V5A 4V8 Canada Tel: (604) 420-1585 Fax: (604) 420-1591 http:// www. statpower.com PROsine 2.5/3.0 ACS Panel
2.5/3.0 ACS PANEL (ADVANCED CONTROL SYSTEM) OWNER S MANUAL 7725 Lougheed Highway Burnaby, BC V5A 4V8 Canada Tel: (604) 420-1585 Fax: (604) 420-1591 http:// www. statpower.com PROsine 2.5/3.0 ACS Panel
Troubleshooting Guide, Freedom and Fleet Power Inverter/Chargers
 Technical Note Freedom/Fleet Power 512-0084-01-01 Rev 1 Troubleshooting Guide, Freedom and Fleet Power Inverter/Chargers Overview This document is a guide for troubleshooting inverters, battery chargers,
Intelli-Time Alarm Clock model 13027
 Instruction Manual Intelli-Time Alarm Clock model 13027 CONTENTS Unpacking Instructions... 2 Package Contents... 2 Product Registration... 2 Features & Benefits... 3 Clock Setup... 4 Intelli-Time Clock...
Digital echo-charge. Owner s Manual. Xantrex Digital echo-charge Battery Charger
 Digital echo-charge Owner s Manual Xantrex Digital echo-charge Battery Charger Thank you for purchasing a Xantrex Digital echo-charge. Xantrex Technology Inc. takes pride in manufacturing quality products
DELORME. Getting Started with. Earthmate GPS BT-20. Bluetooth
 DELORME Getting Started with GPS BT-20 Bluetooth Earthmate Table of Contents Overview... 2 Hardware Features... 2 Using the Earthmate GPS BT-20... 3 Charging the Battery... 4 Troubleshooting... 4 Hardware
Model: 308-1412 Manual DC: 080215 WIRELESS COLOR FORECAST STATION
 Model: 308-1412 Manual DC: 080215 WIRELESS COLOR FORECAST STATION FRONT VIEW SENSOR TX141TH-Bv2 LED TX Sensor Battery Cover Sensor Battery Compartment 2 AA Buttons Battery Compartment 3 AAA BACK VIEW Battery
LS1024B / LS2024B/ LS3024B. Solar Charge Controller USER MANUAL
 EPSOLAR LS1024B / LS2024B/ LS3024B Solar Charge Controller USER MANUAL Thank you very much for selecting our product! This manual offers important information and suggestions with respect to installation,
Key. ➍ Micro USB Port ➎ Operating System Toggle Keys ➏ Foam Screen Protectors. ➊ On/Off switch ➋ Bluetooth Connect Button (flashes when searching)
") INSTRUCTION MANUAL ➏ ➋ ➊ Product Features ➎ ➍ ➌ Built-in wireless Bluetooth 3.0 keyboard Compatible across ios, Android, and Windows, enabling you to mix and match with devices Ultra-thin, lightweight
INSTRUCTION MANUAL ➏ ➋ ➊ Product Features ➎ ➍ ➌ Built-in wireless Bluetooth 3.0 keyboard Compatible across ios, Android, and Windows, enabling you to mix and match with devices Ultra-thin, lightweight
Match. GE Digital Energy. Uninterruptible Power Supply 500-1500 VA. Technology for the Digital World. Match UPS. GE Digital Energy.
 Match Uninterruptible Power Supply 500-1500 VA Manufactured by: General Electric Company Telephone +41 (0)91 / 850 51 51 CH 6595 Riazzino (Locarno) Fax +41 (0)91 / 850 51 44 Switzerland Website www.gedigitalenergy.com
FCC COMPLIANCE STATEMENT
 MEDIA CONVERTER Fiber to UTP Ethernet Media Converter ET90110SC ET90110ST Instruction Guide * Actual product may vary from photo Revised: December 6, 2002 The Professionals Source For Hard-to-Find Computer
BC-5000 OPERATIONS MANUAL BATTERY CAPACITY TESTER COFKO LLC.
 BC-5000 BATTERY CAPACITY TESTER OPERATIONS MANUAL COFKO LLC. COPYRIGHT 2010 1 UNPACKING As you unpack your new BC-5000 battery capacity tester, inspect the tester for signs of shipping damage. If shipping
Bluetooth Audio Receiver GDI-BTPB300. Quick Start Guide
 Bluetooth Audio Receiver GDI-BTPB300 Quick Start Guide 1. Before You Start Using Your 3play Bluetooth Audio Receiver Important Safety Instructions and Warnings Please read this user guide carefully before
Power supply unit Model: PAC-SC50KUA
 Building Air Conditioning Control System Power supply unit Model: PAC-SC50KUA Installation Manual Contents 1. Safety precautions... 1 2. Product feature... 2 1. Specification... 2 2. Appearance... 2 3.
POWER TO GET THE JOB DONE
 52720 1.5 AMP SLOW 12 VOLT BATTERY CHARGER OWNER S MANUAL KEEPS BATTERIES FULLY CHARGED IN STORAGE Automatic over-charging protection Short circuit protection Reverse hook-up protection Overheat protection
User Guide for the Wireless Headset (HS-11W) 9235346 Issue 1
 9235346 Issue 1") User Guide for the Wireless Headset (HS-11W) 9235346 Issue 1 DECLARATION OF CONFORMITY We, NOKIA CORPORATION declare under our sole responsibility that the product HS-11W is in conformity with the provisions
User Guide for the Wireless Headset (HS-11W) 9235346 Issue 1 DECLARATION OF CONFORMITY We, NOKIA CORPORATION declare under our sole responsibility that the product HS-11W is in conformity with the provisions
Instructions & Safety Information Models A220-20D and A220-20L Version 2
 Quick 220 Voltage Converting Power Supply Instructions & Safety Information Models A220-20D and A220-20L Version 2 Quick 220 Systems LLC PO Box 47489 Phoenix, Arizona 85068-7489 800-347-0394 602-938-6057
User Manual. RK-2d / RK-2t. dedicated KVM switch and rackmount screen technology. Designed and manufactured by Austin Hughes
 dedicated KVM switch and rackmount screen technology User Manual RK-2d / RK-2t 1U Short Depth Keyboard Drawer Designed and manufactured by Austin Hughes 751 Legal Information First English printing, October
EPM3. Phase Sequence and Motor Rotation Tester. Users Manual
 EPM3 Phase Sequence and Motor Rotation Tester Users Manual 1 L1 L2 L3 2 3 A B C CAT 600V 3-PHASE TESTER 5 TEST M1 M2 BATT M3 EPM3 MOTOR ROTATION TESTER EPM3 MOTOR ROTATION DETERMINED WHILE FACING MOTOR
Manual. Simrad StructureScan LSS-1 Sonar Module. English
 Manual Simrad StructureScan LSS-1 Sonar Module English www.simrad-yachting.com A brand by Navico - Leader in Marine Electronics Disclaimer As Navico is continuously improving this product, we retain the
AutoRanging Digital MultiMeter
 Owner's Manual AutoRanging Digital MultiMeter Model No. 82139 CAUTION: Read, understand and follow Safety Rules and Operating Instructions in this manual before using this product. Safety Operation Maintenance
12-Volt 10-Amp Regulated Power Supply
 22-506.fm Page 1 Friday, August 6, 1999 12:55 PM Cat. No. 22-506 OWNER S MANUAL Please read before using this equipment. 12-Volt 10-Amp Regulated Power Supply 22-506.fm Page 2 Friday, August 6, 1999 12:55
USER MANUAL Online UPS 1K/2K/3K Rack
 USER MANUAL EN Online UPS 1K/2K/3K Rack Uninterruptible Power Supply System Table of Contents 1. Important Safety Warning 2 1-1. Transportation 2 1-2. Preparation 2 1-3. Installation 2 1-4. Operation 2
Sense Components. Sense monitor. Antenna assembly. External mounting kit Current sensors. Download the Sense app. Go to sense.com/app.
 Sense Components Sense monitor Antenna assembly External mounting kit Current sensors Download the Sense app. Go to sense.com/app Power cable Technical Specifications Sense is a home energy monitoring
400 Amp Rechargeable Jump Start System RAC-HP082
 400 Amp Rechargeable Jump Start System RAC-HP082 MAINTENANCE Always inspect the tool before use to ensure the cables are in good condition and the clamps are clean and free from corrosion. Keep clean by
SOLAR ELECTRIC MODULE ES-124 & ES-62T Owners Manual and Installation Guide
 SOLAR ELECTRIC MODULE ES-124 & ES-62T Owners Manual and Installation Guide circuit. Reverse connection will damage the module and may result in fire. CAUTIONS Solar electric modules produce DC electricity
Mobile Data Power Model: MDP-25
 Mobile Data Power Model: MDP-25 Topic Section Features... 2 Operational Features Summary... 2 Back-up Battery Power Internal Charger Voltage Spike Protection RF Noise Filtering Warning of Imminent Loss
MULTI XS 3600. Battery charger. For lead-acid batteries 1,2-120Ah
 MULTI XS 3600 Battery charger For lead-acid batteries 1,2-120Ah User s Manual and a guide to professional battery charging For Starter/Deep Cycle batteries EN INTRODUCTION Congratulations on your purchase
3.5 mm Audio Jack. Manual innoxplore ix B24 A2DP Stereo Bluetooth Audio Adapter Dongle 3.5mm Audio Jack [ix B24] Contents
![3.5 mm Audio Jack. Manual innoxplore ix B24 A2DP Stereo Bluetooth Audio Adapter Dongle 3.5mm Audio Jack [ix B24] Contents](/thumbs/40/20932712.jpg "3.5 mm Audio Jack. Manual innoxplore ix B24 A2DP Stereo Bluetooth Audio Adapter Dongle 3.5mm Audio Jack [ix B24] Contents") 3.5 mm Audio Jack Manual innoxplore ix B24 A2DP Stereo Bluetooth Audio Adapter Dongle 3.5mm Audio Jack [ix B24] Contents 1 Safety Information.. 2 1.1. Electronic Devices 2 1.2 Aircraft..2 1.3 Medical Instruments..2
3.5 mm Audio Jack Manual innoxplore ix B24 A2DP Stereo Bluetooth Audio Adapter Dongle 3.5mm Audio Jack [ix B24] Contents 1 Safety Information.. 2 1.1. Electronic Devices 2 1.2 Aircraft..2 1.3 Medical Instruments..2
HP UPS R1500 Generation 3
 HP UPS R1500 Generation 3 Installation Instructions Part Number 650952-001 NOTE: The rating label on the device provides the class (A or B) of the equipment. Class B devices have a Federal Communications
Portable Air Conditioner. OWNER S MANUAL Read these instructions before use. Model: MF08CESWW. Voltage rating: 115V~60Hz Power rating : 800W
 MODE ALARM Portable Air Conditioner OWNER S MANUAL Read these instructions before use 8 Model: MF08CESWW Voltage rating: 115V~60Hz Power rating : 800W Customer Support : 1-800-474-2147 For product inquiries
Conserve Insight Energy Use Monitor. User Guide
 Conserve Insight Energy Use Monitor User Guide Find out how much energy your devices really use including watts, the cost of operation, and the amount of carbon dioxide (CO 2 ) produced in generating the
USER MANUAL Online UPS 1K/2K/3K
 USER MANUAL EN Online UPS 1K/2K/3K Uninterruptible Power Supply System Table of Contents 1. Important Safety Warning 2 1.1. Transportation 2 1.2. Preparation 2 1.3. Installation 2 1.4. Operation 2 1.5.
REDI-LINE ELECTRIC GENERATORS USER'S GUIDE. Rugged, Reliable, DC to AC Power Conversion
 REDI-LINE ELECTRIC GENERATORS USER'S GUIDE Rugged, Reliable, DC to AC Power Conversion REDI-LINE ELECTRIC GENERATOR MODEL INPUT ACTUAL OUTPUT ACTUAL OUTPUT WATTS SERIAL NO. PACIFIC SCIENTIFIC MOTOR PRODUCTS
THE NEW GENERATION IN TECHNOLOGY. NI-3103A Alarm Clock w/fm Radio ipod & iphone Docking. Operating Instructions
 THE NEW GENERATION IN TECHNOLOGY NI-3103A Alarm Clock w/fm Radio ipod & iphone Docking Operating Instructions Table of Contents Important Safeguards... 3 Parts... 6 Controls... 6 To Set Up... 7 ipod/iphone
Installation & Operation Manual HANDS-FREE BLUETOOTH MEDIA INTEGRATION KIT. Perfect for ANDROID TM
 GET CONNECTED Installation & Operation Manual HANDS-FREE BLUETOOTH MEDIA INTEGRATION KIT TranzIt BLU HF ISFM2351 Perfect for ANDROID TM Note to Readers, The information contained within the following documentation