Bliz Whiz. Ice Shaver Instruction Manual Model #1001. Cincinnati, OH USA. Part No Revised June 1996
|
|
|
- Alban Gaines
- 7 years ago
- Views:
Transcription
1 Ice Shaver Instruction Manual Model #1001 Part No Revised June 1996 Cincinnati, OH USA

2 SAFETY PRECAUTIONS This equipment is designed and sold for commercial use only. This equipment is not to be used by the consumer in home use. Do not allow direct contact of this equipment by the public when used in food service locations. Only personnel trained and experienced in the equipment operation may operate this equipment. Carefully read all installation instructions before operating the equipment. Always wear safety glasses when servicing this equipment. Never put your fingers or any object into the shaver body (the gooseneck) while the motor is running. Serious injury may occur. (Gold Medal Products does not assume any liability for injury due to careless handling and/or reckless operation of this equipment). Any alterations to this equipment will void the warranty and may cause a dangerous situation. NEVER make alterations to the equipment. Machine must be properly grounded to prevent electrical shock to personnel. Do NOT immerse the equipment in water. Always unplug the equipment before cleaning or servicing. NOTE The information, specifications and illustrations contained in this manual represent the latest data available at time of publication. Right is reserved to make changes as required at the discretion of Gold Medal Products Company without notice.
 while the motor is running. Serious injury may occur.")
3 INSTALLATION MACHINE DESCRIPTION The Bliz Whiz is a compact automatic shaver with a tremendous capacity. You will find that it keeps up with any demand; as soon as you put ice into the hopper, it is shaved into fine snow. ELECTRICAL REQUIREMENTS The Bliz Whiz operates on 120 volt, single phase, 60 cycle AC current. Be sure that your electrical supply meets this requirement. ICE REQUIREMENTS The Bliz Whiz can take ice cubes or block ice, if you break the block into pieces approximately 3 to 4 inches in size. NOTE: The ice will not enter the shaving chute if the pieces are too large. The design of the shaving chute automatically draws the ice against the blades. There is no need for manual effort. OPERATING INSTRUCTIONS MACHINE OPERATION At the base of the machine are switches marked MOTOR and LIGHT. TO LIGHT THE DISPLAY AREA Flip the switch marked LIGHT. You should leave the light on during your operating time. Return the switch to the "OFF" position to turn the light off. TO SHAVE ICE Flip the switch marked MOTOR. You may begin to place ice into the hopper. When you are finished shaving, return switch to the "OFF" position. (See the CAUTION page, at the beginning of this manual, for important safety information.) OPERATING HINTS You can really make a lot of ice in a short time with the Bliz Whiz, but don't let the ice pile up and block the discharge chute. This will jam the machine. If this situation were to happen : 1. Turn the MOTOR switch to the OFF position. 2. Clear the ice out of the machine with a piece of wood. 3. Allow the remainder of the ice in the machine to melt. 4. The Bliz Whiz should now be ready for operation. NOTE: Never allow any foreign or metallic objects around the shaver area of the Bliz Whiz. Blades are often damaged by ice picks and scoops, and debris that may be in the ice. BLIZ WHIZ CLEANING The outer frame of your Bliz Whiz should be cleaned with our Nev-R-Dull polish. This will maintain the original high polish finish of your machine. Clean all other surfaces with a mild soap and water solution. Dry with a clean, soft cloth. 1

4 MAINTENANCE INSTRUCTIONS THE FOLLOWING SECTIONS OF THIS MANUAL ARE IN- TENDED ONLY FOR QUALIFIED SERVICE PERSONNEL WHO ARE FAMILIAR WITH ELECTRICAL EQUIPMENT. THESE ARE NOT INTENDED FOR THE OPERATOR. Adequate eye protection must be used when servicing this equipment to prevent the possibility of injury. Do NOT immerse the equipment in water. Unplug your machine before servicing. GENERAL MAINTENANCE The drive motor bearings are sealed and require no additional lubrication. The shaving mechanism bearings are made of a special material that require no additional lubrication. To put it simply, there is no need to lubricate this equipment. DRIVE SHAFT ADJUSTMENT The drive shaft needs to be adjusted when you hear excessive noise in the shaver head or if you see aluminum shavings in the case. The following adjustment should be made periodically as your equipment wears. To adjust the drive shaft to remove play: 1. Unplug the main power supply cord from the electrical outlet. 2. Remove the lock nuts from the motor and the light switches. 3. Remove the nameplate, and push the switches inward. Now lift off the dome. 4. A brass adjusting screw with a brass jam nut is coming through the cover at the far left rear of the hopper. Loosen the jam nut and turn the screw clockwise until the noise has stopped. 5. Re-tighten the jam nut. 6. Replace dome, switches, nameplate and lock nuts. 2

5 INSTALLING NEW SHAVER BLADES Inspect your equipment before replacing the blades. Use a flashlight to examine the blades in the shaver body. If the blades appear to be nicked or bent, then the blades should be replaced. Follow this procedure: 1. Unplug the main power supply cord from the electrical outlet. 2. Remove the lock nuts from the motor and the light switches. 3. Remove the nameplate, and push the switches inward. 4. Lift off the dome. 5. Remove the motor mounting bolts. Slide the motor out of the coupling. 6. Remove the four bolts that hold the shaving mechanism. 7. Lift the shaving mechanism from the case. 8. Pull apart the two halves of the shaving mechanism. The cutterhead will now be exposed. 9. Remove the blades from the cutterhead. These blades may be resharpened, but it is far better to replace the old blades with a new set. 10. Position the new blades and insert screws until they are finger tight. 11. Set the blade thickness equal to a penny. (See illustration below.) Make sure that the height is even across the cutterhead. Height gage (use penny) Set top of blade flush with height gage, as shown. Shaver Blade Screw with washer Cutterhead 12. Tighten the blade screws completely. Check the blades again with a penny to ensure the blades did not move while tightening the screws. 13. Reassemble the unit reversing the steps above. NOTE: Replace the shims that were between the motor base and the mounting surface. The motor shaft must be in alignment with the shaver drive shaft. Misalignment will cause the motor coupling to wear rapidly. 3

6 REPLACING THE HOPPER CASTING BEARINGS The bearings in the hopper casting will become worn after a lot of use. The shaver head may begin to vibrate when the bearings become worn. Worn bearings should be removed and new bearings pressed into the casting. (See diagram below for part numbers.) Hopper Rear Cover Part No Steel Ball Brass Hex Nut 3/8-20 Thread Adjusting Screw Part No Brass Hex Nut 1/2-13 Thread Thrust Race Part No Hopper Casting Part No Shaver Head Casting Part No Shaft Flanged Bearing Part No Shaft Straight Bearing Part No Motor Coupling (Steel) Part No Shaver Head Shaft Part No

7 ORDERING SPARE PARTS 1. Identify the desired part by checking it against the photos, illustrations, and/or the parts list. 2. When ordering, please include part number, part name, and quantity desired. 3. Please include your model name and machine serial number (located on the machine nameplate) with your order. 4. Address all parts orders to: Parts Department Gold Medal Products Co Medallion Drive Cincinnati, Ohio or, place orders at: (513) Fax: (513)

8 SPARE PARTS Part Number Description Hopper and Drive Motor Coupling Shaver Parts Hopper Assembly with Bearings Hopper Rear Cover Casting Shaver Head Casting Shaver Head Shaft Assembly Machined Lid Casting hole Blade Adjusting Screw Assembly Power Shaft Flanged Bushing Plated Thrust Bearing /2-20 Brass Hex Nut /2-13 Brass Hex Nut Volt, 60 Cycle Drive Motor Door Knob Lights and Switch Bracket (Motor & Light) Electric Controls Lead-in Cord, 15 Amp Plug Switch Light Tube Holder Light Tube Holder Starter Light Ballast Light Starter 6
 Electric Controls 22038 Lead-in Cord, 15 Amp Plug 47201 Switch 41020 Light Tube Holder 41021 Light Tube Holder Starter 41022 Light Ballast 41023 Light")
9 SPARE PARTS (continued) Machine Section Part Number Description General Frame Top Frame Assembly Parts Bottom Frame Assembly Door Assembly Corner Post, (4) Required Name and Switch Plate Front Glass Strip, (2) Required Rear Glass Strip, (2) Required Motor Mount Plate Door Catch, (3) Required White Plastic Dome Counter Drain Pan Assembly "Sharp Blades Warning" Decal Protective Light Cover Drain Pan Assembly Ice Pick Shipping Carton Ice Shaver Drain Hose Oz. Cup Dispenser with Bracket Ounce Snow Dipper Ice Scoop "Safe Operating Instructions" Label Vinyl Glass Channel (14.7 Ft. Required) Rubber Foot, 3/4 Inch High, (4) Required Warning, Disconnect Power Label Hose Clamp with Screw Unplug to Clean Label Power Cord Tag Cord Clip Glass Replacement Front Glass (1/8" x 15" x 17-7/8") Side Glass (1/8" x 11-7/8" x 15") Note: We do not sell replacement glass. Please contact your local hardware store for double strength window glass. 7

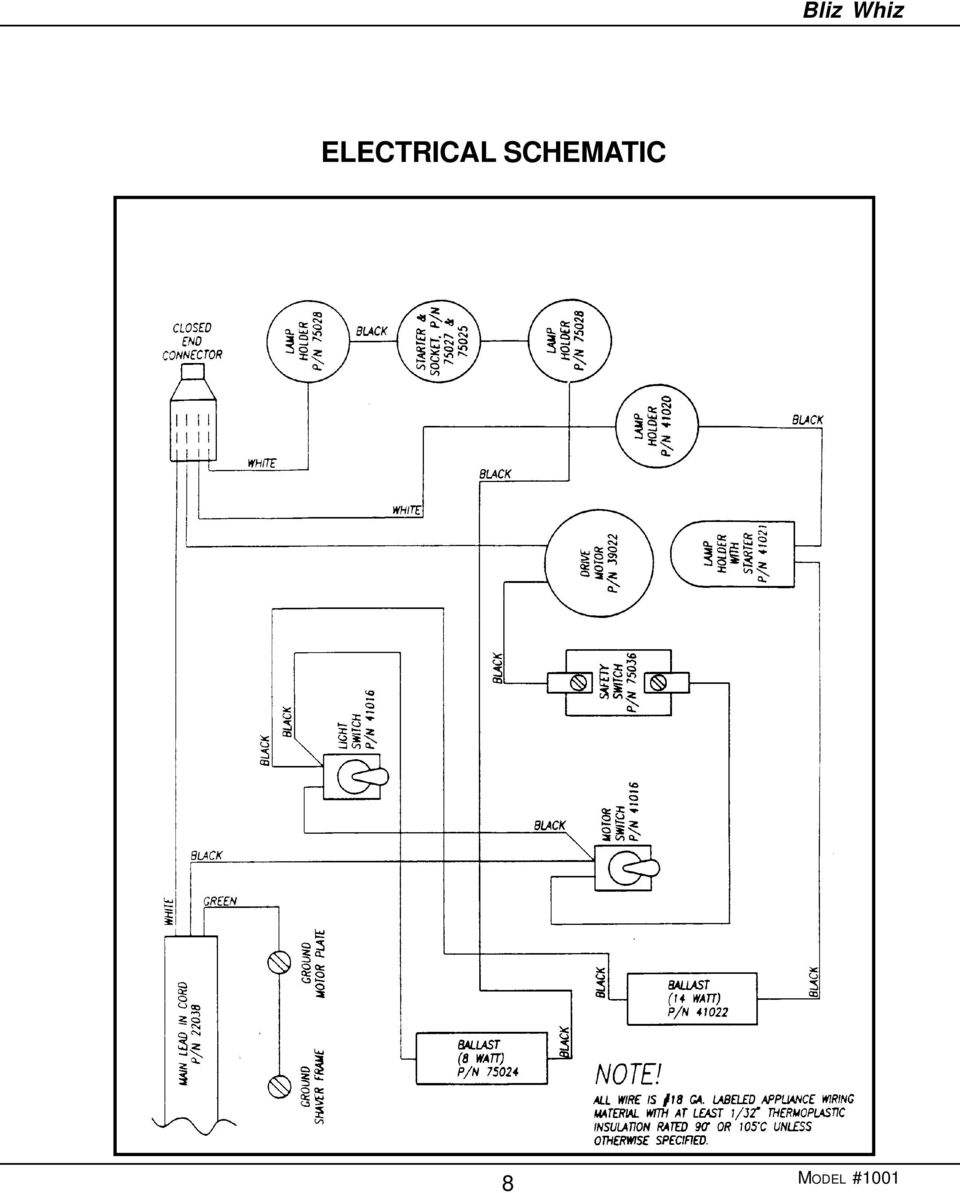
10 ELECTRICAL SCHEMATIC 8
11 WARRANTY WE WARRANT to the original purchaser the Gold Medal equipment sold by us to be free from defects in material or workmanship under normal use and service. Our obligation under this warranty shall be limited to the repair or replacement of any defective part for a period of six (6) months from the date of sale to the Original Purchaser with regard to labor and two (2) years with regard to parts and does not cover damage to the equipment caused by accident, alteration, improper use, voltage, abuse, or failure to follow instructions. THIS WARRANTY IS IN LIEU OF ALL OTHER WARRANTIES EXPRESSED OR IMPLIED, AND OF ALL OTHER OBLIGATIONS OR LIABILITIES ON OUR PART, INCLUDING THE IMPLIED WARRANTY OF MERCHANTIBILITY. THERE ARE NO WARRANTIES WHICH EXTEND BEYOND THE DESCRIP- TION ON THE FACE HEREOF. We neither assume, nor authorize any other person to assume for us, any other obligation or liability in connection with the sale of said GOLD MEDAL equipment or any part thereof. The term Original Purchaser as used in this warranty shall be deemed to mean that person, firm, association, or corporation who was billed by the GOLD MEDAL PRODUCTS COMPANY, or their authorized distributor for the equipment. THIS WARRANTY HAS NO EFFECT AND IS VOID UNLESS THE ORIGINAL PURCHASER FIRST CALLS GOLD MEDAL PRODUCTS COMPANY AT TO DISCUSS WITH OUR SERVICE REPRESENTATIVE THE EQUIP- MENT PROBLEM, AND, IF NECESSARY, FOR INSTRUCTIONS CONCERN- ING THE REPAIR OR REPLACEMENT OF PARTS. NOTE: This equipment is manufactured and sold for commercial use only. GOLD MEDAL PRODUCTS COMPANY Medallion Drive Cincinnati, OH USA

Sno-Kone Syrup Dispenserack
 Sno-Kone Syrup Dispenserack 34110 Revised June 1996 Instruction Manual Model #1067 Vertical Dispenserack and Model #1073 Aluminum Dispenserack Model #1067 Model #1073 Cincinnati, OH 45241-4807 USA SAFETY
GAS SAFETY PRECAUTIONS
 GAS SAFETY PRECAUTIONS Instructions on what to do when a user smells gas can be obtained from the local gas supplier. These instructions must be posted in a prominent location where the unit is to be operated.
!"" #$% "!&' ( ( ) *
 *") !"" #$% "!&' (( ) * G Whiz Gas Popper Instruction Manual Model #5908 Part No. 74874 Revised October 1997 Cincinnati, OH 45241-4807 USA GAS SAFETY PRECAUTIONS Instructions on what to do when a user smells
!"" #$% "!&' (( ) * G Whiz Gas Popper Instruction Manual Model #5908 Part No. 74874 Revised October 1997 Cincinnati, OH 45241-4807 USA GAS SAFETY PRECAUTIONS Instructions on what to do when a user smells
concessionstands.com
 WARNING!! The attached Gold Medal Manual is for reference only and is not intended for any other purpose. The information contained in these on line manuals is subject to change at any time. Improvements
Instruction Manual. Fun Pop 8oz. Popper
 Instruction Manual Fun Pop 8oz. Popper 0700 Medallion Drive, Cincinnati, Ohio 4524-4807 USA Part No. 5940 SAFETY PRECAUTIONS Page 2 INSTALLATION INSTRUCTIONS Inspection of Shipment Unpack all cartons and
Table of Contents WARNING SYMBOLS AND DEFINITIONS
 Table of Contents SAFETY INSTALLATION OPERATION MAINTENANCE Safety... 2 Specifications... 4 Installation... 5 Operation... 8 WARNING SYMBOLS AND DEFINITIONS Maintenance... 9 Parts List and Assembly Diagram...
SAFETY & OPERATING INSTRUCTIONS
 SAFETY & OPERATING INSTRUCTIONS EDLUND TOMATO LASER, Models ETL -316, -140 & -380 READ AND UNDERSTAND THIS MANUAL AND ALL INSTRUCTIONS BEFORE OPERATING THIS SLICER. 159 Industrial Parkway, Burlington,
OPERATORS MANUAL MG22 MEAT GRINDER MG22/0209 ED 1 0011220
 OPERATORS MANUAL MG22 MEAT GRINDER MG22/0209 ED 1 0011220 TO INSURE BOTH SAFE AND TROUBLE-FREE PERFORMANCE, WE STRESS THAT ALL PERSONNEL THAT WILL BE INVOLVED WITH YOUR NEW UNIVEX MEAT GRINDER MUST READ
Multi-Pitch Pitching Machine USER MANUAL
 Multi-Pitch Pitching Machine USER MANUAL TABLE OF CONTENTS Thank you for purchasing the Cimarron Multi-Pitch Pitching Machine. The Cimarron Multi-Pitch Pitching Machine is a high performance pitching machine
Electric Meat Grinder
 Electric Meat Grinder OWNER S MANUAL WARNING: Read carefully and understand all INSTRUCTIONS before operating. Failure to follow the safety rules and other basic safety precautions may result in serious
Name of Equipment Silver King Model SKMCD1P/C1. This equipment chapter is to be inserted in the appropriate section of the Equipment Manual.
 Name of Equipment Silver King Model SKMCD1P/C1 This equipment chapter is to be inserted in the appropriate section of the Equipment Manual. Manufactured exclusively for McDonald s By Silver King Refrigeration,
Foodservice Equipment Specialists P.O. Box 880 Saco, ME. / U.S.A. 04072 877-854-8006 * FAX (207) 283-8080
 283-8080") Foodservice Equipment Specialists P.O. Box 880 Saco, ME. / U.S.A. 04072 877-854-8006 * FAX (207) 283-8080 FOR SERVICE ASSISTANCE U.S. AND CANADA CALL: 1-877-854-8006 24 HOURS/DAY 7 DAYS/WEEK TABLE OF CONTENTS
Foodservice Equipment Specialists P.O. Box 880 Saco, ME. / U.S.A. 04072 877-854-8006 * FAX (207) 283-8080 FOR SERVICE ASSISTANCE U.S. AND CANADA CALL: 1-877-854-8006 24 HOURS/DAY 7 DAYS/WEEK TABLE OF CONTENTS
OWNER S MANUAL FOR PROFESSIONAL SNO CONE MACHINE
 OWNER S MANUAL FOR PROFESSIONAL SNO CONE MACHINE Model Numbers 1911 SNO-STORM THE BLIZZARD ARCTIC BLAST THE COOLER 6133110 (120V) 6133210 (120V) 6133310 (120V) 6133410 (120v) 6233110 (230V) 6233210 (230V)
OWNER S MANUAL Table Tennis Table Patent Pending
 OWNER S MANUAL Table Tennis Table Patent Pending Be sure to write your model number and serial number here for future reference. You can find these numbers printed on the bottom of the table. MODEL # T8179
OWNER S MANUAL FOR PROFESSIONAL SNO CONE MACHINE
 OWNER S MANUAL FOR PROFESSIONAL SNO CONE MACHINE Model Numbers 1911 SNO-STORM THE BLIZZARD ARCTIC BLAST SIMPLY-A-BLAST PORT-A-BLAST THE COOLER 6133110 (120V) 6133210 (120V) 6133310 (120V) 6133300 (120V)
LU6X-130 Instructions and Parts List (including LU6X Basic) Operating Instructions
 Operating Instructions") LORTONE LU6X-130 Item # 061-092 LU6X Basic Item # 061-090 LU6X-130 Instructions and Parts List (including LU6X Basic) Operating Instructions Introduction The LU6X is one the most versatile pieces of equipment
LORTONE LU6X-130 Item # 061-092 LU6X Basic Item # 061-090 LU6X-130 Instructions and Parts List (including LU6X Basic) Operating Instructions Introduction The LU6X is one the most versatile pieces of equipment
#12 Professional Meat Grinders
 #12 Professional Meat Grinders MG-203100 (52021040) Manual Instruction Thank you, and congratulations on purchasing the Non-corrosive electric meat grinder. Your grinder comes complete with everything
Triple Threat 3-in-1 Game Table 3 IN 1 GAME TABLE
 NG0M Triple Threat 3-in- Game Table 3 IN GAME TABLE Thank 3 in Y Game Table Thank you for your purchase of our product. We work around the clock and around the globe to ensure that our products maintain
ATS Overhead Table Shelf System INSTRUCTION MANUAL
 ATS Overhead Table Shelf System INSTRUCTION MANUAL ATS Overhead Table Shelf System Instruction Manual Warranty Newport Corporation warrants this product to be free of defects in material and workmanship
Electric Fryers Instruction Manual Models: 8047D, 8048D, 8049D, 8050D, 8051D 8066, 8068, 8068FL, 8073, 8073BF and 8075
 Part No. 89047 Electric Fryers Instruction Manual Models: 8047D, 8048D, 8049D, 8050D, 8051D 8066, 8068, 8068FL, 8073, 8073BF and 8075 Cincinnati, OH 45241-4807 USA ELECTRIC FRYER SAFETY PRECAUTIONS Installation
PEDAL CAR - GO CART ASSEMBLY & OPERATING INSTRUCTIONS
 PEDAL CAR - GO CART 42822 ASSEMBLY & OPERATING INSTRUCTIONS 3491 Mission Oaks Blvd., Camarillo, CA 93011 Visit our Web site at: http://www.harborfreight.com Copyright 2000 by Harbor Freight Tools. All
Operator Manual 100 Series Coffee Grinders
 Operator Manual 100 Series Coffee Grinders Models 100 and 190SS Model 100 Model 190SS Specifications...2 Safety Information...2 Installation...3 Operation...3 Table of Contents Cleaning & Maintenance...6
4 in 1 Strength Station
 Revision 0 September 2010 4 in 1 Strength Station Owner s Manual Record Serial Number Here Platinum by Tunturi www.tunturi.com Date www.tunturi.com of Purchase 4 in 1 Strength Station Owner s Manual Instructions
Owners & Installation Manual for the Sheridan, Mountainair, Pine Valley and Old Forge Ceiling Fan Family
 Owners & Installation Manual for the Sheridan, Mountainair, Pine Valley and Old Forge Ceiling Fan Family Part of the Kiva Lighting Family Custom Lighting and Fans Since 1992 1312 12th St NW Albuquerque,
Overview PARTS LIST. B. Lever mounting base C. Flush handle assembly D. Grey/Blue float stop E. Grey float (Full Flush) F. Flush valve washer
 F. Flush valve washer") Overview READ ENTIRE INSTRUCTIONS BEFORE STARTING INSTALLATION PARTS LIST A. Flush valve B. Lever mounting base C. Flush handle assembly D. Grey/Blue float stop E. Grey float (Full Flush) F. Flush valve
Overview READ ENTIRE INSTRUCTIONS BEFORE STARTING INSTALLATION PARTS LIST A. Flush valve B. Lever mounting base C. Flush handle assembly D. Grey/Blue float stop E. Grey float (Full Flush) F. Flush valve
Congratulations on your purchase of the Great Planes SLOT MACHINE, the first truly easy way to cut hinge slots in your model airplanes.
 INSTRUCTION MANUAL Congratulations on your purchase of the Great Planes SLOT MACHINE, the first truly easy way to cut hinge slots in your model airplanes. The Slot Machine you have purchased is equipped
149mm. Walk-Thru Assembly Gate. MODEL NO: 1161, 1167 Owner s Manual. www.regalo-baby.com
 149mm 210mm Walk-Thru Assembly Gate MODEL NO: 1161, 1167 Owner s Manual READ ALL INSTRUCTIONS BEFORE ASSEMBLY AND USE OF GATE. KEEP INSTRUCTIONS FOR FUTURE USE. www.regalo-baby.com... Regalo International,
OAK WORKBENCH WITH 2 DRAWERS
 OAK WORKBENCH WITH 2 DRAWERS Model 93991 ASSEMBLY Instructions Visit our website at: http://www.harborfreight.com Read this material before using this product. Failure to do so can result in serious injury.
15GAL STEEL OIL DRAIN WITH 110V PUMP
 15GAL STEEL OIL DRAIN WITH 110V PUMP OWNER S MANUAL WARNING: Read carefully and understand all ASSEMBLY AND OPERATION INSTRUCTIONS before operating. Failure to follow the safety rules and other basic safety
Instructions and precautions. Fork Height. Visit our website at: http://www.harborfreight.com
 Pallet Jack Item 68760 / 68761 Instructions and precautions Specifications Capacity Control Lever Fork Height Fork Length Fork Width Maximum Minimum Width over Forks Steering Wheel Dia. 2-1/2 Ton (5,000
Assembly and Usage Instructions
 Assembly and Usage Instructions A Product 5885 West Van Horn Tavern Road Columbia, MO 65203 www.caldwellshooting.com Instruction #1001667 Limited Warranty Every Caldwell product is warrantied to be free
3/4 PIPE CLAMP WITH STAND
 3/4 PIPE CLAMP WITH STAND Model 94053 ASSEMBLY AND OPERATING INSTRUCTIONS (3/4 DIAMETER PIPE NOT INCLUDED.) 3491 Mission Oaks Blvd., Camarillo, CA 93011 Visit our Web site at: http://www.harborfreight.com
AFE424 SERVICE PARTS
 This is the parts list for the AFE. When looking up part numbers, always check the complete model and serial numbers to be certain of ordering the correct parts. The Air Cooled model has also been manufactured
PRODUCT: WASHER / WASHER-DRYER COMBO MODEL: AW 120 / AW 122 / AW 125 AWD 120 / AWD 121 / AWD 129
 PRODUCT: WASHER / WASHER-DRYER COMBO MODEL: The information included in this Splendide Repair Manual may change without notice. Please see our web site www.splendide.com/service/docs.html for updates,
Express5800/120Ed. Rack Mount Kit Installation Procedures PN: 455-01607-001
 Express5800/120Ed Rack Mount Kit Installation Procedures PN: 455-01607-001 Proprietary Notice and Liability Disclaimer The information disclosed in this document, including all designs and related materials,
758 Heavy-duty Ratchet Guy Wire Cutter
 INSTRUCTION MANUAL 758 Heavy-duty Ratchet Guy Wire Cutter Read and understand all of the instructions and safety information in this manual before operating or servicing this tool. Register this product
AUTO-BREEZE Cotton Candy Machine Instruction Manual Model #3052 & 3052SR
 Part No. 55147 AUTO-BREEZE Cotton Candy Machine Instruction Manual Cincinnati, OH 45241-4807 USA Installation Instructions Inspection of Shipment: After unpacking, check thoroughly for any damage which
Operating Manual. Los Angeles Abrasion Machine HM-70A & HM-70AF
 Operating Manual Los Angeles Abrasion Machine HM-70A & HM-70AF Rev: 07/19/2012 PHONE: 800-444-1508 P.O. Box 200, Lewis Center, Ohio 43035-0200 FAX: 800-255-5314 740-548-7298 E-mail: customerservice@gilsonco.com
Owner s Manual Read and keep this manual. Patents World Wide
 Owner s Manual Read and keep this manual. Patents World Wide S & S Industries, Inc., Sarasota, FL, USA www.trail-gator.com Copyright 2008 All Rights Reserved The following manual is provided to assist
PALLET JACK - 2.5 TON
 PALLET JACK - 2.5 TON 39939 SET UP AND OPERATING INSTRUCTIONS Visit our website at: http://www.harborfreight.com Read this material before using this product. Failure to do so can result in serious injury.
SERVICE PARTS LIST PAGE 1 OF 6 BASE ASSEMBLY SPECIFY CATALOG NO. AND SERIAL NO. WHEN ORDERING PARTS 12" DUAL BEVEL COMPOUND MITER SAW B27A
 PAGE 1 OF 6 BASE ASSEMBLY 00 0 EXAMPLE: Component Parts (Small #) Are Included When Ordering The Assembly (Large #). SPECIFY CATALOG NO. AND NO. WHEN ORDERING PARTS 1 02-80-0050 Thrust Bearing (1) 2 05-80-0510
Pet hair clipper. Model 96822. Diagrams within this manual may not be drawn proportionally.
 Pet hair clipper Model 96822 Cleaning And Operation Instructions Diagrams within this manual may not be drawn proportionally. Due to continuing improvements, actual product may differ slightly from the
Installation Instructions GOOSENECK MOUNTING KIT Chevrolet/GMC 1500/2500/3500 All except 4-door Crew-Cab
 GOOSENECK MOUNTING KIT Equipment Required: Fastener Kit: F Wrenches: 3/4, 7/8, 15/16 Drill Bits: 1/4 Other Tools: Drill WARNING: Under no circumstances do we recommend exceeding the towing vehicle manufacturers
PNEUMATIC PLANISHING HAMMER
 PNEUMATIC PLANISHING HAMMER 94847 ASSEMBLY AND OPERATING INSTRUCTIONS Due to continuing improvements, actual product may differ slightly from the product described herein. Distributed Exclusively by Harbor
Installation Instructions 4508 4508S
 SYMPHONY Spread Lavatory Faucet with Speed Connect Drain Congratulations on purchasing your American Standard faucet with Speed Connect drain, a feature found only on American Standard faucets. Speed Connect
IMPORTANT SAFETY RULES TO FOLLOW
 WARNING FLOOR & CARPET CLEANER Any piece of equipment can be dangerous if not operated properly. YOU are responsible for the safe operation of this equipment. The operator must carefully read and follow
USE &CARE GUIDE. Remote Faucet Pump System. See Important Safeguards on page 2
 Remote Faucet Pump System USE &CARE GUIDE See Important Safeguards on page 2 An exclamation point within an equilateral triangle is intended to alert user to the presence of important operating and maintenance
SBC90. Abrasive Blast Cabinet Assembly & Operating Instructions
 SBC90 Abrasive Blast Cabinet Assembly & Operating Instructions READ ALL INSTRUCTIONS AND WARNINGS BEFORE USING THIS PRODUCT. SAVE THESE INSTRUCTIONS FOR FUTURE REFERENCE. This manual provides important
MBSAW. Meat Cutting Band Saw With Meat Grinder Assembly & Operating Instructions
 06/2011 MBSAW Meat Cutting Band Saw With Meat Grinder Assembly & Operating Instructions READ ALL INSTRUCTIONS AND WARNINGS BEFORE USING THIS PRODUCT. This manual provides important information on proper
REPAIR PARTS MANUAL MODEL NO. PR160Y21RDP (MFG. ID. NO. 96142004500) Rotary Lawn Mower
 Rotary Lawn Mower") REPAIR PARTS MANUAL MODEL NO. PR160Y21RDP (MFG. ID. NO. 96142004500) Rotary Lawn Mower For Parts and Service, contact our authorized distributor: call 1-800-849-1297 For Technical Assistance: call 1-800-829-5886
REPAIR PARTS MANUAL MODEL NO. PR160Y21RDP (MFG. ID. NO. 96142004500) Rotary Lawn Mower For Parts and Service, contact our authorized distributor: call 1-800-849-1297 For Technical Assistance: call 1-800-829-5886
SE-100-1, SE-200-1, SE-500-1, and SE-1000-1 AIR CHAMP PRODUCTS. User Manual SE BRAKE MODELS: (i) MTY (81) 83 54 10 18 ventas@industrialmagza.
 MTY (81) 83 54 10 18 ventas@industrialmagza.") AIR CHAMP PRODUCTS User Manual SE BRAKE MODELS: SE-00-, SE-200-, SE-500-, and SE-000- (i) FORM NO. L-20084-E-040 In accordance with Nexen s established policy of constant product improvement, the specifications
AIR CHAMP PRODUCTS User Manual SE BRAKE MODELS: SE-00-, SE-200-, SE-500-, and SE-000- (i) FORM NO. L-20084-E-040 In accordance with Nexen s established policy of constant product improvement, the specifications
POWER GEAR SLIDE OUT MANUAL
 POWER GEAR SLIDE OUT MANUAL Operation Guide FLUSH FLOOR SLIDE OUT SYSTEM FOR AMERICAN COACH PRODUCTS 82 S0220 01 Rev. 1 AMERICAN COACH SLIDE OUT MANUAL FLUSH FLOOR SYSTEM TABLE OF CONTENTS SECTION PAGE
TOLL FREE: (866) 591-7792. E-Mail: techmail@vigoindustries.com. www.vigoindustries.com VANITY SPECIFICATIONS. VANITY COMPONENTS Model VG09042K1
 591-7792. E-Mail: techmail@vigoindustries.com. www.vigoindustries.com VANITY SPECIFICATIONS. VANITY COMPONENTS Model VG09042K1") VANITY SPECIFICATIONS VANITY COMPONENTS Model VG09042K1 MODEL VG09042K1 FEATURES Freestanding cabinet Soft closing sliding cabinet drawer hardware White, single hole ceramic sink Cabinet ships assembled
VANITY SPECIFICATIONS VANITY COMPONENTS Model VG09042K1 MODEL VG09042K1 FEATURES Freestanding cabinet Soft closing sliding cabinet drawer hardware White, single hole ceramic sink Cabinet ships assembled
USER MANUAL. Bottom Loading Bottled Water Dispenser SAVE THIS MANUAL FOR FUTURE USE. Model # 900172
 Model # 900172: Page 1 USER MANUAL Bottom Loading Bottled Water Dispenser Model # 900172 TO REDUCE THE RISK OF INJURY AND PROPERTY DAMAGE, USER MUST READ THIS MANUAL BEFORE ASSEMBLING, INSTALLING & OPERATING
1000-LB. TRAILER JACK OWNER S MANUAL
 1000-LB. TRAILER JACK OWNER S MANUAL WARNING: Read carefully and understand all INSTRUCTIONS before operating. Failure to follow the safety rules and other basic safety precautions may result in serious
TITAN 13 x 2 ½ BRAKES
 INSTALLATION INSTRUCTION AND SERVICE MANUAL Actuator/Trailer Dealer - Please provide these instructions to the consumer. Consumer - Read and follow these instructions. Keep them with the trailer for future
MODEL G300 BRAKE BLEEDER
 MODEL G300 BRAKE BLEEDER Installation, Operation & Repair Parts Information Branick Industries, Inc. 4245 Main Avenue P.O. Box 1937 Fargo, North Dakota 58103 REV060616 P/N: 81-0035G 1 THIS PAGE INTENTIONALLY
MODEL E-AF. Drain Cleaning Machine. Operator s Manual
 MODEL E-AF Drain Cleaning Machine Operator s Manual!!!! FOR YOUR SAFETY Before you operate or maintenance this equipment, READ this manual carefully and completely! Purchase Date: Serial Number: ELECTRIC
123 Industrial Loop Road Paynesville, MN 56362 Phone: 1-800-864-1649 www.master-mfg.com MASTER MANUFACTURING MASTER GARDNER
 123 Industrial Loop Road Paynesville, MN 56362 Phone: 1-800-864-1649 www.master-mfg.com MASTER MANUFACTURING MASTER GARDNER Part Number PCD E3 009B MM Rev 1 Nov. 2010 INTRODUCTION The purpose of this manual
READ CAREFULLY - FAILURE TO FOLLOW INSTRUCTIONS AND SAFETY RULES MAY RESULT IN SERIOUS INJURY
 Owner s Manual LSP16H LS3001 LS3002H LS3003 LSP21H LS3101 LS3102H LS3103 LSP24H LS3201 LS3102H LS3103 LSP28H LS3301 LS3302H LS3303 mainframe bundle H-unit bundle accessory box mainframe bundle H-unit bundle
2100 AD 015 0009 Mirror Elevator Ball Nut Replacement Procedure
 2100 AD 015 0009 Mirror Elevator Ball Nut Replacement Procedure Derek Guenther 1/28/2015 Rev. Purpose The purpose of this document is to describe the procedure necessary to replace one of the ball nuts
4-in-1 SWIVEL TABLE. 54in (1.37m) CONTACT INFO Hours. Technical Support Monday to Friday (9:00am to 5pm EST) WARNING:
 CONTACT INFO Hours. Technical Support Monday to Friday (9:00am to 5pm EST) WARNING:") 54in (1.37m) 4-in-1 SWIVEL TABLE CAUTINotOrecommended N: ELECTRI CALLY OPERATED PRODUCT for children under 8 years of age. As with all electric products, precautions should be observed during handling
54in (1.37m) 4-in-1 SWIVEL TABLE CAUTINotOrecommended N: ELECTRI CALLY OPERATED PRODUCT for children under 8 years of age. As with all electric products, precautions should be observed during handling
Speed-Mat Rectangle Cutter
 Speed-Mat Rectangle Cutter 1 Honeycomb baseboard. 2 Left hold down. 14 3 Bottom hold down. 4 4 Left / right rule. 8 5 8 5 Left / right rule pointer. 1 6 Top / bottom rule. 7 Top / bottom rule pointer.
Installation Instructions
 Installation Instructions READ BEFORE INSTALLING UNIT For Low Profile Window Air Conditioner INSTALLATION WARNINGS AND CAUTION Carefully read the installation manual before beginning. Follow each step
PRODUCT MANUAL - M090
 PRODUCT MANUAL - M090 MODEL 203/266 ELECTRIC CAN OPENER 1 SAFETY CAUTION: SEVERED CAN LIDS HAVE CUTTING EDGES. USE OF A PROTECTIVE GLOVE OR TONGS IS ADVISED WHEN HANDLING LIDS. WARNING To avoid risk of
1 Ton Telescoping Gantry Crane
 1 Ton Telescoping Gantry Crane 41188 Gantry Crane Read this material before using this product. Failure to do so can result in serious injury. SAVE THIS MANUAL. When unpacking, make sure that the product
Owner s Manual & Safety Instructions
 Owner s Manual & Safety Instructions Save This Manual Keep this manual for the safety warnings and precautions, assembly, operating, inspection, maintenance and cleaning procedures. Write the product s
Char-Lynn Hydraulic Motor. Repair Information. 10 000 Series. October, 1997
 Char-Lynn Hydraulic Motor October, 1997 Repair Information Geroler Motor Two Speed 001 27 Retainer inside bore of valve plate bearingless motors only 4 15 16 3 6 35 Parts Drawing 25 2 2 1 19 17 36 40 47
CHARISMA SHOWER/TUB DOOR INSTALLATION INSTRUCTIONS
 CHARISMA SHOWER/TUB DOOR INSTALLATION INSTRUCTIONS IMPORTANT DreamLine reserves the right to alter, modify or redesign products at any time without prior notice. For the latest up-to-date technical drawings,
5800 Temperature Sensor Cable Assembly
 5800 Temperature Sensor Cable Assembly Removal and Replacement Instruction Sheet #60-4702-070 Revision D, January 14, 2013 Overview The 5800 has two refrigeration temperature sensors, one attached to the
INSTALLATION INSTRUCTIONS PART NUMBER:
 Equipped with AEM Dryflow Filter No Oil Required! INSTALLATION INSTRUCTIONS PART NUMBER: 21-475B (Blue Finish) 21-475C (Gun Metal Grey Finish) 21-475P (Vacuum Metalized Chrome-VMC) 21-475R (Red Finish)
OASIS-PLUS 120V READ ALL INSTRUCTIONS BEFORE OPERATING READ ALL INSTRUCTIONS BEFORE OPERATING OZONE IS A POWERFUL OXIDIZER AND MUST BE USED WITH CARE
 OASIS-PLUS 120V INFORMATION & OPERATING INSTRUCTIONS READ ALL INSTRUCTIONS BEFORE OPERATING READ ALL INSTRUCTIONS BEFORE OPERATING OZONE IS A POWERFUL OXIDIZER AND MUST BE USED WITH CARE 56041852 WARNING:
-1- SPECIFICATIONS 002085 CONE SETTER PLATFORM ATTACHMENT INDEX
 -1-002085 CONE SETTER PLATFORM ATTACHMENT INDEX I. GENERAL EQUIPMENT : A. Intent Statement B. Cone Setter Platform II. III. 1. Understructure Frame 2. Mounting Components 3. Paint 4. Basket 5. Labels 6.
MODEL #12006. Introduction
 THE ORIGINAL PECO POWER SPRAYER PECO OWNER S MANUAL MODEL #12006 (Q0080) Revised: 1/8/2014 PECO POWER SPRAYER MODEL #12006 TABLE OF CONTENTS SECTION PAGE SECTION PAGE INTRODUCTION - - - - - - - - - - -
Safety, Operation and Maintenance Manual with Parts List
 Safety, Operation and Maintenance Manual with Parts List 20-Gallon Wet/Dry Vac Important Information and Safety Instructions PLEASE READ BEFORE USE! # 961130020 9/10-Rev 1 20-Gallon Wet/Dray Vac TABLE
Equipped with AEM Dryflow Filter No Oil Required! INSTALLATION INSTRUCTIONS PART NUMBER 21-754DS. 2012-2015 BMW 335i 3.0L
 Equipped with AEM Dryflow Filter No Oil Required! INSTALLATION INSTRUCTIONS PART NUMBER 21-754DS 2012-2015 BMW 335i 3.0L 1 ITEM NO. PART NUMBER DESCRIPTION QTY. 1 21-2057DK AIR FILTER 1 2 9-0442 TUBE;
SKILL ATTACK PITCHING MACHINE PATENTS APPLIED FOR INSTRUCTION MANUAL. Includes: OPERATION SETUP USE & CARE SERVICE
 VOLLEYBALL SKILL ATTACK PITCHING MACHINE PATENTS APPLIED FOR INSTRUCTION MANUAL Includes: OPERATION SETUP USE & CARE SERVICE REV032813 SPORTS ATTACK, LLC. 800-717-4251 sportsattack.com WARRANTY STATEMENT
1.8 CRANKSHAFT OIL SEALS
 SERIES 60 SERVICE MANUAL 1.8 CRANKSHAFT OIL SEALS An oil seal is fitted between each end of the crankshaft and the bores of the flywheel housing and gear case cover to retain the lubricating oil in the
300 SERIES 331, 332, 333, 344, 356 AND 367 MODELS
 Section: MOYNO 500 PUMPS Page: 1 of 8 Date: March 1, 1998 SERVICE MANUAL MOYNO 500 PUMPS 300 SERIES 331, 332, 333, 344, 356 AND 367 MODELS Mechanical Seal Models Packing Gland Models MODELS DESIGN FEATURES
Ketec, Inc USERS GUIDE SP-1 KT7060. Shoplifting Protection
 Ketec, Inc Shoplifting Protection USERS GUIDE SP-1 KT7060 24501 SP-1 USERS GUIDE INDEX Parts List.1 Assembly Instructions 2 Positioning the System. 3 Tagging Guidelines 4 Removing Hard Tag.. 7 Detection
SINGLE STAGE INLINE FIRE PUMP
 MODEL 383 SINGLE STAGE INLINE FIRE PUMP INSTRUCTION AND REPAIR MANUAL NOTE! To the installer: Please make sure you provide this manual to the owner of the equip ment or to the responsible party who maintains
Bottom Loading Water Dispenser
 Bottom Loading Water Dispenser Model # 601000 TO REDUCE THE RISK OF INJURY AND PROPERTY DAMAGE, USER MUST READ THIS MANUAL BEFORE ASSEMBLING, INSTALLING & OPERATING DISPENSER. SAVE THIS MANUAL FOR FUTURE
TITAN Fuel Tanks. INSTALLATION INSTRUCTIONS G e n e r a t i o n V
 TITAN pt. no.: 02 0000 0143 Important: Please read these instructions carefully and completely before starting the installation. TITAN Fuel Tanks INSTALLATION INSTRUCTIONS G e n e r a t i o n V Extended
Instruction Manual Model #2343PXJ, 2344PXJ, 2345PXJ
 Part No. 39598EXJ Revised March 2002 Instruction Manual Model #2343PXJ, 2344PXJ, 2345PXJ Proctor Companies 10497 Centennial Road Littleton, Colorado 80127 USA Phone: (303) 973-8989 Fax: (303) 973-8884
FJ2. 2 Ton Trolley Floor Jack Assembly & Operating Instructions
 FJ2 2 Ton Trolley Floor Jack Assembly & Operating Instructions READ ALL INSTRUCTIONS AND WARNINGS BEFORE USING THIS PRODUCT. This manual provides important information on proper operation & maintenance.
S B 3 X SERVICE MANUAL. The Taste of Paradise
 S B 3 X SERVICE MANUAL The Taste of Paradise SERVICE MANUAL PAGE SECTION I GENERAL INFORMATION... 2 II GENERAL REPAIRS... 13 III PARTS... 32 IV TROUBLESHOOTING... 41 V DAILY CLEANING PROCEDURES... 43
Flat Bottom Long Ram Hydraulic Jack
 Flat Bottom Long Ram Hydraulic Jack 3 Ton 8 Ton 36468 36469 ASSEMBLY & OPERATING INSTRUCTIONS 349 Mission Oaks Blvd., Camarillo, CA 930 Visit our Web site at http://www.harborfreight.com TO PREVENT SERIOUS
INSTRUCTION MANUAL AND PARTS LIST MODEL 14-10
 VERTICAL BAND SAWS INSTRUCTION MANUAL AND PARTS LIST MODEL 1-10 DAKE/PARMA WHEN ORDERING PARTS GIVE COMPLETE SERIAL NUMBER OF MACHINE GIVE PART NUMBER AND NAME GIVE AMOUNT REQUIRED Unless the above data
ROUTER TABLE INSERT ASSEMBLY AND OPERATING INSTRUCTIONS
 ROUTER TABLE INSERT 94331 ASSEMBLY AND OPERATING INSTRUCTIONS 3491 Mission Oaks Blvd., Camarillo, CA 93011 Visit our Web site at http://www.harborfreight.com Copyright 2006 by Harbor Freight Tools. All
Instructions. Complete RPS 2900 Pump Kit for RoadLazer RoadPak Line Striping System 3A1304A ENG. Pressure Relief Procedure.
 Instructions Complete RPS 2900 Pump Kit for RoadLazer RoadPak Line Striping System 3A1304A ENG Model 24G766 Important Safety Instructions For complete warnings and safety instructions see RoadLazer RoadPak
PAINT SPRAY GUN WASHER
 PAINT SPRAY GUN WASHER 94996 ASSEMBLY AND OPERATING INSTRUCTIONS Visit our website at: http://www.harborfreight.com Read this material before using this product. Failure to do so can result in serious
Mini-led spotlight with magnetic base
 Mini-led spotlight with magnetic base Model 95799 Assembly And Operation Instructions Due to continuing improvements, actual product may differ slightly from the product described herein. 3491 Mission
DUST COLLECTOR 70 GALLON, 2 HP
 DUST COLLECTOR 70 GALLON, 2 HP Model 45378 ASSEMBLY AND OPERATING INSTRUCTIONS 3491 Mission Oaks Blvd., Camarillo, CA 93011 Visit our Web site at http://www.harborfreight.com Copyright 2001 by Harbor Freight
Sport Ice Elektro 124
 Sport Ice Elektro 124 Operation Manual 2007/4 V2.1 Introduction The Sport Ice Elektro 124 is an ice resurfacing machine designed to be used on small ice surfaces. The machine has been designed to produce
Weatherproof Tournament Table Tennis Table
 Weatherproof Tournament Table Tennis Table Owner s Manual Model Number 7035-590 Absolutely Weatherproof Printed on 100% recycled paper.! Made in Germany Thank you for purchasing our high quality KETTLER
MODEL T200-F18 MODEL T125-F18 Finish Nailers
 P MODEL T200-F18 MODEL T125-F18 Finish Nailers IMPORTANT! DO NOT DESTROY It is the customer s responsibility to have all operators and service personnel read and understand this manual. OPERATING MANUAL
ELECTRIC KNIFE SHARPENER
 PRODUCT MANUAL- M109 MODEL 401 ELECTRIC KNIFE SHARPENER Please read thoroughly before operation and keep for future reference Model 401 Knife Sharpener Specifications Model No. #401 Power Requirements
Important: Please read these instructions carefully and completely before starting the installation. TITAN Fuel Tanks
 TITAN pt. no.: 03 0000 0120 Important: Please read these instructions carefully and completely before starting the installation. TITAN Fuel Tanks INSTALLATION INSTRUCTIONS G e n e r a t i o n V Extended
DANGER DANGER. General Information. Safety Is Your Responsibility. Ordering Parts. Contact Information
 Safety Safety Is Your Responsibility DANGER To avoid personal injury or death, carefully read and understand all instructions pertaining to the Anthony Liftgates product. Do not attempt to install, operate,