PV Inverter SUNNY TRIPOWER 8000TL/10000TL/12000TL/15000TL/17000TL
|
|
|
- Gregory Johnson
- 7 years ago
- Views:
Transcription
1 PV Inverter SUNNY TRIPOWER 8000TL/10000TL/12000TL/15000TL/17000TL Installation Guide STP8-17TL-IEN IMEN-STP10-17TL Version 2.1 EN
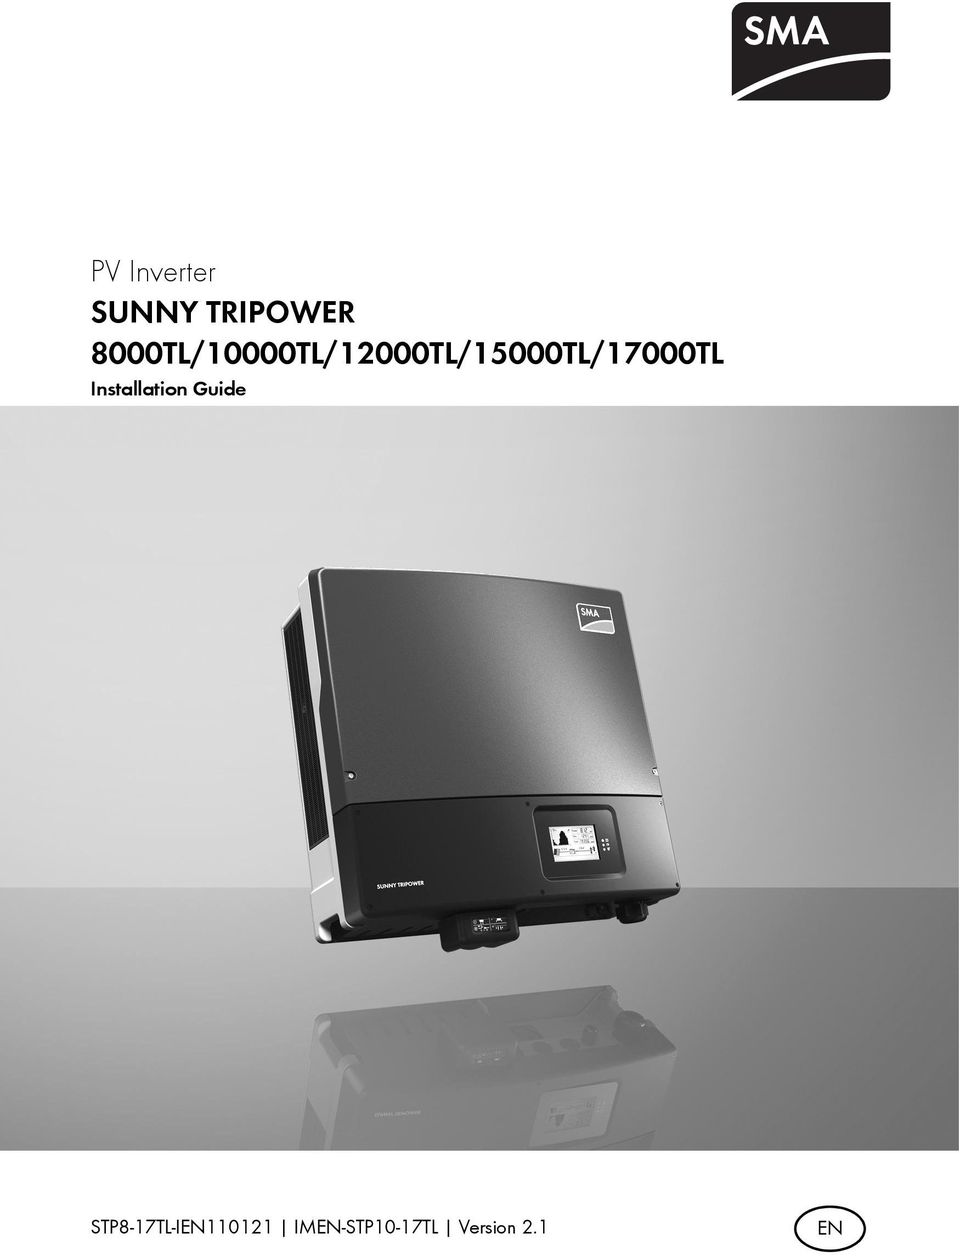
2 Power curve of the past 16 feed-in hours or past 16 days (switching the display is done by tapping on the display) Disturbance that can be remedied on-site (see section 11.2 ) Device disturbance Contact SMA Serviceline Switching between input A and B every 10 seconds A B Tapping on the lower lid: Activating the background illumination Switching through the energy values of the past 16 feed-in hours to the daily energy values of the past 16 days Switching through the line display Bluetooth connection to other Sunny Tripowers Input voltage / input current Grid relay Output voltage / output current of the phase as shown below PV generator event number Grid event number Power reduction due to excessive temperature Sunny Tripower event number Fan might need cleaning Provide better ventilation for Sunny Tripower Current output Daily energy Total energy generated since the Sunny Tripower was installed Text line for displaying an event Phase assignment

3 SMA Solar Technology AG Table of Contents Table of Contents 1 Notes on this Manual Scope of Validity Target Group Additional Information Symbols Used Safety Appropriate Usage Safety Instructions Explanation of Symbols Symbols on the Inverter Symbols on the Type Label Product Description Overvoltage Protectors Type II Auto-adaptive Identification of String Failure Electronic string fuse Reactive power feeding and grid safety management Unpacking Scope of Delivery Identifying the Inverter Installing the Device Safety Selecting the Mounting Location Mounting the Inverter with Rear Panel Installation Guide STP8-17TL-IEN

4 Table of Contents SMA Solar Technology AG 6 Electrical Connection Safety Overview of the Connection Area Connecting the Public Grid (AC) Conditions for the AC Connection AC Connection Procedure Connecting the Second Protective Conductor Connection of the PV Generator (DC) Conditions for the DC connection Assembling the DC plug connector Opening the DC Plug Connector Connecting the PV Generator (DC) Setting the Country Standard and Display Language Checking the Country Standard Expansion of shutdown thresholds Setting the Country Standard and Language using Rotary Switches Communication Bluetooth Multi-function relay Communication module Retrofitting Overvoltage Protectors Type II Commissioning Commissioning the Inverter Display messages during initialization Self-test in accordance with ENEL guideline (only for Italy) Starting the Self-Test by Tapping Test Sequence Interruption of the Self-Test Restarting the Self-Test Activating the auto-adaptive string failure detection STP8-17TL-IEN Installation Guide
............................... 37 6.")
5 SMA Solar Technology AG Table of Contents 8 Disconnecting the Inverter Safety Procedure Maintenance and Cleaning Checking Heat Dissipation Cleaning the Air Grills Cleaning the Fan on the Underside of the Inverter Cleaning the Fans on the Left-Hand Side of the Inverter Checking the fans Checking the Electronic Solar Switch (ESS) for wear Slot for SD card Messages Event messages Error Messages Failure search Sunny Tripower is beeping Checking the PV Array for a Ground Fault Check varistors Replacing overvoltage protectors type II Decommissioning Dismantling the Inverter Replacing the enclosure lid Packing the Inverter Storing the Inverter Disposing of the Inverter Installation Guide STP8-17TL-IEN
 for wear........ 76 10 Slot for SD card................................. 77 11 Messages...................................... 78 11.1 Event messages.")
6 Table of Contents SMA Solar Technology AG 14 Technical Data Sunny Tripower 8000TL Sunny Tripower 10000TL Sunny Tripower 12000TL Sunny Tripower 15000TL Sunny Tripower 17000TL Accessories Contact STP8-17TL-IEN Installation Guide

7 SMA Solar Technology AG Notes on this Manual 1 Notes on this Manual 1.1 Scope of Validity This installation guide describes the assembly, installation, commissioning, maintenance and failure search of the following SMA inverters: Sunny Tripower 8000TL (STP 8000TL-10) Sunny Tripower 10000TL (STP 10000TL-10) Sunny Tripower 12000TL (STP 12000TL-10) Sunny Tripower 15000TL (STP 15000TL-10) Sunny Tripower 17000TL (STP 17000TL-10) Store this manual where it will be accessible at all times. 1.2 Target Group This manual is for qualified personnel. The tasks described in this manual may only be performed by qualified personnel. 1.3 Additional Information You will find further information on special topics such as designing a line circuit breaker or the description of the operating parameters in the download area at Installation Guide STP8-17TL-IEN

8 Notes on this Manual SMA Solar Technology AG 1.4 Symbols Used The following types of safety instructions and general information appear in this document as described below: DANGER! DANGER indicates a hazardous situation which, if not avoided, will result in death or serious injury. WARNING! WARNING indicates a hazardous situation which, if not avoided, could result in death or serious injury. CAUTION! CAUTION indicates a hazardous situation which, if not avoided, could result in minor or moderate injury. NOTICE! NOTICE indicates a situation that can result in property damage, if not avoided. Information Information provides tips that are valuable for the optimal operation of your product. This symbol indicates an outcome. 8 STP8-17TL-IEN Installation Guide

9 SMA Solar Technology AG Safety 2 Safety 2.1 Appropriate Usage The Sunny Tripower is a PV inverter which converts the DC current of a PV generator into AC current and feeds it into the public grid. Principle of a PV plant with this Sunny Tripower String connections Sunny Tripower 8000TL, 10000TL and 12000TL The Sunny Tripower models 8000TL, 10000TL and 12000TL only have 4 string connections at input A! The Sunny Tripower may only be operated with PV generators (modules and cabling) of protection class II. Do not connect any sources of energy other than PV modules to the Sunny Tripower. Capacitive Leakage Currents PV modules with large capacities relative to ground, such as thin-film modules with cells on a metallic substrate, are only to be implemented if their coupling capacity does not exceed 2.55 μf. During grid feeding, a leakage current flows from the cells to ground. The strength of this current depends on the manner in which the modules are installed (e.g. foil on metal roof) and on the prevailing weather conditions (e.g. rain, snow) This "normal" leakage current may not exceed 50 ma due to the fact that the inverter would otherwise automatically disconnect from the grid as a protective measure. Further information on this topic is available in the Technical Information "Capacitive Leakage Currents" in the download area at When designing the PV system, ensure that the values comply with the permitted operating range of all components at all times. The free design program "Sunny Design" ( will assist you. The manufacturer of the PV modules must have approved the modules for use with this Sunny Tripower unit. You must also ensure that all measures recommended by the module manufacturer for long-term maintenance of the module properties are taken (see also Technical Information "Module Technology", in the download area of Installation Guide STP8-17TL-IEN

10 Safety SMA Solar Technology AG Do not use the Sunny Tripower for purposes other than those described here. Alternative uses, modifications to the Sunny Tripower or the installation of components not expressly recommended or sold by SMA Solar Technology AG void the warranty claims and operation permission. Certified countries With the appropriate settings, the Sunny Tripower 10000TL/12000TL/15000TL/17000TL comply with the requirements specified in the following standards and directives (dated: January/2011): UTE C15-712* VDE ( ) Enel-GUIDA* C10/C11( ) a) * PPDS* RD 1663/2000 (2000)* RD 1663/661* EN ( ) b) * AS 4777 (2005)* PPC ( )* G83/1-1* SI 4777* IEC (MEA)* IEC (PEA)* a) only possible if the 3-phase nominal voltage of the phase conductor is 400 V b) does not apply to all national standard deviations of EN * applies to Sunny Tripower 10000TL/12000TL/15000TL/17000TL, is planned for Sunny Tripower 8000TL SMA Solar Technology AG can preset special grid parameters for other countries/installation locations according to customer requests after evaluation by SMA Solar Technology AG. You can make later modifications yourself by changing software parameters with respective communication products (e.g. Sunny Data Control or Sunny Explorer). To change the grid-relevant parameters, you need a personal access code, the so-called SMA Grid Guard code. The application form for the personal access code can be found in the download area at in the category "Certificate" of the respective inverter. 10 STP8-17TL-IEN Installation Guide
: UTE C15-712* VDE 0126-1-1 (02.2006) Enel-GUIDA* C10/C11(08.2003) a) * PPDS* RD 1663/2000 (2000)* RD 1663/661* EN 50438 (12.2007) b) * AS 4777 (2005)* PPC (06.")
11 SMA Solar Technology AG Safety 2.2 Safety Instructions DANGER! Danger to life due to high voltages in the inverter! All work on the inverter may be carried out by qualified personnel only. The appliance is not to be used by children or persons with reduced physical, sensory or mental capabilities, or lack of experience and knowledge, unless they have been given supervision or instruction. Children should be supervised to ensure that they do not play with the appliance. CAUTION! Danger of burn injuries due to hot enclosure parts! During operation, the upper lid of the enclosure and the enclosure body may become hot. Only touch the lower enclosure lid during operation. CAUTION! Possible damage to health as a result of the effects of radiation! Do not stay closer than 20 cm to the inverter for any length of time. Grounding the PV generator Comply with the local requirements for grounding the PV modules and the PV generator. SMA Solar Technology AG recommends connecting the generator frame and other electrically conductive surfaces in a manner which ensures continuous conduction and ground these in order to have optimal protection of the system and personnel. Installation Guide STP8-17TL-IEN

12 Safety SMA Solar Technology AG 2.3 Explanation of Symbols This section gives an explanation of all the symbols shown on the inverter and on the type label Symbols on the Inverter Symbol Explanation Operation Display. Shows the operating status of the inverter. An error has occurred. Read section 12 Failure search (page 88) to remedy the error. Bluetooth Wireless Technology. Shows the status of Bluetooth Communication. DC circuit breaker Electronic Solar Switch (ESS) If the ESS connects, then the DC circuit is completed. To interrupt the DC circuit and disconnect the inverter securely under load, you have to first pull out the ESS and then remove all DC plug connectors, as described in section 8 Disconnecting the Inverter (page 66). Danger to life due to high voltages in the inverter! There is residual voltage in the inverter. The inverter requires 10 minutes to discharge. Wait 10 minutes before you open the upper lid or the DC lid. NOTICE, danger! Observe the connection requirements for second protective conductor in section Conditions for the AC Connection (page 26) Symbols on the Type Label Symbol Explanation Beware of dangerous electrical voltage. The inverter operates at high voltages. All work on the inverter may be carried out by qualified personnel only. Beware of hot surface. The inverter can become hot during operation. Avoid contact during operation. 12 STP8-17TL-IEN Installation Guide

13 SMA Solar Technology AG Safety Symbol Explanation Observe all documentation accompanying the inverter. The inverter must not be disposed of with the household waste. For further information on disposal, see section 13.5 Disposing of the Inverter (page 98). CE mark. The inverter complies with the requirements of the applicable EC guidelines. The inverter has no transformer. Direct Current (DC) Alternating Current (AC) Protection rating IP54. The inverter is protected against dust deposits in the interior and against splashes of water from all angles. RAL quality mark for solar products. The inverter complies with the requirements of the German Institute for Quality Assurance and Labeling. Device class label. The inverter is equipped with a wireless component that complies with the harmonized standards. Certified safety The inverter complies with the requirements of the Equipment and Product Safety Act in Europe. Australian mark of conformity Korean mark of conformity Installation Guide STP8-17TL-IEN

14 Product Description SMA Solar Technology AG 3 Product Description The Sunny Tripower is a multi-string inverter which converts the DC current of a PV generator into AC current. To do this, it is equipped with 2 separate MPP trackers which can be connected to different PV modules. Power is fed to the public grid in three-phase. Cooling is carried out by the cooling system OptiCool, whereby a fan is integrated on the underside and on the left side of the enclosure. In addition, Sunny Tripower is equipped with the features described below. 3.1 Overvoltage Protectors Type II Alongside the standard, thermally controlled varistors, the Sunny Tripower is equipped with module plug-in slots for connecting additional overvoltage protectors of type II. The modules are monitored when plugged in. If a module triggers, a warning will come up on the display or in the external communication (e.g. Sunny WebBox or Sunny Explorer). This makes it easy to integrate the Sunny Tripower into a lightning protection concept. The necessary modules are available as retrofit kits for input A or input A+B. 3.2 Auto-adaptive Identification of String Failure The Sunny Tripower is equipped with a system which recognizes total failure of individual strings or part-strings (see following figure). For this system to function reliably, at least 2 string inputs on the Sunny Tripower must be occupied. With a PV module system of approx. 1 A, monitoring of up to 6 part-strings per string input is possible. One advantage of this system is that its auto-adaptive function completely eliminates the necessity of any configuration. A learning curve of approx. 14 days from initial activation is required by the Sunny Tripower in moderate irradiation. If string failure occurs, a warning will come up on the display or in the external communication (e.g. Sunny WebBox or Sunny Explorer). 14 STP8-17TL-IEN Installation Guide

15 SMA Solar Technology AG Product Description 3.3 Electronic string fuse The Sunny Tripower is equipped with an electronic string fuse. It prevent dangerous reverse currents in the PV generator and thus plays a key role in fire prevention. Reverse currents can occur if connections are reverse poled during installation or as a result of module defects during operation. The electronic string fuse recognizes such defects and short-circuits the PV generator. This prevents the occurrence of reverse currents and thus safeguards both the PV plant and the Sunny Tripower. An advantage of this method is that conventional fuses at the DC inputs are not necessary. The electronic solution is entirely maintenance-free and does not require any dimensioning. In order to get the full benefit of this function, it is crucial to take great care during commissioning of the device (see Section 6.4 Connection of the PV Generator (DC) (page 31)). The Sunny Tripower warns about dangerous conditions by beeping and issuing warnings in the display or via external communication. If electrical installation takes place under conditions of insufficient irradiation (PV voltage smaller than 188 V), the Sunny Tripower will not have power supply which means that the protective functions described above will not be active during installation. 3.4 Reactive power feeding and grid safety management Sunny Tripower inverters are capable of utilizing reactive power and can feed reactive power to the grid by setting a default value for the displacement power factor (cos ϕ). Moreover, these inverters are equipped with extended grid management functions, e.g. power limiter and dynamic grid support. These functions can be activated and configured depending on the requirements of the utility operator. Detailed information on the setting parameters of this function is available in the Technical Description "Sunny Tripower reactive power feeding and grid safety management" in the download area at in the "Technical Description" category of the respective inverter. Installation Guide STP8-17TL-IEN

16 Unpacking SMA Solar Technology AG 4 Unpacking 4.1 Scope of Delivery Check the delivery for completeness and for any visible external damage. Contact your dealer if anything is damaged or missing. Object Number Description A 1 Sunny Tripower B 1 Electronic Solar Switch (ESS) C 1 Rear panel (wall mounting bracket) D 1 Set of documents with explanations and certificates E 1 Installation guide, including user manual F 1 Supplement with the factory settings of the inverter Installation guide for RS485 communication module (optional) 16 STP8-17TL-IEN Installation Guide

17 SMA Solar Technology AG Unpacking Object Number Description Contents of Sunclix DC plug connector bag G 10/12 DC plug connector Sunny Tripower 8000TL/10000TL/12000TL: 10 units (5 x plus, 5 x minus) Sunny Tripower 15000TL/17000TL: 12 units (6 x plus, 6 x minus) H 10/12 Sealing plug Sunny Tripower 8000TL/10000TL/12000TL: 10 units Sunny Tripower 15000TL/17000TL: 12 units Contents of inverter accessories bag I 1 Eyebolt (M5) to secure the Sunny Tripower to the rear panel K 2 Cylinder head screws: (M5x10) to fix the enclosure to the rear panel L 1 Cable gland for AC connection C 1 Counternut for cable gland at AC connection N 1 Terminal clamp (M6) for additional ground O 1 Cylinder head screw (M6) for ground terminal p 1 Lock washer (M6) for ground terminal Q 2 Cylinder head screws (M5x20) for upper lid R 2 Lock washers (M5) for lid screws (spares) 4.2 Identifying the Inverter You can identify the inverter by the type label. The type label is on the right side of the enclosure. The serial number (Serial no.) and the type (Type / Model) of the product, as well as device-specific characteristics are specified on the type label. Installation Guide STP8-17TL-IEN
 for additional ground O 1 Cylinder head screw (M6) for ground terminal p 1 Lock washer (M6) for ground terminal Q 2 Cylinder head")
18 Installing the Device SMA Solar Technology AG 5 Installing the Device 5.1 Safety DANGER! Danger to life due to fire or explosion! Despite careful construction, electrical devices can cause fires. Do not mount the inverter on flammable construction materials. Do not install the inverter in areas where highly flammable materials are stored. Do not install inverters in areas with a risk of explosion. CAUTION! Risk of injury due to the heavy weight of the inverter (approx. 65 kg)! Take the weight of the inverter into account for transport. Select a suitable mounting location and mounting surface. When mounting the rear panel, use fastening material suitable for the mounting surface. Two people are needed to mount the inverter. CAUTION! Danger of burn injuries due to hot enclosure parts! Mount the inverter in such a way that it cannot be touched inadvertently. 5.2 Selecting the Mounting Location Consider the following points when selecting where to install: The installation method and location must be suitable for the inverter's weight and dimensions (see section 14 Technical Data (page 99)). Mount on a solid surface. It must be possible to access the installation location freely and safely at all times without the need for additional tools such as scaffolding or lifting platforms. Service actions are otherwise limited. 18 STP8-17TL-IEN Installation Guide

19 SMA Solar Technology AG Installing the Device Vertical installation or tilted backwards by max. 15. The connection area must point downwards. Never install the device with a forward tilt. Never install the device with a sideways tilt. Do not install horizontally. Install the inverter at eye level. Given the weight of the device, this will facilitate disassembling if service work is necessary. The ambient temperature should be below 40 C to ensure optimal operation. Do not expose the inverter to direct sunlight to avoid a power reduction due to excessive heating. In living areas, do not mount the unit on plasterboard walls or similar in order to avoid audible vibrations. The inverter can make noises when in use which may be perceived as a nuisance in a living area. Observe the minimum clearances to walls, other inverters or objects as shown in the diagram in order to guarantee sufficient heat dissipation and to have enough space for removing the Electronic Solar Switch. Multiple inverters installed in areas with high ambient temperatures There must be sufficient clearance between the individual inverters so that the cooling air from the adjacent inverter is not drawn in. If necessary, increase the clearances and make sure there is enough ventilation to ensure sufficient cooling of the inverters. Installation Guide STP8-17TL-IEN

20 Installing the Device SMA Solar Technology AG 5.3 Mounting the Inverter with Rear Panel 1. Use the rear panel as a drilling template and mark the positions of the drill holes. Display 2. Mount the rear panel. Use 1 upper hole on the right and on the left and the hole in the middle. 20 STP8-17TL-IEN Installation Guide

21 SMA Solar Technology AG Installing the Device 3. Attach the inverter to the rear panel so that the enclosure of the inverter is flush with the rear panel. For two people to transport the inverter, each person must use the recessed grips underneath and at the same time take a hold of the upper edge of the lid. When transporting with a crane, you can attach two eye bolts to the top of the inverter (see A: M10, diameter = 10 mm). To do this, remove the blank plugs and screw in the eye bolts as far as they will go. 4. If necessary, remove the eye bolts after transport and re-attach the blank plugs. 5. Loosen all 6 captive screws of the lower lid. 6. Lift the lower lid upwards and remove it. Installation Guide STP8-17TL-IEN
22 Installing the Device SMA Solar Technology AG 7. Screw the eye bolt supplied into the hole provided to secure the enclosure from being lifted off. Only tighten the eyebolt hand-tight. 8. Using the two M5x10 cylinder head screws provided, secure the enclosure on the underside to prevent the enclosure from being lifted off the rear panel (for torque, see section 14 Technical Data (page 99)). 9. Ensure the inverter is firmly fastened. The inverter is now securely mounted to the wall. If the inverter does not need to be connected immediately, re-attach the lower lid. Attach the lower lid so that it is at an angle. Ensure that the captive screws protrude. Pre-screw all 6 screws and then tighten them in the sequence shown on the right (see section 14 Technical Data (page 99)). 22 STP8-17TL-IEN Installation Guide
23 SMA Solar Technology AG Installing the Device Optional Theft Protection To protect the inverter from theft, you can lock it to the rear panel with a padlock. The lock must meet the following requirements: Size: A: 6 8 mm diameter B: mm C: mm D: mm E: mm Stainless Hardened shackle Secured lock cylinder Storage of the key Store the key carefully for possible service purposes. 1. Put the shackle of the padlock through the eye of the bolt that was previously mounted and close the lock. The inverter is now protected against theft. Installation Guide STP8-17TL-IEN
24 Electrical Connection SMA Solar Technology AG 6 Electrical Connection 6.1 Safety NOTICE! Electrostatic discharge can damage the inverter. Internal components of the inverter can be irreparably damaged by static discharge. Ground yourself before touching a component. 6.2 Overview of the Connection Area Object Description A DC lid (slots for overvoltage protectors and varistors are located here) B Plug for connecting the multi-function relay C Plug for connecting the RS485 communication module (optional) D Clamp for power supply line E Jumper for setting the language to English F Rotary switch for setting the Bluetooth NetID G Screw for releasing and raising the display H Rotary switches for setting the country standard and display language I Cable opening for the multi-function relay (M20, 5 mm 13 mm) 24 STP8-17TL-IEN Installation Guide
25 SMA Solar Technology AG Electrical Connection Object Description A Electronic Solar Switch (ESS) socket B Cable opening for the multi-function relay (M20, 5 mm 13 mm) C Cable feed-throughs for communication via RS485 (M32) D Additional cable feed-through (M20) E Cable feed-through for grid connection (AC) (M32, 14 mm 25 mm) F DC plug connectors for connecting the strings (input zone B) G DC plug connectors for connecting the strings (input zone A) (for Sunny Tripower 8000TL/10000TL/12000TL only 4 units) Installation Guide STP8-17TL-IEN
26 Electrical Connection SMA Solar Technology AG 6.3 Connecting the Public Grid (AC) Conditions for the AC Connection You must comply with the connection requirements of your utility operator. Residual current breaker The inverter is equipped with an integrated universal current-sensitive residual-current monitoring unit. The inverter can automatically differentiate between fault currents and normal capacitive leakage currents. If an external RCD or residual current breaker is strictly required, you must use a switch which triggers at a failure current of 100 ma or higher. Cable Sizing The grid impedance of the AC cable must not exceed 1 Ohm. Otherwise, the inverter will disconnect at full feed capacity due to excessive voltage at the feed-in point. Dimension the conductor cross-section with the help of the "Sunny Design" design program ( in such a way that the conduction loss at nominal power does not exceed 1 %. The maximum cable lengths relative to the conductor cross-section are shown in the following table. Do not exceed the maximum cable length. Conductor cross section STP 8000TL-10 STP 10000TL-10 Max. cable length STP 12000TL-10 STP 15000TL-10 STP 17000TL mm² 60 m 53 m 43 m 35 m 31 m 8.0 mm² 80 m 70 m 58 m 46 m 41 m 10.0 mm² 100 m 88 m 73 m 58 m 52 m 16.0 mm² 1160 m 141 m 116 m 93 m 83 m Connection of a second protective conductor In some installation countries, a second protective conductor is required to prevent a contact current in the event of a malfunction in the original protective conductor. For installation countries falling under the scope of validity of the IEC standard 62109, the following requirements are applicable: Installation of the protective conductor on the AC terminal with a cable cross section of at least 10 mm² Cu. or Installation of a second protective conductor on the ground terminal with the same cross section as the original productive conductor on the AC terminal (see section Connecting the Second Protective Conductor (page 30)). In each case, observe the applicable regulations in the installation country. 26 STP8-17TL-IEN Installation Guide
27 SMA Solar Technology AG Electrical Connection Load Disconnection Unit You must install a separate three-phase circuit-breaker for each inverter in order to ensure that the inverter can be safely disconnected under load. The maximal permissible rating is located in section 14 Technical Data (page 99) DANGER! Danger to life due to fire! When more than one inverter is connected to the same line circuit breaker, the protective function of the line circuit breaker is no longer guaranteed. It can result in a cable fire or the destruction of the inverter. Never connect several inverters to a single line circuit breaker. Install a separate line circuit breaker for each phase. Comply with the maximum permissible fuse protection of the inverter when selecting the circuit breaker. DANGER! Danger to life due to fire! When a generator (inverter) and a consumer are connected to the same line circuit breaker, the protective function of the line circuit breaker is no longer guaranteed. The current from the inverter and the grid can accumulate to overcurrent which is not detected by the line circuit breaker. Never connect loads between the inverter and the line circuit breaker without protection. Always protect loads separately. NOTICE! Damage to the inverter by using screw type fuse elements as a load disconnection unit! A screw type fuse element, e.g. D system (Diazed) or D0 system (Neozed) is not a load disconnection device, and thus may not be used as a load disconnection unit. A screw type fuse element is only used as cable protection. When disconnecting under load using a screw type fuse element, the inverter can be damaged. Use only a load disconnecting switch or a line circuit breaker as a load disconnecting unit. Installation Guide STP8-17TL-IEN
28 Electrical Connection SMA Solar Technology AG Cable Requirements Position Name Value A Cable diameter mm B Conductor cross section mm², with bootlace ferrule max. 10 mm² C Strip insulation Approx. 12 mm The PE wire must be 5 mm longer than the L and N conductors! AC Connection Procedure 1. Check the grid voltage and compare it with the permissible voltage range (see section 14 Technical Data (page 99)). 2. Disconnect the line circuit breaker from all 3 phases and and prevent it from being reactivated. 3. Loosen all 6 captive screws of the lower lid. 4. Lift the lower lid upwards and remove it. 28 STP8-17TL-IEN Installation Guide
29 SMA Solar Technology AG Electrical Connection 5. Check the correct country setting of the inverter using the supplement provided against the factory settings. If the inverter is not set to the desired country standard, then adjust the country standard using the rotary switches as described in section Setting the Country Standard and Language using Rotary Switches (page 48). 6. Remove the adhesive tape from the AC enclosure opening. 7. Insert the AC cable gland from the outside into the cable feed-through and tighten it from the inside with the counternut. 8. Pull the cable through. 9. Raise the AC clamp terminals as far as they will go. NOTICE! Risk of fire when connecting 2 conductors! If 2 conductors are connected to one terminal, a poor electrical contact can result in overheating or a risk of fire. Never connect more than one conductor per terminal. 10. Connect L1, L2, L3, N and the protective conductor (PE) to the AC terminal in accordance with the label. To do this, the PE wire must be 5 mm longer than the L and N wires! L and N must not be swapped. CAUTION! Danger of crushing when terminals snap shut! The terminals close by snapping down fast and hard. Press the terminals down with your thumb, do not grip the entire terminal on all sides. Keep fingers away from the terminals. 11. Close all terminals of the AC terminal again until they snap into place. Installation Guide STP8-17TL-IEN
30 Electrical Connection SMA Solar Technology AG 12. Screw cap nut tightly on to the cable at the feedthrough. DANGER! Danger to life due to high voltages in the inverter! Do not switch on the line circuit breaker until the PV generator has been connected and the inverter is securely closed Connecting the Second Protective Conductor If required in the installation country, the ground terminal can be used to connect a second protective conductor. Procedure 1. Take terminal clamp, cylinder head screw (M6) and lock washer (M6) out of the accessory pack. 2. Insert the stripped ground cable (D) under the terminal clamp (max. cross section 16 mm²). 3. Screw terminal (C) tight with bolt (A). The toothing of the lock washer (B) must face toward the terminal clamp. You can ground multiple inverters as shown in the diagram below: D A B C 30 STP8-17TL-IEN Installation Guide
31 SMA Solar Technology AG Electrical Connection 6.4 Connection of the PV Generator (DC) Conditions for the DC connection The inverter has two input zones "A" and "B", each with its own MPP tracker. At input zone A up to 4 (Sunny Tripower models 8000TL/10000TL/12000TL ) or 5 strings (Sunny Tripower models 15000TL/17000TL) respectively can be connected. At input zone B, 1 string can be connected. For input zone A, the connected modules have the following requirements: Same type Same number Identical alignment Identical tilt The connection cables of the PV modules must be equipped with plug connectors. You will find the necessary DC plug connectors for the DC connection in the delivery. Installation Guide STP8-17TL-IEN
32 Electrical Connection SMA Solar Technology AG Use of Adaptors Adaptors (branch connectors) are not to be visible or freely accessible in the immediate surrounding of the inverter. The DC current flow may not be interrupted via adaptors. Disconnect the inverter, as described in section 8 Disconnecting the Inverter (page 66). The following limiting values at the DC input of the inverter may not be exceeded: Sunny Tripower Max. input voltage (DC) Max. input current (MPP) (DC) Max. short-circuit current (DC) Max. short-circuit current per string input (DC) Input zone A/B Input zone A/B A1 A5/B 8000TL V 22.0 A/11.0 A 33 A/12.5 A 33 A/12.5 A 10000TL V 22.0 A/11.0 A 33 A/12.5 A 33 A/12.5 A 12000TL V 22.0 A/11.0 A 33 A/12.5 A 33 A/12.5 A 15000TL V 33.0 A/11.0 A 50 A/12.5 A 33 A/12.5 A 17000TL V 33.0 A/11.0 A 50 A/12.5 A 33 A/12.5 A WARNING! Risk of fire as a result of overcurrent on the string input! Irreparable damage to the Sunny Tripower. Because the electronic string fuse shorts the PV generator when a fault occurs, the following limiting values may not be exceeded for the maximum short-circuit current per string input. If a string input is overloaded, it can result in an electric arc and hence a risk of fire. Make sure that the limiting values specified in the table above are not exceeded. Check whether the short-circuit currents of the connected modules observe the abovementioned limiting values. 32 STP8-17TL-IEN Installation Guide
33 , SMA Solar Technology AG Electrical Connection At installation, the DC input voltage should be at least 188 V (see section 14 Technical Data (page 99)). This will ensure that the protective function of the integrated electronic string fuse is activated. Otherwise, a reversed polarity at the DC connection or a defective string will not be recognized by the inverter. NOTICE! Risk of fire with the PV generator due to a failure to detect reverse currents! The integrated electronic string fuse monitors the PV generator and protects it against dangerous reverse currents. To activate the electronic string fuse, proceed as follows when connecting the strings: If more than 2 strings are connected to the inverter, ALWAYS INITIALLY connect the first string to input B. No mixed connections between input zones For instance, if the positive pole of a string is connected at input zone A and the negative pole at input zone B, this is called a mixed connection. Only connect strings at one input zone and never mix the input zones A and B! Otherwise, the electronic string fuse cannot fulfill its function. Furthermore, the inverter in this case no longer fulfills the requirements of the EMC Directive (Directive on the electromagnetic compatibility of a device) and therefore loses its operation license. Installation Guide STP8-17TL-IEN
34 Electrical Connection SMA Solar Technology AG Assembling the DC plug connector The connection cables of the PV modules must be equipped with the DC plug connectors provided for connecting the inverter. To assemble the DC plug connectors, proceed as follows: Make sure the plug connectors have the correct polarity. The DC plug connectors have the symbols "+" and " ". Cable Requirements Use a PV1-F cable. Procedure 1. Insert the stripped cable into the plug connector as far as it will go. 2. Press the clamping bracket down until it audibly snaps into place. 3. Ensure the cable is correctly in place. Result If the conductors are visible in the hollow cavity of the clamp, the cable is in the correct position. Action Proceed to step STP8-17TL-IEN Installation Guide
35 SMA Solar Technology AG Electrical Connection Result Action If the conductors are not visible in the hollow cavity of the clamp, the cable is not in the correct position. Loosen the terminal clamp. Use a screwdriver with a width of 3.5 mm. Remove the cable and start again from step Push the threaded joint to the thread and screw into place with a torque of 2 Nm. The DC plug connectors are now assembled and can be connected to the inverter as described in section Connecting the PV Generator (DC) (page 37). Installation Guide STP8-17TL-IEN
36 Electrical Connection SMA Solar Technology AG Opening the DC Plug Connector 1. Screw the threaded joint off. 2. To release the plug, slot a screw driver into the side catch mechanism and lever out. Use a screwdriver with a width of 3.5 mm. 3. Carefully pull apart the DC plug connector. 4. Loosen the terminal clamp. Use a screwdriver with a width of 3.5 mm. 5. Remove cable. The cable is removed from the DC plug connector. 36 STP8-17TL-IEN Installation Guide
37 SMA Solar Technology AG Electrical Connection Connecting the PV Generator (DC) DANGER! Danger to life due to high voltages in the inverter! Before connecting the PV generator, ensure that the AC line circuit breaker is switched off from all 3 phases. WARNING! There is a risk of an electric arc if the DC plug connectors are pulled out while the Sunny Tripower is beeping! The integrated electronic string fuse monitors the PV generator. If installation has not been carried out correctly (e.g. poles reversed) or a string is faulty, the electronic string fuse will short the PV generator and the Sunny Tripower will start beeping. Do NOT pull out the DC plug connector as otherwise there is a risk of an electric arc. Do NOT pull out the Electronic Solar Switch as the entire reverse current will otherwise flow through the defective string and it could result in a fire. Proceed as described in section 12.1 Sunny Tripower is beeping (page 88). NOTICE! Destruction of the inverter by overvoltage! If the voltage of the PV modules exceeds the maximum input voltage of the inverter, it can be destroyed by the overvoltage. All warranty claims become void. Do not connect strings with an open circuit voltage greater than the maximum input voltage of the inverter. Check the system design. NOTICE! Excessive voltages can destroy the measuring device! Only use measuring devices with a DC input voltage range up to at least V. Installation Guide STP8-17TL-IEN
38 Electrical Connection SMA Solar Technology AG 1. Check the connection cables of the PV modules for correct polarity and that the maximum input voltage of the inverter is not exceeded. With an ambient temperature over 10 C, the open circuit voltage of the PV modules should not exceed 90 % of the maximum input voltage of the inverter. Otherwise, check the system design and the PV module connection! At lower ambient temperatures, the maximum input voltage of the inverter can otherwise be exceeded. 2. Check the strings for ground faults, as described in section 12.2 Checking the PV Array for a Ground Fault (page 89). 3. Check the Electronic Solar Switch for wear, as described in section 9.2 Checking the Electronic Solar Switch (ESS) for wear (page 76) and attach it only if it is in perfect condition. Only connect the Electronic Solar Switch during installation when the lid is open! This is necessary in order to activate the protective function of the electronic string fuse. 38 STP8-17TL-IEN Installation Guide
39 SMA Solar Technology AG Electrical Connection NOTICE! Risk of fire with the PV generator due to a failure to detect reverse currents! The integrated electronic string fuse monitors the PV generator and protects it against dangerous reverse currents. To activate the electronic string fuse, proceed as follows when connecting the strings: If more than 2 strings are connected to the Sunny Tripower, ALWAYS INITIALLY connect the first string to input B. Use of external string collection boxes When using external string collection boxes, the functionality of the electronic string fuse may be limited. 4. Check the first DC plug connector to ensure correct polarity and connect (at input B if more than 2 strings are connected to the inverter). 5. After connecting the strings, pay attention to messages in the display and any acoustic signals! Only continue if the following conditions are fulfilled: The green LED is glowing or flashing. There is NO acoustic signal after 30 seconds. NONE of the error messages 40, 64 or 82 are shown in the display. Proceed according to the instructions given in the following table: Event The display is not showing anything after 30 seconds and the Sunny Tripower is not beeping although the DC input voltage is over 188 V. Action There is a fault in the Sunny Tripower. Contact the SMA Serviceline (see section 16 Contact (page 125)). Installation Guide STP8-17TL-IEN
40 Electrical Connection SMA Solar Technology AG Event The Sunny Tripower starts beeping. The display shows error message 40, 64 or 82. Action The Sunny Tripower short-circuits the PV generator. On no account disconnects the Electronic Solar Switch or the DC plug connectors. Wait until the Sunny Tripower stops beeping (in darkness). If you pull out the DC plug connectors, there is a risk of an electric arc, since the Sunny Tripower shorts the PV generator in order to prevent reverse currents flowing through individual strings. Depending on the irradiation intensity, strong currents can be generated. However, the PV generator and the Sunny Tripower are in a safe state. Before you leave the Sunny Tripower, install a contact barrier (e.g. a fence boundary) and moisture protection (e.g. tarpaulin). Wait until dark before pulling out the Electronic Solar Switch and any DC plug connectors, and eliminate any errors (e.g. reversed poles or defective string). Follow the instructions on the display. For more detailed information, see section 11.2 Error Messages (page 79). 6. Follow the same procedure to connect all further strings. It is no longer necessary to wait 30 seconds. Number of Strings - Sunny Tripower 8000TL/10000TL/12000TL The Sunny Tripower models 8000TL/10000TL/12000TL only have 4 strings at input A! 40 STP8-17TL-IEN Installation Guide
41 SMA Solar Technology AG Electrical Connection 7. To create the sealing on the inverter, all the DC inputs that are not required have to be closed as follows: Insert the sealing plugs provided into the DC plug connectors that are not required. Do not insert the sealing plus into the DC inputs on the inverter. Insert the DC plug connectors with sealing plugs into the corresponding DC inputs on the inverter. 8. If the Sunny Tripower does not beep or display an error message, you can disconnect the Electronic Solar Switch. The display switches off. You can now commission the inverter as described in section 7 Commissioning (page 57). The following connections and settings are optional: Installation Guide STP8-17TL-IEN
42 Electrical Connection SMA Solar Technology AG 6.5 Setting the Country Standard and Display Language The inverter can be configured for various countries. This can be done via two rotary switches in the inverter or by configuring the "CntrySet" and/or "Set Country Standard" parameter using a communication device (e.g. Sunny WebBox or Sunny Explorer). The switch position 0 / 0 indicates the delivered state. If you have ordered the inverter with specific country settings, these will have already been preset in the factory via a communication device. In this case, you will not be able to recognize the setting by the switch position. If changes are made via the rotary switches or via a communication device, these settings will be overwritten and cannot be automatically restored. For devices ordered without any specified country of installation, the standard setting is "VDE " and the language is German. Changes will be immediately accepted after switching the line circuit breaker on. If an unprogrammed switch setting is selected, the inverter issues an error message. Grid Guard Protected Country Data Sets In some countries, the local power supply line requirements demand a mechanism which prevents the parameters for grid feeding from being able to be changed. Some country data sets are therefore protected and can only be unlocked with a personal access code, the so-called SMA Grid Guard code. Grid Guard protected country data sets are automatically blocked for 10 feed-in hours after commissioning, or after the last alteration. If the country data set is changed after these 10 feed-in hours, the inverter will not accept the changes and displays the error message "Grid parameter locked". If,however, a later change to the country data set only relates to a change of the display language, this change is immediately taken on. 42 STP8-17TL-IEN Installation Guide
43 SMA Solar Technology AG Electrical Connection It is also possible to set country data sets (parameter "CntrySet" and/or "Set Country Standard"), and to lock or unlock these manually via a communication device. To lock, you have to set the so-called SMA Grid Guard code to "54321". This will automatically appear as an input window when changing the first grid-relevant parameter. The data set can only be unlocked by entering a personal, 10-digit SMA Grid Guard code which is valid for a maximum of 10 grid-feed hours. The application form for the personal access code can be found in the download area at in the category "Certificate" of the respective inverter. The language is configurable without a password independent of the country data set. Changing of parameters in Grid Guard protected country data sets If the parameters within protected country data sets are changed, these are no longer protected and instead of the standard, "ADJ" or "Special setting" is displayed. In this case, the parameters are not changed automatically after 10 grid-feed hours, but have to be manually locked. To manually lock the parameters, set the SMA Grid Guard code to "54321". Further information on parameter settings Detailed information on how to proceed with respect to setting and changing parameters is available in the respective user manual for your software. The last change (executed via switch or communication device) is always verified and activated if applicable. Consequently, the switch position may not necessarily show the actual country configuration. Installation Guide STP8-17TL-IEN
PV Inverter SUNNY TRIPOWER 8000TL / 10000TL / 12000TL / 15000TL / 17000TL
 PV Inverter SUNNY TRIPOWER 8000TL / 10000TL / 12000TL / 15000TL / 17000TL Installation Manual STP8-17TL-IA-en-31 IMEN-STP10-17TL Version 3.1 EN SMA Solar Technology AG Table of Contents Table of Contents
Firmware Update with SD Card SUNNY BOY WINDY BOY SUNNY TRIPOWER
 Firmware Update with SD Card SUNNY BOY WINDY BOY SUNNY TRIPOWER Technical Description NG_UpdSD-TB-en-32 Version 3.2 EN SMA Solar Technology AG Table of Contents Table of Contents 1 Information on this
Communication Interface for SMA Inverters SMA BLUETOOTH PIGGY-BACK
 Communication Interface for SMA Inverters SMA BLUETOOTH PIGGY-BACK Installation Guide BTPB-IEN112112 98-0014212 Version 1.2 EN SMA Solar Technology AG Table of Contents Table of Contents 1 Notes on this
PV Inverter SUNNY BOY 3000TL / 3600TL / 4000TL / 5000TL
 PV Inverter SUNNY BOY 3000TL / 3600TL / 4000TL / 5000TL Installation Manual SB30-50TL-21-IA-en-20 IMEN-SBXTL-21 Version 2.0 EN SMA Solar Technology AG Table of Contents Table of Contents 1 Information
SUNNY TRIPOWER 5000TL 12000TL
 SUNNY TRIPOWER 5000TL 12000TL STP 5000TL-20 / STP 6000TL-20 / STP 7000TL-20 / STP 8000TL-20 / STP 9000TL-20 / STP 10000TL-20 / STP 12000TL-20 NEW available as 10 kva and 12 kva versions Economical Flexible
Ambient Temperature Sensor TEMPSENSOR-AMBIENT
 Ambient Temperature Sensor TEMPSENSOR-AMBIENT Installation Guide TempsensorAmb-IEN110610 98-0042210 Version 1.0 EN SMA Solar Technology AG Table of Contents Table of Contents 1 Notes on this Guide...............................
INFRARED QUARTZ WALL HEATER
 INFRARED QUARTZ WALL HEATER MODEL NO: IQ2000 PART NO: 6939004 MOUNTING & OPERATION INSTRUCTIONS GC0715 INTRODUCTION Thank you for purchasing this CLARKE Infrared Wall Heater. Before attempting to use this
User s Manual Before using the inverter, you need to read and save the safety instructions.
 User s Manual Before using the inverter, you need to read and save the safety instructions. STI SERIES (STI200, STI300, STI500, STI700, STI1000) Power Frequency Pure Sine Wave Inverter The information
HP UPS R1500 Generation 3
 HP UPS R1500 Generation 3 Installation Instructions Part Number 650952-001 NOTE: The rating label on the device provides the class (A or B) of the equipment. Class B devices have a Federal Communications
FLUORESCENT UV- RING LIGHT OPERATING INSTRUCTION
 FLUORESCENT UV- RING LIGHT OPERATING INSTRUCTION Caution! UV-radiation of this device is in the range of UV-A (320-400 nm). Direct exposure to eyes shall therefore be avoided. UV protection glasses shall
MIC-WKT and MIC-WKT-IR
 MIC-WKT and MIC-WKT-IR Installation Manual Bosch Security Systems EN Installation and Operation Manual MIC-WKTI and MIC-WKT-IR Installation Manual EN 2 MIC-WKT and MIC-WKT-IR Washer Pump Drive Card Kits
Accessories SUNNY REMOTE CONTROL
 Accessories SUNNY REMOTE CONTROL Mounting Instructions SRC20-MO-IEN121010 IMEN-SRC20 Version 1.0 EN SMA Solar Technology AG 1 Information on this Document 1 Information on this Document Validity This
INSTALLATION INSTRUCTIONS: Viewline 52 mm
 -5 Safety information The product was developed, manufactured and inspected according to the basic safety requirements of EC Guidelines and state-of-the-art technology. The instrument is designed for use
33.6W Power over Ethernet Waterproof Adapter PoE Plus Single Port Injector for Outdoor Application
 33.6W Power over Ethernet Waterproof Adapter PoE Plus Single Port Injector for Outdoor Application Features Compliant with the IEEE802.3at Standard -40 to +60 C Temperature Range Diagnostic LEDs Full Protection
Battery Power Inverters
 Battery Power Inverters Renogy 500W 1000W 2000W Pure Sine Wave Inverter Manual 2775 E. Philadelphia St., Ontario, CA 91761 1-800-330-8678 1 Version 1.1 Important Safety Instructions Please save these instructions.
Outdoor 33.6W Dual Port Passive Power-over-Ethernet Midspan For External Security Cameras and Wireless Access Points
 Outdoor 33.6W Dual Port Passive Power-over-Ethernet Midspan For External Security Cameras and Wireless Access Points Features SELV Compliant No Detection Passive Injector Gigabit Compatible Full Protection
Installation Guide of Sunrise Solartech PV Modules. Term 2013. Contents. Purpose of this guide. General. Safety precaution for installing a solar
 Installation Guide of Sunrise Solartech PV Modules Term 2013 Contents Purpose of this guide General Safety precaution for installing a solar Photovoltaic system Product Identification Mechanical Installation
Operating Instructions
 Important information: These instructions contain safety information, read and follow them carefully. Dialight will not accept any responsibility for injury, damage or loss which may occur due to incorrect
Redundancy Module QUINT-DIODE/40
 Redundancy Module QUT DIODE provides: 00% decoupling of power supplies connected in parallel Can be installed in potentially explosive areas Load currents up to 60 A supported Easy assembly by snapping
What are the basic electrical safety issues and remedies in solar photovoltaic installations?
 What are the basic electrical safety issues and remedies in solar photovoltaic installations? Presented by: Behzad Eghtesady City of Los Angeles Department of Building and Safety Topics Covered Photovoltaic
ST Series POWER SUPPLIES USER INSTRUCTIONS
 Introduction These instructions detail the installation and operation requirements for the ST20 & ST35 power supplies. These have been designed for operation in RV s providing a DC power system, with optional
Product and functional description
 Product and functional description The KNX / DALI gateway N 141/02 is a 4 MU wide, DINrail mounted KNX device with one DALI interface to which up to 64 DALI actuators (e.g. DALI ballasts) can be connected
Sunny Boy Accessories SMA POWER BALANCER
 Sunny Boy Accessories SMA POWER BALANCER Installation Guide SBUS-PowBal-IUS102810 IMUS-SBUS-PBL Version 1.0 US SMA America, LLC Legal Restrictions Copyright 2010 SMA America, LLC. All rights reserved.
DTM04 TANK MONITOR DTM08 TANK MONITOR Dtm12 TANK MONITOR. Installation and Operation Manual
 DTM04 TANK MONITOR DTM08 TANK MONITOR Dtm12 TANK MONITOR Installation and Operation Manual 1 ENGLISH Safety Instructions 2 Features 2-3 Specifications 3 Installation 4-5 Wiring Diagrams 6-7 Warranty 8
KNX R. Rain Sensor. Installation and Adjustment
 EN KNX R Rain Sensor Installation and Adjustment 1 Content 1. Description... 3 1.1. Technical specifications... 3 2. Installation and commissioning... 4 2.1. Installation notes... 4 2.2. Location... 4
SunMaxx Solar Filling Station Operating Instructions
 SunMaxx Solar Filling Operating Instructions Content 1. Declaration of conformity... 2 2. Introduction... 2 3. Transportation and unpacking... 4 4. Mounting and commissioning... 5 5. End of operation...
ATS Overhead Table Shelf System INSTRUCTION MANUAL
 ATS Overhead Table Shelf System INSTRUCTION MANUAL ATS Overhead Table Shelf System Instruction Manual Warranty Newport Corporation warrants this product to be free of defects in material and workmanship
How To Install A Sunny Boy
 PV Inverter SUNNY BOY 3000-US / 3800-US / 4000-US Installation Guide SB30-40US-IUS103030 TBUS-SB30_40US Version 3.0 EN SMA America, LLC Legal Restrictions Copyright 2010 SMA America, LLC. All rights reserved.
6720616592.00-1.SD. Flat roof. Rack Mounting. Installation instructions 6 720 647 036 (2010/11) AU
 AU") 6720616592.00-1.SD Flat roof Rack Mounting AU Installation instructions 2 Contents AU Contents 1 Key to symbols and safety instructions....... 3 1.1 Explanation of symbols................ 3 1.2 Safety
6720616592.00-1.SD Flat roof Rack Mounting AU Installation instructions 2 Contents AU Contents 1 Key to symbols and safety instructions....... 3 1.1 Explanation of symbols................ 3 1.2 Safety
aseries A13B Mini Bullet Camera User Manual
 aseries A13B Mini Bullet Camera User Manual Thank you for purchasing our product. If there are any questions, or requests, please do not hesitate to contact the dealer. This manual applies to the MicroView
804 Ti Stand. Manual 8.804.8001EN
 804 Ti Stand Manual 8.804.8001EN Metrohm AG CH-9101 Herisau Switzerland Phone +41 71 353 85 85 Fax +41 71 353 89 01 info@metrohm.com www.metrohm.com 804 Ti Stand Manual 8.804.8001EN 06.2010 ek Teachware
Infrarot-Bewegungsmelder IP44
 Infrarot-Bewegungsmelder IP44 infrared motion sensors IP44 ODA (weiß) slim ODA (schwarz) slim 95174 96000 ODA (weiß) ODA (schwarz) 95175 96001 Betriebsanleitung User s Manual User s Manual infrared motion
When any of the following symbols appear, read the associated information carefully. Symbol Meaning Description
 Samba OPLC SM35-J-R20 Installation Guide The Unitronics SM35-J-R20 offers the following onboard I/Os: 12 Digital Inputs, configurable via wiring to include: 1 HSC/Shaft-encoder Input, 2 Analog inputs (only
Installation and safety instructions for AC/DC built-in devices
 The device type and date of manufacture (week/year) can be found on the device rating plate. In the event of any queries about the device, please quote all the details given on the rating plate. For further
Antenna Splitter ASA 1. Instruction manual
 Antenna Splitter ASA 1 Instruction manual Contents Important safety instructions... 2 The ASA 1 active antenna splitter... 4 Delivery includes... 4 Operating elements... 5 Putting the ASA 1 into operation...
ARCO Electric Products Installation and Maintenance Manual Low Voltage Automatic Power Factor Correction Capacitor Systems 2013
 ARCO Electric Products Installation and Maintenance Manual Low Voltage Automatic Power Factor Correction Capacitor Systems 2013 READ CAREFULLY These instructions are intended to cover good practices in
DRM75A 230V 20/100A DIN rail single phase two wire energy meter
 DRM75A 230V 20/100A DIN rail single phase two wire energy meter 1.1 Safety instruction 1.2 Foreword 1.3 Performance criteria 1.4 Specifications 1.5 Basic errors 1.6 Description 1.7 Dimensions 1.8 Installation
Daker DK 1, 2, 3 kva. Manuel d installation Installation manual. Part. LE05334AC-07/13-01 GF
 Daker DK 1, 2, 3 kva Manuel d installation Installation manual Part. LE05334AC-07/13-01 GF Daker DK 1, 2, 3 kva Index 1 Introduction 24 2 Conditions of use 24 3 LCD Panel 25 4 Installation 28 5 UPS communicator
MCR1900 Media Converter 19-Slot Chassis
 MCR1900 Media Converter 19-Slot Chassis Installation Guide Part #5500304-11 Copyright Statement This document must not be reproduced in any way whatsoever, either printed or electronically, without the
12 SOLAR PHOTOVOLTAIC POWER SUPPLY SYSTEMS by John Ware. PV modules are current-limiting
 12 SOLAR PHOTOVOLTAIC POWER by John Ware IT IS PLANNED for BS 7671:2008 to include a new Section 712 providing additional requirements for safety applicable to solar photovoltaic (pv) power supply systems.
INSTALLATION INSTRUCTIONS: Viewline 85 mm
 1-10 1 Safety information The product was developed, manufactured and inspected according to the basic safety requirements of EC Guidelines and state-of-the-art technology. The unit is designed for use
TIG INVERTER INSTRUCTION MANUAL
 TIG INVERTER INSTRUCTION MANUAL Contents Warning General Description Block Diagram Main Parameters Circuit Diagram Installation and Operation Caution Maintenance Spare Parts List Troubleshooting 3 4 4
TOYOTA Tundra 2007 - BACK-UP CAMERA SYSTEM Preparation
 Preparation Part Number(s): PT233-34070, PT923-35070-11, PT923-35070-43 NOTE: Part number of this accessory may not be the same as part number shown. Back Up Monitor Kit Contents PT923-35070-11 / PT923-35070-43
12 Volt 30 Amp Digital Solar Charge Controller
 12 Volt 30 Amp Digital Solar Charge Controller User s Manual WARNING Read carefully and understand all INSTRUCTIONS before operating. Failure to follow the safety rules and other basic safety precautions
PowerFlex 700S and 700H Frame 12 DC Bus Connector Kit
 PowerFlex 700S and 700H Frame 12 DC Bus Connector Kit Installation Instructions This document provides instructions for the installation of a DC bus connector kit for PowerFlex 700S and 700H frame 12 drives
PRELIMINARY MANUAL STAGE COLOR 48. Preliminary User Guide. Official version will follow soon on: WWW.BRITEQ-LIGHTING.COM TABLE OF CONTENTS
 STGE COO 48 Preliminary User Guide Official version will follow soon on: WWW.BITEQ-IGHTIG.COM TBE OF COTETS 1. Safety Instruction 2. Technical Specification 3. How To Set The Unit 4. How To Control The
IMPORTANT SAFETY INSTRUCTIONS WARNING READ AND SAVE THESE OPERATING AND SAFETY INSTRUCTIONS BEFORE USING THIS HEATER.
 THERMAWAVE CERAMIC HEATER Model HZ-850 Series Model HZ-860 Series IMPORTANT SAFETY INSTRUCTIONS WARNING READ AND SAVE THESE OPERATING AND SAFETY INSTRUCTIONS BEFORE USING THIS HEATER. Warning Failure to
SELECTION, APPLICATION AND MAINTENANCE
 DIESEL PROTECTION SYSTEMS Automatic Diesel Engine Shut Down System for Safe Area Applications SELECTION, APPLICATION AND MAINTENANCE Series 300 Series 310 SYSTEM DESCRIPTION Suitable for attended engine
SOLAR ELECTRIC MODULE ES-124 & ES-62T Owners Manual and Installation Guide
 SOLAR ELECTRIC MODULE ES-124 & ES-62T Owners Manual and Installation Guide circuit. Reverse connection will damage the module and may result in fire. CAUTIONS Solar electric modules produce DC electricity
Operating Manual SUNNY BOY 3000TL / 3600TL / 4000TL / 5000TL
 Operating Manual SUNNY BOY 3000TL / 3600TL / 4000TL / 5000TL SB30-50TL-21-BE-en-11 Version 1.1 AMERICAN ENGLISH Legal Provisions SMA Solar Technology AG Legal Provisions The information contained in these
LUCCI AIRFUSION QUEST II CEILING FAN
 LUCCI AIRFUSION QUEST II CEILING FAN WITH IR REMOTE INSTALLATION OPERATION MAINTENANCE WARRANTY INFORMATION CAUTION READ INSTRUCTIONS CAREFULLY FOR SAFE INSTALLATION AND FAN OPERATION. V1.0 QUEST II IR
YSmart Technology Co.,Ltd
 YSmart Technology Co.,Ltd GWV Series Grid Tie Microinverter User Manual The copyright of this user manual belong to YSmart TechnologyCompany Limited. Without the written permission of the copyright holder,
Power Supply Unit, Primary Switched, Narrow Design MINI-PS-12-24DC/24DC/1
 Power Supply Unit, Primary Switched, Narrow Design MINI POWER provides: Extra narrow design with widths of 22.5 mm, 45 mm, and 67.5 mm (0.886, 1.772, and 2.657 in.) Global use due to a wide-range input
Achat 115MA full-range speaker. user manual
 Achat 115MA full-range speaker user manual Musikhaus Thomann Thomann GmbH Hans-Thomann-Straße 1 96138 Burgebrach Germany Telephone: +49 (0) 9546 9223-0 E-mail: info@thomann.de Internet: www.thomann.de
430 Power/Electronics Replacement
 Replacing the main board WARNING Before proceeding, turn off the main power switch and unplug the power cord. Caution Make sure you are properly grounded with an ESD strap before continuing. The main printed
KNX L. Brightness Sensor. Technical specifications and installation instructions Item number 70119
 EN KNX L Brightness Sensor Technical specifications and installation instructions Item number 70119 Elsner Elektronik GmbH Control and Automation Engineering Herdweg 7 D 75391 Gechingen Phone +49 (0) 70
Wind Sensor W-RS485 with RS485 Interface
 Wind Sensor W-RS485 with RS485 Interface Technical data and notes for installation Elsner Elektronik GmbH Steuerungs- und Automatisierungstechnik Herdweg 7 D-75391 Gechingen Germany Phone: +49 (0) 70 56/93
Advantium 2 Plus Alarm
 ADI 9510-B Advantium 2 Plus Alarm INSTALLATION AND OPERATING INSTRUCTIONS Carefully Read These Instructions Before Operating Carefully Read These Controls Corporation of America 1501 Harpers Road Virginia
Solar Inverter Sunny Boy 5000US, 6000US, 7000US
 Solar Inverter Sunny Boy 5000US, 6000US, 7000US Installation Guide SB50US-70US-IUS090523 TBUS-SB50_60_70US Version 2.3 US Copyright 2008 SMA America, Inc. All rights reserved. No part of this document
Product and Applications Description. Application Programs. Example of Operation. GAMMA instabus Technical Product-Information.
 Product and Applications Description The power supply units N 125/x2 can supply DC 24 V power from an additional pair of terminals (yellowwhite). This DC 24 V output voltage can be used to power e.g. an
MTE SERIES RLW. World REACTORS USER MANUAL PART NO. INSTR 030 REL. 090930. 2009 MTE Corporation
 MTE SERIES RLW World REACTORS USER MANUAL PART NO. INSTR 030 REL. 090930 2009 MTE Corporation IMPORTANT USER INFORMATION NOTICE MTE Series RLW reactors are components designed to improve the reliability
How To Set Up An Inverter
 MAKING MODERN LIVING POSSIBLE SOLAR INVERTERS Installation Guide GSM Option Kit FLX series www.danfoss.com/solar Safety Safety Safety Message Types WARNING Safety information important for human safety.
Addendum to the Operating Instructions
 Drive Technology \ Drive Automation \ System Integration \ Services Addendum to the Operating Instructions MOVIMOT with AS-Interface and AC Motor DT/DV Unit Replacement MOVIMOT MM..C -> MM..D with MLK3A
MICA HEATER INSTRUCTION MANUAL Model No: UHM-786 230V 50Hz 2200W
 MICA HEATER INSTRUCTION MANUAL Model No: UHM-786 230V 50Hz 2200W Safety Precautions To reduce the risk of personal injury or damage to property, basic safety precautions must be observed including the
5800 Temperature Sensor Cable Assembly
 5800 Temperature Sensor Cable Assembly Removal and Replacement Instruction Sheet #60-4702-070 Revision D, January 14, 2013 Overview The 5800 has two refrigeration temperature sensors, one attached to the
BUILT-IN DISHWASHER INSTALLATION INSTRUCTIONS
 BUILT-IN DISHWASHER INSTALLATION INSTRUCTIONS PLEASE READ COMPLETE INSTRUCTIONS BEFORE YOU BEGIN LEAVE INSTALLATION INSTRUCTIONS AND USER'S GUIDE WITH OWNER ALL ELECTRIC WIRING AND PLUMBING MUST BE DONE
LS1024B / LS2024B/ LS3024B. Solar Charge Controller USER MANUAL
 EPSOLAR LS1024B / LS2024B/ LS3024B Solar Charge Controller USER MANUAL Thank you very much for selecting our product! This manual offers important information and suggestions with respect to installation,
Digi-Motor Installation Guide
 Digi-Motor Installation Guide Installation Video...located at marsdelivers.com Digi-Motor Installation Guide Digi-Motor For technical assistance with your Azure Digi-Motor, call the MARS technical support
Arctic Leash Instruction Manual Alaskan Products Company LLC.
 Retractable Cord Reel for Engine Block Heaters Arctic Leash Instruction Manual Alaskan Products Company LLC. INSTALLATION INSTRUCTIONS This instruction manual is a reference guide for installing and operating
Express5800/120Ed. Rack Mount Kit Installation Procedures PN: 455-01607-001
 Express5800/120Ed Rack Mount Kit Installation Procedures PN: 455-01607-001 Proprietary Notice and Liability Disclaimer The information disclosed in this document, including all designs and related materials,
Drayton Digistat +2RF/+3RF
 /+3RF Programmable Room Thermostat Wireless Model: RF700/22090 Model: RF701/22092 Power Supply: Battery - Thermostat Mains - Digistat SCR Invensys Controls Europe Customer Service Tel: 0845 130 5522 Customer
AN500T, AN1000, AN1000T, AN1500, AN1500T AN2000, AN2000T
 Product Instruction Manual Accona AN500T, AN1000, AN1000T, AN1500, AN1500T AN2000, AN2000T Panel heater v16.5/5 Version 3.2 Jan 2015 Contents 1. Important safety points 2. Installation 2.1. Wall mounting
Sunny Family 2012 PRODUCT CATALOG
 Sunny Family 2012 PRODUCT CATALOG » Although each PV plant is unique, SMA has the right solution for all demands. SUNNY BOY 1.6 to 5 kw SUNNY MINI CENTRAL 5 to 11 kw SUNNY TRIPOWER 10 to 20 kw SUNNY CENTRAL
Operating Instructions Bedienungsanleitung Mode d emploi
 Operating Instructions Bedienungsanleitung Mode d emploi DW 400 www.bron-kobold.com Operating instructions DW 400 Before use Please read all the information contained in these operating instructions carefully.
13 Watt PORTABLE SOLAR POWER KIT
 3 Watt PORTABLE SOLAR POWER KIT User s Manual Thank you for purchasing a Sunforce Portable Solar Power Kit. Please read these instructions carefully and thoroughly before using the product. Your new Portable
ABB Drives. User s Manual. Pulse Encoder Interface Module RTAC-01
 ABB Drives User s Manual Pulse Encoder Interface Module RTAC-0 Pulse Encoder Interface Module RTAC-0 User s Manual 3AFE 64486853 REV A EN EFFECTIVE:.5.00 00 ABB Oy. All Rights Reserved. Safety instructions
Modular I/O System Analog and Digital Interface Modules
 OPERATING INSTRUCTIONS Modular I/O System Analog and Digital Interface Modules Installation Operation Maintenance Document Information Document ID Title: Operating Instructions Modular I/O System Part
INSTALLATION & SERVICE MANUAL. Display Panel
 INSTALLATION & SERVICE MANUAL Display Panel The PowerLine EMS TM is a specialized power distribution and energy management system intended to be used in recreational vehicles. The Control Module is housed
Instruction manual of pumps WQ, WQF, SN, Furiatka, Furia, KRAKEN, BIG, IP, IPE, SWQ, CTR
 CAUTION! Instruction manual of pumps WQ, WQF, SN, Furiatka, Furia, KRAKEN, BIG, IP, IPE, SWQ, CTR NOTE: read the manual prior to commencement of use. For safety reasons, the pump can only be operated by
Ceiling Fan Installation Instructions
 Ceiling Fan Installation Instructions 1525..series OWNER S MANUAL READ AND SAVE THESE INSTRUCTIONS Total fan wieght with light kit 1-1525-CUL-English INSTALLATION CH-545 Safety Tips WARNING: TO REDUCE
3M Wrist Strap and Footwear Tester 740. User s Guide
 3M Wrist Strap and Footwear Tester 740 User s Guide Table of Contents Section Page Safety Information...3 1.0 General...4 2.0 Description...4 3.0 Operation...5 4.0 Wall Mounting...5 5.0 Wrist Strap Test...6
110244-003. PrintPAD CN3/4/3e/4e. User Guide
 110244-003 PrintPAD CN3/4/3e/4e User Guide TABLE OF CONTENTS PrintPAD CN3/4 & PrintPAD CN3e/4e Printer Views...1 Open View...1 Closed View...1 Using Batteries: General Guidelines...1 Installing and/or
INSTALLATION AND OPERATING INSTRUCTIONS For Model GL1 Gate Locks
 Securitron Magnalock Corp. www.securitron.com ASSA ABLOY, the global leader Tel 800.624.5625 techsupport@securitron.com in door opening solutions INSTALLATION AND OPERATING INSTRUCTIONS For Model GL1 Gate
GENERAL INSTALLATION MANUAL FOR EGING PV MODULES
 GENERAL INSTALLATION MANUAL FOR EGING PV MODULES PLEASE READ THIS MANUAL CAREFULLY BEFORE INSTALLING OR USING THE MODULES. PLEASE PASS ALONG THE ATTACHED USER MANUAL TO YOUR CUSTOMER. 1. INTRODUCTION This
Duct Humidity Transmitter
 SDC-H Duct Humidity Transmitter Features Replaceable sensor element Humidity measurement for air ducts Minimum and maximum value memory 0 0V, 0 0mA or 0V, 4 0mA measuring signals selectable with jumpers
Operating Manual POWER PLANT CONTROLLER
 Operating Manual POWER PLANT CONTROLLER PPC-BE-P7-en-13 98-113900.02 Version 1.3 ENGLISH Legal Provisions SMA Solar Technology AG Legal Provisions The information contained in this document is the property
Terminal Boxes Series 8146
 Series > Enclosures in shock-resistant glass fibre reinforced polyester resin > basic enclosure sizes various heights > Fitted according to the customer's requirements > For terminals up to max. 00 mm
Bullet Camera. Installation Guide. Hangzhou Hikvision Digital Technology Co., Ltd. http://www.hikvision.com
 Bullet Camera Installation Guide Hangzhou Hikvision Digital Technology Co., Ltd. http://www.hikvision.com 1 Thank you for purchasing our product. If there are any questions, or requests, please do not
YINGLI SOLAR PV MODULES Installation and User Manual
 YINGLI SOLAR PV MODULES Installation and User Manual Revision Date December 24, 2011 Applicable for IEC certified products This manual applies to photovoltaic modules ( PV modules, also commonly known
CELO5. User & Installation Manual. www.audac.eu
 CELO5 User & Installation Manual www.audac.eu 2 Introduction 5 High-end Slim Ceiling Speaker The CELO5 is the 5 version of AUDAC s CELO High-end Slim ceiling speaker series with an RMS power of 50 Watt
Cooktop Low-Profile Ventilation Hoods
 INSTALLATION GUIDE Cooktop Low-Profile Ventilation Hoods Contents Wolf Cooktop Low-Profile Ventilation Hoods........ 3 Cooktop Low-Profile Hood Specifications.......... 4 Cooktop Low-Profile Hood Installation............
DLP-PU/E Instruction Manual
 Instruction Manual BEFORE USING THE POWER SUPPLY UNIT Pay attention to all warnings and cautions before using the unit. Incorrect usage could lead to an electrical shock, damage to the unit or a fire hazard.
User Manual SG30KTL-M PV Grid-Connected Inverter
 User Manual SG30KTL-M PV Grid-Connected Inverter SG30KTL-MV2-UEN-Ver22-201503 Version: 2.2 About This Manual This manual is for the inverter SG30KTL-M. The inverter is grid-connected, transformer-less,
GreenWay Solar LED Path and Trail Lighting System. Installation and Owner s Manual
 GreenWay Solar LED Path and Trail Lighting System Installation and Owner s Manual Important Notes and Warnings This installation and instruction manual provides installation, operation, and maintenance
INSTALLATION MANUAL. AC/DC Power Supply
 INSTALLATION MANUAL AC/DC Power Supply Thrane & Thrane A/S AC/DC Power Supply Installation Manual Document number: 98-129099-C Release date: February 26, 2010 Disclaimer Any responsibility or liability
2.06. Version. Kinglong New Energy Technology Co.Ltd. Sunteams 1500 Sunteams 3000. Sunteams 4000 Sunteams 5000
 Photovoltaic Inverter Specification Version 2.06 1500 2000 3000 4000 5000 Kinglong New Energy Technology Co.Ltd. Kinglong New Energy Technology Co.Ltd. specification 1.1. Introduction... 3 1.1.1. Environment...
SMD Rework Station TABLE OF CONTENTS
 SMD Rework Station Thank you for purchasing the Hakko 50B SMD Rework Station. The Hakko 50B is designed to solder and desolder surface mounted devices with hot air. Please read this manual before operating
PSDC 08128. PSDC 12V/8A/8x1A Power supply for up to 8 analog cameras PTC/TOPIC.
 PSDC 08128 v.1.2 PSDC 12V/8A/8x1A Power supply for up to 8 analog cameras PTC/TOPIC. EN** Edition: 9 from 25.05.2015 Supersedes the edition: 8 from 12.12.2014 the 8x 1A/12V DC power output for powering
INTRODUCTION WARNING S!!! VOC SHOULD BE BETWEEN 78 95. MUST NOT EXCEED 96 VOC USE DC CIRCUIT BREAKER/ISOLATOR BETWEEN SOLAR PANELS & CONTROLLER
 INTRODUCTION Thank you for purchasing a WATERBOY pumping system. We set the standard for quality and economy in solar pumping. The WATERBOY range incorporates the best solar pump technologies that were
Backup-System SUNNY BACKUP SYSTEM S
 Backup-System SUNNY BACKUP SYSTEM S Technical Description SBU2200-TEN083320 IMEN-SBU2200 Version 2.0 EN Overview of the Navigation Area: Main menu Submenu 1 Submenu 2 Home Screen 100# METERS 110# Meter