OWNER S MANUAL BLACKSTONE PATIO OVEN MODEL# North Atlantic Logan, UT USA ! WARNING!
|
|
|
- Blaze Hodges
- 7 years ago
- Views:
Transcription
1 OWNER S MANUAL BLACKSTONE PATIO OVEN MODEL# 1575 FOR OUTDOOR USE ONLY! WARNING! Please read manual carefully before assembly Retain this manual for future reference North Atlantic Logan, UT USA

2 ! DANGER! WARNING If you smell gas: 1. Shut off gas to the appliance. 2. Extinguish any open flame. 3. If odor continues, keep away from the appliance and immediately call your gas supplier or your fire department. 1. Do not store or use gasoline or other flammable liquids or vapors in the vicinity of this or any other appliance. 2. An LP cylinder not connected for use shall not be stored in the vicinity of this or any other appliance. WARNING: Before proceeding, make certain that you understand the IMPORTANT INFORMATION section of this manual. Hazardous fire or explosion may result if instructions are ignored. It is the consumer s responsibility to see that the Pizza Oven is properly assembled, installed, and maintained. Failure to follow the instructions in this manual could result in bodily injury and/or property damage. FOR YOUR SAFETY IF YOU SMELL GAS: 1. Turn off gas supply at tank. 2. Extinguish all open flames; do not operate any electrical appliances. 3. Ventilate the area. 4. Check for leaks as detailed in this manual. PRECAUTIONS: 1. Leak test all connections after each tank refill. 2. Never check for leaks with a match or open flame. 3. Do not store gasoline or other flammable vapors and liquids in the vicinity of this or any other appliance. 4. Any LP cylinder not connected for use shall not be stored in the vicinity of this or any other appliance. 5. Do not store a spare LP-gas cylinder under or near this appliance. 6. Never fill the cylinder beyond 80 percent full. 7. If the information in the above two statements is not followed exactly, a fire causing death or serious injury may occur. 8. Do not operate Pizza Oven any closer than 36 inches from any combustible construction, including walls and ceilings. 9. Do not use this appliance under overhead combustible surfaces. 10. The regulator used in this unit is ZHENDAR T3. If this regulator fails, it must be replaced with the exact model and must only be replaced by a professionally licensed, authorized dealer. 2

3 ! DANGER! If you smell gas: 1. Shut off gas to the appliance. 2. Extinguish any open flame. 3. If odor continues, keep away from the appliance and immediately call your gas supplier or your fire department.! WARNING! 1. Do not store or use gasoline or other flammable liquids or vapors in the vicinity of this or any other appliance. 2. An LP Tank not connected for use shall not be stored in the vicinity of this or any other appliance. Call the BLACKSTONE Griddle Information Center for Help and Parts Missing Parts? Assembly Questions? Operation Problems? Before returning Pizza Oven to store, call (435) or us at Model Number Serial Number Date Purchased To Installer/Assembler: Leave these instructions with consumer. To Consumer: Keep this manual for future reference.! CAUTION! Some parts may contain sharp edges, especially as noted in these instructions. Wear protective gloves if necessary.! CAUTION! For residential use only. Do not use for commercial cooking. Installation Safety Precautions Use Pizza Oven, as purchased, only with LP (propane) gas and the regulator/valve assembly supplied. Pizza Oven installation must conform with local codes, or in the absence of local codes, with either the National Fuel Gas Code, ANSI Z223.1/ NFPA 54, Natural Gas and Propane Installation Code, CSA B149.1, or Propane Storage and Handling Code, B149.2, or the Standard for Recreational Vehicles, ANSI A 119.2/NFPA 1192, and CSA Z240 RV Series, Recreational Vehicle Code, as applicable. Pizza Oven is not for use in or on recreational vehicles and/or boats. This Pizza Oven is safety certified for use in the United States and/or Canada only. Do not modify for use in any other location. Modification will result in a safety hazard. Safety Symbols The symbols and boxes shown below explain what each heading means. Read and follow all of the messages found throughout the manual.! DANGER! DANGER: Indicates an imminently hazardous situation which, if not avoided, will result in death or serious injury.! WARNING! WARNING: Be alert to the possibility of serious bodily injury if the instructions are not followed. Be sure to read and carefully follow all of the messages.! CAUTION! CAUTION: Indicates a potentially hazardous situation which,if not avoided, may result in minor or moderate injury. CALIFORNIA PROPOSITION 65! WARNING! WARNING: This product contains chemicals known to the State of California to cause cancer and birth defects or other reproductive harm. (California law requires this warning be given to customers in the State of California.) For more information: 3

4 TABLE OF CONTENTS For Your Safety Use and Care ILLUSTRATED PARTS LIST ASSEMBLY USING AND TUNING CARE AND MAINTENANCE WARRANTY...24 CUSTOMER SERVICE Reordering Parts Contact Info GRILL WARRANTY 12 months full warranty on Pizza Oven parts If this pizza oven fails due to a defect in material or workmanship within one year from the date of purchase, call (435) to arrange for replacement parts. Please retain a copy of your proof of purchase to validate your warranty. You may be requested to send in a copy of your receipt to confirm any warranty requests. Five - years after service For five years from the date of purchase, you can call (435) for help free of charge, with assembly or operation questions. After the first year from the date of purchase, or if a valid proof of purchase cannot be provided, you can purchase replacement parts call (435) (Part purchase price with shipping and handling to be paid by customer.) All warranty coverage excludes ignitor batteries and pizza oven part paint loss, discoloration or surface rusting, which are either expendable parts that can wear out from normal use within the warranty period, or are conditions that can be the result of normal use, accident or improper maintenance. All warranty coverage is void if this pizza oven is ever used for commercial or rental purposes. 4

5 ! DANGER! NEVER store a spare LP cylinder under or near the appliance or in an enclosed area. Never fill a cylinder beyond 80% full. If the information in the two points above is not followed exactly, a fire causing death or serious injury may occur. An overfilled or improperly stored cylinder is a hazard due to possible gas release from the safety relief valve. This could cause an intense fire with risk of property damage, serious injury or death. If you see, smell or hear gas escaping, immediately get away from the LP cylinder and appliance and call your fire department. CAN/CSA-B339, tanks, spheres and tubes for transportation of dangerous goods. Transport Canada (TC). See LP Tank collar for marking. LP Tank valve must have: Type 1 outlet compatible with regulator or grill. Safety relief valve. UL listed Overfill Protection Device (OPD). This OPD safety feature is identified by a unique triangular hand wheel. Use only LP Tanks equipped with this type of valve. LP Tank must be arranged for vapor withdrawal and include collar to protect LP Tank valve. Always keep LP Tanks in upright position during use, transit LP Tank Removal, Transport And Storage Turn OFF all control knobs and LP tank valve. Turn coupling nut counterclockwise by hand only - do not use tools to disconnect. Lift LP tank wire upward off of LP tank collar, then lift LP tank up. Install safety cap onto LP tank valve. Always use cap and strap supplied with valve. Failure to use safety cap as directed may result in serious personal injury and/or property damage. A disconnected LP tank in storage or being transported must have a safety cap installed (as shown). Do not store an LP tank in enclosed spaces such as a carport, garage, porch, covered patio or other building. Never leave an LP tank inside a vehicle which may become overheated by the sun. Do not store an LP tank in an area where children play. LP Tank The LP Tank used with your grill must meet the following requirements: LP Tanks must be constructed and marked in accordance with specifications for LP Tanks of the U.S. Department of Transportation (DOT) or for Canada, or storage. LP Tank in upright position for vapor withdrawal LP (Liquefied Petroleum Gas) LP gas is nontoxic, odorless and colorless when produced. For Your Safety, LP gas has been given an odor (similar to rotten cabbage) so that it can be smelled. LP gas is highly flammable and may ignite unexpectedly when mixed with air. LP Tank Filling Use only licensed and experienced dealers. LP dealer must purge new tank before filling. Dealer should NEVER fill LP Tank more than 80% of LP Tank volume. Volume of propane in tank will vary by temperature. A frosty regulator indicates gas overfill. Immediately close LP Tank valve and call local LP gas dealer for assistance. Do not release liquid propane (LP) gas into the atmosphere. This is a hazardous practice. To remove gas from LP Tank, contact an LP dealer or call a local fire department for assistance. Check the telephone directory under Gas Companies for nearest certified LP dealers. 5

6 LP Tank Exchange Many retailers that sell grills offer you the option of replacing your empty LP tank through an exchange service. Use only those reputable exchange companies that inspect, precision fill, test and certify their tanks. Exchange your tank only for an OPD safety feature-equipped tank as described in the LP Tank section of this manual. Always keep new and exchanged LP tanks in upright position during use, transit or storage. Leak test new and exchanged LP tanks BEFORE connecting to grill. Place dust cap on cylinder valve outlet whenever the cylinder is not in use. Only install the type of dust cap on the cylinder valve outlet that is provided with the cylinder valve. Other types of caps or plugs may result in leakage of propane. LP Tank Leak Test For your safety Leak test must be repeated each time LP tank is exchanged or refilled. Do not smoke during leak test. Do not use an open flame to check for gas leaks. Oven must be leak tested outdoors in a well-ventilated area, away from ignition sources such as gas fired or electrical appliances. During leak test, keep oven away from open flames or sparks. Use a clean paintbrush and a 50/50 mild soap and water solution. Brush soapy solution onto areas indicated by arrows in figure below. Leaks are indicated by growing bubbles.! WARNING! If growing bubbles appear do not use or move the LP tank. Contact an LP gas supplier or your fire department! Connecting Regulator To The LP Tank 1. LP tank must be properly secured onto oven. (Refer to assembly section.) 2. Turn all control knobs to the OFF position. 3. Turn LP tank OFF by turning OPD hand wheel clockwise to a full stop. 4. Remove the protective cap from LP tank valve. Always use cap and strap supplied with valve. 5. Hold regulator and insert nipple into LP tank valve. Hand-tighten the coupling nut, holding regulator in a straight line with LP tank valve so as not to cross thread the connection. Do not insert a POL transport plug (plastic part with external threads) into the Type 1 tank valve outlet. It will defeat the Safety Relief Valve feature. Do not use household cleaning agents. Damage to gas valve/hose/regulator components can result. 6

7 6. Turn the coupling nut clockwise and tighten to a full stop. The regulator will seal on the back-check feature in the LP tank valve, resulting in some resistance. An additional one-half to three-quarters turn is required to complete the connection. Tighten by hand only do not use tools. NOTE: If you cannot complete the connection, disconnect regulator and repeat steps 5 and 6. If you are still unable to complete the connection, do not use this regulator! Call (435) for identical replacement parts. DANGER!! Do not insert any tool or foreign objects into the valve outlet or safety relief valve. You may damage the valve and cause a leak. Leaking propane may result in explosion, fire, severe personal injury, or death. If a leak is detected at any time, STOP and call the fire department. If you cannot stop a gas leak, immediately close LP tank valve and call LP gas supplier or your fire department! Leak Testing Valves, Hose and Regulator 1. Turn all oven control knobs to OFF. 2. Be sure regulator is tightly connected to LP tank. 3. Completely open LP tank valve by turning OPD hand wheel counterclockwise. If you hear a rushing sound, turn gas off immediately. There is a major leak at the connection. Correct before proceeding by calling for replacement parts at (435) Brush soapy solution onto areas where bubbles are shown in picture below: 5. If growing bubbles appear, there is a leak. Close LP tank valve immediately and retighten connections. If leaks cannot be stopped do not try to repair. Call for replacement parts at (435) Always close LP tank valve after performing leak test by turning hand wheel clockwise.! WARNING! Never attempt to attach this grill to the self-contained LP gas system of a camper trailer or motor home. Do not use grill until leak-tested. 7
 252-3030 for identical replacement parts. DANGER!! Do not insert any tool or foreign objects into the valve outlet or safety relief valve. You may damage the valve and cause a leak.")
8 Safety Tips 1. Before opening LP cylinder valve, check the coupling nut for tightness. 2. When Pizza Oven is not in use, turn off control knob and LP cylinder valve. 3. Never move Pizza Oven while in operation or still hot. 4. Use long-handled barbecue utensils and oven mitts to avoid burns and splatters. 5. Maximum on side shelf is 10 lbs. 6. Clean Pizza Oven often, preferably after each cookout. If a bristle brush is used to clean the cooking surface, ensure no loose bristles remain on cooking surfaces prior to cooking. 7. If you notice grease or other hot material dripping from Pizza Oven onto valve, hose or regulator, turn off gas supply at once. Determine the cause, correct it, then clean and inspect valve, hose and regulator before continuing. Perform a leak test. 8. Keep ventilation openings in cylinder enclosure free and clear of debris. 9. The regulator may make a humming or whistling noise during operation. This will not affect safety or use of Pizza Oven. 10. If you have a Pizza Oven problem see the Troubleshooting Section. 11. If the regulator frosts, turn off Pizza Oven and LP cylinder valve immediately. This indicates a problem with the cylinder and it should not be used on any product. Return to supplier! 8

9 WARNING!! Turn controls and gas source or tank OFF when not in use.! CAUTION! If ignition does NOT occur in 5 seconds, turn the burner controls OFF, wait 5 minutes and repeat the lighting procedure. If the burner does not ignite with the valve open, gas will continue to flow out of the burner and could accidently ignite with risk of injury. Match-Lighting Do not lean over Pizza Oven while lighting. 1. Place match into match holder (hanging from side panel of griddle). Light match; then light burner by placing match on right or left side of griddle. 2. Push in and turn burner knob to the HI position, depending on match light hole selected. Be sure burner lights and stays lit. Burner Flame Check Light burner, rotate knob from to low. You should see a smaller flame in low position than seen on. Perform burner flame check on side burner, also. Always check flame prior to each use. If only low flame is seen refer to Sudden drop or low flame in the Troubleshooting. Turning Grill Off Turn knob to the OFF position. Turn LP cylinder OFF by turning hand-wheel clockwise to a full stop. Ignitor Check Turn gas off at LP cylinder. Press and hold electronic ignitor button. Click should be heard and spark seen each time between each collector box or burner and electrode. See Troubleshooting if no click or spark. Valve Check Important: Make sure gas is off at LP cylinder before checking valves. Knobs lock in OFF position. To check valve, first push in knob and release, knob should spring back. If knob does not spring back, replace valve assembly before using oven. Turn knob to low position then turn back to OFF position. Valve should turn smoothly. Hose Check Before each use, check to see if hoses are cut or worn. Replace damaged hoses before using oven. Use only identical replacement part valve/hose/regulator as specified in the Parts List of this Use and Care Guide. General Oven Cleaning Do not mistake brown or black accumulation of grease and smoke for paint. Interiors of gas ovens are not painted at the factory (and should never be painted). Apply a strong solution of detergent and water or use an ovencleaner with scrub brush on insides of oven lid and bottom. Rinse and allow to completely air dry. Do not apply a caustic griddle/ oven cleaner to painted surfaces. Plastic parts: Wash with warm soapy water and wipe dry. Do not use Citrisol, abrasive cleaners, degreasers or a concentrated oven cleaner on plastic parts. Damage to and failure of parts can result. Painted surfaces: Wash with mild detergent or nonabrasive cleaner and warm soapy water. Wipe dry with a soft nonabrasive cloth. Stainless steel surfaces: To maintain your oven s high quality appearance, wash with mild detergent and warm soapy water and wipe dry with a soft cloth after each use. Baked-on grease deposits may require the use of an abrasive plastic cleaning pad. Use only in direction of brushed finish to avoid damage. Do not use abrasive pad on areas with graphics. Stone just needs to be brushed off. If desired, wash Pizza Stone with warm water. NEVER use soap as it may penetrate the stone cooking area and leave a soap taste in food. If a bristle brush is used to clean any of the oven cooking surfaces, ensure no loose bristles remain on cooking surfaces prior to cooking. 9

10 Storing Your Pizza Oven Clean pizza stone. Store in dry location. When an LP cylinder is connected to Pizza Oven, store outdoors in a well-ventilated space and out of reach of children. Cover Pizza Oven if stored outdoors. Choose from a variety of Pizza Oven covers offered by Blackstone. Store Pizza Oven indoors ONLY if LP cylinder is turned off and disconnected, removed from Pizza Oven and stored outdoors. When removing Pizza Oven from storage, follow Cleaning the Burner Assembly instructions before starting griddle. Cleaning the Burner Assembly Follow these instructions to clean and/or replace parts of burner assembly or if you have trouble igniting Pizza Oven. 1. Turn gas OFF at control knob and LP cylinder. 2. Remove upper cover (Part 10 on parts list). 3. Remove heat shield and aluminum cover, stone, and rotating panel. 4. Detach electrode from burner. NOTE: Removal/Detachment method will depend on the burner configuration. 5. Carefully lift burner up and away from valve openings. We suggest three ways to clean the burner tubes. Use the one easiest for you. (A) Bend a stiff wire (a light weight coat hanger works well) into a small hook. Run the hook through burner tube several times.(b) Use a narrow bottle brush with a flexible handle (do not use a brass wire brush), run the brush through burner tube several times.(c) Wear eye protection: Use an air hose to force air into the burner tube and out the burner ports. Check each port to make sure air comes out each hole. 6. Wire brush entire outer surface of burner to remove food residue and dirt. 7. Clean any blocked ports with a stiff wire such as an open paper clip. 8. Check burner for damage, due to normal wear and corrosion some holes may become enlarged. If any large cracks or holes are found replace burner. VERY IMPORTANT: Burner tubes must reengage valve openings. 9. Attach electrode to burner. 10. Carefully replace burners. 11. Attach burners to brackets on firebox. 12. Reposition carryover tubes and attach to burner. Food Safety Food safety is a very important part of enjoying the outdoor cooking experience. To keep food safe from harmful bacteria, follow these four basic steps: Clean: Wash hands, utensils, and surfaces with hot soapy water before and after handling raw meat and poultry. Separate: Separate raw meats and poultry from ready-to eat foods to avoid cross contamination. Use a clean platter and utensils when removing cooked foods. Cook: Cook meat and poultry thoroughly to kill bacteria. Use a thermometer to ensure proper internal food temperatures. Chill: Refrigerate prepared foods and leftovers promptly. For more information Visit the Canadian partnership for Consumer Food Safety Education- safe.ca. How To Tell If Meat Is Grilled Thoroughly Meat and poultry cooked on a griddle or oven often browns very fast on the outside. Use a meat thermometer to be sure food has reached a safe internal temperature, and cut into food to check for visual signs of being done. Whole poultry should reach 165 F/74 C. Juices should run clear and flesh should not be pink. Hamburgers made of any ground meat or poultry should reach 160 F/71 C, and be brown in the middle with no pink juices. Beef, veal and lamb steaks, roasts and chops can be cooked to 145 F/63 C. All cuts of pork should reach 160 F/71 C. NEVER partially grill meat or poultry and finish cooking later. Cook food completely to destroy harmful bacteria. When reheating takeout foods or fully cooked meats like hot dogs, grill to 165 F/64 C, or until steaming hot dogs, grill to 165 F/74 C, or until steaming hot. Follow these guidelines when cooking these types of foods on your pizza. 10

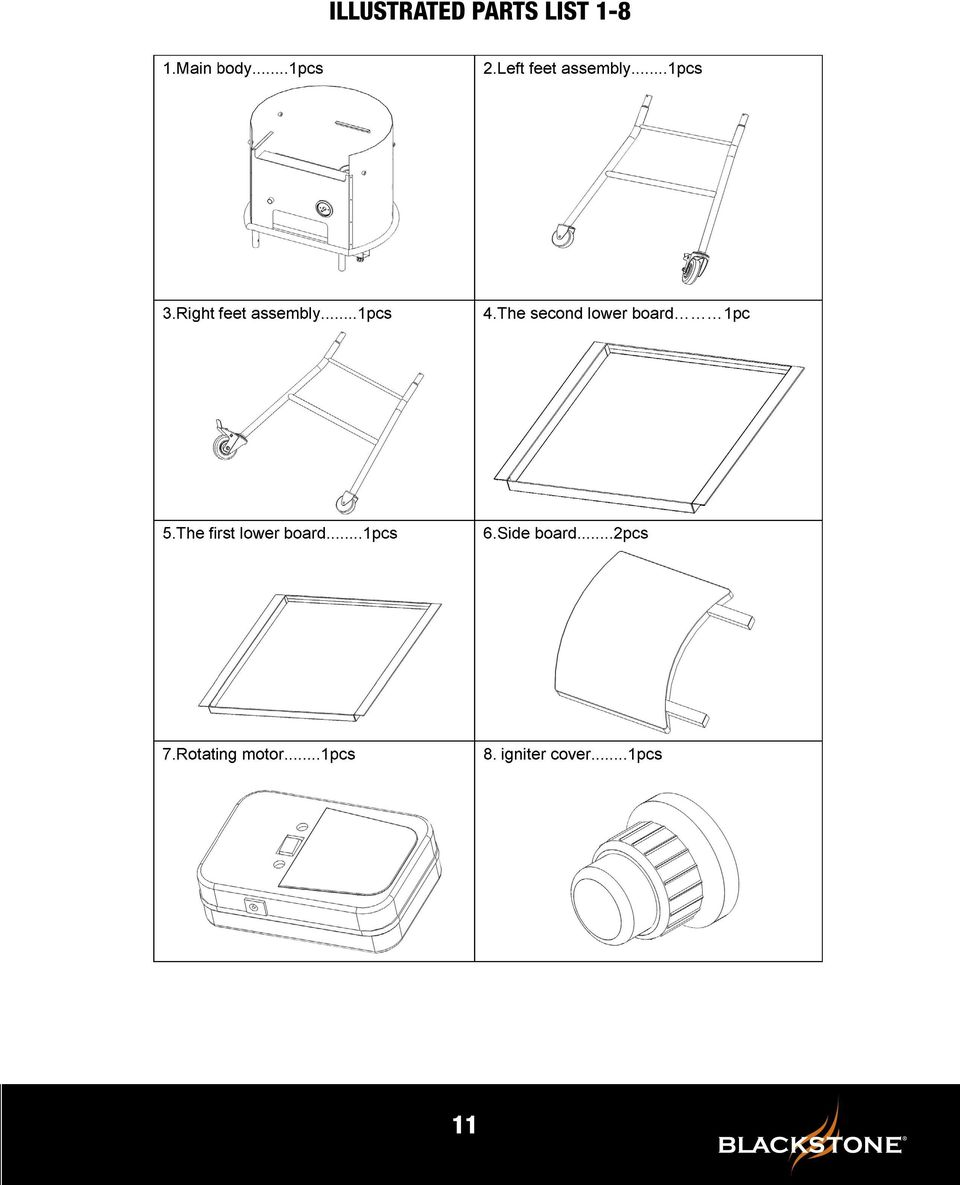
11 ILLUSTRATED PARTS LIST
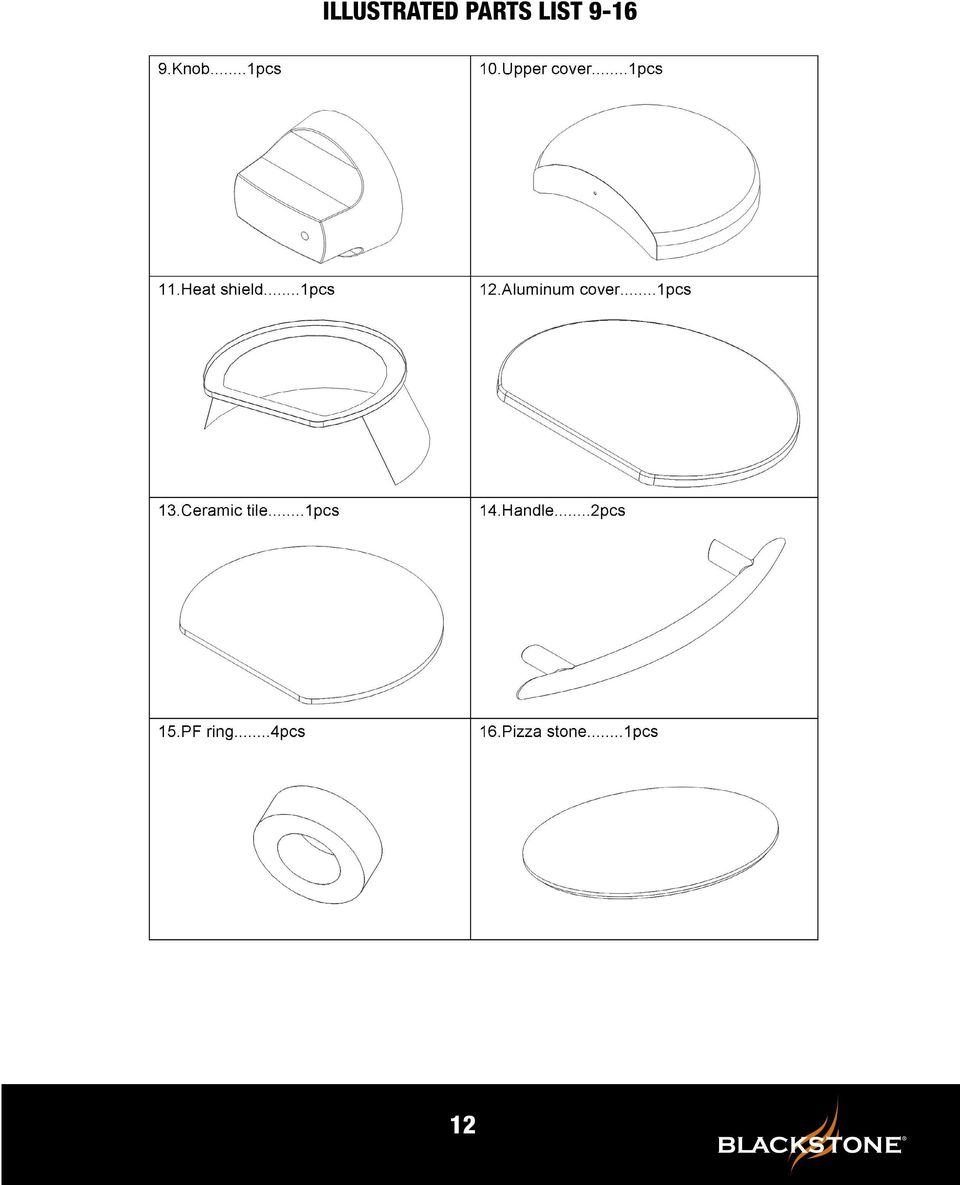
12 ILLUSTRATED PARTS LIST
13 ILLUSTRATED PARTS LIST

14 WARNING: The manufacturer has made every effort to eliminate any sharp edges. However, you should handle all components with care to avoid accidental injury. Tools required: The only tool needed is a Phillips Screwdriver needed for minimal assembly on the cover and main body handles. ASSEMBLY: Please read all instructions thoroughly before proceeding. Find a large, clean area in which to assemble your Pizza Oven. Please refer to the parts list and assembly diagram as necessary. Pizza Oven assembly involves large components; therefore, it is advised to have two people set up the unit. NOTICE: Make sure all the plastic protection is removed before assembling Step 1 Take out the main body, rotating panel and right/left feet assembly from the box. Install the feet assembly on the body and insert the rotating panel into the body as pictured below. 14

15 Step 2 : Take out the handle, PF ring and bolt and assemble them as pictured below Step 3 : (Refer steps a,b, & c on pages 16 & 17) 15
")
16 a) Adjust the slot on the rotating axis of pizza oven as pictured below b) Take out the rotating motor and assemble it as shown below 16

17 c) Move the rotating motor until the drive shaft matches the rotating axis completely Step 4 Take out the pizza stone and put it on the rotating panel 17

18 Step 5 Insert the heat shield into the main body as shown below NOTE: It is important that the heat shield lines up correctly Step 6 Take out the upper pizza stone and put on the heat shield Upper pizza stone 18

19 Step 7 Take out the aluminum cover and put it on top of the heat shield (upper pizza stone) Step 8 Take out the two side boards. Assemble them on the main body and fix them with the fasten knob 19

20 Step 9 Take out the upper cover and put it on the main body as show below Step 10 Take out the first and second lower shelves and put them on the legs NOTE: The top tray can be removed easily for cleaning crumbs from the oven 20

21 Step 11 Insert the battery and assemble the igniter cover and the knob as shown below (battery not included) Step 12 Assemble the thermometer on the upper cover 21
22 HOW TO USE YOUR PIZZA OVEN 1. Turn the Pizza Oven on high and let it warm up. It s fully warmed up when the thermometer hits 300 (approx. 10 minutes). 2. Turn temperature knob down to medium heat and let the temperature settle between (approx. 5 minutes). 3. Depending on the pizza, optimal cooking temperature is about 375. NOTE: the pizza stone surface is hotter than the air. 4. The cooking time is about 2-4 minutes depending on the size and thickness of the dough of the pizza. 5. Pull out the pizza when the crust is to a desired perfection (or when the edges of the pizza crust are brown/golden). FINE TUNING YOUR PIZZA OVEN NOTE: The time and temperature of your oven will depend largely on your outside temperature and elevation. 1. Between the control knob, on the front of the unit,and the adjustable knob, on the regulator, you can adjust the flow (trial and error is recommended depending on the type and size of the pizza you are cooking). 2. Visit our website to find some great tips on how to become a Blackstone Pizza Pro. You can watch video tutorials, get dough recipes, and read success stories, tips, and find favorite recipes from other customers as well as leave some of your own feedback as well. Practice makes perfect so experiment and overall have fun with your Blackstone Pizza Oven! 22
23 CARE AND MAINTENANCE Regularly clean your Pizza Oven between uses and especially after extended periods of storage. Ensure that the Pizza Oven and its components are sufficiently cool before cleaning. Never handle hot parts with unprotected hands. In order to extend and maintain the life and condition of your Pizza Oven, we strongly recommend that the unit be covered when left outside for any length of time, especially during the winter months. Burner maintenance: In most circumstances, burning off the residue after cooking will keep the burner clean. The burner should be removed and cleaned annually or whenever heavy build-up is found in order to ensure that there is no blockage (debris, insects) in either the burner portholes or venture tubes. Use pipe cleaner to clear obstructions. A wire brush can be used to remove corrosion from the burner surfaces. When refitting the burner, be careful to check that the venture tubes of the burner fit over the valve outlets. Fittings and Storage: Annual checking and tightening of metal fittings is recommended. Store the Pizza Oven in a cool dry place. Cover the burners with aluminum foil in order to prevent insects or other debris from collecting in the burner holes. If the Pizza Oven is to be stored indoors, the gas bottle must be disconnected and left outside. The gas bottle should always be stored outside, out of reach of children, and in a dry, well-ventilated area away from any sources of heat or ignition. TROUBLE SHOOTING PROBLEM POSSIBLE CAUSE SOLUTION Burner will not light using the ignition system. 1. Check battery. 2. LP gas cylinder is empty. 3. Faulty regulator. 4. Obstructions in the burner. 5. Obstructions in gas jets or gas hose. 6. Electrode wire is loose or disconnected on electrode or ignition unit. 7. Electrode or wire is damaged/faulty pushbutton igniter. 1. Replace with a good battery. 2. Replace with full cylinder. 3. Have the regulator checked or replaced. 4. Clean burner. 5. Clean jets and gas hose. 6. Reconnect wire. 7. Change electrode and wire change igniter. Burner will not light with a match. Fire in burner tube has a low flame or flashback (a hissing or roaring noise may be heard) 1. LG gas cylinder is empty. 2. Faulty Regulator. 3. Obstructions in burner. 4. Obstructions in gas jets or gas hose. 1. LP gas cylinder is empty. 2. Obstructions in burner. 3. Obstructions in gas jets or gas hose. 4. Windy conditions. 1. Replace with full cylinder. 2. Have the regulator checked or replaced. 3. Clean Burner. 4. Clean jets and gas hose. 1. Use larger cylinder. 2. Clean burner. 3. Clean jets and gas hose. 4. Use grill in a more sheltered position. 23
24 North Atlantic 90-Day Warranty North Atlantic the manufacturer, will warranty for 90 days from purchase all parts, workmanship, and finishes (against rust). It will be the manufacturer s option as to whether to repair or replace any of the above items. All warranties are limited to the original purchaser only. This warranty does not cover any liability on the part of North Atlantic., its agents or employees, for any indirect or consequential damages for breach of warranty. The purchaser must follow the manufacturer s usage instructions. Under no circumstances is the manufacturer responsible for damages from the failure to operate the Pizza Oven properly. It is the responsibility of the purchaser to establish the warranty period by verifying the original purchase date with original sales receipt. For more detailed explanation of the warranty, read below: North Atlantic warrants to the owner that the product covered by this agreement is free from defects in material and workmanship under normal use and service for which it was intended if, but only if, it has been operated in accordance with North Atlantic instructions exclusively for domestic use, and not for private or public club, institutional, or commercial purposes. North Atlantic obligation under this warranty is limited to replacing or repairing, free of charge, any part or parts that may prove, to the satisfaction in North Atlantic, to be defective under normal home use and service within the following stated periods of time from the date of purchase; a) for ninety (90) days from purchase, all parts, finish, and workmanship. Should any failure to conform to this warranty become apparent during applicable warranty periods stated above, the original purchaser must notify North Atlantic of breach or warranty within the applicable warranty period. North Atlantic shall upon notice and compliance by the original purchaser with such instructions, correct such nonconformity by repair or replacement of the defective part or parts. Correction in the manner provided above shall constitute a fulfillment of all obligations of North Atlantic with respect to the quality if the product. North Atlantic does not warrant this equipment to meet the requirement of any safety code of any state, municipality or other jurisdiction, and the original purchaser assumes all risk and liability whatsoever resulting from the use thereof, whether used in accordance with North Atlantic instructions or otherwise. This warranty does not cover and is intended to exclude any liability on the part of North Atlantic its agents, servants or employees whether under this warranty or implied by law for any indirect or consequential damages for breach on any warranty. The purchaser must establish all applicable warranty periods pursuant to this warranty by verifying the original purchase date by producing the dated sales receipt. This warranty shall not apply to this product or any other part thereof which has been subject to accident, negligence, alteration, abuse, or misuse or which as been repaired or altered without North Atlantic written consent, outside of North Atlantic factory. North Atlantic makes no warranty whatsoever in respect to accessories or parts not supplied with it. This warranty shall apply only within the boundaries of the Unites States of America. This warranty gives the original purchaser specific rights, and the original purchaser may also have other rights, which vary from state to state. 24
25 Our Customer Service staff is here to help you! For questions regarding your Blackstone Commercial Pizza Oven, or if in need of replacement parts, you may contact us at: (435) or We re pleased to help you with any questions concerning replacement parts or your warranty. Our customer service staff can be reached Monday through Friday from 8:00 am to 5:00 pm Mountain Standard Time. If all operators are busy or you call after hours, you may leave a message and your call will be returned. 25
San josé OWNER S MANUAL
 San josé OWNER S MANUAL Assembling & operating manual San josé 30 mbar - PORTABLE GAS BARBECUE 1. 2. 3. Improper installation, adjustment, alteration, service or maintenance can injury or property damage.
orlando OWNER S MANUAL
 orlando OWNER S MANUAL 2 Assembling & operating manual Orlando 30 mbar - PORTABLE GAS BARBECUE 1. 2. 3. Improper installation, adjustment, alteration, service or maintenance can injury or property damage.
TWO BURNER PROPANE CAMPING STOVE
 OWNER S MANUAL ASSEMBLY AND OPERATING INSTRUCTIONS TWO BURNER PROPANE CAMPING STOVE WARNING READ AND FOLLOW ALL WARNINGS AND INSTRUCTIONS IN THIS MANUAL TO AVOID PERSONAL INJURY OR PROPERTY DAMAGE. Propane
OUTDOOR LP HOT WATER HEATER CARE, USE AND SAFETY INSTRUCTIONS
 10L OUTDOOR LP HOT WATER HEATER CARE, USE AND SAFETY INSTRUCTIONS Model HWD10 To the installer or person assembling this appliance: Leave this manual with this appliance for future reference. To consumer:
Use and Care Instructions Important Safety Instructions Inside. barbeque grill
 Read this manual before cooking on grill. Failure to follow all manufacturer s instructions could result in serious personal injury and/or property damage. Use and Care Instructions Important Safety Instructions
Cleaning Instructions, Pilot Replacement and Valve Change. Model No.: 233010 Natural Gas
 Cleaning Instructions, Pilot Replacement and Valve Change Model No.: 233010 Natural Gas 8mm open-end wrench 9mm open-end wrench 10mm open-end wrench 12mm open-end wrench 13mm open-end wrench Phillips screw
TWO BURNER PROPANE CAMPING STOVE
 842-A100-S_CmpStove.qxd 2/10/06 11:20 AM Page 1 OWNER S MANUAL TWO BURNER PROPANE CAMPING STOVE FAILURE TO FOLLOW ALL S AND INSTRUCTIONS IN THIS MANUAL COULD LEAD TO PERSONAL INJURY, INCLUDING DEATH. RETAIN
Cleaning Instructions for Burner, Pilot Assembly, and Emitter Screen. Series: 150000 200605 LP Gas
 Cleaning Instructions for Burner, Pilot Assembly, and Emitter Screen Series: 150000 200605 LP Gas Tools needed Bottle brush Non-abrasive scouring pad Small utility brush Heavy-duty pipe cleaners Air hose
Assembly Instructions & User s Manual Triton Classic Gas & Charcoal Grill Model #: FSOGBG3005
 Assembly Instructions & User s Manual Triton Classic Gas & Charcoal Grill Model #: FSOGBG3005 Please keep this instruction manual for future reference Customer Service: (888) 922-2336, 7:00 am to 12:00
USE AND CARE MANUAL FOR OUTDOOR USE ONLY MADE IN THE U.S.A.
 S o n o m a PLATINUM EDITION Sonoma Platinum Edition Grill: 27 Model TM USE AND CARE MANUAL FOR OUTDOOR USE ONLY MADE IN THE U.S.A. General Safety Instructions IMPORTANT SAFETY INFORMATION - Read this
Cleaning Instructions for Burner, Pilot Assembly, and Emitter Screen Series: 220000-450000
 Cleaning Instructions for Burner, Pilot Assembly, and Emitter Screen Series: 220000-450000 10 mm open end wrench 12 mm open end wrench 9/16 open end wrench 5/8 open end wrench 11/16 open end wrench 9/16
Bottom Loading Water Dispenser
 Bottom Loading Water Dispenser Model # 601000 TO REDUCE THE RISK OF INJURY AND PROPERTY DAMAGE, USER MUST READ THIS MANUAL BEFORE ASSEMBLING, INSTALLING & OPERATING DISPENSER. SAVE THIS MANUAL FOR FUTURE
Quickchange. OWNER S MANUAL Model # VGK-GPAK-C1 GAS INSERT FOR SIGNATURE SERIES & C-SERIES KAMADO GRILLS ENGLISH
 GAS INSERT FOR SIGNATURE SERIES & C-SERIES KAMADO GRILLS ENGLISH OWNER S MANUAL Model # VGK-GPAK-C1 SAFETY INFORMATION PLEASE READ THE ENTIRE MANUAL BEFORE OPERATING YOUR VISION KAMADO GRILL. PLEASE KEEP
T360 Barbecue. Assembly Manual. 85-3052-6 (G30531) Propane 1 YEAR LIMITED WARRANTY
 Propane 1 YEAR LIMITED WARRANTY") T360 Barbecue Assembly Manual 85-3052-6 (G30531) Propane 1 YEAR LIMITED WARRANTY READ AND SAVE MANUAL FOR FUTURE REFERENCE. If pre-assembled, leave this manual with unit for consumer s future reference.
T360 Barbecue Assembly Manual 85-3052-6 (G30531) Propane 1 YEAR LIMITED WARRANTY READ AND SAVE MANUAL FOR FUTURE REFERENCE. If pre-assembled, leave this manual with unit for consumer s future reference.
ASK THE EXPERT: Burner Troubleshooting Information & Maintenance
 ASK THE EXPERT: Burner Troubleshooting Information & Maintenance The burner is the heart of your BBQ. It is subject to a number of conditions that can cause damage, and lead to potential safety issues.
USER MANUAL. Bottom Loading Bottled Water Dispenser SAVE THIS MANUAL FOR FUTURE USE. Model # 900172
 Model # 900172: Page 1 USER MANUAL Bottom Loading Bottled Water Dispenser Model # 900172 TO REDUCE THE RISK OF INJURY AND PROPERTY DAMAGE, USER MUST READ THIS MANUAL BEFORE ASSEMBLING, INSTALLING & OPERATING
Propane Conversion Kit PROPANE CONVERSION KIT INSTALLATION MANUAL
 Propane Conversion Kit Supersedes: 145.25-IOM2 (708) Form 145.25-IOM2 (908) PROPANE CONVERSION KIT INSTALLATION MANUAL "LPKIT " - PROPANE CONVERSION KIT Kits are available for field conversion from natural
American Fireglass Outdoor Fire pit kit information. General instructions/warnings for outdoor gas pan and burner systems
 American Fireglass Outdoor Fire pit kit information General instructions/warnings for outdoor gas pan and burner systems We strongly recommend that our burner products be installed by a licensed and certified
Electric Kettle. Model: SK-1717 INSTRUCTIONS MANUAL
 Electric Kettle Model: SK-1717 INSTRUCTIONS MANUAL Thank you for your purchase. Please read this Instruction Manual thoroughly before use and keep in a safe place for future reference. READ ALL INSTRUCTIONS
Owner s Manual PATIO HEATER
 RTA International For Evaluation Only Edited by Foxit PDF Editor Copyright (c) by Foxit Software Company, 2004 Owner s Manual PATIO HEATER TOLL FREE After Service Number 1-888-775-1330 IMPORTANT Read this
USER S, MAINTENANCE and SERVICE INFORMATION MANUAL
 CONTENTS SAFETY INFORMATION................ 2 FOR YOUR SAFETY....................... 2 SYSTEM OPERATION.................. 2 THERMOSTATS........................... 2 INTERMITTENT IGNITION DEVICE...........
OUTDOOR GAS FIREPLACE USER GUIDE North America 630165_2 EF5000. www.escea.net
 OUTDOOR GAS FIREPLACE USER GUIDE North America 630165_2 EF5000 www.escea.net Any service work carried out on this appliance must only be done by a recognised escea technician or authorized personnel. The
GAS SAFETY PRECAUTIONS
 GAS SAFETY PRECAUTIONS Instructions on what to do when a user smells gas can be obtained from the local gas supplier. These instructions must be posted in a prominent location where the unit is to be operated.
THC 85 INDUSTRIAL / COMMERCIAL SPACE HEATER
 THC 85 INDUSTRIAL / COMMERCIAL SPACE HEATER Certified to / Certifié à CGA 2.14 M2000 Conforms to / Conforme à ANSI std Z83.7 2000 Suitable for indoor or outdoor installation / Unvented / Unattended Type
Convection TCO600. For your safety and continued enjoyment of this product, always read the instruction book carefully before using.
 Convection Toaster Oven TCO600 For your safety and continued enjoyment of this product, always read the instruction book carefully before using. IMPORTANT SAFEGUARDS SAVE AND READ THESE INSTRUCTIONS When
Instruction Manual. Image of SP-3015 & SP-3815. Important Safeguards. Automatic Dispensing Hot Water Pot with Reboil Function
 Important Safeguards READ ALL INSTRUCTIONS BEFORE USE. Instruction Manual Automatic Dispensing Hot Water Pot with Reboil Function Image of SP-3015 & SP-3815 SP-3015: 3.0L SP-3815: 3.8L SP-3017: 3.0L (Stainless
INSTALLATION INSTRUCTIONS
 INSTALLATION INSTRUCTIONS VGBQ SERIES CONVERSION KIT VIKING RANGE CORPORATION 111 Front Street Greenwood, Mississippi (MS) 38930 USA (662) 455-1200 IMPORTANT: PLEASE READ AND FOLLOW 1. Before beginning,
FASCINATION 700 HVLP TANNING PRO SYSTEM USER MANUAL
 FASCINATION 700 HVLP TANNING PRO SYSTEM USER MANUAL Congratulations on choosing the Fascination 700 HVLP Tanning Pro System! Your system includes the following items: 1 Fascination 700 HVLP Tanning Pro
Convection TCO650. For your safety and continued enjoyment of this product, always read the instruction book carefully before using.
 Convection Toaster Oven TCO650 For your safety and continued enjoyment of this product, always read the instruction book carefully before using. IMPORTANT SAFEGUARDS SAVE AND READ THESE INSTRUCTIONS When
Dehumidifier Users manual. For Models: DH45S DH65S
 Dehumidifier Users manual For Models: DH45S DH65S 950-0062-revD Jan. 9 2007 FORWARD The appearance of the units that you purchase might be slightly different from the ones described in the Manual, but
Crux TM. Canister mounted stove for outdoor use SWE OPTIMUS CLEVER COOKING SINCE 1899
 EN Crux TM Canister mounted stove for outdoor use FR DE NL DK SWE NO FI IT ES PT PL CZ OPTIMUS CLEVER COOKING SINCE 1899 RU FIGURE [1] FIGURE [2] O-ring Art. No. 8017867 FIGURE [3] FIGURE [4] FIGURE [5]
!"" #$% "!&' ( ( ) *
 *") !"" #$% "!&' (( ) * G Whiz Gas Popper Instruction Manual Model #5908 Part No. 74874 Revised October 1997 Cincinnati, OH 45241-4807 USA GAS SAFETY PRECAUTIONS Instructions on what to do when a user smells
!"" #$% "!&' (( ) * G Whiz Gas Popper Instruction Manual Model #5908 Part No. 74874 Revised October 1997 Cincinnati, OH 45241-4807 USA GAS SAFETY PRECAUTIONS Instructions on what to do when a user smells
Oxy-Fuel Gas Welding. Given a functional oxy-fuel gas unit, instruction and demonstration of use, each student will be able to:
 I. Competencies Oxy-Fuel Gas Welding Given a functional oxy-fuel gas unit, instruction and demonstration of use, each student will be able to: A. Identify the major parts of the oxy-fuel gas unit. B. Pass
INSTRUCTION MANUAL REFRIGERATOR BEFORE USE, PLEASE READ AND FOLLOW ALL SAFETY RULES AND OPERATING INSTRUCTIONS.
 INSTRUCTION MANUAL Model Number: BC-130 REFRIGERATOR BEFORE USE, PLEASE READ AND FOLLOW ALL SAFETY RULES AND OPERATING INSTRUCTIONS. 1 REFRIGERATOR SAFETY Your safety and the safety of others are very
MODEL G300 BRAKE BLEEDER
 MODEL G300 BRAKE BLEEDER Installation, Operation & Repair Parts Information Branick Industries, Inc. 4245 Main Avenue P.O. Box 1937 Fargo, North Dakota 58103 REV060616 P/N: 81-0035G 1 THIS PAGE INTENTIONALLY
CARING FOR YOUR WATER HEATER
 http://waterheatertimer.org/troubleshoot-rheem-tankless-water-heater.html Water Heater Inspections CARING FOR YOUR WATER HEATER Venting System (Direct Vent Only) The venting system should be inspected
FOR THE FOLLOWING MODELS: EE-8075W EE-8075O EE-8075R EE-8075BK
 FIREPLACE HEATER FOR THE FOLLOWING MODELS: EE-8075W EE-8075O EE-8075R EE-8075BK If you have any questions about the operation of your fireplace heater, please contact Crane Customer Care. Toll Free: 888-599-0992
English. Symbols used to mark instructions...3. Congratulations...5 Getting the best results...5. Warnings...6 Operating Procedure...
 2 Contents Components Attachments Guidance Installation Operation Maintenance Service Technical Troubleshooting Symbols used to mark instructions...3 Included Attachments...4 Congratulations...5 Getting
Please read and keep these instructions. Run water through your machine before first use
 47070 Rev 1 24/3/05 2:23 PM Page 1 12 cup filter coffee maker Please read and keep these instructions getting the best from your new coffee maker Safety first Caution must be used when handling hot water,
Instruction Manual. www.aromaco.com AWK-115S
 Hot H2O X-Press Electric Water Kettle Instruction Manual www.aromaco.com AWK-115S Congratulations on your purchase of the Aroma Hot H20 X-Press Kettle. This handy appliance provides more speed and convenience
Espresso/Cappuccino Maker MODELS MEXKITB, MEX1B
 READ AND SAVE THESE INSTRUCTIONS WARNING: A risk of fire and electrical shock exists in all electrical appliances and may cause personal injury or death. Please follow all safety instructions. Espresso/Cappuccino
MODEL T-4 TRENCHER. Operators Manual
 DO NOT THROW AWAY IMPORTANT MANUAL MODEL TRENCHER Operators Manual P.O.BOX 290 San Bernardino, CA. 92402 Phone (909) 478-5700 (800) 922-4680 Fax (909) 478-5710 E-mail: sales@groundhoginc.com www.groundhoginc.com
Your safety and the safety of others are very important.
 NATURAL GAS TO PROPANE CONVERSION KIT 090 INSTALLATION INSTRUCTIONS FOR ALTITUDES 0 -,00 FT. ONLY PROPANE CONVERSION KIT SAFETY... INSTALLATION REQUIREMENTS... Tools and Parts... LP Gas Requirements...
ecomax Instructions for use Wall hung room sealed fan assisted condensing boilers For the user
 For the user Instructions for use ecomax Wall hung room sealed fan assisted condensing boilers ecomax 63/ E ecomax 68/ E ecomax 6/ E ecomax 635 E ecomax 84/ E ecomax 88/ E ecomax 835 E GB Table of contents
15GAL STEEL OIL DRAIN WITH 110V PUMP
 15GAL STEEL OIL DRAIN WITH 110V PUMP OWNER S MANUAL WARNING: Read carefully and understand all ASSEMBLY AND OPERATION INSTRUCTIONS before operating. Failure to follow the safety rules and other basic safety
Triple Threat 3-in-1 Game Table 3 IN 1 GAME TABLE
 NG0M Triple Threat 3-in- Game Table 3 IN GAME TABLE Thank 3 in Y Game Table Thank you for your purchase of our product. We work around the clock and around the globe to ensure that our products maintain
Outdoor LP Gas Mosquito Exterminator
 OWNER S MANUAL Outdoor LP Gas Mosquito Exterminator Model No. SV5100 For Outdoor Use Only (outside any enclosure) WARNING FOR YOUR SAFETY: 1. Improper installation, adjustment, alteration, service or maintenance
3 WATT LED SPOTLIGHT Model No. SLM - 3801
 3 WATT LED SPOTLIGHT Model No. SLM - 3801 OWNER'S MANUAL Customer Service Tel: 1-800-268-3319 Superex Canada Ltd, Toronto,M2H 3B8 Made in China Table of Contents A). Important Safety Instructions B). Charging
1000-LB. TRAILER JACK OWNER S MANUAL
 1000-LB. TRAILER JACK OWNER S MANUAL WARNING: Read carefully and understand all INSTRUCTIONS before operating. Failure to follow the safety rules and other basic safety precautions may result in serious
SL280UHV SERIES GAS FURNACE WARNING
 2010 Lennox Industries Inc. Dallas, Texas, USA 506677 01 11/2010 Supersedes 506409 01 SL280UHV SERIES GAS FURNACE Litho U.S.A. FIRE OR EXPLOSION HAZARD. Failure to follow safety warnings exactly could
Global Water Instrumentation, Inc.
 Global Water Instrumentation, Inc. 11390 Amalgam Way Gold River, CA 95670 T: 800-876-1172 Int l: (916) 638-3429, F: (916) 638-3270 6 Tipping Bucket: RG200 02/05/10 01-343 - 1 - Congratulations on your
Electric Fryers Instruction Manual Models: 8047D, 8048D, 8049D, 8050D, 8051D 8066, 8068, 8068FL, 8073, 8073BF and 8075
 Part No. 89047 Electric Fryers Instruction Manual Models: 8047D, 8048D, 8049D, 8050D, 8051D 8066, 8068, 8068FL, 8073, 8073BF and 8075 Cincinnati, OH 45241-4807 USA ELECTRIC FRYER SAFETY PRECAUTIONS Installation
WS-69TB30SS (22") WS-69TB36SS (22") WS-69TS30SS (18") WS-69TS36SS (18")
 WS-69TB36SS (22) WS-69TS30SS (18) WS-69TS36SS (18)") www.windsterhood.com LINER SERIES WS-69TB30SS (22") WS-69TB36SS (22") WS-69TS30SS (18") WS-69TS36SS (18") NOTE: PLEASE INSPECT HOOD IMMEDIATELY UPON RECEIVING. CLAIM OF DAMAGE AFTER 7 DAYS OF DELIVERY
www.windsterhood.com LINER SERIES WS-69TB30SS (22") WS-69TB36SS (22") WS-69TS30SS (18") WS-69TS36SS (18") NOTE: PLEASE INSPECT HOOD IMMEDIATELY UPON RECEIVING. CLAIM OF DAMAGE AFTER 7 DAYS OF DELIVERY
Mini-led spotlight with magnetic base
 Mini-led spotlight with magnetic base Model 95799 Assembly And Operation Instructions Due to continuing improvements, actual product may differ slightly from the product described herein. 3491 Mission
Multi-Pitch Pitching Machine USER MANUAL
 Multi-Pitch Pitching Machine USER MANUAL TABLE OF CONTENTS Thank you for purchasing the Cimarron Multi-Pitch Pitching Machine. The Cimarron Multi-Pitch Pitching Machine is a high performance pitching machine
INSTALLATION AND OPERATIONS GUIDE FOR GRAND CANYON GAS LOG SYSTEMS
 INSTALLATION AND OPERATIONS GUIDE FOR GRAND CANYON GAS LOG SYSTEMS Installation and service must be provided by a qualified installer, service agency or gas supplier Grand Canyon Gas Logs, logs are made
Model GGR200RDDS. Please Read and Save this Use and Care Book. USA/Canada 1-800-231-9786 THE LEAN MEAN FAT REDUCING GRILLING MACHINE
 TM THE LEAN MEAN FAT REDUCING GRILLING MACHINE Please Read and Save this Use and Care Book USA/Canada 1-800-231-9786 www.prodprotect.com/applica Register your product online at www.prodprotect.com/applica,
Compressed Gas Cylinder Safety
 Compressed Gas Cylinder Safety I. Background. Due to the nature of gas cylinders, special storage and handling precautions are necessary. The hazards associated with compressed gases include oxygen displacement,
IMPORTANT SAFETY RULES TO FOLLOW
 WARNING FLOOR & CARPET CLEANER Any piece of equipment can be dangerous if not operated properly. YOU are responsible for the safe operation of this equipment. The operator must carefully read and follow
IMPORTANT SAFETY INSTRUCTIONS WARNING READ AND SAVE THESE OPERATING AND SAFETY INSTRUCTIONS BEFORE USING THIS HEATER.
 THERMAWAVE CERAMIC HEATER Model HZ-850 Series Model HZ-860 Series IMPORTANT SAFETY INSTRUCTIONS WARNING READ AND SAVE THESE OPERATING AND SAFETY INSTRUCTIONS BEFORE USING THIS HEATER. Warning Failure to
WWW.CALIFORNIAAIRTOOLS.COM Customer Support 1-866-409-4581
 sound proof AIr CoMprEssor CAbInEt owner's MAnuAl spc03 WWW.CALIFORNIAAIRTOOLS.COM Customer Support 1-866-409-4581 TAbLe OF CONTeNTS INTROduCTION IntroductIon 2 Important Safety InStructIonS 5 components
DC REFRIGERATORS 12/24 VOLTS INSTALLATION AND OWNER S MANUAL
 DC REFRIGERATORS 12/24 VOLTS INSTALLATION AND OWNER S MANUAL Service Information If service or parts are required, contact the nearest Norcold Service Center. To find an authorized Norcold Service Center
Getting the best from your urn
 444448538 Standard 444448539 Deluxe Getting the best from your urn Remove any plastic film from the urn before use. Any water in the urn is due to testing and is normal. The urn must be used on a flat
User s Guide. Oreck Air Purifier with HEPA Filtration. Important! Read this manual carefully, and keep for future reference.
 User s Guide Oreck Air Purifier with HEPA Filtration Important! Read this manual carefully, and keep for future reference. Enjoy Congratulations on your purchase of the Oreck Air Purifier with HEPA Filtration.
Back Pack Sprayer. Operator's Manual MODELS MS - 40 MS - 50
 Back Pack Sprayer Operator's Manual MODELS MS - 40 MS - 50 WARNING DANGER Read rules for safe operation and all instructions carefully. ECHO provides this Operator's Manual which must be read and understood
Call us toll free at: 1-800-GEVALIA (1-800-438-2542)
") LIMITED WARRANTY: This appliance shall be free from defects in materials and workmanship under normal home use for a period of one year from the date of receipt. During that period, defects will be repaired
LIMITED WARRANTY: This appliance shall be free from defects in materials and workmanship under normal home use for a period of one year from the date of receipt. During that period, defects will be repaired
MODEL #12006. Introduction
 THE ORIGINAL PECO POWER SPRAYER PECO OWNER S MANUAL MODEL #12006 (Q0080) Revised: 1/8/2014 PECO POWER SPRAYER MODEL #12006 TABLE OF CONTENTS SECTION PAGE SECTION PAGE INTRODUCTION - - - - - - - - - - -
infinity Burr Model #565 #560 Instructions Warranty Product Registration CONICAL Grinder 100W / 120V~ / 60 Hz
 infinity Burr CONICAL Grinder Model #565 #560 Instructions Warranty Product Registration 100W / 120V~ / 60 Hz IMPORTANT SAFEGUARDS When using electrical appliances, basic safety precautions should always
ATS Overhead Table Shelf System INSTRUCTION MANUAL
 ATS Overhead Table Shelf System INSTRUCTION MANUAL ATS Overhead Table Shelf System Instruction Manual Warranty Newport Corporation warrants this product to be free of defects in material and workmanship
National- Spencer Inc.
 9-27-2010 National- Spencer Inc. 19.2V HEAVY DUTY GREASE GUN PRODUCT SPECIFICATION Charger Input Power 110 VAC Battery Output Power 19.2V Battery Capacity 1500 MAH Battery Pack Charge Time 1 Hour Maximum
Wireless Indoor/ Outdoor Thermometer
 Wireless Indoor/ Outdoor Thermometer Owner s Manual Please read before using this equipment. ˆ Contents FCC Information... 3 FCC Declaration of Conformity... 5 Preparation... 5 Installing Batteries...
electric kettle owner's manual SAVE THIS USE AND CARE BOOK Please call 1-800-231-9786 with questions. MGD550
 electric kettle owner's manual SAVE THIS USE AND CARE BOOK MGD550 * Please call 1-800-231-9786 with questions. IMPORTANT SAFEGUARDS When using electrical appliances, in order to reduce the risk of fire,
the Soft Top Breville Customer Service Center www.breville.com Instruction Book - Livret d instructions
 Breville Customer Service Center the Soft Top Instruction Book - Livret d instructions US Customers Mail: Breville USA 19400 S. Western Ave Torrance CA CA 90501-1119 Phone: Customer Service 1 (866) BREVILLE
OWNER S MANUAL. IMPortANt: This instruction manual contains important information necessary for the proper assembly and safe use of the appliance.
 makes great tasting, traditional italian pizza with bubbly cheese, crispy crust & toasty toppings. OWNER S MANUAL IMPortANt: This instruction manual contains important information necessary for the proper
Pet hair clipper. Model 96822. Diagrams within this manual may not be drawn proportionally.
 Pet hair clipper Model 96822 Cleaning And Operation Instructions Diagrams within this manual may not be drawn proportionally. Due to continuing improvements, actual product may differ slightly from the
OUTDOOR PIZZA OVEN INNOVATIVE DESIGN CREATES CULINARY PERFECTION
 OUTDOOR PIZZA OVEN INNOVATIVE DESIGN CREATES CULINARY PERFECTION Dear Sloan Outdoors Customer, Thank you for choosing Sloan Outdoor Products. We recommend you read this manual carefully to fully understand
WATER BATH CANNER Instruction Manual
 WATER BATH CANNER Instruction Manual Register this and other Focus Electrics products through our website: www.registerfocus.com Water Bath Canning At A Glance... 2 Using Your Canner... 3 Processing Times...
Wine Cooler with Thermo-Electric Cooling & Heating Technology
 Wine Cooler with Thermo-Electric Cooling & Heating Technology Model number: WC-0888H (8-bottles capacity) Instruction Manual Please read carefully and follow all safety rules and operating instructions.
NOTE! READ INSTRUCTIONS FULLY BEFORE INSTALLING OR OPERATING.
 INSTALLATION AND OPERATION GUIDE FOR HARGROVE GAS LOGS PROPANE GAS ADEQUATE FIREPLACE VENTILATION IS REQUIRED FOR SAFETY. GAS LOGS MUST BE INSTALLED BY PERSONNEL QUALIFIED FOR INSTALLING GAS APPLIANCES.
PLEASE READ ALL INSTRUCTIONS BEFORE USE AND SAVE A COPY FOR FUTURE REFERENCE!
 PLEASE READ ALL INSTRUCTIONS BEFORE USE AND SAVE A COPY FOR FUTURE REFERENCE! 1. Read all instructions carefully before using the machine. 2. Do not touch hot surfaces. Use handles or knobs. The lid and
Altima Sure Heat Manufacturing 800-229-5647
 Altima Sure Heat Manufacturing 800-229-5647 Professional Stainless Steel Grill: 30, 38, 48 Models AGR38PF (shown with optional equipment USE AND CARE MANUAL FOR OUTDOOR USE ONLY MADE IN THE USA A Message
PAINT SPRAY GUN WASHER
 PAINT SPRAY GUN WASHER 94996 ASSEMBLY AND OPERATING INSTRUCTIONS Visit our website at: http://www.harborfreight.com Read this material before using this product. Failure to do so can result in serious
MAP COFFEE MIA CAPSULE COFFEE MACHINE INSTRUCTION MANUAL MODEL: CM4725. Read this manual thoroughly before using and save it for future reference
 MAP COFFEE MIA CAPSULE COFFEE MACHINE INSTRUCTION MANUAL MODEL: CM4725 Read this manual thoroughly before using and save it for future reference Purchase MAP capsules at Harvey Norman stores nationwide
GUIDELINES - Gas Inspection Regulations 1. Recommendations for camping site owners
 GUIDELINES - Gas Inspection Regulations 1. Recommendations for camping site owners Offer gas tests by recognized experts for camping guests. Keep a record for gas tests. Write down the date and who tested
SunMaxx Solar Filling Station Operating Instructions
 SunMaxx Solar Filling Operating Instructions Content 1. Declaration of conformity... 2 2. Introduction... 2 3. Transportation and unpacking... 4 4. Mounting and commissioning... 5 5. End of operation...
OWNER S MANUAL Table Tennis Table Patent Pending
 OWNER S MANUAL Table Tennis Table Patent Pending Be sure to write your model number and serial number here for future reference. You can find these numbers printed on the bottom of the table. MODEL # T8179
2-SLICE COOL TOUCH TOASTER
 2-SLICE COOL TOUCH TOASTER PLA0405 Instruction Manual Due to on-going product improvements, specifications and accessories may change without notice. Actual product may differ slightly to that depicted.
OWNER S MANUAL FORCE 10 MARINE COMPANY 23080 HAMILTON ROAD RICHMOND, BC CANADA V6V 1C9 TEL: (604) 522-0233 FAX: (604) 522-9608
 522-0233 FAX: (604) 522-9608") Electric Water Heater OWNER S MANUAL FORCE 10 MARINE COMPANY 23080 HAMILTON ROAD RICHMOND, BC CANADA V6V 1C9 TEL: (604) 522-0233 FAX: (604) 522-9608 If your water Heater is Damaged or you have questions
Electric Water Heater OWNER S MANUAL FORCE 10 MARINE COMPANY 23080 HAMILTON ROAD RICHMOND, BC CANADA V6V 1C9 TEL: (604) 522-0233 FAX: (604) 522-9608 If your water Heater is Damaged or you have questions
OPERATOR S MANUAL 18 VOLT, 1 HOUR CHARGER
 OPERATOR S MANUAL 18 VOLT, 1 HOUR CHARGER P110 Your battery charger has been engineered and manufactured to Ryobi s high standard for dependability, ease of operation, and operator safety. When properly
USER INSTRUCTIONS FOR 10 LITRE PORTABLE DEHUMIDIFIER MODEL NO. DHMD102
 USER INSTRUCTIONS FOR 10 LITRE PORTABLE DEHUMIDIFIER MODEL NO. DHMD102 THANK YOU FOR CHOOSING YOUR NEW DEHUMIDIFIER. BEFORE USING THE UNIT READ THESE INSTRUCTIONS FULLY AND RETAIN THEM FOR FUTURE REFERENCE
Voltmaster Trash Pumps Model TSP2, TSP3 and TSP4
 Model TSP2, TSP3 and TSP4 Owner s Manual July 2010 Table of Contents 1 Introduction...................................................... 1 1.1 Read before using..............................................
FJ2. 2 Ton Trolley Floor Jack Assembly & Operating Instructions
 FJ2 2 Ton Trolley Floor Jack Assembly & Operating Instructions READ ALL INSTRUCTIONS AND WARNINGS BEFORE USING THIS PRODUCT. This manual provides important information on proper operation & maintenance.
Cylinder Leak- Down Tester
 Cylinder Leak- Down Tester Item 94190 INSTRUCTIONS AND PRECAUTIONS Visit our website at: http://www.harborfreight.com When unpacking, make sure that the product is intact and undamaged. If any parts are
Threshold 34 in Round Outdoor Firebowl with Slate Tile and Copper Mantel dpci # 009-07-0766 stock # WAD15038T
 Threshold 34 in Round Outdoor Firebowl with Slate Tile and Copper Mantel dpci # 009-07-0766 stock # WAD15038T >> assembly instructions WARNING FOR YOUR SAFETY: For Outdoor Use Only (outside any enclosure)
Acrylic Walls Installation Instructions
 Acrylic Walls Installation Instructions IMPORTANT Please read carefully the following instructions before installing your shower acrylic walls. If you have any questions on this shower acrylic walls installation
Select Radiators Installation Guide
 Select Radiators Installation Guide Table of Contents Informational Symbols...3 Before You Begin...4 Select Rough-In... 5 Connection Installation...6 Optional Piping Arrangements...7 Conventional Wall
Foodservice Equipment Specialists P.O. Box 880 Saco, ME. / U.S.A. 04072 877-854-8006 * FAX (207) 283-8080
 283-8080") Foodservice Equipment Specialists P.O. Box 880 Saco, ME. / U.S.A. 04072 877-854-8006 * FAX (207) 283-8080 FOR SERVICE ASSISTANCE U.S. AND CANADA CALL: 1-877-854-8006 24 HOURS/DAY 7 DAYS/WEEK TABLE OF CONTENTS
Foodservice Equipment Specialists P.O. Box 880 Saco, ME. / U.S.A. 04072 877-854-8006 * FAX (207) 283-8080 FOR SERVICE ASSISTANCE U.S. AND CANADA CALL: 1-877-854-8006 24 HOURS/DAY 7 DAYS/WEEK TABLE OF CONTENTS
75th anniversary blender
 75th anniversary blender MBB1000 Series For your safety and continued enjoyment of this product, always read the instruction book carefully before using. CONTENTS Important Safeguards... 3 Grounding Instructions...
Hot Water Central. Electric Hot Water Dispenser. Instruction Manual AAP-325W. www.aromaco.com
 Hot Water Central Electric Hot Water Dispenser Instruction Manual www.aromaco.com AAP-325W With the Aroma Hot Water Central, hot water is just a button away. Boil up to 3 liters of water in just 30 minutes,
36G22, 36G23, 36G24 & 36G52 36J22, 36J23, 36J24 & 36J52 DSI and HSI Single Stage Combination Gas Valve
 Operator: Save these instructions for future use! FAILURE TO READ AND FOLLOW ALL INSTRUCTIONS CAREFULLY BEFORE INSTALLING OR OPERATING THIS CONTROL COULD CAUSE PERSONAL INJURY AND/OR PROPERTY DAMAGE. DESCRIPTION