Disassembling the Wii
|
|
|
- Jewel Bond
- 7 years ago
- Views:
Transcription
1 Username: Password: Login Disassembling the Wii Method : Taking it Apart There are plenty of reasons to take apart a wii, whatever your case may be here's a guide to doing it. REQUIRED TOOLS AND ITEMS A Nintendo Wii ( of course ) A Tri-wing screwdriver Size 3 (please save us all the trouble and don't try and use a flathead) This NEEDS to have a long shaft. There is a part of the wii that has recessed screws. A mini Phillips screwdriver A small plate or container ( to hold the screws in ) A couple pieces of tape ( use the tape to keep track of what screws belong to part of the wii) Soft Working surface ( the wii scratches very easily ) A razor blade and a pair of tweezers will help remove items Step 1. Removing the Battery Position the Wii like the picture below and you will see a single screw Remove it and pull the battery tray out
 A couple pieces of tape ( use the tape to keep track of what screws belong to part of the wii) Soft Working surface (")
2
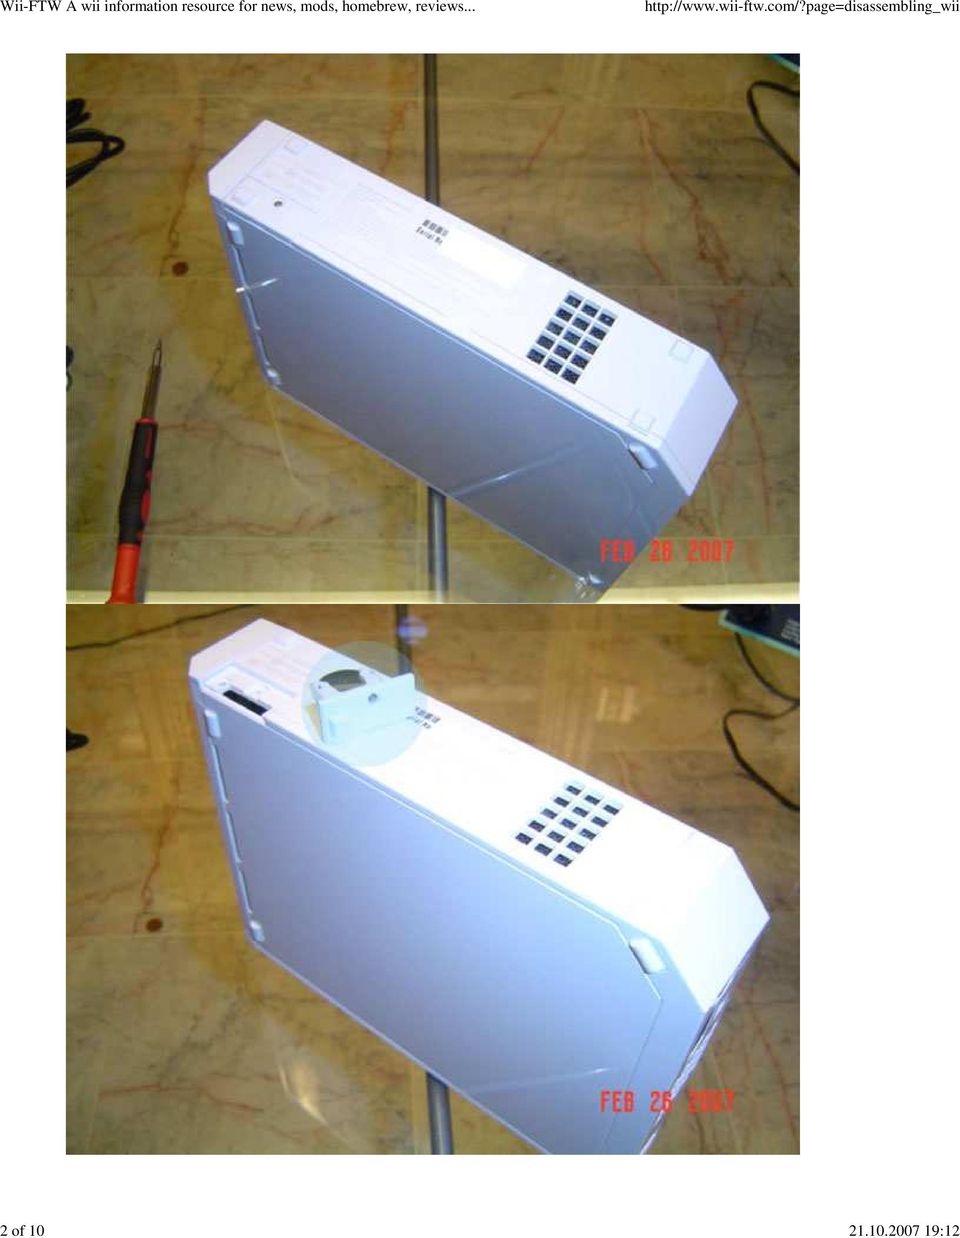
3 Step 2. Removing 5 screws /w plastic covers When the battery was removed it revealed 1 screw. There are four more hidden underneath plastic stickers and rubber feet. Refer to the picture for their locations Peel up the plastic stickers with a razor and pull it away with a tweezers. (place the stickers neatly away from your working area if you plan on putting them back on. ) Remove the screws ( fix the 5 screws to a single piece of scotch tape and put it in your container. ) For reference the black screw is the one on the top left, the two longer screws are located on the bottom and the shorter ones on the top. This is important to remember because you don't want to put the screws in the wrong holes when reassembling the unit. Step 3. Removing Rubber Feet and removing screws Position the wii like in the picture. ( use the notch as a guide ) There are 2 rubber feet on top and 2 plastic stickers on the bottom that you need to remove. ( do not remove the rubber feet on the bottom. Not necessary ) Remove the screws and fix them to a second piece of tape. Take note that the two black screws go into the faceplate/bottom and the two silver ones go into the top/recessed holes.
 For reference the black screw is the one on the top left, the two longer screws are located on the bottom and the shorter ones on the top.")
4 Step 4. Removing GameCube port covers and screws There is a section of the wii that houses the ports for the Gamecube accessories. The 2 covers to this section will flip open and easily detach. If you look there's a sticker on the inside depicting how to remove the covers. They snap off with light pressure. Remove them now. Now remove the 3 black screws here and attach them to a 3rd piece of tape. Notice that the screw closest the front/face of the wii is the longest of the 3 screws.

5 Step 5. Removing the face and detaching the cable Now position the wii with the face upwards with the dvd tray on the bottom. Flip the wii face upwards and away from you SLOWLY and look for the connection marked in the picture. Use a flathead of tweezers to pull the WHITE connector out of the socket. Set aside the face plate in a safe location.

6 Step 6. Removing the GameCube black cover and screws The black covering you saw earlier should lift out easily now. (Although it only goes one way) Remove the 4 screws and attach them to a 4th piece of tape and set them aside. If the position of the wii is like in the picture then the top screws are tri-wing and the bottoms screws are Phillips.
 Remove the 4 screws and attach them to a 4th piece of")
7 Step 7. Opening the Wii up and removing 4 screws Position the wii with the notch on the bottom right. Lift the right side of the wii up and the cover should detach Flip the cover over to the left The heat sink may or may not come with the cover ( if not just remove it ) Remove the 4 screws marked in the picture. Fix them to a 5th piece of tape. (although these screws are much different than the rest you've encountered.)

8 Step 8. Disassembling DVDROM drive Be extremely careful with this step. Slowly flip the top portion of the drive like in the picture. Notice how short those wires are? Remove the White connection first. It's similar to the one earlier on the face of the wii TAKE YOUR TIME ON THIS STEP Now the thicker cable is removed by flipping the brown plastic tab upwards The cable will just slide out now

9 Step 9. Do what you need to do! You're all done! Enjoy! The marked area is an ideal spot for a modchip o Not that we condone the use of modchips for illegal activities or anything.

10 0 News Forum Guides Modchips Hardware Software Shops Disclaimer

Written By: Walter Galan
 Installing iphone 4S Display Assembly Written By: Walter Galan TOOLS: Phillips 00 Screwdriver (1) Plastic Opening Tools (1) PARTS: iphone 4S Display Assembly (1) iphone 4 and 4S Screen Protector (1) Small
Retrofit Instructions Installing a Sport Heated Steering Wheel - Leather, Multifunction BMW X5, E53, 2001 2006
 Retrofit Instructions Installing a Sport Heated Steering Wheel - Leather, Multifunction BMW X5, E53, 2001 2006 Disclaimer: This set of instructions is simply a guide on how I installed my own heated steering
Sony Cyber-shot DSC-T9 Motherboard
 Sony Cyber-shot DSC-T9 Motherboard Replacement This guide gives instructions to the user to install a motherboard into the Sony Cyber-shot DSC-T9 camera. Written By: Stephannie Allen INTRODUCTION This
Service Guide. Gateway M275
 Service Guide Gateway M275 Contents Replacing Gateway M275 Components.................................... 1 Identifying the convertible tablet PC model...................................... 2 Identifying
Document number RS-PRD-00130 Revision 05 Date 20/10/2009 Page 1/30
 Date 20/10/2009 Page 1/30 1. Purpose This document describes the field replacement of the footscan plate cable for these models: 2m hi-end plate SN 11/5/xxx 2m pro plate SN 7/5/xxx 0.5m 2003 hi-end plate
The Ultimate XBOX 360 Guide to Fix 3 Red Lights (RROD)
") The Ultimate XBOX 360 Guide to Fix 3 Red Lights (RROD) We offer a wide range of repair kits to meet just about everyone's needs. We offer kits ranging from just hardware, to kits that include hardware,
The Ultimate XBOX 360 Guide to Fix 3 Red Lights (RROD) We offer a wide range of repair kits to meet just about everyone's needs. We offer kits ranging from just hardware, to kits that include hardware,
Written By: Sam Lionheart
 iphone 5s Battery Replacement Replace the battery in your iphone 5s. Written By: Sam Lionheart INTRODUCTION Use this guide to bring life back to your iphone 5s with a new battery. Removing the battery
UPGRADING AND SERVICING GUIDE
 UPGRADING AND SERVICING GUIDE HPTouchSmart 610 PC Computer features may vary by model. Removing and Replacing a CD/DVD Drive...2 Removing the CD/DVD Drive... 2 Installing a New CD/DVD Drive... 5 Removing
How to modify a car starter for forward/reverse operation
 How to modify a car starter for forward/reverse operation Ok, start by choosing a starter. I took a starter out of an older style Nissan Sentra. I chose this particular starter for two reasons: 1. It was
EasyNote TJ Series. Disassembly Manual
 EasyNote TJ Series Disassembly Manual CHAPTER3 Replacing notebook components Preventing static electricity discharge Preparing the work space Required tools Preparing the notebook Adding or replacing memory
Acer Aspire One AOA150-1570 Disassembly
 Acer Aspire One AOA150-1570 Disassembly Model The Acer Aspire One AOA150-1570 is the model with the 120GB hard drive (not the Flash drive) and 1GB RAM with Windows XP. Disassembly Beware of the ESD (ElectroStatic
Written By: Walter Galan
 ipad 2 GSM Rear Camera Replacement Replace the rear camera in your ipad 2 GSM. Written By: Walter Galan INTRODUCTION Use this guide to replace a broken rear camera. TOOLS: ifixit Opening Picks set of 6
Drive Doctor for Nintendo Wii
 Drive Doctor for Nintendo Wii Installation Guide. Warning: Installation of Drive Doctor for Nintendo Wii requires you to have some prior experience of soldering, and demands careful following of these
Replacement Instructions. Warning: During this procedure, keep small parts away from children.
 apple ibook G4 Memory Card Replacement Instructions Follow the instructions in this sheet carefully. Failure to follow these instructions could damage your equipment and void its warranty. Note: Written
SERVICE GUIDE. Gateway Notebook
 SERVICE GUIDE Gateway Notebook Contents Replacing Gateway Notebook Components...................................1 Identifying the notebook model......................................... 2 Identifying
ipad 2 GSM Headphone Jack & SIM Slot Replacement
 ipad 2 GSM Headphone Jack & SIM Slot Replacement Replace the Headphone jack/sim slot in your ipad 2 GSM. Written By: Walter Galan INTRODUCTION Use this guide to replace a broken headphone jack or SIM card
Written By: Walter Galan
 ipad 2 GSM LCD Replacement Replace the LCD in your ipad 2 GSM. Written By: Walter Galan INTRODUCTION Use this guide to replace a broken LCD. TOOLS: iopener (1) Phillips #00 Screwdriver (1) Plastic Opening
HP Pavilion All-in-One MS200 series PC. Upgrading and Servicing Guide. Printed in
 HP Pavilion All-in-One MS200 series PC *579907-001* *579907-001* Printed in Upgrading and Servicing Guide Replacing a Wireless Keyboard or Mouse...2 Before You Begin... 2 Replacing the Keyboard or Mouse...
Disassembly Procedure
 Chapter 2 Disassembly Procedure Please follow the information provided in this section to perform the complete disassembly procedure of the notebook. Be sure to use proper tools described before. A SUS
Navico-Northstar 2kW JRC Radar Package, Scanner Cable Removal and Replacement
 Navico-Northstar 2kW JRC Radar Package, Scanner Cable Removal and Replacement This work instruction describes the methods and means for which to remove and reinstall optional scanner cable configurations
LG G2 VS980 DISASSEMBLE GUIDE. Recommended Tools. Page 1 of 8. http://www.fixez.com/
 LG G2 VS980 DISASSEMBLE GUIDE Recommended Tools 5-0016 Small Phillips Screwdriver 5-0019 Plastic Opening Tools 5-0022 Nylon Spudger 5-1370 Fine Tip Curved Tweezers Heat Gun/Blow Dryer This guide walks
Installing the Video Input and TV Tuner Cards in a Compact Computer or a Dual PCI-Slot Tower Computer
 Installing the Video Input and TV Tuner Cards in a Compact Computer or a Dual PCI-Slot Tower Computer This booklet describes how to install the video input and TV tuner cards in a compact Macintosh computer
GE Wireless Devices Battery Replacement
 60-506-319.5 Crystal Smoke Detector Two 9V Duracell 9V 1. Twist counter-clockwise until detector become loose from base. 2. Replace batteries observing correct polarity. 3. Replace detector by twisting
Apple iphone 5s DISASSEMBLE GUIDE
 Apple iphone 5s DISASSEMBLE GUIDE Recommended Tools 5-0016 Small Phillips Screwdriver 5-0017 Small Flathead Screwdriver 5-0019 Plastic Opening Tools 5-0020 Suction Cup 5-0022 Nylon Spudger 5-0458 Anti
Samsung Galaxy S4 (SGH-i337) DISASSEMBLE GUIDE
 DISASSEMBLE GUIDE") Samsung Galaxy S4 (SGH-i337) DISASSEMBLE GUIDE Recommended Tools 5-0016 Small Phillips Screwdriver 5-0019 Plastic Opening Tools 5-0022 Nylon Spudger 5-1370 Fine Tip Curved Tweezers Heat Gun / Blow Dryer
Samsung Galaxy S4 (SGH-i337) DISASSEMBLE GUIDE Recommended Tools 5-0016 Small Phillips Screwdriver 5-0019 Plastic Opening Tools 5-0022 Nylon Spudger 5-1370 Fine Tip Curved Tweezers Heat Gun / Blow Dryer
Spreader Light Bulb Replacement Instructions
 Spreader Light Bulb Replacement Instructions IMPORTANT: DISCONNECT LIGHT FROM BATTERY BEFORE PROCEEDING. FAILURE TO DO SO MAY RESULT IN PERSONAL INJURY OR OTHER DAMAGE. Tools Needed You will need the following
Packard Bell. EasyNote MZ series. Disassembly Manual
 Packard Bell EasyNote MZ series Disassembly Manual Table of Contents Overview...3 Technician Notes...3 Disassembly Instructions...3 Reassembly Instructions...3 Required Tools...3 Battery...4 Memory...4
HTC Windows Phone 8X - Disassemble Guide
 HTC Windows Phone 8X - Disassemble Guide TTT-9007 Small Phillips Screwdriver TTT-9010 Plastic Opening Tools TTT-9013 Spudger Heat Gun / Blow Dryer This guide will show you how to disassemble the HTC Windows
Building A Computer: A Beginners Guide
 Building A Computer: A Beginners Guide Mr. Marty Brandl The following was written to help an individual setup a Pentium 133 system using an ASUS P/I- P55T2P4 motherboard. The tutorial includes the installation
www.odometergears.com
 BMW E39 (5 Series) September 1999-2003 Headlight Adjuster Repair (version 1) A special thank you to Trent Cole of Lone Star Bavarian in TX for the great write up. Here are his words verbatim. Earlier model
Written By: Walter Galan
 ipad 2 GSM Front Panel Replacement Replace the front panel in your ipad 2 GSM. Written By: Walter Galan INTRODUCTION Note: this is a complete guide for replacing a plain front panel. If you have a Front
COOPER S PULLEY UPGRADE KIT INSTALLATION INSTRUCTIONS PART NUMBER NME5011
 COOPER S PULLEY UPGRADE KIT INSTALLATION INSTRUCTIONS PART NUMBER NME5011 Below are instructions for the Mini Mania Pulley Upgrade Kit, Part Number NME5011. Please take all necessary precautions for working
DIY CABINET REFACING INSTALLATION GUIDE
 DIY CABINET REFACING INSTALLATION GUIDE CABINET REFACING INSTALLATION Are you ready to reface your outdated cabinets? This guide will show you how to install your new Facelifters Cabinet Refacing Products
SPRITE and BIGFOOT DESKTOP CNC MACHINE KIT ASSEMBLY INSTRUCTIONS
 SPRITE and BIGFOOT DESKTOP CNC MACHINE KIT ASSEMBLY INSTRUCTIONS README FIRST: Thank you for purchasing your MyDIYCNC Desktop CNC Machine Kit. We hope this versatile and innovative machine brings you many
INSTALL/REMOVAL INSTRUCTIONS: WINDOW REGULATOR
 REMOVAL/INSTALL OF WINDOW REGULATOR (741-306) Honda Accord 2003 07 General Tech Tips: Use painter s tape rather than duct tape to secure window. It will not damage paint or leave sticky residue. A plastic
Disassembly Procedure
 Chapter 2 Disassembly Procedure Please follow the information provided in this section to perform the complete disassembly procedure of the Eee PC 4G (701). Be sure to use proper tools described before.
FRONT BUMPER INSTALLATION INSTRUCTIONS 2007-2011 DODGE / MERCEDES SPRINTER
 Aluminess Products Inc 9402 Wheatlands Ct. #A Santee, CA 92071 619-449-9930 FRONT BUMPER INSTALLATION INSTRUCTIONS 2007-2011 DODGE / MERCEDES SPRINTER Please read before beginning Stainless steel hardware
How To: Retrofit the Morimoto Mini D2S bi-xenon Projectors
 How To: Retrofit the Morimoto Mini D2S bi-xenon Projectors Warning: By reading this document I agree that it is only intended to be used as an educational guide. The Retrofit Source Inc. makes no guarantee
Z-Truck (Vertical Moving) Z-truck Flag. Y-Truck (Horizontal Moving) FIGURE 1: VIEW OF THE Z-TRUCK. Flexshaft Assembly
 Z-truck Flag. Y-Truck (Horizontal Moving) FIGURE 1: VIEW OF THE Z-TRUCK. Flexshaft Assembly") Replacing the Cover Micro-Switch To remove and replace the Cover Micro-Switch you will need the following tools: #2 Phillips screwdriver (magnetic tip preferred) #1 Phillips screwdriver (magnetic tip preferred)
Replacing the Cover Micro-Switch To remove and replace the Cover Micro-Switch you will need the following tools: #2 Phillips screwdriver (magnetic tip preferred) #1 Phillips screwdriver (magnetic tip preferred)
5800 Temperature Sensor Cable Assembly
 5800 Temperature Sensor Cable Assembly Removal and Replacement Instruction Sheet #60-4702-070 Revision D, January 14, 2013 Overview The 5800 has two refrigeration temperature sensors, one attached to the
Juice Box Stages 1&2 135&335 Installation Guide 5/10/08
 Tools Required: 8mm socket or nut driver Small flat head screwdriver Electrical tape, masking tape, or shrink tube Pep talk: Although the install looks daunting at first, once you get the learning curve
Triac Printed Circuit Board Replacement
 Technical Service Bulletin: Triac Printed Circuit Board Replacement TRONIC 5000C Pro Models: WH17, WH27, WH36 Introduction Fig. 1 ELECTRICITY IS EXTREMELY DANGEROUS. TAKE EXTRA PRECAUTIONS AND ENSURE ALL
INSTALLATION INSTRUCTIONS
 Rear Vision System Tailgate Handle Camera Mirror Display 2004-2014 Ford F-150 and 2008-2015 Ford Super Duty (Kit part numbers 9002-9521) Kit Contents: Mirror Tailgate Handle with camera and harness Interior
Packard Bell Easy Repair
 Your digital playground Packard Bell Easy Repair EasyNote MX Series Hard Disk Drive Repair Instructions www.packardbell.com Your digital playground Important Safety Check Instructions You must read all
I Click on a link tab to jump to that page. Cover Page
 & nstall Publication, Duplication, or Retransmission Of This Document Not Expressly Authorized n Writing By The nstall Doctor s Prohibited. Protected By U.S. Copyright Laws. 1997,1998,1999,2000. Factory
Inspiron 15. Service Manual. 3000 Series
 Inspiron 15 3000 Series Service Manual Computer Model: Inspiron 15 3541/Inspiron 15 3542/Inspiron 15 3543 Regulatory Model: P40F Regulatory Type: P40F001/P40F002 Notes, Cautions, and Warnings NOTE: A NOTE
apple Service Source PowerBook G4 (DVI) Updated 4 December 2003 2003 Apple Computer, Inc. All rights reserved.
 Updated 4 December 2003 2003 Apple Computer, Inc. All rights reserved.") apple Service Source PowerBook G4 (DVI) Updated 4 December 2003 2003 Apple Computer, Inc. All rights reserved. apple Service Source Upgrades PowerBook G4 (DVI) 2003 Apple Computer, Inc. All rights reserved.
apple Service Source PowerBook G4 (DVI) Updated 4 December 2003 2003 Apple Computer, Inc. All rights reserved. apple Service Source Upgrades PowerBook G4 (DVI) 2003 Apple Computer, Inc. All rights reserved.
Solstice/Sky Water Pump Replacement
 Solstice/Sky Water Pump Replacement The water pump on the Solstice/Sky is starting to need replacement on some vehicles. This guide will help in replacing the water pump while the engine is still in the
Mazda CX7 2010-up 99-7520B
 INSTALLATION INSTRUCTIONS FOR PART 99-7520B APPLICATIONS Mazda CX7 2010-up 99-7520B KIT FEATURES DIN radio provision with pocket ISO radio provision with pocket Double DIN radio provision Painted matte
http://waterheatertimer.org/troubleshoot-rheem-tankless-water-heater.html
 http://waterheatertimer.org/troubleshoot-rheem-tankless-water-heater.html TECHNICAL SERVICE DEPARTMENT Removal, Cleaning, & Reinstallation of the Burner Assembly For models 74 & GT199 Required tools -
How to connect to a Class II router using a mobile-phone data cable specifically for Solwise & Safecom routers
 USB to router s serial port How to connect to a Class II router using a mobile-phone data cable specifically for Solwise & Safecom routers by Neo at RouterTech.Org Introduction Routers based on the AR7RD/AR7WRD
INSTALLATION INSTRUCTIONS
 INSTALLATION INSTRUCTIONS PARTS REQUIRED Single QuickStand Parts A (1) QuickStand Unit B (1) Base Plate C (1) Platform D (1) Palm Support E (1) VESA Plate F (6) M8 x 18 mm Flat Head Machine Screws G (4)
Inspiron 13. Service Manual. 7000 Series. Computer Model: Inspiron 13 7348 Regulatory Model: P57G Regulatory Type: P57G001
 Inspiron 13 7000 Series Service Manual Computer Model: Inspiron 13 7348 Regulatory Model: P57G Regulatory Type: P57G001 Notes, Cautions, and Warnings NOTE: A NOTE indicates important information that helps
2002 2005 Mini Cooper S Grille Install Instructions
 2002 2005 Mini Cooper S Grille Install Instructions Lower Front Grille BEFORE AFTER Package Contents 1 perforated grille (Stiletto, RAZR, or Monster) 6 Zip Tie Mounting Pads 1 is for the temp. sensor 5
Guide for Modified Assembly: Lightning McQueen. By: Collin Patterson, University of Delaware. Materials and Tools:
 Guide for Modified Assembly: Lightning McQueen By: Collin Patterson, University of Delaware Materials and Tools: PVC o 40 inches of 1 in diameter PVC o 25 inches of ¾ in PVC o 4 x 1 in elbows o 2 x ¾ in
CONTENTS TOOLS REQUIRED: Ratchet 13mm Socket 10mm Socket Phillips Screwdriver Pliers Panel Removal Tool. Amp Installation
 CONTENTS 1EA. SUBWOOFER ASSEMBLY P/N RUWRANGLER 1EA. 200 WATT AMP/BRACKET ASSEMBLY P/N RM11JKBTL - Bracket P/N RE08BTL200R - Amp 1EA. POWER HARNESS P/N RHWRANGLERPWR 1EA. OVERLAY HARNESS P/N RHWRANGLER
Replacing the Gateway M675 Keyboard
 Replacing the Gateway M675 Keyboard This package includes a replacement keyboard for your Gateway M675 notebook and these printed instructions. Tools you need You need a small Phillips screwdriver and
FX Circuit Board Replacement Instructions
 FX Circuit Board Replacement Instructions There are three circuit boards inside the FX inverter. Normally, only two of these boards are candidates for replacement; the FET board (large board that includes
Replacing the noisy cooling fan in ICOM IC-2KL by Bert Almemo, VE3OBU/SM7BUR
 Replacing the noisy cooling fan in ICOM IC-2KL by Bert Almemo, VE3OBU/SM7BUR The following describes how to replace the cooling fan for a quieter one in the IC-2KL with as little effort as possible. The
FRONT WINDSHIELD SEAL INSTALLATION
 FRONT WINDSHIELD SEAL INSTALLATION Tech Article From Newsletter 16.1-1st Quarter of 2010 Replacing your Front Windshield Seal ISN T AS HARD AS YOU MAY THINK! Recently, we retooled our front window seal
Instructions for Using the Watch Works Tool Kit to Change a Watch Battery
 Instructions for Using the Watch Works Tool Kit to Change a Watch Battery Click on this link http://www.allamericanwatches.com/site/626101/product/e2306-a to purchase the Watch Battery Replacement Tool
Replacing the Gateway M320 Keyboard
 Replacing the Gateway M320 Keyboard This package includes a replacement keyboard for your Gateway M320 notebook and these printed instructions. Tools you need You need a small Phillips and a small flat-blade
GENUINE PARTS INSTALLATION INSTRUCTIONS
 GENUINE PARTS INSTALLATION INSTRUCTIONS DESCRIPTION: Illuminated Kick Plate APPLICATION: Rogue (2011) PART NUMBER: 999G6 GX010 KIT CONTENTS: Item A B C G H QTY 1 1 1 D 1 E 1 F 3 15 6 Description Kick Plate,
BODY-12, Door Handle - Removal, Installation, and Adjustment
 Introduction BODY-12, Door Handle - Removal, Installation, and Adjustment There are many different procedures floating around describing how to replace the door handles on a 944 and every one of them will
Modification of a EQ-style Dual Axis Controller to Add an Autoguider Port
 www.shoestringastronomy.com Modification of a EQ-style Dual Axis Controller to Add an Autoguider Port Revision 1.0 Copyright 2004, Shoestring Astronomy Page 1 INTRODUCTION The EQ-style telescope mount
PARTS NEEDED FOR CONVERTING FROM LP TO NG
 1 6 7 8 3 5 4 10 9 2 PARTS NEEDED FOR CONVERTING FROM LP TO NG Number Description 1 30" NG Manifold 2 NG side burner valve 3 NG Regulator 4 Rear I/R NG orifice 4 Rear I/R NG orifice 5 Side burner NG orifice
INSTALLATION MANUAL. Installation Instructions
 INSTALLATION MANUAL Power-Pole Signature Series Shallow Water Anchor Installation Instructions CAUTION: Read this instruction manual carefully. Become familiar with the controls and know how to operate
BMW E46 Convertible. Storage Compartment Lid Hydraulic Cylinder Removal
 BMW E46 Convertible Storage Compartment Lid Hydraulic Cylinder Removal Created by taylor192 of E46Fanatics.com Hosted by Top Hydraulics, without any warranties Page.1 Storage compartment lid hydraulic
GT3B Hack Kit Install Instructions Written By Austin Hutchison
 GT3B Hack Kit Install Instructions Written By Austin Hutchison Step 1: Remove 4 screws located on top of the radio. 1 Step 2: There are small plastic latches that also hold the top in place. The easiest
Elecraft K3 KPA3 Power Connector Replacement Revision A Review, April 16, 2012 Copyright 2012, Elecraft, Inc. All Rights Reserved
 Introduction Elecraft K3 KPA3 Power Connector Replacement Revision A Review, April 16, 2012 Copyright 2012, Elecraft, Inc. All Rights Reserved The connectors furnishing high current to the KPA3 module
Mazda CX9 2007-up 99-7516B
 INSTALLATION INSTRUCTIONS FOR PART 99-7516B APPLICATIONS Mazda CX9 2007-up 99-7516B KIT FEATURES DIN radio provision with pocket ISO radio provision with pocket Double DIN radio provision Stacked ISO units
Installing RNS-E SAT NAV for Audi A4
 As one of the major options on the A4 you can get a DVD Satellite Navigation System call the RNS-E. With the help of ebay these sat nav systems are now available to by at a rough cost of 650 plus the cost
Convertible Top Hydraulic Cylinder Removal Manual for W124 E-Class Convertibles 1993-1995 Models 300CE (1993) and E320 (1994-1995)
 and E320 (1994-1995)") Convertible Top Hydraulic Cylinder Removal Manual for W124 E-Class Convertibles 1993-1995 Models 300CE (1993) and E320 (1994-1995) Written by Samit Ghosh with picture material from vexed of benzworld.org
Convertible Top Hydraulic Cylinder Removal Manual for W124 E-Class Convertibles 1993-1995 Models 300CE (1993) and E320 (1994-1995) Written by Samit Ghosh with picture material from vexed of benzworld.org
POLEMOUNT FIELD FIX ASSEMBLY INSTRUCTIONS
 POLEMOUNT FIELD FIX ASSEMBLY INSTRUCTIONS Polemount Field Fix Support If you have any questions or incur any problems installing or using the new Polemount, please use Miovision s Support System by emailing
KITCHENS. Tip PAGE 1 FITTING YOUR KITCHEN GUIDE. How to mark out a kitchen. Tools required for installing a kitchen STEP ONE STEP TWO STEP THREE
 FITTING YOUR KITCHEN GUIDE How to mark out a kitchen PAGE 1 Before starting on the installation, measure 870mm from the lowest point of the floor and mark a datum line around the room to indicate where
Printrbot Getting Started Guide. For models: Printrbot Plus (v2) Printrbot LC (v2) Printrbot jr
 Printrbot LC (v2) Printrbot jr") Printrbot Getting Started Guide For models: Printrbot Plus (v2) Printrbot LC (v2) Printrbot jr Contents 4 Chapter 1: Welcome 4 Overview 4 Support 5 Chapter 2: Your Printrbot has arrived... now what? 5
Printrbot Getting Started Guide For models: Printrbot Plus (v2) Printrbot LC (v2) Printrbot jr Contents 4 Chapter 1: Welcome 4 Overview 4 Support 5 Chapter 2: Your Printrbot has arrived... now what? 5
Post Mount Light Installation*
 Post Mount Light Installation* *For the general installation of most Post Mount Spotlights, many vehicles may need slight modifications to these instructions. You will need the following tools: High torque
ADDING AN ELECTRIC AUXILIARY FAN TO RADIATOR STACK ON 03 ALPINE COACH
 ADDING AN ELECTRIC AUXILIARY FAN TO RADIATOR STACK ON 03 ALPINE COACH The original design of the 03 Alpine Coaches (and perhaps other years as well) did not include any kind of engine fan engage mechanism
SELF INSTALLATION GUIDE
 Ultrafast Fibre-optic Broadband SELF INSTALLATION GUIDE Gigaclear install permission July2012 v1.0 Before you begin Please make sure you have the correct length of cable. Bear in mind that you may need
INSTALLATION INSTRUCTIONS FOR 2006-2009 VW MK5
 CI100018 INSTALLATION INSTRUCTIONS FOR 2006-2009 VW MK5 Rabbit, Jetta 2.5L These instructions are applicable to vehicles equipped with either manual or automatic transmissions Thank you for choosing to
Time needed: ~3h for lid replacement only. Add 1h for operation harness in lid and ~2h more for installing drive unit and cable harness in trunk.
 DIY for replacing trunk lid and/or retrofitting electrical operation of trunk lid. This document is meant to be a support and give advice on the procedure but I will take no responsibility for any damage
WINDOW REPAIR MANUAL & REFERENCE GUIDE
 WINDOW REPAIR MANUAL & REFERENCE GUIDE TABLE OF CONTENTS DOUBLE HUNG & SINGLE HUNG PARTS 4-5 CASEMENT PARTS 6 SCREEN PARTS 7-8 HOW TO REMOVE TILT-IN SASH 9 HOW TO REMOVE A BALANCE 10 HOW TO INSTALL BALANCE
HP 36-Port InfiniBand Switch Cable Management Kit Installation Guide
 HP 36-Port InfiniBand Switch Cable Management Kit Installation Guide HP Part Number: 574412-doc Published: May 2009 Copyright 2009 Hewlett-Packard Development Company, L.P. The information contained herein
HP 16/18-Port Cable Management Kit Installation Guide
 HP 16/18-Port Cable Management Kit Installation Guide Abstract This document describes how to attach the HP 16 Port or 18 Port Cable Management Kit to an HP rack. The cable management bracket is designed
1958-64 WINDOW CHANNEL, WEATHERSTRIP & WHISKER STRIP REPLACEMENT FOR 2-DOOR SEDANS
 By Denny Williams Photos by Denny Williams 1958-64 WINDOW CHANNEL, WEATHERSTRIP & WHISKER STRIP REPLACEMENT FOR 2-DOOR SEDANS Denny Williams - Technical Writer Denny is first and foremost a dyed-in-thewool
TOYOTA Tundra 2007 - BACK-UP CAMERA SYSTEM Preparation
 Preparation Part Number(s): PT233-34070, PT923-35070-11, PT923-35070-43 NOTE: Part number of this accessory may not be the same as part number shown. Back Up Monitor Kit Contents PT923-35070-11 / PT923-35070-43
Kiosk Group, Inc. ASSEMBLY INSTRUCTIONS FOR THE STANDALONE. EXQUISITE ipad KIOSK. For ipad 2-3-4-5 Version Tablets.
 Kiosk Group, Inc. ASSEMBLY INSTRUCTIONS FOR THE STANDALONE EXQUISITE ipad KIOSK For ipad 2-3-4-5 Version Tablets ipad 2-3-4-5 Version Tablet Items Required: ipad data/power cable that came with your ipad.
Control Box Wiring For PRSstandard Tool
 888-680-4466 ShopBotTools.com Control Box Wiring For PRSstandard Tool Copyright 2016 ShopBot Tools, Inc. page 1 Copyright 2016 ShopBot Tools, Inc. page 2 Table of Contents Introduction:...5 Installation:...5
ROTOPOD PERISCOPE LIGHTING KIT (for MCWHLR & Daniel D/Xeno Periscopes)
") ROTOPOD PERISCOPE LIGHTING KIT (for MCWHLR & Daniel D/Xeno Periscopes) 14-APR-2012_rev 1.2 I designed the Periscope Lighting Kit to be as flexible as possible. Every LED is individually controllable. I
ROTOPOD PERISCOPE LIGHTING KIT (for MCWHLR & Daniel D/Xeno Periscopes) 14-APR-2012_rev 1.2 I designed the Periscope Lighting Kit to be as flexible as possible. Every LED is individually controllable. I
89 to 93 Dashboard Removal. Created for Miata.net Members by Anthony Meeks (SE1686)
") 89 to 93 Dashboard Removal Created for Miata.net Members by Anthony Meeks (SE1686) Intro When I bought my 91 SE, the paint on the top of the dashboard was in terrible shape and I immediately determined
89 to 93 Dashboard Removal Created for Miata.net Members by Anthony Meeks (SE1686) Intro When I bought my 91 SE, the paint on the top of the dashboard was in terrible shape and I immediately determined
N64 Potentiometer Analog Stick Retrofit
 N64 Potentiometer Analog Stick Retrofit This document describes in rough detail the procedure to convert a rotary-encoder based OEM Nintendo 64 controller analog stick, to a potentiometer based stick found
Hydraulic Steering Install
 Hydraulic Steering Install Disclaimer: The following is a tutorial on how to install hydraulic steering in a center console boat. I am not a mechanic. I am not a photographer. I am a guy who had a steering
Traditional Sonar and DSI Sonar Installation
 Traditional Sonar and DSI Sonar Installation This document covers the installation of the transducer and display unit installation, which includes connecting the unit to power and installing the unit on
PCS300 Universal IP Reporting Module V1.0
 PCS300 Universal IP Reporting Module V1.0 Reference and Installation Manual Patents: One or more of the following US patents may apply: 7046142, 6215399, 6111256, 6104319, 5920259, 5886632, 5721542, 5287111,
Replacing Faceplate Ribbon Cable on Kenwood KDC-715S (these instructions MAY apply to similar Kenwood motorized faceplate units.)
") Replacing Faceplate Ribbon Cable on Kenwood KDC-715S (these instructions MAY apply to similar Kenwood motorized faceplate units.) Warning: I am not an electronics expert but have done my share of electrical
Replacing Faceplate Ribbon Cable on Kenwood KDC-715S (these instructions MAY apply to similar Kenwood motorized faceplate units.) Warning: I am not an electronics expert but have done my share of electrical
apple Service Source Power Mac G4 Cube Updated June 2, 2003 2002 Apple Computer, Inc. All rights reserved.
 apple Service Source Power Mac G4 Cube Updated June 2, 2003 2002 Apple Computer, Inc. All rights reserved. apple Service Source Take Apart Power Mac G4 Cube 2002 Apple Computer, Inc. All rights reserved.
Adafruit Pi Box Plus. Created by Phillip Burgess. Last updated on 2014-07-24 08:45:08 PM EDT
 Adafruit Pi Box Plus Created by Phillip Burgess Last updated on 2014-07-24 08:45:08 PM EDT Guide Contents Guide Contents Assembly Instructions Preparation Parts List Assembly Opening the Lid If Using a
HP Laser Jet 4200/4240/4250/4300/4350 Swing Plate
 HP Laser Jet 4200/4240/4250/4300/4350 Swing Plate 1 Swing Plate Assembly-RM1-0043 1 Swing Plate Kit-5851-2766 (RM1-0043 plus RM1-1091 gear) CAUTION: Fuser may be hot. Turn off printer, unplug it and allow
BMW E46 Convertible Bow Cylinder replacement guide
 BMW E46 Convertible Bow Cylinder replacement guide There is nothing better than a BMW convertible, until uh oh... what s that? You find a wet spot on the cover or rear deck. You clean it and it comes back.
Table of Contents. www.hunterfan.com. What to Expect with. Preparation. Tools Needed. Wiring. Hanging the Fan. Blades. Motor Housing.
 www.hunterfan.com Table of Contents What to Expect with Your Installation 30 inches Hanging the Fan Wiring 8 Maintenance, Operation & Cleaning Light Kit 13??? 14 1 9 Troubleshooting 11 5 Blades Motor Housing