MIXCRAFT 7 TEACHER S GUIDE. Written by Parker Tichko Design by Alan Reynolds Edited by Peter Clarke and Mitchell Sigman
|
|
|
- Evelyn Burke
- 7 years ago
- Views:
Transcription
1

2

3 MIXCRAFT 7 TEACHER S GUIDE Written by Parker Tichko Design by Alan Reynolds Edited by Peter Clarke and Mitchell Sigman

4 Mixcraft 7 Teacher s Guide 2015 Acoustica Inc. All rights reserved. The content of this guide is furnished for informational use only, and is subject to change without notice. Acoustica Inc. assumes no responsibility or liability for any errors or inaccuracies that may appear in the informational content contained in this guide. Please remember that existing music, video, or images that you may want to include in your project may be protected under copyright law. The unauthorized incorporation of such material into your new work could be a violation of the rights of the copyright owner. Please be sure to obtain any permission required from the copyright owner. Acoustica and Mixcraft are registered trademarks of Acoustica, Inc. in the United States and/or other countries. All other trademarks are the property of their respective owners. Written by: Parker Tichko Edited by: Peter Clarke and Mitchell Sigman Cover design: Alan Reynolds Interior design: Alan Reynolds First Edition ISBN #:

5
6 KEY Student tutorial lesson UNDERSTANDING MIXCRAFT 1 CONSTRUCTING A MUSIC LAB WITH MIXCRAFT Setting Up Your Music Lab Suggested Software...12 Mixcraft s Built-In Virtual Instruments and Effects Plugins School Environments For A Music Lab...13 Music Station Setups...14 Further Reading A SURVEY OF MIXCRAFT Mixcraft s Interface...18 Timeline...19 Master Bar...20 Performance Panel...21 Tab Area: Project, Sound, Mixer & Library...21 The Piano Roll...23 Notation...23 Step Sequencer...24 Toolbar...25 Opening A New Song...25 Saving/Exporting Songs USING AUDIO WITH MIXCRAFT On Audio Tracks...28 Recording With Mixcraft...30 Editing Audio With Mixcraft...33 Looping Audio...34 Snapping Audio Regions to The Timeline...35 Mixing Down Audio USING MIDI WITH MIXCRAFT What is MIDI? On Virtual Instrument Tracks...37 Recording MIDI With Mixcraft...39 Recording MIDI: A Work Flow Editing MIDI With Mixcraft...43 Quantizing...43 Transposing...43 Editing MIDI Regions on The Timeline...43 Looping MIDI Regions...44 Mixing Down MIDI MIXCRAFT VIDEO Video Equipment...46 Video Tutorial...46 Using Still Images & Photographs With Mixcraft Mixing Down Your Movie or Slideshow

7 6 USING MIXCRAFT S EFFECT PLUGINS, LOOPS & INSTRUMENTS Mixcraft s Effect Plugins...52 Reverb...52 Delay...54 More Effects...55 Mixcraft Loops...56 Mixcraft Instruments MUSIC COMPOSITION WITH MIXCRAFT What s In A Song?...60 Common Song Sections...62 One Approach To Making Music With Mixcraft: Loop-Based Music Composing an 8-bar or 12-bar song With loops...64 Trick and Tips With Loops...66 Beyond Loops USING MIXCRAFT FOR SCHOOL PROJECTS Teaching and Lesson Statement...68 Short Projects: Tutorials For Recording & Editing Audio/MIDI in Mixcraft Long Projects: Interdisciplinary Lessons SHORT PROJECTS 9 VOCAL FX PROJECT Activity...73 Effect Plugins Student Assignments...76 Student Assignments Student Assignments Student Assignments...78 Student Assignment...79 Additional Lesson Plans...79 VOCAL FX PROJECT Activity...80 Effect Plugins...83 Assignment...84 Assignment...84 Assignment...84 Assignment...85 Assignment MIXCRAFT MIXLIBS PROJECT Activity...88 Additional Lesson Plans...91 MIXCRAFT MIXLIBS PROJECT Activity

8 KEY Student tutorial lesson 11 MIDI INSTRUMENT SURVEY PROJECT Activity...97 Additional Lesson Plans MIDI INSTRUMENT SURVEY PROJECT Activity MIDI BEATS PROJECT Activity Additional Lesson Plans MIDI BEATS PROJECT Activity LIVE LOOP IMPROVISATION PROJECT Activity Additional Lesson Plans LIVE LOOP IMPROVISATION PROJECT Activity REMIX PROJECT Activity Additional Lesson Plans REMIX PROJECT Activity Beginning to Remix SOUND COLLAGE PROJECT Activity Additional Lesson Plans SOUND COLLAGE PROJECT Activity DEBATE PODCAST PROJECT Activity Additional Lesson Plans DEBATE PODCAST PROJECT Activity Recording The Podcast RAP IMPROVISATION PROJECT Activity Improvising With Mixcraft Additional Lesson Plans RAP IMPROVISATION PROJECT Activity Improvising With Mixcraft

9 18 LYRICAL SONGWRITING PROJECT Activity Writing A Song in Mixcraft Recording The Lyrics in Mixcraft Additional Lesson Plans LYRICAL SONGWRITING PROJECT Activity Writing A Song in Mixcraft Recording The Lyrics in Mixcraft RADIO JINGLE PROJECT Activity Making A Beat in Mixcraft Recording The Jingle In Mixcraft Additional Lesson Plans RADIO JINGLE PROJECT Activity Making A Beat in Mixcraft Recording The Jingle in Mixcraft STOMP NOTATION PROJECT Activity Writing A Part For The STOMP Instrument Performing Additional Lesson Plans STOMP NOTATION PROJECT Activity Writing A Part For The STOMP Instrument Performing FILM SCORING PROJECT Activity Scoring The Film Finishing The Film Additional Lesson Plans FILM SCORING PROJECT Activity Scoring The Film Finishing The Film COMMERCIAL PROJECT Activity Scoring The Commercial Additional Lesson Plans

10 KEY Student tutorial lesson COMMERCIAL PROJECT Activity Scoring The Commercial BEATBOXING PROJECT Activity Additional Lesson Plans BEATBOXING PROJECT Activity APPENDIX Configuring Mixcraft Recording Techniques Solo Vocal Recordings Group Recordings Solo Instrument Recordings Group Recordings Ideas For Student Projects Acknowledgements

11 INTRODUCTION WELCOME Mixcraft s Teaching Guide is designed to compliment educational programs that use Mixcraft. The book examines Mixcraft s many capabilities including, for example, digital signal processing and music composition. Suggestions on how Mixcraft can be incorporated into both music and non-music assignments (e.g. marketing/advertising, podcast creation, and the spoken word performances) are provided throughout the course of the book. Also with the book is an Additional Materials Download which includes teaching aids, such as printable lesson plans (in.pdf form), that give students and educators the ability to work through assignments together. However. more importantly, the text offers strategies for teaching these principles and articulates complex concepts in terms that students will understand. In addition, the internet contains many tutorials on various areas of Mixcraft use. Acoustica s YouTube page contains dozens of informative Mixcraft tutorials. Finally, Mixcraft has an excellent Help section accessible once the software has been opened. Feel free to use these resources in conjunction with this manual. ADDITIONAL MATERIALS DOWNLOAD You can download the Additional Materials for this book at: The Additional Materials file contains sample projects, videos, photographs, and student handouts that can be very helpful in teaching the lessons found in this book. THE LAYOUT OF THE BOOK Chapter 1 begins with suggestions on constructing a music lab. Various designs are offered to help educators create an ideal teaching environment. Chapter 2 examines Mixcraft s various functions and features including details of the interface and preferences for tweaking the software to match the demands of the individual classroom. Chapters 3 and 4 offer brief tutorials on two principal areas how to use both audio and MIDI with Mixcraft. For educators interested in developing film or video lesson plans, Chapter 5 covers Mixcraft s video functions. All of the software s extra features, such as plugins, virtual instruments, and audio loops, are surveyed in Chapter 6. And finally, Chapter 7 covers what presumably the majority of educators will be interested in music composition using Mixcraft. There has been a strong demand for lesson plans specifically designed for Mixcraft. Consequently, the final two-thirds of this manual offer detailed, exemplary lesson plans that are designed specifically for grade school, middle school, and high school students. The lesson plans are divided by estimated classroom time and by relevance to interdisciplinary topics. Chapter 8 covers the formal introduction to these comprehensive lesson plans. 7

12 NATIONAL STANDARDS FOR MUSIC EDUCATION Before formalized and national guidelines were created for music education, school administrators were perplexed by how to measure and assess the educational value of a music-based curriculum. As a result, the National Standards for Music Education (NSME) were created. These nine standards are intended to guide educators when creating and teaching student projects and lesson plans. In this book, all of these standards are addressed. There are lesson plans on solo and group music performance, on listening and analyzing music, and, of course, on composing and arranging music within specified guidelines. Additionally, many of these standards can supplement the lesson plans in ways that are not outlined in this text. Should educators wish to extend the proposed lesson plans, brainstorming with the concepts inherent in the NSME is an excellent approach. THE NATIONAL STANDARDS FOR MUSIC EDUCATION 1. Singing, alone and with others, a varied repertoire of music. 2. Performing on instruments, alone and with others, a varied repertoire of music. 3. Improvising melodies, variations, and accompaniments. 4. Composing and arranging music within specified guidelines. 5. Reading and notating music. 6. Listening to, analyzing, and describing music. 7. Evaluating music and music performances. 8. Understanding relationships between music, the other arts, and disciplines outside the arts. 9. Understanding music in relation to history and culture. (Taken from: 8

13 UNDERSTANDING MIXCRAFT

14 CHAPTER 1 CONSTRUCTING A MUSIC LAB WITH MIXCRAFT Educators are often faced with tough decisions when creating a computer-based music lab. Financial constraints, classroom space and availability, and curriculum limitations will inevitably influence the purchasing of equipment, the classroom setup, and the lesson plans. For educators who have no background working with music equipment or software, building a music lab can feel especially overwhelming. Researching and learning about audio equipment takes time and a great deal of patience: one can easily get lost in the sea of equipment that is readily available. This chapter attempts to rectify these issues and demystify the audio world. First, in the Setting Up Your Music Lab section, an overview of affordable music hardware and software is offered. Included is a selection of the common pieces of equipment that should jump start the process of turning a classroom or computer lab into a fully functioning music lab. Next, School Environments For Your Music Lab outlines how to configure and setup music hardware and software. For educators interested in more technical explanations, a great amount of literature is available that discusses audio equipment, recording arts, and audio production. SETTING UP YOUR MUSIC LAB SUGGESTED HARDWARE PC Computer: Mixcraft is for PC computers only. Currently, Mixcraft version 7 is supported by Windows 7 and 8, Vista, and XP. During student lessons, it would be best for each student to have a computer. If this is not possible, then the class can be divided into small groups of students who share what individual computers are available. When resources are scarce, however, at a bare minimum, having one central PC and projector run by the educator will suffice for many lessons, especially for those recording projects that include the entire classroom. Computer Audio Drivers/Sound Device: PC computers have built in audio drivers that enable communication between software applications and the computer s sound card. For the lowest possible latency and solid audio performance, WaveRT mode is often the best choice. However, WaveRT is only available in Windows Vista, Windows 7, and Windows 8. ASIO drivers will typically give the best possible performance for your audio hardware, but these drivers are generally available only with professional audio interfaces. Finally, Wave mode is available on all versions of Windows and works with nearly all audio hardware, but it generally suffers from very high latency. Acoustica MVS USB Microphone. USB Microphones plug directly into computers and do not need an audio/computer interface. Projector/Projection Screen: It might be necessary for educators to walk students through lesson plans step-by-step. Using a projector and projection screen during classroom projects will accomplish this instruction need. A mobile projector on a cart is appropriate when using shared classroom space because it allows educators to easily set up or tear down. Microphones: Educators looking to record student solo or group performances might need to use a microphone. There are many resources available that explain microphone types, setup, positioning, and microphone care. For classroom purposes, investing in a cheap condenser microphone (around $ USD) or a USB microphone will suffice for most student projects. 10

15 Audio/Computer Interface: In short, an audio/computer interface is a device that converts an incoming audio signal into a digital signal that is recognizable by a computer. This conversion allows engineers to use an audio software equipped computer to record musicians. In addition to supporting audio, some interfaces also support MIDI. Audio/computer interface devices require little set up, often plugging directly into a computer s USB or firewire slot. Shop around and look for devices that fit the budget of the classroom. Also keep in mind how the device will be used in the classroom. Will the class be recording more than one or two tracks simultaneously? Will MIDI instruments be used? Depending on the physical setup or budget of the class, either buy one device for a main teaching computer or buy smaller devices suitable for each individual computer station (having both setups would be best). Mixcraft is compatible with all pc-based audio/computer interfaces. Instruments: A music curriculum often requires the recording of acoustic or electronic instruments. Acoustic instruments such as acoustic guitars, drums, string, brass, wind, or percussive instruments are typically miked or recorded with a microphone. Electronic instruments, ranging from electric guitars, synthesizers, or drum machines, are typically recorded directly through an audio cable that can be plugged into an audio/computer interface. Mixcraft is capable of recording all acoustic and electronic instruments. USB Audio/Computer Interface. This device supports the use of external microphones and instruments during recording. Instrument and Microphone Cables: Whether for recording with an external microphone or with an instrument itself, it is important to purchase the right audio cables. Microphones generally take an XLR cable; electronic instruments normally use a ¼ (inch) audio cable. Finally, a MIDI instrument to Mixcraft hookup usually requires a MIDI cable. Much like socks in the washer, cords tend to disappear, so do not hesitate to purchase a couple of extras! MIDI Controller: MIDI Controllers are devices that normally use a keyboard interface to control virtual instruments or other external hardware. These devices work well in a classroom setting to control and perform with Mixcraft s virtual instruments. For example, a student performing with a MIDI keyboard device can actually play Mixcraft s Organ Instrument. MIDI Controllers vary widely in price range, but a small, reliable MIDI keyboard can be purchased for around $100 dollars. MIDI Keyboard Controller. Keyboards such as this model, work with Mixcraft and can play and control Mixcraft s built-in virtual instruments. Monitors or Headphones: It will be important to monitor class recordings and Mixcraft sessions. For student computer stations, it would be ideal to have one pair of headphones per computer station. For educator stations, a decent pair of monitor speakers should allow the whole class to hear whatever Mixcraft session the class has been working on. 1/8 Stereo Mini and 1/4 Mono Plug USB Cable XLR Microphone Cable with Male and Female ends. MIDI Cable 11

16 SUGGESTED SOFTWARE Mixcraft: Mixcraft is a Digital Audio Workstation (DAW) that allows users to record, edit, mix, and play back audio. Mixcraft also supports MIDI, has scoring capabilities, and comes with a selection of built-in virtual instruments and over 6,000 audio loops. Currently, the latest release is Version 7 and is for Windows only. MIXCRAFT S BUILT-IN VIRTUAL INSTRUMENTS AND EFFECTS PLUGINS Mixcraft Built-in Virtual Instruments: Mixcraft bundled a variety of built-in, soft or virtual instruments with their software. These instruments range from software replications of classic organs, electric pianos, synthesizers and to even drum sets! Educators and students can create these sounds using Mixcraft without owning or recording any of the actual instruments. Simply launch Mixcraft and load up an instrument on Mixcraft s virtual instrument tracks. Though not required, a MIDI controller works best when performing with virtual instruments. Mixcraft Loops: Mixcraft 7 comes bundled with over 6,000 (WOW!) professionally produced loops. Mixcraft loops are segments of pre-recorded and edited audio that spread across a range of different sounds and instruments. Loops include drum beats, guitar chord progressions, keyboard parts, and even world music instruments! The lesson plans included in this manual address how to use these loops for student projects. Students and educators will need an internet connection to download loops on demand. 12

17 SCHOOL ENVIRONMENTS FOR A MUSIC LAB The layout and construction of a music lab depends on either classroom size or on access to a computer lab. With these specific restrictions in mind, three common setups of a music lab in a school environment will handle most situations. For educators whose only option is to transform their home classroom into a music lab, the 1 Teacher, 1 Computer, 1 Projector layout works well. Educators, however, who have access to a computer lab, will make set-up choices based on whether the lab is for music exclusively or is a shared, general use facility. In this setup, a designated PC is used to run Mixcraft. An audio/computer interface is connected to the PC through USB or firewire protocols and acts as a liaison for MIDI instruments, electronic instruments, and microphones. Situated at the front of the classroom is a projector and projector screen that shows the main PC s screen to students. Alongside the screen are two monitor speakers that play back audio from the Mixcraft session. SINGLE CLASSROOM SETUPS 1 Teacher 1 Computer 1 Projector When an educator does not have access to a computer lab or extra classroom, the basic setup of a computer, projector, and monitor speakers will be sufficient to create an in-house music lab. REQUIRED MATERIALS PC Computer Mixcraft Projector (Projection Screen) Computer Speakers RECOMMENDED MATERIALS Audio/Computer Interface MIDI Controller Monitor Speakers USB Microphone Interactive White Board Discussion: Depending on the layout of the classroom, it is important to keep in mind how students will engage with lesson plans and Mixcraft. For instance, students should be able to see the educator s computer screen clearly: coupling a main computer with a projector and projection screen will allow a classroom of students to follow a handout or lesson plan easily. This approach might also be effective in familiarizing students with the basics of audio software, running simple lesson plans, or orchestrating class-sized projects. One drawback of such a setup, however, is that only one student or teacher at a time will be able to use Mixcraft. Nevertheless, for classsized lesson plans where the educator oversees the use of audio hardware with Mixcraft for such projects as Rap Improvisation or STOMP, this arrangement is ideal. 13

18 REQUIRED MATERIALS: PC Computers Mixcraft Computer Speakers or Headphones MUSIC STATION SETUPS 1) The Shared Computer Lab: Schools will have one main computer lab that multiple educators and classes share. A shared computer lab can be divided into small, computer booths ( music stations ) that are outfitted with audio hardware and software. In this setting, students will be able to work independently or in small groups to complete assignments. For educators with access to a shared computer lab, remember to allow ample time to set up and clean up the classroom RECOMMENDED MATERIALS: Audio/Computer Interfaces MIDI Controllers Monitor Speakers or headphones Microphones, USB Microphones, or Instruments Interactive White Board Discussion: For smaller projects, such as the Mixlibs Project or Vocal FX Project, this setup is ideal. If classroom space allows, having a portable projector and projection screen at the front of the computer lab will help the educator facilitate and oversee the lesson. Remember, because this is shared space, it might be best to set up the lab before class starts to maximize lesson time (particularly if the selected lesson involves musical instruments and other music gear). 14

19 2) The Music Computer Lab: In some school environments, an entire computer lab might be dedicated to audio recording and production. As with the shared computer lab, music stations would comprise the majority of the music computer lab space. A larger workstation for the educator could include, but not be limited to, a mixing board, projector, and projection screen. Since the mixing board can record multiple instruments simultaneously (ideal for student group performances) and can monitor the volume output from each music station, the teacher can control all the student work from one central station. Incorporating other music equipment into this setup for example a hardware compressor, EQs, or a variety of instruments might be useful. REQUIRED MATERIALS: PC Computers Mixcraft Computer Speakers or Headphones RECOMMENDED MATERIALS: Audio/Computer Interfaces MIDI Controllers Monitor Speakers or headphones Microphones, USB Microphones, or Instruments Mixer Projector and Projection Screen Interactive White Board Discussion: The music computer lab setup will be the most resource exhausting of the three lab types covered. Nevertheless, a fully equipped music lab is ideal for handling the widest variety of audio projects, from recording solo singers or voice actors to recording larger music projects such as student jazz quartets, rock bands, and word music ensembles. Larger student projects would certainly benefit from having such a setup, specifically the Remix and Lyrical Songwriting projects. 15
 and can monitor the volume output from each music station, the teacher can control all the")
20 In this setup, the audio/computer interface is the focal point of all recording and monitoring. Attached to the PC through USB or firewire ports, the interface should have a headphone jack, audio inputs for microphones, and inputs for electronic instruments. Students should be familiarized, prior to recording or monitoring their music, to the model and functions of the audio/computer interface. Additional capabilities on the interface may include analog in and outs for monitors and MIDI in and outs for other MIDI devices. FURTHER READING There are many setup options for creating a music lab. If the above suggestions are not possible, seeking out other literature will help cultivate alternatives. The For Dummies book series is a great place to start; the language is directed towards the layperson and the content is thorough. Creating a solid music lab is no easy task; the process should not be rushed! Strong, J. Home Recording For Musicians For Dummies. Strong, J. PC Recording Studios For Dummies. Eargle, J. Eargle s The Microphone Book. 16

21 17
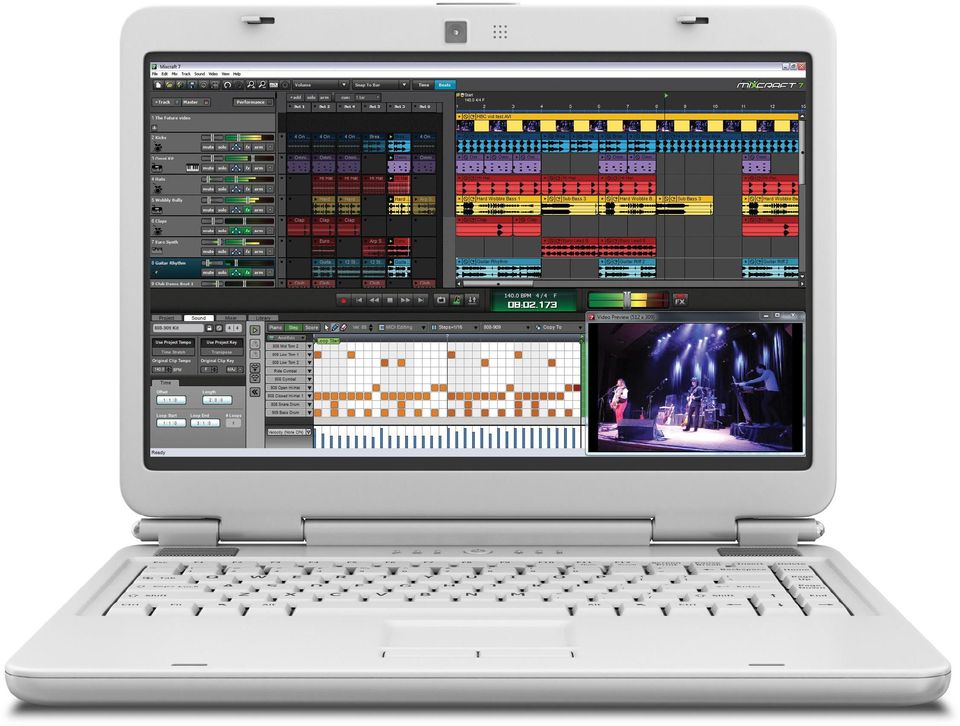
22 CHAPTER 2 A SURVEY OF MIXCRAFT An eager user launches Mixcraft for the first time and loads in some previously recorded audio. Now what? Without any knowledge of the interfaces of the program, it would be difficult to know where to begin even finding the magic play button would be uncertain! This chapter, which will help educators learn to navigate Mixcraft s visual interface, begins with a look at the workspace. The Workspace is then deconstructed into individual components. The chapter concludes with a description of these individual Workspace components. For easier learning, the most important and necessary functions of Mixcraft have been highlighted. For specific walkthroughs on how to use audio, MIDI, or video with Mixcraft refer to Chapters 3, 4, or 5 (respectively). If educators should have further questions, multiple technical references and Mixcraft s built-in Help Menu are available. MIXCRAFT S INTERFACE Mixcraft s workspace with eight audio tracks. Arguably the most important piece of Mixcraft s interface, the Workspace allows users to manage their session by adding or deleting tracks, starting or stopping playback, editing and arranging audio, and controlling the master volume. This is where all the magic happens. The left column displays all the in-use tracks. These tracks are used to mix and record audio or to use Mixcraft s virtual instruments (shown in the above screen shot are eight audio tracks earmarked by the speaker clip art). The white open space to the right, with a grid-like backdrop, is Mixcraft s Timeline. This space allows users to arrange, edit, and visualize their sessions. The top area contains the menu and toolbar, while at the bottom is the master bar (there is that magic play button!). The record button and the master volume slider are located on the master bar. Below is a deconstruction of the Workspace. We recommend reviewing these essential features before beginning the lesson plans: 18
23 TIMELINE The Timeline is a linear organization of all audio tracks, virtual instrument tracks, video tracks, send tracks (tracks that apply effects over multiple tracks) and submixing tracks (tracks that contain other tracks). Here, users will see audio recordings represented as audio regions that are illustrated with audio waveforms. Virtual instrument tracks use MIDI and thus are shown as MIDI regions that display MIDI graphics. There are several important functions relative to the Timeline that educators should become acquainted with: 1. The Playback Cursor: The Playback Cursor, denoted by a green marker, acts like a vertical cursor on the Timeline. Click anywhere on the Timeline to set the cursor. Playback begins from the cursor s location. The cursor can also be used to highlight or select regions on the Timeline. 2. Markers: Adding markers is a handy way to narrate a Mixcraft session because it enables a user to label specific parts of a song (verse, chorus, bridge) on the Timeline. Located at the top of the Timeline are numbers that refer to measures and beats. Simply right click on a beat number to add a marker. 3. Snap Setting: Though technically part of the Toolbar, the snap setting influences how regions on the Timeline behave. When editing audio and MIDI regions, activating the snap settings automatically snaps the regions to the Timeline s grid. Users can easily rearrange or edit regions and ensure that they remain aligned with the rest of the session. Audio and MIDI Regions: Both audio and MIDI information appears on the Timeline in the form of regions. Audio Regions are editable chunks of audio that can be dragged, cropped/extended, or cut to be arranged on the Timeline. Regions illustrate the waveforms of either imported or recorded audio. Users will notice that for percussion sounds or instruments with a quick attack, the audio region will display peaks in the waveforms that refer to these transients (the quick percussive attack of a sound). An example of how audio appears on Mixcraft s Timeline. MIDI Regions illustrate MIDI notes and MIDI data. Horizontal lines within the region refer to the duration of a note (how long the note will be sustained) while the vertical position of a line refers to pitch (higher lines have a higher relative pitch to lower lines). A virtual bass instrument realized as MIDI on Mixcraft s Timeline. 19
24 MASTER BAR The Master Bar, located at the bottom of the Workspace, allows users to play (click the green arrow icon or hit space bar), stop play (click the green arrow or hit space bar again), or record (click the red circle or hit R ) during your Mixcraft session. Simply hover the cursor over each icon to learn its relative function. Remember, play back or recording begins from the position of the playback cursor. Mixcraft also has rewind and fast forward functions. Master Transport Controls Loop, Metronome and Punch In/Out Controls Tempo and Time Screen Master Volume Control Master FX Bypass The master bar controls: recording (red dot), play (green arrow), and fast forward and rewind icons. Three additional toolbar icons, located to the right of the master play button on the master bar, activate loop mode, the metronome, and punch in/out recording. The green screen interface to the right refers to the play position or time, the tempo of the session (calculated in BPM), and the session s master meter and key. To adjust the tempo or key, simply click the interface and change the parameters. Tempo and time screen: Users can double-click or hover over the interface to edit certain parameters, such as key and meter. Master volume slider: A master volume slider controls the level of Mixcraft s overall audio output. Select the slider with your cursor and move it left or right to adjust the master volume Moving it to the right increases the volume. Moving it to the left decreases the volume. The metronome icon and settings Metronome: The metronome function enables a metronome that will sound along with the music during playback or recording. By having the accompaniment of the underlying beat, students playing along can (hopefully!) achieve cleaner performance takes. Additionally, recording to a metronome ensures that the audio tracks are aligned to Mixcraft s Timeline, which makes recordings easier to edit. The metronome has three settings: playback, recording, and count-in measures. Users should become acquainted with the recording and recording count-in measures because these settings are commonly employed. The latter setting activates a count off before Mixcraft starts recording and is useful for recording groups of students. 20
25 PERFORMANCE PANEL The performance panel is a powerful performance-orientated tool that allows students to remix, compose, improvise, and perform music in real-time with Mixcraft. Consisting of a grid-like interface, students can drag and drop Mixcraft loops, audio recordings, and even MIDI regions into unoccupied panels and use these panels to then cue, play back, and create a song from the ground up with audio and MIDI loops. For student projects, the performance panel makes it easy to experiment with different arrangements when performing or improvising live music. External MIDI controllers can also be used to control the performance panel. The performance panel, located on the right, is a massive grid that students can use to launch audio and MIDI regions and loops to create a song from the ground up. TAB AREA: PROJECT, SOUND, MIXER & LIBRARY The Tab Area (lower left of Workspace) is a group of windows organized into four tabs (Project, Sound, Mixer, and Library). For student projects, the most important tabs will be the Library and Mixer areas. Both teachers and students should become familiar with the search and browsing features of the Library and the layout of the Mixer. Project Tab: Here, users will find the metadata (e.g. song title, author, album title, music genre, etc.) and project notes pertaining to the Mixcraft session. Students can use this area to jot down notes or ideas about the project. These fields can be edited by clicking and entering text. Here, the Project Tab displays the session information for the song Rapunzel by Ben Hale. 21
26 Sound Tab: The Sound Tab displays a graphic representation of a selected audio region on the Timeline and specific parameters that can change the tempo, key, pitch, or length of the audio region. Users can also edit longer audio regions into short loops by dragging the Loop Start and Loop End markers (as shown in the figure above). Try importing some audio samples and notice how Mixcraft represents these files visually. Transients, or the quick percussive attack of a sound, are often illustrated as peaks and are used as a reference when editing audio and creating loops. Waveform of an audio file imported into Mixcraft. Mixer Tab: The Mixer is modeled upon old analog mixing consoles. Mixing consoles control the level and panning of individual tracks, allowing audio engineers to mix or mold each individual track into one master track (for example, a song). For students, the most important component of the mixer is the volume slider: each track has a corresponding slider that raises or lowers its volume (the sliders are orientated vertically). Pan sliders allow users to move tracks, or pan them, to the left, right, or center area of the listening environment (they run horizontally and are located at the top of the volume sliders). Try experimenting with different volume and pan settings during student projects. Mixcraft s mixer is modeled after old analog mixing consoles. Here students can adjust the volume and panning of each track. Library Area: Mixcraft likes loops. And as an educator you will learn quickly, so too do students. The Library Tab allows students to search, preview, and ultimately use loops in Mixcraft. Students can browse the library categories on the left by instrument, key, tempo, style, etc. to easily find a sample that might compliment a lesson. For music-intensive projects, the library is an accessible and incredible resource for finding high quality audio loops that allow students with no formal music training or background to begin producing music. 22
27 The loop library is an organized collection of Mixcraft s loops. Users can browse the loops or search with a specific loop in mind. THE PIANO ROLL The Piano Roll enables users to edit MIDI notes and other MIDI parameters. The Piano Roll consists of a small, horizontal time line and vertical keyboard spread. Using the pencil icon in the upper left hand corner, users can draw notes onto the Piano Roll. The notes appear as horizontal lines. Users can trim, highlight, and arrange these lines on the Piano Roll s time line. Underneath each note, a vertical line appears that determines the note velocity. Increasing the velocity increases the loudness of and accents a note. Additionally, users can record MIDI insttrument performances and use the Piano Roll for precise edits such as quantizing and transposition. Example of a bass line performance notated on the Piano Roll. NOTATION An additional function found in the Piano Roll enables Mixcraft to create notation either from MIDI data or by free-hand drawing. The notation window can be accessed under the Sound Tab, by clicking the Notation button in the upper left-hand corner of the Piano Roll. By toggling between Piano Roll and Notation, Mixcraft displays a MIDI arrangement either as MIDI data on the Piano Roll or as Notation. As shown below, Mixcraft can effortlessly switch between Piano, Step, and Score display modes. Changes made in any of these editors are instantly and automatically updated in the others. 23
28 A MIDI performance in the Piano Roll prior to conversion to notation. The MIDI performance from above converted into notation. STEP SEQUENCER Mixcraft also as a step sequencer, a useful tool for programming drum beats and short melodies. The step sequencer is broken up into steps with user-determined note lengths (e.g. the duration of the steps can be set to quarter, eight, sixteenth notes, etc.) Step sequencers are commonly integrated into music hardware such like drum machines and bass synthesizers, and allow musicians and producers to quickly program drum beats, bass lines, motives, and more. Students will find the step sequencer to be an intuitive compositional tool that can be incorporated into many of the lesson plans. Step sequencers present a fun and easy interface for composing of pattern-based drum beats, bass lines, and melodies. 24
29 TOOLBAR The Toolbar, located at the top of the Workspace, is a collection of shortcuts relative to specific actions in Mixcraft. There are icons for opening and saving sessions, mixing down audio, and even burning audio to CD. To become familiar with the toolbar, highlight the icons the cursor. The most important functions for students to learn are the zooming and snap-to-measure features: Zooming In and Out: The two magnifying glass icons allow users to either zoom in (+) or out (-) of the Timeline. This feature is incredibly helpful when either editing audio and video or arranging regions on the Timeline. Snap To Measure: As mentioned in the Timeline section, the snap to measure function aligns regions to the Timeline grid. This feature is useful for editing audio or MIDI regions or for using Mixcraft s loops. The drop down menu changes the snap to grid settings to different note sizes. Generally, the 1/8th or 1/16th note is a good setting to start with. OPENING A NEW SONG Once Mixcraft is launched, the New Project window will display on the screen. This useful prompt makes it easy for students and teachers to configure Mixcraft for lesson plans. The New Project window helps students set up Mixcraft for any kind of project: recording a student or a band, creating loop-based or beat-matched music, or using virtual instruments. Using the prompt, students and teachers can specify the number of audio tracks, virtual instrument tracks, tempo, key, and other settings that make it easy to get started. All of the student projects in this book utilize the New Project window, so it is recommended to spend some time learning it. To create your own template, simply close the New Project window. TIP: Educators can save custom templates by going to: Menu Save As Save As Mixcraft Template. The opening Mixcraft screen lets users quickly and easily set up Mixcraft sessions. 25
30 SAVING/EXPORTING SONGS Saving: Users can save any Mixcraft session to a computer hard drive for later use. Simply go to the Menu > File > Save As All recordings, Timeline arrangements, plugin effects and parameter settings will be saved in the session file and an accompanying folder stored on the main computer hard drive. Exporting: Mixcraft supports several file formats for mixing down audio. Educators and students should begin by mixing down sessions in either.mp3 or.wav file formats. To mix down a session go to the Menu > Mix Down To > File format. Mixing down a session in Mixcraft. Before mixing down, it is important to check the peak volume on the master fader. As is the case with audio tracks, peaking into the red zone can add artifacts (unwanted or accidental sounds) or distort the final mix down. After mixing down the session, the audio file can then be played through computer software, burned to a CD, or added to a digital media player (such as a digital music player or smart phone). 26
31 NOTES: 27
32 CHAPTER 3 TUTORIAL USING AUDIO WITH MIXCRAFT Audio is the main component of Mixcraft. Prior to supporting MIDI and virtual instruments, Mixcraft was primarily used to record either solo performers or groups of musicians. As a result, the audio components of the software are incredibly lucid and well thought-out. For educators and students, audio will be the driving force behind both the music and non-music lesson plans found in this book: learning to record a music performance or capturing a non-music recording (such as a speech) are objectives that run throughout the student projects. Chapter 3 provides instructions for recording, editing, and looping audio. First, an overview of Mixcraft s audio functions is given: beginning with the audio track, users will learn how to operate not only these pieces of software but also their respective components as well. Next, a tutorial on recording audio is provided. Educators are encouraged to go over this tutorial, step-by-step, prior to teaching the lesson plans. Finally, several editing techniques are described. Educators and students will find these techniques useful during post-production. ON AUDIO TRACKS Back in the early days of recording, music was recorded directly to and captured on analog tape. With the introduction of computers to the modern recording studio, software engineers have simulated the functionality of these early tape machines and analog tracks by creating audio software with virtual tracks. Audio Tracks in Mixcraft are pieces of software specialized for recording and editing audio. Users can capture their own recordings or can import audio directly onto Mixcraft s audio tracks. Generally, each audio track is reserved for a specific instrument. Mixcraft, however, has no limits on the number of audio tracks users can add (at least as many as your computer s processor can handle!). Audio tracks also display certain acoustic properties of a recording or audio sample audio waveforms, for example. The waveform height (easily spotted as peaks or transients) is correlated with loudness: taller parts of the waveform are perceived to be louder than shorter parts. These graphic representations are useful for editing or for finding certain sections of a recording. Mixcraft s Audio Track. Since Mixcraft s audio track is a compilation of several important audio functions, a user should understand each function prior to recording. Below is a breakdown of the audio track: Mixcraft s Audio Track Tuning Fork: An ingenious feature, the Tuning Fork, monitors and displays the pitch of an incoming audio signal. Users can tune instruments without the need for an external tuner or a superfluous effect plugin. To activate the tuning fork, an audio track must be armed by left clicking the arm button. Once armed, a turning fork icon will appear in the left hand corner. Selecting the icon activates the tuner. An armed audio track with the tuning fork selected. 28
33 Monitor Signal: Before recording, it is important to monitor the level of an incoming audio signal. The volume meter contains two horizontal rectangles (one for the left and one for the right speaker) and a volume slider. The volume meter contains a color spectrum as the volume of a sound increases the hues of the meter change from green to red. Ask the performer to perform at the intended volume level and track where the loudest peak reaches on the volume meter. Recording should be done in the yellow zone. In this zone, recordings will be audible but not so loud that added artifacts (accidental or unwanted sounds) will dirty the recording with, for example, clipping or distortion. An example of the yellow or safe zone to record in. If the meter is reaching the red area, try dialing back the gain on the audio/computer interface, turning down the volume on the instrument, or moving the performer away from the microphone. An example of the red or unsafe zone. This area could damage your ears and recordings. Mute/Solo: The Mute and Solo buttons control the playing or recording of audio tracks. A track is silenced completely with the mute button. Muting may be useful when deciding on arrangements or when comparing different audio track combinations. The solo button allows only the selected track to play or record, while the remaining tracks are muted. Soloing is useful when users only want to monitor one track. Remember, however, that tracks can be either muted or soloed in any combination. Two examples: With eight tracks, two could be soloed which would mute the other six; or two could be muted which would allow the other six to play or be recorded. Automation Toggle: Automation is an advanced technique which makes it possible to program changes for particular parameters (pan and volume) in Mixcraft that automatically adjust over time. For example, users can program volume (such as volume shifts during a chorus section) and pan (such as moving an instrument audio to the left, center or right of the listening environment) with changes that will then automate during playback/recording. To toggle the automation interface, select the icon with three dots connected by two lines. A subtrack will appear below the audio track. To change the values of volume or of panning, left click and hold on the line running across the middle of the subtrack, then drag the point created up or down. Each click on the line will create a point which can be moved up or down for multiple volume or pan changes to the track. Sample automation of volume levels. In this example, the highest dot increases the volume of the track by 3Db while the lowest dot decreases the volume by 2 Db. The volume amplification or reductions follows the contour of the automation. Pan: Panning is the placement of a sound in the left, right, or center of the listening environment. The pan slider, located alongside the volume meter, moves the track along this continuum. The default pan placement is in the center. Certain instruments are placed in this default position. For example, a kick drum or bass guitar is likely to be panned dead center. Rhythm guitars, tom toms, 29
34 or orchestral instruments might be pushed to the left or right side of the listening environment. There is no correct way to pan instruments but many mixing engineers try to replicate how a live orchestra or band might sound to the audience. Thus, many pan the instruments according to the setup of music stages or orchestra pits. FX: The FX icon launches the FX window in which users can select and apply effect plugins to the instrument track. These effects range from reverb and delay to equalization and compression. An overview of Mixcraft s built-in effects is covered in Chapter 6. Arm for recording: The Arm icon activates the audio track for recording. Once armed, the audio track will turn red and the volume meter will now display the level of any incoming audio. To start recording on the Timeline, hit the round, red master record button or press ctrl-r on the computer keyboard. TUTORIAL RECORDING WITH MIXCRAFT This section examines basic audio recording. Educators will learn how to prepare software and hardware prior to recording, workflows for recording, and finally techniques for editing audio. SETTING UP FOR RECORDING At this stage, educators should have an idea of what hardware and software is required for their curriculum. Ideas on how to set up a music lab can be found in Chapter 1. Before beginning to record, have on hand everything required for the session. Brainstorm beforehand to facilitate this process. Make lists. For instance, microphones are usually needed to record acoustic instruments and vocals; while electronic instruments, like guitars or synthesizers, require different hardware such as instrument cables (usually TRS cable) and an audio/computer interface. Be prepared. Finally, it is vital to properly set up and configure the audio hardware with the Mixcraft software beforehand. Below are common recording scenarios that educators may face: Scenario one: I am recording a solo instrumental or vocal performance. Scenario two: I am recording a large group a cappella performance. Scenario three: I am recording a jazz trio or string quartet. Each of these recording scenarios requires a different setup. For instance, recording a solo performer only requires one microphone or one instrument cable. However, when recording multiple instruments or voices simultaneously, several microphones or instrument cables might be needed. SETTING UP RECORDING ENVIRONMENTS WITH A MICROPHONE 1. Turn off monitors (and use headphones): To prevent feedback during set up, turn off any speakers or monitors attached to the computer s audio output. Have performers record with headphones on because this will allow them to hear the recording session without creating a feedback loop. Connect headphones to the headphone jack on the audio/computer interface or on the computer. 2. Next, connect the microphone(s) to the audio/computer interface with a microphone cord. Some microphones may require external power (usually in the form of 48v). Check your microphone s manual before activating the 48v option on your preamp or 30
35 audio/computer interface. If using a microphone pop filter for vocal recordings, place the filter in front of the microphone. 3 Position the microphone near the performer or instrument. It is important to correctly position the microphone at an optimal distance from the performer. For tips on recording with microphones, refer to the appendix. SETTING UP RECORDING ENVIRONMENTS WITH ELECTRONIC INSTRUMENTS 1. Turn off monitors (and use headphones): To prevent feedback during set up, turn off any speakers or monitors attached to the computer s audio output. Have performers record with headphones on because this will allow them to hear the recording session without creating a feedback loop. Connect headphones to the headphone jack on the audio/ computer interface or on the computer. 2. First, connect an instrument cable to the instrument. Next, connect the instrument cable to the audio/computer interface or to a preamp. Arm an audio track in Mixcraft to test whether sound from the instrument is reaching the software. Trouble Shooting: At times, an audio track is armed in Mixcraft but no sound is heard when the performer plays! An excellent strategy for trouble shooting an audio signal is to conceptualize and then investigate the audio signal path: audio will first be generated by a vocalist or instrument then will travel through a microphone or instrument cable. These cables might be attached to a direct box, preamp, or computer/audio interface before reaching a computer. Scrutinizing each of the stops an audio signal makes is an effective methodology for validating the signal path. (For example, is the instrument s volume knob turned on? Is the preamp s gain set at an optimal level? Is the audio track in Mixcraft armed?). Once a working signal path is established, it is time to record. RECORDING WORK FLOW 1. In this tutorial, either test record by speaking/singing into a microphone or record a musician playing an instrument. To begin recording, open Mixcraft and use the New Project window to load a template with one audio track. 31
MIXCRAFT 6 TEACHER S GUIDE. Written by Parker Tichko Edited by Peter Clarke Design by Alan Reynolds
 MIXCRAFT 6 TEACHER S GUIDE Written by Parker Tichko Edited by Peter Clarke Design by Alan Reynolds Mixcraft 6 Teacher s Guide 2013 Acoustica Inc. All rights reserved. The content of this guide is furnished
Mbox Basics Guide. Version 6.7 for LE Systems on Windows XP or Mac OS X. Digidesign
 Mbox Basics Guide Version 6.7 for LE Systems on Windows XP or Mac OS X Digidesign 2001 Junipero Serra Boulevard Daly City, CA 94014-3886 USA tel: 650 731 6300 fax: 650 731 6399 Technical Support (USA)
GETTING STARTED WITH STUDIO ONE ARTIST
 GETTING STARTED WITH STUDIO ONE ARTIST 2009, PreSonus Audio Electronics, Inc. All Rights Reserved. TABLE OF CONTENTS Studio One Artist Features...3 System Requirements...4 Installation and Authorization...5
Basics. Mbox 2. Version 7.0
 Basics Mbox 2 Version 7.0 Copyright 2005 Digidesign, a division of Avid Technology, Inc. All rights reserved. This guide may not be duplicated in whole or in part without the express written consent of
GarageBand 2.0 Getting Started
 GarageBand 2.0 Getting Started Darby Tober School of Information, Technology Lab Fall 2005 GarageBand 2.0 is the musical component of Apple s ilife 05 Suite. Novice and more advanced composers can use
How to Start Making Music in Pro Tools
 How to Start Making Music in Pro Tools Read this guide if you are new to Pro Tools or are just starting out making your own music. Inside, you ll find quick examples of how to record, compose, mix, and
GarageBand 2.0 Recording, Editing, & Mixing
 GarageBand 2.0 Recording, Editing, & Mixing Darby Tober School of Information, Technology Lab Fall 2005 GarageBand 2.0 is part of Apple s ilife 05 suite of programs. Need music for your imovie HD video
Midi Workshop. SAWStudio. From RML Labs. To order this product, or download a free demo, visit www.sawstudio.com
 SAWStudio Midi Workshop From RML Labs Welcome to the exciting new Midi WorkShop add-on for SAWStudio! The Midi WorkShop requires SAWStudio, SAWStudioLite, or SAWStudioBasic as a host. The Midi WorkShop
Soundcraft Signature MTK Recording Guide
 Soundcraft Signature MTK Recording Guide S O U N D C R A F T S I G N AT U R E M T K R E C O R D I N G G U I D E 2 Table of Contents USB Overview... 04 Installing the Drivers (PC Only)... 04 Finding the
Rhythm Rascal Quick Start Guide Overview
 Rhythm Rascal Quick Start Guide Overview Rhythm Rascal is a virtual drum machine that can be programmed to play any style of music. It allows you to create unlimited patterns within a song, and each pattern
www.tracktion.com Tracktion 4 Quick Start Guide
 QUICK START GUIDE www.tracktion.com Part No. 900201 Rev. A 01/2013 2013 Tracktion Software Corporation. All Rights Reserved. All brand names mentioned are trademarks or registered trademarks of their respective
AUDACITY SOUND EDITOR SOFTWARE A USER GUIDE FOR AUDIO-VISUAL WORKERS
 AUDACITY SOUND EDITOR SOFTWARE A USER GUIDE FOR AUDIO-VISUAL WORKERS Prepared by Peter Appleton Copyright 2008 All illustrations in this guide were created using Audacity v1.2.6 Version 0.5 Page 1 of 18
WAVES JJP STRINGS & KEYS User Guide
 WAVES JJP STRINGS & KEYS TABLE OF CONTENTS CHAPTER 1 INTRODUCTION...3 1.1 WELCOME...3 1.2 PRODUCT OVERVIEW...3 1.3 COMPONENTS...4 1.4 A FEW WORDS FROM JJP...4 CHAPTER 2 QUICKSTART GUIDE...5 CHAPTER 3 CONTROLS,
Salisbury Township School District Planned Course of Study - Music Production Salisbury Inspire, Think, Learn, Grow Together!
 Topic/Unit: Music Production: Recording and Microphones Suggested Timeline: 1-2 weeks Big Ideas/Enduring Understandings: Students will listen to, analyze, and describe music that has been created using
Apple Pro Training Series: Logic Pro X: Professional Music Production
 Apple Pro Training Series: Logic Pro X: Professional Music Production By David Nahmani ISBN-13: 978-0-321-96759-6 First print run January 28, 2014: Updates and Errata for Logic Pro X v10.0.6 The guide,
Digital Video Capture and Edit with imovie HD 6.0.2
 RESEARCH AND INSTRUCTIONAL SUPPORT REVISED: AUGUST 2006 Project Management Digital Video Capture and Edit with imovie HD 6.0.2 Plan out your time and process before beginning the capture and edit. A few
Windows Movie Maker 2012
 Windows Movie Maker 2012 Open Windows Movie Maker A shortcut for Movie Maker should be on the desktop, but if it is not, you can search for the program by touching the right edge of the screen and swiping
PART 1. Using USB Mixer with a Computer
 PART 1. Using USB Mixer with a Computer Universal Serial Bus Mixers The USB mixer is equipped with either one or two USB ports that allow you to play and record audio directly from your computer! Just
Movie Maker 2 Beginning
 Movie Maker 2 Beginning Quick Overview...3 Preparing a Folder...3 Collecting Resources...3 Pictures...4 Screen Resolution...4 Starting Windows Movie Maker...4 Which Version?...4 Windows Movie Maker 2 Window...4
Tutorial Use Ableton Live for a live set
 Intellinoise Studio Intelligent Audio Conception www.intellinoise.com www.electrypnose.com Tutorial Use Ableton Live for a live set Material needed : - Ableton Live - Some finished tracks 1. Introduction
1. Inputting sound into the computer
 RECORDING AND BURNING CDS FOR THE CARILLON This guide will help you record your carillon performances and make CDs and audio files using your Mac or Windows computer and free software. The guide is divided
Working with Windows Movie Maker
 518 442-3608 Working with Windows Movie Maker Windows Movie Maker allows you to make movies and slide shows that can be saved to your computer, put on a CD, uploaded to a Web service (such as YouTube)
Step by step guide to using Audacity
 Step by step guide to using Audacity Contents 1 - Introduction... 1 2 - Getting Started... 2 2.1 - Starting Audacity... 2 3 Recording, Saving and Editing Your Audio... 3 3.1 Recording your audio... 3 3.2
Getting Started Guide
 Getting Started Guide Contents Welcome to Corel VideoStudio Pro X6............................ 2 New Features and Enhancements................................ 4 Understanding the Workspace..................................
Easy VHS to DVD 3 & Easy VHS to DVD 3 Plus. Getting Started Guide
 Easy VHS to DVD 3 & Easy VHS to DVD 3 Plus Getting Started Guide ii Roxio Easy VHS to DVD Getting Started Guide www.roxio.com Get Started with Roxio Easy VHS to DVD 3 In this guide Welcome to Roxio Easy
Message from the Development Team. Contents. Message from the Development Team..2. Panel Controls and Terminals...3. Using the UR22mkII...
 EN Contents Contents Message from the Development Team..2 Panel Controls and Terminals...3 Front Panel...3 Rear Panel...5 Software...7 Using the UR22mkII...10 Connections...10 Configuring Audio Driver
PowerPoint 2007 Basics Website: http://etc.usf.edu/te/
 Website: http://etc.usf.edu/te/ PowerPoint is the presentation program included in the Microsoft Office suite. With PowerPoint, you can create engaging presentations that can be presented in person, online,
Adobe Acrobat 6.0 Professional
 Adobe Acrobat 6.0 Professional Manual Adobe Acrobat 6.0 Professional Manual Purpose The will teach you to create, edit, save, and print PDF files. You will also learn some of Adobe s collaborative functions,
MainStage 3 User Guide. For OS X
 MainStage 3 User Guide For OS X KKApple Inc. Copyright 2013 Apple Inc. All rights reserved. Your rights to the software are governed by the accompanying software license agreement. The owner or authorized
Soft Call Recorder v3 Manual Version 2.007 08
 Soft Call Recorder v3 Manual Version 2.007 08 Soft Call Recorder Manual Vidicode 2008 1 2 Soft Call Recorder Manual Vidicode 2008 Contents 1 Introduction... 5 2 Getting started...... 7 2.1 Software installation...7
Audio-Technica AT-LP60-USB, AT-LP120-USB, AT-LP240-USB & AT-LP1240-USB Turntables. Software Guide
 Audio-Technica AT-LP60-USB, AT-LP120-USB, AT-LP240-USB & AT-LP1240-USB Turntables Software Guide Audio-Technica USB Turntables Contents A note about software... 2 System requirements... 2 Installing Audacity
BOSS GT-10 GUITAR EFFECTS PROCESSOR TRAINING GUIDE
 BOSS GT-10 GUITAR EFFECTS PROCESSOR TRAINING GUIDE Contents: 1. FEATURES 2. LEVEL ONE: Quick Demo and EZ Tone 3. LEVEL TWO: Going Deep 4. FIVE FEATURES TO KNOW and SHOW 5. ACCESSORIES 1. FEATURES BOSS
Roxio Easy LP to MP3 Getting Started Guide
 Roxio Easy LP to MP3 Getting Started Guide Corel Corporation or its subsidiaries. All rights reserved. 2 Getting started with Roxio Easy LP to MP3 In this guide Welcome to Roxio Easy LP to MP3 3 System
Audacity 1.2.4 Sound Editing Software
 Audacity 1.2.4 Sound Editing Software Developed by Paul Waite Davis School District This is not an official training handout of the Educational Technology Center, Davis School District Possibilities...
Cassette2CD Wizard User's Manual
 Cassette2CD Wizard User's Manual Table of Contents 1. Installation Instructions a. Connecting tape-deck to the computer b. Installing the Software 2. Using Cassette2CD Wizard a. Setting up and Testing
Cubase LE 5. Installing Cubase LE 5. Trademarks. Quick Start Guide
 Cubase LE 5 Quick Start Guide This chapter explains basic operations for using the unit with Cubase LE 5. This explanation is not intended to replace the user s manual for Cubase LE 5. Also, since Cubase
Introduction to Final Cut Pro 7 - Editing Basics
 Workshop Objectives Become familiar with the Final Cut Pro workspace, basic editing, capturing footage, using tools, exporting to tape, or QuickTime. Learn effective workflow and file management strategies.
DIGITAL AUDIO BASICS
 DIGITAL AUDIO BASICS 81 DIGITAL AUDIO BASICS 82 DIGITAL AUDIO BASICS 83 DIGITAL AUDIO BASICS 84 DIGITAL AUDIO BASICS 85 DIGITAL AUDIO BASICS 86 DIGITAL AUDIO BASICS 87 DIGITAL AUDIO BASICS 88 DIGITAL AUDIO
Information Technology Lab School of Information University of Texas Summer 2005
 Introduction to Windows Movie Maker 2 1 Information Technology Lab School of Information University of Texas Summer 2005 1. Introduction This paper tutorial is designed as a basic introduction to Microsoft
Recording Audio in GarageBand
 Recording Audio in GarageBand GarageBand, part of the ilife suite of applications, turns the Mac into a versatile multitrack audio recording studio. Using GarageBand, you and your students can compose
Pizzicato. Music Notation. Intuitive Music Composition. A Full Range of Music Software for the Musician. and
 Pizzicato TM Music Notation and Intuitive Music Composition Pizzicato Light Pizzicato Beginner Pizzicato Notation Pizzicato Guitar Pizzicato Choir Pizzicato Soloist Pizzicato Drums & Percussion Pizzicato
Co-designed by TASCAM and
 Page 1 of 6 FW-1884 Control Surface and Audio/MIDI Interface Up to 18 simultaneous inputs Comprehensive mixing, automation, editing and navigation tools for DAWs Eight 100mm motorized touchsensitive channel
Music technology. Draft GCE A level and AS subject content
 Music technology Draft GCE A level and AS subject content July 2015 Contents The content for music technology AS and A level 3 Introduction 3 Aims and objectives 3 Subject content 4 Recording and production
SMART Board User Guide for PC
 SMART Board User Guide for PC What is it? The SMART Board is an interactive whiteboard available in an increasing number of classrooms at the University of Tennessee. While your laptop image is projected
Using Audacity to Podcast: University Classroom Version Dr. Marshall Jones Riley College of Education, Winthrop University
 Using Audacity to Podcast: University Classroom Version Dr. Marshall Jones Riley College of Education, Winthrop University Audacity is available for the Mac and PC. It is free. (That s right, FREE!) You
SMART BOARD USER GUIDE FOR PC TABLE OF CONTENTS I. BEFORE YOU USE THE SMART BOARD. What is it?
 SMART BOARD USER GUIDE FOR PC What is it? SMART Board is an interactive whiteboard available in an increasing number of classrooms at the University of Tennessee. While your laptop image is projected on
Table of Contents Getting Started... Recording...11 Playing Back...14
 USER GUIDE Table of Contents Getting Started...4 Main Window Essentials...5 Operation Modes...7 Setup...8 Recording...11 Tracks... 11 > Track Names... 11 > Adding Tracks... 11 > Master Bus... 11 > Track
Parrot Zikmu by Starck. User guide
 Parrot Zikmu by Starck User guide Contents Getting started... 4 Installation... 4 Installation... 4 Maintenance and precautions... 5 Commands... 5 Turning the speakers on / off... 5 Selecting an audio
USER GUIDE ENGLISH ( 3 6 )
") USER GUIDE ENGLISH ( 3 6 ) GUÍA DEL USUARIO ESPAÑOL ( 7 10 ) GUIDE D'UTILISATION FRANÇAIS ( 11 14 ) GUIDA PER L'USO ITALIANO ( 15 18 ) BENUTZERHANDBUCH DEUTSCH ( 19 22 ) USER GUIDE (ENGLISH) Box Contents
USER GUIDE ENGLISH ( 3 6 ) GUÍA DEL USUARIO ESPAÑOL ( 7 10 ) GUIDE D'UTILISATION FRANÇAIS ( 11 14 ) GUIDA PER L'USO ITALIANO ( 15 18 ) BENUTZERHANDBUCH DEUTSCH ( 19 22 ) USER GUIDE (ENGLISH) Box Contents
AUDIO INTERFACE MANUAL
 AUDIO INTERFACE MANUAL ZOOM Corporation Reproduction of this manual, in whole or in part, by any means, is prohibited. Contents Contents 2 Audio interface and control surface 4 Cubase LE Installation overview
itunes Basics Website: http://etc.usf.edu/te/
 Website: http://etc.usf.edu/te/ itunes is the digital media management program included in ilife. With itunes you can easily import songs from your favorite CDs or purchase them from the itunes Store.
USER GUIDE ENGLISH ( 3 6 )
") USER GUIDE ENGLISH ( 3 6 ) GUÍA DEL USUARIO ESPAÑOL ( 7 10 ) GUIDE D'UTILISATION FRANÇAIS ( 11 14 ) GUIDA PER L'USO ITALIANO ( 15 18 ) BENUTZERHANDBUCH DEUTSCH ( 19 22 ) USER GUIDE (ENGLISH) Box Contents
USER GUIDE ENGLISH ( 3 6 ) GUÍA DEL USUARIO ESPAÑOL ( 7 10 ) GUIDE D'UTILISATION FRANÇAIS ( 11 14 ) GUIDA PER L'USO ITALIANO ( 15 18 ) BENUTZERHANDBUCH DEUTSCH ( 19 22 ) USER GUIDE (ENGLISH) Box Contents
Welcome to Corel VideoStudio Pro X5
 Contents Welcome to Corel VideoStudio Pro X5............................ 2 New Features and Enhancements................................ 4 Getting to Know the Workspace.................................
Introduction to Smart Board. Table of Contents. Connection Basics 3. Using the Board (Basics) 4. The Floating Tools Toolbar 5-6
 4. The Floating Tools Toolbar 5-6") Introduction to Smart Board Table of Contents Overview 2 Connection Basics 3 Using the Board (Basics) 4 The Floating Tools Toolbar 5-6 The Smartboard Smart Tool Buttons Collecting and Sharing Content with
Introduction to Smart Board Table of Contents Overview 2 Connection Basics 3 Using the Board (Basics) 4 The Floating Tools Toolbar 5-6 The Smartboard Smart Tool Buttons Collecting and Sharing Content with
User Guide FFFA001106. www.focusrite.com
 User Guide FFFA001106 www.focusrite.com TABLE OF CONTENTS OVERVIEW.... 3 Introduction...3 Features.................................................................... 3 Box Contents...3 System Requirements....4
Hosted Call Recorder Guide. Rev A (21/11/14)
") Hosted Call Recorder Guide Rev A (21/11/14) Replay Interface The Replay area of the Quantify interface is used to retrieve and replay calls from your Red Box Recorder. Below is an example of the interface
Hosted Call Recorder Guide Rev A (21/11/14) Replay Interface The Replay area of the Quantify interface is used to retrieve and replay calls from your Red Box Recorder. Below is an example of the interface
User Guide. VT1708A VIA HD Audio Adeck For Windows 2000, Windows XP & Server 2003. Jun 13 2007 Revision 1.1e
 VT1708A VIA HD Audio Adeck For Windows 2000, Windows XP & Server 2003 Jun 13 2007 Revision 1.1e VT1708A VIA HD Audio Adeck For Windows 2000, Windows XP & Server 2003 Revision History Rev Date Initial Note
Teaching Composition With Technology
 ASME 2011 Teaching Composition With Technology Katie Wardrobe Midnight Music Recording and Sequencing... 3 Software options...3 Arranging techniques and other musical concepts... 3 Using pre- made loops...3
DR-1 Portable Digital Recorder OWNER'S MANUAL
 » D01019610A DR-1 Portable Digital Recorder OWNER'S MANUAL Contents 1 Introduction... 3 Main functions... 3 Supplied accessories... 3 Recycling the rechargeable battery... 3 Notes about this manual...
SAMPLIT U S E R M A N U A L
 SAMPLIT U S E R M A N U A L Table of Contents 1 Welcome to Samplit 2 2 Quick start 4 3 Project 7 4 Typical session 8 5 Project settings 9 6 Main window 11 7 MIDI recall 14 8 Recording 15 9 Looping 17 10
Table of contents. Quick Start... 1. Basic operation... 4. Creating your own sounds...12. Items in the screen... 6. Performing...
 1 Table of contents ii Quick Start... 1 Step 1 Listen to the sound of the effect programs...1 Step 2 Play back a song and cancel the guitar part...2 Step 3 Perform along with the song...3 Basic operation...
USING WINDOWS MOVIE MAKER TO CREATE THE MOMENT BEHIND THE PHOTO STORY PART 1
 PART 1 Windows Movie Maker lets you assemble a range of video, pictures, and sound elements to create a story. It is an application that comes with most PC computers. This tip sheet was created using Windows
SYSTEM MIX PLUS. Owner's Manual DIGITAL MUSIC CORPORATION
 SYSTEM MIX PLUS Owner's Manual 1 Table of Contents 1. Introduction.................. 2 1.1 Overview 1.2 Unpacking 2. Operation................... 3 2.1 Front Panel 2.2 Rear Panel 3. Mixer.....................
How to record multiple tracks on Zoom H4N
 How to record multiple tracks on Zoom H4N Three or Four Track Recording Step by Step: by Jennifer Cluff, July 2012 This simple guide explains the easiest way to create multi-track recordings with the Zoom
Using Microsoft Producer for PowerPoint to Record Accounting Lectures
 Using Microsoft Producer for PowerPoint to Record Accounting Lectures A presentation to the 2007 Conference of the Teachers of Accounting at Two-Year Colleges May 17-19, Indianapolis, IN Presenter: Lou
Transferring Video Clips to Digital Video Using Pinnacle 15
 Transferring Video Clips to Digital Video Using Pinnacle 15 Understanding Movie Formats Before you can begin the process of converting VHS to digital video, you must decide what movie format you need,
Music Technology II. What are some additional applications understand midi sequencing. for music production software?
 Music Technology II This class is open to all students in grades 9-12. This course is designed for students seeking knowledge and experience in music technology. Topics covered include: live sound recording
VHS2DVD Wizard User's Manual
 VHS2DVD Wizard User's Manual Table of Contents 1. Installation Instructions a. Installation Package Contents b. Installation Instructions c. Setting Up the Computer for Video Capturing i. Adjust the Screen
P420-M TM USB speakerphone
 P420-M TM USB speakerphone User guide Welcome Congratulations on purchasing your new Plantronics product. This guide contains instructions for setting up and using your Plantronics P420-M USB speakerphone.
Software Sequencing Basics
 October 12, 1998 software sequencing basics Software Sequencing Basics Supplemental Notes Roland gear is often used in conjunction with a variety of software sequencer programs. The purpose of this document
Delivering a Music Product
 Unit 9: Delivering a Music Product Unit code: QCF Level 3: Credit value: 10 Guided learning hours: 60 Aim and purpose R/600/6964 BTEC National The aim of this unit is to enable learners to experience the
The main imovie window is divided into six major parts.
 The main imovie window is divided into six major parts. 1. Project Drag clips to the project area to create a timeline 2. Preview Window Displays a preview of your video 3. Toolbar Contains a variety of
Important HP Media Center PC Updates
 Important HP Media Center PC Updates Your system uses Microsoft Windows XP Media Center Edition 2005. Before starting the system and using the Media Center setup wizard, please read this updated information
Studio One Mackie Control Support
 Studio One Mackie Control Support Table of Contents Introduction... 1 1 Setup... 1 1.1 Main Unit... 1 1.2 Extender... 1 1.3 Grouping Units... 2 2 Function Overview... 3 2.1 Mixer... 3 2.1.1 Layout... 3
Sanako Study 1200 USER GUIDE
 Sanako Study 1200 USER GUIDE Copyright 2015 Sanako Corporation. All rights reserved. Microsoft is a registered trademark. Microsoft Windows Vista, Windows 7 and Windows 8 are trademarks of Microsoft Corporation.
QUICK SETUP GUIDE: Firewire/mLAN Windows Cubase AI4 / Studio Manager / Motif XS Editor / Windows
 QUICK SETUP GUIDE: Firewire/mLAN Windows Cubase AI4 / Studio Manager / Motif XS Editor / Windows Install _ Install Cubase AI4 on your computer. Update to the latest version at www.steinberg.net Download
Recording and Editing Audio with Audacity
 1 Recording and Editing Audio with Audacity http://audacity.sourceforge.net/ Audacity is free, open source software for recording and editing sounds. It is available for Mac OS X, Microsoft Windows, Linux,
Tutorial for Tracker and Supporting Software By David Chandler
 Tutorial for Tracker and Supporting Software By David Chandler I use a number of free, open source programs to do video analysis. 1. Avidemux, to exerpt the video clip, read the video properties, and save
Greenwich Public Schools Electronic Music Curriculum 9-12
 Greenwich Public Schools Electronic Music Curriculum 9-12 Overview Electronic Music courses at the high school are elective music courses. The Electronic Music Units of Instruction include four strands
Welcome to The Grid 2
 Welcome to 1 Thanks for choosing! These training cards will help you learn about, providing step-by-step instructions for the key skills you will need and introducing the included resources. What does
Create a Poster Using Publisher
 Contents 1. Introduction 1. Starting Publisher 2. Create a Poster Template 5. Aligning your images and text 7. Apply a background 12. Add text to your poster 14. Add pictures to your poster 17. Add graphs
User s Guide. Creative Prodikeys DM
 User s Guide Creative Prodikeys DM Information in this document is subject to change without notice and does not represent a commitment on the part of Creative Technology Ltd. No part of this manual may
DIGITAL MUSIC DAY 1 WHAT IS SOUND? ANALOG AND DIGITAL EARLY RECORDING WAX FOR YOUR EARS ROUND BUT FLAT WIRE AND TAPE PURE SOUND
 DIGITAL MUSIC DAY 1 WHAT IS SOUND? 1. Making a sound playing a musical instrument, moves the surrounding the instrument. 2. Making a sound sends out air which hit your ears. 3. Waves of changing air pressure
Windows Live Movie Maker for teachers and faculty
 Windows Live Movie Maker for teachers and faculty Step-by-step Get Windows Live Movie Maker Download Download Windows Live Movie Maker at http://windowslive.com/desktop/moviemaker Run After the program
Advanced Presentation Features and Animation
 There are three features that you should remember as you work within PowerPoint 2007: the Microsoft Office Button, the Quick Access Toolbar, and the Ribbon. The function of these features will be more
For HOME and BROADCASTER versions the options are kept simple for quick configuration.
 TABLE OF CONTENTS INTRODUCTION 3 HOME and BROADCASTER VERSION SETUPS 3 CONFIGURATION OPTIONS DEFINED 4 BASIC (QUICK) CONFIGURATIONS 5 HEADPHONES 5 EXTERNAL MIXERS 8 MICROPHONE 11 LINE INPUTS 12 ADVANCED
Waves Trans-X. Software Audio Processor. User s Guide
 Waves Trans-X Software Audio Processor User s Guide Waves Trans-X software guide page 1 of 8 Chapter 1 Introduction and Overview The Waves Trans-X transient processor is a special breed of dynamics processor
SMART NOTEBOOK 10. Instructional Technology Enhancing ACHievement
 SMART NOTEBOOK 10 Instructional Technology Enhancing ACHievement TABLE OF CONTENTS SMART Notebook 10 Themes... 3 Page Groups... 4 Magic Pen... 5 Shape Pen... 6 Tables... 7 Object Animation... 8 Aligning
Digital Story Telling with Windows Movie Maker Step by step
 . PAGE 1 Superhighways 2013 CONTENTS Before you open Windows Movie Maker (WMM)... 3 Organising your digital assets... 3 Windows Live Photo Gallery... 3 Your First Project in WMM... 4 Adding Audio... 6
Creating a Digital Movie with Pinnacle Studio (v. 10) Overview... 2. Using Pinnacle Studio... 3
 Overview... 2. Using Pinnacle Studio... 3") Creating a Digital Movie with Pinnacle Studio (v. 10) Overview... 2 Understanding Movie Formats...2 Permissions and Copyright...2 Using Pinnacle Studio... 3 Step One: Capturing Video from a Digital Camera...3
Creating a Digital Movie with Pinnacle Studio (v. 10) Overview... 2 Understanding Movie Formats...2 Permissions and Copyright...2 Using Pinnacle Studio... 3 Step One: Capturing Video from a Digital Camera...3
SMART Board User Guide for Mac
 SMART Board User Guide for Mac What is it? SMART Board is an interactive whiteboard available in an increasing number of classrooms at the University of Tennessee. While your laptop image is projected
COLLEGE OF MEDICINE. Sony Portable Video Conference Systems. Operations Manual
 COLLEGE OF MEDICINE Sony Portable Video Conference Systems Operations Manual SONY PORTABLE VIDEO CONFERENCE SYSTEM OPERATIONS MANUAL Produced by the University of Saskatchewan DIVISION OF MEDIA AND TECHNOLOGY
EUROPEAN COMPUTER DRIVING LICENCE. Multimedia Audio Editing. Syllabus
 EUROPEAN COMPUTER DRIVING LICENCE Multimedia Audio Editing Syllabus Purpose This document details the syllabus for ECDL Multimedia Module 1 Audio Editing. The syllabus describes, through learning outcomes,
QUICK SETUP GUIDE: USB-MIDI Cubase AI4 / Motif XS Editor / Windows
 QUICK SETUP GUIDE: USB-MIDI Cubase AI4 / Motif XS Editor / Windows Install _ Install Cubase AI4 on your computer. Update to the latest version at www.steinberg.net Download and Install _ The Motif XS Operating
Contents. 5. Navigating the Software Menus 25 The Basics 25 Diagrams of Top Level Sub Menus 27. 6. Tips and Troubleshooting 34
 Contents 1. Quick Start 1 Features 1 What You Need to Begin 2 Installing the Battery 2 The Basic Controls 3 Play Music 5 Listen to the FM Radio 7 Voice recording 8 Headphone/Earphone 9 2. Playing Music
Copyright 2010 Cakewalk, Inc. All rights reserved. Program Copyright 2010 Cakewalk, Inc. All rights reserved.
 SONAR X1 User Guide Information in this document is subject to change without notice and does not represent a commitment on the part of Cakewalk, Inc. The software described in this document is furnished
How To Use A Qsc Touchmix Mixer
 Application Guide for Musicians & Bands DON T BE FOOLED BY THE SMALL PACKAGE. Inside each QSC TouchMix mixer is a versatile and powerful set of features and functions the equivalent of a large conventional
Software User Manual. Designed and Engineered by Blackstar Amplification UK
 Software User Manual Designed and Engineered by Blackstar Amplification UK Introduction System Requirements This user manual will guide you through the installation and use of the Blackstar INSIDER software
Open Pro Tools. Click File/ New Session and name your session.
 RECORD USING MIC BOOTH Open Pro Tools. Click File/ New Session and name your session. If you are working to video click File/ Import / Video and select your video. When the video pops up as a track a small
Note: To use the following three applications, first start up Data Manager and then use Data Manager button operations to start them up.
 This software lets you create WK-3000/WK-3200/WK-3500/WK-3700/CTK-691 and CTK-900 (keyboard) data on your computer and exchange such data between the computer and keyboard. Data Manager Transfer keyboard