Wellness Spas by Coast Spas Manufacturing Inc Street, Langley BC Canada
|
|
|
- Lee Sherman
- 7 years ago
- Views:
Transcription
1 VERSION Wellness Spas by Coast Spas Manufacturing Inc Street, Langley BC Canada

2 TABLE OF CONTENTS General Information Quick Start Guide Page 3 Page 4 Important Safety Instructions Page 5 Preparation and Set-up for Your New Spa Page 6 Electrical Requirements Page 6 Draining & Winterizing Page 6 Filter Maintenance Page 7 Water Quality Maintenance Page 7 Water Clarity Troubleshooting Page 9 Product & Care Guide Page 10 Glossary of Terms Page Basic Installation and Configuration Guidelines Page 12 Troubleshooting Guide Page Spa Controls Page Touchscreen Control Panel Page Wellness IV Control Panel Page Wellness Color Screen Controls (Non-touch) Page Spa Panel Removal Instructions Page 35 2
 Page 27-34 Spa Panel Removal")
3 3
4 4

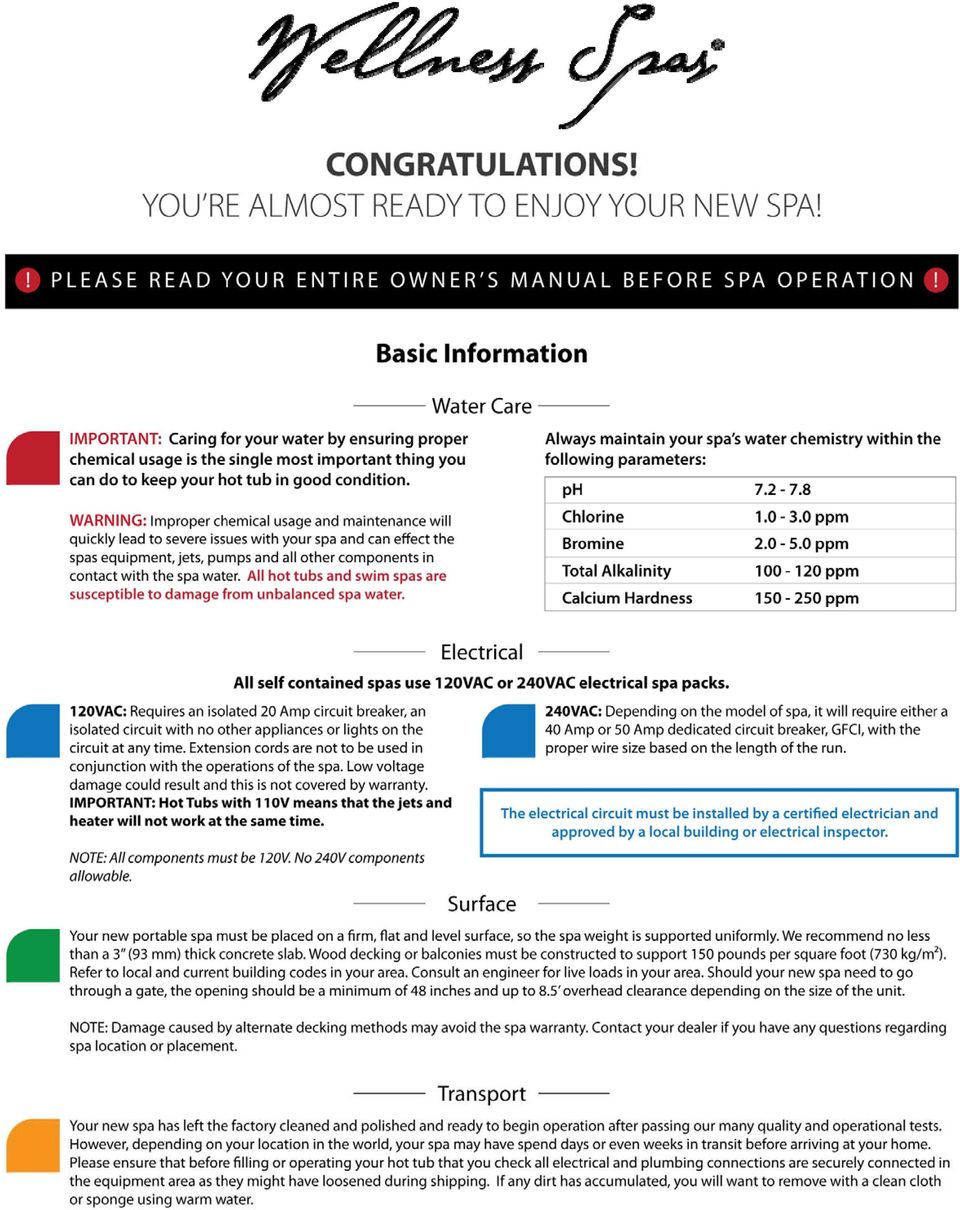
5 IMPORTANT SAFETY INSTRUCTIONS READ AND FOLLOW ALL INSTRUCTIONS CAREFULLY DANGER: Risk of Injury. The suction fittings in this hot tub are sized to match the specific water flow created by the pump. Should the need arise to replace the suction fittings or the pump, be sure that the flow rates are compatible. Never operate the hot tub if the suction fittings are broken or missing. Never replace a suction fitting with one rated less than the flow rate marked on the original suction fitting. DANGER: Risk of Accidental Drowning. Do not allow children to be in or around the spa without adult supervision. Keep the spa cover on and locked when not in use. See instructions enclosed with the cover for locking procedures. DANGER: Risk of Electrical Shock. The electrical supply for this product must include a suitably rated switch or circuit breaker to open all ungrounded supply conductors to comply with section of the National Electrical Code, ANSI/NFPA 70. The disconnect must be readily accessible and visible to the hot tub occupant but installed at least 5 feet (1.5 m) from the hot tub water. READ, FOLLOW AND SAVE THESE INSTRUCTIONS a) A green colored terminal or a terminal marked G, Gr, Ground, Grounding or the symbol * is located inside the supply terminal box or compartment. To reduce the risk of electric shock, this terminal must be connected to the grounding means provided in the electric supply service panel with a continuous copper wire equivalent in size to the circuit conductors that supply this equipment. b) At least two lugs marked Bonding Lugs are provided on the external surface or on the inside of the supply terminal box compartment. To reduce the risk of electric shock, connect the local common bonding grid in the area of the hot tub to these terminals with an insulated or bare copper conductor not smaller than No. 6 AWG. c) All field-installed metal components such as rails, ladders, drains or other similar hardware within 5 feet (1.5 m) of the hot tub shall be bonded to the equipment grounding buss with copper conductors not smaller than No. 6 AWG. WARNING: To Reduce the Risk of Injury: The water in a hot tub should never exceed 104 F (40 C). Water temperatures between 100 F (38 C) and 104 F (40 C) are considered safe for a healthy adult. Lower water temperatures are recommended for young children and when hot tub use exceeds 10 minutes. Since excessive water temperatures have a high potential for causing fetal damage during the early months of pregnancy, pregnant or possibly pregnant women should limit hot tub water temperatures to 100 F (38 C). If pregnant, please consult your physician before using a hot tub. Before entering the hot tub, the user should measure the water temperature with an accurate thermometer since the tolerance of water temperature regulating devices may vary as much as +/- 5 F (2 C). Persons suffering from obesity or a medical history of heart disease, low or high blood pressure, circulatory system problems or diabetes should consult a physician before using a hot tub. CAUTION: Risk of Hyperthermia: Hyperthermia occurs when the internal temperature of the body reaches a level several degrees above the normal body temperature of 98.6 F (37 C). The symptoms of hyperthermia include drowsiness, lethargy, and an increase in the internal temperature of the body. Prolonged immersion in hot water may induce hyperthermia. A description of the causes, symptoms, and effects of hyperthermia are as follows: Unawareness of impending hazard; Failure to perceive heat; Failure to recognize the need to exit hot tub; Physical inability to exit hot tub; Fetal damage in pregnant women; and Unconsciousness and danger of drowning. WARNING: Children should not use hot tubs without adult supervision. WARNING: Do not use hot tubs unless all suction guards are installed to prevent body and hair entrapment. WARNING: People with infectious diseases should not use a hot tub. WARNING: To avoid injury, exercise care when entering or exiting the hot tub. WARNING: Do not use drugs or alcohol before or during the use of a hot tub to avoid unconsciousness and possible drowning. The use of alcohol or drugs can greatly increase the risk of fatal hyperthermia in hot tubs. WARNING: Pregnant or possibly pregnant women should consult a physician before using a hot tub. WARNING: Water temperature in excess of 38 C (100 F) may be injurious to your health. Before entering the hot tub, measure the water temperature with an accurate thermometer. WARNING: Do not use a hot tub immediately following strenuous exercise. WARNING: Prolonged immersion in a hot tub may be injurious to your health. WARNING: Do not permit electric appliances (such as lights, telephone, radio, television, etc.) within 5 feet (1.5m) of this hot tub unless such appliances are built-in by the manufacturer. WARNING: People using medication and/or having an adverse medical history should consult a physician before using a spa or hot tub. CAUTION: Observe a reasonable time limit when using the hot tub. Long exposures at higher temperatures can cause high body temperature. Symptoms may include dizziness, nausea, fainting, drowsiness, and reduced awareness. These effects could possibly result in drowning. CAUTION: Enter and exit the hot tub slowly. Wet surfaces can be very slippery. CAUTION: Proper chemical maintenance of hot tub water is necessary to maintain safe water and prevent possible damage to hot tub components. Maintain water chemistry in accordance with manufacturer s instructions. CAUTION: Use the straps and clip tie downs to secure the cover when not in use. This will help to discourage unsupervised children from entering the hot tub and keep the hot tub cover secure in high-wind conditions. There is no representation that the cover, clip tie-downs, or actual locks will prevent access to the hot tub. CAUTION: For exercise, the water should not exceed 90 F (32 C). CAUTION: When using this electrical equipment, basic safety precautions should always be followed. 5

6 PREPARATION AND SET-UP FOR YOUR NEW SPA LOCATION FOR YOUR NEW SPA: You want to keep in mind how you intend to use the spa and plan the location accordingly. How close is the spa from the exit or entrance to your house? (consider the cold weather) Is the path to your spa clean of debris, sand, grass? (so as not to track into the spa) Is there protection from wind, inclement weather? Can neighbors or passersby see the spa? NOTE: Allow for service access: Many spa owners enjoy placing their spa in a decorative enclosure or a deck. Keep in mind that you need to have access to the equipment for maintenance and the spa should be able to be moved or lifted without destroying the special enclosure or its surroundings. You should discuss this with your dealer when designing the location. Extension cords are not to be used in conjunction with the operations of the spa. Low voltage damage could result and this is not covered by warranty. NOTE: All components must be 120V; No 240V components allowable. 240VAC: Depending on the model of spa, it will require either a 40 Amp or 50 Amp dedicated circuit breaker, GFCI, with the proper wire size based on the length of the run. The electrical circuit must be installed by a certified electrician and approved by a local building or electrical inspector. ELECTRICAL REQUIREMENTS All self contained spas use 120VAC or 240VAC electrical spa packs.. These instructions describe the only acceptable electrical wiring procedures. Spas wired in any other way will void your warranty and may result in serious injury. All installations should be completed by a certified electrician. Failure to comply with state and local codes may result in fire or personal injury and will be the sole responsibility of the spa owner. 120VAC: This requires an isolated 20 Amp circuit breaker. This needs to be an isolated circuit with no other appliances or lights on this circuit at any time. Extension cords are not to be used in conjunction with the operations of the spa. Low voltage damage could result and this is not covered by warranty. NOTE: All components must be 120V; No 240V components allowable. 240VAC: Depending on the model of spa, it will require either a 40 Amp or 50 Amp dedicated circuit breaker, GFCI, with the proper wire size based on the length of the run. The electrical circuit must be installed by a certified electrician and approved by a local building or electrical inspector. SURFACE AND PAD REQUIREMENTS Your new portable spa must be placed on a firm, flat and level surface, so the spa weight is supported uniformly. We recommend no less than a 3 (93 mm) thick concrete slab. Wood decking or balconies must be constructed to support 150 pounds per square foot (730 kg/m²). Refer to local and current building codes in your area. Consult an engineer for live loads in your area. Should your new spa need to go through a gate, the opening should be a minimum of 48 inches and up to 8.5 overhead clearance depending on the size of the unit. NOTE: Damage caused by alternate decking methods may avoid the spa warranty. Contact your local dealer if you have any questions regarding spa location or placement. DRAINING AND WINTERIZING DRAINING YOUR SPA After a period of 3-4 months, detergent residues from bathing suits and soap film will build up in your spa water. Once this happens, your spa water will appear cloudy and should probably be replaced. Turn power OFF at the breaker. Locate the drain valve (usually in the equipment area). Remove the safety cap and attach garden hose. Drain water to a convenient area. (Spa water may harm grass or plants if sanitizer levels are high.) When water begins to flow out of the hose, open the air relief valve located on filter lid (Hydro-Cyclonic Filtration) or Air Bleeder Valve (Skim Filtration) Your spa will drain except for a small portion left in the foot well. This can be removed with a sponge and pail. Once empty, clean as required. To finish, remove garden hose and attach safety cap. IMPORTANT (Cascade Series Only): There will be an additional drain valve. This is connected directly to the tank reservoir and you will see the water level go down on the sight tube in the equipment area. WINTERIZING YOUR SPA In many areas of the world the temperature may drop below 32 F (0 C). We recommend the spa is always filled with water and running at normal spa temperatures. By doing this you will minimize the risk of freezing within your spa. If it is necessary to leave your spa unattended for long periods of time during cold weather conditions, you should drain your spa to avoid accidental freezing caused by power outages. Your local dealer can perform the following winterizing procedures, if you are not completely comfortable with them. Ensure that you have fully drained the spa (Refer to the DRAINING YOUR SPA section) After draining, your spa may still have water remaining in the equipment and plumbing fittings. Disconnect the hand-tightened union fittings going to and from the jet pumps. Be careful not to lose the o-rings between the unions and pump housing. Leave drain valve in the open position and safety cap off. To completely drain the plumbing lines, a wet/dry shop vacuum can be used to draw out any remaining water. Place the vacuum hose over the jet fittings in the 6

7 spa as well as the plumbing lines in the equipment area. You should also disconnect the plug on the crystal clear inspection tube (if installed) Remove the filter cartridge and store in a warm, dry area. Clean the spa shell and place spa cover on spa. Be sure to lock the cover in place in case of high winds or rain. WARNING: The instructions above should be followed accordingly when winterizing your spa however they are guidelines and potential freeze damage may still occur. All freeze damage is the sole responsibility of the spa owner and will not be covered by the warranty should it occur. NOTE: Make sure the o-ring is on the air relief valve, and is finger tight prior to starting the pump. This o-ring should periodically be lubricated with a silicone lubricant. There is a 3/8 clear line coming from the filter area and this goes to the bottom corner of the spa. This drains all the water from around the filter canister. This is a good time to check the skimmer basket. Bring skimmer door (weir) forward and unscrew basket. Clean out debris and reinstall. Look for these specialized cleaning attachments at your local dealership. EMERGENCY SITUATIONS: To eliminate freezing in the event of equipment failure, use a 100-watt light bulb or small heater via extension cord and place it in the equipment area, keeping it away from plumbing lines. This will help for a short period of time until proper service can be rendered. FILTER MAINTENANCE The spa filter is one of the most important maintenance items of a hot tub. The filter is there to remove debris from the water and needs to be cleaned on a regular basis. Failure to do so may result in poor performance, poor water clarity and could prevent the spa from heating. Filtration starts as soon as flow is steady through the filter. As the filter cartridge removes the debris from the spa water, the accumulated debris causes flow resistance. CLEANING AND REPLACING FILTER CARTRIDGE Your spa filter has been designed for quick and easy maintenance. The filter cartridge should be rinsed by hose once a week and cleaned with a cartridge cleaner once a month. A second filter cartridge is recommended and will speed up this process. This can be purchased from your local dealer. TOP LOAD FILTERS Turn power OFF at the breaker. Loosen air relief valve, then remove retainer ring. Pull filter lid straight up to remove. Do not twist or pull the filter lid up on an angle. This could cause damage to the filter canister, especially in freezing conditions. Remove filter cartridge and clean with a garden hose and a high-pressure nozzle. Periodically you may need to soak your filter in a cartridge filter cleaner to remove excess minerals and/or oils. Rinse filter thoroughly before installing. Clean o-ring on filter lid and apply a light film of silicone lubricant to the o-ring. Do not use a petroleum-based lubricant as it could damage the o-ring. Consult your dealer to purchase suitable lubricant. Place clean Cartridge in filter canister. Replace filter lid and re-tighten retaining ring (finger tight only) WATER QUALITY MAINTENANCE Maintaining the quality of the water within the specified limits will serve to enhance your enjoyment and prolong the life of the hot tub s equipment. It is a fairly simple task, but it requires regular attention because the water chemistry involved is a balance of several factors. There is no simple formula, and there is no avoiding it. An indifferent approach to water maintenance will result in poor and potentially harmful conditions for soaking and even damage to your hot tub investment. The most important thing to keep in mind is that preventing poor water chemistry is much easier than correcting poor water chemistry. For specific guidance on maintaining water quality, consult your Authorized Dealer who can recommend appropriate chemical products for sanitizing and maintaining your hot tub. MAINTAIN HEALTHY SPA WATER Important! When maintaining your hot tub s water chemistry, ensure that your cover is removed during any aggressive treatments to allow for dissipation into the air. Take care to remove the cover slowly and let chemicals deplete if you are uncertain if your water is properly balanced. Always maintain your hot tub s water chemistry within the following parameters: ph: ph is a measure of relative acidity or alkalinity of water and is measured on a scale of 0 to 14. The midpoint of 7 is said to be neutral, above which is alkaline and below which is acidic. In hot tub water, it is very important to maintain a slightly alkaline condition of 7.2 to 7.8. Problems become proportionately severe the further outside of this range the water 7

8 gets. A low ph will be corrosive to metals in the hot tub equipment. A high ph will cause minerals to deposit on the interior surface (scaling). In addition, the ability of the sanitation agents to keep the hot tub clean is severely affected as the ph moves beyond the ideal range. That is why almost all hot tub water test kits contain a measure for ph as well as sanitizer. Sanitizer (Chlorine or Bromine): To destroy bacteria and organic compounds in the hot tub water by breaking them down into non-harmful levels which get filtered out. A sanitizer must be used regularly, either chlorine or bromine. Sanitizing your spa water is the most important spa maintenance you can do for yourself. Total Alkalinity: This refers to the ability of the hot tub water to resist changes in ph. Controlling alkalinity can help keep your ph in the appropriate range thereby lessening the need for ph balancing. If the TA is too low the ph level will fluctuate rapidly from high to low. If the TA is too high the ph will tend to be too high and will be very difficult to bring back down. Calcium Hardness: This is a measurement of dissolved calcium in the water. Calcium will help control the corrosive nature of the spa s water. WARNING: Never store chemicals inside the equipment area of your spa. IMPORTANT: Do not use Hydrogen Peroxide based sanitizers in your spa. When using Chlorine or Bromine tablets you must use a floating dispenser. These chemicals can have an extremely corrosive effect on certain materials in the spa. Damage caused by use of these chemicals, or improper use of any chemicals, is not covered under the spa s warranty. OTHER ADDITIVES: Many other additives are available for your spa. Some are necessary to compensate for out-of-balance water, some aid in cosmetic water treatment and others simply alter the feel or smell of the water. Your Authorized Dealer can advise you on the use of these additives. 8
: To destroy bacteria and organic compounds in the hot tub water by breaking them down into non-harmful levels which get filtered out.")
9 WATER CLARITY TROUBLESHOOTING PROBLEM PROBABLE CAUSE POTENTIAL SOLUTIONS Water Odor Improper sanitization Excessive organics in water ph is too low Add sanitizer Shock spa with sanitizer Adjust ph Chlorine Odor Chloramines are too high ph is too low Shock spa with sanitizer Adjust ph Musty Odor Bacteria or Algae growth Shock spa with sanitizer Drain and refill spa water Scale Total alkalinity is too high ph is too high High calcium content in water Adjust total alkalinity Adjust ph Use stain and scale product Stains Total alkalinity is too low ph is too low High metal content in water Adjust alkalinity Adjust ph Use stain and scale product Cloudy Water Poor filtration ph is too high Hardness is too high Total alkalinity is too high Suspended particles Clean filter cartridge Adjust ph Adjust hardness Adjust total alkalinity Drain and refill spa water Algae Growth ph is too high Sanitizer is too low Adjust ph Shock spa with sanitizer Adjust sanitizer level Eye Irritation ph is too low Sanitizer is too low Adjust ph Shock spa with sanitizer Adjust sanitizer level Skin Rash/Irritation Free chlorine level too high Unsanitary water Adjust chlorine level Shock spa with sanitizer Adjust sanitizer level 9

10 PRODUCT & CARE GUIDE Your Authorized Dealer carries a wide variety of care and maintenance products. For more information please contact your Dealer. REQUIRED FILTER MAINTENANCE Your new hot tub is equipped with a filter cartridge. To ensure maximum water quality at all times, you should replace the filter cartridge every six months, or earlier as necessary. The filter cartridge is designed to be thrown away! Attempts to re-use the filter cartridge may result in the rerelease of unwanted particles back into the hot tub. PLEATCO DUAL CORE FILTERS Your hot tub/spa comes with a premium filter. Most come with equipped with a Pleatco DualCore Filter, which does a better job of cleaning your spa water than any other filter cartridge. The DualCore filter has two layers of filtration media, the outer layer and the inner layer. Both are engineered to remove different particles from your water. Do not pull on the pillows Pillows should be cleaned using a soft cloth and mild soap, then wiped with a conditioner. We recommend that pillows be washed each time you drain you spa. HOT TUB INTERIOR Your hot tub has a fiberglass reinforced acrylic shell. Generally dirt and stains will not adhere to the surface. To properly clean the surface, we recommend wiping it with a soft damp cloth (or sponge) using household soap or liquid detergent and rinsing thoroughly with fresh water. Stubborn dirt or stains may be removed by using Spic & Span adequately dissolved in water. Contact your dealer and inquire about maintenance packages. DO NOT use any cleaning products containing abrasives or solvents, since these could damage the surface. Harsh chemicals should never be used on acrylic surfaces. Damage to the shell due to the use of harsh chemicals is not covered under the warranty. DO NOT leave your hot tub drained and in direct sunlight for extended periods of time. Extreme heat could cause damage to the acrylic surface and may induce an effect known as crazing. The outer core is similar to a traditional filter which traps larger debris, while the inner core filters the water for particles down to 3 microns in size. The inner core is easily removed and both filter media can be cleaned. STAINLESS STEEL CONTROLS AND COMPONENTS ABOVE THE WATER LINE To preserve the stainless steel finish of the controls and components above the water line, we recommend they be wiped with a dry soft cloth after each use of your hot tub. In addition, off-gas your tub by removing the cover for approximately 30 minutes multiple times per week (if not in use) and after every shock treatment. Keeping your spa water clean and refreshing is extremely important for your enjoyment of your hot tub. Our hot tubs come with only the best filters available in order to ensure your satisfaction. REQUIRED WATER REPLACEMENT You should replace the hot tub s water every 3-6 months. The frequency will depend on a number of variables including frequency of use, number of bathers and attention paid to the water quality maintenance. You will know it is time for a change when you can no longer get the normal feel or sparkle to the water, even though the key water balance measurements are all within the recommended ranges. HEADREST / PILLOW CARE The pillows can be removed for easy cleaning and maintenance. All pillows have plugs within the pillow itself. To remove the pillow, grab the bottom edge firmly and pull outward. This will allow the pillows to popout from the receptacle in the spa shell. To reinstall the pillow you will align the pillow plug with the receptacle. Press/hit the front side of the pillow firmly, which will insert the plug back into the receptacle. Proper water chemistry must be maintained. Your hot tub pillows are easily and quickly damaged when exposed to unbalanced spa water. If you suspect that your chemicals may be unbalanced, remove your pillows immediately until the water has been restored to suggested conditions. Do not sit on the pillows CABINET CARE Never spray cabinets with a high-pressure garden hose or pressure washer for any reason. This action may induce an electrical short in the hot tub s electrical equipment. CEDAR CABINET Our cedar cabinets are made from top quality Western Cedar and manufactured and stained at our factory. With proper care and maintenance, your cedar cabinet should maintain its beauty for many years. Manufacturer recommends touch-up or re-staining of the cabinet every three to four years depending on your environment. Contact your Dealer for restaining procedures. VINYL CABINET Vinyl cabinets are made of a rigid polymer that combines the durability of plastic with the beauty of real wood. This cabinet is manufactured so that it won t crack, peel, blister or delaminate even after prolonged exposure to the elements. We recommend wiping the cabinet with a soft damp cloth (or sponge) using household soap or liquid detergent and rinsing with fresh water thoroughly. DO NOT use abrasive cleansers or material as this may damage the surface. 10

11 SLATE CABINETS Optional Slate cabinets are custom-built and painted in our factory. We recommend lightly brushing the cabinet with a SOFT bristle brush to remove any dirt or stains. For more information on the care of your Slate cabinet, please contact your Local Dealer. ON/OFF DIVERTER VALVE: The smaller diverter is used to control water flow and to turn on/off the neck jets and/or waterfalls. FILTER AIR RELIEF VALVE: Located on top of dome filter lid. Used to release air from the filter. COVER CARE A well cared for spa cover is a thing of beauty in its own right. Be sure to clean and condition your cover at least once a month more often if needed. Your cover needs to be cleaned and conditioned because vinyl can be dry and become brittle, spoiling your spa s appearance. Dry, brittle vinyl can also tear at the seams and stress points. Quality materials, internal sewn reinforcing and careful workmanship can only go so far against the ravages of Mother Nature. See the specific Warranty card enclosed with your cover for further details. When you shock your spa you need to remove the cover for a minimum of 30 minutes to ensure that the chemical gas off can escape from the spa. You are required to keep the spa covered at all time when not in use to protect the shell from harmful UV rays. A covered spa will use less electricity when maintaining the desired water temperature See the manual that comes with the cover for proper mounting of the cover locks The cover should remain locked at all times to prevent unauthorized entry into the spa and potential drowning. Do not Sit, Stand or Lie on your cover. Nor should you place any heavy object on top of the cover as this may damage the structure. VERY IMPORTANT: We recommend a vinyl conditioner for your spa cover. Your local dealer carries a wide variety of care and maintenance products. Choose a pleasant day each month to remove your cover from the spa and lay it on a flat surface accessible by garden hose. Douse the cover with a healthy amount of water from the hose or a bucket to rinse away loose dirt or debris. Using a soft bristle brush and a mild solution of dishwashing liquid (about one teaspoon of detergent to two gallons of water), and with a gentle circular motion, scrub the cover clean. Be careful not to let any areas of the cover dry before they re thoroughly rinsed. Now apply the vinyl conditioner as directed on the container. Massage the conditioner into the cover in a gentle but firm manner. Before replacing the cover on your spa, wipe and rinse any dirt from the bottom of the cover. When you are ready, put the cover on the spa. SKIMMER BLEEDER VALVE: Located in the skimmer area, needs to be loosened while filling the spa. This will help eliminate air from being trapped in the spa equipment. OZONATOR: Available as an option. The ozonator produces natural ozone through the Corona Discharge process. Continuous use of an ozonator can dramatically reduce sanitizer consumption. CONTROL BOX (Pack): Basically the heart of the spa. Power is distributed to any/all functions of the spa: pumps, ozonator, LED lighting, heater element, etc. CONTROL PANEL: Mounted on the top lip of the spa and controls the functions of the spa. DRAIN VALVE: Used in draining of the spa. Normally located in the equipment area. EQUIPMENT ENCLOSURE: An enclosure that houses the control box, pump(s) and other electrical components. FILTER: The filter cleans the spa by passing water through a filter cartridge where debris and impurities are removed. Top load filter means the filter cartridge is accessible through the top of the spa. Front access skimmer means cartridge is accessed through door of skimmer. FLOOR DRAIN: The floor drain is covered by a grate-type cover and is utilized when draining the spa. It also acts as the return for the ozonator. You will see bubbles emitted from this drain, which is the result of water mixing with the ozone output. GATE VALVES: Red with a grey handle is located at the inlet and outlet of the pumping system. Used while servicing the spa equipment, the valves open or close the water flow to the equipment. To remain open for normal use, turn fully counterclockwise. NOTE: To remove tree sap, use lighter fluid (not charcoal lighter but the fluid used in cigarette lighters). Use sparingly, then immediately apply conditioner to that area. GLOSSARY OF TERMS KNIFE VALVES: A white T -handled valve, same functions as Gate valve (see above), except to open them you pull up on handle. HEATER: The electronically controlled heater raises the temperature of the spa to the desired setting. AIR CONTROL VALVE: Mounted generally on the lip of the spa, it induces warm air from the equipment enclosure into the jet stream through venturi action. WATER DIVERTER VALVE: The large diverter is used to divert water to various seats in the spa. LEDs: LEDs and their special lenses can be used to achieve the desired mood lighting in the spa and spa jets. SKIMMER: This is the rectangular outlet at the water level. The skimmer removes surface debris to the filter. The water level in the spa should be kept ½ to ¾ up on the skimmer for optimum operation. 11

12 SUCTION FITTING: During operation of the equipment, the suction works in conjunction with the skimmer to draw water from the bottom of the spa through the filter, keeping the spa sparkling clean. NECK JET: Direction-controllable jet for soothing neck massage. ADJUSTABLE CLUSTER JET: Our adjustable, high-intensity hydrotherapy jet. DIRECTIONAL JET: Provides a straight flow for a therapeutic massage The Owner should test and reset the GFCI or RCD on a regular basis to verify its function. WARNING! SHOCK HAZARD! NO USER SERVICEABLE PARTS. Do not attempt service of this control system. Contact your dealer or service organization for assistance. Follow all owner s manual power connection instructions. Installation must be performed by a licensed electrician and all grounding connections must be properly installed. Disconnect the electric power before servicing. Keep access door closed. ROTATIONAL JET: Provides a Uni-directional circular therapeutic massage. MASSAGE JET: Delivers massage in staccato bursts over a narrow, focused area. VOLCANO/WHIRLPOOL JET: high-output jet designed for foot and leg massage. LAMINAR FLOW WATER FEATURE: A thin stream of water that arcs from the spa lip. CSA COMPLIANCE Caution: Test the ground fault circuit interrupter before each use of the spa. Read the instruction manual. Adequate drainage must be provided if the equipment is to be installed in a pit. For use only within an enclosure rated CSA Enclosure 3. Connect only to a circuit protected by a Class A ground fault circuit interrupter or residual current device. To ensure continued protection against shock hazard, use only identical replacement parts when servicing. Install a suitably rated suction guard to match the maximum flow rate marked. BASIC INSTALLATION AND CONFIGURATION GUIDE- LINES Warning! Qualified Technician Required for Service and Installation Use minimum 6AWG copper conductors only. Torque field connections between 21 and 23 in lbs. Readily accessible disconnecting means to be provided at time of installation. Permanently connected power supply. Connect only to a circuit protected by a Class A Ground Fault Circuit Interrupter (GFCI) or Residual Current Device (RCD) mounted at least 5 (1.52M) from the inside walls of the spa/hot tub and in line of sight from the equipment compartment. Warning: Water temperature in excess of 38 C may be injurious to your health. Disconnect the electrical power before servicing. CSA ENCLOSURE: TYPE 2 Refer to Wiring Diagram inside the cover of the control enclosure. Refer to Installation and Safety Instructions provided by the spa manufacturer. Warning: People with infectious diseases should not use a spa or hot tub. Warning: To avoid injury, exercise care when entering or exiting the spa or hot tub. Warning: Do not use a spa or hot tub immediately following strenuous exercise. Warning: Prolonged immersion in a spa or hot tub may be injurious to your health. Warning: Maintain water chemistry in accordance with the Manufacturers instructions. Warning: The equipment and controls shall be located no less than 1.5 meters horizontally from the spa or hot tub. WARNING! GFCI OR RCD PROTECTION. 12

13 SPA SYSTEM TROUBLESHOOTING GUIDE SYMPTOM PROBABLE CAUSE RECOMMENDED ACTION Spa does not work Power is turned off Reset GFCI No display on the control panel Power is turned off Defective topside control Reset GFCI Contact your Dealer Letters on the control panel An error has been found Refer to the Reference Card for your control panel to verify the error. Contact your Dealer for service PUMP PROBLEMS SYMPTOM PROBABLE CAUSE RECOMMENDED ACTION Noisy/Loud motor Air trapped in the pump Low water level Worn pump seal Defective pump Open bleed valve in the skimmer Add water to the spa Contact your Dealer Contact your Dealer Pumps power down on their own Set temperature has been reached Filtration cycle has ended Automatic time out Overheat safety protection No problem No problem Pumps are set to run for a predetermined time while the spa is in use (15-20 Mins) The pumps have a thermal overload which will prevent them from running for extended periods of time. Wait until pumps have cooled down (1+ hrs). If problem persists, contact your Dealer. Pump running constantly, will not Filter cycle set to 24 hours Turn off 24 hour filtration turn off Problem with the circuit board Turn power off at GFCI and contact your Dealer Pump will not turn on GFCI tripped Motor has overheated Not plugged in Damaged plug Seized motor Blown fuse Motor vent is blocked Reset the GFCI Let cool for 1+ hour Plug in to the board Contact your Dealer Contact your Dealer Check fuse or contact your Dealer Clear debris from the vent 13

14 HEAT PROBLEMS PROBABLE CAUSE RECOMMENDED ACTION Water will not heat Error message on control panel Refer to the Reference Card for your control panel to Spa is in a different Heat Mode verify the error Set spa to Standard Mode Water level is too low Add water to the spa Poor water flow Clean filter & check valves Closed valves Open all valves Pump 1 is not running Contact your dealer Water is too hot Incorrect reading Verify temperature with thermometer Filter cycle duration is too long Reduce duration of the filter cycle Pump speeds reversed Contact your dealer Water will not maintain heat Cover is off for extended periods of time in cold weather / cold wind. Put cover back onto hot tub and allow for heat to regenerate. Call your dealer if temperature does not Hot tub is wired for 110V and jets are on. increase. Hot tubs wired for 110V only have enough power to heat or operate pumps. Turn off jets to power LIGHTING ISSUES PROBABLE CAUSE RECOMMENDED ACTION Standard light will not come on Bulb has burnt out Replace the light bulb LED lighting not in sync Burnt out bulb/connection Contact your dealer LED lighting won t come on Incorrect settings Contact your dealer PUMPS WILL NOT PRIME PROBABLE CAUSE RECOMMENDED ACTION Pump on but no water flow Air trapped in pump No water in the pump Closed valves Loosen bleed valve in skimmer Check the fill level in the spa Open all valves HYDROTHERAPY JETS PROBABLE CAUSE RECOMMENDED ACTION Little to no water flowing from jets Jets turned off Pump not primed Valves are closed Diverter set to a different seat Dirty filter Open jet by turning the face counter clockwise Reset breaker to allow for the spa to prime the pump. Open bleed valve in the skimmer area Open valves Switch diverter Remove and clean filter cartridge PLUMBING SYSTEM PROBABLE CAUSE RECOMMENDED ACTION Water around base of spa Loose connections Leak from internal fitting Hand tighten all quick disconnects and fittings. Check gaskets and o-rings Contact your dealer 14

15 The only item that can be changed on the left side of the Main Screen is the Set Temperature. Touch either the set temperature line or the water temperature to go to the Set Temperature screen. TOUCHSCREEN SPA CONTROLS THE MAIN SCREEN - SPA STATUS Important information about spa operation can be seen on the Main Screen. Most features, including Set Temperature adjustment, can be accessed from this screen. The actual water temperature and Set Temperature can be seen, and the Set Temperature can be adjusted. Timeof-Day, Ozone and Filter status is available, along with other messages and alerts. The selected Temperature Range is indicated in the upper right corner. The Jets Icon in the center will spin if any pump is running and changes color when the heater is on. A Lock icon is visible if the panel or settings are locked. The Menu choices on the right can be selected and the screen will change to show more detailed controls or programming functions. MESSAGES At the bottom of the screen, messages may appear at various times. Some of these messages must be dismissed by the user. THE SET TEMPERATURE SCREEN SET TEMPERATURE Press Inc or Dec to modify the Set Temperature. The Set Temperature changes immediately. Press Back to return to the Main Screen. If you need to switch between high range and low range you need to go to the Settings Screen. PRESS-AND-HOLD If the Up or Down button is pressed and held, the temperature will continue to change until the button is released, or the Temperature Range limits are reached. THE SPA SCREEN NAVIGATION Navigating the entire menu structure is done by touching the screen. When a text item is shown in white on the main screen, it is selectable. The menu selections on the right side of the screen can be selected. Select one of these to enter a different screen with additional controls. Most menu screens time out and revert to the main screen after 30 seconds of no activity. ALL EQUIPMENT ACCESS The Spa Screen shows all available equipment to control, as well as other features, like Invert. The display shows icons that are related to the equipment installed on a particular spa model, so this screen may change depending on the installation. The icon buttons are used to select and control individual devices. Some devices, like pumps, may have more than one ON state, so the icon will change to reflect the state that 15

16 the equipment is in. Below are some examples of 2-speed Pump indicators. If the Spa has a Circ Pump, a Circ Pump Icon will appear to indicate its activity, but outside of Priming Mode, the Circ Pump cannot be controlled directly. NOTE: The icon for the pump that is associated with the heater (Circ or P1 Low) will have a red glow in the center when the heater is running. PAGE UP/DOWN If an Up or Down button is shown and pressed when in a Menu List, the list can be scrolled a page at a time. The scroll bar on the right side of the screen indicates the relative position of the page. COMMON BUTTONS EXITING SCREENS When you see both of these buttons, whether they are labeled or not, they always mean Save and Cancel. They appear on most editing screens once you have changed the value on that screen. VALUES INCREMENT/DECREMENT If an Up or Down button is shown and pressed when on an editing page, and a value has been selected (highlighted), the value can be incremented by pressing the up arrow or decremented by pressing the down arrow. If the screen times out due to no activity it will act like Cancel. When you see only this button, whether it is labeled or not, it means Back or Exit. It appears on editing screens before you have changed any value, as well as on all other screens. 16

17 THE SETTINGS SCREEN PROGRAMMING, ETC. The Settings Screen is where all programming and other spa behaviors are controlled. This screen has several features that can be acted on directly. These features may include Temp Range, Heat Mode, Hold, and Invert Panel. When one of these items is selected, it will toggle between two settings. All other menu items (with an arrow pointing to the right) go to another level in the menu. CIRCULATION MODE If the spa is configured for 24HR circulation, the heater pump generally runs continuously. Since the heater pump is always running, the spa will maintain set temperature and heat as needed in Ready Mode, without polling. In Rest Mode, the spa will only heat to set temperature during programmed filter times, even though the water is being filtered constantly when in 24HR circulation mode. DUAL TEMPERATURE RANGES (HIGH VS. LOW) This system incorporates two temperature range settings with independent set temperatures. The specific range can be selected on the Settings screen and is visible on the Main Screen in the upper right corner of the display. These ranges can be used for various reasons, with a common use being a ready to use setting vs. a vacation setting. Each range maintains its own set temperature as programmed by the user. This way, when a range is chosen, the spa will heat to the set temperature associated with that range. High Range can be set between 80 F and 104 F. Low Range can be set between 50 F and 99 F. More specific Temp Ranges may be determined by the Manufacturer. Freeze Protection is active in either range. READY-IN-REST MODE Ready in Rest Mode appears in the display if the spa is in Rest Mode and the Jets 1 Button is pressed. When the heater pump has come on automatically (for example for heating) you can switch between low speed and high speed but you cannot turn the heater pump off. After 1 hour, the System will revert to Rest Mode. This mode can also be reset by entering the Settings Menu and selecting the Heat Mode line. FILL IT UP! PREPARATION AND FILLING Fill the spa to its correct operating level. Be sure to open all valves and jets in the plumbing system before filling to allow as much air as possible to escape from the plumbing and the control system during the filling process. After turning the power on at the main power panel, the top-side panel will display a splash screen or startup screen. HEAT MODE READY VS. REST In order for the spa to heat, a pump needs to circulate water through the heater. The pump that performs this function is known as the heater pump. The heater pump can be either a 2-speed pump (Pump 1) or a circulation pump. If the heater pump is a 2-Speed Pump 1, Ready Mode will circulate water every 1/2 hour, using Pump 1 Low, in order to maintain a constant water temperature, heat as needed, and refresh the temperature display. This is known as polling. Rest Mode will only allow heating during programmed filter cycles. Since polling does not occur, the temperature display may not show a current temperature until the heater pump has been running for a minute or two. When the heater pump has come on automatically (for example for heating) you can switch between low speed and high speed but you cannot turn the heater pump off. PRIMING MODE M019* After the initial start-up sequence, the control will enter Priming Mode and display a Priming Mode screen. Only pump icons appear on the priming mode screen. During the priming mode, the heater is disabled to allow the priming process to be completed without the possibility of energizing the heater under low-flow or no-flow conditions. Nothing comes on automatically, but the pump(s) can be energized by selecting the Jet buttons. If the spa has a Circ Pump, it can be turned on and off by pressing the Circ Pump button during Priming Mode. 17

18 NON-CIRC SYSTEMS The low-speed of pump 1 runs when the blower or any other pump is on. If the spa is in Ready Mode, Pump 1 low may also activate for at least 1 minute every 30 minutes to detect the spa temperature (polling) and then to heat to the set temperature if needed. When the low-speed turns on automatically, it cannot be deactivated from the panel, however the high speed may be started. CIRCULATION PUMP MODES If the system is equipped with a circ pump, it will be configured to work in one of three different ways: PRIMING THE PUMPS As soon as the Priming Mode screen appears on the panel, select the Jets 1 button once to start Pump 1 in low-speed and then again to switch to high-speed. Also, select the other pumps, to turn them on. The pumps should be running in high-speed to facilitate priming. If the pumps have not primed after 2 minutes, and water is not flowing from the jets in the spa, do not allow the pumps to continue to run. Turn off the pumps and repeat the process. Note: Turning the power off and back on again will initiate a new pump priming session. Sometimes momentarily turning the pump off and on will help it to prime. Do not do this more than 5 times. If the pump(s) will not prime, shut off the power to the spa and call for service. Important: A pump should not be allowed to run without priming for more than 2 minutes. Under NO circumstances should a pump be allowed to run without priming beyond the end of the 4-5 minute priming mode. Doing so may cause damage to the pump and cause the system to energize the heater and go into an overheat condition. EXITING PRIMING MODE The system will automatically enter the normal heating and filtering at the end of the priming mode, which lasts 4-5 minutes. You can manually exit Priming Mode by pressing the Exit button on the Priming Mode Screen. Note that if you do not manually exit the priming mode as described above, the priming mode will be automatically terminated after 4-5 minutes. Be sure that the pump(s) have been primed by this time. Once the system has exited Priming Mode, the top-side panel will display the Main Screen, but the display will not show the temperature yet, as shown below. This is because the system requires approximately 1 minute of water flowing through the heater to determine the water temperature and display it. 1. The circ pump operates continuously (24 hours) with the exception of turning off for 30 minutes at a time when the water temperature reaches 3 F (1.5 C) above the set temperature (most likely to happen in very hot climates). 2. The circ pump stays on continuously, regardless of water temperature. 3. A programmable circ pump will come on when the system is checking temperature (polling), during filter cycles, during freeze conditions, or when another pump is on. The specific Circulation Mode that is used has been determined by the Manufacturer and cannot be changed in the field. Other device options may be available, like Blower, Light, Mister, etc. FILTRATION AND OZONE On non-circ systems, Pump 1 low and the ozone generator will run during filtration. On circ systems, the ozone will generally run with the circ pump, but can be limited to filtration cycles. The system is factoryprogrammed with one filter cycle that will run in the evening (assuming the time-of-day is properly set) when energy rates are often lower. The filter time and duration are programmable. A second filter cycle can be enabled as needed. At the start of each filter cycle, the water devices like blower, mister device (if these exist) and other pumps will run briefly to purge the plumbing to maintain good water quality. FREEZE PROTECTION If the temperature sensors within the heater detect a low enough temperature, then the water devices automatically activate to provide freeze protection. The water devices will run either continuously or periodically depending on conditions. In colder climates, an optional freeze sensor may be added to protect against freeze conditions that may not be sensed by the standard sensors. Auxiliary freeze sensor protection acts similarly except with the temperature thresholds determined by the switch. See your dealer for details. SPA BEHAVIOR PUMPS On the Spa Screen, select a Jets button once to turn the pump on or off, and to shift between low- and high-speeds if equipped. If left running, the pump will turn off after a time-out period. CLEAN-UP CYCLE (OPTIONAL) When a pump or blower is turned on by a button press, a clean-up cycle begins 30 minutes after the pump or blower is turned off or times out. The pump and the ozone generator will run for 30 minutes or more, depending on the system. On some systems, you can change this setting. 18

19 TIME-OF-DAY BE SURE TO SET THE TIME-OF-DAY Setting the time-of-day is important for determining filtration times and other background features. Set Time will appear on the display if no time-of-day is set in the memory. On the Settings Screen, select the Time-of-Day line. On the Time-of-Day screen, simply select the Hour, Minutes, and 12/24 Hour segments. Use the Up and Down Buttons to make changes. CIRCULATION PUMP MODES Some spas may be manufactured with Circ Pump settings that allow programming filtration cycle duration. Some circ Modes are preprogrammed to operate 24 hours a day and are not programmable. Refer to the spa manufacturer s documentation for any Circ Mode details. PURGE CYCLES In order to maintain sanitary conditions, as well as protect against freezing, secondary water devices will purge water from their respective plumbing by running briefly at the beginning of each filter cycle. If the Filter Cycle 1 duration is set for 24 hours, enabling Filter Cycle 2 will initiate a purge when Filter Cycle 2 is programmed to begin. THE MEANING OF FILTER CYCLES 1. The heating pump always runs during the filter cycle* 2. In Rest Mode, heating only occurs during the filter cycle 3. Purges happen at the start of each filter cycle For example, if your spa is set up for 24/hour circulation except for shutting off when the water temperature is 3 F/1.3 C above the set temperature, that shutoff does not occur during filter cycles. ADDITIONAL SETTINGS NOTE: This only applies to some systems: If power is interrupted to the system, Time-of-Day will be maintained for several days. ADJUSTING FILTRATION LIGHT CYCLE OPTION If Light Cycle does not appear in the Settings Menu, the Light Timer feature is not enabled by the manufacturer. When available, the Light Timer is OFF by default. The settings can be edited the same way that Filter Cycles are edited. MAIN FILTRATION Using the same adjustment as Setting the Time, Filter Cycles are set using a start time and a duration. Each setting can be adjusted in 15- minute increments. The panel calculates the end time and displays it automatically. FILTER CYCLE 2 - OPTIONAL FILTRATION Filter Cycle 2 is OFF by default. This displays as No. When Filter Cycle 2 is ON it displays as Yes. Press Yes or No to toggle Filter Cycle 2 ON or OFF. When Filter Cycle 2 is ON, it can be adjusted in the same manner as Filter Cycle 1. It is possible to overlap Filter Cycle 1 and Filter Cycle 2, which will shorten overall filtration by the overlap amount. INVERT PANEL Selecting Invert Panel will flip the display and the buttons so the panel can be easily operated from inside or outside the hot tub. 19

20 AUXILIARY PANEL(S) SPECIFIC BUTTONS FOR SPECIFIC DEVICES If the spa has an Auxiliary Panel(s) installed, pressing buttons on that panel will activate the device indicated for that button. These dedicated buttons will operate just like the Spa Screen buttons and the equipment will behave in the same manner with each button press. SCENES WHAT ARE SCENES? Scenes are stored combinations of equipment states. For example if you want to have Pump 1 at high speed and Pump 2 at low speed and the Light ON, you could store that in a Scene and recall this combination at any time. RESTRICTING OPERATION The control can be restricted to prevent unwanted use or temperature adjustments. Locking the Panel prevents the controller from being used, but all automatic functions are still active. Locking the Settings allows Jets and other features to be used, but the Set Temperature and other programmed settings cannot be adjusted. Settings Lock allows access to a reduced selection of menu items. These include Filter Cycles, Invert, Information and Fault Log. They can be seen, but not changed or edit STORING A SCENE Press a Scene number and hold until Scene stored appears at the bottom of the screen to save the current equipment combination. RECALLING A SCENE To recall a Scene simply press a Scene number. Pressing any Scene line which has not yet been stored will simply turn off all spa devices. UNLOCKING To unlock either Settings or Panel first select Settings (if it says On ) or Panel (if it says On ), than press in the middle of the screen for at least 5 seconds. ADDITIONAL SETTINGS HOLD MODE - M037* Hold Mode is used to disable the pumps during service functions like cleaning or replacing the filter. Hold Mode will last for 1 hour unless the mode is exited manually. If spa service will require more than an hour, it may be best to simply shut down power to the spa. DRAIN MODE Some spas have a special feature that allows Pump 1 to be employed when draining the water. When available, this feature is a component of Hold Mode. 20

CTV-1500 Cooling Tower Vacuum Operating & Maintenance Manual
 CTV-1500 Cooling Tower Vacuum Operating & Maintenance Manual Goodway Technologies Corporation 420 West Avenue Stamford, CT 06902-6384 (203)359-4708 Sales: 1-800-333-7467 Customer Service: 1-800-370-2855
MAINTAINING YOUR SPA WATER
 MAINTAINING YOUR SPA WATER Tap water that is safe to drink is not always safe for a spa. Normal tap water is usually filled with minerals and microcontaminants that are not visible to the naked eye. Properly
102 F. spatouch Menued Control Panels. High Range. Spa Scenes Settings. Set: 104 F 8:32 PM Ozone Filter 1 Ready in Rest Mode.
 spatouch Menued Control Panels Balboa Water Group BP Series Systems User Interface and Programming Reference The spatouch menued panel is compatible with all BP systems that already support the TP800 and/or
Clearwater Spas SPA MANUAL. Resort Series Beachcraft Series XS Series. relax refresh renew. P.O. Box 2140 Woodinville, WA 98072 www.clearwaterspas.
 Clearwater Spas SPA MANUAL Resort Series Beachcraft Series XS Series relax refresh renew P.O. Box 2140 Woodinville, WA 98072 www.clearwaterspas.com spa manual Clearwater Spas, US/Canada, 1.1.14 relax refresh
Instruction Manual. Image of SP-3015 & SP-3815. Important Safeguards. Automatic Dispensing Hot Water Pot with Reboil Function
 Important Safeguards READ ALL INSTRUCTIONS BEFORE USE. Instruction Manual Automatic Dispensing Hot Water Pot with Reboil Function Image of SP-3015 & SP-3815 SP-3015: 3.0L SP-3815: 3.8L SP-3017: 3.0L (Stainless
Never use a spa or hot tub alone. Do not allow children to use a spa without supervision.
 ASK THE EXPERT: SPA MAINTENANCE GUIDE By: All Seasons Spas & Fireplaces http://www.all4seasons.com Introduction Soaking in a hot tub or spa can be uniquely soothing and relaxing, but the hot water environment
Dehumidifier Users manual. For Models: DH45S DH65S
 Dehumidifier Users manual For Models: DH45S DH65S 950-0062-revD Jan. 9 2007 FORWARD The appearance of the units that you purchase might be slightly different from the ones described in the Manual, but
CARING FOR YOUR WATER HEATER
 http://waterheatertimer.org/troubleshoot-rheem-tankless-water-heater.html Water Heater Inspections CARING FOR YOUR WATER HEATER Venting System (Direct Vent Only) The venting system should be inspected
Heat Pump. Quick Start Guide Models: 035, 055, 075, 090, 115, 110, 120, 121, 135, 155, 156, & 175
 Heat Pump Quick Start Guide Models: 035, 055, 075, 090, 115, 110, 120, 121, 135, 155, 156, & 175 For product manuals and further installation / operation procedures visit www.aquacal.com Important Read
Owners Guide. Built by May Manufacturing Inc. Victorville, California
 Owners Guide Built by May Manufacturing Inc. Victorville, California TABLE OF CONTENTS CONGRATULATIONS 3 SAFETY WARNINGS 4 SPA CONFIGURATION and WATER CAPACITIES 7 ELECTRICAL REQUIREMENTS and INSTALLATION
the most popular line of spas in the world
 the most popular line of spas in the world www.catalinaspas.com Congratulations On your purchase of a Catalina Spa. Your new spa will give you years of enjoyment. With its state-of-theart construction
USER INSTRUCTIONS FOR 10 LITRE PORTABLE DEHUMIDIFIER MODEL NO. DHMD102
 USER INSTRUCTIONS FOR 10 LITRE PORTABLE DEHUMIDIFIER MODEL NO. DHMD102 THANK YOU FOR CHOOSING YOUR NEW DEHUMIDIFIER. BEFORE USING THE UNIT READ THESE INSTRUCTIONS FULLY AND RETAIN THEM FOR FUTURE REFERENCE
Portable Evaporative Air Cooler. OWNER S MANUAL Read and save these instructions before use. Model: CL30XC
 Portable Evaporative Air Cooler OWNER S MANUAL Read and save these instructions before use Model: CL30XC Power rating: 250 Watts Voltage rating: 230 Volt, 50Hz Made in P.R.C. QUICK START GUIDE Fill with
IMPORTANT SAFETY INSTRUCTIONS
 S E R I E S Bodywrap Whirlpool System Bodywrap whirlpool systems are offered on numerous MAAX Aker models of various sizes, shapes and surface materials. Depending on the model selected, the unit is equipped
Electric Kettle. Model: SK-1717 INSTRUCTIONS MANUAL
 Electric Kettle Model: SK-1717 INSTRUCTIONS MANUAL Thank you for your purchase. Please read this Instruction Manual thoroughly before use and keep in a safe place for future reference. READ ALL INSTRUCTIONS
OWNER S MANUAL FOR THE PATIO SAUNA
 OWNER S MANUAL FOR THE PATIO SAUNA CONGRATULATIONS! You are about to install the world s leading portable sauna. No other sauna manufacturer can offer you the features and owner support that Saunatec,
Baths of Distinction Inc. 5843 Carrier St St. Petersburg Florida USA 33714 1.866.938.3880. Manufacturers of Classically Styled Vintage Bathtubs
 Baths of Distinction Inc. 5843 Carrier St St. Petersburg Florida USA 33714 1.866.938.3880 Manufacturers of Classically Styled Vintage Bathtubs INSTRUCTION & INSTALLATION MANUAL - AIRLINE HEATED AIR BUBBLE
Ducoterra Radiant Heating Panel Installation Manual
 Ducoterra Radiant Heating Panel Installation Manual 1. Introduction Your new radiant heating panels are designed to heat living and working spaces rapidly and efficiently by radiant heating. Like the sun,
Air Conditioner Water Heater - A Product of HotSpot Energy LLC
 Air Conditioner Water Heater - A Product of HotSpot Energy LLC PLEASE READ THIS BEFORE YOU INSTALL THE UNIT 1. This air conditioner must be installed and/or repaired by a qualified technician. If you perform
VS CONTROL PACK INSTALLATION INSTRUCTIONS
 VS CONTROL PACK INSTALLATION INSTRUCTIONS Hot Tub Works www.hottubworks.com 1-800-770-0292 CustomerCare@HotTubWorks.com Congratulations! You have purchased and are about to install in your spa, the most
USER MANUAL. Bottom Loading Bottled Water Dispenser SAVE THIS MANUAL FOR FUTURE USE. Model # 900172
 Model # 900172: Page 1 USER MANUAL Bottom Loading Bottled Water Dispenser Model # 900172 TO REDUCE THE RISK OF INJURY AND PROPERTY DAMAGE, USER MUST READ THIS MANUAL BEFORE ASSEMBLING, INSTALLING & OPERATING
Maintenance Guide For Above Ground Pools
 Maintenance Guide For Above Ground Pools Includes: General Operations/Overview......... page 2 The Five Keys to Pool Care............ page 2 Pump Operations............... page 3 Filter Operations...............
BUILT-IN DISHWASHER INSTALLATION INSTRUCTIONS
 BUILT-IN DISHWASHER INSTALLATION INSTRUCTIONS PLEASE READ COMPLETE INSTRUCTIONS BEFORE YOU BEGIN LEAVE INSTALLATION INSTRUCTIONS AND USER'S GUIDE WITH OWNER ALL ELECTRIC WIRING AND PLUMBING MUST BE DONE
FOR THE FOLLOWING MODELS: EE-8075W EE-8075O EE-8075R EE-8075BK
 FIREPLACE HEATER FOR THE FOLLOWING MODELS: EE-8075W EE-8075O EE-8075R EE-8075BK If you have any questions about the operation of your fireplace heater, please contact Crane Customer Care. Toll Free: 888-599-0992
ETL listed for installations within 5 ft. (1.5M) of outer edge of water www.srsmith.com 79-15152-00 Rev E2 9.14 Page 1 of 10
 of outer edge of water www.srsmith.com 79-15152-00 Rev E2 9.14 Page 1 of 10") Color Light Streams Large Laminar Installation Manual (CLSLL) Input Power: Total Power: 12V AC 5W 4008814 ETL listed for installations within 5 ft. (1.5M) of outer edge of water 79-15152-00 Rev E2 9.14
Color Light Streams Large Laminar Installation Manual (CLSLL) Input Power: Total Power: 12V AC 5W 4008814 ETL listed for installations within 5 ft. (1.5M) of outer edge of water 79-15152-00 Rev E2 9.14
IMPORTANT SAFETY INSTRUCTIONS WARNING READ AND SAVE THESE OPERATING AND SAFETY INSTRUCTIONS BEFORE USING THIS HEATER.
 THERMAWAVE CERAMIC HEATER Model HZ-850 Series Model HZ-860 Series IMPORTANT SAFETY INSTRUCTIONS WARNING READ AND SAVE THESE OPERATING AND SAFETY INSTRUCTIONS BEFORE USING THIS HEATER. Warning Failure to
OPL BASIC. Dosing System for Professional Laundry machines. Contents
 OPL BASIC Dosing System for Professional Laundry machines Contents 1 Getting Started. Page 2 2 Installation. Page 4 3 Set Up & Operation. Page 8 4 Maintenance & Accessories. Page 10 5 Troubleshooting Page
INSTALLATION & OPERATING INSTRUCTIONS
 INSTALLATION & OPERATING INSTRUCTIONS WARNING RISK OF ELECTRIC SHOCK. CONNECT ONLY TO A CIRCUIT PROTECTED BY A GROUND-FAULT CIRCUIT-INTERRUPTER. THE UNIT SHOULD BE INSTALLED BY A QUALIFIED SERVICE REPRESENTATIVE.
HYLA NST Cleaning System
 Owner s Manual HYLA NST Cleaning System The HYLA NST Cleaning System aspirates and cleans the air through a waterbased filtration process. The system is intended for household use only. Applications: Usual
Troubleshooting Salt Generators
 Troubleshooting Salt Generators NOTE Turn off power to unit prior to attempting service or repair. Problems and Corrective Action Problem Possible Cause Corrective Action Low or no chlorine. Low stabilizer
EXPRESS STILL WARNING It is legal in New Zealand to own and operate a still for the purpose of producing alcohol for your own consumption.
 THE EXPRESS STILL This still represents the next generation in home distillation equipment. It eliminates the problem of having to spend all day processing a 25 litre wash. Taking 1 hour to heat up, then
Portable Air Conditioner. OWNER S MANUAL Read these instructions before use. Model: MM14CCS. Voltage rating: 115V~60Hz Power rating : 1400W
 Portable Air Conditioner OWNER S MANUAL Read these instructions before use Model: MM14CCS Customer Support : 1-800-474-2147 Voltage rating: 115V~60Hz Power rating : 1400W For product inquiries or support
Hot Tub Start-up Guide
 HOT TUB GUIDE Hot Tub Start-up Guide Connect to the electricity supply. Get a qualified electrician to do this, as you need a Part P certificate for your warranty and potentially for your home insurance.
Instruction manual for Firstline FCS12000CH
 Instruction manual for Firstline FCS12000CH Contents Introduction... 2 Safety Awareness... 3 Safety Awareness... 4 Name of Parts... 5 Name of Parts... 6 Remote Controller Preparation... 7 Operation of
Operating Instructions Split System Air Conditioner
 Operating Instructions Split System Air Conditioner Model No. Indoor Unit Type Indoor Unit Type Nominal Capacity 26 36 F2 Low Silhouette Ducted S-26PF2U6 S-36PF2U6 Connectable outdoor unit lineup This
Portable Air Conditioner. OWNER S MANUAL Read these instructions before use. Model: MN12CES / MN10CESWW
 Portable Air Conditioner OWNER S MANUAL Read these instructions before use 8 Model: MN12CES / MN10CESWW Voltage rating: 120V~60Hz Power rating : 1100W (MN12CES) Power rating : 900W (MN10CESWW) Customer
POOL SUNSHINE IONIZER MODELS SPD, SPD2 AND SPS INSTALLATION INSTRUCTIONS
 Sunshine Pool Products, LLC Manufacturer of Quality Pool & Spa Products 902 W 2010 S, Syracuse, Utah 84075 USA Voice: 801-825-4523 Website: www.sunshinepool.com Email: info@sunshinepool.com POOL SUNSHINE
Installation Manual. Solar Pool Heating System. Read the complete manual before beginning the installation
 Solar Pool Heating System Installation Manual Read the complete manual before beginning the installation 1. Sizing the System Visit www.techno-solis.com to size the system using the sizing calculator.
AMFA-27 AMFA-29. Operator s Manual & Installation Instructions. Rev. 2.5
 AMFA-27 AMFA-29 Operator s Manual & Installation Instructions Rev. 2.5 Date: 17 July, 2010 Permanently-connected, utility Interactive, single-phase, inverters Model AMFA-27 WIND TURBINE INVERTER (240 VAC
IMPORTANT SAFETY INSTRUCTIONS READ AND FOLLOW ALL INSTRUCTIONS SAVE THESE INSTRUCTIONS
 Spa Owner s Manual www.dreammakerspas.com This Manual Contains IMPORTANT SAFETY INSTRUCTIONS READ AND FOLLOW ALL INSTRUCTIONS SAVE THESE INSTRUCTIONS NOTE TABLE OF CONTENTS REFER TO ID PLATE ON FRONT OF
Portable Evaporative Air Cooler for Outdoor, Indoor & Commercial Use. OWNER S MANUAL Read and save these instructions before use.
 OFF COOL 0 3 2 1 OFF Portable Evaporative Air Cooler for Outdoor, Indoor & Commercial Use ON SPEED ON SWING OWNER S MANUAL Read and save these instructions before use Model: CO60PM Power rating: 220 Watts
IMPORTANT SAFETY RULES TO FOLLOW
 WARNING FLOOR & CARPET CLEANER Any piece of equipment can be dangerous if not operated properly. YOU are responsible for the safe operation of this equipment. The operator must carefully read and follow
the Soft Top Breville Customer Service Center www.breville.com Instruction Book - Livret d instructions
 Breville Customer Service Center the Soft Top Instruction Book - Livret d instructions US Customers Mail: Breville USA 19400 S. Western Ave Torrance CA CA 90501-1119 Phone: Customer Service 1 (866) BREVILLE
Water Priming Mode Purge air from plumbing system. How do I solve ER-3 WATER PRIME: TIPS ON FILLING SPA IMPORTANT NOTE WARNING
 Water Priming Mode Purge air from plumbing system TIPS ON FILLING SPA Before filling remove spa skirt and be sure that all valves in the plumbing system are fully open to maximise the amount of air that
ClearView 100. Instruction Manual
 ClearView 100 Instruction Manual Important Safeguards This appliance is not intended for use by children or infirm persons without supervision. Young children should be supervised to ensure that they do
POOL ROVER SERIES 2 ROBOTIC POOL CLEANER PRODUCT SETTINGS AND TROUBLESHOOTING GUIDE
 820406 POOL ROVER SERIES 2 ROBOTIC POOL CLEANER PRODUCT SETTINGS AND TROUBLESHOOTING GUIDE PLEASE READ CAREFULLY BEFORE USING YOUR POOL CLEANER Aqua Products, Inc 282 Grove Avenue Cedar Grove, NJ 07009
Keeping Your Swimming Pool and Spa Healthy Environmental Health Guide
 Keeping Your Swimming Pool and Spa Healthy Environmental Health Guide A swimming pool or spa can be an asset to your home, and provide the opportunity to take part in healthy relaxing activities. However,
floater imports DF169 ECO AIR COOLER EVAPORATIVE AIR COOLER WITH IONIZER USER S MANUAL
 floater imports DF169 ECO AIR COOLER EVAPORATIVE AIR COOLER WITH IONIZER USER S MANUAL WHAT IS AN ECO AIR COOLER? The ECO AIR COOLER uses evaporative cooling to provide an airflow that is cooler than the
To the Catalina Spa Experience.
 CATALINA SPAS TM OWNERS MANUAL 1 Welcome To the Catalina Spa Experience. During the past 30 years satisfied customers have been responsible for Catalina Spas phenomenal growth and success in the spa industry.
NewAir AC-10000E, AC-10000H Portable Air Conditioner Owner s Manual PLEASE READ AND SAVE THESE INSTRUCTIONS
 NewAir AC-10000E, AC-10000H Portable Air Conditioner Owner s Manual PLEASE READ AND SAVE THESE INSTRUCTIONS BEFORE USE GENERAL SAFETY INSTRUCTIONS: ALWAYS OPERATE THE UNIT IN AN UPRIGHT POSITION AND PLACE
Oil and Coolant Circulating Heating System. Model - OCSM
 Oil and Coolant Circulating Heating System Model - OCSM Installation & Operation Manual 216280-000 REV 2 Identifying Your System The HOTSTART heating system is designed to heat fluids for use in marine
Line to Refrigerator Ice/Water Dispenser
 Standard 18 Line to Refrigerator Ice/Water Dispenser Pump Module Bottled Water How The System Works The FLOJET Bottled Water Dispensing System was designed to pump water from a commercially available 5-gallon
Portable Air Conditioner. OWNER S MANUAL Read these instructions before use. Model: MF08CESWW. Voltage rating: 115V~60Hz Power rating : 800W
 MODE ALARM Portable Air Conditioner OWNER S MANUAL Read these instructions before use 8 Model: MF08CESWW Voltage rating: 115V~60Hz Power rating : 800W Customer Support : 1-800-474-2147 For product inquiries
MAP COFFEE MIA CAPSULE COFFEE MACHINE INSTRUCTION MANUAL MODEL: CM4725. Read this manual thoroughly before using and save it for future reference
 MAP COFFEE MIA CAPSULE COFFEE MACHINE INSTRUCTION MANUAL MODEL: CM4725 Read this manual thoroughly before using and save it for future reference Purchase MAP capsules at Harvey Norman stores nationwide
INSTRUCTION MANUAL REFRIGERATOR BEFORE USE, PLEASE READ AND FOLLOW ALL SAFETY RULES AND OPERATING INSTRUCTIONS.
 INSTRUCTION MANUAL Model Number: BC-130 REFRIGERATOR BEFORE USE, PLEASE READ AND FOLLOW ALL SAFETY RULES AND OPERATING INSTRUCTIONS. 1 REFRIGERATOR SAFETY Your safety and the safety of others are very
Safety, Operation and Maintenance Manual with Parts List
 Safety, Operation and Maintenance Manual with Parts List 20-Gallon Wet/Dry Vac Important Information and Safety Instructions PLEASE READ BEFORE USE! # 961130020 9/10-Rev 1 20-Gallon Wet/Dray Vac TABLE
3 WATT LED SPOTLIGHT Model No. SLM - 3801
 3 WATT LED SPOTLIGHT Model No. SLM - 3801 OWNER'S MANUAL Customer Service Tel: 1-800-268-3319 Superex Canada Ltd, Toronto,M2H 3B8 Made in China Table of Contents A). Important Safety Instructions B). Charging
Beachcomber Hot Tubs Owner s Manual
 Beachcomber Hot Tubs Owner s Manual Table of Contents Safety Instructions............................................. 1 Beachcomber Safety Features................................. 2 Starting up a Beachcomber
Ceiling Mount Air Handler Manual
 www.surna.com 303.993.5271 Ceiling Mount Air Handler Manual Models: CMAH12, CMAH18, CMAH24, CMAH30, CMAH36, CMAH48, CMAH60 Revised: September 2014 Table of Contents Warranty Information 4 Limited Warranty
IMPORTANT INSTRUCTIONS & OPERATING MANUAL. Houston 50 Inch Electric Wall Mounted Fireplace Black / White
 IMPORTANT INSTRUCTIONS & OPERATING MANUAL Houston 50 Inch Electric Wall Mounted Fireplace Black / White Model Number:MFE5050BK Model Number:MFE5050WH Read these instructions carefully before attempting
EVAPORATIVE AIR COOLER INSTRUCTION MANUAL
 EVAPORATIVE AIR COOLER INSTRUCTION MANUAL Model: SF-614P Please read this manual thoroughly before using this product. Keep in a safe place for future reference. CONTENTS A. PRODUCT INTRODUCTION 2 B. TECHNICAL
OASIS-PLUS 120V READ ALL INSTRUCTIONS BEFORE OPERATING READ ALL INSTRUCTIONS BEFORE OPERATING OZONE IS A POWERFUL OXIDIZER AND MUST BE USED WITH CARE
 OASIS-PLUS 120V INFORMATION & OPERATING INSTRUCTIONS READ ALL INSTRUCTIONS BEFORE OPERATING READ ALL INSTRUCTIONS BEFORE OPERATING OZONE IS A POWERFUL OXIDIZER AND MUST BE USED WITH CARE 56041852 WARNING:
Name of Equipment Silver King Model SKMCD1P/C1. This equipment chapter is to be inserted in the appropriate section of the Equipment Manual.
 Name of Equipment Silver King Model SKMCD1P/C1 This equipment chapter is to be inserted in the appropriate section of the Equipment Manual. Manufactured exclusively for McDonald s By Silver King Refrigeration,
INTRODUCTION WARNING S!!! VOC SHOULD BE BETWEEN 78 95. MUST NOT EXCEED 96 VOC USE DC CIRCUIT BREAKER/ISOLATOR BETWEEN SOLAR PANELS & CONTROLLER
 INTRODUCTION Thank you for purchasing a WATERBOY pumping system. We set the standard for quality and economy in solar pumping. The WATERBOY range incorporates the best solar pump technologies that were
OWNER S MANUAL FORCE 10 MARINE COMPANY 23080 HAMILTON ROAD RICHMOND, BC CANADA V6V 1C9 TEL: (604) 522-0233 FAX: (604) 522-9608
 522-0233 FAX: (604) 522-9608") Electric Water Heater OWNER S MANUAL FORCE 10 MARINE COMPANY 23080 HAMILTON ROAD RICHMOND, BC CANADA V6V 1C9 TEL: (604) 522-0233 FAX: (604) 522-9608 If your water Heater is Damaged or you have questions
Electric Water Heater OWNER S MANUAL FORCE 10 MARINE COMPANY 23080 HAMILTON ROAD RICHMOND, BC CANADA V6V 1C9 TEL: (604) 522-0233 FAX: (604) 522-9608 If your water Heater is Damaged or you have questions
NewAir AC-10100E / AC-10100H Portable Air Conditioner Owner s Manual PLEASE READ AND SAVE THESE INSTRUCTIONS
 NewAir AC-10100E / AC-10100H Portable Air Conditioner Owner s Manual PLEASE READ AND SAVE THESE INSTRUCTIONS ELECTRICAL SAFETY This appliance is for indoor use only. Always turn off the unit and unplug
15GAL STEEL OIL DRAIN WITH 110V PUMP
 15GAL STEEL OIL DRAIN WITH 110V PUMP OWNER S MANUAL WARNING: Read carefully and understand all ASSEMBLY AND OPERATION INSTRUCTIONS before operating. Failure to follow the safety rules and other basic safety
Portable Air Conditioner
 Portable Air Conditioner Owner's Manual Model:3 in 1 12,000 Btu/h Series 3 Please read this owner s manual carefully before operation and retain it for future reference. CONTENTS 1. SUMMARY...1 2. PORTABLE
FASCINATION 700 HVLP TANNING PRO SYSTEM USER MANUAL
 FASCINATION 700 HVLP TANNING PRO SYSTEM USER MANUAL Congratulations on choosing the Fascination 700 HVLP Tanning Pro System! Your system includes the following items: 1 Fascination 700 HVLP Tanning Pro
Utility Distribution Systems
 Utility Distribution Systems 6/2012 A0011037 1 WARRANTY This equipment is warranted to be free from defects in materials and workmanship, under normal use and service, for a period of 12 months from date
Call us toll free at: 1-800-GEVALIA (1-800-438-2542)
") LIMITED WARRANTY: This appliance shall be free from defects in materials and workmanship under normal home use for a period of one year from the date of receipt. During that period, defects will be repaired
LIMITED WARRANTY: This appliance shall be free from defects in materials and workmanship under normal home use for a period of one year from the date of receipt. During that period, defects will be repaired
LED MOTION ACTIVATED FLOOD LIGHT
 Utilitech & UT Design are registered trademarks of LF, LLC. All Rights Reserved. ITEM #0611551, #0611550 LED MOTION ACTIVATED FLOOD LIGHT MODEL #SE1036-BP2-02LF0-U, SE1036-WH3-02LF0-U Français p. 10 Español
Water Tec of Tucson Water Systems
 Water Tec of Tucson Water Systems Water Filter Owner s Manual Water Tec of Tucson www.water-tec.com 4601 S. 3 RD Avenue Tucson, AZ 85714 (520) 790-1512 Fax (520) 745-0549 1 MAIN COMPONENTS Your water treatment
12 Volt 30 Amp Digital Solar Charge Controller
 12 Volt 30 Amp Digital Solar Charge Controller User s Manual WARNING Read carefully and understand all INSTRUCTIONS before operating. Failure to follow the safety rules and other basic safety precautions
ENGLISH INSTRUCTION & INSTALLATION MANUAL DUCTLESS MINI SPLIT AIR CONDITIONING SYSTEMS
 ENGLISH INSTRUCTION & INSTALLATION MANUAL DUCTLESS MINI SPLIT AIR CONDITIONING SYSTEMS Céliera Corporation. All rights reserved. Unauthorized duplication, reproduction prohibited. CONTENTS SAFETY PRECAUTIONS...
Quick Start Guide See Inside for Use and Safety Information
 3 rd Generation Personal 3D Printer Quick Start Guide See Inside for Use and Safety Information The USB Mass Storage Device Contains the User Guide and Quick Start Guide in other Languages Congratulations
FAQ s & Product & Troubleshooting Guide 37
 FAQ s & TROUBLESHOOTING GUIDE Pool Water Treatment SIMPLE DIRECTIONS FOR THE TREATMENT OF AUSTRALIAN SWIMMING POOL WATER SANITISATION: The approved form for sanitisation for Australian swimming pools is
Dealer Sales & Service Guide
 Analog Models w/thermostat or Timerstat Heat Siphon Not Starting 1 BREAKER TRIPPED - Check Breaker Box for correct size breaker Breakers: EX; Domestic model 2.25hp (20amp) 3.25hp (40amp) 5hp (50amp) check
OPERATOR S MANUAL 18 VOLT, 1 HOUR CHARGER
 OPERATOR S MANUAL 18 VOLT, 1 HOUR CHARGER P110 Your battery charger has been engineered and manufactured to Ryobi s high standard for dependability, ease of operation, and operator safety. When properly
Instruction Manual. www.aromaco.com AWK-115S
 Hot H2O X-Press Electric Water Kettle Instruction Manual www.aromaco.com AWK-115S Congratulations on your purchase of the Aroma Hot H20 X-Press Kettle. This handy appliance provides more speed and convenience
EVANS ELECTRONIC TEMPERATURE CONTROL TROUBLESHOOTING GUIDE for systems equipped with electric coolant valve and external PC board.
 EVANS ELECTRONIC TEMPERATURE CONTROL TROUBLESHOOTING GUIDE for systems equipped with electric coolant valve and external PC board. This Troubleshooting Guide covers the electric coolant valve and control
Service Guide 12/27/03 TESTING, SERVICE & REPAIR GUIDE (For SH Space Heating Models & RA Water Heating Models)
") TESTING, SERVICE & REPAIR GUIDE (For SH Space Heating Models & RA Water Heating Models) WARNING - HIGH VOLTAGE AC electrical circuits are connected to this heater. Do not attempt any service work on the
TESTING, SERVICE & REPAIR GUIDE (For SH Space Heating Models & RA Water Heating Models) WARNING - HIGH VOLTAGE AC electrical circuits are connected to this heater. Do not attempt any service work on the
ROTARY TUMBLER INSTRUCTIONS AND PARTS LIST
 ROTARY TUMBLER INSTRUCTIONS AND PARTS LIST Model 3-1.5B Model 45C Model 33B LORTONE 12130 Cyrus Way Mukilteo, WA 98275 (425) 493-1600 SETTING UP YOUR MACHINE For 45C Unit Only (33B & 3-1.5B already assembled)
National- Spencer Inc.
 9-27-2010 National- Spencer Inc. 19.2V HEAVY DUTY GREASE GUN PRODUCT SPECIFICATION Charger Input Power 110 VAC Battery Output Power 19.2V Battery Capacity 1500 MAH Battery Pack Charge Time 1 Hour Maximum
NÜVE SANAYİ MALZEMELERİ İMALAT VE TİCARET A.Ş. OT 020 BENCH TOP STEAM STERILIZER USER S MANUAL
 NÜVE SANAYİ MALZEMELERİ İMALAT VE TİCARET A.Ş. OT 020 BENCH TOP STEAM STERILIZER USER S MANUAL NÜVE SANAYİ MALZEMELERİ İMALAT VE TİCARET A.Ş. Esenboğa Yolu 22 km Akyurt - ANKARA / TURKEY Tel : (00 90 312)
Rules for Safe Operation
 Rules for Safe Operation Important: Do not attempt to operate the CleanStation until you have read and understand all of the instructions in this manual. Failure to do so may result in injury. The machine
PNEUMATIC - HIGH PRESSURE FLAT-FORM HEAVY LIFTING BAGS
 PLEASE READ AND UNDERSTAND THIS MANUAL BEFORE USING SAVA LIFTING BAGS PNEUMATIC - HIGH PRESSURE FLAT-FORM HEAVY LIFTING BAGS & INFLATION ACCESSORIES SAFETY, OPERATION AND MAINTENANCE INSTRUCTIONS NON-COMPLIANCE
Digital Photo Picture Frame. Operation Manual
 Digital Photo Picture Frame Operation Manual 20070309 CONGRATULATIONS on your purchase of a Polaroid 7 LCD Digital Photo Picture Frame. Please read carefully and follow all warnings and instructions in
Please read and keep these instructions. Run water through your machine before first use
 47070 Rev 1 24/3/05 2:23 PM Page 1 12 cup filter coffee maker Please read and keep these instructions getting the best from your new coffee maker Safety first Caution must be used when handling hot water,
Select Radiators Installation Guide
 Select Radiators Installation Guide Table of Contents Informational Symbols...3 Before You Begin...4 Select Rough-In... 5 Connection Installation...6 Optional Piping Arrangements...7 Conventional Wall
L aguna B ay S pas. Get Away... Every Day. Owner s Guide Book
 LagunaBayManualVer12.10.2_Layout 1 12/10/10 12:44 PM Page 1 L aguna B ay S pas Get Away... Every Day. Owner s Guide Book Important information about your LaGuna Bay Spa Spa Model Spa Serial number Date
GeniJet Pipeless Motor Spa Installation
 GeniJet Pipeless Motor Spa Installation NOTE: Keller International, LLC. recommends using rubber silicone when installing the gasket. If the surface of the Spa is flat and smooth use the flat gasket with
DC REFRIGERATORS 12/24 VOLTS INSTALLATION AND OWNER S MANUAL
 DC REFRIGERATORS 12/24 VOLTS INSTALLATION AND OWNER S MANUAL Service Information If service or parts are required, contact the nearest Norcold Service Center. To find an authorized Norcold Service Center
SWIMMING POOL HEAT PUMP
 SWIMMING POOL HEAT PUMP Installation & User Manual Model HP40B HP50B HP65B Hayward Pool Products Canada, Inc. T: 1-888-238-7665 www.haywardpool.ca CONTENT I. Application 4 II. Features 4 III. Technical
ARCO Electric Products Installation and Maintenance Manual Low Voltage Automatic Power Factor Correction Capacitor Systems 2013
 ARCO Electric Products Installation and Maintenance Manual Low Voltage Automatic Power Factor Correction Capacitor Systems 2013 READ CAREFULLY These instructions are intended to cover good practices in
CHAPTER 4 UTILITY SYSTEMS ELECTRICAL. Utility Systems Electrical. Main Panel
 CHAPTER 4 UTILITY SYSTEMS ELECTRICAL Utility Systems Electrical The electrical supply to your home begins outside, where you will see either an overhead feed and piping down the side of your home or (if
MODEL 300505 INSTALLATION INSTRUCTIONS
 WWW.BURCAM.COM 2190 Boul. Dagenais West TEL: 514.337.4415 LAVAL (QUEBEC) FAX: 514.337.4029 CANADA H7L 5X9 info@burcam.com Your pump has been carefully packaged at the factory to prevent damage during shipping.
Installer s Guide WARNING: 18-GJ11D1-2. Ultraviolet (UV-C) Lamp Kit for 2-5 Ton Air Handlers HAZARDOUS VOLTAGE - DISCONNECT POWER BEFORE SERVICING
 Lamp Kit for 2-5 Ton Air Handlers HAZARDOUS VOLTAGE - DISCONNECT POWER BEFORE SERVICING") Installer s Guide 18-GJ11D1-2 : Models: BAYUVCLK001-40 Watt, 2 Lamp NOTE: A BAYCC24VK01 can be installed for Series 8 Air Handlers to extend the life of the lamp. This accessory kit will disable the lamp
Installer s Guide 18-GJ11D1-2 : Models: BAYUVCLK001-40 Watt, 2 Lamp NOTE: A BAYCC24VK01 can be installed for Series 8 Air Handlers to extend the life of the lamp. This accessory kit will disable the lamp
WALL MOUNTED SPLIT TYPE AIR CONDITIONER
 WALL MOUNTED SPLIT TYPE AIR CONDITIONER MANUAL 8 OM-G12-ACSON CONTENTS - Operating Guide page 1 - G12 Remote Controller Indication page 2 - Indicator Lights page 4 - Installation of Aroma page 5 - Auto
Rexroth Hydraulic Pump A10VO Series User Manual
 Rexroth Hydraulic Pump A10VO Series User Manual Rexroth Hydraulic pump A10VO Series User Manual Revised 5/1/2009 Page 1 of 12 Functional Purpose This pump is preferred over a fixed displacement (gear)