Replacement Installation Instructions
|
|
|
- Shonda Marsh
- 7 years ago
- Views:
Transcription
1 Sliding Door Replacement Installation Instructions Please make sure you have: Fixed 1 - Operating (X) Panel (Glazing Bead Inside, Roller Adjustment Holes Outside) 1 - Fixed (O) Panel (For 3-Panel doors, there are 2 fixed panels!) 1 - Patio Door Screen Carton 1 - Patio Door Main Frame Carton OX XO Rough Opening Size Finished Tip-to-Tip Operating Operatin g As viewed from outside Fixed 5'0" x 6'8" 6'0" x 6'8" 8'0" x 6'8" 9'0" x 6'8" 12'0" x 6'8" 58 7/8" x 79 1/2" 70 7/8" x 79 1/2" 94 7/8" x 79 1/2" 107 7/16" x 79 1/2" 143 7/16" x 79 1/2" Step 1 Pre-Installation Check (before beginning tear-out) Confirm that the replacement door is handed correctly, and is the right size and color. Check the color of the screen. Check the contents of the Main Frame Carton. Identify: A 1 - Head -- Make sure the top hung screen adapter, the roller track, and the bumper are pre-installed and the rollers are tightly attached B 1 - Sill -- Consists of PVC sill, aluminum screen track, aluminum threshold, fixed panel shim, and stainless steel roller cap (all pre-assembled) C 2 - Jambs (1 Left & 1 Right) D 2 - Interlocks (1 Interior & 1 Exterior) E 1 - Screw Hole Cover for Exterior Interlock F 3 - Jamb Pocket Covers (1 Interior, 1 Exterior, & 1 Head) 1 - Box containing Handle Hardware G 1 - Installation and Assembly Screw Package 2 - Mini-Blind Cords & Tensioners (only for optional mini-blinds) For 3-Panel doors, you will also have 1 exterior astragal post and 1 interior astragal post (illustrations inside).
 Confirm that the")
2 Step 2 Remove the existing door & Prepare the opening 1 Repair loose or rotted boards. 2 It s most important that the sill is flat & level. Step 3 Patio Door Mainframe Assembly 1 Locate 20 frame assembly screws - #10 x 2". 2 Lay out the four frame parts, interior face down, on a flat, clean surface. Gasket seals are factory-applied to the head & sill. 3 Important: Silicone the ends of each frame member at joint to ensure adequate water protection. 4 Line up the screw holes in the head & sill with the jambs and fasten together with the 20 - #10 x 2" screws. Note: If you are installing an optional vent latch, attach the keeper to the sill before installing the frame. See Step 12. If you are installing a two-panel door, skip Step 3A and proceed to Step 4. Step 3A Three-Panel Mainframe Assembly Photo 1A Photo 2A Insert the interior astragal post into the assembled mainframe. Attach it with 8 - #10 x 2" screws. (Photos 1A & 2A)The mainframe is now ready for installation. Cross-Section of Interior Astragal Post Step 4 Mainframe Installation Each jamb requires 3-4 installation screws. The installation screwholes are not drilled in the jamb, as you could locate the installation screws through either the interior or exterior channel of the jamb. If you do not want to install the installation screws in the outside channel, you can remove some of the short screws that hold the striker into the jamb and screw long installation screws in their place. 1. Apply (2) 3/8 beads of sealant along the sill opening and continue them up both jambs at least 6 and apply shims where necessary. (The sill should never angle towards the interior of the home and lay on both lines of sealant) A sill pan is suggested for every installation application but is optional for replacement application. *Creating a sill pan The pan should have at least 2 end dams and a ½ back dam and 1 downward front leg. This can be created using a preformed pan, self-adhesive flashing tape, or a combination of both. (If using multiple materials for the creation of the sill pan be aware that all items need to be place in a water boarding fashion one overlapping the other for easy water drainage). In some occasions it may be necessary to apply a bead of sealant along the back side of the 1 downward leg on the sill pan prior to installation. Press the sill pan into the sealant. Check for level, plumb and square If this is a New Construction Installation Follow the Flashing instruction on the last page of this pamphlet. Photo # Photo #2 2. Set the frame into the opening and install it with the 8 - #8 x 2 1/2" pan head screws. (Photos #1 & 2) Note: Pre-drill an 1/8" pilot hole, then drill a 3/8" diameter hole through the interior wall to allow the installation screws to be covered by a screw hole plug. Even though the installation holes and screws are covered by the snap-in pocket covers, it is necessary to snap in the screw hole plugs to minimize possibility of air and wind noise.

3 Step 4 Mainframe Installation (Continued) Photo #3 3. It is recommended that 1-2 screws be run into the head through the outer channel of the frame into the home. (Photo #3) Photo #4 Photo #5 4. Use shims to square up the frame and make the diagonal corner-to-corner measurements equal. (Photos #4& 5) 5. Seal around the roller track support where it meets the operating jamb. If you are installing a two-panel door, skip Step 5A and proceed to Step 5. Step 5A Three-Panel Fixed Panel Installation Photo 3A 1 Lift the fixed panel up & into the head pocket (Photo 3A), swing the bottom in, and set it down onto the fixed panel shim. Note: The fixed panel can be installed from either the inside or outside. Also, there are 2 fixed panels with a 3-panel door. Make certain the weeps are to the bottom and the wide stile goes into the jamb. 2 Slide the fixed panel completely into the jamb pocket. (Photo 4A) Photo 4A Photo 5A 3 Secure the fixed panel to the mainframe using 3 - #8 x 1 1/4" security screws. (Photo 5A) Cross-Section of Exterior Astragal Post Photo 6A Photo 7A 4 Insert the exterior astragal post, positioning the head end first, and taking care to line up the notches on the sill end with the sill track. (Photos 6A & 7A) 5 Use a mallet to firmly tap the bottom into its final position. (Photo 8A) Photo 8A
, swing the bottom in, and set it down onto the fixed panel shim.")
4 Step 5A Three-Panel Fixed Panel Installation (Continued) Photo 9A Photo 10A 6 Fasten the exterior astragal post to the fixed panel using the 5-2 1/2" installation screws in the 5 pre-drilled holes. (Photo 9A) Note: Make sure not to overtighten the screws. 7 Fasten the exterior astragal post to the interior astragal post using the 6 - #8 x 1 1/4" security screws in the 6 pre-drilled holes. (Photo 10A) Note: Make sure not to overtighten the screws. 8 Apply a bead of silicone around the bottom of the pocket in the exterior astragal post. Photo 11A 9 Install the jamb pocket cover. (Photo 11A) You can now resume installing the patio door like a two-panel door, following the remaining steps, including Step 5. Step 5 Two-Panel Fixed Panel Installation Photo #7 Photo #9 Photo #11 1 Lift the fixed panel up & into the head pocket (Photo #7), swing the bottom in, and set it down onto the fixed panel shim. Note: The fixed panel can be installed from either the inside or outside. 2 See that the panel is sitting level on the shim and snap the exterior interlock into the panel. The angled side of the interlock is the bottom. (Photo #8) 3 Screw the interlock to the fixed panel. Use the 5 #6 x 3/4" flat-head screws. (Photo #9) 4 Snap the filler strip in the channel to cover the interlock screws. (Photo #10) Note: Use a hammer and wood block (to avoid marring) to snap in the filler strip. 5 Slide the panel along the shim completely into the jamb pocket. Photo #8 Photo #10 CAUTION: Do not install screws to fixed panel (next, step 6) until the operating panel is installed and locked. 6 Secure the fixed panel into place by putting the 3 #8 x 1 1/4" screws through the jamb center leg and into the fixed panel. (Photo #11) These holes will be covered when the pocket cover is snapped in.
 You can now resume installing the patio door like a two-panel door, following the remaining steps, including Step 5.")
5 Step 6 Screen Installation 1 Before setting the screen in the top hung track, apply tension on the rollers (pry on the roller leaf spring) at the bottom of the screen door that goes along the guide track to eliminate the possibility of the screen slipping off the lower guide track. (Photo #14) Note: There may be a plastic bag of parts in the patio door screen box which is not Photo #14 required in the installation. Photo #15 Pry up the guide roller for added tension. Step 7 Photo #12 2 Insert the screen into the roller track in the head. 3 Carefully snap lower guide rollers over the track of the sill. 4 Attach the screen through the pre-drilled slots in the roller track with the supplied screws which go right into a bushing in the screen frame. Then adjust the height for a free & easy rolling screen. (Photo #15) CAUTION: It is necessary to completely adjust the height and operation of the screen before installing the operating panel; otherwise, the top screen adjustment screw is difficult to access unless you have an offset Phillips screw driver Operating Panel Installation 1 From the inside, lift the operating panel up & into the head pocket - swing the bottom in - set it down onto the stainless steel roller track. (Photo #12) 2 Check the leading edge of the operating panel to frame for perfect sight line. 3 If necessary, adjust rollers by using a phillips screwdriver through the access holes in the exterior face of the bottom sash rail. After final adjustment, snap screw hole plugs in roller access holes. Note: Initially, after adjusting rollers, door may operate tightly as the operating panel is coming in contact with the gasket that Photo #13 is attached to the sill. After some operation of the door, the gasket on the sill will naturally compress, allowing easier operation of the door while providing a tight seal along the sill. 4 Attach the interior interlock to the operating panel (the interior interlock has the square notch at the bottom to fit over the sill track). Position it so that the short side of the notch is even with the bottom of the sash rail and snap it into the end of the panel. (Photo #13) Note: Interior interlock doesn t require any screws to attach it to the operating panel. Step 8 Attach Interior & Exterior Handle to the Operating Panel Note: Handle assembly instructions are packaged with the handle in a separate box. Photo #17 Photo #16 1 If provided, insert grommit into the two interior holes for assembly screws. (Photo #16) Follow the installation instructions in the handle set box using step 1 first, then step 2 for the trim set with the key cylinder. CAUTION: If you have difficulty removing the key or operating the key lock, rotate the actuator pin 180 and reattach. (Photo #17) Note: To insure proper lock alignment, check that the height of the keeper aligns with the height of the lock openings in the active style. Adjust the height by loosening the screws that attach the keeper to the jamb and sliding the keeper either up or down, or by raising or lowering the operating sash. Note: In order to make the lock operate easily, you may have to shim behind the end keepers. The factory has already installed one shim behind the center keeper. Actuator Pin CAUTION: Slamming the door closed will cause the operating panel to hit the compression seals in the jamb and bounce out, not allowing the door to be properly locked. To easily lock the door, slide and hold the door closed, and turn the thumb knob or the keylock.

6 Step 9 Snap in Pocket Covers Photo #18 1 Snap in the first pocket cover in the interior channel of the jamb in front of the fixed panel. This covers installation screws as well as the screws that secure the fixed panel in place. (Photo #18) 2 Snap the pocket cover in the exterior channel of the jamb that the operating panel slides into. Note: This pocket cover has the rotating screen latch pre-attached to it. Photo #19 3 Snap the short pocket cover into the head between the jamb and fixed panel, aligning the indicator line to the same line in the jamb. (Photo #19) Step 10 Latching of Screen Door Photo #20 1 Slide the patio door screen closed and, while holding the door closed, rotate the knob into the latch in the face of the screen. (Photo #20) Note: Shims have been pre-installed behind the screen knob. Adjust as necessary. For Doors with Optional Mini-Blinds: Step 11A Cord & Tensioner Attachment: Sizes > 74" x 81 1 /2"* CAUTION: There is double-sided tape on the back of the magnet operator for the mini-blinds. Once the tape is removed and the magnet is attached to the door, it cannot be adjusted. Make sure to follow these procedures to insure proper alignment: Photo #21 1 Position the external magnet after carefully cleaning the glass area where it will be placed. For proper operation, the external magnet must be perfectly interfaced with the internal one. Therefore, before removing the adhesive protecting film, position the external magnet on the glass next to the internal one. Verify smooth raising and lowering of the blind. Then remove the film and position the external magnet on the glass following the magnetic attraction. (Photo #21) Photo #22 2 Position the cord tensioner, keeping the cord in tension. The operator tip on the cord tensioner should be positioned at approximately the line on the tensioner or slightly higher to keep the cord engaged. Excessive tension on the loop will hinder cord movement. (Photo #22) Note: Pulling the cord on the right side lowers the blind, while pulling the cord on the left side raises the blind. Small adjustments by pulling on the right and left side of the cord will enable optimum slat positioning. Close-up of Cord Tensioner Close-up of External Magnet & Cord *White blinds may come cordless; see step 11B. All other colors will be corded.

7 Step 11B Cordless Side-Slide Lift and Tilt Operator: Sizes < 74" x 81 1 /2" Photo A Photo B If you are installing a door smaller than or equal to 74" x 81 1/2", you may be installing a door with a Cordless Side-Slide Lift and Tilt Operator. Photo A is of the Lift Operator (on side), and Photo B is of the Tilt Operator (on top). Note: These operators are factory installed. For Doors with Optional Vent Latch: Step 12 Vent Latch & Keeper Attachment Note: If you are installing an optional vent latch, attach the keeper to the sill BEFORE installing the frame. Note: Attach the vent latch AFTER the door is completely installed and any adjustments are made. Parts: Latch, Keeper, Latch Locator Template, 4 - #8 x 1 1/4" white-head latch screws, 2 - #8 x 1 1/4" brown-head keeper screws. Photo #23 Photo #24 1 Attach the keeper to the sill with the 2 #8 x 1 1/4" keeper screws. (Photos #23 & #24) Photo #25 2 Align the locator template with the bottom corner of the operating panel and tape in place. (Photo #25) Note: One side of the template is for XO doors; the other side is for OX doors. Photo #26 Photo #27 3 Position the latch screw holes over the indicator lines so that the extended plunger is centered in the first slot of the keeper and mark the four hole positions. (Photos #26 & #27) Photo #28 Photo #29 4 Pilot drill the holes with a 3/32" bit. (Photo #28) 5 Remove the template and install the latch. (Photo #29)

8 Frame Package Contents A Head w/ Top Hung Screen Adapter & Roller Track B Sill Jamb - Operating Side Jamb - Fixed Side D Interior/Exterior Interlocks C Jambs E Interlock Screw Cover G Screw Package contents SCREW HOLE PLUG 10-3/8" Diameter INTERLOCK SCREW 5 - # 6 X 3/4" FIXED-PANEL SECURITY SCREW 3 - # 8 X 1 1/4" FRAME ASSEMBLY SCREW 20 - # 10 X 2" INSTALLATION SCREW 10 - # 8 X 2 1/2" F Interior/Exterior/Head Pocket Covers extra Screw Package for 3-Panel DoorS FIXED-PANEL SECURITY SCREW 6 - # 8 X 1 1/4" FRAME ASSEMBLY SCREW 8 - # 10 X 2" INSTALLATION SCREW 5 - # 8 X 2 1/2"

9 New Construction With/Without Sheathing: With Sheathing: Step One: Rough Opening (RO) Prep Check opening for level, plumb and square. Note any discrepancies for proper shimming in later steps, or if possible, adjust rough opening to create a level, plumb and square opening. The exterior surface of the home should already have a weather barrier such as but not limited to Tyvek, TYPAR, or PINKWRAP. At the opening, create a modified I cut running from the top middle portion of the opening running down the middle (fig.1-1 Steps 1 ) Cut along the top or head of the opening. (fig 1-1 Step 2) Cut along the bottom of the opening to create two flaps. (Fig. 1-1 Step 3) Fold the wrap toward the interior of the home and staple along the rough framing. Cut any excess house wrap off. At the top left corner of the opening, come up 9 and out away from the opening 9 and make a mark. Repeat this step for the right side. From each of the corners using a utility knife, cut from the created mark down to the top corner of the rough opening. From the left mark, cut down to the upper left of the rough opening. From the right mark, cut to the upper right corner of the rough opening. This will create a flap at the top of the opening Fold the flap up and temporarily tape.(fig. 1-1 Fold line) Below is the formula to determine the flashing tape lengths: Sill is RO width + 18 Jamb is RO width + 17 Head is RO width + 20
 Cut along the top or head of the opening.")
10 Cut the self-adhesive flashing tape to size using the formula provided above. If 9 flash tape is not being used, formulas will need to be adjusted. 9 is the minimum width permitted. At the bottom left corner of the opening, come down 9 and out 9 ; mark this spot and repeat for the bottom right corner. Apply your precut sill flashing tape starting at the one of the predetermined spots made in the previous step and end at the other pre-marked spot. The flashing tape should touch both marks and reach up to the outside bottom of the rough opening. (fig. 1-2) Use a hand roller to ensure a smooth even application of the flashing tape. Using a single piece of self-adhesive flashing tape, make a sill pan with end dams (sides) that run up the Rough framing jamb at least 6 and fold over on to the face of the rough opening and extend outward from the rough opening at least 2. (Figure 1-3 and 1-4) Next, set your level on the sill of the rough opening and shim accordingly.
 Use a hand roller to ensure a smooth even application of the flashing tape.")
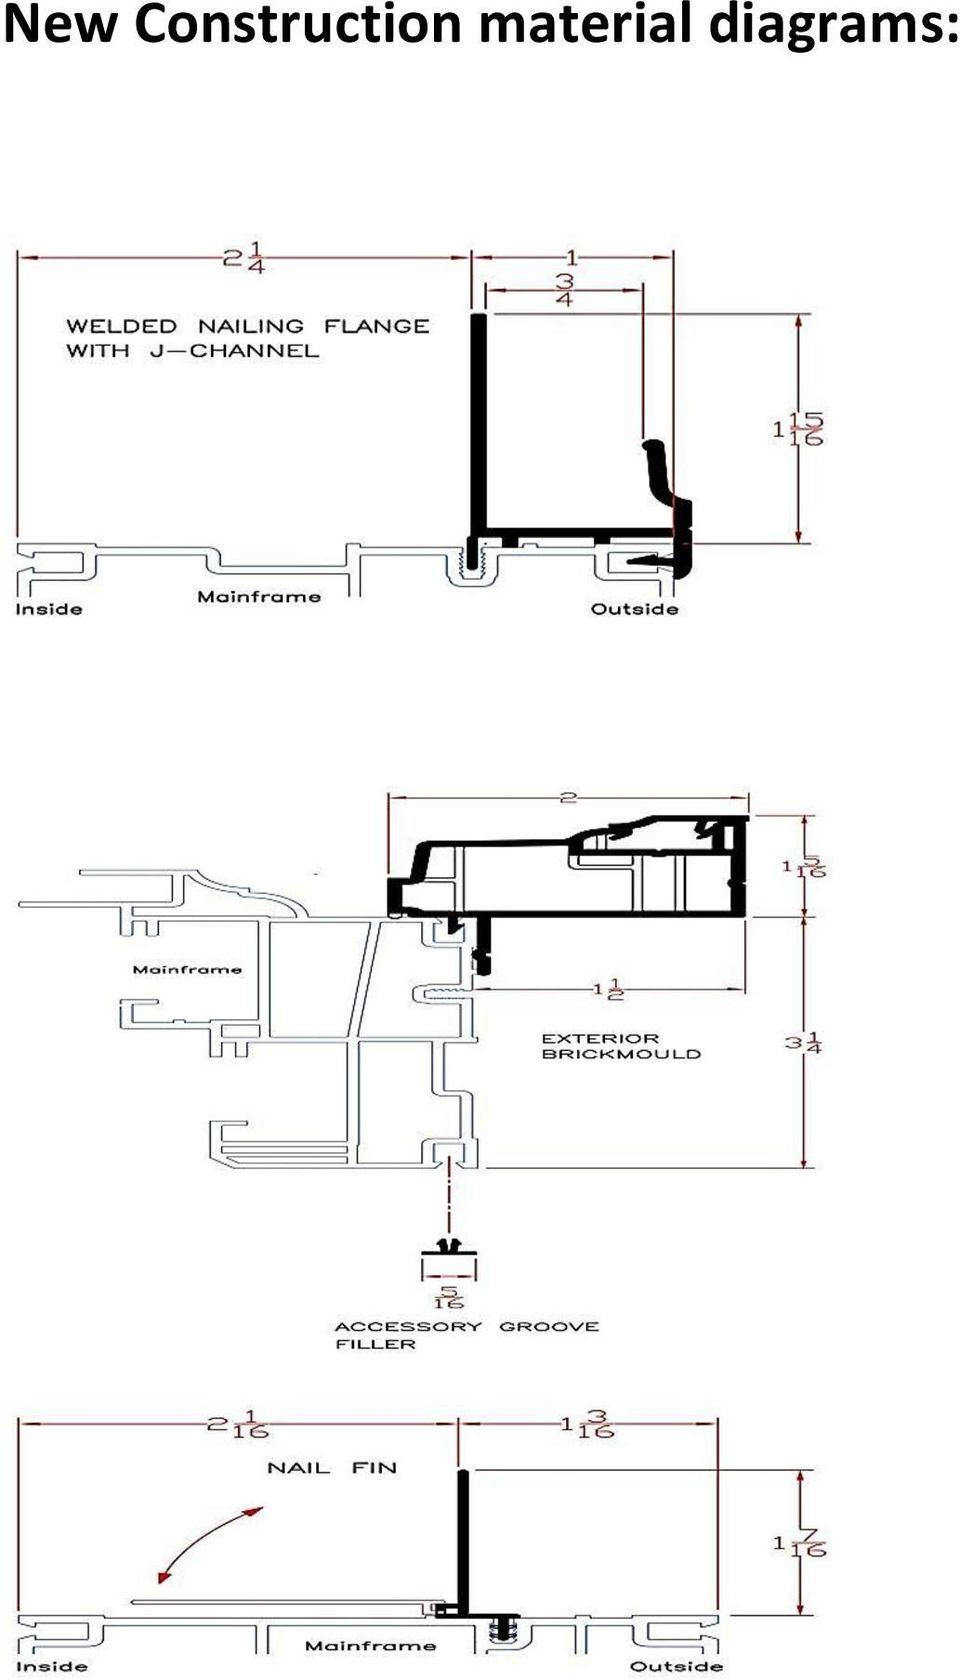
11 Step Two: Door installation If applicable, apply loose nail fin flange to the head and jambs of the door frame. (Fig. 0-2) To apply, press nail fin into the accessory groove located on the frame 1 back from the exterior face of the door frame. At each corner on the back side of the nail fin, (side closer to the interior of the door) apply the Sunrise Window supplied chevrons connecting each corner. Apply a 3/8 thick bead of sealant across the enter perimeter of the nail flange/j-channel nail flange following along the same line as nailing flange holes. Set the door in place tilting it so that the bottom of the unit is set in place first with the head of the unit tilted in afterwards. Make sure the door is centered in the rough opening. Press the nailing flange against the sheathing to create a seal good seal between the seething and nail fin. (Squeeze out of the sealant should present around the entire perimeter of the unit) Check for level, plumb and square. Shim around the door placing shims staring 4-6 up from the each of the corner. Each jamb side and the head should have at least three sets of shims. (fig. 2-1) Starting at the top of the left jamb side, loosely install one mounting fastener. (tighten after final adjustments have been completed) Check for level, plumb and square. Apply a fastener at the bottom right jamb nail flange. Check for level, plumb and square. Adjust if necessary. Apply fasteners to the remaining nail flange holes occasionally checking for level, plumb and square. Place a 3/8 thick bead of sealant around the door unit in a U shape. Each leg of the U should extent up past the head of the door unit up approximately 8.5 Fig. 2-1

12 Apply the left side and right side flashing tape. Each piece should extend 8.5 above the head of the door and set 1/2 above the bottom of the sill flashing tape. (Fig. 2-2) Use a hand roller to press the flashing into the previously applied sealant making sure that the flashing tape has a smooth even application. Apply a 3/8 thick bead of sealant across the top of the nail flange following along the line of nail flange hole overlapping the jamb side flashing tape to the end of the nail flange on both sides. Apply flashing tape to the head of the unit. The flashing tape should overlap the left and right jamb flashing by 1. Using a hand roller, press the flashing tape into the previously applied sealant while make sure that the flashing tape is smooth and evenly applied. Lower the house wrap flap that was previously taped in the upward position and apply house wrap tape along the diagonal cut lines. Fig. (2-2) Fig. 2-3 Step Three: Interior Finishing Secure the door using the provided installation screws (Fig.2-1) At the bottom left shim, drill a 3/8 hole into the exterior jamb pocket and install one 2 ½ pan head screw loosely. Follow this up with a screw at the top right jamb shim making sure to predrill a 3/8 hole. Do not fully tighten this screw. Install a screw in each shim point on the left and right jambs. Predrill, 4 up/down, Apply at least one screw into exterior pocket of the frame head at the or near the center predrilling a 3/8 hole prior to the installation of the screw. Check level, plumb and square. Using low expansion foam, insulate around the interior of the door unit making sure to follow the manufacturer s instruction on proper usage. Loose insulation can be substituted for low expansion foam. Finish as desired.

13 New Construction material diagrams:
14 Installation without Sheathing: Step One: Rough Opening (RO) Prep Check opening for level, plumb and square. Note any discrepancies for proper shimming in later steps, or if possible, adjust rough opening to create a level, plumb and square opening. Pre-cut your flashing tape using the following formulas: Sill: RO width + (2 x tape width) Jamb: RO height + (2 x tape width) - 1 Fig. 1-1 Head: RO width + (2 x tape width) + 2 Using a staple gun, attach the sill flashing to the sill of the rough framing leaving 9 on both the left and right side of the rough opening. Only staple along the top portion of the flashing only at the sill of the rough opening leaving the bottom and side section open. (Fig. 1-1) All staples should be between apart. Using a single piece of self-adhesive flashing tape, make a sill pan with end dams (sides) that run up the Rough framing jamb at least 6 and fold over on to the face of the rough opening and extend outward from the rough opening at least 2 (Fig.1-3) Fig. 1-2
 + 2 Using a staple gun, attach the sill flashing to the sill of the rough framing leaving 9 on both the left and right side of the rough opening.")
15 Step Two: Installing the door Check the sill for level once again and shim if necessary. If applicable, apply loose nail fin flange to all four sides of the door frame. To apply, press nail fin into the accessory groove located on the frame 1 back from the exterior face of the door. At each corner on the back side of the nail fin, (side closer to the interior of the door) use a piece of self-adhesive flashing tape in the shape of an L to connect the nail fins at each top corner. Using a 3/8 bead of silicone sealant, apply a line of sealant along the nailing flange/j-channel nail flange holes around the head and jambs of the door. An optional bead of sealant can be placed along the rough framing where the flange will be in contact with the rough framing. Set the door in place by tilting it so that the bottom of the unit is set in place first with the head of the unit tilted in afterwards. Press the nailing flange against the sheathing to create a bond with the sealant. There should be squeeze out present around the entire perimeter of the flange. Place a fastener on the top of the right jamb nail flange making sure not to fully tighten the fastener leaving room for further adjustment. (Tighten after final adjustments have been made) Shim around the door placing shims starting 4-6 up from the each of the corner. Each jamb side and the head should have at least three sets of shims. (fig. 2-1) Check level, plumb and square. Apply fasteners to the remaining nail flange holes occasionally checking for level, plumb and square.

16 Step Three: Finishing exterior flashing Apply a 3/8 bead of silicone sealant along the left and right jamb nail flange holes continuing up the 8½ above the head of the window on both sides. Apply the left and right jamb flashing extending 8 ½ above the head of the window unit on both sides. The jamb flashing should sit on top of the sill flashing and NOT extend past it on the bottom. (fig. 3-1) Press the jamb flashing into the sealant. Using a staple gun attach the flashing to the rough framing making sure not to staple on the nail flange of the window unit or below the sill of the rough opening. (fig. 3-1) Repeat the steps on the opposite jamb. Apply a bead of sealant across the head where the nail flange holes are placed and a second bead of sealant horizontally 8 ½ above the head of the window. Place head flashing at the top of the window pressing it into the sealant. The head flashing should extend out past the both jamb flashing pieces by a least a ½. (Fig. 3-2) A water resistant barrier should then be installed. Fig. 3-1 Fig. 3-2 Step Four: Water resistant barrier The barrier should be installed in water board fashion. The water board method starts by placing the bottom section on first and each additional layer should overlap the previous layer. The first layer of the water resistant barrier should be set under the loose section of the sill flashing. Each following section of water resistant barrier should be placed over top of the previous. This can be done by someone other than the window installer.

17 Step Five: Finishing Interior Secure the door using the provided installation screws. (Fig.2-1) At the bottom left shim, drill a 3/8 hole into the exterior jamb pocket and install one 2 ½ pan head screw loosely. Follow this up with a screw at the top right jamb shim making sure to predrill a 3/8 hole. Do not fully tighten this screw. Install a screw in each shim point on the left and right jambs. Predrill 4 up/down. Apply at least one screw into exterior pocket of the frame head at the or near the center predrilling a 3/8 hole prior to the installation of the screw. Check level, plumb and square. Using low expansion foam, insulate around the interior of the door unit making sure to follow the manufacturer s instruction on proper usage. Loose insulation can be substituted for low expansion foam Finish as desired. Water Barrier Step NOTE: There are many variations of install that may be encountered when replacing windows. One conventional installation is described in these instructions. For questions on appropriate installation procedures, refer to your GENERAL CONTRACTOR, LOCAL and STATE BUILDING CODES, ARCHITECTURAL SPECIFICATIONS, and ASTM E2112.

Window Installation Instructions
 Caution The correct installation methods of windows in full frame or insert applications is critical towards achieving the tested performance of the window and longterm enjoyment and energy savings for
Tundra Series Windows January 2016
 Tundra Series Windows January 2016 New Construction Installation Instructions Nail Fin, J-Fin and Brickmold Aplications product. ATTENTION! Read and understand all installation instructions before installing
Clad Direct Glaze Window Installation Instructions
 Clad Direct Glaze Window Installation Instructions Sill flashing and sealing: 2. An overview of the proper flashing sequence is shown in figure 1. Please read entire installation instructions carefully
INSTALLATION INSTRUCTIONS IMPERVIA (Vent and Fixed) AWNING, CASEMENT, and LARGE AWNING WINDOW WITH FINS
 AWNING, CASEMENT, and LARGE AWNING WINDOW WITH FINS") 2009 Pella Corporation INSTALLATION INSTRUCTIONS IMPERVIA (Vent and Fixed) AWNING, CASEMENT, and LARGE AWNING WINDOW WITH FINS Part Number: 80WH0100 Installation Instructions for Typical Wood Frame Construction.
2009 Pella Corporation INSTALLATION INSTRUCTIONS IMPERVIA (Vent and Fixed) AWNING, CASEMENT, and LARGE AWNING WINDOW WITH FINS Part Number: 80WH0100 Installation Instructions for Typical Wood Frame Construction.
Replacement Window Installation Guide Non-Impact & Impact Resistant Windows without Nailing Fin
 Replacement Window Installation Guide Non-Impact & Impact Resistant Windows without Nailing Fin americancraftsmanwindows.com Project Requirements: Failure to follow these instructions may void product
INSTALLATION INSTRUCTION - INSTRUCCIONES DE INSTALACION FOR DOUBLE-HUNG VENT REPLACEMENT WINDOW
 Vinyl Windows and Doors Manufactured by Pella Corporation INSTALLATION INSTRUCTION - INSTRUCCIONES DE INSTALACION FOR DOUBLE-HUNG VENT REPLACEMENT WINDOW Lea las instrucciones en español en el reverso.
Sun Windows General Information Sun New Construction Window Installation Instructions
 Sun Windows General Information Section 1 G F H H H A. Apply Weather Resistive Barrier B. Apply Sill Flashing Tape C. Place Waterproof Sill Shims D. Caulk Back of Nail Fin Sides & Top, Set Window, Fasten
IMPORTANT! READ ALL INSTRUCTIONS BEFORE BEGINNING INSTALLATION. Step 1:
 IMPORTANT! READ ALL INSTRUCTIONS BEFORE BEGINNING INSTALLATION. Thank you for purchasing your new replacement windows from Great Lakes Window. The following instructions will help remove the old windows
WINDOW REPAIR MANUAL & REFERENCE GUIDE
 WINDOW REPAIR MANUAL & REFERENCE GUIDE TABLE OF CONTENTS DOUBLE HUNG & SINGLE HUNG PARTS 4-5 CASEMENT PARTS 6 SCREEN PARTS 7-8 HOW TO REMOVE TILT-IN SASH 9 HOW TO REMOVE A BALANCE 10 HOW TO INSTALL BALANCE
All-Season Sunroom Sliding Glass Door Installation Instructions
 ASRESGD-08 All-Season Sunroom Sliding Glass Door Installation Instructions Panel Frame Door Frame Left Side Foam Insulator IE241 H Bar Assembly Door Frame Top Track Panel Frame Door Frame Right Side Stationary
Combination Unit 5'6" Windows a i o P t
 for Andersen 5'6" Double-Hung Venting s Windows a i o P t o rs D o Congratulations You have just purchased one of the many fine Andersen products. For ease of assembly and installation and continued enjoyment
Installation Instructions Double-Hung, Single-Hung, Casement, Awning, Sliding, Picture & Shapes Non-Impact & Impact Resistant Nailing Fin Windows
 Installation Instructions Double-Hung, Single-Hung, Casement, Awning, Sliding, Picture & Shapes Non-Impact & Impact Resistant Nailing Fin Windows americancraftsmanwindows.com Project Requirements: Read
WINDOW INSTALLATION GUIDE FOR NEW CONSTRUCTION - WOOD FRAMING
 WINDOW INSTALLATION GUIDE FOR NEW CONSTRUCTION - WOOD FRAMING IMPORTANT NOTICES AND INFORMATION Read these instructions in their entirety prior to installing windows. Any local building code requirements
SLIDING PATIO DOOR INSTALLATION INSTRUCTIONS USING FRAME SCREWS
 Vinyl Windows and Doors Manufactured by Pella Corporation Part Number: V984528 2012 Pella Corporation SLIDING PATIO DOOR INSTALLATION INSTRUCTIONS USING FRAME SCREWS Installation Instructions for Typical
Basement Window Installation Guide Hopper and Sliding
 Basement Window Installation Guide Hopper and Sliding americancraftsmanwindows.com Project Requirements: Installation must comply with all applicable building codes. Existing window frame, wall and weatherresistant
Vinyl Brick Mould Field Installation Instructions All Vinyl and Vinyl Clad Windows
 Vinyl Brick Mould Field Installation Instructions All Vinyl and Vinyl Clad Windows Viewed from the exterior. IMPORTANT: Please read before you begin installation. TABLE OF CONTENTS AND TOOL / MATERIAL
INSTALLATION INSTRUCTIONS for Vinyl Windows with Integral Nailing Fin (JII001)
") Thank you for selecting JELD-WEN products. Attached are JELD-WEN s recommended installation instructions for Vinyl windows with an integral nailing fin. While the use of these installation instructions
Thank you for selecting JELD-WEN products. Attached are JELD-WEN s recommended installation instructions for Vinyl windows with an integral nailing fin. While the use of these installation instructions
450 SERIES SLIDING GLASS DOOR ASSEMBLY AND INSTALLATION INSTRUCTIONS
 450 SERIES SLIDING GLASS DOOR ASSEMBLY AND INSTALLATION INSTRUCTIONS Effective 2/12/11 Revised 7/7/15 TACOMA, WA (253) 922-6030 PORTLAND, OR (503) 682-3270 MARYSVILLE, WA (360) 659-0836 SACRAMENTO, CA
INSTALLATION INSTRUCTIONS for Premium Pocket Windows (JII022) IMPoRtaNt INFoRMatIoN & glossary. safety & HaNdlINg
 IMPoRtaNt INFoRMatIoN & glossary. safety & HaNdlINg") Thank you for selecting JeLd-weN products. Attached are JeLd-weN s recommended installation instructions for pocket (replacement) double-hung, casement, awning, picture or transom windows, designed to
Thank you for selecting JeLd-weN products. Attached are JeLd-weN s recommended installation instructions for pocket (replacement) double-hung, casement, awning, picture or transom windows, designed to
HALE PET DOOR INSTALLATION INSTRUCTIONS HALE STANDARD PANEL MODEL
 HALE PET DOOR INSTALLATION INSTRUCTIONS HALE STANDARD PANEL MODEL Please read these instructions carefully and completely before attempting to install Hale Pet Doors; they will guide you through the steps
Installation Guide for Andersen Architectural Wood Inswing Entry Doors
 Installation Guide for Andersen Architectural Wood Inswing Entry Doors Congratulations! You have just purchased one of the many fine Andersen products. Proper assembly, installation and maintenance are
Installation Instructions
 Installation Instructions READ BEFORE INSTALLING UNIT For Low Profile Window Air Conditioner INSTALLATION WARNINGS AND CAUTION Carefully read the installation manual before beginning. Follow each step
INSTALLATION INSTRUCTIONS for Vinyl Windows without Nailing Fin (JII011) ImPOrTANT INFOrmATION & GlOssAry. rough OPeNINGs
 ImPOrTANT INFOrmATION & GlOssAry. rough OPeNINGs") Thank you for selecting JELD-WEN products. Attached are JELD-WEN s recommended installation instructions for vinyl windows without a nailing fin (including finless, flush fin and flange). Read these instructions
Thank you for selecting JELD-WEN products. Attached are JELD-WEN s recommended installation instructions for vinyl windows without a nailing fin (including finless, flush fin and flange). Read these instructions
Combination Unit (shown from interior) WARNING
 WARNING") for Andersen Double-Hung Venting s Windows a i o P t o rs D o Congratulations You have just purchased one of the many fine Andersen products. For ease of assembly and installation and continued enjoyment
for Andersen Double-Hung Venting s Windows a i o P t o rs D o Congratulations You have just purchased one of the many fine Andersen products. For ease of assembly and installation and continued enjoyment
Therma-Tru Slim-Line Sliding Patio Door. Assembly and Installation
 Therma-Tru Slim-Line Sliding Patio Door Assembly and Installation Read all instructions before starting. Builder or subcontractor, please forward these instructions to the homeowner. The applicable standards
Installation Guide for Andersen Architectural Clad Outswing Commercial Doors
 Installation Guide for Andersen Architectural Clad Outswing Commercial Doors Congratulations! You have just purchased one of the many fine Andersen products. Proper assembly, installation and maintenance
Brick Veneer Construction
 Brick Veneer Construction Check list of suggested tools & support items Claw hammer Tape measure 3/4" [19 or 20] Wood chisel Wood or plastic shims Pry bar Utility knife Caulking and caulking gun Power
We urge you to read and follow the attached installation instructions. Failure to do so may void the warranty of this garden window unit.
 Important Information for New Construction Installations Attention Installer! We urge you to read and follow the attached installation instructions. Failure to do so may void the warranty of this garden
4 5/16 Subframe Installation
 4 5/16 Subframe Installation The subframe system is a great installation tool for installing windows in masonry conditions. Typically subframes are used in masonry openings so that windows can be anchored
Basic Spring Motor Roller Shades
 Comprehensive Roller Shade Installation Guide Basic Spring Motor Roller Shades ATTENTION!!! READ CAREFULLY! This shade has a reliable long-lasting Spring Motor. The Spring Motor must have proper tension
ILLUSION FRAMELESS SHOWER ENCLOSURE INSTALLATION INSTRUCTIONS
 PREPARATION Approximate Installation Time: Tools Required for Installation: 60 minutes Hacksaw Electric Drill 3/16 Masonry Bit Pencil/Felt tip pen Safety Glasses Measuring Tape Masking Tape Standard Screw
INSTALLATION INSTRUCTIONS for Vinyl Patio Doors with Integral Nailing Fin (JII006)
") Thank you for selecting JELD-WEN products. Attached are JELD-WEN s recommended installation instructions for Vinyl Patio Doors with nailing fin. Any local building code requirements supersede the recommended
Thank you for selecting JELD-WEN products. Attached are JELD-WEN s recommended installation instructions for Vinyl Patio Doors with nailing fin. Any local building code requirements supersede the recommended
Premier & Deluxe 3-Season Room Sliding Glass Door
 DTSSGD-11 Premier & Deluxe 3-Season Room Sliding Glass Door Installation Instructions Screen Door Seal Left Side Track Top Track Assembly Right Side Track Right Side Trim Sliding Glass Door Sliding Screen
Information Technology Solutions
 Information Technology Solutions Aluminum Sliding Door Assembly Instructions Shield Doors & Windows Bi-fold Door Assembly Instructions For Support Please Call 03 8339 2252 Aluminum Sliding Door Assembly
PRODUCT GUIDE Vinyl Patio Doors (JPG008)
") This guide contains procedures for common user serviceable repair tasks found on vinyl patio doors. If a condition arises that is not covered in this guide, please contact us for professional help. This
This guide contains procedures for common user serviceable repair tasks found on vinyl patio doors. If a condition arises that is not covered in this guide, please contact us for professional help. This
DESIGN AND CONSTRUCTION GUIDELINES AND STANDARDS DIVISION 8 DOORS AND WINDOWS 08 50 00 WINDOWS
 SECTION INCLUDES Metal Windows Vinyl/Aluminum Clad Wood Windows Solid Fiberglass and Vinyl Windows Wood Windows (Historic Preservation only) RELATED SECTIONS 02 83 00 Lead Paint Remediation 06 10 00 Rough
Installation Instructions
 Installation Instructions 1. Position the unit onto bridging packers. These keep the unit away from any water sitting inside the frame. 2. Centralise the unit within the frame and pack the edges with appropriate
Important Information for Installer & Homeowner
 Important Information for Installer & Homeowner Homeowner: Please keep this information for your records, do not discard! Installation Instructions for Wood Frame Construction Replacement (See other side
IMPORTANT INSTALLATION GUIDE VALENCIA SQUARE CORNER SHOWER READ ALL INSTRUCTIONS CAREFULLY BEFORE STARTING THE INSTALLATION
 INSTALLATION GUIDE VALENCIA SQUARE CORNER SHOWER SEALANT REQUIRED TO COMPLETE THIS INSTALLATION: (Not supplied) Sika Sikasil NG (Arctic White) To seal the WHITE shower door and returns to the shower tray.
We urge you to read and follow the attached installation instructions. Failure to do so may void the warranty of this garden window unit.
 Important Information for New Construction Installations Attention Installer! We urge you to read and follow the attached installation instructions. Failure to do so may void the warranty of this garden
DIY CABINET REFACING INSTALLATION GUIDE
 DIY CABINET REFACING INSTALLATION GUIDE CABINET REFACING INSTALLATION Are you ready to reface your outdated cabinets? This guide will show you how to install your new Facelifters Cabinet Refacing Products
PANELIZED HOME INSTALLATION GUIDELINE
 PANELIZED HOME INSTALLATION GUIDELINE A typical home package will be constructed of Snap-N-Lock Insulated Panels clad with steel skins. 4" panels will be used for the walls, and 6" panels for the roof.
INSTALLATION INSTRUCTIONS for Bifold Doors (JII103)
") Thank you for selecting JELD-WEN products. Attached are JELD-WEN s recommended installation instructions for premium composite, hollow and solid core molded Bifold Doors. Bifolds are designed for fast
Thank you for selecting JELD-WEN products. Attached are JELD-WEN s recommended installation instructions for premium composite, hollow and solid core molded Bifold Doors. Bifolds are designed for fast
InsulView Window Installation Instructions
 InsulView Window Installation Instructions 1. The entire building is normally sheeted with the 2" 2 ½ OR 3 wall panel and the windows installed at a later time. A window retrofit of an existing building
Balance Shoe and Balance Replacement
 and Replacement for E-Series Double-Hung and Single-Hung Windows Thank you for choosing Andersen. For questions call 1-888-888-7020. For more information and/or guides visit www.eaglewindow.com Please
Barewood Octagon and Elongated Windows Installation Instructions
 Step-by-step instructions to a beautiful window. Measuring and Installation of your new window from Century Specialty Windows couldn't be easier with our step-by-step instructions. Quality, function and
IN00419 (rev A) Aqua 6 Glide Quadrant and Off-set Quadrant Enclosure
 Aqua 6 Glide Quadrant and Off-set Quadrant Enclosure") IN00419 (rev A) Aqua 6 Glide Quadrant and Off-set Quadrant Enclosure Instruction suitable for both Quadrant & Off-set Quadrant variations. Instruction suitable for both Right and Left Hand fixing variations
IN00419 (rev A) Aqua 6 Glide Quadrant and Off-set Quadrant Enclosure Instruction suitable for both Quadrant & Off-set Quadrant variations. Instruction suitable for both Right and Left Hand fixing variations
DE Frame with C Series Sidelight
 TOOLS REQUIRED Tape measure 6' magnetic level 3' magnetic level Screw gun with clutch adjusted #2 phillips tip #3 phillips tip Screwdriver (used to adjust frame on will using oval slots) Pry Bar Powder
HOW TO INSTALL A BEAUTIFUL NEW KITCHEN
 HOW TO INSTALL A BEAUTIFUL NEW KITCHEN Easy to follow step-by-step kitchen cabinet installation TOOL AND MATERIAL LIST Hammer Pry bar Screwdriver Phillips Flathead Level Tape measure Pencil Straight edge
GreenGuard Housewrap Installation Guide
 000768PACBPHW_Flashing Bro 5/23/03 2:52 PM Page 1 For the most current product information, go to www.green-guard.com. Pactiv Building Products believes the information and recommendations herein to be
Black Wolf POCKET BILLIARD TABLE INSTALLATION MANUAL. SERVICE DEPARTMENT P.O. BOX 68 BRISTOL, WI 53104
 Black Wolf TM POCKET BILLIARD TABLE INSTALLATION MANUAL www.brunswickbilliards.com SERVICE DEPARTMENT P.O. BOX 68 BRISTOL, WI 53104 51-905710-000 SEPTEMBER 2010 NOTE: Please use the instructions in this
How to Install UnderDeck The Original.
 How to Install UnderDeck The Original. TOOLS: Chalk Line Caulk Gun Garden hose or water bucket Gloves Hammer or Screw Gun Power Mitre Saw with OSB Blade Pencil Pliers Safety Glasses Straight Edge / Carpenter
Vinyl Greenhouse Window Page 2 of 6 New Contruction Installation Instructions
 New Construction Installation Instructions EPLACEMENT Installation Instructions Page 2 of 6 New Contruction Installation Instructions 1. Frame rough opening equal to window call out size. ough opening
WINDOW INSTALLATION GUIDE
 WINDOW INSTALLATION GUIDE is not responsible for or liable for any use or misuse of the information contained in this window installation guide. Window Installation Guide This guide provides basic information
INSTALLATION INSTRUCTIONS for Swinging French and Patio Doors (JII105)
") Thank you for selecting JELD-WEN products. Attached are JELD-WEN s recommended installation instructions for Steel, Fiberglass, Vinyl, and Wood French and Patio Doors. Read these instructions thoroughly
Thank you for selecting JELD-WEN products. Attached are JELD-WEN s recommended installation instructions for Steel, Fiberglass, Vinyl, and Wood French and Patio Doors. Read these instructions thoroughly
CHARISMA SHOWER/TUB DOOR INSTALLATION INSTRUCTIONS
 CHARISMA SHOWER/TUB DOOR INSTALLATION INSTRUCTIONS IMPORTANT DreamLine reserves the right to alter, modify or redesign products at any time without prior notice. For the latest up-to-date technical drawings,
ASTM E 1886 and ASTM E 1996 TEST REPORT. Rendered to: Atrium Companies, Inc. SERIES/MODEL: 50/305 HS PRODUCT TYPE: Vinyl Horizontal Slider
 ASTM E 1886 and ASTM E 1996 TEST REPORT Rendered to: Atrium Companies, Inc. SERIES/MODEL: 50/305 HS PRODUCT TYPE: Vinyl Horizontal Slider Report No.: Test Date: 5/21/07 Through: 5/23/07 Report Date: 5/30/07
PRODUCT GUIDE Vinyl Single and Double-Hung Windows (JPG006)
") This guide contains procedures for common user serviceable repair tasks found on vinyl single and double-hung windows. If a condition arises that is not covered in this guide, please contact us for professional
This guide contains procedures for common user serviceable repair tasks found on vinyl single and double-hung windows. If a condition arises that is not covered in this guide, please contact us for professional
Installation Instructions For Slider Casement Air Conditioners
 Installation Instructions For Slider Casement Air Conditioners NOTE: These instructions describe installation in a typical wood framed window with a wood SLIDE-BY sash, or installation in a metal CASEMENT
MGB Chrome Bumper Conversion
 MGB Chrome Bumper Conversion Installation Instructions For 1974 1/2-1980 MGB This kit requires cutting, welding, and painting. Professional installation recommended. Note: Every MGB body is slightly different
WELCOME. Recommended Window Installation. 1.5 credits Minnesota Department of Labor and Industry
 WELCOME Recommended Window 1.5 credits Minnesota Department of Labor and Industry In accordance with the Department of Labor and Industry s statute 326.0981, Subd. 11, This educational offering is recognized
Speed-Mat Rectangle Cutter
 Speed-Mat Rectangle Cutter 1 Honeycomb baseboard. 2 Left hold down. 14 3 Bottom hold down. 4 4 Left / right rule. 8 5 8 5 Left / right rule pointer. 1 6 Top / bottom rule. 7 Top / bottom rule pointer.
Reachout Lock Replacement for Andersen 2-Panel and 4-Panel 400 Series Frenchwood Gliding, 200 Series Narroline, and Perma-Shield Gliding Patio Doors
 for Andersen 2-Panel and 4-Panel 400 Series Frenchwood Gliding, 200 Series Narroline, and Perma-Shield Gliding Patio Doors Thank you for choosing Andersen. For questions call 1-888-888-7020. For more information
WHI 90-Minute Rated Veneered Door Frame Installation Instructions
 No. 940-03-10 INSTALLATION INSTRUCTIONS 90 MINUTE RATED VENEERED DOOR FRAME DOOR REQUIREMENTS: Consult the door manufacturer to make sure that the doors are qualified for the hardware to be installed,
REDI-EXIT COMMERCIAL FIRE DOOR AND EXTERIOR DOOR KITS INSTALLATION GUIDELINES
 REDI-EXIT COMMERCIAL FIRE DOOR AND EXTERIOR DOOR KITS INSTALLATION GUIDELINES Tools Required Tape Measure Hammer Slotted Screw Driver #2 & #3 Philips Screw Driver 3-4 Foot Level 12 Pry Bar Cold Chisel
BUTTERFLY SHOWER DOOR INSTALLATION INSTRUCTIONS
 BUTTERFLY SHOWER DOOR INSTALLATION INSTRUCTIONS IMPORTANT DreamLine reserves the right to alter, modify or redesign products at any time without prior notice. For the latest up-to-date technical drawings,
Sash Replacement Guide
 for Andersen 200/400 Series Awning Windows Read all instructions carefully before attempting this procedure. If you have any questions about your ability to complete this procedure, call Andersen at 1-888-888-7020
PRODUCT GUIDE Aluminum Single-Hung Windows (JPG002)
") This guide contains procedures for common user serviceable repair tasks found on aluminum single-hung windows. If a condition arises that is not covered in this guide, please contact us for professional
This guide contains procedures for common user serviceable repair tasks found on aluminum single-hung windows. If a condition arises that is not covered in this guide, please contact us for professional
Technical data sheet PVC Bi-fold doors
 Standard Specifications White internally beaded, Deceuninck 3000 series profile 28mm Low-e toughened sealed units with argon gas Open in doors with white handles and hinges Tracks are fitted to the top
Heavy Glass Frameless Shower Door With Return Panel
 202 Anderson Ave., elvue, KS 66407 Phone: 800-669-9867 Fax: 800-393-6699 www.onyxcollection.com Heavy Glass Frameless Shower Door With Return Panel Full Showers with Return ench Seat with Return FRLSDRPL-0116
New Construction Stud Frame Vinyl Window Installation Guide
 New Construction Stud Frame Vinyl Window Installation Guide This manual contains procedures based on ASTM E2112 and Installation Masters Installer Training & Certification Program Manual RLC-1 The procedures
March 14, 2007. Installation of Bay, Bow and Garden Windows
 March 14, 2007 Re: Installation of Bay, Bow and Garden Windows Attached are the Atrium Companies, Inc recommendation for the installation of bay, bow and garden windows. These instructions were developed
Active and Passive Sash Replacement
 for Andersen Gliding Windows Read all instructions carefully before attempting this procedure. If you have any questions about your ability to complete the procedure, call Andersen at 1-888-888-7020 for
DIRECTIONS FOR ASSEMBLING BASE & WALL CABINETS
 DIRECTIONS FOR ASSEMBLING BASE & WALL CABINETS TheRTAStore.com STEP 1: CLEAR A WORK SPACE Place your RTA cabinet panels on a smooth, scratch resistant surface in a large, open area. (Some people like to
K. D. FRAME ASSEMBLY FOR CLOSED STEEL STUD WALLS...Ins 10. FRAME INSTALLATION DETAILS FOR CLOSED STEEL STUD WALLS...Ins 11
 K. D. FRAME ASSEMBLY FOR MASONRY WALLS...........................Ins 2 FRAME INSTALLATION DETAILS FOR MASONRY WALLS......................Ins 3 INSTALLING EXISTING MASONRY WALL ANCHORS IN FRAME..................Ins
INSTALLATION OF A BAY WINDOW
 INSTALLATION OF A BAY WINDOW Installation of a Bay Window These instructions relate to the replacement of an existing bay window or replacement of a straight window with a new bay window, in an opening
foot skylight) is enough to knock a worker off their feet. A 10 mph wind gust on a 5 x 6 skylight develops a wind force of 270 lbs.
 is enough to knock a worker off their feet. A 10 mph wind gust on a 5 x 6 skylight develops a wind force of 270 lbs.") Skylight Installation Instructions This document provides instruction and guidelines for installation of both curb mount (CM) and self flashing (SF) unit skylights on flat, pitched (> or equal to 3/12
Skylight Installation Instructions This document provides instruction and guidelines for installation of both curb mount (CM) and self flashing (SF) unit skylights on flat, pitched (> or equal to 3/12
PRODUCT GUIDE Vinyl Casement & Awning Windows (JPG005)
") This guide contains procedures for common user serviceable repair tasks found on vinyl casement and awning windows. If a condition arises that is not covered in this guide, please contact us for professional
This guide contains procedures for common user serviceable repair tasks found on vinyl casement and awning windows. If a condition arises that is not covered in this guide, please contact us for professional
OWNER S MANUAL Table Tennis Table Patent Pending
 OWNER S MANUAL Table Tennis Table Patent Pending Be sure to write your model number and serial number here for future reference. You can find these numbers printed on the bottom of the table. MODEL # T8179
SECTION 08560 SERIES 1500 VINYL PATIO DOORS
 SERIES 1500 VINYL PATIO DOORS PART 1 GENERAL 1.1 SECTION INCLUDES A. Patio Doors 1.2 RELATED SECTIONS A. Section 05450: Cold Formed Metal Framing. B. Section 06100: Rough Carpentry. C. Section 06200: Finish
SERIES 238 WINDOWS. NOTE: Read instructions completely before attempting any installation.
 1 Installation Instructions SERIES 238 WINDOWS Page 2: Page 3-4: Page 5: Page 6: Page 7: Opening Preparation and Wood Buck Installation Installation Instructions for Series 238 WINDOWS Figure 1: Buck preparation
Customer Service 800.780.8889 or visit us online at smithnoble.com. Wood Shutters. Step by Step Installation. Troubleshooting Tips
 reflect your style TM Customer Service 800.780.8889 or visit us online at smithnoble.com Wood Shutters Step by Step Installation Troubleshooting Tips Easy Care Instructions STEP 1 Your New Shutter Thank
GARDEN WINDOW GLAZING AND DE-GLAZING INSTRUCTIONS
 GARDEN WINDOW GLAZING AND DE-GLAZING INSTRUCTIONS DE-GLAZING 1.) If there is any PVC cement covering the joints where external glazing bead strips meet, cut through the cement with a utility knife. 2.)
POD Visor Instructions
 POD Visor Instructions Please read fully before beginning assembly and mounting the Visor Parts List - Visor Left Part (LV), Visor Right Part (RV) Qty 2, Aluminum Crossbars Hardware - Qty 17, 1/4" X 3/4"
glass & Glazing Products
 glass & Glazing Products WallMaker Create an unlimited variety of bright, beautiful and secure interior environments with the easy-to-install Stylmark WallMaker glass wall system. This versatile system
300mm. 2mm MIN GAP. PLACE 100mm X 100mm. SO THAT IT IS 38mm INTO
 INSTALL PEEL & STICK (P&S) GUSSETS WITH PRIMER AS PER MANUFACTURERS INSTRUCTIONS 2mm MIN GAP IN SHEATHING STEP 1 PLACE 100mm X 100mm PIECE OF P&S IN CORNER SO THAT IT IS 38mm INTO THE OPENING EACH WAY
INSTALLATION INSTRUCTIONS for Vinyl Windows with Integral Nailing Fin (JII001) IMPORTANT INFORMATION AND GLOSSARY ROUGH OPENINGS
 IMPORTANT INFORMATION AND GLOSSARY ROUGH OPENINGS") Thank you for selecting JELD-WEN products. Attached are JELD-WEN s recommended installation instructions for Vinyl windows with an integral nail fin. Not all window types may be installed into every wall
Thank you for selecting JELD-WEN products. Attached are JELD-WEN s recommended installation instructions for Vinyl windows with an integral nail fin. Not all window types may be installed into every wall
STEEL-RITE II or III COMMERCIAL SECTIONAL DOOR Owner s Manual Supplement Model 52242 NOTICE TO USER
 STEEL-RITE II or III COMMERCIAL SECTIONAL DOOR Owner s Manual Supplement Model 52242 NOTICE TO USER Thank you for purchasing the Steel-Rite II or III, model 52242 commercial sectional door from RITE-HITE
FRONT BUMPER INSTALLATION INSTRUCTIONS 2007-2011 DODGE / MERCEDES SPRINTER
 Aluminess Products Inc 9402 Wheatlands Ct. #A Santee, CA 92071 619-449-9930 FRONT BUMPER INSTALLATION INSTRUCTIONS 2007-2011 DODGE / MERCEDES SPRINTER Please read before beginning Stainless steel hardware
Installation Instructions
 READ BEFORE INSTALLING UNIT For Slider Casement Air Conditioners To avoid risk of personal injury, property damage, or product damage due to the weight of this device and sharp edges that may be exposed:
TENSION ISSUES? ROLLER SEE PAGE 7
 ROLLER TENSION ISSUES? SEE PAGE 7 Roller Shade Installation Guide Important: If you have ordered a valance for your shade, you must first read the Valance Installation Guide found in your box. We make
1958-64 WINDOW CHANNEL, WEATHERSTRIP & WHISKER STRIP REPLACEMENT FOR 2-DOOR SEDANS
 By Denny Williams Photos by Denny Williams 1958-64 WINDOW CHANNEL, WEATHERSTRIP & WHISKER STRIP REPLACEMENT FOR 2-DOOR SEDANS Denny Williams - Technical Writer Denny is first and foremost a dyed-in-thewool
INSTALLATION INSTRUCTIONS for Vinyl Patio Doors without Nailing Fin (JII015) IMPORTANT INFORMATION AND GLOSSARY
 IMPORTANT INFORMATION AND GLOSSARY") Thank you for selecting JELD-WEN products. Attached are JELD-WEN s recommended installation instructions for vinyl patio doors without nailing fin, including flush fin. Read these instructions thoroughly
Thank you for selecting JELD-WEN products. Attached are JELD-WEN s recommended installation instructions for vinyl patio doors without nailing fin, including flush fin. Read these instructions thoroughly
Casement/Awning Window Parts Reference Catalog
 Casement/Awning Window Parts Reference Catalog (Includes Miscellaneous Parts for Eyebrow Casement and Garden Bay Windows) #1028654 (Revised 03/02) Weather Shield Mfg., Inc. Medford, WI 54451 715/748-2100
KITCHENS. Tip PAGE 1 FITTING YOUR KITCHEN GUIDE. How to mark out a kitchen. Tools required for installing a kitchen STEP ONE STEP TWO STEP THREE
 FITTING YOUR KITCHEN GUIDE How to mark out a kitchen PAGE 1 Before starting on the installation, measure 870mm from the lowest point of the floor and mark a datum line around the room to indicate where
ISSUE 2. Installation Guide
 ISSUE 2 Installation Guide Here at Slide and Fold, we LOVE our Bi-Fold Plus range of folding-sliding doors. We want to ensure that your customers love them too. So we have created a new, detailed installation
How To Install Your Frameless Shower Enclosure
 How To Install Your Frameless Shower Enclosure a) Installing Single Frameless Door Side Mounted Wall Hinges b) Installing Frameless Door with In-Line Panel c) Installing Frameless Door Between In-Line
Composite Stone Veneer
 Composite Stone Veneer Installation Guide Ver 1 Jun 2015 www.compstone.com Composite Stone Veneer Installation Guide Contents Introduction & Overview 3 Required Tools 4 Optional Tools 4 Attachment Guidelines:
Glossary. 1/3 1/3 1/3 - Configuration of a vent-fixed-vent (xox) window in which the vents and fixed panel are equal sizes
 window in which the vents and fixed panel are equal sizes") Glossary 1/3 1/3 1/3 - Configuration of a vent-fixed-vent (xox) window in which the vents and fixed panel are equal sizes 1/4 1/2 1/4 - Configuration of a vent-fixed-vent (xox) window in which the vents
Glossary 1/3 1/3 1/3 - Configuration of a vent-fixed-vent (xox) window in which the vents and fixed panel are equal sizes 1/4 1/2 1/4 - Configuration of a vent-fixed-vent (xox) window in which the vents
170 Sliding Patio Door available Styles
 170 Sliding Patio Door available Styles A-171 OXO Continuous Frame Continuous Frame Transom Sidelite A-172 XO OX A-173 XOO OOX A-175 OXXO Manufacturer of Alpine Window Products 170 Sliding Patio Door Component