INFM22AGB. IMM Rev CUSTOMER CARE LINE:
|
|
|
- Winifred Malone
- 7 years ago
- Views:
Transcription
1 Lancet : Sae Han Med Corp , Sungsuk-Dong, Ilsandong-Gu, Goyang-City, Gyeonggi-Do, Korea Lancing Device : GMMC Room No. 1112, Ace Tower 9 th Bldg., , Kasan-Dong, Kumchon-Ku, Seoul, Korea CUSTOMER CARE LINE: INFM22AGB IMM Rev

2
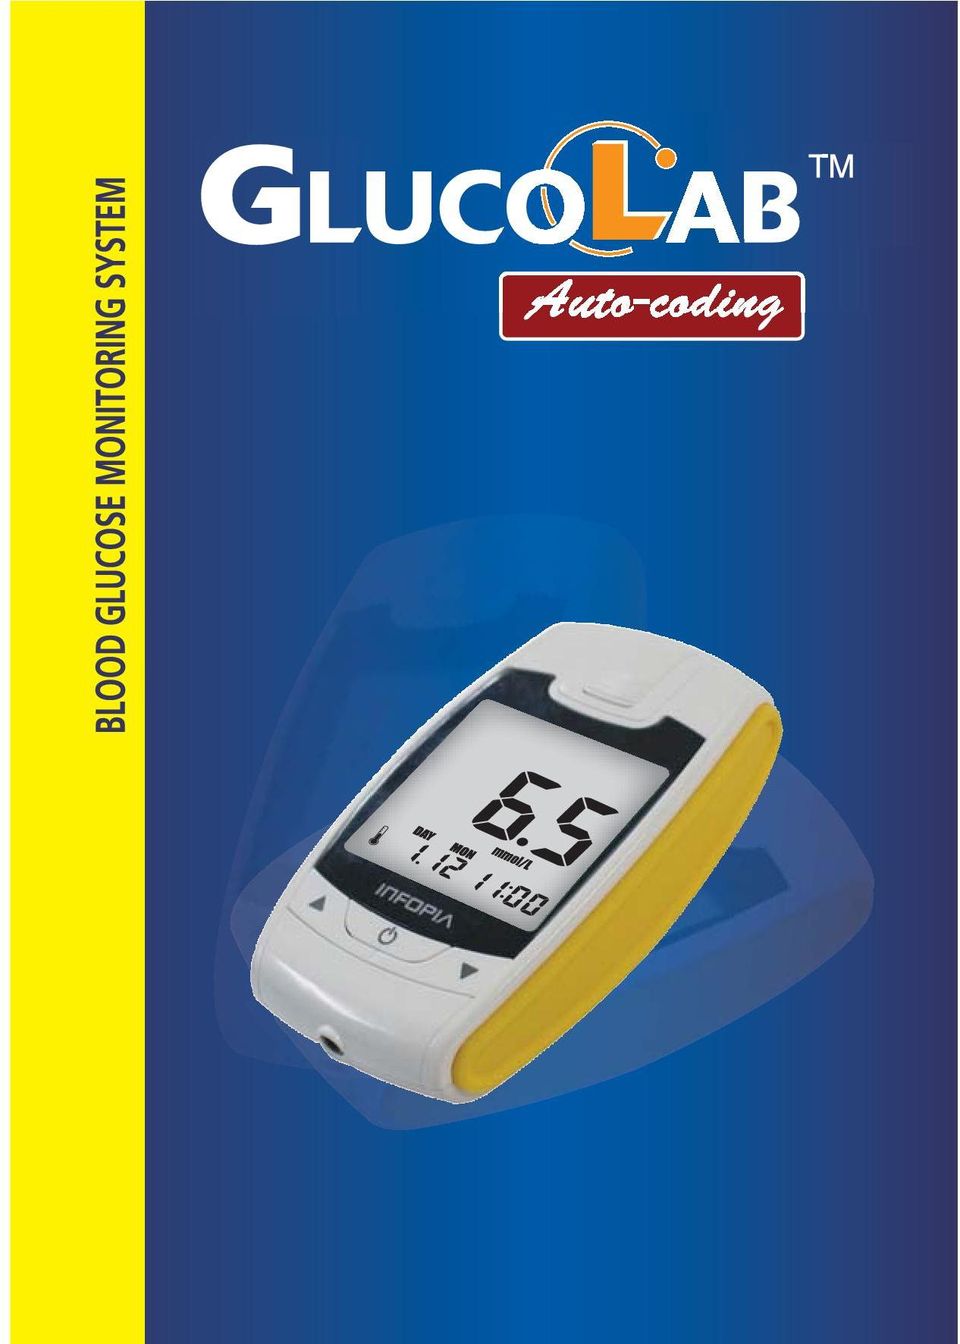
3 Dear GLUCOLAB TM Auto-coding Blood Glucose Monitoring System Owner Test Principle Thank you for choosing the GLUCOLAB TM Auto-coding Blood Glucose Monitoring System. This booklet has important information you need to know about the GLUCOLAB TM Auto-coding Blood Glucose Monitoring System. Please read it carefully. We understand that self-testing of blood glucose level provides a way to control your diabetes and may give you peace of mind by testing regularly. As a result GLUCOLAB TM Auto-coding was developed to provide you with a fast and accurate reading with a convenient and simple process. Our goal at GLUCO- LAB TM Auto-coding is to provide the best quality healthcare products coupled with superior customer service. Always consult with your healthcare professional before making any changes to your diabetes management. The GLU- COLAB TM Auto-coding Blood Glucose Monitoring System is for in vitro diagnostic use only. Important information The GLUCOLAB TM Auto-coding Blood Glucose Monitoring System is intended for use outside the body (in vitro diagnostic use only). It should be used only for testing blood glucose and only with fresh capillary whole blood samples. It should not be used for the diagnosis of diabetes. Consult your physician or diabetic healthcare professional about daily management of your diabetes and proper use of the glucometer. Please pay close attention when handling blood. Improper procedures may cause serious hazards to your health. The GLUCOLAB TM Auto-coding Blood Glucose Monitoring System contains small parts. Please keep your monitoring system out of reach of children. The enzyme glucose oxidase on the blood glucose test strip reads specifically with the blood glucose. The current generated is converted and displayed as blood glucose value. The GLUCOLAB TM Auto-coding Blood Glucose Monitoring System is plasmacalibrated to allow easy comparison of results with laboratory methods. A blood glucose meter which is calibrated against a whole blood method may have different results in comparison to GLUCOLAB TM Auto-coding. The laboratory system used for calibration of the GLUCOLAB TM Auto-coding Blood Glucose Monitoring System is YSI 2300 STAT plus which is equipped with a glucose oxidase system. Note < Maintaining the GLUCOLAB TM Auto-coding blood glucose test meter > 1. Do not assemble or disassemble the blood glucose test meter. 2. Please keep in a dry place. 3. Please keep clean and dry. 4. Please do not store in the same place as toxic chemicals or gases. 5. Keep out of direct sunlight. CAUTION 1. If the code of the blood glucose test meter and of the blood glucose test strip vial does not match, you must set the code number. 2. If the code on the LCD window and on the blood glucose test vial do not match, follow the coding procedure for accurate results

4 Contents 1. Learning the System Intended use of Blood Glucose Test Meter GLUCOLAB TM Auto-coding Blood Glucose Monitoring System Kit Contents GLUCOLAB TM Auto-coding Blood Glucose Test Meter GLUCOLAB TM Auto-coding Blood Glucose Test Meter Display GLUCOLAB TM Auto-coding Blood Glucose Test Strip Information 2. Before Testing Setting the blood glucose test meter Auto-Coding Function Performing a Glucose control solution test 3. Testing Your Blood Glucose Testing Your Blood-Preparation Collecting a Drop of Blood Testing Procedure Blood Glucose Test Strip Ejector Function 4. Reviewing Your Results 5. Alternate Site Testing 6. Performing a Blood Test using and Alternate Site 7. GLUCOLAB TM Auto-coding Blood Glucose Test Meter Software 8. Taking Care of Your Blood Glucose Test Meter Cleaning Your Blood Glucose Test Meter and Maintenance Dispose of meter and batteries 9. Troubleshooting 10. Specifications 11. Conversion table mmol/l mg/dl 12. Symbol reference 13. Warranty Intended use of GLUCOLAB TM Auto-coding Blood Glucose Test Meter The GLUCOLAB Auto-coding TM Blood Glucose Monitoring System is intended for in vitro diagnostic use only. GLUCOLAB Auto-coding TM Blood Glucose Monitoring System is for self-testing. It should not be used for the diagnosis of diabetes or for the testing of newborns. The GLUCOLAB TM Auto-coding was designed to test a blood glucose (sugar) level and can be used with a capillary whole blood sample. Do not use the GLUCOLAB TM Auto-coding Blood Glucose Monitoring System for any purpose other than blood glucose testing. CAUTION : Before using any product, please read all instructions. Consult your physician or diabetic healthcare professional about daily management of your diabetes and proper use of the glucometer. TM If you have any questions about the GLUCOLAB Auto-coding product, please contact Neon Diagnostics Ltd. Freephone patient helpline

5 BLOOD GLUCOSE TEST METER For use with Blood Glucose Test Strip only INFM22A GL-5C13-1C0-03 Rev BLOOD GLUCOSE TEST METER Bd. General Wahis Brussels, Belgium GL-5C13-1C1-03 Rev GLUCOLAB TM Auto-coding Blood Glucose Monitoring System KIT Contents GLUCOLAB TM Auto-coding Blood Glucose Test Meter Blood glucose test strip Port: Insert the GLUCOLAB TM Autocoding blood glucose test strip here. Blood glucose test strip ejector Display Screen: Displays your test results, symbols and messages. Function Button: Powers the meter on/off, prompts memory data and acts as an enter button during setup and after tests. Up/Down Arrow Buttons: Adjusts setting, scrolls through memory 1. GLUCOLAB TM Auto-coding Blood Glucose Test Meter 2. GLUCOLAB TM Auto-coding Blood Glucose Test Strips 3. Lancing Device 4. Lancets 5. Operation Manual Your GLUCOLAB TM Auto-coding Blood Glucose Monitoring System has been sealed and should contain all of the parts shown above. Please return the system to the place of purchase or contact your nearest GLU- COLAB TM Auto-coding representative if the container seals are broken or parts are missing Warranty Registration Card 7. Patient Logbook 8. Carrying Case 9. Two 3V Li-CR2032 Batteries 10. Control Solution Normal Serial Number Battery Cover CAUTION 1. Do not use GLUCOLAB TM Auto-coding blood glucose test meter in a dry environment, especially if synthetic materials are present. Synthetic clothes, carpets, etc., may cause damaging static discharges in a dry environment. 2. Do not use GLUCOLAB TM Auto-coding blood glucose test meter near cellular or cordless telephones, walkie talkies, garage door openers, radio transmitters, or other electrical or electrical equipment that are sources of electromagnetic radiation, as these may interfere with the proper operation of the blood glucose test meter. 9

6 GLUCOLAB TM Auto-coding Blood Glucose Test Meter Display GLUCOLAB TM Auto-coding Blood Glucose Test Strip Information Low Battery Warning Symbol Strip Code Symbol Blood drop symbol for test Alarm Symbol Before Having a Meal After Having a Meal After Sports Activity After Taking Medication Temperature / Date Time / Test Result Amount Test Result Unit Symbol Control Solution Symbol Storage and Handling Caution 1. Keep out of direct sunlight. 2. Store the GLUCOLAB TM Auto-coding Blood Glucose Test Strip vials in a cool, dry place between 2-30 C (36-86? ). Do not freeze. 3. Make a note of the discard date on the vial label when you first open it. Discard remaining GLUCOLAB TM Auto-coding blood glucose test strips 3 months after first opening the vial. 4. Close the vial cap tightly immediately after removing a GLUCOLAB TM Autocoding blood glucose test strip. 5. Do not use test strips after the expiration date printed on the package or vial as this may cause inaccurate results. 6. Avoid getting dirt, food or water on the blood glucose test strip. Do not bend, cut, or alter the GLUCOLAB TM Auto-codingblood glucose test strip. 7. GLUCOLAB TM Auto-coding blood glucose test strips are for single use only. 8. Keep the blood glucose test strip vial away from children. 9. Please refer to the user s manual for GLUCOLAB TM Auto-coding blood glucose test strip for additional information. 10. Discard the used blood glucose test strip carefully, to prevent any infection. AVR CHK Average Test Result System Troubleshooting Symbol Use only GLUCOLAB TM Auto-coding brand blood glucose test strips with your GLUCOLAB TM Auto-coding blood glucose test meter.? Apply Blood Target? Confirmation Window? Contact Bar

7 GLUCOLAB TM Auto-coding Blood Glucose Test Strip Information Setting Your Blood Glucose Test Meter Limitations of Blood glucose measuring system : The blood glucose test strips provide accurate results when the following conditions are observed: - Use the GLUCOLAB TM Auto-coding blood glucose test strips with the GLUCOLAB TM Auto-coding blood glucose test meter or GLUCOLAB TM blood glucose test meter. - Use fresh capillary whole blood only. - Do not use neonate samples. - The blood glucose test strips are for single use only. Do not reuse. - Dehydration may lower test results. - Inaccurate results may occur when in shock, hypotensive, hyperglycemic, or hyperosmolar state, with or without ketosis. - Blood glucose test strips used above altitudes of 10,000 feet will have an effect on test results. Doctors - Please note the following interferences that may affect test results : - GLUCOLAB TM Auto-coding test strip results can be used with hematocrit levels in the range of 20% to 60%. If the hematocrit range is out of the range(20~60%), then the test results may be lower or higher than actual value. - Interferences : Acetaminophen, Uric and, Ascorbic acid (Vitamin C), and other reducing substances when occurring in normal blood or normal therapeutic concentrations do not significantly affect results. However, abnormally high concentrations may cause inaccurately high results. - Lipemic samples; Cholesterol up to 12.93mmol/L or triglyceride up to 33.9mmol/L do not significantly affect the results. Values beyond these levels should be interpreted with caution. - Blood samples that contain a high concentration of dissolved oxygen may lower the test result. The GLUCOLAB TM Auto-coding Blood Glucose Test Meter has a variety of excellent functional modes; beep sound to alert when function is set, date, time, five daily alarms, ability to designate activities related to the test result, and the ability to designate three unique data averages. Power On Press for 3 seconds at least. User Activity Option After pressing and releasing either or buttons to turn the user Activity option on/off, confirm with. Year After pressing and releasing either or buttons to set the year (from 2007 to 2099), confirm with. Performance Characteristics : The performance of the blood glucose test strips has been evaluated in laboratory and in clinical tests. Measurement Range : The measurement range of the GLUCOLAB TM Auto-coding Blood glucose measuring system is 0.5 to 33.3 mmol/l. Date / Time After pressing and releasing either or buttons to set the date and time, confirm each with. Temperature unit Press and release either or buttons to set or. Enter button. Number of days for average After pressing and releasing either or buttons to set the number of days for average calculation (3 different possible), confirm with

8 Setting Your Blood Glucose Test Meter Auto-Coding Function 1. GLUCOLAB TM Auto-coding has automatic code recognition function. Alarm on/off After pressing and releasing either? or? buttons to turn the alarm on/off, confirm with. Alarm time After pressing and releasing either? or? buttons to set the alarm hour and minute, confirm with. Alarm After programming the number of desired alarms (5 alarms possible), confirm with. 2. It recognizes automatically the code number. This is a very convenient function preventing the inconvenience of setting the code number on the blood glucose test meter every time. CAUTION 1. **VERY IMPORTANT: Correct test unit. Your GLUCOLAB TM Auto-coding blood glucose test meter is pre-set as mmol/l as test unit. An incorrect test unit will lead to an incorrect test result display. Please consult your healthcare professional if you re not sure which test unit to use. Stored test results are displayed correctly after re-setting the test unit. See also conversion table on page Without setting the date properly, the average glucose level and the results in memory will not show proper values. It is recommended to set the blood glucose test meter before use and when new batteries are installed. 3. It is not possible to test your blood glucose in the setting mode. 4. To turn the meter off during setup, press for at least 5 seconds. CAUTION 1. Do not bend the blood glucose test strip to prevent the Automatic code recognition failure. 2. If the code recognition label is damaged, the code recognition may fail. Please check the code number on the LCD window with the code number on the blood glucose test strip vial

9 Performing a Glucose Control Solution Test Performing a Glucose Control Solution Test The glucose control solution should be used when there is suspicion that the blood glucose test meter or the blood glucose test strips are not working properly. For example: if strips have been exposed to extreme conditions or if you drop the blood glucose test meter. Check the expiration date before performing a glucose control solution test. Do not used if expired. Once opened, solution expires after 3 months. The Glucose control solution should be used Whenever you suspect the blood glucose test meter or blood glucose test strip is not functioning properly. If your blood glucose test results are not consistent with your symptoms or if you think they are not accurate. If you have dropped the blood glucose test meter. For quality control in the point of care usage. For teaching or learning the system. 1. Shake the glucose control solution before use. 2. Discard the 1st drop of glucose control solution, this will eliminate any residue. 3. Place a drop of glucose control solution on a clean dry surface (ex. The lid of the blood glucose test strip vial). 4. Insert a blood glucose test strip into the port and press the up arrow. A glucose control solution vial will appear on the bottom left hand side of the screen, above the date and time. This will allow you to differentiate between a glucose control solution test and an actual blood test for future reference. 5. Dip the blood glucose test strip into the glucose control solution. 6. Results appear in 5 seconds. 7. Compare the result to the range printed on the blood glucose test strip vial, the results should fall within that range. 8. If your glucose control solution falls out of range, do not perform a glucose test, please contact your local representative. Note: - GLUCOLAB TM Auto-coding glucose control solution is sold separately. - It is recommended that glucose control solution is stored at room temperature 20~25 (68 77 ) before testing. For example If you use a normal glucose control solution, you must use the normal range printed on the side of the blood glucose test strip vial Results that fall outside the expected range may indicate: Test not performed at room temperature. An error in the way you are doing the test. Expired or contaminated glucose control solution. A problem with the blood glucose test meter. Glucose control solution that is too warm or cold. Failure to discard the first drop of glucose control solution and to wipe the bottle tip clean. Failure to shake the glucose control solution adequately. CAUTION If your glucose control solution falls out of range, do not perform a glucose test, please contact your local representative. The Glucose Control Solution range is not the recommended range for your blood glucose level

10 Testing Your Blood - Preparation Collecting a Drop of Blood Before testing, be sure to read this section and blood glucose test strip package insert found in the blood glucose test strip box carefully, Make sure you have all the necessary items to begin testing: GLUCOLAB TM Auto-codingblood glucose test meter GLUCOLAB TM Auto-codingblood glucose test strip Lancing Device Sterile Lancets The lancing device is a convenient medical tool for collecting capillary blood samples for glucose monitoring or other tests which require one or two drops of blood. As a more advanced lancing device, it provides ultimate safety and comfort for obtaining blood samples. An adjustable tip offers 5 levels of skin penetration for individual user s comfort and a lancet ejector enables the safe disposal of the used lancet. As an added bonus it also has a transparent tip for AST (Alternative Site Testing). PRECAUTIONS Never use a lancet that has been used by someone else. This could lead to contamination. If the lancing device is to be used by another person, the unit must be properly disinfected and a new tip and lancet must be used. Do not leave the lancet in the device after use. A new lancet must only be placed into the lancing device directly before testing. This device has many small parts and could be a choking hazard for children if swallowed. In the case of hospital use, hospitals need to consult their own infection control protocols in order to avoid any contamination. Always dispose of the used lancet in a biohazard garbage container. COMPONENTS Clear Tip CAUTION Ejection System Sliding Barrel To reduce risk of infection : 1. The lancing device and sterile lancets should NOT be shared with others. 2. Always use a new, sterile lancet and a new blood glucose test strip. 3. Practice using the Lancing Device and become accustomed with its use. 4. Lancets and blood glucose test strips are for single use only. 5. Wash your hands with warm, clean water and soap before testing. 6. Avoid getting hand lotion, oils, dirt or debris on the lancets or on the lancing device. 7. Dry your hands completely before testing. Depth Indicator/Adjustable Tip Lancet Holder Release Button

11 Collecting a Drop of Blood Collecting a Drop of Blood 1. Unscrew the tip of the lancing device by turning it counter-clockwise while holding the base firmly. 2. With two fingers, pull out the lancet carrier and hold it in place. 3. While holding the lancet carrier, insert a new sterile lancet into the bottom of lancet carrier. RECOMMENDED AVAILABLE LANCETS Some general sterilized lancets are BD-Ultra Fine, Cleanlet Fine, E-Z Ject, G-P Lite, Microlet, Monolet, One Touch, Soft Touch, Therasense, Ultra TLC and Unilet GP. Please note: Some lesser known lancets may not work properly due to their dimensions. Please contact your representative to make sure that you are using proper lancets. USING THE CLEAR TIP (AST) 1. Place the clear tip in the skin at the chosen alternative site, press and hold the continuously for a few seconds, then push the release button to take a sample. 2. Watch through the clear tip until a sufficient blood sample is taken. If there is not enough blood, gently massage the area until a sufficient sample has been collected. STORAGE Products must be stored at room temperature protected from sunlight or moisture. 4. Twist the cap of the lancet off. Click 5. Put the tip of the lancing device back on and turn it clockwise. 6. Hold the tip firmly in one hand then pull out the sliding barrel with the other hand. This will load the lancing device. CLEANING AND DISINFECTION Clean and wipe the outside of the lancing device a minimum of once a week with a soft cloth, dampened with mild soap and water. Wash the adjustable tip and the clear tip once a week with mild soap. Do not immerse in liquid. WARRANTY The lancing device has a 2-year warranty from the date of purchase. A malfunctioning device should be returned to the following address: 7. Place the lancing device in place. Hold the firmly against the side of the finger, with the cap resting on the finger. (The harder it is pressed the deeper the puncture.) Press the release button to take a sample. Discard your Blood glucose test Lancet 8. Unscrew the tip of the lancing device by turning it counter-clockwise. 9. Push the lancet ejector forward with the thumb and simultaneously pull out the sliding barrel to dispose of the used lancet in a proper biohazard container. GMMC Room No. 1112, Ace Tower 9th Bldg., , Kasan-Dong, Kumchon-Ku, Seoul, South Korea Tel : Fax : GMMC, S.L. C/Jordi de S. Jordi 13, Valencia SPAIN Tel : Fax: U.K. Distributor: Neon Diagnostics Ltd. Untis 7&8, Swanbridge Industrial Park, Black Croft Road, Witham, Essex, CM8 3YN CUSTOMER CARE LINE: Push the needle into its protective cover. pull the lancet out and discard appropriately
 1.")
12 Testing Procedure Testing Procedure Correct Applying Blood Completely Filled Correct Step 1 Firmly insert the blood glucose test strip into the blood glucose test meter port with the infopia facing towards you. The blood glucose test meter automatically turns on displaying the code, ambient temperature and the date and time. The GLUCOLAB TM Auto-coding will automatically recognize the blood glucose test strip code number and adjust the blood glucose test meter accordingly. A blinking blood glucose test strip will appear at the top of the screen indicating the blood glucose test meter is ready for testing. Note : Inserting the blood glucose test strip in the wrong direction will turn the blood glucose test meter on, but you will be unable to test. Caution 1. If the code is not displayed after for a while, pull the blood glucose test strip out of the port, and re-start the procedure from the beginning. 2. If the code on the LCD display window and on the test vial does not match, try another new blood glucose test strip. If the mismatch persists, please contact your local representative for help. 3. If the blood glucose test meter does not power on, pull the blood glucose test strip out of the port, and re-insert the blood glucose test strip. 4. Avoid testing under direct sunlight, for a more accurate test result. 5. If you apply your blood sample too early, ERROR5 message will appear on LCD ( refer to p35). For a more accurate test result avoid testing under direct sunlight. Step 2 Incorrect Poorly filled Incorrect GLUCOLAB TM Auto-coding blood glucose test meter only requires 1.0 sample volume. Apply your blood to the glucose test strip and do not take off your finger until you get the beep sound.the test will automatically start. Place the top edge of the blood glucose test strip to the area you prepared for testing. The blood will automatically be drawn into the blood glucose test strip channel. When the chamber has enough blood, your blood glucose test meter will automatically count down. Caution 1. If the countdown does not start, do not add more blood to the blood glucose test strip! Discard the blood glucose test strip an restart testing. 2. If you do not conduct the test within 3 minutes, the blood glucose test meter will automatically power off to save battery life. In this case the test procedure should start again from the beginning. 3. You may get an inaccurate result if the blood sample is not completely filled in a single action

13 Testing Procedure Testing Your Blood - Case of Setting User Option Step 4 If you selected to use the User Activity option during set up, press and button to select the activity that correlates with your result (refer to p10), then press. mmol/l Step 3 After the beeping sound, the test will begin automatically and your results will appear in 5 seconds. It should begin counting down from 5 to 1 second on the LCD display window. The LCD window will display the result of your blood glucose level, temperature and time. Record the result value in your logbook. When blood glucose test strip is removed, the blood glucose test meter turns off automatically. CAUTION 1. If the test result is out of the test range, the Hi/Lo message will be shown on the LCD. (refer to p35) 2. Safely discard used blood glucose test strip and lancet, to a proper place, according to the local regulation

14 Test Strip Ejector Function Reviewing Your Result The GLUCOLAB TM Auto-coding blood glucose test meter stores up to 500 test results in its built-in memory, along with the average sugar level for the number of days which you had preset the blood glucose test meter to calculate. These values can be recalled in the LCD display at any time. Check your previous result by pressing the arrow button. Check your average data by pressing the arrow button. Press and Push forward Eject your blood glucose test strip 1. Once the test is complete, slide the ejector button forward to remove the blood glucose test strip from the blood glucose test meter. 2. Discard the used blood glucose test strip and lancet accordingly. The third latest The second latest The latest 7day average from the test date 14 day average from the test date 21day average from the test date CAUTION 1. If you push the ejector button too far forward, it may malfunction. 2. Strong impacts may result in a malfunction of the blood glucose meter. Average test result Test Unit Test result amount Average test result days

15 Alternate Site Testing Performing a Blood Test Using and Alternate Site Upper Arm Dorsal Hand Thigh Forearm Ventral Palm Fingertips Calf Performing a Blood Test Using an Alternate Site To ensure accurate results when lancing your forearm, upper arm, hand, thigh, or calf, wash the test site with soap and water. Make sure there is no cream or lotion on the test site.thoroughly dry your hands and test site. Important Information About Using Alternative Sites Testing : Alternate sites where you can test are dorsal hand, ventral palm, upper arm, forearm, calf, and thigh. Under certain conditions, blood glucose test results obtained using samples taken from your alternate sites may differ significantly from fingertip samples The conditions in which these differences are more likely to occur are when your blood glucose is changing rapidly such as following a meal, as insulin dose, or associated with physical exercise. When blood glucose is changing rapidly, fingertip samples show these changes more quickly than alternate sites samples. When your blood glucose is falling, testing with a fingertip sample may identify a hypoglycemic (low blood glucose) level sooner than a test with a alternate sites sample. Use alternate sites samples only for testing prior to or more than two hours after meal, insulin doses, or physical exercise. Testing performed within two hours after meals, insulin doses, or physical exercise or whenever you feel that your glucose levels may be changing rapidly should be done from the fingertip. You should also use fingertip testing whenever you have a concern about hypoglycemia (insulin reactions) such as when driving a car, particularly if you suffer from hypoglycemic unawareness (lack of symptom to indicate as insulin reaction), as forearm testing may fail to detect hypoglycemia. Important : We recommend that you test on your fingertips if you are testing for hypoglycemia (low blood glucose) or if you are suffering from hypoglycemia unawareness. CAUTION To receive accurate test results, at least 1.0 minimum sample volume is required

16 Performing a Blood Test Using and Alternate Site To bring fresh blood to the surface of the test site, rub the test site vigorously for a few seconds until you feel it getting warm. Lance the test site with the lancing device: 1. Hold the clear cap down against the top of your test site. Press the release button. Do not lift up. 2. Continue to hold the lancing device and gradually increase pressure for several seconds. GLUCOLAB TM Auto-coding Blood Glucose Test Meter Software You can transfer test results from the GLUCOLAB TM Auto-coding blood glucose test meter to a computer. You can download the software from our web site. ( You can purchase the computer communication cable separately from a local representative. [User] [PC] 3. While holding the lancing device on your test site, look through the clear cap; until a drop of blood appears approximate size 4. Lift the lancing device straight up; be careful not to smear the blood on your testing site. 5. Place the edge of the blood glucose test strip to the drop of blood. cable 6. The blood will automatically draw into the channel of the blood glucose test strip. You may get an inaccurate result if the blood sample is not completely filled in a single action

17 Cleaning Your Meter and Maintenance Replacing the Batteries Blood glucose test meter : Your blood glucose test meter does not require special maintenance or cleaning. avoid getting dirt, dust, blood, glucose control solution, or liquids on the blood glucose test meter, the test port, or data port. Your blood glucose test meter operation temperature is 10~40 ( ). It is recommended that you store the blood glucose test meter in its carrying case after each use. A cloth dampened with water and mild detergent can be used to wipe down the outside of the blood glucose test meter. Your GLUCOLAB TM Auto-coding blood glucose test meter is a precision instrument. Please handle it with care. Lancing Device: Clean the lancet device and caps with soap and tepid water. To disinfect the lancet device, prepare a disinfectant solution of one part household bleach to 10 parts water. Dampen a cloth with this solution and wipe the lancet device thoroughly. Soak only the cap for at least 30 minutes in the disinfectant solution. Do not soak the lancet device in liquid. Rinse the lance device and cap with water and dry thoroughly. For detailed instructions concerning GLUCOLAB TM Auto-coding blood glucose test strips, refer to the blood glucose test strip package insert found in the blood glucose test strip box. Please store the GLUCOLAB TM Auto-coding blood glucose measuring system in a cool, dry area, out of reach of children. Do not freeze. For a more accurate test result avoid testing under direct sunlight. Do not soak the blood glucose test meter orblood glucose test strips in water or liquid. Do not subject the meter or blood glucose test strips to excessive heat. Use your meter according to the instructions in the manual. If you need to purchase the lancing device, lancets or blood glucose test strips, contact your local representative. Discard the used Lancets carefully, to prevent any infection The low battery icon will appear in the upper left corner of the LCD screen to alert you when the battery power is running low, indicating a new battery is needed. Your GLUCOLAB TM Auto-coding blood glucose test meter uses only two 3V Lithium batteries (CR2032), which are included. When replacing the batteries, only CR2032 or equivalent lithium battery should be used. After changing the batteries, please be sure to recheck your blood glucose test meter settings. Dispose of meter and batteries Dispose of meter: The meter must be disposed of according to the local regulations concerning the disposal of electrical and electronic equipment. The Waste Electrical and Electronic Equipment(WEEE) regulation implement provisions of the European Parliament and Council Directive 2012/19/EU aimed to reducing the amount of EEE waste going for final disposal. The manufacturer, has specific instructions for the recovery of the meter. Please contact your distributor. Dispose of batteries : Please recycle or dispose of used batteries using your local battery collection systems and in compliance with your local environmental laws and regulations. Batteries contain chemicals that, if released, may affect the environment and human health. The crossed-out wheeled-bin symbol indicates the need for the separate collection for batteries. <Follow-up Action> 1. Check your meter with the glucose control solution (p16-17) 2. Perform your test again (p22-24) 3. If you are experiencing symptoms that are not consistent with your blood glucose test results, call your healthcare professional. CAUTION Remove both batteries from the compartment and dispose of them according your institution's guidelines. 33

18 Troubleshooting Troubleshooting The following chart may help you identify certain problems, but may not solve all problems that can occur. Please contact your local representative or customer support if the problem persists. Message Problem Action Required User applied the blood sample before the LCD display was blinking Please wait for the LCD to display icon blinking before applying your blood sample Message Problem Action Required Problem with the blood glucose test meter Caused by either used or wet blood glucose test strip Place the battery again, and set the blood glucose test meter. If the problem persists, please contact your authorized representative or customer support Please insert a new blood glucose test strip and perform your test again Problem with the Auto-coding label The ambient temperature is too low Please insert a new test strip and perform your test again. If Er6 message persists, please contact your local representative. If blinks with "SUN", avoid to the direct sunlight and retest. Place the blood glucose test meter within the operating temperature range for 10 minutes or more and retest. Problem with the test strip Blood glucose test strip is damaged Please insert a new test strip and apply the blood sample until confirmation window is completely filled. Please insert a new blood glucose test strip and perform your test again The ambient temperature is too high The test result is lower than 0.5 mmol/l Place the meter within the operating temperature range for 10 minutes or more and retest. Check the accuracy of your blood glucose test strip by performing a glucose control solution test. If the test results in a normal reading, re-test your blood sample two or three times. If "Lo" persists, consult your doctor immediately

19 Troubleshooting Troubleshooting Message Problem Action Required The blood glucose test meter does not power on Test does not start after applying blood sample The test result is higher than 33.3 mmol/l Battery is dead or there is a problem with the blood glucose test meter Poor blood sample Check the accuracy of your blood glucose test strip by performing a glucose control solution test. If the test results in a normal reading, re-test your blood sample two or three times. If "Hi" persists, consult your doctor immediately. Change the battery and if the problem persist, contact your local representative (refer to the P.33) Please insert a new blood glucose test strip and perform your test again Message Problem Action Required Low battery symbol appears in the upper left corner of the LCD screen Low battery warning symbol and 3 digit code Low battery Low battery Battery needs replacing. For your free replacement batteries, please contact Neon Diagnostics Ltd. Freephone Patient Helpline: Battery needs replacing. For your free replacement batteries, please contact Neon Diagnostics Ltd. Freephone Patient Helpline: The result is inconsistent There may be a problem with the blood glucose test strip Please insert a new blood glucose test strip and perform your test again No readings in memory to display Not enough readings in memory to display designated averages

20 Specifications Conversion table mmol/l mg/d/l Sample type Sample volume Test Range Capillary whole blood 1.0ul 0.55 ~ 33.3 mmol/l mmol/l mg/dl Reading time 5 seconds mmol/l Calibration Plasma - Equivalent mg/dl Altitude Operating Temperature Operating Humidity Strip storage temperature 3048m (10,000 feet ) 10-40? (50-104? ) 10-90% 2-30? ( ? ) mmol/l mg/dl mmol/l Display Type LCD mg/dl Dimension 85 X 50.5 X (mm) mmol/l Weight 49g ( Including Battery) mg/dl Power rating Battery Life PC communications port 3 V Li Battery (CR2032) X 2 One year after purchasing Communication is available to connect computer with cable mmol/l mg/dl
 mmol/l mg/dl mmol/l 6.7 7.0 7.2 7.5 7.8 8.0 8.3 8.9 120 126 130 135 140 145 150 160 9.0 9.4 10.0 10.5 11.0 11.1 12.0 12.5 13.")
21 Symbol Reference Warranty Symbol SN Description Consult Instructions for use Used By This product fulfills the requirements of Directive 98/79/EC on in vitro diagnostic medical devices Attention, See Instructions for use For In Vitro Diagnostic Use Batch code Catalogue Number Temperature limitation Do not reuse Serial number Date of Manufacture Manufacturer Keep away from sunlight Self-testing Used Waste electrical and electronic equipment Authorized representative in the European Community Waste batteries and accumulators Three - Year Warranty If, at any time during the first three years after purchase the blood glucose test meter does not work for any reason with the exception of obvious abuse, misuse, or disastrous damage, NEON DIAGNOS- TICS LTD will replace your GLUCOLAB TM Auto-coding cose test meter or equivalent free of charge. The Warranty Policy of NEON DIAGNOSTICS LTD applies to the original purchaser of the blood glucose test meter and include the batteries supplied with the blood glucose meter set. Please fill in the warranty card attached to the set. Mail or fax it back to us. The GLUCOLAB TM Auto-coding blood glucose test meter has a full three-year warranty from the original date of your purchase. For your convenience, please include your date and place of purchase. Biohazard
22 MEMO MEMO
Introduction 1 The system 1 The meter 2 The display 3 The mode 3 The measurement 4 Coding the meter 4 How to obtain a drop of blood 6 Application of
 Introduction 1 The system 1 The meter 2 The display 3 The mode 3 The measurement 4 Coding the meter 4 How to obtain a drop of blood 6 Application of the blood 7 Procedure to test glucose 7 Procedure to
Blood Glucose Monitoring System USER GUIDE
 Blood Glucose Monitoring System USER GUIDE AW 06629001B Rev. date: 07/2009 Contents: Getting to know your system 1 Setting the time and date, and coding your meter 4 Testing your blood glucose 8 Reviewing
Blood Glucose Monitoring System USER GUIDE. Replaces Owner s Booklet
 Blood Glucose Monitoring System USER GUIDE Replaces Owner s Booklet AW 06650201A Rev. date: 07/2009 Contents: Getting to know your system 1 Setting up your meter 4 Testing your blood glucose 8 Attaching
Preface. Preface. A Healthcare professional should be contacted when Customer Service is not available.
 Preface Preface Thank you for selecting the GE100 Monitoring System. This manual provides all the information you need to operate this product for accurate test results. Please read the entire manual before
Blood Glucose Monitoring System. Owner's Booklet. Instructions for use.
 Blood Glucose Monitoring System Owner's Booklet Instructions for use. Contents covered by one or more of the following U.S. patents: 6,179,979, 6,193,873, 6,284,125, 6,716,577, 6,749,887, 6,797,150, 6,863,801,
Key Features in the AgaMatrix Jazz
 Advanced Blood Glucose Monitoring System OWNER S GUIDE Key Features in the AgaMatrix Jazz No Coding Required - The AgaMatrix Jazz doesn t require you to code your meter. Insert a test strip and you are
SD CodeFree BLOOD GLUCOSE MONITORING SYSTEM
 Dear SD CodeFree System Owner; Thank you for choosing the SD CodeFree Blood Glucose Monitoring System. Your new SD CodeFree Blood Glucose Monitoring System is an important tool that can help you better
The FreeStyle Lite Meter and How It Works
 ENGLISH The FreeStyle Lite Meter and How It Works System Check Screen This screen always appears when the meter is turned on so that you can make sure the display is working properly. Do not use the meter
Nova Max Blood Glucose Monitor Owner s Guide
 Nova Max Blood Glucose Monitor Owner s Guide Nova Biomedical 200 Prospect Street Waltham, MA 02454-9141 U.S.A. Telephone: 1-800-681-7390 Web site: www.novacares.com Made in the USA by Nova Biomedical Corporation
BLOOD GLUCOSE MONITORING SYSTEM USER GUIDE
 BLOOD GLUCOSE MONITORING SYSTEM USER GUIDE Thank you for choosing the CONTOUR blood glucose monitoring system! We are proud to be your partner in helping you manage your diabetes. Our goal is to make this
Caution! Please read complete Owner s Booklet and all product Instructions for Use.
 INTRODUCTION: Liberty Blood Glucose Monitoring System The Liberty System is a simple, accurate way to test whole blood glucose (sugar) level, anytime, anywhere. Our goal is to provide quality healthcare
Self-Monitoring of Blood Glucose
 My Doctor Says I Should Monitor My Blood Glucose... What Does This Mean? BD Getting Started Self-Monitoring of Blood Glucose Daily Blood Sugar Monitoring When you have diabetes, managing your blood glucose
BLOOD GLUCOSE MONITORING SYSTEM USER GUIDE
 BLOOD GLUCOSE MONITORING SYSTEM USER GUIDE Thank you for choosing the Contour blood glucose monitoring system! We are proud to be your partner in helping you manage your diabetes. Our goal is to make this
Title: Glucose Testing: StatStrip Glucose Meter Page 1 of 6
 Title: Glucose Testing: StatStrip Glucose Meter Page 1 of 6 CentraCare Health (CCH) adopts the following policy/procedure for: St. Cloud Hospital Original: 5/02 Minor Revision: Full Review: 1/15 Replaces:
Blood Glucose Monitoring System Owner s Booklet Instructions for use
 Blood Glucose Monitoring System Owner s Booklet Instructions for use For use with the App on iphone, ipod touch and ipad Blood Glucose Monitoring System Owner s Booklet 1 Owner s Booklet Thanks for choosing
Blood Glucose & Ketone Monitoring System. User s Manual
 Blood Glucose & Ketone Monitoring System User s Manual Definition of Symbols These symbols are associated with your meter. Batch code This packaging is capable of being recycled Catalog number Manufacturer
BLOOD GLUCOSE METER. Standard Owner s Booklet for Single Patient Use Only
 BLOOD GLUCOSE METER Standard Owner s Booklet for Single Patient Use Only Before You Start Testing About the meter and test strips Carefully read and follow the instructions in the Getting Started Guide,
BLOOD GLUCOSE METER / GLYCOMÈTRE. User s Manual Manuel de l'utilisateur
 BLOOD GLUCOSE METER / GLYCOMÈTRE User s Manual Manuel de l'utilisateur Whether the Accu-Chek Aviva Meter is your first blood glucose meter or you have used a meter for some time; please take the time
Inform II. Quick Reference Guide. for Healthcare Professionals BLOOD GLUCOSE MONITORING SYSTEM
 Inform II BLOOD GLUCOSE MONITORING SYSTEM Quick Reference Guide for Healthcare Professionals 2 Table of Contents Important... 4 General Information... 6 ACCU-CHEK Inform II Meter...10 How to Perform Patient
User Manual. Read this user manual carefully before you start testing
 User Manual Read this user manual carefully before you start testing MENARINI HELPLINE Menarini Helpline: (UK) 0800 243667 (Republic of Ireland) 1800 709903 (Northern Ireland) 0800 7837286 This number
digital fever alert ear thermometer suitable from birth instruction manual
 digital fever alert ear thermometer suitable from birth instruction manual digital fever alert ear thermometer instruction manual Please read these instructions carefully before using the thermometer and
Wireless Blood Glucose Monitoring System
 Wireless Blood Glucose Monitoring System User Guide For use with CONTOUR LINK Blood Glucose Meter, Ascensia MICROFILL Test Strips, and Compatible Medtronic Diabetes Devices Thank you for choosing the CONTOUR
BLOOD GLUCOSE METER. Active. Owner s Booklet
 BLOOD GLUCOSE METER Active Owner s Booklet Dear ACCU-CHEK System Owner, Thank you for choosing the ACCU-CHEK Active system. Congratulations on your decision to take control of your diabetes. We ve designed
Title: Fingerstick Glucose by Accu-Chek Inform
 Title: Fingerstick Glucose by Accu-Chek Inform Target Audience: This module is available to aid in assessing competency for all clinical staff who perform fingerstick glucose testing. Contents Instructions...
PROCEDURE NO. POC.514.01 LBH. Printed copies are for reference only. Please refer to the electronic copy for the latest version.
 Department Of Pathology POC.514.01- Blood Glucose Monitoring Accu-Chek Inform II Procedure-LBH Version# 1 Department PROCEDURE NO. PAGE NO. Point-of-Care Testing POC.514.01 LBH 1 OF 7 Printed copies are
HUMULIN 70/30 KwikPen
 1 Instructions for Use HUMULIN 70/30 KwikPen (70% human insulin isophane suspension 30% human insulin injection [rdna origin]) Read the Instructions for Use before you start taking HUMULIN 70/30 and each
NFC Communication Tray Model: HHX-IT3-Z
 INSTRUCTION MANUAL NFC Communication Tray Model: HHX-IT3-Z ENGLISH CONTENTS Introduction...3 Important safety information...4 Know your unit...6 Transferring data to the PC...7 Care and maintenance...8
FLASH GLUCOSE MONITORING SYSTEM. User s Manual
 FLASH GLUCOSE MONITORING SYSTEM User s Manual Contents Reader Symbols... 1 Important Safety Information... 3 Indications for Use... 3 Contraindications... 4 Getting to Know Your System...........................
BLOOD GLUCOSE METER. Getting Started Guide for Single Patient Use Only
 BLOOD GLUCOSE METER Getting Started Guide for Single Patient Use Only Before You Start Testing About the meter and test strips Carefully read and follow the instructions in the Getting Started Guide,
Instructions for Use. Components of the GENOTROPIN PEN 12
 Instructions for Use Important Note Please read these instructions completely before using the GENOTROPIN PEN 12. If there is anything you do not understand or cannot do, call the toll-free number listed
Instruction Manual Temp 4/5/6 Temperature Meter Series
 Instruction Manual Temp 4/5/6 Temperature Meter Series 68X243607 Technology Made Easy... Rev. 2 01/03-1 - Preface This instruction manual serves to explain the use of the Temp 4/5/6 temperature meter.
ClikSTAR - Important facts about your new insulin delivery device.
 ClikSTAR - Important facts about your new insulin delivery device. Instruction for Use ClikSTAR Insulin delivery device Before you start: Read these instructions and follow them completely each time you
el-720 Carbon Dioxide Gas Leak Detector User s Guide
 el-720 Carbon Dioxide Gas Leak Detector User s Guide Congratulations on the purchase of the AccuTools el-720 Carbon Dioxide Gas Leak Detector, the most technologically advanced instrument of its kind.
RT-1261A Ear and Forehead Thermometer Owner s Manual
 RT-1261A Ear and Forehead Thermometer Owner s Manual 311-1261000-009 Version 1.0 April, 2009 IMPORTANT SAFETY INSTRUCTIONS nu-beca RT-1261A Ear and Forehead Thermometer READ THIS BEFORE USING The following
3 WATT LED SPOTLIGHT Model No. SLM - 3801
 3 WATT LED SPOTLIGHT Model No. SLM - 3801 OWNER'S MANUAL Customer Service Tel: 1-800-268-3319 Superex Canada Ltd, Toronto,M2H 3B8 Made in China Table of Contents A). Important Safety Instructions B). Charging
User Manual Important: First read the Medication Guide that comes inside your FORTEO carton.
 1 RA082FSAM02 User Manual Important: First read the Medication Guide that comes inside your FORTEO carton. Before you use your new FORTEO delivery device, please read the entire front and back of this
INSTRUCTIONS FOR USE HUMIRA 40 MG/0.8 ML SINGLE-USE PEN
 INSTRUCTIONS FOR USE HUMIRA (Hu-MARE-ah) (adalimumab) 40 MG/0.8 ML SINGLE-USE PEN Do not try to inject HUMIRA yourself until you have been shown the right way to give the injections and have read and understand
Wireless Indoor/ Outdoor Thermometer
 Wireless Indoor/ Outdoor Thermometer Owner s Manual Please read before using this equipment. ˆ Contents FCC Information... 3 FCC Declaration of Conformity... 5 Preparation... 5 Installing Batteries...
Nokia Wireless Keyboard (SU-8W) User Guide
 User Guide") Nokia Wireless Keyboard (SU-8W) User Guide DECLARATION OF CONFORMITY We, NOKIA CORPORATION declare under our sole responsibility that the product SU-8W is in conformity with the provisions of the following
Nokia Wireless Keyboard (SU-8W) User Guide DECLARATION OF CONFORMITY We, NOKIA CORPORATION declare under our sole responsibility that the product SU-8W is in conformity with the provisions of the following
A Self-Study Packet for The Johns Hopkins Hospital Point-of-Care Testing Program copyright 2011 Johns Hopkins Hospital All rights reserved
 A Self-Study Packet for The Johns Hopkins Hospital Point-of-Care Testing Program copyright 2011 Johns Hopkins Hospital All rights reserved Overview and Objectives This module provides an introduction to
Bydureon 2 mg powder and solvent for prolonged-release suspension for injection in pre-filled pen How to use Bydureon pre-filled pen
 INSTRUCTIONS FOR THE USER Read these instructions carefully before use Bydureon 2 mg powder and solvent for prolonged-release suspension for injection in pre-filled pen How to use Bydureon pre-filled pen
YOUR GUIDE TO THE LANTUS SOLOSTAR INSULIN PEN
 Important Safety Information for Lantus You must test your blood sugar levels while using insulin, such as Lantus. Do not make any changes to your dose or type of insulin without talking to your healthcare
INSTRUCTIONS FOR USE HUMIRA 40 MG/0.8 ML, 20 MG/0.4 ML AND 10 MG/0.2 ML SINGLE-USE PREFILLED SYRINGE
 INSTRUCTIONS FOR USE HUMIRA (Hu-MARE-ah) (adalimumab) 40 MG/0.8 ML, 20 MG/0.4 ML AND 10 MG/0.2 ML SINGLE-USE PREFILLED SYRINGE Do not try to inject HUMIRA yourself until you have been shown the right way
My Doctor Says I Should Learn To Use Insulin... What Do I Do Next? BD Getting Started. Drawing and Injecting Insulin
 My Doctor Says I Should Learn To Use Insulin... What Do I Do Next? BD Getting Started Drawing and Injecting Insulin It is important to know how to draw and inject insulin so that you can give your injection
INTRODUCTION TO CLINICAL PRACTICE AND CLINICAL SKILLS 2nd Year MEDICAL YEAR 2009/2010
 INTRODUCTION TO CLINICAL PRACTICE AND CLINICAL SKILLS 2nd Year MEDICAL YEAR 2009/2010 POINT OF CARE TESTING This session is designed to teach you the principals of point of care testing. This is common
BODY FAT & HYDRATION % MONITOR SCALE
 EVALUATION BODY FAT & HYDRATION % MONITOR SCALE INSTRUCTION MANUAL MODEL 12-1190 ver 7/08 BODY FAT & HYDRATION % MONITOR SCALE Introduction and Precaution: MODEL: 12-1190 1. Congratulations for purchasing
ExStik TM ph Waterproof Meters
 User Guide ExStik TM ph Waterproof Meters Models PH100 & PH110 Patent Pending ExStik TM Description Front Panel Controls 1. Battery compartment cap 2. LCD Display 3. MODE / HOLD button 4. CAL / RECALL
USER INSTRUCTIONS FOR 10 LITRE PORTABLE DEHUMIDIFIER MODEL NO. DHMD102
 USER INSTRUCTIONS FOR 10 LITRE PORTABLE DEHUMIDIFIER MODEL NO. DHMD102 THANK YOU FOR CHOOSING YOUR NEW DEHUMIDIFIER. BEFORE USING THE UNIT READ THESE INSTRUCTIONS FULLY AND RETAIN THEM FOR FUTURE REFERENCE
Tympanic Thermometer
 Tympanic Thermometer Tympanic Thermometer Owner s Manual Version 1.0 May, 2013 IMPORTANT SAFETY INSTRUCTIONS READ THIS BEFORE USING The following basic safety precautions should always be taken. 1. Close
Instant Ear Thermometer
 INSTRUCTION MANUAL Instant Ear Thermometer Model 18-107-000 Please read this detailed guidebook completely before operating this unit. English Spanish Limited Five-Year Warranty Your Ear Thermometer is
HUMULIN (HU-mu-lin) N
 N") Instructions for Use HUMULIN (HU-mu-lin) N (human insulin [rdna origin] isophane suspension) vial (100 Units/mL, U-100) Read the Instructions for Use before you start taking HUMULIN N and each time you
Instructions for Use HUMULIN (HU-mu-lin) N (human insulin [rdna origin] isophane suspension) vial (100 Units/mL, U-100) Read the Instructions for Use before you start taking HUMULIN N and each time you
Refer to page 6 to page 19 for detailed instructions.
 CODE:GZ0000297065 Refer to page 6 to page 19 for detailed instructions. Preface This manual describes the operation of the COMPACT CONDUCTIVITY METER, B-771. Be sure to read this manual before using the
Accutrend Plus. User s Manual
 Accutrend Plus User s Manual Date of issue: March 2007 2007, Roche Diagnostics All rights reserved. ACCU-CHEK, ACCUTREND, COBAS, SAFE-T-PRO and SOFTCLIX are trademarks of Roche. This instrument complies
SALTER AIRE Plus COMPRESSOR Model 8350 / 8352 / 8353. Instruction Manual. Page 1 of 9
 SALTER AIRE Plus COMPRESSOR Model 8350 / 8352 / 8353 Instruction Manual Page 1 of 9 TABLE OF CONTENTS Introduction...3 Important Safeguards..3 System Components...5 Setup and Operation...5 Setup...5 Operation....6
body fat scale + Instruction Manual complete body analysis scale HEALTH
 HEALTH body fat scale + complete body analysis scale Instruction Manual Content Safety instructions... 4 About this device... 4 General... 4 Handling batteries properly... 5 Never carry out repairs yourself...
HEART RATE + CALORIE MONITOR
 S7 S7 HEART RATE + CALORIE MONITOR SB4065IS01SPORB.indd 1 TABLE OF CONTENTS INTRODUCTION 1 HOW TO USE THIS MANUAL 1 ACTIVATING THE WATCH FROM POWER DOWN MODE 1 WARNINGS & CAUTIONS 2 CARE & MAINTENANCE
HAIR CLIPPER. Model No. HC5150 HC5150 2. 3.
 All technical modifications reserved. 09/08. TSC 08.0634 HAIR CLIPPER 2. 3. 1. Model No. HC5150 4. 10/UK/HC5150 Version 03/10 Part No. T22-29458 REMINGTON is a Registered Trade Mark of Spectrum Brands,
User Guide. Temperature and Humidity Datalogger. Model 42280
 User Guide Temperature and Humidity Datalogger Model 42280 Introduction Congratulations on your purchase of the Extech 42280 Thermometer and Relative Humidity Datalogger. The 42280 is a wall-mount, tripod
Digital Photo Picture Frame. Operation Manual
 Digital Photo Picture Frame Operation Manual 20070309 CONGRATULATIONS on your purchase of a Polaroid 7 LCD Digital Photo Picture Frame. Please read carefully and follow all warnings and instructions in
Lexmark E260, E260d, and E260dn Series. Maintenance Guide
 Lexmark E260, E260d, and E260dn Series Maintenance Guide May 2008 www.lexmark.com Contents...3 Cleaning the exterior of the printer...3 Storing supplies...3 Conserving supplies...3 Checking the status
The OmniPod Insulin Management System
 Caregiver GUIDE The OmniPod Insulin Management System The OmniPod is an easy-to-use, two-part insulin delivery system. If you are a school nurse, daycare provider, or other secondary caregiver for someone
INSTRUCTION MANUAL Contactless Clinical Infrared Thermometer GT-101
 INSTRUCTION MANUAL Contactless Clinical Infrared Thermometer GT-101 17 D GB F I E P NL AR A Dear customer, Thank you for your confi dence in Geratherm and congratulations on your purchase! By purchasing
Bluelab Soil ph Meter Instruction Manual
 Instruction Manual www.getbluelab.com Table of Contents 1.0 Information about measuring the ph of soils/media. 2 2.0 Introduction to Bluelab Soil ph Meter 4 3.0 Preparing the Bluelab Soil ph Meter for
Fox 40 Whistle Watch USER MANUAL 609-0700
 Fox 40 Whistle Watch USER MANUAL 609-0700 CONTENTS BUTTONS AND FEATURES... 3 OPERATING THE WATCH... 4 STOPWATCH MODE... 5 COUNTDOWN MODE... 6 ALARM MODE... 7 BATTERY REPLACEMENT... 8 CARE AND MAINTENANCE...
Instructions for Use
 1 Instructions for Use HUMULIN R U-500 KwikPen insulin human injection U-500 (500 units/ml, 3 ml pen) Important: Know your dose of HUMULIN R U-500 insulin. The Pen delivers your dose in insulin units.
Nokia Bluetooth Headset BH-607. Issue 2. 1
 Nokia Bluetooth Headset BH-607 2 3 1 4 5 6 7 8 9 11 10 Issue 2. 1 12 13 14 DECLARATION OF CONFORMITY Hereby, NOKIA CORPORATION declares that this BH-607 product is in compliance with the essential requirements
Part #93-657-00 rev 1. American Diagnostic Corporation 55 Commerce Drive, Hauppauge, New York 11788 1-800-232-2670 www.adctoday.
 Part #93-657-00 rev 1 American Diagnostic Corporation 55 Commerce Drive, Hauppauge, New York 11788 1-800-232-2670 www.adctoday.com A Special Thank You... Thank you for choosing the ADC 657 Electronic Stethoscope.
User Guide. Body fat scale
 User Guide Body fat scale Now that you have purchased a CRANE product you can rest assured in the knowledge that, as well as your Manufacturer s warranty, you have the added peace of mind of dedicated
e 1 0 0 I N S T RUC TION M ANU A L
 e 1 0 0 I N S T RUC TION M ANU A L The Empire Digital Level Accuracy, Readability, Durability one FEATURES: Easy to read back light Display reads right side up even if the level is upside down Audio beep
LG Wireless Remote Controller
 Visit us at : http://www.lgservice.com LG Wireless Remote Controller Owner's & Installation Manual Models: PQWRHSF0 PQWRCSF0 LG ENGLISH ITALIANO ESPAÑOL FRANÇAIS DEUTSCH IMPORTANT Please read this installation
Suggested BiliChek Usage Protocol
 Suggested BiliChek Usage Protocol I. Subject: BiliChek Non-Invasive Bilirubin Analyzer II. Purpose: To outline and define the use of the BiliChek Non-Invasive Bilirubin Analyzer in the hospital setting
Transcutaneous Electrical Nerve Stimulation Device LUMI-TENS
 Transcutaneous Electrical Nerve Stimulation Device LUMI-TENS Operation Manual Read Before Using LUMI-TENS-INS-LAB-RevA08 TABLE OF CONTENTS INTRODUCTION TO TENS INDICATIONS AND CONTRAINDICATIONS WARNINGS
HED\ED:NS-BL 037-3rd
 HED\ED:NS-BL 037-3rd Insulin Insulin is produced by the beta cells in the islets of Langerhans in the pancreas. When glucose enters our blood, the pancreas should automatically excrete the right amount
Anaphylaxis and Epinephrine Auto-Injector
 Lesson Guide Anaphylaxis and Epinephrine Auto-Injector Lesson Length: 45 minutes Guidance for the Instructor To complete this lesson and meet the lesson objectives, you must: Welcome participants and explain
MAP COFFEE MIA CAPSULE COFFEE MACHINE INSTRUCTION MANUAL MODEL: CM4725. Read this manual thoroughly before using and save it for future reference
 MAP COFFEE MIA CAPSULE COFFEE MACHINE INSTRUCTION MANUAL MODEL: CM4725 Read this manual thoroughly before using and save it for future reference Purchase MAP capsules at Harvey Norman stores nationwide
INSULIN INJECTION KNOW-HOW
 0-0- 0 INSULIN INJECTION KNOW-HOW pro tips (and tricks) for easier and better Insulin Injections ABDOMEN THIGHS BUTTOCKS ARMS recommended injection sites WHERE IS THE BEST PLACE TO GIVE INJECTIONS? 0-
Kurzweil KORE 64. ROM Expansion Board for the PC3 and PC3K
 Kurzweil KORE 64 ROM Expansion Board for the PC3 and PC3K Installation Instructions August 1, 2012 2012 Young Chang Co., Ltd. All rights reserved. Kurzweil is a product line of Young Chang Co., Ltd. Kurzweil,
Electric Kettle. Model: SK-1717 INSTRUCTIONS MANUAL
 Electric Kettle Model: SK-1717 INSTRUCTIONS MANUAL Thank you for your purchase. Please read this Instruction Manual thoroughly before use and keep in a safe place for future reference. READ ALL INSTRUCTIONS
EP2242393; WO2012/080751; GB1210274.5
 Curl Secret 2667U UK Patent and Application Nos. GB2455716; EP2242393; WO2012/080751; GB1210274.5 BaByliss CURL Secret The BaByliss Curl Secret has revolutionary technology to effortlessly create beautiful,
Care and Handling of Your VAIO Computer
 Care and Handling of Your VAIO Computer Proper Handling Use your computer on a clean dry, stable surface. Use only specified peripheral equipment and interface cables or you may experience problems. When
CONTINUOUS GLUCOSE MONITORING SYSTEM USER S GUIDE
 CONTINUOUS GLUCOSE MONITORING SYSTEM USER S GUIDE CONTINUOUS GLUCOSE MONITORING SYSTEM IMPORTANT CONTACTS AND NUMBERS Dexcom Website: www.dexcom.com Your Transmitter ID: Your Receiver ID: Your Healthcare
IN-OUT Thermometer with Cable Free Sensor and Clock
 IN-OUT Thermometer with Cable Free Sensor and Clock MODEL: RAR232 USER'S MANUAL INTRODUCTION Congratulations on your purchase of the RAR232 In-Out Thermometer with 433MHz cable free sensor and calendar
Jarv Joggerz BT-301 Bluetooth Stereo Headphones Users Guide
 Jarv Joggerz BT-301 Bluetooth Stereo Headphones Users Guide Features: Bluetooth Wireless technology Compact design fits in the palm of your hand and weighs less than 2 oz. Comfortable Behind the Neck design
CoaguChek System. User Manual. This is a CLIA waived system.
 CoaguChek System XS User Manual This is a CLIA waived system. Table of Contents About this Manual...1 Symbols and Abbreviations...1 User Resources...2 Video...2 Getting Started...2 User Manual...2 Test
STANDARD OPERATING PROCEDURE FOR NOVA STAT STRIP CONNECTIVITY BLOOD GLUCOSE METERS FOR USE IN LEEDS NHS TRUST
 STANDARD OPERATING PROCEDURE FOR NOVA STAT STRIP CONNECTIVITY BLOOD GLUCOSE METERS FOR USE IN LEEDS NHS TRUST This Standard Operating Procedure explains the protocol for measuring blood glucose concentration
How To Prepare and Give a Prefilled Syringe Injection
 Diablo Valley Onc&Hem Med Grp, Inc Phone Number: (925)6775041 How To Prepare and Give a Prefilled Syringe Injection Patient Education Quick Reference Guide The following are instructions for use of prefilled
ENGLISH INSTRUCTION & INSTALLATION MANUAL DUCTLESS MINI SPLIT AIR CONDITIONING SYSTEMS
 ENGLISH INSTRUCTION & INSTALLATION MANUAL DUCTLESS MINI SPLIT AIR CONDITIONING SYSTEMS Céliera Corporation. All rights reserved. Unauthorized duplication, reproduction prohibited. CONTENTS SAFETY PRECAUTIONS...
Nokia Bluetooth Headset BH-108 9220721/1
 Nokia Bluetooth Headset BH-108 1 2 3 4 5 6 7 8 9 9220721/1 DECLARATION OF CONFORMITY Hereby, NOKIA CORPORATION declares that this BH-108 product is in compliance with the essential requirements and other
4.3-inch Back-Up Camera
 TM 4.-inch Back-Up Camera Model No.: PKC0BU4 Owner s Manual and Warranty Information Read these instructions completely before using this product. Retain this Owner s Manual for future reference. INTRODUCTION
LCD BacPac. User Manual + Warranty Info
 LCD BacPac User Manual + Warranty Info Firmware Update To determine if a firmware update is required, please follow these steps: With the camera fully charged, attach the LCD BacPac to camera and power
Blood Glucose Monitoring: The Facts about Accuracy
 Blood Glucose Monitoring: The Facts about Accuracy Summary The purpose of this document is to provide the facts about the accuracy of self-monitoring of blood glucose (SMBG) systems. Accuracy can be defined
Instruction Manual HI 96800 Refractometer for Refractive Index and Brix Measurements
 Instruction Manual HI 96800 Refractometer for Refractive Index and Brix Measurements www.hannainst.com 1 Dear Customer, Thank you for choosing a Hanna Instruments product. Please read this instruction
WSD130 SOLDERING STATION
 NOTES S2032ACH 8/98 Rev. 11/01 WSD130 SOLDERING STATION 1. Power Switch 2. Digital Display 3. UP Button 4. DOWN Button 5. Optical Regulator, Right 6. Connection for Soldering Iron, Right 7. Selection Switch
Milwaukee USER MANUAL. Milwaukee. Smart DO Meter PORTABLE DISSOLVED OXYGEN METER MODEL: SM600. Authorized Dealer: ISMIL600 11/01
 Milwaukee Milwaukee USER MANUAL PORTABLE DISSOLVED OXYGEN METER MODEL: SM600 Smart DO Meter Authorized Dealer: ISMIL600 11/01 PROBE PREPARATION: The meter is supplied with a 9V battery. Slide off the battery
DX-395. FM/AM/SW1/SW2 PLL Synthesized Receiver OWNER S MANUAL. Cat. No. 20-225. Please read before using this equipment.
 20-225.fm Page 1 Wednesday, August 4, 1999 10:07 AM Cat. No. 20-225 OWNER S MANUAL Please read before using this equipment. DX-395 FM/AM/SW1/SW2 PLL Synthesized Receiver 20-225.fm Page 2 Wednesday, August
Blood Sugar Monitoring
 Sugar Monitoring Know Your Sugar Numbers Taking control of your diabetes and blood glucose (blood sugar) can make you feel better and stay healthy. Research shows that maintaining your blood glucose level
Bydureon 2 mg powder and solvent for prolonged-release suspension for injection
 INSTRUCTIONS FOR THE USER Your step by step guide Bydureon 2 mg powder and solvent for prolonged-release suspension for injection If you have questions about taking Bydureon Refer to the Common questions
Forehead Thermometer INSTRUCTION MANUAL. Model MC-720
 Forehead Thermometer Model MC-720 INSTRUCTION MANUAL Thank you very much for purchasing the Forehead Thermometer. Be sure to read this Instruction Manual thoroughly before use. Keep this Instruction Manual
Forehead. Use and Care Manual. Thermometer IMPORTANT! READ AND SAVE THESE INSTRUCTIONS. Model V977
 Forehead Thermometer Use and Care Manual IMPORTANT! READ AND SAVE THESE INSTRUCTIONS Model V977 Questions or Comments Call toll-free: 1-800-477-0457 or E-mail: consumerrelations@kaz.com www.kaz.com QUICK
Nucleus Freedom BTE Rechargeable Battery (A25) and Nucleus Freedom BTE Recharger
 and Nucleus Freedom BTE Recharger") Nucleus Freedom BTE Rechargeable Battery (A25) and Nucleus Freedom BTE Recharger The Nucleus Freedom BTE Rechargeable Battery (A25) is designed for use with your Nucleus Freedom BTE Controller (3 Zinc
Nucleus Freedom BTE Rechargeable Battery (A25) and Nucleus Freedom BTE Recharger The Nucleus Freedom BTE Rechargeable Battery (A25) is designed for use with your Nucleus Freedom BTE Controller (3 Zinc