Dentalaire Owner s Manual for all Dental Stations
|
|
|
- Colin Paul
- 7 years ago
- Views:
Transcription
1 Dentalaire Owner s Manual for all Dental Stations DENTALAIRE

2 SET UP PROCEDURE FOR DENTALAIRE DENTAL STATIONS STEP # 1 - Open crate using a large screwdriver. Please check crate for any damages and report them to Dentalaire immediately or note on paperwork while receiving a damaged unit. (800) STEP # 2 - If you have purchased a wall mount or table mount dental station, carefully lift the compressor out of the crate. If you have purchased a mobile dental station, loosen the bolts at cross-member with a wrench as it should be carefully rolled and gently lifted out of the crate. STEP # 3 - Please refer to the schematics and parts breakdown section on pages This will show you all the parts that make up your dental station and will help you become more familiar with it. STEP # 4 - Next using a pair of scissors, carefully cut away all the packing material that goes around the tubing for the high and low speed handpieces. Also the tubing that goes to the piezo or air scaler tubing. Please remove all other packing material. STEP # 5 - On the side of the compressor opposite the purge valve, connect the Air Intake Filter. This is the black mushroom shaped cap, that just screws on where the red cap was. The hole that you can see and feel on the Air Intake Filter should be at 12:00, not 6:00. It you have it at 6:00 oil can leak out. This should be cleaned yearly with soapy water or alcohol, rinsed well and put back on.the Air Intake Filter keeps the compressor running quietly and also keeps foreign debris out of the motor. STEP # 6 - Open the 22oz. bottle of synthetic compressor oil. At the top of the compressor is the oil fill hole. This is where you are to put the oil. Unscrew and start adding the oil. Go slowly and empty the bottle by about half to two thirds empty. STOP. WAIT a few minutes as the oil takes some time to go into the compressor. Slowly add some more oil and wait until you see the oil in the glass eye on the side of the compressor and stop when it gets to the mid level ( the red line). In most cases you will usually use about 7/8 s of the bottle. Add oil until level in sight glass is half full while motor is not running.the oil level must be half full on the sight glass. ( If you overfill the compressor and, cannot see any air bubble do not run the compressor!) Please call Dentalaire and let our service department take care of you. On any mobile dental station it is easier to fill the compressor with oil, when the table is at its highest 36 level, not when it is right above the compressor. Please change the oil yearly. Make sure to raise the table before putting in the compressor oil. STEP # 7 - Take the water bottle and fill it only with distilled water leaving about two inches of air space at the top. STEP # 8 - Connect the power cord to 110 vac grounded receptacle and place compressor power switch in the ON position, which means the switch on top of compressor is turned clockwise. On units that have a scaler or a fiberoptic sys- 2 DENTALAIRE DENTAL STATIONS

3 tem, you will also need to hit the switch underneath the table part of the mobile dental station. STEP # 9 - Unpack both handpieces and find the Once A Day Spray Handpiece Lubricant. Each handpiece ( the high speed and low speed ) must be lubricated before you use. Insert the spray tip of the Once A Day Spray into the drive port at the base of the handpiece, spray once and then remove. Do this for with each handpiece. Lubricating Handpiece Attaching Handpiece STEP # 10 -Attach the handpieces to the appropriate labeled tubing located on the tubing connectors. STEP # 11 - Depress the foot control for 5-10 seconds to permit air to purge excess lubricant from the handpiece. Do this with each handpiece as well. (Except Air Scalers, this type of handpiece should not be lubricated). CAUTION: Do not operate any handpiece without a bur, prophy angle, contra angle or bur blank tightened securely in place. PERMANENT TURBINE / CHUCK DAMAGE WILL RESULT!!!!! STEP # 12 - Enjoy your new dental unit. Please call us if you have any questions. We are here to help in any way we can. (800) SELECTION OF HANDPIECES Your dental station comes with a high speed and a low speed handpiece. The high speed is for drilling and sectioning of the teeth. The low speed is used mainly for polishing. It also can have an air scaler, which is used to scale (clean) the teeth. DENTALAIRE DENTAL STATIONS 3

4 OPERATION OF HANDPIECES HIGH SPEED HANDPIECE operates at pressures of 38 to 40 PSI and attains a speed of 350,000 to 400,000 RPM. The water mist helps to keep the handpiece motor and bur cool, as well as the patient s tooth cool while doing restorations, cutting or rotary prophy scaling procedures. Constant preventive maintenance is essential in caring for handpieces. If they are not properly cleaned and lubricated, abrasives such as finely ground tooth, metal will cause excessive wear and undue vibration. Bush Button Bur Bur Tool Changing When inserting and removing burs from handpieces, use the bur tool by holding it between the thumb and forefinger. Slide the bur tool over the head of the handpiece. Pull the wrench knob away from the head, then push the knob back to engage the chuck. The square tip of the wrench must fit into the square hole inside of the handpiece head ( this is the chuck ). To remove the bur, rotate the wrench one full turn COUNTERCLOCKWISE until the bur is free. To tighten, rotate the wrench one full turn CLOCKWISE until the bur is secure. Never overtighten the bur, as serious damage can result to the chuck and bur tool. On units that have a push button bur changer, to insert the bur simply push your thumb on the back cap of the high speed handpiece to engage the chuck. You will feel a click, and then you insert the bur all the way as far as you can. To take out repeat the above step and then pull out the bur. If you do not put the bur in all the way it will damage the chuck. You will then need to purchase a new turbine for your high speed handpiece. SLOW SPEED HANDPIECE operates at pressures of 30 to 32 PSI and generates speeds from a crawl to 5500 RPM depending on the pressure applied to the foot control. The slow speed should be placed on the right side of the delivery system (dry side), as no coolant is needed for the slow speed procedures. As with the high speed handpiece, always read and follow manufacturer s instructions for operation, lubrication, cleaning, and sterilization for the slow speed motor and attachments. 4 DENTALAIRE DENTAL STATIONS

5 NOSE PORTION SWIVELS 360 TO REDUCE HAND FATIGUE Slow Speed Handpiece CHUCK ACCEPTS STANDARD SHANK DIAMETER PROPHY ANGLE, SIM- PLE PUSH PULL CHUCK SYSTEM Slow Speed Handpiece w/ Prophy Angle To attach prophy angles, contra angles, cutting wheels or handpiece burs to the handpiece, simply push onto handpiece making sure to line up the notch with the set pin. CAUTION: Do not run slow speed unless an angle or bur is installed as serious chuck damage will result. DENTALAIRE DENTAL STATIONS 5

6 CLEANING OF HIGH and LOW SPEED HANDPIECES Before cleaning procedures the bur must be removed from the handpiece. The handpiece must be cleaned with a brush or wiped with alcohol after each patient. STERILIZATION OF HIGH and LOW SPEED HANDPIECES 1.) The handpiece must be sterilized by autoclave for 15 minutes at 135 degreesc (275 fahrenheit). 2.) Only use non chlorine products, and no chemical solutions. 3.) Do not sterilize the handpiece with the bur inserted. REPAIR AND REPLACING THE HIGH SPEED CARTRIDGE ONLY USE THE ORIGINAL REPLACEMENT TURBINES, for total assurance of quality control and product life. The cartridge is a fragile instrument. Please call our service department if you have questions or need help in replacing this part. DA400RC - Standard Screw Type Turbine DA400RCA - Push Button Turbine OPERATION OF AIR SCALER HANDPIECE Air Scaler handpieces produce oval strokes up to 6400 Hz. to efficiently remove tough calculus. The air scaler is attached to the wet side of the delivery system so that the water coolant can be directed on to the surface being cleaned. The water spray continuously flushes and cools the work area. The scaler tips screw into the end of the scaler and should be tightened using the finger wrench provided with the scaler. The pressure for the air scaler should be at 50 to 52 PSI. Scaler Tip Housing Water Inlet Air Inlet Sonic Air Scaler CAUTION : Do not tighten tip excessively, as the stack that the tip screws into can be damaged, which results in structural damage and loss of vibration. NOTE : The air scaler handpiece uses a higher air flow (CFM) than either the high speed or slow speed handpiece. For this reason, there is a probability when the air scaler is run continuously that it could cause the compressor to overheat and possibly shut ott due to excess cycle time. It is recommended that if long periods of air scaler operation is desired, that a one HP air com- 6 DENTALAIRE DENTAL STATIONS

7 pressor be used. CYCLE TIME = ON CYCLE SHOULD BE EQUAL IT S OFF CYCLE (during the period of operation the air compressor should be off at least as often as it is on). IMPORTANT: This air scaler is fully autoclavable. Recommended temperature is degrees (135 degrees C ) for 10 to 15 minutes. Before autoclaving, the scaler should be cleaned of all blood, saliva, and other debris. To insure sterilization of the scaler, it should be autoclaved in a proper autoclavable bag and kept in the bag until ready to use. *** PLEASE DO NOT LUBRICATE THE AIR SCALER HANDPIECE *** WATER COOLANT ADDING WATER TO DENTAL SYSTEM Slowly remove water bottle from pressure manifold assembly and add DIS- TILLED WATER only. Leave approximately two inches of air space at the top. Replace bottle, tighten until secure. Mobile cart, wall mount and table mount systems hold 1500ml. of water. Countertop units hold 1000ml. of water. AIR / WATER SYRINGE All of our dental stations come with an air / water syringe installed and ready to use. Depress the left button for water only. Depress the right button for air only. Depress both buttons to get a mist spray. MAINTENANCE OF THE DENTALAIRE DENTAL SYSTEMS COMPRESSOR Please change the oil in the compressor once a year. HOW TO CHANGE THE OIL: To change the oil, you want to start by taking the white cover off of the compressor by removing the six bolts at the bottom. Now tilt the compressor away from you and unscrew the site glass indicator. Tip the compressor forward and pour the oil into a small bucket or coffee can. Next screw the site glass back on. Put the white cover back over the compressor and screw in the six bolts. Please refer to our Compressor Maintenance Guide Chart on the following page to help you keep the compressor running in top form. DENTALAIRE DENTAL STATIONS 7

8 COMPRESSOR MAINTENANCE GUIDE CHART MAINTENANCE PROCEDURE DAILY WEEKLY MONTHLY ANNUALLY 1. Purge Drain X 2. Vent Moisture Trap X 3. Check Oil Level X 4. Clean Air Filter Intake X 5. Change Oil X 6. Complete check of System X SERVICE AND MAINTENANCE LOG SERVICE PERFORMED DATE SERVICED BY 1. INITIAL INSTALLATION AIR / WATER SYRINGE Air or water leakage from the syringe is due to either worn or defective valve cores in the syringe head. To rebuild syringe first remove the pin on the side of the housing,and then simply pull out the buttons straight out of the syringe head. Now remove the valve cores using the valve core tool. Install new valve cores. Do not overtighten. Remove all water deposits off buttons. Lubricate the buttons with the Once A Day Spray.Reinstall the Air/ Water buttons. Re- insert the pin through housing. Syringe Rebuild Kit Item # A ORAL ILLUMINATION This refers to any of our high speed handpieces that have a fiberoptic system. Mostly in our Ultimate Dental Station. This unit will periodically require a change in the Halogen Light Bulb. Here s how to change the bulb: 1. Please make sure you are wearing gloves (before) handling the new bulb. The oils from your body will ruin the new halogen bulb. 8 DENTALAIRE DENTAL STATIONS

9 2. Slide both sleeves back from the connector nut exposing bulb on side of housing. 3. Remove old bulb. 4. Install new bulb. 5. Place bulb back into housing 6. Slide sleeve over housing.. 7. Reinstall high speed handpiece. DA400FOB - Fiberoptic Halogen Replacement Bulb Changing bulb on Hi- Speed Handpiece TROUBLE SHOOTING GUIDE I. NO COOLANT WATER 1. Water bottle empty. 2. Flow control knob is closed. 3. On / Off toggle is off. 4. High speed handpiece is in the low speed position 5. Faulty water relay valve. 6. Plugged coolant port in handpiece. II. COOLANT WATER DOES NOT SHUT OFF 1. Faulty water relay valve. 2. Water On / Off toggle left on III. COOLANT WATER LEAKING FROM HANDPIECE 1. Missing or damaged handpiece connector gasket. 2. Faulty water relay valve. 3. Slow speed handpiece is in the high speed position. IV. MORE THAN ONE HANDPIECE RUNS AT THE SAME TIME 1. Handpieces are not positioned all the way down in the holders. 2. Faulty auto block diaphragm. DENTALAIRE DENTAL STATIONS 9

10 V. AIR / WATER SYRINGE PROBLEMS 1. Water drips from tip. A.) Faulty valve core 2. Button blow out. A.) Tip is plugged at the end. B.) Tip is not installed all the way into the quick change adapter. (Loosen nut, press tip further into connector and tighten nut while holding the tip in) C.) Faulty o-ring in tip adapter. 3 Air or water leaks from buttons when in use. A.) Faulty buttons. 4. Low air or water flow cont: A.) Improper regulator adjustment B.) Empty water bottle C.) Kinked supply tubing. D.) Plugged tubing. E.) Plugged syringe head VI. FOOT CONTROL HISSES 1. Faulty foot control popped valve. 2. Foot control tubing connected backwards. VII. HANDPIECE TUBING BLOWS OFF 1. Handpiece has been over pressurized. VIII. COMPRESSOR WON T TURN ON 1. Check power source. 2. Check tank pressure (compressor will not turn on if tank is fully pressurized). 3. Faulty starting capacitor (replace). 4. Compressor is over-heated and the thermal safety switch is off. (Let unit cool and it will come on automatically, usually in minutes). IX. HANDPIECE LACKS POWER 1. Inadequate tank pressure. 2. Improper regulator pressure (reset regulator). 3. Improper individual handpiece pressure adjustment. 4. Faulty foot control. 5. Handpiece connector gasket is missing. 6. Directional selector ring is not rotated all the way into forward or reverse. (Slow speed handpiece only) 7. Faulty handpiece tubing. X. COMPRESSOR RUNS, BUT WON T PRESSURIZE FULLY 1. Plug is on the air inlet. Replace with air filter. 2. Compressor tank drain valve is leaking air. 3. Faulty check valve between compressor and filter tank. XI. COMPRESSOR OVERHEATS 1. Air inlet is plugged. 10 DENTALAIRE DENTAL STATIONS

11 2. Handpiece pressure is set too high. 3. Handpiece has been run for too long a time and the 50% duty cycle has been exceeded. XII. UNIT IS PRESSURIZED BUT HANDPIECE DOES NOT RUN 1. Regulator pressure is low or off. 2. Supply tubing from regulator to control head is kinked. 3. Faulty foot control. 4. Handpiece holder is turned off with lock lever (automatic units only). 5. Handpiece holder valve is not exhausting. 6. Handpiece directional ring is between forward and reverse (slow speed handpiece only). 7. Faulty handpiece turbine. TROUBLE SHOOTING GUIDE FOR BUILT IN AMDENT PIEZO SCALER I. THE SCALER WON T RUN 1. Check main power, main fuse, On / Off Switch. II. WEAK OR NO TIP VIBRATION 1. Increase the power control setting. 2. Check to see if tip is tightened properly. 3. The tip is worn out, replace with new tip. 4. Change to a new handpiece. 5. Faulty air switch. 6. Change back to the old handpiece and then replace the electronic part. 7. Replace both the handpiece and electronic part. III. INSUFFICIENT WATER SPRAY 1. Turn the knob to full open position. 2. Check / replace water filter. 3. Check all water connections. Be sure there is no leakage or kinked tubing. 4. Remove the tip, if the water is dripping from the handpiece, replace the tip. 5. Check the delivery unit s control block that activates the water out to the scaler handpiece is working properly. FOOT CONTROL TO ULTRASONIC PIEZO SCALER This is for Dentalaire Model number s (Ultimate Dental Station) and 00504, which is a countertop unit. This foot pedal has two buttons, one large and one small. The large button is for operating the high and low speed handpieces. The small button is for operating the piezo scaler only. DENTALAIRE DENTAL STATIONS 11

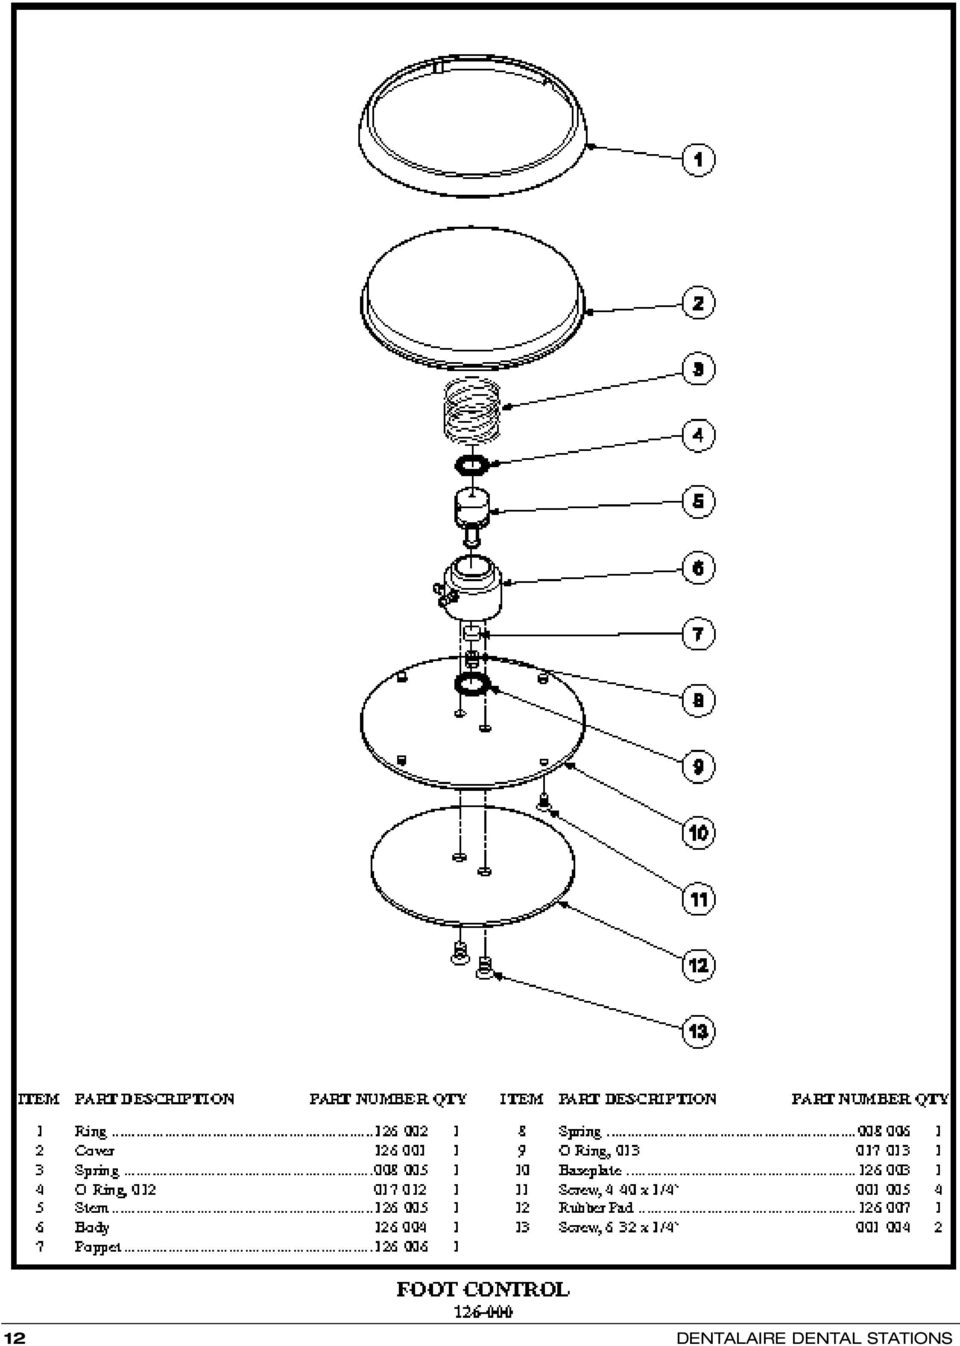
12 12 DENTALAIRE DENTAL STATIONS
13 DENTALAIRE DENTAL STATIONS 13

14 14 DENTALAIRE DENTAL STATIONS

15 DENTALAIRE DENTAL STATIONS 15

16 3 Handpiece Automatic Control J-400, J DENTALAIRE DENTAL STATIONS

17 3 Handpiece Automatic Control J-300 DENTALAIRE DENTAL STATIONS 17

18 3 Handpiece Automatic Control J DENTALAIRE DENTAL STATIONS

19 DENTALAIRE DENTAL STATIONS 19

20 DENTALAIRE Toll Free (800) Fax (714)

Owner s Manual for Dentalaire Prestige Dental Stations
 Owner s Manual for Dentalaire Prestige Dental Stations Toll Free (800) 866-6881 Fax (714) 540-9947 www.dentalaireproducts.com 17150 Newhope Street, Suite 407, Fountain Valley, CA 92708 NOTES Limited Warranty
Installation Instructions 4508 4508S
 SYMPHONY Spread Lavatory Faucet with Speed Connect Drain Congratulations on purchasing your American Standard faucet with Speed Connect drain, a feature found only on American Standard faucets. Speed Connect
Procenter Delivery System* Troubleshooting Charts
 1 2 3 4 Procenter Delivery System* Troubleshooting Charts * includes International (Whip) Units Component Page Procenter / Int l. (Whip) Delivery Units*... 2 Assistant s Units...6 Midmark Cuspidor...7
FLUSHOMETER - TANK SYSTEM
 Owner s Service Manual 501-A Series FLUSHOMETER - TANK SYSTEM 501-A Series FLUSHMATE 501-A SERIES (D) (E) (C) 2 3 (B) 1 4 (F) (A) 6 5 List of Components for 501-A Series*: 1. Lower Supply Group w/hose
CDS TROUBLESHOOTING SECTION I. VACUUM. 1.0. Weak vacuum at wand. Gauge reads normal (10hg to 14hg)
") CDS TROUBLESHOOTING SECTION I. VACUUM 1.0. Weak vacuum at wand. Gauge reads normal (10hg to 14hg) 1.1. Clogged hoses or wand tube. Disconnect hoses and carefully check for an obstruction. 1.2. Excessive
CDS TROUBLESHOOTING SECTION I. VACUUM 1.0. Weak vacuum at wand. Gauge reads normal (10hg to 14hg) 1.1. Clogged hoses or wand tube. Disconnect hoses and carefully check for an obstruction. 1.2. Excessive
Trouble Shooting. Pump
 Trouble Shooting Pump Trouble Possible Cause Remedy Oil leaking in the area of water pump crankshaft Worn crankshaft seal, bad bearing, grooved shaft, or failure of retainer o-ring. Excessive play on crankshaft
2 HP / 4 GALLON AIR COMPRESSOR OWNER'S MANUAL
 2 HP / 4 GALLON AIR COMPRESSOR OWNER'S MANUAL WARNING: Read carefully and understand all INSTRUCTIONS before operating. Failure to follow the safety rules and other basic safety precautions may result
Compressor Service & Maintenance Manual
 Compressor Service & Maintenance Manual C Series COMPRESSOR (D)C1103 (D)C1203 (D)C2106 (D)C2206 (D)C3210 Copyright 2006 DCI. All Rights Reserved. 92311, Rev. C, 08/13 1 C1000 Series Service & Maintenance
Installation Instructions 6028.801
 DAZZLE Installation Instructions 08.80 Spread Lavatory Faucet with Speed Connect Drain* Congratulations on purchasing your American Standard faucet with Speed Connect drain, a feature found only on American
Installation Operation Maintenance Troubleshooting Version 2.1, Apr/09
 Installation Operation Maintenance Troubleshooting Version 2.1, Apr/09 1402 Congratulations! All of us at Summit Dental Systems want you to know that your 1402 Delivery Unit has been built with the finest
Overview PARTS LIST. B. Lever mounting base C. Flush handle assembly D. Grey/Blue float stop E. Grey float (Full Flush) F. Flush valve washer
 F. Flush valve washer") Overview READ ENTIRE INSTRUCTIONS BEFORE STARTING INSTALLATION PARTS LIST A. Flush valve B. Lever mounting base C. Flush handle assembly D. Grey/Blue float stop E. Grey float (Full Flush) F. Flush valve
Overview READ ENTIRE INSTRUCTIONS BEFORE STARTING INSTALLATION PARTS LIST A. Flush valve B. Lever mounting base C. Flush handle assembly D. Grey/Blue float stop E. Grey float (Full Flush) F. Flush valve
Manual for GlobePharma Mini-Press II Rotary Tablet Press
 1 of 13 Preparing the Rotary Press 1. Make sure the rotary press is unplugged. 2. Open the bottom cabinet of the rotary press and take out the grey tool kit, and the beige box of punches and dies. 3. Take
STAINLESS STEEL TANK TABLE OF CONTENTS TROUBLESHOOTING... 1 TESTING WATER TEMPERATURE... 3 TANK & JACKET ASSEMBLY... 4.
 TABLE OF CONTENTS STAINLESS TROUBLESHOOTING... 1 TESTING WATER TEMPERATURE... 3 & JACKET ASSEMBLY... 4 SST Section 052506 1 Troubleshooting performed by untrained personnel could result in electrical
Operator s Instructions
 Operator s Instructions A-Series Dental Units Document 90070 Rev C 0/0 Operator s Instructions A-Series Dental Units Table of Content Operating Conditions... Storage & Shipping Conditions... Classifications...
SunMaxx Solar Filling Station Operating Instructions
 SunMaxx Solar Filling Operating Instructions Content 1. Declaration of conformity... 2 2. Introduction... 2 3. Transportation and unpacking... 4 4. Mounting and commissioning... 5 5. End of operation...
STORAGE, INSTALLATION AND MAINTENANCE PROCEDURES
 GATE VALVE O.S. & Y 1.0 Periodic Inspections 1.1 The valve stem packing should be inspected at least monthly. If the stem packing shows signs of leakage, simply tighten the adjusting nuts to compress the
Cleaning & Sanitisation
 Cleaning & Sanitisation Notice: The information and/or procedures presented in the following demonstration(s) should be performed by a trained Water Cooler Service Technician only. Never attempt to service
Fleck 4650. Service Manual INSTALLATION AND START-UP PROCEDURE TABLE OF CONTENTS JOB SPECIFICATION SHEET
 Fleck 4650 Service Manual TABLE OF CONTENTS JOB SPECIFICATION SHEET...1 INSTALLATION AND START-UP PROCEDURE...1 CONTROL VALVE DRIVE ASSEMBLY...2 CONTROL DRIVE ASSEMBLY FOR CLOCK...3 BYPASS VALVE ASSEMBLY...4
Hot, Warm and Cold Mineral Water Cooler [Models Cool18, Cool25, Cool36, Cool50, Cool75, Cool100]
![Hot, Warm and Cold Mineral Water Cooler [Models Cool18, Cool25, Cool36, Cool50, Cool75, Cool100]](/thumbs/26/7741864.jpg "Hot, Warm and Cold Mineral Water Cooler [Models Cool18, Cool25, Cool36, Cool50, Cool75, Cool100]") Hot, Warm and Cold Mineral Water Cooler [Models Cool18, Cool25, Cool36, Cool50, Cool75, Cool100] PLEASE READ BEFORE INSTALLATION TO PREVENT DAMAGE TO THE COOLER HOT WATER TANK STEAM EXAUST VENT (CAUTION!)
Hot, Warm and Cold Mineral Water Cooler [Models Cool18, Cool25, Cool36, Cool50, Cool75, Cool100] PLEASE READ BEFORE INSTALLATION TO PREVENT DAMAGE TO THE COOLER HOT WATER TANK STEAM EXAUST VENT (CAUTION!)
3. SEISCO PARTS & SERVICE REMOVAL AND REPAIR GUIDE
 4 3. SEISCO PARTS & SERVICE REMOVAL AND REPAIR GUIDE A. Changing the Control Board B. Replacing a Heating Element C. Thermistor Replacement D. High Limit Switch Replacement E. Level Detector Replacement
Installation Operation Maintenance Troubleshooting
 Installation Operation Maintenance Troubleshooting Version 3, 2.1, June/09 Apr/09 1416 1402 Table of Contents Important information 2 Weights & Dimensions 3 Operator s Instructions 4 Flow Diagram 5 Purging
IMPORTANT SAFETY RULES TO FOLLOW
 WARNING FLOOR & CARPET CLEANER Any piece of equipment can be dangerous if not operated properly. YOU are responsible for the safe operation of this equipment. The operator must carefully read and follow
Flat Bottom Long Ram Hydraulic Jack
 Flat Bottom Long Ram Hydraulic Jack 3 Ton 8 Ton 36468 36469 ASSEMBLY & OPERATING INSTRUCTIONS 349 Mission Oaks Blvd., Camarillo, CA 930 Visit our Web site at http://www.harborfreight.com TO PREVENT SERIOUS
MP-4V Heavy Duty Riveter / 39048
 MP-4V Heavy Duty Riveter / 39048 This newly designed heavy-duty air/hydraulic riveter is ergonomically designed with the professional in mind. The light weight 3.7 lbs. well balanced MP-4V includes a Vacuum
PC1130 Electric Air Compressor
 Senco Products Inc. 8485 Broadwell Road Cincinnati, Ohio 45244 PC1130 Electric Air Compressor Operating Instructions 2006 by Senco Products, Inc. Warnings for the safe use of this tool are included in
IMPACT SPRINKLER TROUBLESHOOTING GUIDE
 RAIN USE AND OPERATION BIRD IMPACT SPRINKLER TROUBLESHOOTING GUIDE The diagrams below depict typical Rain Bird sprinklers with all available controls. Your particular model may have only some of these
Model MS-41BP 4G/ 15L. WARNING Carefully Read These Instructions Before Use 013529 R0514
 Backpack Sprayer Use and Care Manual Model MS-41BP 4G/ 15L WARNING Carefully Read These Instructions Before Use 013529 R0514 WARNING WARNING: Improper use or failure to follow instructions can result in
MODEL G300 BRAKE BLEEDER
 MODEL G300 BRAKE BLEEDER Installation, Operation & Repair Parts Information Branick Industries, Inc. 4245 Main Avenue P.O. Box 1937 Fargo, North Dakota 58103 REV060616 P/N: 81-0035G 1 THIS PAGE INTENTIONALLY
Volkswagen Jetta, Golf, GTI 1999, 2000 Brake System 47 Brakes - Hydraulic Components (Page GR-47)
") 47 Brakes - Hydraulic Components (Page GR-47) FS III front brake calipers, servicing Front brake caliper piston, removing and installing FN 3 front brake calipers, servicing Front caliper piston, removing
47 Brakes - Hydraulic Components (Page GR-47) FS III front brake calipers, servicing Front brake caliper piston, removing and installing FN 3 front brake calipers, servicing Front caliper piston, removing
SBC90. Abrasive Blast Cabinet Assembly & Operating Instructions
 SBC90 Abrasive Blast Cabinet Assembly & Operating Instructions READ ALL INSTRUCTIONS AND WARNINGS BEFORE USING THIS PRODUCT. SAVE THESE INSTRUCTIONS FOR FUTURE REFERENCE. This manual provides important
National- Spencer Inc.
 9-27-2010 National- Spencer Inc. 19.2V HEAVY DUTY GREASE GUN PRODUCT SPECIFICATION Charger Input Power 110 VAC Battery Output Power 19.2V Battery Capacity 1500 MAH Battery Pack Charge Time 1 Hour Maximum
MBSAW. Meat Cutting Band Saw With Meat Grinder Assembly & Operating Instructions
 06/2011 MBSAW Meat Cutting Band Saw With Meat Grinder Assembly & Operating Instructions READ ALL INSTRUCTIONS AND WARNINGS BEFORE USING THIS PRODUCT. This manual provides important information on proper
OWNER S MANUAL Table Tennis Table Patent Pending
 OWNER S MANUAL Table Tennis Table Patent Pending Be sure to write your model number and serial number here for future reference. You can find these numbers printed on the bottom of the table. MODEL # T8179
20 GALLON WET DRY VACUUM
 20 Gallon Wet & Dry Vacuum 110" Water Lift Vac Motor 24" Front Mount Squeegee Assembly 50' Cord Special Tip Pour Feature Warranty Contractor Tool Kit Includes: Wet p/u Tool, Dry p/u Tool, Crevice Tool,
Dive Rite 200 & 300 Bar Isolator Manifold Service Manual
 Dive Rite 200 & 300 Bar Isolator Manifold Service Manual Principal Photography and Text by Pete Nawrocky Copyright 2003 Lamartek Inc. D/B/A Dive Rite 0 Warning This manual is only to be used as a guide
MODEL E-AF. Drain Cleaning Machine. Operator s Manual
 MODEL E-AF Drain Cleaning Machine Operator s Manual!!!! FOR YOUR SAFETY Before you operate or maintenance this equipment, READ this manual carefully and completely! Purchase Date: Serial Number: ELECTRIC
PC1131 Electric Air Compressor
 Senco Products Inc. 8485 Broadwell Road Cincinnati, Ohio 45244 PC1131 Electric Air Compressor Operating Instructions 2006 by Senco Products, Inc. Warnings for the safe use of this tool are included in
ROTARY TUMBLER INSTRUCTIONS AND PARTS LIST
 ROTARY TUMBLER INSTRUCTIONS AND PARTS LIST Model 3-1.5B Model 45C Model 33B LORTONE 12130 Cyrus Way Mukilteo, WA 98275 (425) 493-1600 SETTING UP YOUR MACHINE For 45C Unit Only (33B & 3-1.5B already assembled)
ZAPPY 3 OWNER S MANUAL. Read this manual completely before riding your Electric ZAPPY 3.
 ZAPPY 3 OWNER S MANUAL Read this manual completely before riding your Electric ZAPPY 3. TECHNICAL INFORMATION Model No. : ZAPPY 3 Product size Type of motor Motor power Battery type Battery Charger Charging
Watts Pure Water Systems
 Watts Pure Water Systems WM-120-PT Installation and Operation Manual Premier Water Systems Do not use with water that is microbiologically unsafe or of unknown quality without adequate disinfection before
BOWIE PUMPS OPERATION - MAINTENANCE
 BOWIE PUMPS OPERATION - MAINTENANCE PUMPING PRINCIPLE: The meshing owieeof the gears cause a slight depression, with the resulting enmeshing of the gears causing a vacuum drawing the fluid being pumped
www.servicechamp.com
 1-800-221-0216 Fax: 1-800-472-2281 www.servicechamp.com Service Champ Part 52081 Service Interval every 30,000 miles / Chevrolet 1992-2002 6.5 liter Description and Operation The fuel filter element separates
SECTION G2: CABLE PROCESSOR MODULE MAINTENANCE
 SECTION G2: CABLE PROCESSOR MODULE MAINTENANCE Cable Processor Module overview WARNING! When tipping the Cable Processor Module back, (after removing the toggle arm pin), use extreme caution not to drop
HYDRAULIC LIFT TABLE CART 2200-LB.
 HYDRAULIC LIFT TABLE CART 2200-LB. OWNER S MANUAL WARNING: Read carefully and understand all MACHINE ADJUSTMENT AND OPERATION INSTRUCTIONS before operating. Failure to follow the safety rules and other
300 SERIES 331, 332, 333, 344, 356 AND 367 MODELS
 Section: MOYNO 500 PUMPS Page: 1 of 8 Date: March 1, 1998 SERVICE MANUAL MOYNO 500 PUMPS 300 SERIES 331, 332, 333, 344, 356 AND 367 MODELS Mechanical Seal Models Packing Gland Models MODELS DESIGN FEATURES
Trouble shooting for fiber Units only
 TROUBLE SHOOTING Electric Lights Jazz FX Jazz/FX Spa Fiber Illuminators Note: For proper trouble shooting have your model number ready. It is located on the outside of your Illuminator on a Fiberstars
Original Assembly Guide
 TCT Multipurpose Single Bevel Sliding Compound Mitre Saw Original Assembly Guide Read instructions before assembling this tool. Table of Contents GB Assembly Guide Read instructions before assembling this
FASCINATION 700 HVLP TANNING PRO SYSTEM USER MANUAL
 FASCINATION 700 HVLP TANNING PRO SYSTEM USER MANUAL Congratulations on choosing the Fascination 700 HVLP Tanning Pro System! Your system includes the following items: 1 Fascination 700 HVLP Tanning Pro
OWNER S MANUAL. FOOTWORKS tm Faucet Controller. Foot Operated Faucet Control Valves for Commercial Sinks
 OWNER S MANUAL for FOOTWORKS tm Faucet Controller Foot Operated Faucet Control Valves for Commercial Sinks - 1 - Introduction Congratulations on your purchase of a FOOTWORKS tm Faucet Controller, an engineered
accidents which arise due to nonobservance and the safety information herein.
 20 GALLON COMPRESSOR Model: 7342 CALIFORNIA PROPOSITION 65 WARNING: You can create dust when you cut, sand, drill or grind materials such as wood, paint, metal, concrete, cement, or other masonry. This
Installation Instructions 4662.003
 Installation Instructions.00 SINGLE CONTROL KITCHEN FAUCET Thank you for selecting American-Standard...the benchmark of fine quality for over 00 years. To ensure that your installation proceeds smoothly--please
ROTARY TUMBLER INSTRUCTIONS AND PARTS LIST
 ROTARY TUMBLER INSTRUCTIONS AND PARTS LIST Model QT66 Model QT12 Model QT6 LORTONE 12130 Cyrus Way Mukilteo, WA 98275 (425) 493-1600 SETTING UP YOUR MACHINE Install The Barrel Guide: Using the machine
Read This Before Operating The BaseHit
 Read This Before Operating The BaseHit IMPORTANT OPERATING INSTRUCTIONS THE ACCURACY OF THE BASEHIT PITCHING MACHINE DEPENDS ON THE QUALITY, HARDNESS AND TYPE OF BALLS USED WITH THIS PRODUCT! TREND SPORTS
Before repairing your toilet, you must determine
 Before repairing your toilet, you must determine which type of toilet you have. Pressurized Toilets If you have a pressurized toilet, it is recommended that you call a licensed plumbing contractor to repair
Multi-Pitch Pitching Machine USER MANUAL
 Multi-Pitch Pitching Machine USER MANUAL TABLE OF CONTENTS Thank you for purchasing the Cimarron Multi-Pitch Pitching Machine. The Cimarron Multi-Pitch Pitching Machine is a high performance pitching machine
Installation and Operating Instructions Installation Instructions for SS EPE-316L Series
 INSTR3010 0406 Installation and Operating Instructions Installation Instructions for SS EPE-316L Series Congratulations on your purchase of this Aqua-Pure high flow, single housing filtration system. This
Step-by-step instructions:
 Spark plug thread repair for Ford Triton cylinder heads Step-by-step instructions: Identification Installation Verification Specifically designed and tested for 4.6L, 5.4L, and 6.8L 2 and 4 valve heads,
PNEUMATIC PLANISHING HAMMER
 PNEUMATIC PLANISHING HAMMER 94847 ASSEMBLY AND OPERATING INSTRUCTIONS Due to continuing improvements, actual product may differ slightly from the product described herein. Distributed Exclusively by Harbor
PAINT SPRAY GUN WASHER
 PAINT SPRAY GUN WASHER 94996 ASSEMBLY AND OPERATING INSTRUCTIONS Visit our website at: http://www.harborfreight.com Read this material before using this product. Failure to do so can result in serious
Cooling system components, removing and installing
 Page 1 of 34 19-1 Cooling system components, removing and installing WARNING! The cooling system is pressurized when the engine is warm. When opening the expansion tank, wear gloves and other appropriate
NO LONGER IN. Some service parts may not be available for this product!
 M7-00 thru -00 Service and Parts Manual Self-Contained Steam Sterilizer Serial Number Prefixes: RB, CR, CP, CS, FM, FN NO LONGER IN -00 M7 thru -00 Some service parts may not be available for this product!
#12 Professional Meat Grinders
 #12 Professional Meat Grinders MG-203100 (52021040) Manual Instruction Thank you, and congratulations on purchasing the Non-corrosive electric meat grinder. Your grinder comes complete with everything
123 Industrial Loop Road Paynesville, MN 56362 Phone: 1-800-864-1649 www.master-mfg.com MASTER MANUFACTURING MASTER GARDNER
 123 Industrial Loop Road Paynesville, MN 56362 Phone: 1-800-864-1649 www.master-mfg.com MASTER MANUFACTURING MASTER GARDNER Part Number PCD E3 009B MM Rev 1 Nov. 2010 INTRODUCTION The purpose of this manual
How To Replace A Reverse Osmosis Water Tank
 ALL MODELS REVERSE OSMOSIS WITH NONAIRGAP FAUCET 1. Read all instructions carefully before starting installation. 2. Find the cold water line beneath your sink. The cold water is typically on the right.
MODEL RF Drain Cleaning Machine
 MODEL RF Drain Cleaning Machine Operator s Manual!! DANGER!! FOR YOUR SAFETY Before you operate or maintenance this equipment, READ this manual carefully and completely! Purchase Date: Serial Number: ELECTRIC
Waters Corporation. Waters 2690/5 USER & TROUBLESHOOTING GUIDE
 Waters Corporation Waters 2690/5 USER & TROUBLESHOOTING GUIDE Contents 2690/5 Theory Setup procedures. Troubleshooting the 2690/5 User maintenance of the 2690/5 Spare Parts 2 2690/5 Theory 2690/5 Solvent
INSTALLATION MANUAL MODEL RP-100
 INSTALLATION MANUAL FOR 24 VALVE 5.9L CUMMINS POWERED DODGE TRUCKS 2003 THROUGH 2004.5 MODEL RP-100 READ THESE INSTRUCTIONS THOROUGHLY BEFORE BEGINNING INSTALLATION 5400 BUSINESS 50 WEST SUITE 8 573 635-0555
Arctic Leash Instruction Manual Alaskan Products Company LLC.
 Retractable Cord Reel for Engine Block Heaters Arctic Leash Instruction Manual Alaskan Products Company LLC. INSTALLATION INSTRUCTIONS This instruction manual is a reference guide for installing and operating
Cleaning Instructions, Pilot Replacement and Valve Change. Model No.: 233010 Natural Gas
 Cleaning Instructions, Pilot Replacement and Valve Change Model No.: 233010 Natural Gas 8mm open-end wrench 9mm open-end wrench 10mm open-end wrench 12mm open-end wrench 13mm open-end wrench Phillips screw
USER INSTRUCTIONS FOR 10 LITRE PORTABLE DEHUMIDIFIER MODEL NO. DHMD102
 USER INSTRUCTIONS FOR 10 LITRE PORTABLE DEHUMIDIFIER MODEL NO. DHMD102 THANK YOU FOR CHOOSING YOUR NEW DEHUMIDIFIER. BEFORE USING THE UNIT READ THESE INSTRUCTIONS FULLY AND RETAIN THEM FOR FUTURE REFERENCE
DENTAL CHAIR AND UNIT SP- CIELA IMPORTANT
 DENTAL CHAIR AND UNIT SP- CIELA OPERATING MANUAL IMPORTANT This manual provides operating instruction for BELMONT SP-CIELA. The instructions contained in this booklet should be thoroughly read and understood
SERVICE PARTS LIST PAGE 1 OF 6 BASE ASSEMBLY SPECIFY CATALOG NO. AND SERIAL NO. WHEN ORDERING PARTS 12" DUAL BEVEL COMPOUND MITER SAW B27A
 PAGE 1 OF 6 BASE ASSEMBLY 00 0 EXAMPLE: Component Parts (Small #) Are Included When Ordering The Assembly (Large #). SPECIFY CATALOG NO. AND NO. WHEN ORDERING PARTS 1 02-80-0050 Thrust Bearing (1) 2 05-80-0510
FLUSHMATE FLUSHMATE FLUSHOMETER - TANK SYSTEM. Owner s Service Manual 503 and 504 Series
 Owner s Service Manual 503 and 504 Series FLUSHMATE FLUSHOMETER - TANK SYSTEM 503 504 FLUSHMATE A Division of Sloan Valve Company 30075 Research Drive New Hudson, MI 48165 800-533-3460 248-446-5300 http://www.flushmate.com
CTV-1500 Cooling Tower Vacuum Operating & Maintenance Manual
 CTV-1500 Cooling Tower Vacuum Operating & Maintenance Manual Goodway Technologies Corporation 420 West Avenue Stamford, CT 06902-6384 (203)359-4708 Sales: 1-800-333-7467 Customer Service: 1-800-370-2855
Volkswagen Jetta, Golf, GTI 1999, 2000 2.8 Liter VR6 2V Engine Mechanical, Engine Code(s): AFP 17 Engine-Lubrication (Page GR-17)
: AFP 17 Engine-Lubrication (Page GR-17)") 17 Engine-Lubrication (Page GR-17) Lubrication system components, removing and installing Oil filter housing, disassembling and assembling Oil pan, removing and installing Oil pressure and oil pressure
17 Engine-Lubrication (Page GR-17) Lubrication system components, removing and installing Oil filter housing, disassembling and assembling Oil pan, removing and installing Oil pressure and oil pressure
Safety, Operation and Maintenance Manual with Parts List
 Safety, Operation and Maintenance Manual with Parts List 20-Gallon Wet/Dry Vac Important Information and Safety Instructions PLEASE READ BEFORE USE! # 961130020 9/10-Rev 1 20-Gallon Wet/Dray Vac TABLE
Global Water Instrumentation, Inc.
 Global Water Instrumentation, Inc. 11390 Amalgam Way Gold River, CA 95670 T: 800-876-1172 Int l: (916) 638-3429, F: (916) 638-3270 6 Tipping Bucket: RG200 02/05/10 01-343 - 1 - Congratulations on your
NewAir AC-10000E, AC-10000H Portable Air Conditioner Owner s Manual PLEASE READ AND SAVE THESE INSTRUCTIONS
 NewAir AC-10000E, AC-10000H Portable Air Conditioner Owner s Manual PLEASE READ AND SAVE THESE INSTRUCTIONS BEFORE USE GENERAL SAFETY INSTRUCTIONS: ALWAYS OPERATE THE UNIT IN AN UPRIGHT POSITION AND PLACE
CHROME FRONT BRAKE MASTER CYLINDER KIT
 -J075 REV. 009-0-0 CHROME FRONT BRAKE MASTER CYLINDER KIT GENERAL Kit Number 5-99D, 5-99D Models These Chrome Master Cylinder Kits are designed to replace the original equipment front brake master cylinder
TECHNICAL BULLETIN. Meritor WABCO Cab Leveling Valves and Chassis Leveling Valves. How the Cab Leveling and Chassis Leveling Valves Work
 Revised 02-00 TECHNICAL BULLETIN Meritor WABCO Cab Leveling Valves and Chassis Leveling Valves This technical bulletin covers both cab and chassis leveling valves manufactured by Meritor WABCO. While the
SET-UP AND INSTALLATION FOR LEAD SCREW CARTRIDGE ASSEMBLY
 SET-UP AND INSTALLATION FOR LEAD SCREW CARTRIDGE ASSEMBLY 82-13-1 O-Ring (Rear) The Lead Screw Assembly is shipped separately. Note: Install Electrical and Pneumatic Circuitry. Be Sure electrical and pneumatic
ENGINE FUEL FUEL FILTER... FUEL HEATER... INJECTOR... SUPPLY PUMP... COMMON RAIL... FUEL PRESSURE LIMITTER...
 FUEL FILTER............................ FUEL HEATER.......................... INJECTOR.............................. SUPPLY PUMP.......................... COMMON RAIL.......................... FUEL PRESSURE
Installation, operation and maintenance manual
 Installation, operation and maintenance manual TWO POST LIFT HCT2.1AL30 HCT2.1AL40 HCT2.5AL30 HCT2.5AL40 READ THIS ENTIRE MANUAL BEFORE INSTALLATION TO ENSURE A CORRECT OPERATION AND LONG SERVICE LIFE
Your safety and the safety of others are very important.
 NATURAL GAS TO PROPANE CONVERSION KIT 090 INSTALLATION INSTRUCTIONS FOR ALTITUDES 0 -,00 FT. ONLY PROPANE CONVERSION KIT SAFETY... INSTALLATION REQUIREMENTS... Tools and Parts... LP Gas Requirements...
CARING FOR YOUR WATER HEATER
 http://waterheatertimer.org/troubleshoot-rheem-tankless-water-heater.html Water Heater Inspections CARING FOR YOUR WATER HEATER Venting System (Direct Vent Only) The venting system should be inspected
Unique DV-ST UltraPure - Manuel: for valve sizes DN8 to DN80 (¼ to 3 )
") Instruction Manual Unique DV-ST UltraPure - Manuel: for valve sizes DN8 to DN80 (¼ to 3 ) ESE01752-EN4 2014-02 Original manual Table of contents The information herein is correct at the time of issue
Instruction Manual Unique DV-ST UltraPure - Manuel: for valve sizes DN8 to DN80 (¼ to 3 ) ESE01752-EN4 2014-02 Original manual Table of contents The information herein is correct at the time of issue
Hydraulic Air Riveter. Operation Manual RC197 RC198. Recommend for mass production line industrial area. Page 1
 Hydraulic Air Riveter Recommend for mass production line industrial area Operation Manual RC197 RC198 Page 1 CONTENTS 1 Important Safety Rules 2 Tool Specification 2.1 Nomenclature 2.2 Technical Data 3
Installing a new 928 Motorsports All-Aluminum Radiator
 928 Motorsports Supercharger Installation Copyright 2008, 928 Motorsports, LLC All Rights Reserved Installing a new 928 Motorsports All-Aluminum Radiator Copyright 2008 928 Motorsports, LLC. Toll-Free
8 ton air/hydraulic long ram jack
 8 ton air/hydraulic long ram jack Model 94562 Set up and Operating Instructions Visit our website at: http://www.harborfreight.com Read this material before using this product. Failure to do so can result
NewAir AC-10100E / AC-10100H Portable Air Conditioner Owner s Manual PLEASE READ AND SAVE THESE INSTRUCTIONS
 NewAir AC-10100E / AC-10100H Portable Air Conditioner Owner s Manual PLEASE READ AND SAVE THESE INSTRUCTIONS ELECTRICAL SAFETY This appliance is for indoor use only. Always turn off the unit and unplug
USER MANUAL. Bottom Loading Bottled Water Dispenser SAVE THIS MANUAL FOR FUTURE USE. Model # 900172
 Model # 900172: Page 1 USER MANUAL Bottom Loading Bottled Water Dispenser Model # 900172 TO REDUCE THE RISK OF INJURY AND PROPERTY DAMAGE, USER MUST READ THIS MANUAL BEFORE ASSEMBLING, INSTALLING & OPERATING
DIAMOND Retractable Rodding Robot Model SPRAYROD-R
 2004-12-21 2 1 (23) DIAMOND Retractable Rodding Robot Model SPRAYROD-R 2004-12-21 2 2 (23) Table of contents 1 TECHNICAL DESCRIPTION...4 1.1 MAIN DETAILS...5 1.2 COMPONENTS DESCRIPTION...5 1.2.1 Pneumatic
Instruction Manual. Image of SP-3015 & SP-3815. Important Safeguards. Automatic Dispensing Hot Water Pot with Reboil Function
 Important Safeguards READ ALL INSTRUCTIONS BEFORE USE. Instruction Manual Automatic Dispensing Hot Water Pot with Reboil Function Image of SP-3015 & SP-3815 SP-3015: 3.0L SP-3815: 3.8L SP-3017: 3.0L (Stainless
HYDRAULIC TABLE CART 500-LB.
 HYDRAULIC TABLE CART 500-LB. OWNER S MANUAL WARNING: Read carefully and understand all MACHINE ADJUSTMENT AND OPERATION INSTRUCTIONS before operating. Failure to follow the safety rules and other basic
Air-Oxygen Blender. Service Manual. Model No. PM5200 Series PM5300 Series (shown)
") Service Manual Model No. PM5200 Series PM5300 Series (shown) SAVE THESE INSTRUCTIONS 300 Held Drive Tel: (+001) 610-262-6090 Northampton, PA 18067 USA Fax: (+001) 610-262-6080 www.precisionmedical.com
Service Manual Model No. PM5200 Series PM5300 Series (shown) SAVE THESE INSTRUCTIONS 300 Held Drive Tel: (+001) 610-262-6090 Northampton, PA 18067 USA Fax: (+001) 610-262-6080 www.precisionmedical.com
Installation Operation Maintenance Troubleshooting Version 2.1, Apr/09 DAYTONA
 Installation Operation Maintenance Troubleshooting Version 2.1, Apr/09 1607 DAYTONA Congratulations! All of us at Summit Dental Systems want you to know that your 1607 Daytona Cuspidor has been built with
ETL listed for installations within 5 ft. (1.5M) of outer edge of water www.srsmith.com 79-15152-00 Rev E2 9.14 Page 1 of 10
 of outer edge of water www.srsmith.com 79-15152-00 Rev E2 9.14 Page 1 of 10") Color Light Streams Large Laminar Installation Manual (CLSLL) Input Power: Total Power: 12V AC 5W 4008814 ETL listed for installations within 5 ft. (1.5M) of outer edge of water 79-15152-00 Rev E2 9.14
Color Light Streams Large Laminar Installation Manual (CLSLL) Input Power: Total Power: 12V AC 5W 4008814 ETL listed for installations within 5 ft. (1.5M) of outer edge of water 79-15152-00 Rev E2 9.14
APM HDC-4000 O PTICAL FIBER P OLISHING M ACHINE
 Domaille Engineering LLC APM HDC-4000 O PTICAL FIBER P OLISHING M ACHINE USER S GUIDE Domaille Engineering, LLC 7100 Dresser Drive NE Rochester, MN 55906 Phone 507.281.0275 Fax 507.281.5694 www.domailleengineering.com
5800 Temperature Sensor Cable Assembly
 5800 Temperature Sensor Cable Assembly Removal and Replacement Instruction Sheet #60-4702-070 Revision D, January 14, 2013 Overview The 5800 has two refrigeration temperature sensors, one attached to the
Service manual. Website: www.andico.com.au CAUTION - BEFORE SERVICING THE UNIT, READ THE SAFETY - PRECAUTIONS IN THIS MANUAL.
 Website: www.andico.com.au Service manual CAUTION - BEFORE SERVICING THE UNIT, READ THE SAFETY - PRECAUTIONS IN THIS MANUAL. - ONLY FOR AUTHORISED SERVICE PERSONNEL. MODELS: MPK1-09CR-QB8 MPK1-12ER-QB6