DIAL-UP DATA. User s Guide
|
|
|
- Joan Golden
- 7 years ago
- Views:
Transcription
1 DIAL-UP DATA User s Guide Iridium Satellite LLC Rev. 5; January 1, 2003

2 DIAL-UP DATA SERVICE TABLE OF CONTENTS 1 Dial-Up Data Overview Hardware/Software Requirements Modem Driver Installation and Configuration WINDOWS 95/98/ME SETUP Install the Modem Driver Windows 95/98/Me Configure Dial-Up Networking Windows 95/98/Me WINDOWS NT4.0 SETUP Install the Modem Driver Windows NT Configure Dial-Up Networking Windows NT WINDOWS 2000 SETUP Install the Modem Driver Windows Configure Dial-Up Networking Windows WINDOWS XP SETUP Install the Modem Driver Windows XP Configure Dial-Up Networking Windows XP Hardware Connections SETTING UP THE 9500 OR 9505 PORTABLE PHONE SETTING UP THE 9570 PORTABLE DOCK SETTING UP THE 9520 MOBILE PHONE SETTING UP THE EUROCOM IRIDIUM FIXED MOUNT UNIT Dialing a Call Iridium Satellite LLC 2 Rev. 5; January 1, 2003

3 DIAL-UP DATA SERVICE OVERVIEW 1 Dial-Up Data Overview Dial-Up Data Service provides dial-up connectivity through your Iridium phone to another computer, a remote LAN (e.g., a corporate network), or an Internet Service Provider (ISP). This service offers a typical data rate of 2.4 Kbps. You will be able to use Dial-Up Data service just as you would use the modem on your computer to dial a call through the public switched telephone network (PSTN). The only differences are that the dialed telephone number must conform to the international dialing pattern used by Iridium, and that you will use your Iridium phone as the data modem. In essence, your Iridium phone appears as an external modem to your computer. Before using Dial-Up Data, you will need to install the Motorola Satellite Series Data Modem driver (provided on the Iridium World Data Services CD) on your computer. You will then be able to use standard software applications (e.g., Microsoft Dial-Up Networking) to initiate data calls with Dial-Up Data Service. How it works Dial-Up Data Service functions in much the same way. From the perspective of your computer, the Iridium handset is an external modem. On your computer, you will configure a dial-up networking connection. As part of that connection, you will identify the modem associated with the Iridium handset and the phone number to dial. Then, in dial-up networking you will enter your user name and password to access your ISP, and you will initiate the connection. Your handset will dial and initiate a connection with the Iridium gateway through the Iridium satellite constellation. Since your Iridium handset is requesting to establish a data connection, the switch at the gateway will route the call through a modem. The modem at the Iridium gateway will then dial into and connect to another modem at your ISP. Once connected and a session has been established, you can check your and browse the Internet just like you would across the PSTN. Figure 1 illustrates how a Dial-Up data call is routed. ISP Internet Iridium Gateway PSTN Figure 1. Iridium Dial-Up Data Connectivity Corporate Network Iridium Satellite LLC 3 Rev. 5; January 1, 2003

4 IRIDIUM WORLD DATA SERVICES HARDWARE/SOFTWARE REQUIREMENTS 2 Hardware/Software Requirements To use Iridium Dial-Up Data Service, you will need the following: A Windows -based PC, with: Windows 95, 98, Me, NT4.0 (Service Pack 4 or later), 2000 or XP CD-ROM drive Serial port A SIM Card that is provisioned for data (note that this SIM can also be used for voice calls). An Iridium Phone with a data-capable internal software version and additional hardware/software: Iridium Phone Type Software Version Required Hardware/Software Required Motorola 9500 Portable Phone INC0620 or later 1 Data Kit Motorola 9505 Portable Phone LAC109G or later 1 Data Kit Motorola 9520 Mobile Phone RAC0620 or later 1 Data CD Motorola 9521 LBT-based products (e.g. the Iridium 9500 Data Module) Motorola 9522 LBT-based products EuroCom Fixed Mount Unit RAC0620 or later All software versions for the 9522 are data capable Transceiver software version 3.xx.xx or later 3 Custom Cable, Power Supply 2 and Data CD Custom Cable, Power supply 2 and Data CD Serial Cable 4 and Data CD To check the software version: Turn the phone on and press *#91#. Consult product documentation for details. Consult the user s guide that came with the phone for instructions on how to check the transceiver software version. Included with the phone. Note that this is a straight through and not a null modem cable. Iridium Satellite LLC 4 Rev. 5; January 1, 2003

5 DIAL-UP DATA SETUP & CONFIGURATION 3 Modem Driver Installation and Configuration Prior to using your Iridium phone as a modem for Dial-Up Data, you must do the following: Install the Motorola Satellite Series modem driver on your PC, and Set up and configure a dial-up networking connection. This section contains instructions for installing the modem driver and configuring Dial-Up Networking in selected Microsoft Windows environments. These instructions are identical to those that you would use to install and configure any new modem in Microsoft Windows. If you cannot find your operating system below, please refer to the user manual provided with your computer and follow the instructions for installing a new modem. Note: In order to proceed, Dial-Up Networking must be installed on your computer. Dial- Up Networking is a standard Windows feature that is typically installed by default when a computer is initially set up. If Dial-Up Networking is not installed on your computer, please refer to the user manual provided with your operating system and follow the instructions for installing Dial-Up Networking. For Windows 95, 98 or Me, complete the steps in section 3.1 For Windows NT4.0, complete the steps in section 3.2 For Windows 2000, complete the steps in section 3.3 For Windows XP, complete the steps in section 3.4 Iridium Satellite LLC 5 Rev. 5; January 1, 2003

6 DIAL-UP DATA WINDOWS 95/98/Me SETUP 3.1 Windows 95/98/Me Setup In order to install the modem driver and configure dial-up networking, you will need the following: The Iridium World Data Services CD An available communications port on your computer (e.g., COM1) Note: The following instructions are for Windows Me. Windows 95 and 98 are very similar in appearance, but the individual screens you see may differ slightly Install the Modem Driver Windows 95/98/Me 1. Close all applications. 2. Choose Start > Settings > Control Panel to open the Control Panel window. 3. Double-click on Modems to open the Modem Properties window. Note: If no modems are currently installed on your computer, you will not see the Modem Properties window. In this case, skip to step Click the General tab, and you will see all the modems installed on your computer. Click on Add to open the Install New Modem window. This will begin the modem installation procedure. Henceforth, you can cancel at any time without affecting your system by clicking Cancel. Iridium Satellite LLC 6 Rev. 5; January 1, 2003

7 DIAL-UP DATA WINDOWS 95/98/Me SETUP 5. If you are using a laptop, you may be presented with the following screen. Select the Other radio button and click Next >. 6. Choose the checkbox marked Don t detect my modem; I will select it from a list. Then, click Next >. Iridium Satellite LLC 7 Rev. 5; January 1, 2003

8 DIAL-UP DATA WINDOWS 95/98/Me SETUP 7. Click on Have Disk 8. The default drive setting is A:\, which is the default floppy drive on most computers. Insert the Iridium World Data Services CD into your CD drive, and click Browse 9. Browse to the Dial-Up Data directory on the CD, and then click OK. Iridium Satellite LLC 8 Rev. 5; January 1, 2003

9 DIAL-UP DATA WINDOWS 95/98/Me SETUP 10. In the Install New Modem window, select the Motorola Satellite Series Data Modem and click Next >. 11. Select an available Communications Port (or COM Port) on which to install the modem (e.g., COM1), and click Next >. This is the port to which you will connect your Iridium phone. Iridium Satellite LLC 9 Rev. 5; January 1, 2003
 on which to install the modem (e.g., COM1), and click Next >.")
10 DIAL-UP DATA WINDOWS 95/98/Me SETUP 12. Click Finish. 13. Click either Close or OK to close the Modem Properties window. 14. You have now completed the installation of the Motorola Satellite Series Data Modem. Continue with section Iridium Satellite LLC 10 Rev. 5; January 1, 2003

11 DIAL-UP DATA WINDOWS 95/98/Me SETUP Configure Dial-Up Networking Windows 95/98/Me In order to use your Iridium handset for dial-up networking, you need to create a new dial-up networking connection. In Windows 95: Choose Start > Programs > Accessories > Dial-Up Networking In Windows 98/Me: Choose Start > Programs > Accessories > Communications > Dial-Up Networking In the Dial-Up Networking window, you can modify an existing connection type or create a new connection type. Unless you are comfortable using the dial-up networking options, we recommend that you create a new connection type for Dial-Up Data. To Create a New Connection Type: 1. In the Dial-Up Networking window, double-click Make New Connection. Henceforth, you can cancel at any time without affecting your system by clicking Cancel. 2. In the Make New Connection window, enter a connection name and select Motorola Satellite Series Data Modem from the device list. For example, if you are creating a connection to your ISP and your ISP is called Saturn Internet, you might name your connection Iridium Saturn. Click Next >. Iridium Satellite LLC 11 Rev. 5; January 1, 2003

12 DIAL-UP DATA WINDOWS 95/98/Me SETUP 3. In the Make a New Connection window, you must do the following: In the Telephone number box, enter the telephone number you wish to use for your connection. Enter the number in international dialing format: 00 + Country Code + Area Code/Phone Number. For example, if you are dialing an ISP in Tempe, Arizona, USA, you would enter , where 1 is the country code and is the ISP s telephone number. Please note that this is not a valid telephone number! Note: This is the same dialing pattern used for voice calls. In fact, you can verify that you are dialing the correct number for your ISP by dialing the number as a voice call on your satellite phone. You should hear your ISP s modem tones if dialed properly. Leave the Area Code box blank Click Next >. 4. Click Finish to save your new Dial-Up Networking connection. Iridium Satellite LLC 12 Rev. 5; January 1, 2003

13 DIAL-UP DATA WINDOWS 95/98/Me SETUP 5. In the Dial-Up Networking window, right click on your new dial-up connection and select Properties. 6. Upon selecting Properties, you will see a window similar to the one shown below. Select the General tab, and then de-select the check box for Use area code and Dialing Properties. Also, verify that you have entered the correct phone number. Set up the parameters for the rest of the menus (for example, Networking) as required by your ISP. 7. Click OK to return to the Dial-up Networking window. Close the Dial-up Networking window. 8. You have now completed the configuration of Dial-Up Networking. To connect your hardware and initiate a dial-up data call, continue with section 4. Iridium Satellite LLC 13 Rev. 5; January 1, 2003
 as required by your ISP. 7. Click OK to return to the Dial-up Networking window. Close the Dial-up Networking window. 8.")
14 DIAL-UP DATA WINDOWS NT 4.0 SETUP 3.2 Windows NT4.0 Setup In order to install the modem driver and configure dial-up networking, you will need the following: The Iridium World Data Services CD An available communications port on your computer (e.g., COM1) Administrator privileges for Windows NT Install the Modem Driver Windows NT Close all applications. 2. Choose Start > Settings > Control Panel to open the Control Panel window. 3. Double click on Modems to open the Modems Properties window. 4. Click the General tab, and you will see all the modems installed on your computer. Click on Add to open the Install New Modem window. This will begin the modem installation procedure. Henceforth, you can cancel at any time without affecting your system by clicking Cancel. Iridium Satellite LLC 14 Rev. 5; January 1, 2003

15 DIAL-UP DATA WINDOWS NT 4.0 SETUP 5. Choose the checkbox marked Don t detect my modem; I will select it from a list. Then, click Next > to open the Install New Modem window. 6. Click on Have Disk to open the Install From Disk window. Iridium Satellite LLC 15 Rev. 5; January 1, 2003

16 DIAL-UP DATA WINDOWS NT 4.0 SETUP 7. The default drive setting is A:\, which is the default floppy drive on most computers. Insert the Iridium World Data Services CD into your CD drive, and browse to the Dial-Up Data directory on the CD. Click OK. 8. In the Install New Modem window, select the Motorola Satellite Series Data Modem and click Next >. Iridium Satellite LLC 16 Rev. 5; January 1, 2003

17 DIAL-UP DATA WINDOWS NT 4.0 SETUP 9. Click the Selected ports radio button, and select an available Communications Port (or COM Port) on which to install the modem (e.g., COM1) and click Next >. This is the port to which you will connect your Iridium phone. 10. Click Finish to close the Install New Modem window. Iridium Satellite LLC 17 Rev. 5; January 1, 2003
 and click Next >. This is the port to which you will connect your Iridium phone. 10.")
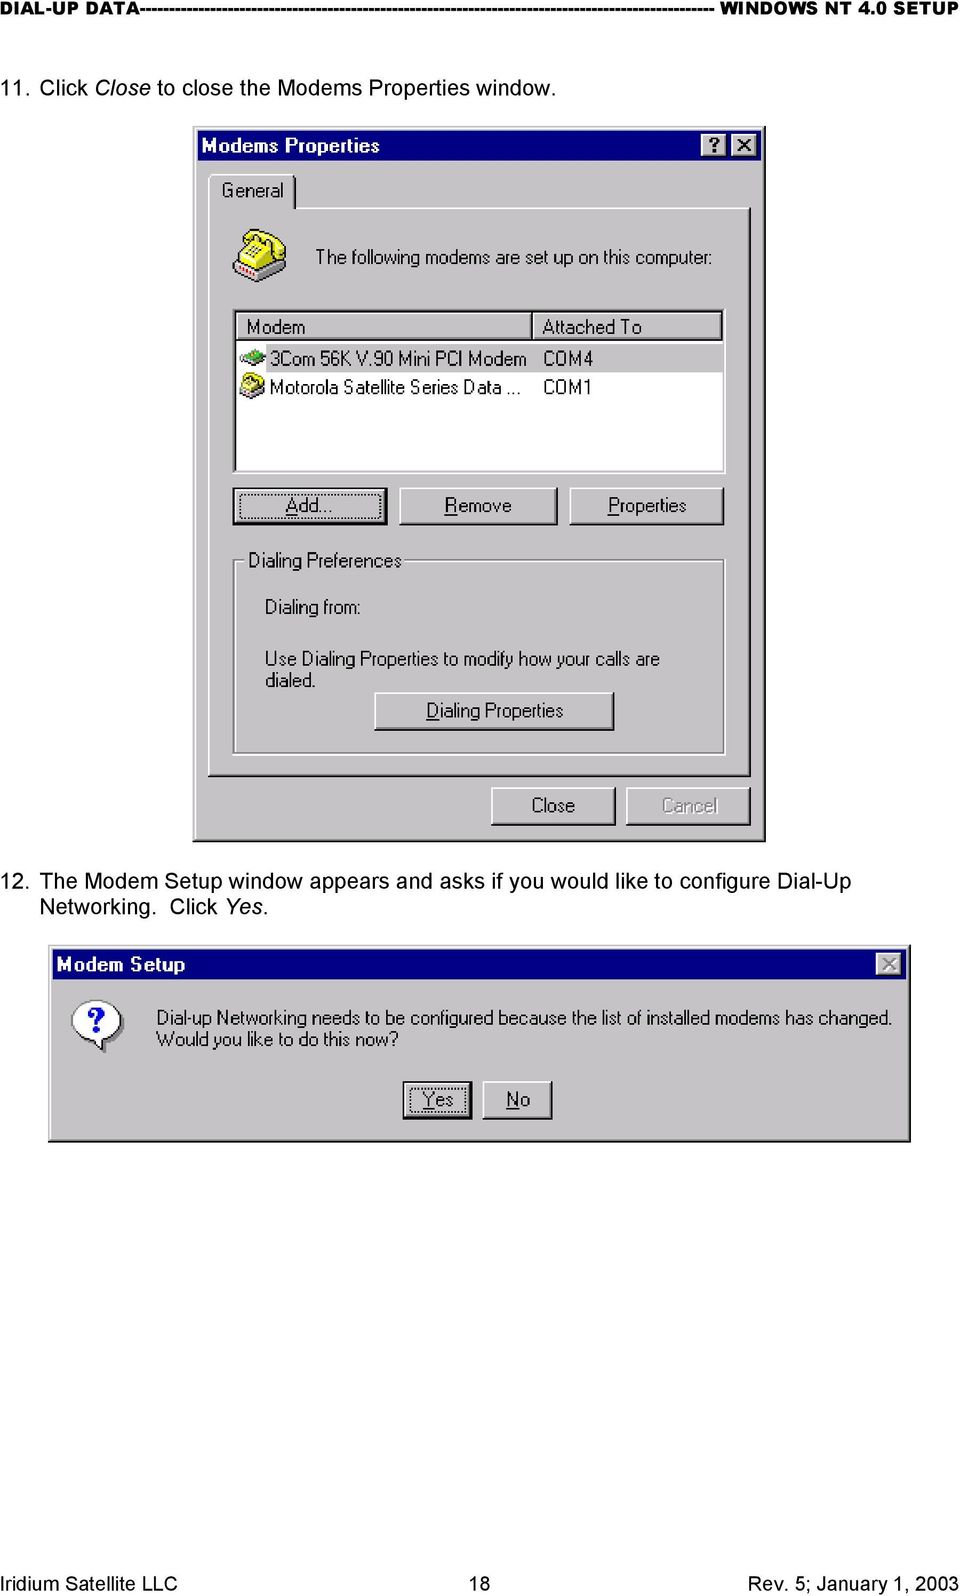
18 DIAL-UP DATA WINDOWS NT 4.0 SETUP 11. Click Close to close the Modems Properties window. 12. The Modem Setup window appears and asks if you would like to configure Dial-Up Networking. Click Yes. Iridium Satellite LLC 18 Rev. 5; January 1, 2003
19 DIAL-UP DATA WINDOWS NT 4.0 SETUP 13. The Remote Access Setup window appears. Click Add to continue. Note: If a modem is already installed on the COM port that you would like to use for the Motorola Satellite Series Data Modem, select the modem in the list and click Remove. 14. Select the Motorola Satellite Series Data Modem from the list of RAS capable devices. Click OK to add the entry to the Remote Access Setup list. 15. The new entry is added to the list of modems. Click Continue. 16. When the computer asks if you would like to restart the computer, click Yes. 17. You have now completed the installation of the Motorola Satellite Series Data Modem. Continue with section Iridium Satellite LLC 19 Rev. 5; January 1, 2003

20 DIAL-UP DATA WINDOWS NT 4.0 SETUP Configure Dial-Up Networking Windows NT4.0 In order to use your Iridium handset for dial-up networking, you need to create a new dial-up networking connection. In the Dial-Up Networking window, you can modify an existing connection type or create a new connection type. Unless you are comfortable using the dial-up networking options, we recommend that you create a new connection type for Dial-Up Data. To Create a New Connection Type: There are two possible sequences of windows that could arise depending on whether or not the New Phonebook Entry Wizard has previously been disabled. The following instructions assume that the wizard is not used. If you are using the Wizard, use the information from the following instructions to populate the Wizard screens. 1. Choose Start > Programs > Accessories > Dial-Up Networking to open the Dial-Up Networking window. If Dial-Up Networking has no phonebook entries, the following window will appear. Click OK if this window appears. 2. If a phonebook entry already exists, a window similar to the following will appear. Click New. Iridium Satellite LLC 20 Rev. 5; January 1, 2003

21 DIAL-UP DATA WINDOWS NT 4.0 SETUP 3. The New Phonebook Entry window appears. You must do the following: In the Entry name box, enter a connection name. For example, if you are creating a connection to your Internet Service Provider, and your ISP is called Saturn Internet, you might name your connection Iridium Saturn. In the Phone number box, enter the telephone number you wish to use for your connection. Enter the number in international dialing format: 00 + Country Code + Area Code/Phone Number. For example, if you are dialing an ISP in Tempe, Arizona, USA, you would enter , where 1 is the country code and is the ISP s telephone number. Please note that this is not a valid telephone number! Note: This is the same dialing pattern used for voice calls. In fact, you can verify that you are dialing the correct number for your ISP by dialing the number as a voice call on your satellite phone. You should hear your ISP s modem tones if dialed properly. De-select the Use Telephony dialing properties check-box. In the Dial using list, select Motorola Satellite Series Data Modem. Click Configure... Iridium Satellite LLC 21 Rev. 5; January 1, 2003
22 DIAL-UP DATA WINDOWS NT 4.0 SETUP 4. Verify the proper settings according to the window below. Click OK to save any changes. Upon returning to the New Phonebook Entry window, click OK. 5. Close the Dial-Up Networking window. 6. You have now completed the configuration of Dial-Up Networking. To connect your hardware and initiate a dial-up data call, continue with section 4. Iridium Satellite LLC 22 Rev. 5; January 1, 2003
23 DIAL-UP DATA WINDOWS 2000 SETUP 3.3 Windows 2000 Setup In order to install the modem driver and configure dial-up networking, you will need the following: The Iridium World Data Services CD An available communications port on your computer (e.g., COM1) Administrator privileges for Windows Install the Modem Driver Windows Close all applications 2. Choose Start > Settings > Control Panel to open the Control Panel window. 3. Double click on Phone and Modem Options to open the Phone and Modem Options window. 4. Click the Modems tab, and you will see all the modems installed on your computer. Click on Add to open the Add/Remove Hardware Wizard for installing a new modem. This will begin the modem installation procedure. Henceforth, you can cancel at any time without affecting your system by clicking Cancel. Iridium Satellite LLC 23 Rev. 5; January 1, 2003
24 DIAL-UP DATA WINDOWS 2000 SETUP 5. Choose the checkbox marked Don t detect my modem; I will select it from a list. Then, click Next > to open the Install New Modem window of the Add/Remove Hardware Wizard. 6. Click on Have Disk to open the Install From Disk window. Iridium Satellite LLC 24 Rev. 5; January 1, 2003
25 DIAL-UP DATA WINDOWS 2000 SETUP 7. The default drive setting is A:\, which is the default floppy drive on most computers. Insert the Iridium World Data Services CD into your CD drive, and click Browse 8. Browse to the Dial-Up Data directory on the CD, and then click OK. Iridium Satellite LLC 25 Rev. 5; January 1, 2003
26 DIAL-UP DATA WINDOWS 2000 SETUP 9. In the Install New Modem window, select the Motorola Satellite Series Data Modem and click Next >. 10. Click the Selected ports radio button, and select an available Communications Port (or COM Port) on which to install the modem (e.g., COM1). This is the port to which you will connect your Iridium phone. Click Next >. Iridium Satellite LLC 26 Rev. 5; January 1, 2003
27 DIAL-UP DATA WINDOWS 2000 SETUP 11. The following window will appear. Click Yes. 12. Click Finish to close the Install New Modem window. Iridium Satellite LLC 27 Rev. 5; January 1, 2003
28 DIAL-UP DATA WINDOWS 2000 SETUP 13. Click OK to close the Phone and Modem Options window. 14. You have now completed the installation of the Motorola Satellite Series Data Modem. Continue with section Iridium Satellite LLC 28 Rev. 5; January 1, 2003
29 DIAL-UP DATA WINDOWS 2000 SETUP Configure Dial-Up Networking Windows 2000 In order to use your Iridium handset for dial-up networking, you need to create a new dial-up networking connection. In the Network and Dial-Up Connections window, you can modify an existing connection type or create a new connection type. Unless you are comfortable using the dial-up networking options, we recommend that you create a new connection type for Dial-Up Data. To Create a New Connection Type: 1. Choose Start > Programs > Accessories > Communications > Network and Dial-up Connections to open the Network and Dial-Up Connections window. 2. In the Network and Dial-Up Connections window, double-click Make New Connection to open the Network Connection Wizard. Henceforth, you can cancel at any time without affecting your system by clicking Cancel. To continue, click Next >. Iridium Satellite LLC 29 Rev. 5; January 1, 2003
30 DIAL-UP DATA WINDOWS 2000 SETUP 3. In the Network Connection Type window of the Network Connection Wizard, select the appropriate Dial-up connection type (either Dial-up to private network or Dial-up to the Internet ). This example assumes you are creating a connection to your Internet Service Provider. Click Next >. 4. In the Internet Connection Wizard, select I want to set up my Internet connection manually. Click Next >. Iridium Satellite LLC 30 Rev. 5; January 1, 2003
31 DIAL-UP DATA WINDOWS 2000 SETUP 5. In the Internet Connection Wizard, select I connect through a phone line and a modem. Click Next >. 6. The following Internet Connection Wizard window appears only if you have more than one modem installed. If this window appears, choose the Motorola Satellite Series Data Modem from the drop down list. Then, click Next >. Iridium Satellite LLC 31 Rev. 5; January 1, 2003
32 DIAL-UP DATA WINDOWS 2000 SETUP 7. In the Internet Connection Wizard window, you must do the following: In the Telephone number box, enter the telephone number you wish to use for your connection. Enter the number in international dialing format: 00 + Country Code + Area Code/Phone Number. For example, if you are dialing an ISP in Tempe, Arizona, USA, you would enter , where 1 is the country code and is the ISP s telephone number. Please note that this is not a valid telephone number! Note: This is the same dialing pattern used for voice calls. In fact, you can verify that you are dialing the correct number for your ISP by dialing the number as a voice call on your satellite phone. You should hear your ISP s modem tones if dialed properly. De-select the checkbox for Use area codes and dialing rules. (Note: This will gray-out the Area code and Country/Region name and code boxes. Because they are grayed-out, it does not matter what these boxes contain) Click Next >. Iridium Satellite LLC 32 Rev. 5; January 1, 2003
33 DIAL-UP DATA WINDOWS 2000 SETUP 8. In the Internet Connection Wizard, enter your user name and password to access your ISP. Click Next >. 9. In the Internet Connection Wizard, enter a connection name. For example, if you are creating a connection to your ISP and your ISP is called Saturn Internet, you might name your connection Iridium Saturn. Click Next >. Iridium Satellite LLC 33 Rev. 5; January 1, 2003
34 DIAL-UP DATA WINDOWS 2000 SETUP 10. In the Internet Connection Wizard, if you have already configured your (or you are not using Microsoft Outlook), select No. Click Next >. 11. In the Internet Connection Wizard, de-select To connect to the Internet immediately. Click Finish to save your new connection. Iridium Satellite LLC 34 Rev. 5; January 1, 2003
35 DIAL-UP DATA WINDOWS 2000 SETUP 12. In the Dial-Up Networking window, right click on your new dial-up connection and select Properties. 13. Upon selecting Properties, you will see the window below. Select the General tab, and verify the settings with the figure below. Also, verify that you have entered the correct telephone number. (Note that your telephone number should be seen in place of ). Iridium Satellite LLC 35 Rev. 5; January 1, 2003
36 DIAL-UP DATA WINDOWS 2000 SETUP 14. From the General menu, click Configure to verify the proper settings. The settings should match the figure below. Click OK to return to the Properties window, and then click OK again to close the Properties window. 15. You have now completed the configuration of Dial-Up Networking. To connect your hardware and initiate a dial-up data call, continue with section 4. Iridium Satellite LLC 36 Rev. 5; January 1, 2003
37 DIAL-UP DATA WINDOWS XP SETUP 3.4 Windows XP Setup In order to install the modem driver and configure dial-up networking, you will need the following: The Iridium World Data Services CD An available communications port on your computer (e.g., COM1) Administrator privileges (if using Windows XP Professional Edition) Install the Modem Driver Windows XP 1. Close all applications 2. Choose Start > Control Panel to open the Control Panel window. 3. Double click on Phone and Modem Options to open the Phone and Modem Options window. 4. Click the Modems tab, and you will see all the modems installed on your computer. Click on Add to open the Add Hardware Wizard for installing a new modem. This will begin the modem installation procedure. Henceforth, you can cancel at any time without affecting your system by clicking Cancel. Iridium Satellite LLC 37 Rev. 5; January 1, 2003
38 DIAL-UP DATA WINDOWS XP SETUP 5. Choose the checkbox marked Don t detect my modem; I will select it from a list. Then, click Next >. Iridium Satellite LLC 38 Rev. 5; January 1, 2003
39 DIAL-UP DATA WINDOWS XP SETUP 6. Click on Have Disk to open the Install From Disk window. 7. The default drive setting is A:\, which is the default floppy drive on most computers. Insert the Iridium World Data Services CD into your CD drive, and click Browse Iridium Satellite LLC 39 Rev. 5; January 1, 2003
40 DIAL-UP DATA WINDOWS XP SETUP 8. Browse to the Dial-Up Data directory on the CD, and then click Open. 9. Click OK. Iridium Satellite LLC 40 Rev. 5; January 1, 2003
41 DIAL-UP DATA WINDOWS XP SETUP 10. In the Install New Modem window, select the Motorola Satellite Series Data Modem and click Next >. Iridium Satellite LLC 41 Rev. 5; January 1, 2003
42 DIAL-UP DATA WINDOWS XP SETUP 11. Click the Selected ports radio button, and select an available Communications Port (or COM Port) on which to install the modem (e.g., COM1). This is the port to which you will connect your Iridium phone. Click Next >. 12. The following window will appear. Click Continue Anyway. Iridium Satellite LLC 42 Rev. 5; January 1, 2003
43 DIAL-UP DATA WINDOWS XP SETUP 13. Click Finish to close the Install New Modem window. Iridium Satellite LLC 43 Rev. 5; January 1, 2003
44 DIAL-UP DATA WINDOWS XP SETUP 14. Click OK to close the Phone and Modem Options window. 15. You have now completed the installation of the Motorola Satellite Series Data Modem. Continue with section Iridium Satellite LLC 44 Rev. 5; January 1, 2003
45 DIAL-UP DATA WINDOWS XP SETUP Configure Dial-Up Networking Windows XP In order to use your Iridium handset for dial-up networking, you need to create a new dial-up networking connection. In the Network and Dial-Up Connections window, you can modify an existing connection type or create a new connection type. Unless you are comfortable using the dial-up networking options, we recommend that you create a new connection type for Dial-Up Data. To Create a New Connection Type: 1. Choose Start > All Programs > Accessories > Communications > New Connection Wizard. 2. The New Connection Wizard opens. Henceforth, you can cancel at any time without affecting your system by clicking Cancel. To continue, click Next >. Iridium Satellite LLC 45 Rev. 5; January 1, 2003
46 DIAL-UP DATA WINDOWS XP SETUP 3. Select the appropriate Dial-up connection type (either Connect to the Internet or Connect to the network at my workplace ). This example assumes you are creating a connection to the Internet. Click Next >. Iridium Satellite LLC 46 Rev. 5; January 1, 2003
47 DIAL-UP DATA WINDOWS XP SETUP 4. Select Set up my connection manually. Click Next >. 5. Select Connect using a dial-up modem. Click Next >. Iridium Satellite LLC 47 Rev. 5; January 1, 2003
48 DIAL-UP DATA WINDOWS XP SETUP 6. The following Internet Connection Wizard window appears only if you have more than one modem installed. If this window appears, choose the Motorola Satellite Series Data Modem. Then, click Next >. Iridium Satellite LLC 48 Rev. 5; January 1, 2003
49 DIAL-UP DATA WINDOWS XP SETUP 7. In the ISP Name box, enter a name for your connection. For example, if you are creating a connection to your ISP and your ISP is called Saturn Internet, you might name your connection Iridium Saturn. Click Next >. Iridium Satellite LLC 49 Rev. 5; January 1, 2003
50 DIAL-UP DATA WINDOWS XP SETUP 8. In the Phone Number box, enter the telephone number you wish to use for your connection. Enter the number in international dialing format: 00 + Country Code + Area Code/Phone Number. For example, if you are dialing an ISP in Tempe, Arizona, USA, you would enter , where 1 is the country code and is the ISP s telephone number. Please note that this is not a valid telephone number! Note: This is the same dialing pattern used for voice calls. In fact, you can verify that you are dialing the correct number for your ISP by dialing the number as a voice call on your satellite phone. You should hear your ISP s modem tones if dialed properly. Click Next >. Iridium Satellite LLC 50 Rev. 5; January 1, 2003
51 DIAL-UP DATA WINDOWS XP SETUP 9. If using Windows XP Professional Edition, the following window may appear. If so, select either Anyone s use or My use only. Click Next >. Iridium Satellite LLC 51 Rev. 5; January 1, 2003
52 DIAL-UP DATA WINDOWS XP SETUP 10. Enter your user name and password to access your ISP. Click Next >. Iridium Satellite LLC 52 Rev. 5; January 1, 2003
53 DIAL-UP DATA WINDOWS XP SETUP 11. Click Finish to save your new connection. Iridium Satellite LLC 53 Rev. 5; January 1, 2003
54 DIAL-UP DATA WINDOWS XP SETUP 12. Choose Start > All Programs > Accessories > Communications > Network Connections. 13. Right-click on your new dial-up connection (Iridium Saturn in this example) and select Properties. Iridium Satellite LLC 54 Rev. 5; January 1, 2003
55 DIAL-UP DATA WINDOWS XP SETUP 14. Verify the settings with the figure below. Also, verify that you have entered the correct telephone number. (Note that your telephone number should be seen in place of ). Make sure Use dialing rules is unchecked. Iridium Satellite LLC 55 Rev. 5; January 1, 2003
56 DIAL-UP DATA WINDOWS XP SETUP 15. From the General menu, click Configure. The settings should match the figure below. Click OK to return to the Properties window, and then click OK again to close the Properties window. 16. You have now completed the configuration of Dial-Up Networking. To connect your hardware and initiate a dial-up data call, continue with section 4. Iridium Satellite LLC 56 Rev. 5; January 1, 2003
57 DIAL-UP DATA /9505 PORTABLE PHONE SETUP 4 Hardware Connections 4.1 Setting up the 9500 or 9505 Portable Phone 1. Insert your data-provisioned SIM card into the phone. See the user guide for your phone if you need further instructions on how to insert the SIM card. 2. Connect the Data Adapter to the bottom of the phone. 3. (Optionally) connect a charging device to the Data Adapter. 4. Plug the Serial Cable into the Data Adapter. Iridium Satellite LLC 57 Rev. 5; January 1, 2003
58 DIAL-UP DATA /9505 PORTABLE PHONE SETUP 5. Plug the Serial Cable into the serial port on your computer. 6. Rotate and extend the phone s antenna. Place the phone into the stand, or otherwise position the phone so that the antenna is vertical and has a clear view of the sky. 7. Continue with section 5. Iridium Satellite LLC 58 Rev. 5; January 1, 2003
59 DIAL-UP DATA EUROCOM IRIDIUM FIXED MOUNT UNIT SETUP 4.2 Setting up the 9570 Portable Dock 1. Insert your data-provisioned SIM card into the phone or the dock. See the user guide for your Portable Phone or Portable Dock if you need further instructions on how to insert the SIM card. 2. Insert the 9500 Portable Phone into the Portable Dock (or insert a 9505 Portable Phone, with optional dock adapter). 3. Plug the Serial Cable into the back of the Portable Dock. 4. Plug the Serial Cable into the serial port on your computer. 5. Connect an external antenna to the Portable Dock, and orient the antenna so that it has a clear view of the sky. 6. Continue with section Setting up the 9520 Mobile Phone 1. Insert your data-provisioned SIM card into the Mobile Phone. See the user guide for your phone if you need further instructions on how to insert the SIM card. 2. The wiring harness for the 9520 Mobile Phone contains a built-in Serial Cable. Plug the Serial Cable into the serial port on your computer. 3. Verify that an external antenna is connected to the Mobile Phone, and orient the antenna so that it has a clear view of the sky. 4. Continue with section 5. Iridium Satellite LLC 59 Rev. 5; January 1, 2003
60 DIAL-UP DATA EUROCOM IRIDIUM FIXED MOUNT UNIT SETUP 4.4 Setting up the EuroCom Iridium Fixed Mount Unit 1. Open the small lid on the top of the transceiver unit and insert your data-provisioned SIM card. See the user guide for your phone if you need further instructions on how to insert the SIM card. 2. The EuroCom Iridium Fixed Mount Unit comes with a 9-Pin Serial Cable. Plug the Serial Cable into the port labeled Data on the transceiver unit. 3. Plug the Serial Cable into the serial port on your computer. 4. Verify that an external antenna is connected to the phone, and orient the antenna so that it has a clear view of the sky. 5. Continue with section 5. Iridium Satellite LLC 60 Rev. 5; January 1, 2003
61 DIAL-UP DATA DIALING A CALL 5 Dialing a Call To place a Dial-Up Data call, you must open the Dial-Up Networking window and select the dialup connection you created for your Motorola phone. 1. Connect the computer and phone as described in Section Orient the phone s antenna with a clear view of the sky. 3. If your computer is turned off, turn it on and wait for it to boot up. 4. Turn on your Iridium phone and wait for it to register with the satellite network. 5. Depending on your Windows operating system, choose one of the following to open the Dial- Up Networking window: Start > Programs > Accessories > Dial-Up Networking Start > Programs > Accessories > Communications > Dial-Up Networking Start > Programs > Accessories > Communications > Network and Dial-up Connections Start > Programs > Accessories > Communications > Network Connections Start > All Programs > Accessories > Communications > Network Connections 6. A window similar to the following will appear. Double-click the dial-up connection you created for your Motorola Satellite Series phone. In this example, you would double click Iridium Saturn. 7. Find your operating system below and follow the appropriate instructions. Iridium Satellite LLC 61 Rev. 5; January 1, 2003
62 DIAL-UP DATA DIALING A CALL Windows 95/98/Me: In the Connect To window, enter the user name and password that you use to access your ISP or corporate network, and if desired, click the Save password checkbox so that you do not have to re-enter the password every time a connection is made. Click Connect and your Iridium handset will begin to dial. Go to Step 8. Windows NT: The Dial-Up Networking window appears. Select your connection from the drop down list (for example, Iridium Saturn). Verify that the phone number is correct. Click Dial to continue. Iridium Satellite LLC 62 Rev. 5; January 1, 2003
63 DIAL-UP DATA DIALING A CALL A window similar to the following will appear. Enter the user name and password that you use to access your ISP or corporate network. If desired, click the Save password checkbox so that you do not have to re-enter the password every time a connection is made. Press OK and your Iridium handset will begin to dial. Go to Step 8. Windows 2000: The Connect window appears. Click Dial and your Iridium handset will begin to dial. Go to Step 8. Iridium Satellite LLC 63 Rev. 5; January 1, 2003
64 DIAL-UP DATA DIALING A CALL Windows XP: The Connect window appears. Click Dial and your Iridium handset will begin to dial. Go to Step As the Iridium phone is dialing, it will blink Data Call In Progress and a Dial-Up Networking window will appear on your computer showing the current status of the connection (just as it does when connecting through the landline network to your ISP or corporate network). 9. Once connected, the handset will continue to display Data Call In Progress, but it will no longer blink, and the following window will appear on your computer indicating that your user name and password are being verified. Iridium Satellite LLC 64 Rev. 5; January 1, 2003
65 DIAL-UP DATA DIALING A CALL 10. Once authenticated, a dial-up networking session is established, and the dial-up networking icon will appear in your task bar. 11. You can now launch your Web browser, program or other program you normally use when connected to your corporate network or Internet Service Provider. Note: See the Application Notes document for instructions on how to optimize some common software applications for use with Iridium World Data Services. Iridium Satellite LLC 65 Rev. 5; January 1, 2003
66 DIALUP DATA TRADEMARK NOTICE Trademark Notice Iridium and the Iridium logo are registered trademarks and/or service marks of Iridium Satellite LLC. Windows, Windows 95, Windows 98, Windows Me, Windows NT, Windows 2000, Windows XP, Dial-Up Networking, Outlook, Outlook Express and Internet Explorer are registered trademarks of Microsoft Corporation. Netscape, Netscape Navigator and Netscape Messenger are registered trademarks of Netscape Communications Corporation. Apollo Emulator and Smart Connect are registered trademarks of Brand Communications Ltd. Motorola and Satellite Series are registered trademarks of Motorola, Inc. Iridium Satellite LLC 66 Rev. 5; January 1, 2003
DIAL-UP DATA. User s Guide
 DIAL-UP DATA User s Guide Iridium Satellite LLC Rev. 2; June 15, 2001 DIAL-UP DATA SERVICE--------------------------------------------------------------------------------------- TABLE OF CONTENTS 1 Dial-Up
DIRECT INTERNET DATA. User s Guide
 DIRECT INTERNET DATA User s Guide Iridium Satellite LLC Rev. 2; June 15, 2001 DIRECT INTERNET DATA ------------------------------------------------------------------------------------- TABLE OF CONTENTS
DIAL-UP DATA. Troubleshooting
 DIAL-UP DATA Troubleshooting Iridium Satellite LLC Rev. 5; January 1, 2003 General Most user problems are associated with unfamiliarity or improper use of the Iridium phone or with improper configuration
WORLD DATA SERVICES. Overview
 WORLD DATA SERVICES Overview Iridium Satellite LLC Rev. 1; June, 2001 IRIDIUM WORLD DATA SERVICES ----------------------------------------------------------------------- TABLE OF CONTENTS 1 Introduction
DIAL-UP DATA. Troubleshooting
 DIAL-UP DATA Troubleshooting Iridium Satellite LLC Rev. 2; June 15, 2001 General Most user problems are associated with unfamiliarity or improper use of the Iridium handset or with improper configuration
MODEM AND DIAL-UP. Installation/Configuration (Windows 95/98/Me/NT/2000/XP)
") MODEM AND DIAL-UP Installation/Configuration (Windows 95/98/Me/NT/2000/XP) Iridium Satellite LLC 1 February 22, 2006 --------------------------------------------------------------------------------------------------------------------------------------------TABLE
MODEM AND DIAL-UP Installation/Configuration (Windows 95/98/Me/NT/2000/XP) Iridium Satellite LLC 1 February 22, 2006 --------------------------------------------------------------------------------------------------------------------------------------------TABLE
Iridium Extreme TM Satellite Phone. Data Services Manual
 Iridium Extreme TM Satellite Phone Data Services Manual Table of Contents 1 OVERVIEW... 1 2 HOW IT WORKS... 1 3 BEFORE INSTALLING... 2 4 USB DRIVER INSTALLATION... 3 5 MODEM INSTALLATION AND CONFIGURATION...
DIRECT INTERNET 3. Install Guide for the Windows 7 Operating System
 DIRECT INTERNET 3 Install Guide for the Windows 7 Operating System Iridium Communications Inc. Rev. 1; October 15, 2010 Overview Iridium s Direct Internet Data Service allows customers to connect directly
Palomar College Dial-up Remote Access
 Palomar College Dial-up Remote Access Instructions for Windows 95/98 and Windows 2000 Following are instructions to implement dialup access to the Palomar College network, email and Internet. The minimum
DIRECT INTERNET 3. Install Guide for the Windows XP Operating System
 DIRECT INTERNET 3 Install Guide for the Windows XP Operating System Iridium Communications Inc. Rev. 1; October 15, 2010 Overview Iridium s Direct Internet Data Service allows customers to connect directly
Installing the Gerber P2C Plotter USB Driver
 Installing the Gerber P2C Plotter USB Driver 1 You can install a Gerber P2C plotter using a USB connection and communicate with it using compatible design software. The following procedures describe installing
DIRECT INTERNET 3. Install Guide for the Mac OS Operating System
 DIRECT INTERNET 3 Install Guide for the Mac OS Operating System Iridium Communications Inc. Rev. 1; October 15, 2010 Overview Iridium s Direct Internet Data Service allows customers to connect directly
USER GUIDE. Ethernet Configuration Guide (Lantronix) P/N: 2900-300321 Rev 6
 P/N: 2900-300321 Rev 6") KRAMER ELECTRONICS LTD. USER GUIDE Ethernet Configuration Guide (Lantronix) P/N: 2900-300321 Rev 6 Contents 1 Connecting to the Kramer Device via the Ethernet Port 1 1.1 Connecting the Ethernet Port Directly
KRAMER ELECTRONICS LTD. USER GUIDE Ethernet Configuration Guide (Lantronix) P/N: 2900-300321 Rev 6 Contents 1 Connecting to the Kramer Device via the Ethernet Port 1 1.1 Connecting the Ethernet Port Directly
Setup and Configuration Guide for Pathways Mobile Estimating
 Setup and Configuration Guide for Pathways Mobile Estimating Setup and Configuration Guide for Pathways Mobile Estimating Copyright 2008 by CCC Information Services Inc. All rights reserved. No part of
PCLinq2 Hi-Speed USB Bridge-Network Cable. Quick Network Setup Guide
 PCLinq2 Hi-Speed USB Bridge-Network Cable Congratulations! Quick Network Setup Guide For Windows 98/ME/2000/XP Congratulations for installing the PCLinq2 Hi-Speed USB Bridge-Network Cable. This Quick Network
TSX ETZ Configuration of your computer for TSX ETZ direct connection by serial link. Eng V1.0
 TSX ETZ Configuration of your computer for TSX ETZ direct connection by serial link Eng V1.0 2 Table of Contents About the book.......................................5 Chapter 1 Configuration and connection
CANON FAX L360 SOFTWARE MANUAL
 CANON FAX L360 SOFTWARE MANUAL Before You Begin the Installation: a Checklist 2 To ensure a smooth and successful installation, take some time before you begin to plan and prepare for the installation
Installation Instructions for 9555 USB Driver
 Prior to using the data modem features of your 9555 handset; you must first install the VCOMPORT 9555 USB Driver. This driver is compatible with: Windows XP Service Pack 2, Windows 2000 Service Pack 4,
Omni 56K USB Lite Quick Start Guide
 Omni 56K USB Lite Quick Start Guide ZyXEL TOTAL INTERNET ACCESS SOLUTION 1. Hardware Installation Connect your modem to your analog phone or fax. Use the phone cord included to connect to the phone jack
How to setup a VPN on Windows XP in Safari.
 How to setup a VPN on Windows XP in Safari. If you want to configure a VPN connection from a Windows XP client computer you only need what comes with the Operating System itself, it's all built right in.
GRICdial User's Guide
 GRICdial User's Guide Table of Contents System Requirements Getting Connected Additional Settings Main Menu Functions Setting up Proxy FAQ System Requirements For Windows 95 You should have the following
USB Driver Installation for Windows XP
 USB Driver Installation for Windows XP USB Serial Converter Driver Installation for Windows XP CAUTION: You must use the drivers on the CD-ROM supplied with your USB Device. DO NOT download drivers from
Bluetooth for Windows
 Bluetooth for Windows Getting Started Copyright 2006 Hewlett-Packard Development Company, L.P. Microsoft and Windows are U.S. registered trademarks of Microsoft Corporation. Bluetooth is a trademark owned
ZP 500 Plus Thermal Printer
 Quick Installation Guide FedEx Ship Manager Software FedEx Ship Manager at fedex.com ZP 500 Plus Thermal Printer Step 1: Confirm Printer Kit Contents Your printer kit contains: 1. Thermal Printer 4. USB
Guide to Installing BBL Crystal MIND on Windows 7
 Guide to Installing BBL Crystal MIND on Windows 7 Introduction The BBL Crystal MIND software can not be directly installed on the Microsoft Windows 7 platform, however it can be installed and run via XP
Hastings & Prince Edward District School Board Windows XP Dial-Up Internet Access Configuration
 Hastings & Prince Edward District School Board Windows XP Dial-Up Internet Access Configuration Getting Started Before you begin, obtain the following:! An HPEDSB Internet (email) Account.! A 33,600-baud
LPR for Windows 95/98/Me/2000/XP TCP/IP Printing User s Guide. Rev. 03 (November, 2001)
") LPR for Windows 95/98/Me/2000/XP TCP/IP Printing User s Guide Rev. 03 (November, 2001) Copyright Statement Trademarks Copyright 1997 No part of this publication may be reproduced in any form or by any
LPR for Windows 95/98/Me/2000/XP TCP/IP Printing User s Guide Rev. 03 (November, 2001) Copyright Statement Trademarks Copyright 1997 No part of this publication may be reproduced in any form or by any
Installation Guide. Your FedEx Ship Manager system number. Before you start
 Installation Guide Your FedEx Ship Manager system number Installation Guide During registration, you receive a FedEx Ship Manager system number. Write the number here so you have it on hand whenever you
Chapter7 Setting the Receiving PC for Direct Upload. Setting the Receiving PC for Direct Upload... 148 For Windows... 148 For Macintosh...
 Chapter7 Setting the Receiving PC for Direct Upload Setting the Receiving PC for Direct Upload... 148 For Windows... 148 For Macintosh... 153 Setting the Receiving PC for Direct Upload This section explains
AirStation VPN Setup Guide WZR-RS-G54
 AirStation VPN Setup Guide WZR-RS-G54 WZR-RS-G54 Introduction The WZR-RS-G54 s VPN services allows users to securely access their home or office network from anywhere in the world. All services available
Windows Dial Up Networking (DUN) for AirLink Modems Application Note - How To
 for AirLink Modems Application Note - How To") Windows Dial Up Networking (DUN) for AirLink Modems Application Note - How To Dial-up Networking (DUN) allows a computer or other device to use your AirLink modem to connect to the Internet or private
Windows Dial Up Networking (DUN) for AirLink Modems Application Note - How To Dial-up Networking (DUN) allows a computer or other device to use your AirLink modem to connect to the Internet or private
56K PCI DATA/FAX Modem. User Manual
 56K PCI DATA/FAX Modem User Manual Contents 1. Package Contents... 1 2. Minimum System Requirement... 2 3. Panel Descriptions... 3 4. Hardware Installation... 4 5. Installing The Modem Drivers... 5 A.
Installing the Microsoft Network Driver Interface
 Installing the Microsoft Network Driver Interface Overview This guide explains how to install the PictureTel Live200 Microsoft Network Driver Interface (NDIS) software you have downloaded from PictureTel's
Motorola Phone Tools. Quick Start
 Motorola Phone Tools Quick Start Contents Minimum Requirements...2 Before Installing Motorola Phone Tools...3 Installing Motorola Phone Tools...4 Mobile Device Installation and Configuration...5 Online
Metasys System Direct Connection and Dial-Up Connection Application Note
 Metasys System Direct Connection and Dial-Up Connection Application Note Code No. LIT-1201639 Software Release 5.1 Issued August 27, 2013 Supersedes October 4 2010 Refer to the QuickLIT website for the
CPEi 800/825 Series. User Manual. * Please see the Introduction Section
 CPEi 800/825 Series User Manual * Please see the Introduction Section Contents Introduction...iii Chapter 1: CPEi 800/825 User Guide Overview... 1-1 Powerful Features in a Single Unit... 1-2 Front of the
DSL Self-install Kit Instructions
 DSL Self-install Kit Instructions Cover and installation notes Page 1 1. Verify your system requirements Page 2 2. Verify the contents of your DSL Self-Install kit Page 2 3. Install filters on your telephone
GSM Ready 56K FAX/MODEM PC Card
 GSM Ready 56K FAX/MODEM PC Card Quick Installation Guide M73-APO02-110 INTRODUCTIONS The GSM-Ready 56K Fax/Modem PC Card provides you both fax and data connection via GSM cellular networks. With this combo
Troubleshooting Sprint Mobile Broadband USB Modem by Novatel Wireless TM (Ovation TM U727)
") Troubleshooting Sprint Mobile Broadband USB Modem by Novatel Wireless TM (Ovation TM U727) If you are unable to resolve your issue using the Troubleshooting steps below, please contact Sprint Customer
Troubleshooting Sprint Mobile Broadband USB Modem by Novatel Wireless TM (Ovation TM U727) If you are unable to resolve your issue using the Troubleshooting steps below, please contact Sprint Customer
FileMover 1.2. Copyright Notice. Trademarks. Patents
 FileMover 1.2 Copyright Notice No part of this publication may be reproduced, transmitted, transcribed, stored in a retrieval system, or translated into any human or computer language, in any form or by
Use only a shielded parallel interface cable that is IEEE 1284-compliant and/or a USB cable that is no longer than 6 feet long (1.8 meters).
.") For Windows XP Users Setting Up the machine and PC to Work Together Before You begin When necessary, please purchase the appropriate interface cable you intend to use with this machine (parallel or USB).
For Windows XP Users Setting Up the machine and PC to Work Together Before You begin When necessary, please purchase the appropriate interface cable you intend to use with this machine (parallel or USB).
Setting up a VPN connection Windows XP
 Setting up a VPN connection Windows XP 1. Open Control Panel. 2. Click on Network and Internet Connections. 3. Click on Create a connection to the network at your workplace. 4. Select Virtual Private Network
Quick-Start Guide 007-SE01-001. Gigaset. Residential Wireless Gateway SE567/SE568. Gigaset Communications GmbH is a trademark licensee of Siemens AG
 Quick-Start Guide 007-SE01-001 Gigaset Residential Wireless Gateway SE567/SE568 Gigaset Communications GmbH is a trademark licensee of Siemens AG Before you begin... Verify that the following items came
Installing S500 Power Monitor Software and LabVIEW Run-time Engine
 EigenLight S500 Power Monitor Software Manual Software Installation... 1 Installing S500 Power Monitor Software and LabVIEW Run-time Engine... 1 Install Drivers for Windows XP... 4 Install VISA run-time...
DSL Self-install Kit Instructions. SpeedStream 4100
 DSL Self-install Kit Instructions SpeedStream 4100 Cover and installation notes Page 1 1. Verify your system requirements Page 2 2. Verify the contents of your DSL Self-Install kit Page 2 3. Install filters
DSL Self-install Kit Instructions. SpeedStream 5360
 DSL Self-install Kit Instructions SpeedStream 5360 Cover and installation notes Page 1 1. Verify your system requirements Page 2 2. Verify the contents of your DSL Self-Install kit Page 2 3. Install filters
VERIZON WIRELESS VZACCESS MANAGER QUICK START GUIDE FOR PC CARDS
 VERIZON WIRELESS VZACCESS MANAGER QUICK START GUIDE FOR PC CARDS WELCOME Congratulations on purchasing VZAccess Manager the most popular data connectivity solution for wireless Internet access. This Quick
OfficeConnect Internet Firewall 25 Internet Firewall DMZ. QuickStart Guide (3C16770, 3C16771)
") OfficeConnect Internet Firewall 25 Internet Firewall DMZ QuickStart Guide (3C16770, 3C16771) Checking Package Contents Getting Started Thank you for purchasing the OfficeConnect Internet Firewall. The
OfficeConnect Internet Firewall 25 Internet Firewall DMZ QuickStart Guide (3C16770, 3C16771) Checking Package Contents Getting Started Thank you for purchasing the OfficeConnect Internet Firewall. The
Printer Support Guide. FedEx Ship Manager Software
 Printer Support Guide FedEx Ship Manager Software Printer FAQs Installing Printer Drivers How do I download and install the Zebra printer drivers? To download and install the current Zebra printer drivers
Frontier DSL SelfConnect Guide
 Frontier DSL SelfConnect Guide Frontier DSL Self-Installation Guide Table of Contents Getting Started...2 Customer and Computer Requirements...2...3 STEP 1: Install Microfilters...3 STEP 2: Install Your
c. Securely insert the Ethernet cable from your cable or DSL modem into the Internet port (B) on the WGT634U. Broadband modem
 on the WGT634U. Broadband modem") Start Here Follow these instructions to set up your router. Verify That Basic Requirements Are Met Assure that the following requirements are met: You have your broadband Internet service settings handy.
Start Here Follow these instructions to set up your router. Verify That Basic Requirements Are Met Assure that the following requirements are met: You have your broadband Internet service settings handy.
Job Aid: Creating Additional Remote Access Logins
 This job aid describes the steps required to add an additional remote access login to the Avaya S8300, S8500, and S8700 Series Media Servers. These logins may be used to establish a Point to Point Protocol
Esi-Mail. Setup and User s Guide. Visit http://www.esiusers.com for up-to-date help. 0450-0479 Rev. A
 Esi-Mail Setup and User s Guide 0450-0479 Rev. A Visit http://www.esiusers.com for up-to-date help. Table of contents Introduction... 1 About this guide... 1 System requirements... 2 ESI hardware requirements...
Hypercom Key Loading and Management (HKLM) RS232 PPP Key Injection PC Setup Guide
 RS232 PPP Key Injection PC Setup Guide") Hypercom Key Loading and Management (HKLM) RS232 PPP Key Injection PC Setup Guide Hypercom Corporation 8888 East Raintree Drive Scottsdale, Arizona 85260 USA Corporate Telephone: 480.642.5000 Corporate
Hypercom Key Loading and Management (HKLM) RS232 PPP Key Injection PC Setup Guide Hypercom Corporation 8888 East Raintree Drive Scottsdale, Arizona 85260 USA Corporate Telephone: 480.642.5000 Corporate
e-dpp 4.0.2 May 2013 Quick Installation Guide Microsoft Windows 2003 Server, XP, Vista, 7 Access Database
 e-dpp 4.0.2 May 2013 Microsoft Windows 2003 Server, XP, Vista, 7 Access Database ELTECHS Engineering and Consulting Co., Ltd., Japan www.eltechs.co.jp Tel No. +81 (47) 490-1010 Fax No. +81 (47) 490-1011
Operating Instructions
 Operating Instructions (For Setting Up) Digital Imaging Systems Installation Overview Model No. DP-8060 / 8045 / 8035 Table of Contents Setting Your Machine Installation Overview General Installation Overview...
Connecting to the Internet
 Connecting to the Internet Connecting the Gateway to the Internet Configuration of TCP/IP Protocol Installing the USB Drivers Connecting Ethernet Network Devices Connecting USB Network Devices Connecting
Brother Automatic E-Mail Printing OPERATION MANUAL
 Brother Automatic E-Mail Printing OPERATION MANUAL Copyright Brother 1999 No part of this publication may be reproduced in any form or by any means without permission in writing from the publisher. The
IrDA-USB IrDA USB Adapter
 IrDA-USB IrDA USB Adapter The IrDA USB Adapter enables infrared wireless data communication through your PC s USB port. No IRQ, DMA settings nor configurations, the IrDA USB Adapter is much better than
16.4.3 Lab: Data Backup and Recovery in Windows XP
 16.4.3 Lab: Data Backup and Recovery in Windows XP Introduction Print and complete this lab. In this lab, you will back up data. You will also perform a recovery of the data. Recommended Equipment The
Router Setup Manual. NETGEAR, Inc. 4500 Great America Parkway Santa Clara, CA 95054 USA 208-10060-01 2006-03-17
 NETGEAR, Inc. 4500 Great America Parkway Santa Clara, CA 95054 USA 208-10060-01 2006-03-17 2006 by NETGEAR, Inc. All rights reserved. Trademarks NETGEAR is a trademark of Netgear, Inc. Microsoft, Windows,
Section 5: Installing the Print Driver
 Section 5: Installing the Print Driver In This Section Print Driver Installation for USB Connection Using the Ethernet Connection and a Crossover Cable Print Driver: The Epilog print driver is the software
DVG-2101SP VoIP Telephone Adapter
 This product can be set up using any current web browser, i.e., Internet Explorer 6 or Netscape Navigator 6.2.3. DVG-2101SP VoIP Telephone Adapter Before You Begin 1. If you purchased this VoIP Telephone
Install Device Drivers and Toolkit for Windows 7
 Install Device Drivers and Toolkit for Windows 7 The USB driver is required for all installations to assure that the computer communicates with the digitizer. Note: Installation instructions for Windows
DIAL-UP INTERNET ACCESS
 APPLICATION NOTE AN-15 DIAL-UP INTERNET ACCESS Dial-up Internet Access solves your Internet access needs while you re out of the office or on the road. This optional service complements the high-speed
EnGenius ERB9250 300M Range Extender. Quick Start Guide
 EnGenius ERB9250 300M Range Extender Quick Start Guide Package Contents One ERB9250 300M Range Extender One 12V/1A power adapter Two 2dBi 2.4GHz SMA antennas One Ethernet cable One CD-ROM with user s manual
CONTENTS ACTIONTEC DSL MODEM: 3. DSL Kit Contents 3 CONFIGURING YOUR COMPUTER: 5. Static IP Address Setup 5 Dynamic IP Address Setup 7
 CONTENTS ACTIONTEC DSL MODEM: 3 DSL Kit Contents 3 CONFIGURING YOUR COMPUTER: 5 Static IP Address Setup 5 Dynamic IP Address Setup 7 ACTIONTEC DSL MODEM INSTALLATION: 9 Actiontec DSL Modem Installation
Verizon Remote Access User Guide
 Version 17.12 Last Updated: August 2012 2012 Verizon. All Rights Reserved. The Verizon names and logos and all other names, logos, and slogans identifying Verizon s products and services are trademarks
SatTerm-G SOFTWARE MANUAL FOR A3LA-IG
 TN2004-70-V3.2 SatTerm-G SOFTWARE MANUAL FOR A3LA-IG Version 3.2 December 6, 2004 Copyright 2004 by NAL Research Corporation The specifications in this document are subject to change at NAL Research s
Wireless Router Setup Manual
 Wireless Router Setup Manual NETGEAR, Inc. 4500 Great America Parkway Santa Clara, CA 95054 USA 208-10082-02 2006-04 2006 by NETGEAR, Inc. All rights reserved. Trademarks NETGEAR is a trademark of Netgear,
XStream Remote Control: Configuring DCOM Connectivity
 XStream Remote Control: Configuring DCOM Connectivity APPLICATION BRIEF March 2009 Summary The application running the graphical user interface of LeCroy Windows-based oscilloscopes is a COM Automation
B890 4G LTE Smart Hub Getting Started Guide
 B890 4G LTE Smart Hub Getting Started Guide HUAWEI TECHNOLOGIES CO., LTD. Thank You for Purchasing the B890 4G LTE Smart Hub! Before You Begin What s in the Box : 1. B890 4G LTE Smart Hub 2. Power adapter
Getting Started with WebEx Access Anywhere
 Getting Started with WebEx Access Anywhere This guide provides basic instructions to help you start using WebEx Access Anywhere quickly. This guide assumes that you have a user account on your meeting
Installation Guide. EarthLink
 Installation Guide EarthLink Welcome to EarthLink DSL & Home Phone Service Congratulations! You ve made the smart choice for super-fast DSL and super-simple phone service. Follow the instructions in this
Tufts VPN Client User Guide for Windows
 Tufts VPN Client User Guide for Windows Introduction The Tufts Virtual Private Network (VPN) implementation is a service that is provided to the faculty and staff of Tufts University to enable secure access
USB. Wireless Bluetooth Adapter. Software version: 1.1. User Manual. Solutions for the Digital Life
 USB Wireless Bluetooth Adapter Software version: 1.1 User Manual Solutions for the Digital Life Table of Contents Page 1. Introduction 1 What is Bluetooth? 1 Package Contents 1 Minimum System Requirements
VERITAS Backup Exec 9.1 for Windows Servers Quick Installation Guide
 VERITAS Backup Exec 9.1 for Windows Servers Quick Installation Guide N109548 Disclaimer The information contained in this publication is subject to change without notice. VERITAS Software Corporation makes
Internet Guide. Prepared for 55 John Street
 Internet Guide Prepared for 55 John Street I. Internet Service How do I connect to the Internet? WiFi (Wireless Connectivity) is available throughout the building. In order to connect, you will need a
Global Monitoring + Support
 Use HyperTerminal to access your Global Monitoring Units View and edit configuration settings View live data Download recorded data for use in Excel and other applications HyperTerminal is one of many
Network Setup Guide. Introduction. Setting up for use over LAN
 Network Setup Guide This manual contains the setup information required to use the machine over wired LAN. If you use the machine with USB connection, refer to your setup sheet. Introduction To use the
Chapter 1 Connecting the Router to the Internet
 Chapter 1 Connecting the Router to the Internet This chapter describes how to set up the router on your Local Area Network (LAN) and connect to the Internet. It describes how to set up your wireless ADSL
TPG MOBILE BROADBAND QUICK SETUP GUIDE
 TPG MOBILE BROADBAND QUICK SETUP GUIDE TPG USB E1762 Modem Thank you for choosing TPG Mobile Broadband and USB E1762 modem. This User Guide provides step by step instructions that will take you through
HP-1000 Powerline Ethernet Adapter
 HP-1000 Powerline Ethernet Adapter User s manual BEFORE INSTALLATION Plan ahead the installation of your powerline network. Note: You will need at least two powerline adapters to create a powerline network.
Downloading Driver Files
 The following instructions are for all DPAS supported Intermec printers. The Intermec InterDriver EasyCoder PD42 (203 dpi) - IPL driver has been tested and recommended for DPAS use. This driver will support
Iridium Satellite Phonebook Tool Version H2PT0901 User Guide v3.2
 Iridium Phonebook Tool Version H2PT0901 User Guide Iridium Satellite Phonebook Tool Version H2PT0901 User Guide v3.2 May 6, 2013 Iridium Subscriber Equipment Firmware Engineering Table of Contents 1 PURPOSE...
HP-1000 Powerline USB Adapter
 HP-1000 Powerline USB Adapter User s manual BEFORE INSTALLATION Plan ahead the installation of your powerline network. Note: You will need at least two powerline adapters to create a powerline network.
10.3.1.6 Lab - Data Backup and Recovery in Windows XP
 5.0 10.3.1.6 Lab - Data Backup and Recovery in Windows XP Introduction Print and complete this lab. In this lab, you will back up data. You will also perform a recovery of the data. Recommended Equipment
Bluetooth Wireless USB Adapter. User Manual (GBU211 / GBU311)
") Bluetooth Wireless USB Adapter User Manual (GBU211 / GBU311) Welcome Thank you for purchasing one of the most feature-rich Bluetooth to USB adapters available. IOGEAR s Bluetooth to USB adapters are first-rate
Bluetooth Wireless USB Adapter User Manual (GBU211 / GBU311) Welcome Thank you for purchasing one of the most feature-rich Bluetooth to USB adapters available. IOGEAR s Bluetooth to USB adapters are first-rate
Smart Control Center. User Guide. 350 East Plumeria Drive San Jose, CA 95134 USA. November 2010 202-10685-01 v1.0
 Smart Control Center User Guide 350 East Plumeria Drive San Jose, CA 95134 USA November 2010 202-10685-01 v1.0 2010 NETGEAR, Inc. All rights reserved. No part of this publication may be reproduced, transmitted,
Chapter 1 Installing the Gateway
 Chapter 1 Installing the Gateway This chapter describes how to set up the wireless voice gateway on your Local Area Network (LAN), connect to the Internet, and perform basic configuration. For information
HUMAC2009 Software Installation Instructions for Windows XP and Vista
 101 Tosca Drive Stoughton, MA 02072 USA (Phone) 781.297-2034 (FAX) 781.297-2039 (Web) www.csmisolutions.com HUMAC2009 Software Installation Instructions for Windows XP and Vista 1. Program Requirements...
DEFINITY IP Softphone User s Guide. Introduction. User Definitions. Before You Start: NOTE:
 DEFINITY IP Softphone User s Guide Introduction The intent of this document is to guide you through the steps required to install the software that will enable you to use DEFINITY IP Softphones. NOTE:
PIGCHAMP MOBILE. PigCHAMP Knowledge Software. Installation Guide for Mobile Units
 PIGCHAMP MOBILE PigCHAMP Knowledge Software Installation Guide for Mobile Units Table of Contents: Important Note:... 4 Chapter 1: PC Setup... 5 A. Install PigCHAMP Mobile Manager on Windows XP...5 B.
Guest PC. for Mac OS X. User Guide. Version 1.6. Copyright 1996-2005 Lismore Software Systems, Ltd. All rights reserved.
 Guest PC for Mac OS X Version 1.6 User Guide Copyright 1996-2005 Lismore Software Systems, Ltd. All rights reserved. Table of Contents About Guest PC... 1 About your Virtual Computer... 1 Creating a Virtual
ETHERNET WEATHER STATION CONNECTIONS Application Note 33
 ETHERNET WEATHER STATION CONNECTIONS Application Note 33 With WeatherLink and a Device Server INTRODUCTION It is possible to substitute an Ethernet connection for the direct USB or serial connection that
If you are unable to set up your Linksys Router by using one of the above options, use the steps below to manually configure your router.
 This article describes how to manually configure a Linksys Router for broadband DSL that uses PPPoE (Point-to-Point Protocol over Ethernet) for authentication. For automatic configuration options, please
Internet Setup Manual for Windows 95/98
 Step 1 On your Windows 95/ 98 desktop, click on Start, then click on Settings, then click on Control Panel. Step 2 Inside of the Control Panel, find the icon labeled Network. Now double-click on the Network
Installation Guide (No Router)
") Installation Guide (No Router) This installation guide will show you how to get your voip phone service working. This installation guide should be used if you have a standard DSL or cable modem and no
Installation Guide (No Router) This installation guide will show you how to get your voip phone service working. This installation guide should be used if you have a standard DSL or cable modem and no
Networking. General networking. Networking overview. Common home network configurations. Wired network example. Wireless network examples
 Networking General networking Networking overview A network is a collection of devices such as computers, printers, Ethernet hubs, wireless access points, and routers connected together for communication
Connecting the DG-102S VoIP Gateway to your network
 Contents of Package: DG-102S VoIP Station Gateway Power adapter CD-ROM, including User s Manual Quick Install Guide Requirements: RS-232 Console Cable Two RJ-45 CAT-5 Straight-Through Cables For more information