Big Data Lab. MongoDB and Hadoop SGT, Inc. All Rights Reserved
|
|
|
- Aubrey Fitzgerald
- 7 years ago
- Views:
Transcription
1 SGT WHITE PAPER Big Data Lab MongoDB and Hadoop 2015 SGT, Inc. All Rights Reserved 7701 Greenbelt Road, Suite 400, Greenbelt, MD Tel: (301) Fax: (301)
 614-8600")
2 1.0 Introduction 1.1 What is Covered in this Document 2.0 Setup MongoDB 2.1 Amazon AWS Account 2.2 Setup Amazon EC2 instance for MongoDB Select AMI Select Instance Type Number of Instances Add Storage Instance Description Security Group Create Security Key Pair Launching Instances Connect To Instance Generate Private Key Save Private Key Connect With PuTTY Add Storage Volume for Database 2.3 Install MongoDB Configure MongoDB 2.4 Create Simulation Data Move Code to Windows Configure Number of Providers, Beneficiaries, & Claims Build JAR Populate Database 3.0 Setup Cluster 3.1 Setup Amazon EC2 Instances AWS Sign In Launch Instances Select AMI Select Instance Type Number of Instances Add Storage Instance Description Security Group Create Security Key Pair Launching Instances 3.2 Connecting to Instances with SSH Client Enable Public Access 3.3 Setup WinSCP Access

3 4.0 Build Mongo Hadoop Connector 4.1 Download Mongo Hadoop Connector 4.2 Build Mongo Hadoop Connector Jars 5.0 Install & Configure Hadoop 5.1 Update Package Dependencies 5.2 Install Java 5.3 Download Hadoop 5.4 Setup Environment Variables 5.5 Setup Password less SSH on Servers 5.6 Copy Mongo Hadoop Jars to Hadoop 5.7 Hadoop Cluster Setup hadoop env.sh core site.xml hdfs site.xml mapred site.xml Move Configuration to all Nodes Configure Master Nodes Modify masters File on Master Modify slaves File on Master Copy masters & slaves Files to All Master Nodes Configure Slave Nodes Modify slaves file on slave Copy slaves file to all other slave nodes Hadoop Daemon Startup Verify HTTP Status 6.0 Run Map Reduce Programs 6.1 What Is Map Reduce Mapper Code Reducer Code 6.2 Build & Run Map Reduce Jars Build JAR Files Run JAR Files Other JAR Files

4 1.0 Introduction The prototype health care claims system model was built to explore the possibilities of using MongoDB and Hadoop for big data processing across a cluster of servers in the cloud. The idea was to use MongoDB to store hundreds of millions of records and then to use Hadoop s map reduce functionality to efficiently process the data. MongoDB is a NoSQL, document based, database that provides easy scalability, thus it was a fitting choice for this project. Apache Hadoop is a framework that enables the distributed processing of large data sets across clusters of computers. Hadoop is designed to scale from use on a single server, to use on thousands of servers. 1.1 What is Covered in this Document This document covers how to setup MongoDB and a Hadoop cluster in an Amazon cloud environment using Amazon AWS Ubuntu instances. It includes how to use my code to generate large amounts of data for MongoDB. It also covers how to setup the Mongo Hadoop Connector on a cluster of machines running Hadoop. The concept of Map Reduce is explained and some code is shown to demonstrate how it works and what to put in the configuration XML file based on the code. Finally it demonstrates how to run map reduce programs that were written for this project that can be retrieved from github. 2.0 Setup MongoDB MongoDB is a document based NoSQL that provides high performance and easy scalability. Database objects (documents) easily map to programming language data types so this database will be for the objective of this project. We are going to setup MongoDB on a dedicated server in the cloud using Amazon Web Services. 2.1 Amazon AWS Account If you do not already have an Amazon AWS account, please create a new one here ( Since the signup process is straight forward, I am going to skip this step.

5 Sign in to your account. 2.2 Setup Amazon EC2 instance for MongoDB Once you have signed up for an Amazon account, Login to Amazon Web Services, click on My Account and select AWS Management Console. Than navigate to the EC2 console. Once you are on the EC2 Console homepage, click Launch Instance Select AMI I used Ubuntu Server bit OS

6 2.2.2 Select Instance Type Select a Medium instance (m3.medium) Number of Instances For this MongoDB setup, I used a single instance to store the database.

7 2.2.4 Add Storage Choose 8GB for the size of your main drive. Since we are going to put a large database on this instance, 8 GB will not be nearly big enough, but we will add additional storage later on a separate drive Instance Description Optionally you can add a description so that you can keep your instances straight later.

8 2.2.6 Security Group Next we will create a new security group. We will modify the rules later on Create Security Key Pair Review and Launch Instance. Amazon EC2 uses public key cryptography to encrypt and decrypt login information. Public key cryptography uses a public key to encrypt a piece of data, such as a password, and then the recipient uses the private key to decrypt the data. The public and private keys are known as a key pair. Create a new keypair and give it a name hadoopec2cluster and download the keypair (.pem) file to your local machine. Click Launch Instance

9 2.2.8 Launching Instances Once you click Launch Instance you will be redirected to the Launch Status page. In the bottom right corner you should see a button for View Instance. Once you click this link, you will be taken back to the EC2 console page. Initially, your instance will be in a pending state, but after a few moments, it should change to running. When you create a group with default options it add a rule for SSH at port 22. In order to have TCP and ICMP access we need to add 2 additional security rules. Add All TCP, All ICMP and SSH (22) under the inbound rules to HadoopEC2SecurityGroup. This will allow ping, SSH, and other similar commands among servers and from any other machine on the internet. Make sure to Apply Rule changes to save your changes.
 under the inbound rules to HadoopEC2SecurityGroup.")
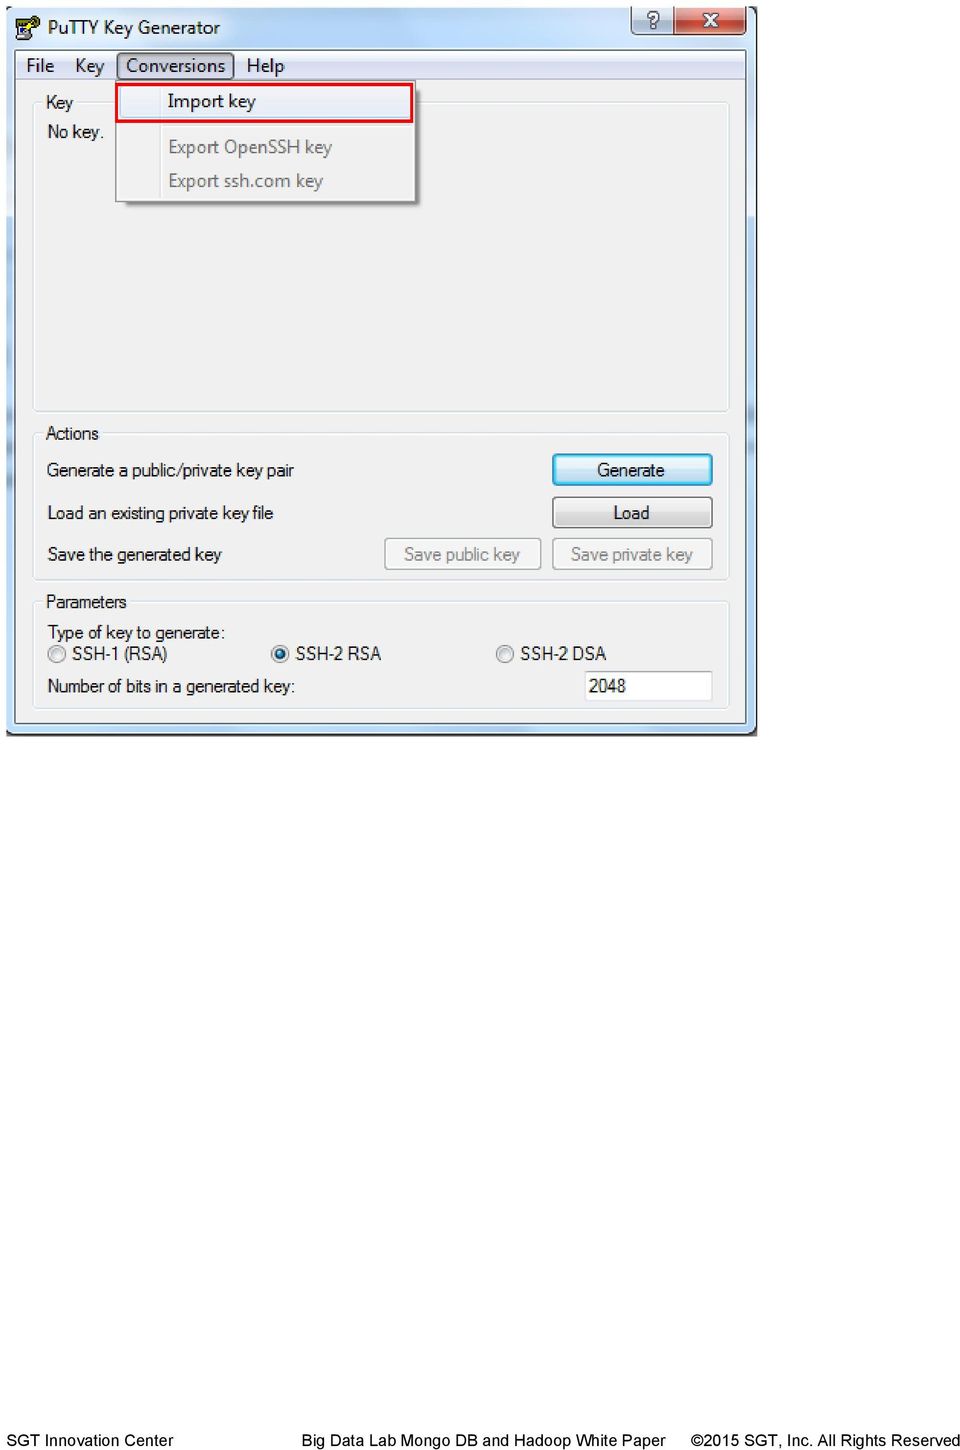
10 These protocols and ports are also required to enable communication among cluster servers. As this is a test setup we are allowing access to all for TCP, ICMP and SSH and not bothering about the details of individual server port and security Connect To Instance We are going to use Putty to connect to our instances. To do this we will need two applications. 1. PuTTY( 2. PuTTYgen( Generate Private Key On your local machine, download the PuTTY and PuTTYgen executables and place them wherever you like. Now we need to generate a private key for our instance using PuttyGen. Let s launch PUTTYGEN client and import the key pair we created during launch instance step KeyForServer.pem (hadoopec2cluster) Navigate to Conversions and Import Key
 2.2.9.1 Generate Private Key On your local machine, download the PuTTY and PuTTYgen executables and place them wherever you like.")
11
12 Once you import the key you can enter passphrase to protect your private key or leave the passphrase fields blank to use the private key without any passphrase. Passphrase protects the private key from any unauthorized access to servers using your machine and your private key. Any access to server using passphrase protected private key will require the user to enter the passphrase to enable the private key enabled access to AWS EC2 server Save Private Key Now save the private key by clicking on Save Private Key and click Yes as we are going to leave passphrase empty.

13 Save the.ppk file and give it a meaningful name.

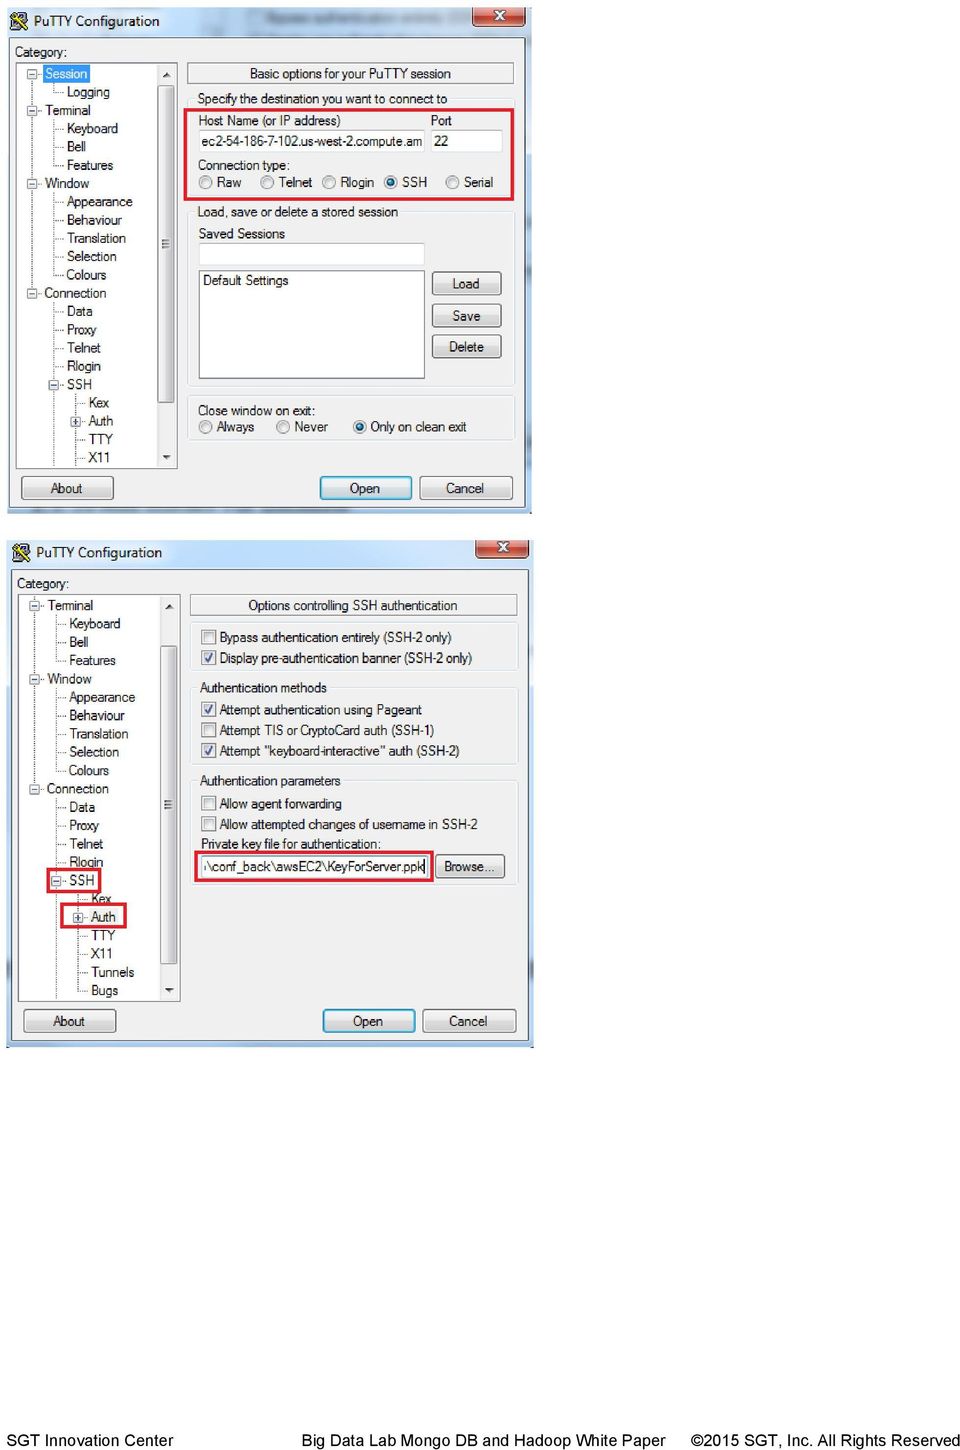
14 Close PuttyGen. We are now ready to connect to our Amazon Instance Machine Connect With PuTTY Let s connect to our instance now. Launch Putty client, grab the public DNS, import the.ppk private key that we just created for password less SSH access. As per amazon documentation, for Ubuntu machines username is ubuntu

15
16 when you launch the session first time, you will see below message, click Yes and will prompt you for the username, enter ubuntu, if everything goes well you will be presented welcome message with Unix shell at the end.

17 If there is a problem with your key, you may receive below error message Add Storage Volume for Database Now we have to add storage to our instance so that we can store the database. On the left hand side of the online EC2 console, click on Volumes.

18 Then Click Create Volume at the top of the page and add the amount of storage you will require for your database. Since I will be using many different sizes of databases in various tests, I chose 400GB, so that I could store a few different databases at the same time. Make sure that you choose the same Availability zone as your MongoDB instance. Here it is us west 2b. Once we have created a volume, we now have to attach it to an instance. Right click on the new volume and click Attach Volume Type in the tag that we previously entered (MongoDB_Instance) for the instance, and /dev/sdf for the device.

19 Navigate back to Instances, select MongoDB_Instance, and confirm that /dev/sdf now shows up in the instance details. Connect to your instance using Putty, or some other SSH client. Using the lsblk command you should see your new volume listed. Notice that our new drive shows up as xvdf, and it doesn t have a mountpoint yet. First we need to create a filesystem on our new drive. To do this run the command sudo mkfs t ext4 /dev/xvdf

20 Now we need to mount the drive with the sudo mount /dev/xvdf /mnt command. Run lsblk again and you should now see the device mountpoint set to /mnt. Now we need to set this to mount on every system reboot so that we don t have to keep manually mounting the drive. First create a backup of your /etc/fstab file so that you can use it if you accidentally destroy or delete this file while it is being edited. Edit the file to show the following: Save and close the file. Run sudo mount a to ensure that you have edited the file correctly. If there is no error message, then there is no error in the fstab file and you are good to continue. WARNING: Errors in /etc/fstab can render a system unbootable. Do not shut down a system that has errors in the /etc/fstab file! At this point, our new volume will now be mounted upon every reboot.

21 2.3 Install MongoDB Now we need to install MongoDB. First we will need to import the public key used by the package management system. To import the key, issue the following command: $ sudo apt key adv keyserver hkp://keyserver.ubuntu.com:80 recv 7F0CEB10 Next we will need to create a list file for MongoDB with the following command: $ echo 'deb distro.mongodb.org/repo/ubuntu upstart dist 10gen' sudo tee /etc/apt/sources.list.d/mongodb.list Then ensure that all local packages are up to date: $ sudo apt get update We can now install the latest stable version of MongoDB with the following command: $ sudo apt get install mongodb 10gen Configure MongoDB Now that MongoDB is installed, we need to choose a location for the database files. If we try start MongoDB right now using sudo mongod you will see an error because the default data directory (/data/db/) doesn t exist. To fix this error, you can simply create a directory /data/db/, however, we are going to set the default directory to our newly mounted drive(volume). To do this you can either manually reset the default path in the /etc/mongodb.conf by changing To dbpath=/var/lib/mongodb dbpath=/mnt
22 Or when you start MongoDB, you can simply pass in the mount location of our new drive with the dbpath option with the following command: $ sudo mongod dbpath /mnt MongoDB should now start without errors. To view your databases, open a new terminal and type mongo. 2.4 Create Simulation Data Now that we have MongoDB installed, we need to create data that we can use so that we can do something with it. We will use a simulation data generation program that I wrote that can be found on github (stash). First we have to install git. Issue the following command to do this: $ sudo apt get install git Answer Y when prompted if you want to download the file. Now get this code, we will use git on our Ubuntu instance. Issue the following commands: $ cd ~ $ git clone When prompted for a password for the repository, enter issuemanager. Now you can list all the files in the home directory and you should see a new directory named simulationdatagenerator Move Code to Windows Now we are going to use WinSCP to copy this over to our local windows machine so we can build the code in Eclipse. You can download WinSCP here. Once downloaded, simply run the winscp553setup.exe and choose the installation directory. Once the installer is finished running, navigate to your new WinSCP installation directory and run WinSCP.
23 You will need to Provide the public DNS for the Amazon EC2 instance, The User Name ubuntu, and the private key file that we generated with PuTTYgen. When you are asked if you trust this host, press Yes. This will open a secure copy instance and you will simply need to drag and drop the simulationdatagenerator directory over to your machine. Now you simply need to open this project with eclipse. If you do not have eclipse, it can be downloaded here( I am using Eclipse IDE for Java EE Developers, Windows 64 Bit, but Eclipse Standard should work fine.
24 When you first launch eclipse, it will ask you to select a workspace folder. Select the folder that we just copied the simulationdatagenerator directory to (in this case C:\Users\UserName\Documents\workspace). Once eclipse loads, go to File > Import and select Existing Project into Workspace. On the Import Projects page, select Select root directory: and find our simulationdatagenerator directory.
25 Click Finish and now you should see the project appear in the Project Explorer Configure Number of Providers, Beneficiaries, & Claims Before we run the program, we need to choose how much simulation data we want. Open up the MongoDBdataImport.java file.
26 Near the top of this file, you will see a section that looks like this: This is where you set how many beneficiaries, providers, and claims you want in your database. Set the totalben variable to the number of Beneficiaries you want in the database. In this case there would be 5000 Beneficiary database documents generated. Likewise, set numproviders to the number of Providers you want in the database. In this case there would only be 25 Providers. To set the number of claims you use the max and min variables. For each Provider, the program will choose a random number within the range of max min inclusively and create that many claims for that particular provider. If you want all Providers to have the same number of claims simply set max equal to min. For example, if you set these values to totalben =
27 numproviders = max = 6000 min = 2000 This would generate a database with data for 100 million beneficiaries, 25 thousand providers, and each provider would have a different random number of claims between 2000 and 6000 (so one might have 2349, another might have 4302 etc.), with an overall number of claims roughly at 100 million. If instead we set max and min both equal to 4000, so that we have the following: totalben = numproviders = max = 4000 min = 4000 Then we could generate a database with 100 million beneficiaries, 25 thousand providers, and exactly 4000 claims per provider for a total of exactly 100 million claims. The program will generate two collections in a database called testdata. There will be one collection called Beneficiaries, which will simply have a list of beneficiaries and their information. A database document for a beneficiary will look something like: The second collection will be a list of Providers and each provider will have subdocuments that represent the claims filed by the beneficiaries of that particular provider. A Provider database document will look something like:
28 2.4.3 Build JAR To run this code on our Instance out in the cloud, we first need to build a Jar file for it using eclipse. To do this, hold down Ctrl and select both com.generatedata and zipcitystatelatlong.csv in the Project Explorer, right click and select export. Choose to export to a JAR file.
29 Then check the Export generated class files and resources, Compress the contents of the Jar file, and the zipcitystatelatlong.csv checkboxes. Choose a location and name for the JAR file and click Finish.
30 Now open back up WinSCP and copy your new JAR file over to your Amazon EC2 instance that is running MongoDB Populate Database Before you can run the jar file, you will need to install java and download the most current version of MongoDB java driver. The MongoDB java driver can be downloaded here ( driver/mongo jar). Once that is downloaded, copy it over to your EC2 instance. Before we install java let s update the packages on our instance. $ sudo apt get update To install java run the following commands. $ sudo add apt repository ppa:webupd8team/java $ sudo apt get update $ sudo apt get install oracle jdk7 installer Run the java version command to ensure that it installed properly.
31 After this is done, use the following command from the directory you copied the JAR files into to populate the database: $ java cp test.jar:mongo jar com.generatedata.mongodbdataimport Note: This can take a long time (a few days) if you are generating hundreds of millions of beneficiary records. After the jar is done running, you should see output like this: We can then go into MongoDB and double check that the data was created. $ mongo > show dbs > use testdata > show collections > db.provider.count() > db.beneficiary.count() The output should look like the following. 3.0 Setup Cluster We will setup a 4 node cluster for running Hadoop using medium instances. You can stop the instance anytime to avoid the charge, but you will lose the public IP and host and restarting the instance will create new ones. You can also terminate your Amazon EC2
32 instance anytime and by default it will delete your instance upon termination, so just be careful what you are doing. 3.1 Setup Amazon EC2 Instances tmp AWS Sign In Sign back into your Amazon AWS account Launch Instances Once you have signed up for an Amazon account, Login to Amazon Web Services, click on My Account and select AWS Management Console. Than navigate to the EC2 console.
33 Once you are on the EC2 Console homepage, click Launch Instance Select AMI I used Ubuntu Server bit OS Select Instance Type Select a Medium instance (m3.medium)
34 Number of Instances Select put 4 for the number of instances. We are going to configure the cluster with 1 master and 3 slave nodes Add Storage Choose 8GB, which is the minimum amount of storage allowed for a medium instance.
35 Instance Description Leave the instance description empty since we are adding multiple instances, we will add these individually later Security Group Choose Select an existing security group and choose the one we created for our instance running MongoDB, HadoopEC2SecurityGroup Create Security Key Pair Finally Select Review and Launch and then if everything looks right select Launch. When prompted to select a key pair, select Choose and existing key pair and use the same key pair we previously created, hadoopec2keypair. This way we can use the same private key that we generated with PuTTYgen to connect to all of our instances. Once you click Launch Instance 4 instance should be launched with pending state
36 Once in running state we are now going to rename the instance name as below. 1. namenode (Master) 2. slave1 (data node will reside here) 3. slave2 (data node will reside here) 4. slave3 (data node will reside here) You should now have five instances running, one for the MongoDB database, and the four new ones we just created. If you used the same security group for all of them (HadoopEC2SecurityGroup) then we shouldn t have to change any of the security rules at this point, however if you used a different security group, then you will have to repeat the steps in section Connecting to Instances with SSH Client Let s connect to our instance now. Launch Putty client, grab the public DNS for each instance, import the.ppk private key that we created in section As per amazon documentation, for Ubuntu machines username is ubuntu
37
38 when you launch the session first time, you will see below message, click Yes and will prompt you for the username, enter ubuntu, if everything goes well you will be presented welcome message with Unix shell at the end. If there is a problem with your key, you may receive below error message
39 Similarly connect to remaining 3 machines slave1, slave2, and slave3 respectively to make sure you can connect successfully Enable Public Access Back on the Amazon EC2 Console; retrieve the Public DNS, Public IP, and the Private IP s for all five instances. Next we are going to update the hostname with the ec2 public URL and update the /etc/hosts file to map the ec2 public URL with the ip address. Finally we are going to setup aliases for each node s ip address and the ip addresses for the nodes that each node will communicate with. This will help us configure the master and slaves with these aliases instead of the ip addresses. This is useful because when you shut down an EC2 instance, you will lose your ip address. We are going to set it up so that when you turn your cluster off and then back on again later you will only have to modify the /etc/hosts file instead of having to modify all of your Hadoop configuration files. We are going to add the following format to this file on all four our instances in the Hadoop cluster. The general format of our master node (namenode) /etc/hosts file will look like: Private IP of namenode Public DNS of namenode
40 Private IP of namenode namenode alias Public IP of slave1 slave1 alias Public IP of slave2 slave2 alias Public IP of slave3 slave3 alias Public IP of MongoDB_Instance MongoDB_Instance alias The general format of our slave nodes (slave1, slave2, slave3) /etc/hosts file will look like: Private IP of the slave machine Private IP of the slave machine Public DNS of the slave machine slave machine alias (slave1, slave2, or slave3) Public IP of namenode namenode alias So these files on all four machines will look like: 3.3 Setup WinSCP Access In order to securely transfer files from your windows machine to Amazon EC2 WinSCP is a handy utility. Provide hostname, username and private key file and save your configuration and Login
41 If you see above error, just ignore and upon successful login you will see unix file system of a logged in user /home/ubuntu your Amazon EC2 Ubuntu machine. Upload the.pem file to master machine (namenode). It will be used while connecting to slave nodes during hadoop startup daemons and connecting to the our MongoDB_Instance during map reduce job execution. 4.0 Build Mongo Hadoop Connector
42 Tmp Since we are using MongoDB for input and output, which is not standard Hadoop input/output, we will need to use the MongoDB Connectro for Hadoop. The connector is used to pull data from MongoDB and route it to Hadoop Map Reduce jobs, process it, and then return it back to a MongoDB collection. 4.1 Download Mongo Hadoop Connector To download the connector, first you will need to install git. Enter the following command from your namenode instance. $ sudo apt get install git Answer Y when asked if you want to download git. Enter the following command. $ cd ~ $ git clone hadoop.git Then change directories to your new mongo hadoop directory. $ cd mongo hadoop We will be using a self bootstrapping version of sbt to build the JAR file for this code. You can find full documentation in the README.md file that is included in this package and online at hadoop. 4.2 Build Mongo Hadoop Connector Jars Since we will be using Hadoop 1.2.1, we will build the connector for Hadoop 1.1. The reason that we set it to build for 1.1 is because the changes in between Hadoop 1.1 and 1.2 do not affect the Mongo Hadoop Connector so there isn t a separate build for version 1.2. To build the JAR file we will be using the general purpose build tool, Gradle, that is included in this version (1.2.1 at the time of writing) of the Mongo Hadoop Connector. To build against Hadoop 1.1, enter the following command. $./gradlew jar Phadoop_version= 1.1 The JAR file for the core module should be placed in core/build/libs. 5.0 Install & Configure Hadoop 5.1 Update Package Dependencies Let s update the packages, I will start with master, repeat this for SNN and 2 slaves. $ sudo apt get update Once its complete, let s install java
43 5.2 Install Java Use the following commands to install the latest Oracle Java (JDK) 7 in Ubuntu. $ sudo add apt repository ppa:webupd8team/java $ sudo apt get update $ sudo apt get install oracle jdk7 installer Run the java version command to ensure that it installed properly. Repeat this for all other nodes as well. (slave1, slave2, & slave3) 5.3 Download Hadoop I am going to use haddop stable version from apache download page and here is the mirror issue wget command from shell $ wget /hadoop tar.gz Unzip the files and review the package content and configuration files.
44 $ tar xzvf hadoop tar.gz For simplicity, rename the hadoop directory to hadoop for ease of operation and maintenance. $ mv hadoop hadoop 5.4 Setup Environment Variables Setup Environment Variable for ubuntu user Update the.bashrc file to add important Hadoop paths and directories. Navigate to home directory $cd Open.bashrc file in vi edito $ vi.bashrc Add following at the end of file export HADOOP_CONF=/home/ubuntu/hadoop/conf export HADOOP_PREFIX=/home/ubuntu/hadoop #Set JAVA_HOME export JAVA_HOME=/usr/lib/jvm/java 7 oracle # Add Hadoop bin/ directory to path export PATH=$PATH:$HADOOP_PREFIX/bin Save and Exit. To check whether its been updated correctly or not, reload bash profile, use following commands source ~/.bashrc echo $HADOOP_PREFIX echo $HADOOP_CONF Repeat 5.3 and 5.4 for remaining 3 instances (slave1, slave2, & slave3). 5.5 Setup Password less SSH on Servers
45 Master server remotely starts services on slave nodes, which requires password less access to Slave Servers. AWS Ubuntu server comes with pre installed OpenSSh server. Quick Note: The public part of the key loaded into the agent must be put on the target system in ~/.ssh/authorized_keys. This has been taken care of by the AWS Server creation process Now we need to add the AWS EC2 Key Pair identity haddopec2cluster.pem to SSH profile. In order to do that we will need to use following ssh utilities ssh agent s is a background program that handles passwords for SSH private keys. ssh add command prompts the user for a private key password and adds it to the list maintained by sshagent. Once you add a password to ssh agent, you will not be asked to provide the key when using SSH or SCP to connect to hosts with your public key. Amazon EC2 Instance has already taken care of authorized_keys on master server, execute following commands to allow password less SSH access to slave servers.eval First of all we need to protect our keypair files, if the file permissions are too open (see below) you will get an error To fix this problem, we need to issue following commands $ chmod 644.ssh/authorized_keys Quick Tip: If you set the permissions to chmod 644, you get a file that can be written by you, but can only be read by the rest of the world. $ chmod 400 haddoec2cluster.pem Quick Tip: chmod 400 is a very restrictive setting giving only the file onwer read only access. No write / execute capabilities for the owner, and no permissions what so ever for anyone else. To use ssh agent and ssh add, follow the steps below:
46 1. At the Unix prompt, enter: eval `ssh agent s`note: Make sure you use the backquote ( ` ), located under the tilde ( ~ ), rather than the single quote ( ' ). 2. Enter the command: ssh add hadoopec2cluster.pem if you notice.pem file has read only permission now and this time it works for us. **Keep in mind ssh session will be lost upon shell exit and you have repeat ssh agent and ssh add commands. It is recommended that you simply add these commands to the.bashrc file so that you don t have to repeat yourself everytime you login. Add the following to the end of the.bashrc file on the Master node (namenode): eval `ssh-agent s` ssh-add /home/ubuntu/ hadoopec2cluster.pem Now let s verify that we can connect to all of our slave nodes and our mongo node with SSH. Type exit to close your SSH session and return to your master node. 5.6 Copy Mongo Hadoop Jars to Hadoop Now we need to copy that mongo hadoop JAR that we built into Hadoop s lib folder. For version 1.2.1, the lib folder is simply hadoop/lib. To do this issue the following commands.
47 $ cd ~/mongo hadoop/core/build/libs $ cp mongo hadoop core*.jar ~/hadoop/lib/mongo hadoop core.jar You will also need the MongoDB java driver, mongo jar that we used earlier to populate the MongoDB database. Simply copy this over with WinSCP. Now to copy these files to all of the slave nodes, issue the commands: $ scp mongo jar mongo hadoop core.jar ubuntu@slave1:/home/ubuntu/hadoop/lib $ scp mongo jar mongo hadoop core.jar ubuntu@slave2:/home/ubuntu/hadoop/lib $ scp mongo jar mongo hadoop core.jar ubuntu@slave3:/home/ubuntu/hadoop/lib 5.7 Hadoop Cluster Setup This section will cover the hadoop cluster configuration. We will have to modify hadoop env.sh This file contains some environment variable settings used by Hadoop. You can use these to affect some aspects of Hadoop daemon behavior, such as where log files are stored, the maximum amount of heap used
48 etc. The only variable you should need to change at this point is in this file is JAVA_HOME, which specifies the path to the Java 1.7.x installation used by Hadoop. core site.xml key property fs.default.name for namenode configuration for e.g hdfs://namenode/ hdfs site.xml key property dfs.replication by default 3 mapred site.xml key property mapred.job.tracker for jobtracker configuration for e.g jobtracker:8021 We will first start with master (NameNode) and then copy above xml changes to remaining 3 nodes (SNN and slaves) Finally, in section we will have to configure conf/masters and conf/slaves. masters defines on which machines Hadoop will start secondary NameNodes in our multi node cluster. slaves defines the lists of hosts, one per line, where the Hadoop slave daemons (datanodes and tasktrackers) will run. Lets go over one by one. Start with masters (namenode) hadoop env.sh $ vi $HADOOP_CONF/hadoop env.sh and add JAVA_HOME shown below and save changes. tmp core site.xml This file contains configuration settings for Hadoop Core (for e.g I/O) that are common to HDFS and MapReduce Default file system configuration property fs.default.name goes here it could for e.g hdfs / s3 which will be used by clients. $ sudo $HADOOP_CONF/core site.xml We are going t0 add two properties fs.default.name will point to NameNode URL and port (usually 8020) hadoop.tmp.dir A base for other temporary directories. Its important to note that every node needs hadoop tmp directory. I am going to create a new directory hdfstmp as below in all 4 nodes. Ideally you can write a shell script to do this for you, but for now going the manual way. $ cd
49 $ mkdir hdfstmp Quick Tip: Some of the important directories are dfs.name.dir, dfs.data.dir in hdfs site.xml. The default value for the dfs.name.dir is ${hadoop.tmp.dir}/dfs/data and dfs.data.dir is${hadoop.tmp.dir}/dfs/data. It is critical that you choose your directory location wisely in production environment. <configuration> <property> <name>fs.default.name</name> <value>hdfs://namenode:8020</value> </property> <property> <name>hadoop.tmp.dir</name> <value>/home/ubuntu/hdfstmp</value> </property> </configuration> hdfs site.xml This file contains the configuration for HDFS daemons, the NameNode, SecondaryNameNode and data nodes. We are going to add 2 properties dfs.permissions.enabled with value false, This means that any user, not just the hdfs user, can do anything they want to HDFS so do not do this in production unless you have a very good reason. if true, enable permission checking in HDFS. If false, permission checking is turned off, but all other behavior is unchanged. Switching from one parameter value to the other does not change the mode, owner or group of files or directories. Be very careful before you set this dfs.replication Default block replication is 3. The actual number of replications can be specified when the file is created. The default is used if replication is not specified in create time. Since we have 3 slave nodes we will set this value to 3. <configuration> <property>
50 <name>dfs.replication</name> <value>3</value> </property> <property> <name>dfs.permissions</name> <value>false</value> </property> </configuration> mapred site.xml This file contains the configuration settings for MapReduce daemons; the job tracker and the task trackers. The mapred.job.tracker parameter is a hostname (or IP address) and port pair on which the Job Tracker listens for RPC communication. This parameter specify the location of the Job Tracker for Task Trackers and MapReduce clients. JobTracker will be running on master (NameNode) <configuration> <property> <name>mapred.job.tracker</name> <value>hdfs://namenode:8021</value> </property> </configuration> Move Configuration to all Nodes
51 Now, we are done with hadoop xml files configuration master, lets copy the files to remaining 3 nodes using secure copy (scp) start with SNN, if you are starting a new session, follow ssh add as per section 1.5 from master s unix shell issue below command $ scp hadoop env.sh core site.xml hdfs site.xml mapred site.xml ubuntu@slave1:/home/ubuntu/hadoop/conf $ scp hadoop env.sh core site.xml hdfs site.xml mapred site.xml ubuntu@slave2:/home/ubuntu/hadoop/conf $ scp hadoop env.sh core site.xml hdfs site.xml mapred site.xml ubuntu@slave3:/home/ubuntu/hadoop/conf Configure Master Nodes Every hadoop distribution comes with master and slaves files. By default it contains one entry for localhost, we have to modify these 2 files the master node (namenode) and slaves (slave1, slave2, & slave3) machines since we only have one master, we have no dedicated machine for SecondaryNamdenode, however if you had a much more labor intensive program, you would want to have a second master instance dedicated for SecondaryNamenode.
52 Modify masters File on Master conf/masters file defines on which machines Hadoop will start Secondary NameNodes in our multi node cluster. In our case, there will only be one master, but keep in mind that running a second master node with one dedicated for Hadoop HDFS user guide : The secondary NameNode merges the fsimage and the edits log files periodically and keeps edits log size within a limit. It is usually run on a different machine than the primary NameNode since its memory requirements are on the same order as the primary NameNode. The secondary NameNode is started by bin/start dfs.sh on the nodes specified in conf/masters file. $ vi $HADOOP_CONF/masters Provide an entry for the hostname where you want to run NameNode daemon. In our case this is namenode. We can simply use the aliases we setup in section Modify slaves File on Master The slaves file is used for starting DataNodes and TaskTrackers. We will add all of our dedicated slave instances (slave1, slave2, & slave3) using the aliases for their public IP addresses that we set up in section 3.2.1, and we will also run our master node (namenode) as a slave node, however, on larger clusters with huge amounts of data, you will not want to run the DataNode and TaskTracker daemon on the master as well. $ vi $HADOOP_CONF/slaves Copy masters & slaves Files to All Master Nodes Since I m not actually using more than one master node, this step can be skipped, but if you wanted to run more than one master each master would have an exact copy of the masters and slaves files from our namenode instance. All other master nodes would have to be listed in the masters file as well. To copy the configuration to other master nodes: $ scp masters slaves ubuntu@someothermasternode:/home/ubuntu/hadoop/conf Configure Slave Nodes Since we are configuring slaves (slave1, slave2, & slave3), masters file on all of the slave machines are going to be empty
53 $ vi $HADOOP_CONF/masters Next, update the slaves file on slave server (slave1) with the IP address of the slave node. Notice that the slaves file at Slave node contains only its own IP address (or alias) and not of any other slave node in the cluster. $ vi $HADOOP_CONF/slaves Similarly update masters and slaves for slave2 and slave3. The slaves files on all four instances will look like: Hadoop Daemon Startup The first step to starting up your Hadoop installation is formatting the Hadoop file system, which is implemented on top of the local file systems of your cluster. You will need to do this the first time you set up a Hadoop installation. Do not format a running Hadoop file system, this will cause all of your data to be erased. To format the namenode: $ hadoop namenode format
54 Now let s start all hadoop daemons from our master node (namenode). $ cd HADOOP_CONF $ start all.sh This starts NameNode, JobTracker, and SecondaryNameNode on our master node (namenode). If we had a second master node, it would run SecondaryNameNode on it as well. This starts DataNode and TaskTracker on all slave nodes listed in the $HADOOP_CONF/slaves file (including our master node in this case). namenode:
55 slave1: slave2: Slave3: Verify HTTP Status We can verify the status of Namenode at us west 2.compute.amazonaws.com:50070/dfshealth.jsp (this is using the public DNS of namenode)
56 We can check the jobtracker status at us west 2.compute.amazonaws.com:50030/jobtracker.jsp (this using the public DNS of namenode)
57 We can check the status of the slave nodes at us west 2.compute.amazonaws.com:50060/tasktracker.jsp (using public DNS for slave1, just change public DNS to check other slave nodes) 6.0 Run Map Reduce Programs 6.1 What is Map Reduce Hadoop map reduce accepts input parameters for a key, which is a key value pair from a document, and a value, which is also a key value pair from a document, it then combines (maps) all of the keys with an equal value into a single document and then allows the programmer to perform any calculations necessary with the value data(reduce). The general data flow for a hadoop map reduce job using MongoDB for input and output looks as follows:
58 Figure 1: Generalized Map Reduce Sequence Diagram For example, in this project there is a map reduce program called AVGperNPI (Appendices A, B, & C), it takes in the key value pair Provider_NPI_Number for the key for the mapper, and it takes in the key value pair Covered Paid Amount as the value. The mapper then combines all claims that have the same NPI number and sends the NPI number and a list of all the Covered Paid Amount values as doubles (or DoubleWritable) to the Reducer. The reducer then iterates through the list of doubles, sums them together, and divides by the number of elements in the list to calculate the average claim amount for all the claims with the matching NPI number. The reducer writes the NPI number and the calculated average to a BSON object and writes this BSON object into a new collection in MongoDB. This new document will look something like: { } "_id" : ObjectId(" cac4f1874ff31ce7d"), "Provider NPI Number" : NumberLong(" "), "Average Claim Amount" : This map reduce program maps all claims with the same NPI number together, and reduces them to one document with the average claim amount for the NPI number listed instead of the individual claim amounts. It should be noted, that doubles, floats, ints, etc. cannot be directly used for a mapper key or passed to the reducer. Instead classes that implement Writable must be used, such as
59 DoubleWritable, FloatWritable, IntWritable, etc. A complete list of these classes is in the org.apache.hadoop.io package which can be viewed here ( Hadoop cannot read or write any data that is not contained in a class that implements Writable, because Hadoop needs the data in a serialized format that Writable provides Mapper Code We are going to look at the code in Appendix A that is going to look at our Provider collection and calculate the average of all of the claims per unique provider or NPI Number. To do this we will be mapping claim data to each individual NPI number. The MongoDB documents that we generated with our simulation data generator in section 2.4 for the Providers collection look like the following: Provider NPI Number Provider Data Subdocument Claim1 Covered Paid Amount Other Claim1 data Subdocument Claim2 Covered Paid Amount Other Claim2 data Subdocument Claim(n) Covered Paid Amount Other Claim(n) data Since we are calculating the average value of subdocuments per document, the generalized form of the mapper output key value pair that will be passed to the Reducer will be Document ID : Subdocument Claim Value (Covered Paid Amount). In this code, since our document ID is the NPI number(long) for our provider and our subdocument claim value is the value in the key value pair of Covered Paid Amount : Number(double), we will have to use a mapper output key value pair of LongWritable:DoubleWritable. This key is set in the code by the highlighted portion of the following line: public class AvgPerNPIMapper extends Mapper<Object, BSONObject, LongWritable, DoubleWritable> { The first two entries here, Object and BSONObject, are the mapper input s format. Since MongoDB stores all of its data in BSON format, which are binary JSON files, we use the class BSONObject for the input value format, and the generalized Object class for the input key format. These need to match the values in the map function shown public void map(final Object pkey, final BSONObject pvalue, final Context pcontext) The last parameter in this method, pcontext, is what will be read by the reducer, so this is where we will write our key value pairs that we want to send to the reducer.
60 Since we are passing in one MongoDB document at a time, and each document is one Provider with n number of claims, and we want to map each NPI Number to the covered value of each claim we will have to iterate through all of the claims in each document and map the covered paid amount to the NPI number and then send that keyvalue pair to the reducer. First, to get the NPI number, we use the following code: long npi = (long)pvalue.get("provider_npi_number"); Then to iterate through the claims for that particular provider, we will use the following loop: while(true) { try { i++; temp = ((BSONObject)pValue.get("Claim " + Integer.toString(i))); pcontext.write(new LongWritable(npi), new DoubleWritable((double)temp.get("Covered Paid Amount"))); } //when there are no more claims for this Provider exit loop catch(throwable t) { System.out.println("Claim " + i + " Does Not Exist"); break; } } This loop will iterate through claims until it tries to find a data for a claim that does not exist. This means that if a provider has 2309 this loop will run until it tries to pull data for claim 2310, and then it will catch an exception which will cause the loop to terminate. The iteration was done in this way because we don t want to have to know how many claims each provider has and manually set it in the code each time we run a map reduce job on new data. This also allows us to easily perform the map reduce job on data sets where we have a different number of claims per provider. In the above code, first we read in the entire claim subdocument as a BSONObject with: i++; temp = ((BSONObject)pValue.get("Claim " + Integer.toString(i))); Then the output key value pair for the mapper is written to pcontext with: pcontext.write(new LongWritable(npi), new DoubleWritable((double)temp.get("Covered Paid Amount"))); Notice that we are writing in the NPI number (npi) as a LongWritable and the covered paid amount as a DoubleWritable as a key value pair into pcontext which is then accessed by the reducer. The last section in the reducer that should be mentioned is the termination condition for the loop. Because the number of claims for each provider is unknown, the loop is terminated by a break statement when the mapper tries to access a claim that has a higher claim number than the final claim for that provider. This is done by the following code: catch(throwable t) { System.out.println("Claim " + i + " Does Not Exist"); break; }
61 6.1.2 Reducer Code In the reducer, the key value pair being received as input from the mapper needs to match the key that you defined in the mapper and will be defined in the class declaration: public class AvgPerNPIReducer extends Reducer<LongWritable, DoubleWritable, BSONWritable, BSONWritable> The last two entries here are the Key Value pairs for the output. Since MongoDB stores all of its data in BSON files, we are going to use BSON Writable for both of these. The reducer is going to receive everything that was written into the mapper pcontext variable and split it into groups by the key and then allows the programmer to do whatever he wants with the values. So if you had a provider with 2409 claims, you would get a single LongWritable key for the NPI number with a collection of DoubleWritables for the claim values. These values are then parameters for the reduce public void reduce(final LongWritable pkey, final Iterable<DoubleWritable> pvalues,final Context pcontext) The values pkey and pvalues are the key value pair that was passed in from the mapper through the mapper pcontext variable. Note that the above pcontext variable is not the same as the one in the mapper, it is just the name used for data that will be written to the output after the reduce function runs. The reducer is very simple, it just takes the average with the following code: double avg = 0; int cnt = 0; for (final DoubleWritable value : pvalues) { cnt++; avg += value.get(); } avg = avg/cnt; Then it writes both the NPI number and the average value to a BasicBSONObject. BasicBSONObject output = new BasicBSONObject(); output.put("provider NPI Number", pkey.get()); output.put("average Claim Amount", avg); Finally this BSON object is written to pcontext, which is written back into MongoDB after the reducer runs. pcontext.write(null, new BSONWritable(output)); The first parameter above is used for specifying the document _id field, if it is set to null then MongoDB will automatically generate a unique _id, whereas if you wanted to specify an _id then you could simply put the desired id number instead of null. The second parameter tells the writer which XML Configuration File All of the options for running the map reduce jobs are stored in an xml file that is named test.xml, which can be found in Appendix D. The TestXMLCoinfig.java file in Appendix C tells the map reduce function where to find the configuration file with the code: Configuration.addDefaultResource("test.xml");
62 The options that we need to pay attention to in this file are: mongo.input.uri 1. mongo.input.uri 2. mongo.output.uri 3. mongo.job.mapper 4. mongo.job.reducer 5. mongo.job.input.format 6. mongo.job.output.format 7. mongo.job.output.key 8. mongo.job.output.value 9. mongo.job.mapper.output.key 10. mongo.job.mapper.output.value This should be set to the URI of your mongodb which should be: <property> <! If you are reading from mongo, the URI > <name>mongo.input.uri</name> <value>mongodb://ec us west 2.compute.amazonaws.com/testData.Provider</value> </property> Where ec us west 2.compute.amazonaws.com is the public DNS of your server running MongoDB, testdata is the name of the database, and Provider is the name of the collection in the database. Alternatively you could probably use the alias mongo that we setup earlier, but it wasn t tested it this way. mongo.output.uri This should likewise be set to: <property> <! If you are writing to mongo, the URI > <name>mongo.output.uri</name> <value>mongodb://ec us west 2.compute.amazonaws.com/testData.AvgPerNPI</value> </property> mongo.job.mapper This should be set to the class path of the mapper class: <property> <! Class for the mapper > <name>mongo.job.mapper</name> <value>avgpernpi.avgpernpimapper</value> </property> mongo.job.reducer This should be set to the class path of the reducer class: <property> <! Reducer class > <name>mongo.job.reducer</name> <value>avgpernpi.avgpernpireducer</value>
63 </property> mongo.job.input.format When using MongoDB as input, this should be set to: <property> <! InputFormat Class > <name>mongo.job.input.format</name> <value>com.mongodb.hadoop.mongoinputformat</value> </property> mongo.job.output.format When using MongoDB as output, this should be set to: <property> <! OutputFormat Class > <name>mongo.job.output.format</name> <value>com.mongodb.hadoop.mongooutputformat</value> </property> mongo.job.output.key This should be set to the same class as the mapper output key: <property> <! Output key class for the output format > <name>mongo.job.output.key</name> <value>org.apache.hadoop.io.longwritable</value> </property> Where the mapper output key we used was: public class AvgPerNPIMapper extends Mapper<Object, BSONObject, LongWritable, DoubleWritable> { mongo.job.output.value This should be set to the class used for the final output of the map reduce job: <property> <! Output value class for the output format > <name>mongo.job.output.value</name> <value>com.mongodb.hadoop.io.bsonwritable</value> </property> Where the final output class for the map reduce job is: public class AvgPerNPIReducer extends Reducer<LongWritable, DoubleWritable, BSONWritable, BSONWritable> mongo.job.mapper.output.key If you download the example code from the mongo hadoop connector on github, it will say that this is optional, but it is not. This must be set to the same class as the mapper output key in the key value pair: <property> <! Output key class for the output format > <name>mongo.job.output.key</name>
Deploying MongoDB and Hadoop to Amazon Web Services
 SGT WHITE PAPER Deploying MongoDB and Hadoop to Amazon Web Services HCCP Big Data Lab 2015 SGT, Inc. All Rights Reserved 7701 Greenbelt Road, Suite 400, Greenbelt, MD 20770 Tel: (301) 614-8600 Fax: (301)
Running Kmeans Mapreduce code on Amazon AWS
 Running Kmeans Mapreduce code on Amazon AWS Pseudo Code Input: Dataset D, Number of clusters k Output: Data points with cluster memberships Step 1: for iteration = 1 to MaxIterations do Step 2: Mapper:
Health Care Claims System Prototype
 SGT WHITE PAPER Health Care Claims System Prototype MongoDB and Hadoop 2015 SGT, Inc. All Rights Reserved 7701 Greenbelt Road, Suite 400, Greenbelt, MD 20770 Tel: (301) 614-8600 Fax: (301) 614-8601 www.sgt-inc.com
Single Node Hadoop Cluster Setup
 Single Node Hadoop Cluster Setup This document describes how to create Hadoop Single Node cluster in just 30 Minutes on Amazon EC2 cloud. You will learn following topics. Click Here to watch these steps
Running Knn Spark on EC2 Documentation
 Pseudo code Running Knn Spark on EC2 Documentation Preparing to use Amazon AWS First, open a Spark launcher instance. Open a m3.medium account with all default settings. Step 1: Login to the AWS console.
Apache Hadoop 2.0 Installation and Single Node Cluster Configuration on Ubuntu A guide to install and setup Single-Node Apache Hadoop 2.
 EDUREKA Apache Hadoop 2.0 Installation and Single Node Cluster Configuration on Ubuntu A guide to install and setup Single-Node Apache Hadoop 2.0 Cluster edureka! 11/12/2013 A guide to Install and Configure
Hadoop Installation MapReduce Examples Jake Karnes
 Big Data Management Hadoop Installation MapReduce Examples Jake Karnes These slides are based on materials / slides from Cloudera.com Amazon.com Prof. P. Zadrozny's Slides Prerequistes You must have an
Setting up Hadoop with MongoDB on Windows 7 64-bit
 SGT WHITE PAPER Setting up Hadoop with MongoDB on Windows 7 64-bit HCCP Big Data Lab 2015 SGT, Inc. All Rights Reserved 7701 Greenbelt Road, Suite 400, Greenbelt, MD 20770 Tel: (301) 614-8600 Fax: (301)
How to Run Spark Application
 How to Run Spark Application Junghoon Kang Contents 1 Intro 2 2 How to Install Spark on a Local Machine? 2 2.1 On Ubuntu 14.04.................................... 2 3 How to Run Spark Application on a
CS380 Final Project Evaluating the Scalability of Hadoop in a Real and Virtual Environment
 CS380 Final Project Evaluating the Scalability of Hadoop in a Real and Virtual Environment James Devine December 15, 2008 Abstract Mapreduce has been a very successful computational technique that has
Hadoop Training Hands On Exercise
 Hadoop Training Hands On Exercise 1. Getting started: Step 1: Download and Install the Vmware player - Download the VMware- player- 5.0.1-894247.zip and unzip it on your windows machine - Click the exe
Hadoop (pseudo-distributed) installation and configuration
 installation and configuration") Hadoop (pseudo-distributed) installation and configuration 1. Operating systems. Linux-based systems are preferred, e.g., Ubuntu or Mac OS X. 2. Install Java. For Linux, you should download JDK 8 under
Hadoop (pseudo-distributed) installation and configuration 1. Operating systems. Linux-based systems are preferred, e.g., Ubuntu or Mac OS X. 2. Install Java. For Linux, you should download JDK 8 under
INSTALLING KAAZING WEBSOCKET GATEWAY - HTML5 EDITION ON AN AMAZON EC2 CLOUD SERVER
 INSTALLING KAAZING WEBSOCKET GATEWAY - HTML5 EDITION ON AN AMAZON EC2 CLOUD SERVER A TECHNICAL WHITEPAPER Copyright 2012 Kaazing Corporation. All rights reserved. kaazing.com Executive Overview This document
Source Code Management for Continuous Integration and Deployment. Version 1.0 DO NOT DISTRIBUTE
 Source Code Management for Continuous Integration and Deployment Version 1.0 Copyright 2013, 2014 Amazon Web Services, Inc. and its affiliates. All rights reserved. This work may not be reproduced or redistributed,
The objective of this lab is to learn how to set up an environment for running distributed Hadoop applications.
 Lab 9: Hadoop Development The objective of this lab is to learn how to set up an environment for running distributed Hadoop applications. Introduction Hadoop can be run in one of three modes: Standalone
HADOOP - MULTI NODE CLUSTER
 HADOOP - MULTI NODE CLUSTER http://www.tutorialspoint.com/hadoop/hadoop_multi_node_cluster.htm Copyright tutorialspoint.com This chapter explains the setup of the Hadoop Multi-Node cluster on a distributed
Using The Hortonworks Virtual Sandbox
 Using The Hortonworks Virtual Sandbox Powered By Apache Hadoop This work by Hortonworks, Inc. is licensed under a Creative Commons Attribution- ShareAlike3.0 Unported License. Legal Notice Copyright 2012
研 發 專 案 原 始 程 式 碼 安 裝 及 操 作 手 冊. Version 0.1
 102 年 度 國 科 會 雲 端 計 算 與 資 訊 安 全 技 術 研 發 專 案 原 始 程 式 碼 安 裝 及 操 作 手 冊 Version 0.1 總 計 畫 名 稱 : 行 動 雲 端 環 境 動 態 群 組 服 務 研 究 與 創 新 應 用 子 計 畫 一 : 行 動 雲 端 群 組 服 務 架 構 與 動 態 群 組 管 理 (NSC 102-2218-E-259-003) 計
Setup Hadoop On Ubuntu Linux. ---Multi-Node Cluster
 Setup Hadoop On Ubuntu Linux ---Multi-Node Cluster We have installed the JDK and Hadoop for you. The JAVA_HOME is /usr/lib/jvm/java/jdk1.6.0_22 The Hadoop home is /home/user/hadoop-0.20.2 1. Network Edit
HSearch Installation
 To configure HSearch you need to install Hadoop, Hbase, Zookeeper, HSearch and Tomcat. 1. Add the machines ip address in the /etc/hosts to access all the servers using name as shown below. 2. Allow all
Getting Started with Amazon EC2 Management in Eclipse
 Getting Started with Amazon EC2 Management in Eclipse Table of Contents Introduction... 4 Installation... 4 Prerequisites... 4 Installing the AWS Toolkit for Eclipse... 4 Retrieving your AWS Credentials...
Hadoop Installation. Sandeep Prasad
 Hadoop Installation Sandeep Prasad 1 Introduction Hadoop is a system to manage large quantity of data. For this report hadoop- 1.0.3 (Released, May 2012) is used and tested on Ubuntu-12.04. The system
Installation and Configuration Documentation
 Installation and Configuration Documentation Release 1.0.1 Oshin Prem October 08, 2015 Contents 1 HADOOP INSTALLATION 3 1.1 SINGLE-NODE INSTALLATION................................... 3 1.2 MULTI-NODE
CONFIGURING ECLIPSE FOR AWS EMR DEVELOPMENT
 CONFIGURING ECLIPSE FOR AWS EMR DEVELOPMENT With this post we thought of sharing a tutorial for configuring Eclipse IDE (Intergrated Development Environment) for Amazon AWS EMR scripting and development.
Hadoop Data Warehouse Manual
 Ruben Vervaeke & Jonas Lesy 1 Hadoop Data Warehouse Manual To start off, we d like to advise you to read the thesis written about this project before applying any changes to the setup! The thesis can be
Extending Remote Desktop for Large Installations. Distributed Package Installs
 Extending Remote Desktop for Large Installations This article describes four ways Remote Desktop can be extended for large installations. The four ways are: Distributed Package Installs, List Sharing,
Student installation of TinyOS
 Jan.12, 2014 Author: Rahav Dor Student installation of TinyOS TinyOs install Automatic installation... 1 Get Linux... 2 Install Ubuntu on a Virtual Machine... 2 Install Ubuntu on VMware... 2 Installing
Deploying a Virtual Machine (Instance) using a Template via CloudStack UI in v4.5.x (procedure valid until Oct 2015)
 using a Template via CloudStack UI in v4.5.x (procedure valid until Oct 2015)") Deploying a Virtual Machine (Instance) using a Template via CloudStack UI in v4.5.x (procedure valid until Oct 2015) Access CloudStack web interface via: Internal access links: http://cloudstack.doc.ic.ac.uk
Deploying a Virtual Machine (Instance) using a Template via CloudStack UI in v4.5.x (procedure valid until Oct 2015) Access CloudStack web interface via: Internal access links: http://cloudstack.doc.ic.ac.uk
A SHORT INTRODUCTION TO BITNAMI WITH CLOUD & HEAT. Version 1.12 2014-07-01
 A SHORT INTRODUCTION TO BITNAMI WITH CLOUD & HEAT Version 1.12 2014-07-01 PAGE _ 2 TABLE OF CONTENTS 1. Introduction.... 3 2. Logging in to Cloud&Heat Dashboard... 4 2.1 Overview of Cloud&Heat Dashboard....
Integrating SAP BusinessObjects with Hadoop. Using a multi-node Hadoop Cluster
 Integrating SAP BusinessObjects with Hadoop Using a multi-node Hadoop Cluster May 17, 2013 SAP BO HADOOP INTEGRATION Contents 1. Installing a Single Node Hadoop Server... 2 2. Configuring a Multi-Node
TP1: Getting Started with Hadoop
 TP1: Getting Started with Hadoop Alexandru Costan MapReduce has emerged as a leading programming model for data-intensive computing. It was originally proposed by Google to simplify development of web
Introduction to analyzing big data using Amazon Web Services
 Introduction to analyzing big data using Amazon Web Services This tutorial accompanies the BARC seminar given at Whitehead on January 31, 2013. It contains instructions for: 1. Getting started with Amazon
Managing Software and Configurations
 55 CHAPTER This chapter describes how to manage the ASASM software and configurations and includes the following sections: Saving the Running Configuration to a TFTP Server, page 55-1 Managing Files, page
Installation Guide Setting Up and Testing Hadoop on Mac By Ryan Tabora, Think Big Analytics
 Installation Guide Setting Up and Testing Hadoop on Mac By Ryan Tabora, Think Big Analytics www.thinkbiganalytics.com 520 San Antonio Rd, Suite 210 Mt. View, CA 94040 (650) 949-2350 Table of Contents OVERVIEW
1. Product Information
 ORIXCLOUD BACKUP CLIENT USER MANUAL LINUX 1. Product Information Product: Orixcloud Backup Client for Linux Version: 4.1.7 1.1 System Requirements Linux (RedHat, SuSE, Debian and Debian based systems such
DVS-100 Installation Guide
 DVS-100 Installation Guide DVS-100 can be installed on any system running the Ubuntu 14.04 64 bit Linux operating system, the guide below covers some common installation scenarios. Contents System resource
MATLAB Distributed Computing Server Cloud Center User s Guide
 MATLAB Distributed Computing Server Cloud Center User s Guide How to Contact MathWorks Latest news: Sales and services: User community: Technical support: www.mathworks.com www.mathworks.com/sales_and_services
Distributed convex Belief Propagation Amazon EC2 Tutorial
 6/8/2011 Distributed convex Belief Propagation Amazon EC2 Tutorial Alexander G. Schwing, Tamir Hazan, Marc Pollefeys and Raquel Urtasun Distributed convex Belief Propagation Amazon EC2 Tutorial Introduction
SparkLab May 2015 An Introduction to
 SparkLab May 2015 An Introduction to & Apostolos N. Papadopoulos Assistant Professor Data Engineering Lab, Department of Informatics, Aristotle University of Thessaloniki Abstract Welcome to SparkLab!
How To Install Hadoop 1.2.1.1 From Apa Hadoop 1.3.2 To 1.4.2 (Hadoop)
") Contents Download and install Java JDK... 1 Download the Hadoop tar ball... 1 Update $HOME/.bashrc... 3 Configuration of Hadoop in Pseudo Distributed Mode... 4 Format the newly created cluster to create
Contents Download and install Java JDK... 1 Download the Hadoop tar ball... 1 Update $HOME/.bashrc... 3 Configuration of Hadoop in Pseudo Distributed Mode... 4 Format the newly created cluster to create
Hadoop Setup. 1 Cluster
 In order to use HadoopUnit (described in Sect. 3.3.3), a Hadoop cluster needs to be setup. This cluster can be setup manually with physical machines in a local environment, or in the cloud. Creating a
Installation Guidelines (MySQL database & Archivists Toolkit client)
") Installation Guidelines (MySQL database & Archivists Toolkit client) Understanding the Toolkit Architecture The Archivists Toolkit requires both a client and database to function. The client is installed
Installation Guidelines (MySQL database & Archivists Toolkit client) Understanding the Toolkit Architecture The Archivists Toolkit requires both a client and database to function. The client is installed
VXOA AMI on Amazon Web Services
 2013 Silver Peak Systems, Inc. QUICK START GUIDE VXOA AMI on Amazon Web Services A Silver Peak Virtual Appliance (VX) can be deployed within an Amazon Web Services (AWS) cloud environment to accelerate
Rstudio Server on Amazon EC2
 Rstudio Server on Amazon EC2 Liad Shekel liad.shekel@gmail.com June 2015 Liad Shekel Rstudio Server on Amazon EC2 1 / 72 Rstudio Server on Amazon EC2 Outline 1 Amazon Web Services (AWS) History Services
Install guide for Websphere 7.0
 DOCUMENTATION Install guide for Websphere 7.0 Jahia EE v6.6.1.0 Jahia s next-generation, open source CMS stems from a widely acknowledged vision of enterprise application convergence web, document, search,
Web Application Firewall
 Web Application Firewall Getting Started Guide August 3, 2015 Copyright 2014-2015 by Qualys, Inc. All Rights Reserved. Qualys and the Qualys logo are registered trademarks of Qualys, Inc. All other trademarks
Comsol Multiphysics. Running COMSOL on the Amazon Cloud. VERSION 4.3a
 Comsol Multiphysics Running COMSOL on the Amazon Cloud VERSION 4.3a Running COMSOL on the Amazon Cloud 1998 2012 COMSOL Protected by U.S. Patents 7,519,518; 7,596,474; and 7,623,991. Patents pending. This
Local Caching Servers (LCS): User Manual
: User Manual") Local Caching Servers (LCS): User Manual Table of Contents Local Caching Servers... 1 Supported Browsers... 1 Getting Help... 1 System Requirements... 2 Macintosh... 2 Windows... 2 Linux... 2 Downloading
Local Caching Servers (LCS): User Manual Table of Contents Local Caching Servers... 1 Supported Browsers... 1 Getting Help... 1 System Requirements... 2 Macintosh... 2 Windows... 2 Linux... 2 Downloading
Online Backup Client User Manual Linux
 Online Backup Client User Manual Linux 1. Product Information Product: Online Backup Client for Linux Version: 4.1.7 1.1 System Requirements Operating System Linux (RedHat, SuSE, Debian and Debian based
Building a Private Cloud Cloud Infrastructure Using Opensource
 Cloud Infrastructure Using Opensource with Ubuntu Server 10.04 Enterprise Cloud (Eucalyptus) OSCON (Note: Special thanks to Jim Beasley, my lead Cloud Ninja, for putting this document together!) Introduction
H2O on Hadoop. September 30, 2014. www.0xdata.com
 H2O on Hadoop September 30, 2014 www.0xdata.com H2O on Hadoop Introduction H2O is the open source math & machine learning engine for big data that brings distribution and parallelism to powerful algorithms
CDH 5 Quick Start Guide
 CDH 5 Quick Start Guide Important Notice (c) 2010-2015 Cloudera, Inc. All rights reserved. Cloudera, the Cloudera logo, Cloudera Impala, and any other product or service names or slogans contained in this
How To Set Up A Backupassist For An Raspberry Netbook With A Data Host On A Nsync Server On A Usb 2 (Qnap) On A Netbook (Qnet) On An Usb 2 On A Cdnap (
 On A Netbook (Qnet) On An Usb 2 On A Cdnap (") WHITEPAPER BackupAssist Version 5.1 www.backupassist.com Cortex I.T. Labs 2001-2008 2 Contents Introduction... 3 Hardware Setup Instructions... 3 QNAP TS-409... 3 Netgear ReadyNas NV+... 5 Drobo rev1...
WHITEPAPER BackupAssist Version 5.1 www.backupassist.com Cortex I.T. Labs 2001-2008 2 Contents Introduction... 3 Hardware Setup Instructions... 3 QNAP TS-409... 3 Netgear ReadyNas NV+... 5 Drobo rev1...
If you prefer to use your own SSH client, configure NG Admin with the path to the executable:
 How to Configure SSH Each Barracuda NG Firewall system is routinely equipped with an SSH daemon listening on TCP port 22 on all administrative IP addresses (the primary box IP address and all other IP
Oracle Managed File Getting Started - Transfer FTP Server to File Table of Contents
 Oracle Managed File Getting Started - Transfer FTP Server to File Table of Contents Goals... 3 High- Level Steps... 4 Basic FTP to File with Compression... 4 Steps in Detail... 4 MFT Console: Login and
Running Hadoop On Ubuntu Linux (Multi-Node Cluster) - Michael G...
 - Michael G...") Go Home About Contact Blog Code Publications DMOZ100k06 Photography Running Hadoop On Ubuntu Linux (Multi-Node Cluster) From Michael G. Noll Contents 1 What we want to do 2 Tutorial approach and structure
Go Home About Contact Blog Code Publications DMOZ100k06 Photography Running Hadoop On Ubuntu Linux (Multi-Node Cluster) From Michael G. Noll Contents 1 What we want to do 2 Tutorial approach and structure
WinSCP PuTTY as an alternative to F-Secure July 11, 2006
 WinSCP PuTTY as an alternative to F-Secure July 11, 2006 Brief Summary of this Document F-Secure SSH Client 5.4 Build 34 is currently the Berkeley Lab s standard SSH client. It consists of three integrated
Lecture 2 (08/31, 09/02, 09/09): Hadoop. Decisions, Operations & Information Technologies Robert H. Smith School of Business Fall, 2015
: Hadoop. Decisions, Operations & Information Technologies Robert H. Smith School of Business Fall, 2015") Lecture 2 (08/31, 09/02, 09/09): Hadoop Decisions, Operations & Information Technologies Robert H. Smith School of Business Fall, 2015 K. Zhang BUDT 758 What we ll cover Overview Architecture o Hadoop
Lecture 2 (08/31, 09/02, 09/09): Hadoop Decisions, Operations & Information Technologies Robert H. Smith School of Business Fall, 2015 K. Zhang BUDT 758 What we ll cover Overview Architecture o Hadoop
CactoScale Guide User Guide. Athanasios Tsitsipas (UULM), Papazachos Zafeirios (QUB), Sakil Barbhuiya (QUB)
, Papazachos Zafeirios (QUB), Sakil Barbhuiya (QUB)") CactoScale Guide User Guide Athanasios Tsitsipas (UULM), Papazachos Zafeirios (QUB), Sakil Barbhuiya (QUB) Version History Version Date Change Author 0.1 12/10/2014 Initial version Athanasios Tsitsipas(UULM)
CactoScale Guide User Guide Athanasios Tsitsipas (UULM), Papazachos Zafeirios (QUB), Sakil Barbhuiya (QUB) Version History Version Date Change Author 0.1 12/10/2014 Initial version Athanasios Tsitsipas(UULM)
Hadoop Lab - Setting a 3 node Cluster. http://hadoop.apache.org/releases.html. Java - http://wiki.apache.org/hadoop/hadoopjavaversions
 Hadoop Lab - Setting a 3 node Cluster Packages Hadoop Packages can be downloaded from: http://hadoop.apache.org/releases.html Java - http://wiki.apache.org/hadoop/hadoopjavaversions Note: I have tested
RHadoop and MapR. Accessing Enterprise- Grade Hadoop from R. Version 2.0 (14.March.2014)
") RHadoop and MapR Accessing Enterprise- Grade Hadoop from R Version 2.0 (14.March.2014) Table of Contents Introduction... 3 Environment... 3 R... 3 Special Installation Notes... 4 Install R... 5 Install
RHadoop and MapR Accessing Enterprise- Grade Hadoop from R Version 2.0 (14.March.2014) Table of Contents Introduction... 3 Environment... 3 R... 3 Special Installation Notes... 4 Install R... 5 Install
CASHNet Secure File Transfer Instructions
 CASHNet Secure File Transfer Instructions Copyright 2009, 2010 Higher One Payments, Inc. CASHNet, CASHNet Business Office, CASHNet Commerce Center, CASHNet SMARTPAY and all related logos and designs are
RecoveryVault Express Client User Manual
 For Linux distributions Software version 4.1.7 Version 2.0 Disclaimer This document is compiled with the greatest possible care. However, errors might have been introduced caused by human mistakes or by
How to Install and Configure EBF15328 for MapR 4.0.1 or 4.0.2 with MapReduce v1
 How to Install and Configure EBF15328 for MapR 4.0.1 or 4.0.2 with MapReduce v1 1993-2015 Informatica Corporation. No part of this document may be reproduced or transmitted in any form, by any means (electronic,
Unifying Information Security. Implementing TLS on the CLEARSWIFT SECURE Email Gateway
 Unifying Information Security Implementing TLS on the CLEARSWIFT SECURE Email Gateway Contents 1 Introduction... 3 2 Understanding TLS... 4 3 Clearswift s Application of TLS... 5 3.1 Opportunistic TLS...
MarkLogic Server. Installation Guide for All Platforms. MarkLogic 8 February, 2015. Copyright 2015 MarkLogic Corporation. All rights reserved.
 Installation Guide for All Platforms 1 MarkLogic 8 February, 2015 Last Revised: 8.0-4, November, 2015 Copyright 2015 MarkLogic Corporation. All rights reserved. Table of Contents Table of Contents Installation
Moving Drupal to the Cloud: A step-by-step guide and reference document for hosting a Drupal web site on Amazon Web Services
 Moving Drupal to the Cloud: A step-by-step guide and reference document for hosting a Drupal web site on Amazon Web Services MCN 2009: Cloud Computing Primer Workshop Charles Moad
1. GridGain In-Memory Accelerator For Hadoop. 2. Hadoop Installation. 2.1 Hadoop 1.x Installation
 1. GridGain In-Memory Accelerator For Hadoop GridGain's In-Memory Accelerator For Hadoop edition is based on the industry's first high-performance dual-mode in-memory file system that is 100% compatible
CDH installation & Application Test Report
 CDH installation & Application Test Report He Shouchun (SCUID: 00001008350, Email: she@scu.edu) Chapter 1. Prepare the virtual machine... 2 1.1 Download virtual machine software... 2 1.2 Plan the guest
Desktop : Ubuntu 10.04 Desktop, Ubuntu 12.04 Desktop Server : RedHat EL 5, RedHat EL 6, Ubuntu 10.04 Server, Ubuntu 12.04 Server, CentOS 5, CentOS 6
 201 Datavoice House, PO Box 267, Stellenbosch, 7599 16 Elektron Avenue, Technopark, Tel: +27 218886500 Stellenbosch, 7600 Fax: +27 218886502 Adept Internet (Pty) Ltd. Reg. no: 1984/01310/07 VAT No: 4620143786
Install and configure SSH server
 Copyright IBM Corporation 2009 All rights reserved Install and configure SSH server What this exercise is about... 1 What you should be able to do... 1 Introduction... 1 Part 1: Install and configure freesshd
Online Backup Linux Client User Manual
 Online Backup Linux Client User Manual Software version 4.0.x For Linux distributions August 2011 Version 1.0 Disclaimer This document is compiled with the greatest possible care. However, errors might
Online Backup Client User Manual
 For Linux distributions Software version 4.1.7 Version 2.0 Disclaimer This document is compiled with the greatest possible care. However, errors might have been introduced caused by human mistakes or by
Kognitio Technote Kognitio v8.x Hadoop Connector Setup
 Kognitio Technote Kognitio v8.x Hadoop Connector Setup For External Release Kognitio Document No Authors Reviewed By Authorised By Document Version Stuart Watt Date Table Of Contents Document Control...
Tutorial: Using HortonWorks Sandbox 2.3 on Amazon Web Services
 Tutorial: Using HortonWorks Sandbox 2.3 on Amazon Web Services Sayed Hadi Hashemi Last update: August 28, 2015 1 Overview Welcome Before diving into Cloud Applications, we need to set up the environment
Quick Start Guide. Cerberus FTP is distributed in Canada through C&C Software. Visit us today at www.ccsoftware.ca!
 Quick Start Guide Cerberus FTP is distributed in Canada through C&C Software. Visit us today at www.ccsoftware.ca! How to Setup a File Server with Cerberus FTP Server FTP and SSH SFTP are application protocols
RoomWizard Synchronization Software Manual Installation Instructions
 2 RoomWizard Synchronization Software Manual Installation Instructions Table of Contents Exchange Server Configuration... 4 RoomWizard Synchronization Software Installation and Configuration... 5 System
Easy Setup Guide 1&1 CLOUD SERVER. Creating Backups. for Linux
 Easy Setup Guide 1&1 CLOUD SERVER Creating Backups for Linux Legal notice 1&1 Internet Inc. 701 Lee Road, Suite 300 Chesterbrook, PA 19087 USA www.1and1.com info@1and1.com August 2015 Copyright 2015 1&1
This handout describes how to start Hadoop in distributed mode, not the pseudo distributed mode which Hadoop comes preconfigured in as on download.
 AWS Starting Hadoop in Distributed Mode This handout describes how to start Hadoop in distributed mode, not the pseudo distributed mode which Hadoop comes preconfigured in as on download. 1) Start up 3
DVS-100 Installation Guide
 DVS-100 Installation Guide DVS-100 can be installed on any system running the Ubuntu 14.04 64 bit Linux operating system, the guide below covers some common installation scenarios. Contents System resource
Online Backup Client User Manual Mac OS
 Online Backup Client User Manual Mac OS 1. Product Information Product: Online Backup Client for Mac OS X Version: 4.1.7 1.1 System Requirements Operating System Mac OS X Leopard (10.5.0 and higher) (PPC
Online Backup Client User Manual Mac OS
 Online Backup Client User Manual Mac OS 1. Product Information Product: Online Backup Client for Mac OS X Version: 4.1.7 1.1 System Requirements Operating System Mac OS X Leopard (10.5.0 and higher) (PPC
Zend Server Amazon AMI Quick Start Guide
 Zend Server Amazon AMI Quick Start Guide By Zend Technologies www.zend.com Disclaimer This is the Quick Start Guide for The Zend Server Zend Server Amazon Machine Image The information in this document
Online Backup Client User Manual
 For Mac OS X Software version 4.1.7 Version 2.2 Disclaimer This document is compiled with the greatest possible care. However, errors might have been introduced caused by human mistakes or by other means.
Partek Flow Installation Guide
 Partek Flow Installation Guide Partek Flow is a web based application for genomic data analysis and visualization, which can be installed on a desktop computer, compute cluster or cloud. Users can access
File transfer clients manual File Delivery Services
 File transfer clients manual File Delivery Services Publisher Post CH Ltd Information Technology Webergutstrasse 12 CH-3030 Berne (Zollikofen) Contact Post CH Ltd Information Technology Webergutstrasse
WA1826 Designing Cloud Computing Solutions. Classroom Setup Guide. Web Age Solutions Inc. Copyright Web Age Solutions Inc. 1
 WA1826 Designing Cloud Computing Solutions Classroom Setup Guide Web Age Solutions Inc. Copyright Web Age Solutions Inc. 1 Table of Contents Part 1 - Minimum Hardware Requirements...3 Part 2 - Minimum
HADOOP. Installation and Deployment of a Single Node on a Linux System. Presented by: Liv Nguekap And Garrett Poppe
 HADOOP Installation and Deployment of a Single Node on a Linux System Presented by: Liv Nguekap And Garrett Poppe Topics Create hadoopuser and group Edit sudoers Set up SSH Install JDK Install Hadoop Editting
IDS 561 Big data analytics Assignment 1
 IDS 561 Big data analytics Assignment 1 Due Midnight, October 4th, 2015 General Instructions The purpose of this tutorial is (1) to get you started with Hadoop and (2) to get you acquainted with the code
Eucalyptus 3.4.2 User Console Guide
 Eucalyptus 3.4.2 User Console Guide 2014-02-23 Eucalyptus Systems Eucalyptus Contents 2 Contents User Console Overview...4 Install the Eucalyptus User Console...5 Install on Centos / RHEL 6.3...5 Configure
HADOOP CLUSTER SETUP GUIDE:
 HADOOP CLUSTER SETUP GUIDE: Passwordless SSH Sessions: Before we start our installation, we have to ensure that passwordless SSH Login is possible to any of the Linux machines of CS120. In order to do
Set JAVA PATH in Linux Environment. Edit.bashrc and add below 2 lines $vi.bashrc export JAVA_HOME=/usr/lib/jvm/java-7-oracle/
 Download the Hadoop tar. Download the Java from Oracle - Unpack the Comparisons -- $tar -zxvf hadoop-2.6.0.tar.gz $tar -zxf jdk1.7.0_60.tar.gz Set JAVA PATH in Linux Environment. Edit.bashrc and add below
HDFS Cluster Installation Automation for TupleWare
 HDFS Cluster Installation Automation for TupleWare Xinyi Lu Department of Computer Science Brown University Providence, RI 02912 xinyi_lu@brown.edu March 26, 2014 Abstract TupleWare[1] is a C++ Framework
Hadoop Tutorial. General Instructions
 CS246: Mining Massive Datasets Winter 2016 Hadoop Tutorial Due 11:59pm January 12, 2016 General Instructions The purpose of this tutorial is (1) to get you started with Hadoop and (2) to get you acquainted
Amazon Web Services EC2 & S3
 2010 Amazon Web Services EC2 & S3 John Jonas FireAlt 3/2/2010 Table of Contents Introduction Part 1: Amazon EC2 What is an Amazon EC2? Services Highlights Other Information Part 2: Amazon Instances What
Deployment Guide: Transparent Mode
 Deployment Guide: Transparent Mode March 15, 2007 Deployment and Task Overview Description Follow the tasks in this guide to deploy the appliance as a transparent-firewall device on your network. This
How To Install Powerpoint 6 On A Windows Server With A Powerpoint 2.5 (Powerpoint) And Powerpoint 3.5.5 On A Microsoft Powerpoint 4.5 Powerpoint (Powerpoints) And A Powerpoints 2
 And Powerpoint 3.5.5 On A Microsoft Powerpoint 4.5 Powerpoint (Powerpoints) And A Powerpoints 2") DocAve 6 Service Pack 1 Installation Guide Revision C Issued September 2012 1 Table of Contents About the Installation Guide... 4 Submitting Documentation Feedback to AvePoint... 4 Before You Begin...
DocAve 6 Service Pack 1 Installation Guide Revision C Issued September 2012 1 Table of Contents About the Installation Guide... 4 Submitting Documentation Feedback to AvePoint... 4 Before You Begin...
SUSE Manager in the Public Cloud. SUSE Manager Server in the Public Cloud
 SUSE Manager in the Public Cloud SUSE Manager Server in the Public Cloud Contents 1 Instance Requirements... 2 2 Setup... 3 3 Registration of Cloned Systems... 6 SUSE Manager delivers best-in-class Linux
MATLAB on EC2 Instructions Guide
 MATLAB on EC2 Instructions Guide Contents Welcome to MATLAB on EC2...3 What You Need to Do...3 Requirements...3 1. MathWorks Account...4 1.1. Create a MathWorks Account...4 1.2. Associate License...4 2.
Working with Docker on Microsoft Azure
 Working with Docker on Microsoft Azure Lab Overview In this lab you will create a Docker enabled virtual machine from the Azure Marketplace. You will then go through basic Docker commands. After that,