USER MANUAL FOR THE MONTHLY E-RETURN SOFTWARE INDEX SL NO TOPIC PAGE NUMBER. I ADDING ESTABLISHMENTS, LOG IN AND CREATING USERS 2 to 4
|
|
|
- Stewart Jennings
- 8 years ago
- Views:
Transcription
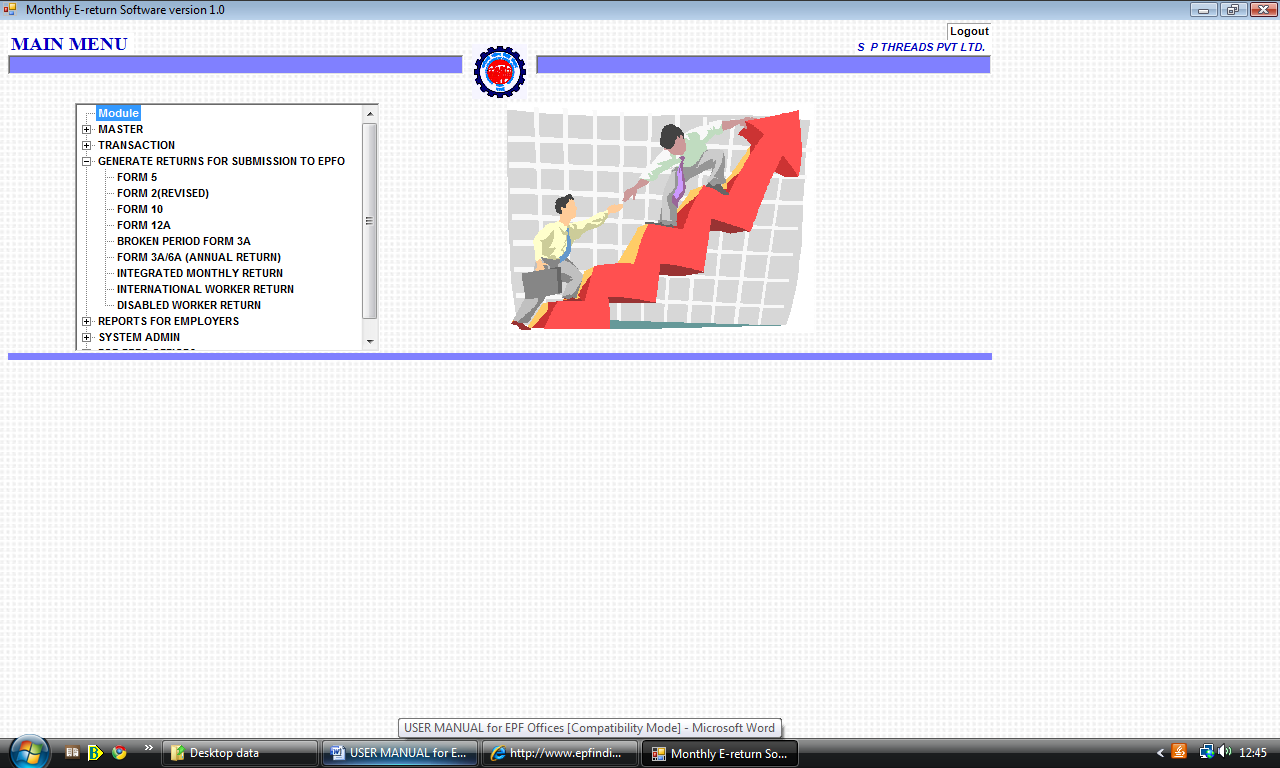
1 USER MANUAL FOR THE MONTHLY E-RETURN SOFTWARE INDEX SL NO TOPIC PAGE NUMBER I ADDING ESTABLISHMENTS, LOG IN AND CREATING USERS 2 to 4 1 ADD MULTIPLE ESTABLISHMRENTS ANDLOGIN 2 2 UPDATING THE CONTRIBUTION AND OTHER PARAMETERS 3 3 CHANGING PASSWORD 4 4 CREATING A NEW USER 4 5 RESET DATA FOR A MONTH OR PERIOD 4 II SETTING ESTABLISHMENT S DETAILS 5 1 ENTERING/UPDATING ESTABLISHMENT MASTER 5 III DATA ENTRY/UPLOAD FUNCTIONS 6 to 15 1 DATA ENTRY/UPLOAD OF MEMBER MASTER 6 2 DATA ENTRY/UPLOAD OF EXIT DETAILS 9 3 DATA ENTRY/UPLOAD OF MONTHLY WAGE DETAILS 10 4 ENTRY OF DATA/GENERATION OF CHALLAN 13 5 DATA ENTRY/UPLOAD OF NOMINATION DETAILS 14 IV GENERATION OF RETURNS 16 to 19 1 GENERATION OF FORM GENERATION OF FORM 2 (R) 16 3 GENERATION OF FORM GENERATION OF FORM 12A (R) 17 5 GENERATION OF BROKEN PERIOD 3A 18 6 GENERATION OF FORM 3A/6A 18 7 GENERATION OF INTEGRATED MONTHLY RETURN 18 8 GENERATION OF INTERNATIONAL WORKERS RETURN 18 9 GENERATION OF DISABLED EMPLOYEES RETURN 19 SCREEN SHOTS 20 TO 24 1
 16 3 GENERATION OF FORM 10 17 4 GENERATION OF FORM 12A")

2 DEFAULT USER ID : admin PASSWORD: admin CHAPTER I ADDING ESTABLISDHMENTS, LOGIN, SETTING CONTRIBUTION PARAMETERS AND CREATING USERS 1. ADD MULTIPLE ESTABLISHMRENTS ANDLOGIN When you click on the link of E Return Setup the first page will contain two functions one for Addition of Establishment and the second one is for Selecting and Logging in the selected establishment. In addition function,you can select Region Code and Office Code by selecting an office name from the list.when you select an Office name from the list then it will automatically fill the box for region code and Office code,then you have to enter the Establishment Code which is a 7 digit number and Establishment extension and click ADD button, it will show a message Establishment is added sucessfully. When an Establishment is successfully added then from the list (SELECT ESTABLISHMENT) will contain the list of all added Establishments, from this you can select your Establishment and click OPEN button for opening the Tool for the selected Establishment.When you click on the OPEN button, Login Page is displayed and this page contains the Establishment ID in the top right corner of the page. 2

3 To login the user has to first select the establishment for which he has to enter data or generate return. Once an establishment has been added, select the same from the establishment code field and click open button. The software supplied has a default user name admin, and default password admin. The system allows the user to create/delete new/existing users and to change password. However the admin user cannot be deleted and only his password can be changed. Admin user only can change the Contribution and other parameters (such as wage ceiling, contribution rates etc, based on which the amounts are calculated in the Returns generated through this software). It is advised that the employer keeps the admin role with himself and sets the Contribution and Other Parameters. He may create users for the data entry/upload of the data and generation of all Returns and Reports and allot such user id to subordinate staff. 2. UPDATING THE CONTRIBUTION AND OTHER PARAMETERS. a) Lognin using the admin user id and with the default password admin or after changing the password through the process detailsed below under sl no. II below. b) Click System Admin. c) From the sub Menu, click Contribution and Other Parameters. d) The screen will show the contribution rates under the three schemes, administrative charges and Inspection Cherges rates and the minimum amounts and also the wage ceilings for the employees and in special cases for the disabled employees if employed after e) The default rate of contribution that appears will be 12% and can be changed to 10% if applicable for your establishment. f) After changing the rate, click save. g) A message, Record submitted successfully will appear. h) Click OK and then Click Back i) The Main Menu will appear. j) Use process under sl no. III for creating a new user. NOTE: All other rates such as administrative charges, inspection charges, wage ceiling, pension contribution rate etc are to be changed only when there is a notification to this effect and edit has been provided so that returns may be generated correctly till a patch to the software is released. However if these rates are changed, the changed rate information will be printed on the returns. So it is advised only the contribution rate be changed to 10 or 12% as applicable. 3

4 3. CHANGING PASSWORD a) Enter the User ID and the password given at the time of creating user. b) Click Change Password. c) The screen that appears will ask for old password and the new password to be entered. On press of Tab key, the message of successful change of password appears. d) Click OK. e) The Login Screen will appear again. f) Enter the new password and Click Login. g) The Main Menu will open. 4. CREATING A NEW USER. i. Enter default user id and password in the Login page and Click Login. ii. On the Main Menu, Click System Admin. iii. Clisk User Master. iv. Click ADD. v. The screen will ask for User ID, User Name and Password. vi. After entry, Click SAVE. vii. The new user is created. viii. Click Back and on Main Menu, Click Logout. ix. The new user can now login with his/her user id and pasword given at the time of creation of the user and can change his/her password as per process stated above. 5. RESET DATA BASE OR PERIOD: These two functiona are for deleting the data of Monthly wages and challan for a perticular month or period, in case wrong entries were made and edit takes longer time. When the data is reset for a period, the data moves to a different location with the same name of establishment and its id (code no.) (and deleted from the current database ). 4

5 CHAPTER II UPDATING THE ESTABLISHMENT MASTER Initially the details of the establishment has to be entered in the software and the returns will be generated accordingly. This can be done both by the admin user or any other user created. The process is as follows: a) Login after entering the used id and password. b) On the main menu, click Master. c) In the sub Menu click Establishment s Details. d) The screen for the entry/selection od details will open. e) In case the data was entered earlier, click EDIT to make changes. f) The establishment Code number will appear on the basis of the establishment added and for which the login has been done. g) Following details are required/can be updated: i. Name and Address of Establishment (mandatory) ii. Phone number/ etc of the establishment.(optional) iii. Exemption Status under each Scheme. (mandatory) By default the status appears as unexempted under each Scheme and can be changed. iv. Date of Coverage (mandatory) Enter the date of coverage as per the order issued by the EPFO Office while intimating the Code number. On press of Tab Button, Applicable date of Pension Scheme is auto populated with the same date of coverage but can be edited in case the Pension Scheme was applied to your establishment from a different date as compared to the Provident Fund Scheme. In such case the applicable date for Pension Scheme will be taken as the date of joining for Pension for all members who joined between the two dates. h) After entry/updation at the time of some change in the data such as address, exemption status etc, click SAVE. i) A message stating Information updated successfully will appear. j) Click OK. k) The Main Menu will appear. 5
 The establishment Code number will appear on the basis of the establishment added and for which the login has been done. g) Following details are required/can be updated: i.")
6 CHAPTER III DATA ENTRY/UPLOAD OF MEMBER S/MONTHLY WAGE DATA 1. DATA ENTRY/UPLOAD OF MEMBER S DATA A. DATA ENTRY OF EMPLOYEE MASTER On the Main Menu, click Master and then from the sub menu click EMPLOYEE MASTER Click ADD Button. Screen will allow entry of Account Number (code number of the establishment not to be entered anywhere again), Name, Father s /Husband s name, date of birth, gender and date of joining. These are mandatory fields and are as per the Form 5. In case of a female, the husband radio button can be selected, in case the name given is of husband in the Father s/husband s name field. Field for Marietal status of member is also there and the user can select the correct status. The fied is however not mandatory and in case the data is not entered in this field, the status by default is married. Through this screen any past service of member can be entered. The flags for international worker and disabled worker are N by default but can be changed to yes. In case of International worker, the passport details can be entered after clicking the link for it. The date of leaving and reason can also be entered through this screen. This feature is also available in the screen for monthly wage data entry. The flags for the higher wages for Provident Fund and Pension Fund can also be updated. By default these flags are N. The screen also allows to enter the id, mobile number, address and bank details of the employees. These are not mandatory but if entered, they will help in faster settlement of claims. After entry of the data, Click SAVE. Message Record saved successfully appears. Click OK The details of the member appears in the view bar below. Click ADD for next member and repeat the process. B. UPLOAD OF EMPLOYEE MASTER 6

7 In case the establishment is having the details of employees in digital form that is in any system, the data can be uploaded in this software and there is no need to make any data entry. For this, the data entry screen has an IMPORT DATA button. There is another button with? mark which will give the structure of the upload file which is as follows: Structure of File for Import 1. Employee Number * (Max Length 7) 2. Member Name * (Max Length 85) 3. Gender * (Max Length 1) 4. Father s Name * (Max Length 85) 5. Disabled Flag * (Max Length 1) 6. international Worker flag * (Max Length 1) 7. Date of Birth (Max Length 10) 8. Date of Joining (Max Length 10) 9. Mobile Number (Max Length 15) 10. E Mail ID (Max Length 50) 11. Past Service (Max Length 1) 12. Higher Flag of EPF (Max Length 1) 13. Higher Flag of EPS (Max Length 1) 14. Bank Account No. (Max Length 30) 15. Bank Name. (Max Length 50) 16. Branch Name. (Max Length 50) 17. Address1 (Max Length 35) 18. Address2 (Max Length 35) 19. City (Max Length 35) 20. District (Max Length 35) 21. State (Max Length 35) 22. Pin Code (Max Length 11) 23. Marital Status (Max Length 1) 24. Father/Husband FLAG (Max Length 1) Codes for Father/Husband FLAG are FATHER - F HUSBAND - S Codes for Marital Status are WIDOWER - E MARRIED - M REMARRIED - R UNMARRIED - U WIDOW - W DIVORCEE - D All fields with * are mandatory Note: The date of birth and date of joining of a member are mandatory for generation of Form 5 of the member but in upload it is kept non mandatory. This has been done to ensure that the user may upload the available data and then through the edit button, update the missing fields that are mandatory. Once uploaded, there is a Report to see the list of such memebrs for whom these two fields are missing in the data base. Using this report the user can make the entry of the two dates through edit mode. 7
 7. Date of Birth (Max Length 10) 8. Date of Joining (Max Length 10) 9. Mobile Number (Max Length 15) 10. E Mail ID (Max Length 50) 11.")
8 Further this has been done to ensure that the Annual Return in Form 3A is generated for all members, even if the DOB, DOJ of old members is not readily available. However for such members, Form 5 cannot be generated till the two fields are entered. Upload Process is as follows: i. Click IMPORT DATA button. ii. The system will ask to chose the location of the data file. Chose the file and click OPEN. iii. The data will be imported and a message Employee master uploaded successfully will appear. iv. Click OK v. In case data of any member pre-existed in the data base, a log file will be generated showing the list of members whose data was ignored as it preexisted, as follows: LOG FILE \ PF NO 278 is already exists ignored vi. In case the data of the member 278 is to be changed, edit mode has to be used. vii. After upload, the details of the employees will appear in the view bar below. Each column can be clicked to see the list in ascending or decending order. viii. Details of the member selected in the view bar will appear in the top screen. ix. Details of the member selected can be edited after clicking the EDIT button and SAVE after changing the details. x. Details of any mamber can also be populated in the screen by entry of the account number in the relevant box, and then pressing the Tab key. xi. Every month the new members can be added through the data entry mode or file upload. In case of upload of the data file with added members, the new members details will be uploaded and the data of the existing memebrs will be ignored. Thus there is no need to create an upload file with only the new members. xii. After the upload function, it is better to view the Report on Members whose Date of Joining and Date of Birth are missing. For this go to Main Menu, Click Reports, then from the Sub Menu, Click Members having DOB or DOJ as blank. The report will open and will show the list of such members. This can be used to collect the details and then enter it through the edit mode as explained above. 8

9 Note: Once the employee master is updated in the system, Form 5 for any month and even for a range on months can be generated for all those members whose DOB and DOJ are available in the system. In case of the following non-mandatory fielfd, if the data is blank while uploading, the system records following : a. Higher flag of EPF, if blank: YES b. Higher Flag for EPS, if blank: NO c. Father s/husband s field, if blank: Father d. Marietal Status field, if blank: Married. Codes for Marital Status are WIDOWER - E MARRIED - M REMARRIED - R UNMARRIED - U WIDOW - W DIVORCEE - D 2. DATA ENTRY/UPLOAD OF EXIT DETAILS The software provides for the entry of date of leaving and reason for leaving for any member through the following modes: a. Under the Master Module>>Employee Master function, data entry can be done of such member: Select the membet from the lower view bar or enter the account number and press tab key. Details of the selected member will appear. Click EDIT button. Click check box for Whether you want to enter Exit Details. Box for date of leaving and reason for leaving will appear. Enter the date of leaving. Select the reacon for leaving. Click SAVE button. Message, Record saved successfully will appear. Repeat process for other such members. b. The date can be uploaded also. Go to Master Module>>Employee Master function The? button will give the details of data as follows: 9

10 Structure of File for Import 1. Employee Number * (Max Length 7) 2. Date of Leaving * (Max Length 10) 3. Reason For Leaving * (Max Length 1) Codes for Reason For Leaving are RETIREMENT - R SUPERANNUATION - S DEATH IN SERVICE - D PERMANENT DISABLEMENT - P CESSATION - C all fields with * are mandatory Click Import Exit Details button. System will ask for the location for file. Locate and Select the file and double click it. The data will be uploaded and message for it will appear. This way you can upload the data for the members who are going to superannuate on a future date also. In such cases where the date of exit is available in the system, Form 10 can be generated for the respective months. c. The data entry or upload for the exit details can also be done through the same way under the Transaction Module>> Monthly Data Upload/Data Entry. In this case only the day of the leaving (in the wage month) is to be entered and not the entire date since the screen opened is for a particular wage month. 3. DATA ENTRY/UPLOAD OF MONTHLY WAGE DATA A. DATA ENTRY OF MONTHLY WAGE DATA Double Click the Transaction Function in the Main Menu. In the sub menu, double click Monthly Return Data Entry. The screen will ask to enter the Return Month and Year. Click Next. The data entry screen will open. Enter the members account number in the field and press GO button. Fields for entry of wages and contributions will open. Enter wages and press tab key. The contributions will be populated based on the Flags for higher wages under Provident Fund and Pension Fund. B. UPLOAD OF MONTHLY WAGE DATA i. Double Click the Transaction function under the Main Menu. ii. In the sub menu, double click Monthly Return Data Entry. iii. The screen will ask to enter the Return Month and Year. iv. Click Next. The data entry screen will open. 10

11 v. The screen has a IMPORT DATA button and another button with? mark. The click of? will show the file structure required for upload, as follows: Structure of File for Import i. Employee Number * (Max Length 7) ii. Wages * (Max Length 12) iii. EPF contribution EE * (Max Length 12) iv. Refund of EE (Max Length 12) v. NCP days (Max Length 5) vi. Date of leaving (Max Length 10) vii. Reason for leaving (Max Length 1) viii. Wage arrears (Max Length 12) ix. EPF Contribution EE arrears (Max Length 12) x. EPF Contribution ER arrears (Max Length 12) xi. EPS Contribution arrears (Max Length 12) all fields with * are mandatory Please note that the VPF amount if any is included in the EE Share. Also the EE Share cannot be less than the due amount calculated taking into account the contribution rate, Flag for Disabled or International Worker, and Higher wage flags. vi. Click the IMPORT DATA button. System will ask to select the location of the file. vii. After selecting the file, click OPEN button and the data will be uploaded. viii. Message that Employee Monthly data updated successfully will be displayed. ix. On click of OK the data will appear in the lower view bar and data for all colomns can be sorted in ascending or descending order on a click. x. Data of the member selected in the lower view bar will appear in the screen above. xi. The exit details can be entered through this function also. For this enter the account number in the field for PF No. and press GO button. The data of the entered member will be displayed. Enter only the date of leaving and select the reason for leaving. Here the month and year are not to be entered since the data opened is of a pearticular wage month. System automatically recirds the DOE against the wage month that is displayed at the right hand top corner. xii. After upload, click TOTAL CHARGES button. 11
 xi. EPS Contribution arrears (Max Length 12) all fields with * are mandatory Please note that the VPF amount if any is included in the EE Share.")
12 xiii. The details of the account wise charges on the basis of the wage data and contributions will appear. The screen will also show the amount of Pension Fund diverted to Employer Share due to some memners attaining 58 years age. This will happen only in case of members whose date of birth is available in the system through the Employee Master. xiv. Click SAVE button. Message that Information saved successfully will appear. xv. xvi. xvii. xviii. Click OK. The data entry screen will appear. The date of leaving can also be entered at this stage. In case of the member who have left service, the broken period 3A form can be generated from here. Click VIEW REPORT button. Form 3A for the member whose data is appearing on the screen is generated. This can be printed from here. This function can also be used to show the contribution card of a member on demand. Click BACK button. The main screen now displays the account wise dues for the wage month. UPLOAD OF SUBSEQUENT MONTH WAGE DATA i. Double Click the Transaction function under the Main Menu. ii. In the sub menu, double click Monthly Return Data Entry. iii. The screen will ask to enter the Return Month and Year. The screen will alos show the months and the accounts wise dues for the months for which data is already uploaded/entered. iv. Click Next. The data entry screen will open. v. In addition to the possibilities to enter the data or upload monthly wage file as explained above, for the subsequest months, there is option to import the previous months data if same. vi. For using this feature, Click Previous Month Data. vii. A message will come Do you want to carry previous month data for this month. viii. Click YES if you want to do so. ix. The data of previous month, less for those who left in the previous month will be impotred and a message Data is imported successfully will be displayed. x. On click of OK the data imported will be displayed in the view bar below. 12

13 xi. Click Total Charges. And save the data. xii. Click Back button and the Sub Menu Page will appear, tjis time with the added details for the month for which the data was imported. Repeat this process for the subsequent months. Even in case there is some difference in the previous months data, say due to change in wages for a few members only, the previous months data can be imported and individual cases can be corrected and rectified. Note: Once the monthly wage data is entered/uploaded, the 3A Form can be generated for the year and even for the broken period for members who have left service. 4. DATA ENTRY/GENERATION OF CHALLAN The software has the feature to genetare one or multiple challans for a month, if the employer is paying dues through more than one challan. The process is as follows: i. Double Click the Transaction function under the Main Menu. ii. In the sub menu, double click Challan Form Data Entry. iii. The screen that opens will ask to enter the Due month and due year. iv. On press of Tab Key after entry of month and year the Wage month will be displayed automatically. v. Click Next Button. vi. Challn screen will appear with account wise due amounts which can be edited if the employer wishes to pay less amount through this challan. vii. Note: Payment of any amount after the due date will attrack Penal Damages and Interest under section 7Q. viii. Enter the Cheque number, cheque date and name of depositor and click save. ix. Message Record is saved will appear. x. On click of OK the Print Challan will will appear. xi. Click Print Challan Button. Thechallan report will appear and can be printed. xii. Click BACK. xiii. The sub Menu Screen will appear and will display the challan details with status fresh. xiv. Till the status of the challan is FRESH, it can be opened through click of the selected challan in the lower view bar. It can be edited also. xv. Once the remittance is made, the presentation date can be entered in the challan. xvi. For this, click NEXT on the sub menu screen after entry of the due month and year and this time the screen will allow to enter the presentation date etc. Mandatory fields are marked with *. xvii. Once the details are saved, the challan data for this challan becomes final and cannot be edited. The status of the challan will become Remitted. This data will be displayed in the Annual Return 6A when the 3A return is generated. 13

14 Note: In case you have remitted lesser amount than the dues calculated through the system, and the remittance details have been ebtered and saved, another challan for the same month can be generated and this time the remaining amounts as per the dues will be displayed. Same process is to be repeated fo reach such challan. 5. DATA ENTRY/UPLOAD OF NOMINATION DETAILS Once a new member joins the establishment, the nomination form 2(R) has to be submitted for each member. The software gives facility to generate the nomination forms for each member whose details are available in the employee master. Further after the nomination forms are submitted by the employees, the software provides facility for entry of the nomination details. Facility for upload of the data is also there if the data is already available with the employer in digital form. The data entry process is as follows: i. Double click Transaction fromthe main menu ii. Double click Form 2 (Revised) Upload/Data Entry from the sub menu iii. Screen will open with the details of the oldest account number) (first member available in the system). iv. To enter details of any particular member, enter the account number in the Employee No field and click Search. The details of that member as available in the employee master will appear. The Name and Account Number details are displayed while the other details are editable. Marietal Status is to be selected. Enter address details if not displayed from the employee master. Temporary address if same as Permanent one can be copied by click of => button. Entry can also be made. v. Click save to save the data. vi. View Report is for printing the Form 2 (R) with available details so that it can be given to members for filling up the nominee details. vii. Multiple forms can also be printed if details of members have been entered first or have been uploaded. On click of Print Multiple Form 2, the screen will ask to enter the Starting PF No and Ending PF No. Click OK and the Form 2 for all PF Numbers will be generated. viii. Once the details are received from the members, that data can also be entered further as follows: ix. Click Part A (EPF) on the Screen. 14

15 x. Screen for entry of PF Nomination will open. Enter the nominee name, select Gender. If address is same as member, click the check box and the address will be copied. xi. Select the relationship with the memebr, date of birth of the nominee, and total amount of share for the nominee. In case the nominee is a minor or lunatic, click the appropriate box to enter the details of Guardian where the name, address and reletionship with the Nominee (not member)is to be entered. In case of any nominee whose age is over 18 years, the check box for Minor is disabled. xii. Click save after entry and then the system shows an additional button to Add New, for the second nominee if the PF amount is to be distributed among more than one family members. The total amount of share cannot be more than 100%. xiii. Once the nomination details are saved and no further nominee is to be added, Click Part B (EPS). This section is to add the valid family members (spouse, son, daughter only)for the Pension benefits. If the nominee entered in the PF part is also family member as per the Pension Scheme, the name of the said nominee will be displayed and there is no need to again enter his/her details. xiv. In case there are other family members for whom PF share was not given, the details may be added from here. For this click Add and enter details as per the screen. xv. The third button Pension Nominee is to be used only when the member has no family as per the Pension Scheme. This can be when the member is unmarried, or spouse has died and all children are above 25 years of age. xvi. In case the Part B has any entry, the system will not allow to enter Pension Nominee. Further if the Part B has no spouse, and if children have crossed 25 years age, Pension Nominee details can be entered. xvii. After filling up of the form the Return can again be printed if required. UPLOAD. There is also facility to import the data if already available in digital form. For this following is the process: Click Import button. System will ask to select the file. On opening the selected file the upload will take place and a message that data is uploaded successfully will appear. In case data is existing the upload will be ignored and log file will show that. 15

16 CHAPTER IV GENERATION OF RETURNS 1. GENERATION OF FORM 5: Once the data entry/upload of the basic details of the members is over, the system can generate the Form 5 Return for any selected month or for a range of months. The process is as follows: i. Go to Generation of Return>>Form 5 ii. Enter return month and return year iii. Click next. iv. In case after the upload of member details, some members data do not have date of joining or date of birth, a message to this effect will appear. You can generate a list of such memebrs from Reports>>members having doj or dob blank, and for such members enter the missing details through edit button in Masters>>Employee Details. However you can click OK and generate the report. v. On click of OK, system will aks you to save the soft copy of the file generated. The return has been given a name by the system and the same name appears on the hard copy also for your convenience. Please do not change the file neme. vi. Save the file at desired location in your system. On saving the file, a message will appear that the text file has been saved and the report is being generated. vii. The report will then appear and it can be printed. In case you don t want to print immediately, close the file. viii. A message will appear that report is already saved at the same location where the text was saved. Note: At the time of grneration of Form 5 a separate PDF file with the additional information of members such as address details, bank details etc is also generated and saved. Form 5 Details for multiple months: Click check box Whether you want to generate text file for Form 5 for a given period. Screen will ask to enter from month year and To month year. After entry click next and repeat process as for the single month return. 2. GENERATION OF FORM 2 (R) The provision to print Form 2 for single or multiple members before receiveing nomination details from members and after the same has already been given under the data entry function itself. 16

17 This function here is for generation of text file. Go to Returns>> Form 2 (REVISED) System will ask to give the range of members. After entry, click next. System will ask to save the file after giving name. Save. The hard copy of return will also appear. Return can be printed from here also. 3. GENERATION OF FORM 10 Once the data entry/upload of the exitc details of the members is over, the system can generate the Form 10 Return for any selected month or for a range of months. The process is as follows: i. Go to Generation of Return>>Form 10 ii. Enter return month and return year iii. Click next.. iv. System will aks you to save the soft copy of the file generated. The return has been given a name by the system and the same name appears on the hard copy also for your convenience. Please do not change the file neme. v. Save the file at desired location in your system. On saving the file, a message will appear that the text file has been saved and the report is being generated. vi. The report will then appear and it can be printed. In case you don t want to print immediately, close the file. vii. A message will appear that report is already saved at the same location where the text was saved. Form 10 Details for multiple months: Click check box Whether you want to generate text file for Form 10 for a given period. Screen will ask to enter from month year and To month year. After entry click next and repeat process as for the single month return. 4. GENERATION OF FORM 12A Go to Generation of Returns>.Form 12 A System will ask to enter return month and year Enter and click next System will show the dues as per the monthly wage details. The remitted part will be displayed equal to dues. In case part remittance has been made, the same can be edited. Dues part cannot be edited. Enter date of remittence (presentation), Bank name and branch details. Click Next. System will ask to save the soft copy at a location. Save it at desired location. 17

18 Hard copy will alsp appear and will be auto saved as in case of Form 5 and 10. s 5. GENERATION OF BROKEN PERIOD 3A In case of submission of bulk claims, broken period 3A for multiple members can be generated. Go to Generation of Reports>>Broken period 3A System will ask to enter the financial year. Enter 2009 for , the latter part will be displayed by the system. Enter the range of employees for whom 3A is to be generated. On press of tab key, all members in the renge that have date of exit in the system will appear. Select the members for whom claim is to be submitted. Click Next. The process for generation of text file and hard copy is same as in case of Form 5, 10, 12A. 6. GENERATION OF FORM 3A/6A Go to Generation of Returns>> Form 3A (Annual Returns) System will ask to enter the financial year. For enter 2010 and press tab key. The latter part will be displayed. Click next. System will take some time and ask for saving the text file. The process is same as in case of other returns. In this case a Form 6A is also generated in hard copy and saved at the same location. 7. GENERATION OF INTEGRATED MONTHLY RETURN This is a new return with an intention to replace the existing monthly and annual returns. In such case the advantage to the employers is that they have to file only one return each month and no annual return. The total number of pages to be printed and signed will be reduced to a great extent. The advantage to the members will be that their balances will be updated each month. The employer will also not have to prepare any broken period 3A. This will again reduce the errors in the #A submitted twice for exit members. The process of generation is same as that for form 5. It can be generated one for each month. 8. GENERATION OF INTERNATIONAL WORKERS RETURN This return can be generated in respect of the International Workers on monthly basis. The data comes only after the wage details are entered in the monthly details and once the details of the international worker is entered through the Employee Master. 18

19 The report generated is in hard copy only. 9. GENERATION OF DISABLED EMPLOYEES RETURN This return can be generated in respect of the Disabled Workers on monthly basis. The data comes only after the wage details are entered in the monthly details and for the employees who joined on or after The report generated is in hard copy only. 19

20 SCREEN SHOTS FOR GUIDENCE 1. Packages and Functions 20

21 21

22 2. ESTABLISHMENT DETAILS Added establishment details, codes will be displayed. Exemption details. Can be edited. Coverage details. Can be edited. 22

23 3. Employee Details Import employee data Import exit details Add member details Edit member details 23

24 3. WAGE DETAILS Import wage date for the first time. Import previous months data if no change Import exit details 24
if the correct date was 5 th April, 2011. But in case you enter 04/15/2011 for 15 th April, 2011, it will show it as error.
 1. How to validate a text file through the Validation tool? In some cases when a file is validated, it gives an error message that the number of required fields is less than the required fields. Answer:
Please click on ANNX-K menu option as in the screen below.
 Process flow for online submission of NEFT Payment Details, Payment Invoice & Annexure-K by an Exempted Trust to EPFO office (For a member who has changed employment from an exempted establishment to an
REGISTER OF COMPANIES, ENTERPRISES AND BUSINESS
 RWANDA BUSINESS REGISTRY PROJECT REGISTER OF COMPANIES, ENTERPRISES AND BUSINESS NAMES USER MANUAL Online user Version: 1.0 March 9 th 2010 NORWAY REGISTERS DEVELOPMENT AS TABLE OF CONTENTS 1 INTRODUCTION...
User Manual FOR KYC Registration Agency
 User Manual FOR KYC Registration Agency DECEMBER 2011 About KRA: SEBI (Securities and Exchange Board of India) has formulated the KYC Registration Agency (KRA) Regulations, which have been notified vide
1. Who can use Agent Portal? 2. What is the definition of an active agent? 3. How to access Agent portal? 4. How to login?
 1. Who can use Agent Portal? Any active agent who is associated with Future Generali Life Insurance Company Limited can logon to Agent Portal 2. What is the definition of an active agent? An agent, whose
Learn AX: A Beginner s Guide to Microsoft Dynamics AX. Managing Users and Role Based Security in Microsoft Dynamics AX 2012. Dynamics101 ACADEMY
 Learn AX: A Beginner s Guide to Microsoft Dynamics AX Managing Users and Role Based Security in Microsoft Dynamics AX 2012 About.com is a Rand Group Knowledge Center intended to provide our clients, and
2010 MegaPath Inc. All rights reserved. Confidential and Proprietary 2
 Polycom SIP Phones Base Configuration for MegaPath Duet Hosted Voice Service Contents Summary... 3 Configuration Settings Overview... 3 Restarting the Phone... 5 Rebooting the Phone... 6 Uploading Log
Note: Claim Form 10D should be submitted in two copies in case pension is to be drawn in other Region/Sub Region.
 FORM 10-D (EPS) (Supplied free of cost at EPFO Offices/can also be downloaded from epfindia website) INSTRUCTIONS (These Instructions sheets are not required to be printed for submission of the claim form
Core Training Quick Reference Guide Version 2.0
 Core Training Quick Reference Guide Version 2.0 Page 1 of 34 Contents Changes from Previous Version... 3 Introduction... 5 Guidance for Professional Users based in Colleges/ Schools/ Departments... 5 Logging
account multiple solutions
 Quick Start Guide 1 Our easy to use guide will get you up and running in no time! The guide will assist you with: Generating your Sage Pay login Navigation Creating contacts Creating system users Setting
Health Indicators Advancing Healthy Aging in Your Community. Database Instructions for Managers
 Health Indicators Advancing Healthy Aging in Your Community Database Instructions for Managers Getting to the Database Website You can access the Health Indicators online database in two different ways.
Payco, Inc. Evolution and Employee Portal. Payco Services, Inc.., 2013. 1 Home
 Payco, Inc. Evolution and Employee Portal Payco Services, Inc.., 2013 1 Table of Contents Payco Services, Inc.., 2013 Table of Contents Installing Evolution... 4 Commonly Used Buttons... 5 Employee Information...
Using Ad-Hoc Reporting
 Using Ad-Hoc Reporting The purpose of this guide is to explain how the Ad-hoc reporting function can be used to produce Management Information from client and product data held in the Key. The guide will
Dealer Tutorial. Uplink Customer Service 1-888-9UPLINK sales@uplink.com. 2010 Uplink Security, LLC. All rights reserved.
 Welcome to the u-traq Dealer Tutorial Uplink Customer Service 1-888-9UPLINK sales@uplink.com 2010 Uplink Security, LLC. All rights reserved. Table of Contents I. Device Overview Introduction to u-traq
FAQ on e-filing of Income tax Return
 FAQ on e-filing of Income tax Return 1. What is e-filing of Returns? Answer: Filing of Income Tax returns is a legal obligation of every person whose total income for the previous year has exceeded the
Class Climate Online Evaluation Instructions
 I: GETTING STARTED II: IMPORTING MULTIPLE INSTRUCTORS AND COURSES III: CREATING and/or EDITING INDIVIDUAL USERS IV: ADDING and/or EDITING INDIVIDUAL COURSES V: IMPORTING E-MAIL ADDRESSES (BULK) VI: ADDING
Applicant User Guide
 Applicant User Guide To apply for IHHL Construction/Conversion, Person needs an Applicant Login ID by registering on IHHL. This Login ID can also be used by Urban Local Bodies to upload one or more applications.
Frequently Asked Questions (FAQs): Provident Fund with RPFC
: Provident Fund with RPFC") Frequently Asked Questions (FAQs): Provident Fund with RPFC 1.1 What is Employees Provident Fund & Miscellaneous Provisions Act, 1952? It is social security legislation for the future benefit of employees
Frequently Asked Questions (FAQs): Provident Fund with RPFC 1.1 What is Employees Provident Fund & Miscellaneous Provisions Act, 1952? It is social security legislation for the future benefit of employees
Online submission of account of receipts and utilization of Foreign Contribution for the year in FC-6 Form
 Online submission of account of receipts and utilization of Foreign Contribution for the year in FC-6 Form Instructions for online filing of annual account in FC-6 Form 1. For online filing of annual accounts,
Milwaukee Carpenters District Council Health, Vacation, and Millwright Funds. Online Remittance Processing Instructions
 Milwaukee Carpenters District Council Health, Vacation, and Millwright Funds Online Remittance Processing Instructions Milwaukee Carpenters District Council Health, Vacation, and Millwright Funds Online
Welcome to SharpConnect
 Welcome to SharpConnect User Guide for Sharp Health Plan Brokers Version 1.1 www.sharphealthplan.com SharpConnect User Guide for Brokers page 1 TABLE OF CONTENTS Page I. Introduction to SharpConnect...
1. Access your account Log in to your online account at http://service.ringcentral.com using your main Ring Central phone number and password.
 Ring Central Quick Set Up settings for GA Hotline For assistance call National Hotline Committee Chair hotlinechair@trusteewebsite.com Ring Central Support (888) 898-4591 The purpose of this document is
E-MAIL - Spam Filtering
 E-MAIL - Spam Filtering SPAM FILTERING OVERVIEW... USER S GUIDE...... Common Login Errors......... Lists Tab... 5 Profile Tab... 7 Quarantine Tab... 0 LOGGING IN MAIN SCREEN SPAMBLOCKER TABS (LISTS, PROFILE
Government of Andhra Pradesh, Finance Department DDOUser Manual For Employee Data Capturing Application
 Government of Andhra Pradesh, Finance Department DDOUser Manual For Employee Data Capturing Application December, 2013 Instructions and Guidelines for Filling up the Employee details Form to be filled
DOCUMENT MANAGEMENT SYSTEM
 DOCUMENT MANAGEMENT SYSTEM USER S MANUAL By: MIS Department Software Division Page 1 of 14 1. Overview Document Management System is a powerful web based file manager and storage utility. It was developed
User Manual. EVM Tracking Application
 User Manual Of EVM Tracking Application (Version 2.9.12) 12 Jun 2015 Page 1 of 168 Table of Contents INTRODUCTION... 9 1. Change Password... 10 2. Main Menu Page... 11 3. Warehouse Master... 15 3.1. Warehouse
External Account Creation and Upload Instructions for the Local Government (LG) Audit Report Collection System
 Audit Report Collection System") External Account Creation and Upload Instructions for the Local Government (LG) Audit Report Collection System In order to submit data for any Department of Audits and Accounts (DOAA) web application,
External Account Creation and Upload Instructions for the Local Government (LG) Audit Report Collection System In order to submit data for any Department of Audits and Accounts (DOAA) web application,
Does the GC have an online document management solution?
 This FAQ contains: Web File Services definition Access web file services Create a WFS folder Upload a document Email a link to a document folder Create WFS subscription Cancel existing subscription Create
Integrated Challan cum Return (ICR) - Scope of Work for ICR Platform
 - Scope of Work for ICR Platform") Integrated Challan cum Return (ICR) - Scope of Work for ICR Platform 1. Proposed System Modules: a) User Portal b) ICR Management Platform c) Integration with Bankers Core Banking platform d) Messaging
Integrated Challan cum Return (ICR) - Scope of Work for ICR Platform 1. Proposed System Modules: a) User Portal b) ICR Management Platform c) Integration with Bankers Core Banking platform d) Messaging
Chapter 20: Workflow
 Chapter 20: Workflow 1 P a g e Table of Contents 1. About Workflow... 5 2. About this Guide... 5 3. Vital Information... 5 4. Security... 5 5. Activity... 5 6. Accessing Workflow... 6 7. Adding a Workflow...
User Manual for Constituent Colleges(PIT) - Student
 - Student") User Manual for Constituent Colleges(PIT) - Student Step 1 Go to http://ptuaccounts.ac.in or http://ptu.ac.in Step 2 Take/Hover mouse on Registration/Online payment link Step 3 Click on Constituent Colleges
User Manual for Constituent Colleges(PIT) - Student Step 1 Go to http://ptuaccounts.ac.in or http://ptu.ac.in Step 2 Take/Hover mouse on Registration/Online payment link Step 3 Click on Constituent Colleges
User Manual for efiling of Return for VAT (ver. 2.2) Download/ Upload Return Filing Method E-FILING RETURN FOR
 Download/ Upload Return Filing Method E-FILING RETURN FOR") E-FILING OF RETURN FOR VAT USER MANUAL National Informatics Centre, WBSC Page 1 of 48 Online Filing of Returns Thanks for accessing the website of the Directorate of Commercial Taxes, West Bengal. Now
E-FILING OF RETURN FOR VAT USER MANUAL National Informatics Centre, WBSC Page 1 of 48 Online Filing of Returns Thanks for accessing the website of the Directorate of Commercial Taxes, West Bengal. Now
SIGN Surgical Database Training Manual
 Manual In addition to using the Online Surgical Database for single case entry, you can also use the Offline Data Entry Tool (ODET) to enter each case offline and then upload a batch of cases to the online
Contents 1 Overview 2 Steps to run an Excel Add-In Setup: 3 Add-Ins 4 LOGIN 5 SEND SMS 5.1 Send Text or Flash Sms 5.2 Select Range 5.
 Contents 1 Overview 2 Steps to run an Excel Add-In Setup: 3 Add-Ins 4 LOGIN 5 SEND SMS 5.1 Send Text or Flash Sms 5.2 Select Range 5.3 Selected Range Preview List 5.4 Scheduling of Messages 5.5 Scheduled
ONLINE DISABILITY CERTIFICATE GUIDELINES FOR APPLICANTS
 Department of Health and Family Welfare ONLINE DISABILITY CERTIFICATE GUIDELINES FOR APPLICANTS The Disability form is designed to fill up the personal details of the people suffering from various types
Quick Overview: How to Submit Documents to FM Processing
 i Contents Quick Overview: How to Submit Documents to FM Processing... iii How to Log in to the Document Management System (DMS)... iv How to Search for a Folder... iv How to Add Documents to a Folder...
CompuBal. Video Helps. 1. Introduction Video. 2. Permanent Information Video. a. Direct feeding Video. b. Import form Accounting software Video
 CompuBal Video Helps 1. Introduction Video 2. Permanent Information Video 3. Input of the data a. Direct feeding Video b. Import form Accounting software Video c. Feeding through Trial balance Video 4.
End User s Guide. Electronic Filing
 End User s Guide Electronic Filing Rev: August 2014 This end user s guide has been skillfully created by smartech.net through meetings with the Clerk of the Circuit Court of Cook County and Online Information
Office of Student Employment 5781 Wingate Hall Orono, Maine 04469-5781
 Office of Student Employment 5781 Wingate Hall Orono, Maine 04469-5781 Tel: 207.581.1349 Fax: 207.581.3261 umaine.edu/studemp student.employ@umit.maine.edu Table of Contents I. Getting Started About the
FREQUENTLY ASKED QUESTIONS PROVIDENT FUND
 ` FREQUENTLY ASKED QUESTIONS PROVIDENT FUND These Frequently Asked Questions (FAQs) are general information based on the commonly sought responses and do not amount to advice on any particular matter.
How To Get A Financial Aid Award In Athena
 Athena Self-Service Walkthrough By the UGA Office of Student Financial Aid 220 Holmes/Hunter Academic Building Athens, GA 30602-6114 Phone: (706) 542-6147 Section 1 How to Find Out What is Needed by the
USER MANUAL FOR INTERNET BANKING (IB) SERVICE
 SERVICE") USER MANUAL FOR INTERNET BANKING (IB) SERVICE Content: Introduction and General questions. Accessing and using Internet Banking. 1. Log In, Log Out and Printing screen/transaction information 2. Inquiries
USER MANUAL FOR INTERNET BANKING (IB) SERVICE Content: Introduction and General questions. Accessing and using Internet Banking. 1. Log In, Log Out and Printing screen/transaction information 2. Inquiries
[Jet-Magento Integration]
![[Jet-Magento Integration]](/thumbs/30/14673243.jpg "[Jet-Magento Integration]") CedCommerce. All rights reserved. SUPPORT@CEDCOMMERCE.COM [Jet-Magento Integration] CedCommerce Jet-Magento Integration, an extension by CedCommerce, establishes synchronization of inventory, price, other
CedCommerce. All rights reserved. SUPPORT@CEDCOMMERCE.COM [Jet-Magento Integration] CedCommerce Jet-Magento Integration, an extension by CedCommerce, establishes synchronization of inventory, price, other
MANUAL FOR eclocklite TIME ATTENDANCE AND PAYROLL SOFTWARE
 MANUAL FOR eclocklite TIME ATTENDANCE AND PAYROLL SOFTWARE About eclocklite eclocklite is the kind of application software which reduces the human efforts. It keeps the records of the employee at regular
DarwiNet Client Level
 DarwiNet Client Level Table Of Contents Welcome to the Help area for your online payroll system.... 1 Getting Started... 3 Welcome to the Help area for your online payroll system.... 3 Logging In... 4
Frequently Asked Questions on EPF.
 Frequently Asked Questions on EPF. Q1.Who are required to be enrolled to PF? Any person employed directly or indirectly by the establishment, working in or in connection with the establishment, including
School Management Information System
 School Management Information System - User Guide for MIS Client Department of School Education, Haryana10-Apr-15 Versions Version Comments 1.1 New Entry, View, Upload Page 1 About School Management Information
Installing Globodox Web Client on Windows Server 2012
 Installing Globodox Web Client on Windows Server 2012 Make sure that the Globodox Desktop Client is installed. Make sure it is not running. Note: Please click on Allow or Continue for all required UAC
The purpose of this User Guide is to provide users with guidance on the following:
 LEAD MANAGEMENT Introduction The purpose of this User Guide is to provide users with guidance on the following: Creating a Lead Importing Leads Managing Leads Completing a Lead Not Proceeding Re-opening
Click on any link to get the details of accounts under that category.
 Login Page To login to Andhra Bank Internet Banking one should have the following: Login ID : Login ID is customers Customer ID Login Password : Login Password will be sent through courier to customer
Enrolment and filing of e-return in Form 4-A under Profession Tax Act
 (In Association with National Informatics Centre) User manual On e-prerana(profession Tax Enrolment Registration And Administration ) Enrolment and filing of e-return in Form 4-A under Profession Tax Act
How To Register A Power Plant On The Em Delivery Body Website
 EMR Company Registration and User Management Guidance document for EMR participants User Support Guide for EMR Company Registration and User Management 02 nd July 2015 National Grid Electricity Transmission
User Manual For Online Registration of Private Schools
 User Manual For Online Registration of Private Schools Important Instructions for the Private Schools: 1. The purpose of this web portal is to monitor RTE compliance in schools and assess 25% reservation
NHSP:Online. Uploading Agency Rates. NHSP:Online. Agency Rates Admin V2.2 Issued December 2012 Page 1 of 31
 Uploading Agency Rates Page 1 of 31 Contents Page 1.0 Getting Started...3 2.0 Notifications...6 3.0 Downloading a Blank Template...7 4.0 Filling out your rates template...8 5.0 Uploading your completed
DIGITIZATION NATIONAL POPULATION REGISTER TRAINING MANUAL (ADMINISTRATOR) 2011
 2011") DIGITIZATION OF NATIONAL POPULATION REGISTER TRAINING MANUAL (ADMINISTRATOR) 2011 CONTENT ABBREVIATIONS & ACRONYMS INTRODUCTION TO THE MANUAL PART I Introduction PART II 1.1 Introduction to NPR 1.2 Roles
DIGITIZATION OF NATIONAL POPULATION REGISTER TRAINING MANUAL (ADMINISTRATOR) 2011 CONTENT ABBREVIATIONS & ACRONYMS INTRODUCTION TO THE MANUAL PART I Introduction PART II 1.1 Introduction to NPR 1.2 Roles
Training Module for Customer Portal & Customer Care. Enabling the Next Wave of Connectivity
 Training Module for Customer Portal & Customer Care Customer Portal Interface used by the registered end user to interact with the network End user can modify Information, change Password & check the account,billing
Baylor Secure Messaging. For Non-Baylor Users
 Baylor Secure Messaging For Non-Baylor Users TABLE OF CONTENTS SECTION ONE: GETTING STARTED...4 Receiving a Secure Message for the First Time...4 Password Configuration...5 Logging into Baylor Secure Messaging...7
Guidance for completing an online application* for admissions to Primary and Secondary Schools in Cardiff Council
 Guidance for completing an online application* for admissions to Primary and Secondary Schools in Cardiff Council *This guidance relates to making an online application in English. You are strongly advised
Help Manual for online application form Faculty (Asst. Professor/Addl. Professor/Professor) Recruitment
 Recruitment") Help Manual for online application form Faculty (Asst. Professor/Addl. Professor/Professor) Recruitment 1.0 Introduction All-India Institute of Medical Sciences was established as an institution of national
Help Manual for online application form Faculty (Asst. Professor/Addl. Professor/Professor) Recruitment 1.0 Introduction All-India Institute of Medical Sciences was established as an institution of national
HOW TO GUIDE MONEY MANAGEMENT
 MONEY MANAGEMENT CONTENTS Introduction... 2 Launch Money Management... 3 Add Accounts... 4 Delete Accounts... 6 Transaction History... 7 Sorting Transaction History... 7 Deleting Transactions (Manual Only)...
Operating Manual for Organizations Posting Jobs and Student Placement Opportunities on www.workinginmentalhealth.ca
 Operating Manual for Organizations Posting Jobs and Student Placement Opportunities on www.workinginmentalhealth.ca Ministry of Health and Long-Term Care January 2006 Table of Contents Page Chapter 1:
U N I V E R S I TY. FormFire Broker Guides and Training Videos. FormFire Broker Guides. Welcome and Introduction Guide - Click to view
 F O R M F I R E U N I V E R S I TY FormFire Broker Guides and Training Videos FormFire Broker Guides Welcome and Introduction Guide - Click to view 1. New Broker Setup Guide - Click to view 2. Adding Clients
NCAA Single-Source Sign-On System User Guide
 NCAA Single-Source Sign-On System Table of Contents General Description... 1 Glossary of Terms... 1 Common Features Log In... 2 Password... 3 Log Out... 4 Tabs... 4 Buttons and Links... 4 Management and
Zenith Bank Corporate Internet Banking User Guide. Zenith Bank Corporate Internet Banking User Guide
 Zenith Bank Corporate Internet Banking User Guide 1 STEP-BY-STEP USER GUIDE The following information will help you make the most of your Corporate Internet Banking (CIB). Table of Contents i. Brief on
User Manual for Employee Management System (EMS)
") User Manual for Employee Management System (EMS) Roles and Responsibility Sr. # User Description Use 1 Administrator Department Employee at HO office. Manages Qualification Manages Pay Scale Manages Designation
User Manual for Employee Management System (EMS) Roles and Responsibility Sr. # User Description Use 1 Administrator Department Employee at HO office. Manages Qualification Manages Pay Scale Manages Designation
Online Railway Reservation. Intel Easy Steps 1 2012 Intel Corporation All rights reserved.
 Online Railway Reservation Intel Easy Steps 1 2012 Intel Corporation Online Railway Reservation Introducing Online Railway Reservation System Technology has transformed many aspects of life in the 21st
From the Start Page click on Create New Client. Alternatively, you can click on New Client within the Browse window on the left hand side
 Lead Management The purpose of this User Guide is to provide users with guidance on how to create and manage leads. The guide has been split into a number of sections for ease of reference: Creating a
Testing and Accommodation Enhancements
 Testing and Accommodation Enhancements CECAS users will notice that a set of changes to the CECAS production (live) site have occurred. The changes are: Child Demographics screen has been updated to contain
Council of Ontario Universities. COFO Online Reporting System. User Manual
 Council of Ontario Universities COFO Online Reporting System User Manual Updated September 2014 Page 1 Updated September 2014 Page 2 Table of Contents 1. Security... 5 Security Roles Defined in the Application...
Guidance for completing an online application for admission to school
 Guidance for completing an online application for admission to school This document has been compiled to assist parent(s) / carer(s) in completing an online application for their child s admission to a
Appendix A How to create a data-sharing lab
 Appendix A How to create a data-sharing lab Creating a lab involves completing five major steps: creating lists, then graphs, then the page for lab instructions, then adding forms to the lab instructions,
eschoolplus Katy Independent School District Enrollment Online
 Enrollment Online Table of Contents How to find Enrollment Online... 3 How to Register with Enrollment Online... 3 Create a New Enrollment Online Form... 3 Input/Select Data in the Form... 4 Student Information
How To Connect To Ecs.Org From A Pc Or Mac Or Ipad (For A Laptop) With A Network Connection (For Mac) With The Ipad Or Ipa (For Pc Or Ipac) With An Ipa Or Ip
 With A Network Connection (For Mac) With The Ipad Or Ipa (For Pc Or Ipac) With An Ipa Or Ip") 1) Getting a Windows username and password... 2 2) Download VPN Client... 4 3) Installing VPN... 11 4) Configure VPN... 18 5) Firewall... 20 6) Connecting using VPN... 20 7) Setting up a default connection...
1) Getting a Windows username and password... 2 2) Download VPN Client... 4 3) Installing VPN... 11 4) Configure VPN... 18 5) Firewall... 20 6) Connecting using VPN... 20 7) Setting up a default connection...
Pay your mobile bills online. Intel Easy Steps 1 2012 Intel Corporation All rights reserved.
 Pay your mobile bills online Intel Easy Steps 1 2012 Intel Corporation Online Payments: Pay your mobile bills online (Airtel*) Online Payments All of us use a number of utility services in our daily activities
How To Register A Post Matric Scholarship Scheme On Prerana.Org.In
 Prerana Post-matric scholarship Registration, Release And Network Automation Post-Matric Scholarship Scheme for ST, SC & OBC/SEBC Community Students National Informatics Centre, Orissa State Centre, Bhubaneswar
Totally Internet Based Software. System Setup. Strategy Systems, Inc. PO Box 2136 Rogers, AR 72757 (479) 271-7400
 271-7400") Totally Internet Based Software System Setup Strategy Systems, Inc. PO Box 2136 Rogers, AR 72757 (479) 271-7400 Adding Users... 1 User Information Tab... 1 Operations Tab... 2 Accounting Tab... 2 Display
Totally Internet Based Software System Setup Strategy Systems, Inc. PO Box 2136 Rogers, AR 72757 (479) 271-7400 Adding Users... 1 User Information Tab... 1 Operations Tab... 2 Accounting Tab... 2 Display
VIDEO DOCUMENTATION IEP Log in, Student List and Menu Options
 VIDEO DOCUMENTATION IEP Log in, Student List and Menu Options The July 1 st, 2013 IOWA IDEA INTEGRATED DATA SYSTEM encompasses the Child Find, IEP, IFSP and IMS applications. The two approved browsers
CHAPTER 11 LEGAL ACCOUNTING MODULE 11.0 OVERVIEW 11.1 REQUIREMENTS AND INSTALLATION. 11.1.1 Special Requirements. 11.1.
 EXTENDED SERVICE OPTIONS CHAPTER 11 11.0 OVERVIEW The Legal Accounting Module provides line item tracking of legal expenses incurred during the collection process. You can track expenses incurred by the
Table of Contents INTRODUCTION...2 HOME PAGE...3. Announcements... 6 Personalize... 7 Reminders... 9 Recent Items... 11 SERVICE CATALOG...
 Table of Contents INTRODUCTION...2 HOME PAGE...3 Announcements... 6 Personalize... 7 Reminders... 9 Recent Items... 11 SERVICE CATALOG...12 REQUEST...14 Request List View... 15 Creating a New Incident...
e-invoicing your guide to using with TNT
 e-invoicing your guide to using with TNT A For any technical assistance please email Atherstone.Helpdesk@tnt.com or call 01827 711 611 Contents welcome to e-invoicing with TNT 03 registering for e-invoicing
Answers to Cardmember questions about Online Services and statement delivery.
 Answers to Cardmember questions about Online Services and statement delivery. For more information, please contact your Program Administrator or Customer Service. Online Statements What is an Online Statement?
Charter Business Phone. Online Control Panel Getting Started Guide. Document Version 1.0
 Charter Business Phone Online Control Panel Getting Started Guide Document Version 1.0 Table of Contents 1 About This Guide...4 2 Overview...5 2.1 Online Control Panel and Call Manager... 5 3 Manual and
(In Association with National Informatics Centre) User manual. Administration )
 User manual. Administration )") (In Association with National Informatics Centre) User manual On e-prerana(profession Tax Enrolment Registration And Administration ) Filing of monthly statement in Form 5-A and the annual return in Form
(In Association with National Informatics Centre) User manual On e-prerana(profession Tax Enrolment Registration And Administration ) Filing of monthly statement in Form 5-A and the annual return in Form
Guidelines for filling up Online Application Form for Internship
 Guidelines for filling up Online Application Form for Internship Please read this guideline before filling up your online application form. For Students: STEP I: NEW USER REGISTRATION. The students who
e-tutorial Online Correction
 e-tutorial Online Correction Copyright 2012 Income Tax Department 1 Login to TRACES Click on help ion next to each field for more details For more details on any screen, click on Help icon Enter userid
Desktop Fax. Administration and Fax Management User Guide
 Desktop Fax Administration and Fax Management User Guide Table of Contents Welcome to Desktop Fax... 0 Desktop Fax Management... 0 Login to Desktop Fax... 1 Navigation... 1 Getting Started with Desktop
mywcb Online User Guide
 WCB REV NOVEMBER, 2014 mywcb Online User Guide for Employers ebusiness Support Team Phone: 780-498-7688 Fax: 780-498-7866 Email: ebusiness.support@wcb.ab.ca Hours: 8:00 a.m. to 4:30 p.m., Monday through
Banner Web Time Entry Approver s Handbook
 Banner Web Time Entry Approver s Handbook Welcome to Banner Web Time Entry The Web Time Entry system allows employees to individually log onto the mybanner.kenyon.edu secure website and enter the hours
USER MANUAL FOR STUDENTS
 USER MANUAL FOR STUDENTS 1 P age 1. Students Registration The home page of ASHIRWAD can be accessed through the URL http://punjabscholarships.gov.in which is the e-scholarship(post Matric) portal which
User Guide and Tutorial Central Stores Online Ordering System. Central Stores Financial Services Western Washington University
 User Guide and Tutorial Central Stores Online Ordering System Central Stores Financial Services Western Washington University TABLE OF CONTENTS 1. Introduction... Page 3 2. Finding and Logging into Central
Ordering Mortgage Insurance from National MI Encompass User Guide
 Ordering Mortgage Insurance from National MI Encompass User Guide Dated: August 2014 National Mortgage Insurance Corporation 2100 Powell Street 12 TH Floor Emeryville, CA 94608 www.nationalmi.com All rights
Birla Sun Life Insurance Group Protection Solutions Policy Contract UIN: 109N006V04
 This is a One Year Renewal Group Term Insurance Plan and the terms and conditions of the plan are as mentioned under this contract BSLI may amend or place endorsement/s to this Policy from time to time
(FOR OFFICE USE ONLY)
") PUNJAB NATIONAL BANK ACCOUNT OPENING FORM (All BRANCHES) The Manager, Branch Office.. Dist. No. Customer ID No: (Sole/first A/c holder only) Account No. (16 digits) FOR RESIDENT INDIVIDUALS (SINGLE/ JOINT)
PUNJAB NATIONAL BANK ACCOUNT OPENING FORM (All BRANCHES) The Manager, Branch Office.. Dist. No. Customer ID No: (Sole/first A/c holder only) Account No. (16 digits) FOR RESIDENT INDIVIDUALS (SINGLE/ JOINT)
PAYLINE USER GUIDE LOGGING INTO PAYLINE PROCESSING A PURCHASE
 Payline User Guide PAYLINE USER GUIDE Payline is a web-based payment management client that can be used to process credit card transactions manually, process refunds, set up recurring payments and generate
Schools Remote Access Server
 Schools Remote Access Server This system is for school use only. Not for personal or private file use. Please observe all of the school district IT rules. 6076 State Farm Rd., Guilderland, NY 12084 Phone:
Fairfield University Using Xythos for File Sharing
 Fairfield University Using Xythos for File Sharing Version 7.0 Table of Contents I: Manage your Department Folder...2 Your Department Folder... 2 II: Sharing Folders and Files Inside of Fairfield U...3
System Administration and Log Management
 CHAPTER 6 System Overview System Administration and Log Management Users must have sufficient access rights, or permission levels, to perform any operations on network elements (the devices, such as routers,
How to Use the ESC-20 Online Commitment Form System. How to Log Into the Commitment Form System
 How to Use the ESC-20 Online Commitment Form System The Online Commitment System provides ESC-20 clients with an online process for completing and submitting commitments for Products and Services offered
RSCCD REMOTE PORTAL TABLE OF CONTENTS: Technology Requirements NOTE
 RSCCD REMOTE PORTAL The RSCCD Remote Portal allows employees to access their RSCCD Email (via Outlook Web Access), Department (Public) Folders, Personal (H Drive) Folder, and the District Intranet from
USER MANUAL FOR ONLINE REGISTRATION & CHOICE FILLING
 USER MANUAL FOR ONLINE REGISTRATION & CHOICE FILLING NEW CANDIDATE REGISTRATION REGISTERED USER LOGIN FORGOT PASSWORD CHOICE AVAILABLE CHOICE SUBMISSION CHOICE INTERCHANGE DELETION OF MULTIPLE CHOICES