1. Get the car in the air either on a lift, on ramps, or jack stands. 2. Remove the underbody panel as if you were doing a regular oil change.
|
|
|
- Betty Quinn
- 4 years ago
- Views:
Transcription


1 Killer B Ultimate Oil Pick-Up Tube, Baffle, and Pan install on a 2011 Subaru WRX - by EFI Logics (directions should be close for all other Subaru models) 1. Get the car in the air either on a lift, on ramps, or jack stands. 2. Remove the underbody panel as if you were doing a regular oil change.


2 3. Take a look at the pan and your surroundings before diving in. Then, drain the oil.


3 4. Go back above and remove the bolt holding the dipstick tube to the head. 5. Go back under the car and loosen both engine mount bolts from the sub frame.


4 6. Lift the engine up so the engine mounts come out of the sub frame. Since we will be removing the oil pan anyway, the best place to jack it up is from the header. However, keep in mind that some aftermarket headers will need to be removed to get the pan out and in.


5 7. Once the engine mounts are removed from the sub frame, you can put in nuts with one flat end upside-down on the mounts to re-lower the engine back onto the sub frame to keep some clearance. This will help especially on those who need to remove their headers in order to make the pan switch.


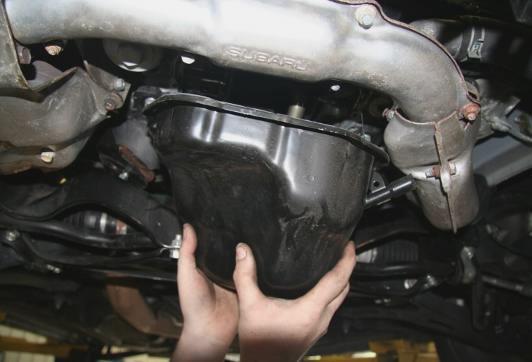
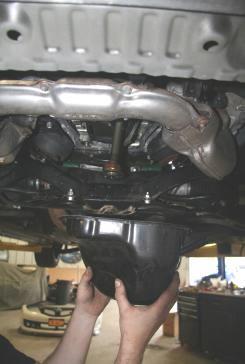
6 8. Once the engine is down and safe to work under, start removing the bolts that hold the stock pan to the engine. Most of these can be removed with a straight socket and extension; the rear bolts will need a universal connector. 9. Once the bolts are removed, you will still need to separate the pan from the engine, which is being held on by sealant. We started off with a putty knife to break the seal a bit, then you can take a flat head screw driver or small pry bar to *gently* separate the pan from the engine. Be careful not to damage either the sealing surface on the engine block or damage the pan (especially if you are not installing the Killer B pan with the pick-up tube).


7 10. Make sure to remove the dip stick tube from the pan. This should come out fairly easily if you remembered to remove the bolt above earlier. Once the sealant has been broken apart on all edges, remove the factory oil pan.
8


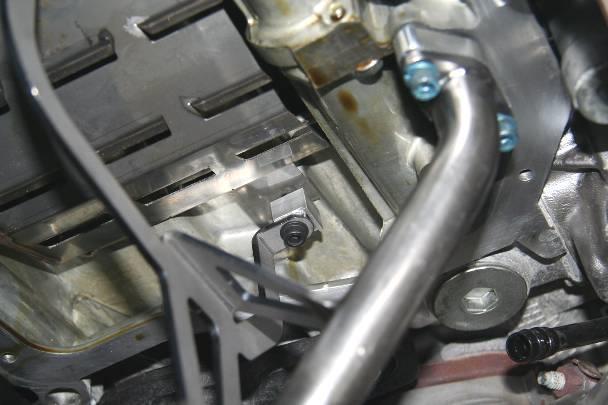
9 11. Clean the sealing surface on the block. This will need to be done on the oil pan as well if you are reusing the factory oil pan. The best way to do this is to take a flat razor blade and skim the edge at a 90 degree angle, which removes the sealant but does not risk damaging the sealing surface. Once clean of large clusters of sealant, take a piece of Scotch Brite to the sealing surface to remove any left over from the razor.


10 12. Next, remove the bolts holding in the stock oil baffle and pick-up tube. Removing these will drop more oil, so be careful to not be right underneath when they are removed. Clean up the mess and keep going!


11 13. Make sure to remove the stock o-ring for the oil pick-up tube if it didn t come off with the tube. This will be replaced with the o-ring that Killer B supplies.


12 14. Next, the final cleaning of the block with some parts cleaner make sure to spray onto a clean rag then use the rag to clean, rather than spraying directly up at the engine. Not only can this be harmful to your eyes (use protection!), but you could potentially spray the crank bearings. Nice and clean


13 15. In the box from Killer B, we have the pan, pick-up tube, baffle, spacers for the pick-up tube, hardware, and instructions. Make sure you have everything before attempting the install.


14 16. Begin installing the new parts we started with the o-rings on the dip stick tube and the baffle (using Killer B s supplied hardware and two bolts are reused from factory piece).


15 17. Then in goes the pick-up tube with the supplied hardware and o-rings. Double-check to make sure all of these bolts are properly tightened up.

16


17


18 18. Because this car has the factory exhaust manifolds, all we had to do to get the oil pan into place was remove the left (US driver) side heat shield. This allowed for enough clearance to get the pan in. Again, for some aftermarket headers, you may need to remove them for this. We do also bring the jack back in for some extra clearance if you had to remove the headers, you will just need to keep the nuts on the engine mounts and live with less space. Clean up the oil pan just as you did with the engine block and make sure you TEST FIT!
 and apply to the oil pan")

19 19. Next, take some sealant (we use Subaru 3-bond) and apply to the oil pan surface, making sure to get around all bolt holes and not to put on too little or too much.


20 20. Next, carefully place the oil pan into place remember how this was done during the test fitting to keep from removing sealant from the oil pan surface on the way in. Press firmly when in place and get a few of the bolts in on different sides of the pan to keep it from falling.


21 21. Keep screwing in the supplied bolts with an Allen socket around the pan. For the rear most bolts, these will be difficult, especially if you cannot jack up on the headers but use the universal attachment to make sure these are snug.


22


23 22. When the pan is on, make sure to line up the dip stick tube into the pan. Jack up the engine and remove the nuts from the engine mounts. Lower the engine and make sure the mounts line up into the sub frame. You should then be able to get the dip stick a bit further into the oil pan.


24 23. Go back up top and push the dipstick tube in the rest of the way. Bolt the tube back down and raise the car back up. Make sure the dipstick went in the rest of the way, then apply some of the sealant used earlier inside, making sure it s sealed (the o-rings should be sufficient, but we do this regardless). Clean off the excess sealant.

 to clean up")


25 24. If the heat shield was removed from the exhaust manifold, reattach. Put the nuts back on the engine mount studs and tighten down. You can also take a flat head screw driver and cut the rest of the sealant off once it has dried (overnight is best, but a couple hours will work) to clean up the sides of the pan. 25. Remove the oil filter to complete the oil change (or you can reuse the oil if you kept it, but we suggest often oil changes anyway! Prime the new filter and put that back on, then just add the oil. This pan should hold right around 5.5 US quarts of oil, but check the dipstick level to make sure you have the proper level and check again after the first time the engine has warmed up and cooled down. Check for leaks around the pan, and then reattach the underbody splash guard!


26 26. Enjoy your new Killer B Ultimate Pick-Up Tube, Pan, and Baffle!
FRONT BUMPER INSTALLATION INSTRUCTIONS 2007-2011 DODGE / MERCEDES SPRINTER
 Aluminess Products Inc 9402 Wheatlands Ct. #A Santee, CA 92071 619-449-9930 FRONT BUMPER INSTALLATION INSTRUCTIONS 2007-2011 DODGE / MERCEDES SPRINTER Please read before beginning Stainless steel hardware
TITAN Fuel Tanks. INSTALLATION INSTRUCTIONS G e n e r a t i o n V
 TITAN pt. no.: 02 0000 0143 Important: Please read these instructions carefully and completely before starting the installation. TITAN Fuel Tanks INSTALLATION INSTRUCTIONS G e n e r a t i o n V Extended
Important: Please read these instructions carefully and completely before starting the installation. TITAN Fuel Tanks
 TITAN pt. no.: 03 0000 0120 Important: Please read these instructions carefully and completely before starting the installation. TITAN Fuel Tanks INSTALLATION INSTRUCTIONS G e n e r a t i o n V Extended
FRONT WINDSHIELD SEAL INSTALLATION
 FRONT WINDSHIELD SEAL INSTALLATION Tech Article From Newsletter 16.1-1st Quarter of 2010 Replacing your Front Windshield Seal ISN T AS HARD AS YOU MAY THINK! Recently, we retooled our front window seal
Installation Instructions 4508 4508S
 SYMPHONY Spread Lavatory Faucet with Speed Connect Drain Congratulations on purchasing your American Standard faucet with Speed Connect drain, a feature found only on American Standard faucets. Speed Connect
CorkSport Mazdaspeed 6 Rear Sway Bar 2006-2007 Mazdaspeed 6
 CorkSport Mazdaspeed 6 Rear Sway Bar 2006-2007 Mazdaspeed 6 Pre-Installation Notes: The CorkSport Rear Sway Bar is a great addition to improving the handling performance to the Mazdaspeed 6. It will minimize
Auto-belay Cable Replacement Process
 Auto-belay Cable Replacement Process Version 2.00 WARNING: The air pressure in the auto-belay system is what causes the cable to be retracted when releasing the cable or climbing the wall with the cable
Walbro 255lph Inline Fuel Pump Install Procedure
 Walbro 255lph Inline Fuel Pump Install Procedure Note: Instructions are based on a single in tank pump with under car OEM VW filter. Total install time for a qualified technician is approximately 2 hrs.
Retrofit Instructions Installing a Sport Heated Steering Wheel - Leather, Multifunction BMW X5, E53, 2001 2006
 Retrofit Instructions Installing a Sport Heated Steering Wheel - Leather, Multifunction BMW X5, E53, 2001 2006 Disclaimer: This set of instructions is simply a guide on how I installed my own heated steering
DIY CABINET REFACING INSTALLATION GUIDE
 DIY CABINET REFACING INSTALLATION GUIDE CABINET REFACING INSTALLATION Are you ready to reface your outdated cabinets? This guide will show you how to install your new Facelifters Cabinet Refacing Products
Figure 2 The fan and shroud also needs to be removed for access to the four a/c compressor bolts and removal of the compressor from the top.
 Here are some pictures to show what s required when replacing the A/C compressor, expansion valve and receiver/drier on a 2001 Volvo V70. Even if you don t replace these A/C parts these pictures can help
CAM-03, Camshaft Assembly Oil Seal Replacement
 CAM-03, Camshaft Assembly Oil Seal Replacement Tools Jack stands Floor Jack Metric Socket set Metric Wrench set Porsche Timing Belt Tension tool (P9201) Flywheel Lock (P9206) Balance Shaft Pin Spanner
BODY-12, Door Handle - Removal, Installation, and Adjustment
 Introduction BODY-12, Door Handle - Removal, Installation, and Adjustment There are many different procedures floating around describing how to replace the door handles on a 944 and every one of them will
STEADYfast Stabilizer Installation Notes Fifth Wheel and Travel Trailers 11/23/13
 STEADYfast Stabilizer Installation Notes Fifth Wheel and Travel Trailers 11/23/13 (See Supplemental Instructions for trailers with heavy duty round footplates and/or Power Leveling Systems) PHONE SUPPORT
VW GOLF Mk4 TDI FRONT MOUNTING INTERCOOLER INSTALLATION INSTRUCTIONS
 VW GOLF Mk4 TDI FRONT MOUNTING INTERCOOLER INSTALLATION INSTRUCTIONS Tools required: 10mm/13mm socket and 3/8 drive ratchet with extension Torx T20/25/30 screwdrivers or bits Phillips head screwdriver,
INTENSE Street/Strip Shift Pak for 4T65E and 4T65E-HD Transaxles SAC 9.6.05 Visit us at www.intense-racing.com!
 INTENSE Street/Strip Shift Pak for 4T65E and 4T65E-HD Transaxles SAC 9.6.05 Visit us at www.intense-racing.com! Applications: 1998-current Grand Prix GT 1998-current Monte Carlo 1998-current other applications
Slide the new steering column shaft through the steering column from the driver compartment.
 Slide the new steering column shaft through the steering column from the driver compartment. Push the column shaft through the steering column until the machined end is out past the column lower bushing.
MGB Chrome Bumper Conversion
 MGB Chrome Bumper Conversion Installation Instructions For 1974 1/2-1980 MGB This kit requires cutting, welding, and painting. Professional installation recommended. Note: Every MGB body is slightly different
Solstice/Sky Water Pump Replacement
 Solstice/Sky Water Pump Replacement The water pump on the Solstice/Sky is starting to need replacement on some vehicles. This guide will help in replacing the water pump while the engine is still in the
SLACK PERFORMANCE KARTS
 SLACK PERFORMANCE KARTS SET UP GUIDE Thank you for purchasing a 2013 Slack Axiom Chassis. Performance Mfg. strives to provide you with the very best chassis and components on the market today. Your satisfaction
system in the world. your vehicle. We pride feedback Sincerely, President
 Thank you for purchasing a CORSA Performance exhaust system, the best premium exhaust system in the world. If this is your first CORSA Performance exhaust system, I would like to welcomee you to the CORSA
Equipped with AEM Dryflow Filter No Oil Required! INSTALLATION INSTRUCTIONS PART NUMBER 21-754DS. 2012-2015 BMW 335i 3.0L
 Equipped with AEM Dryflow Filter No Oil Required! INSTALLATION INSTRUCTIONS PART NUMBER 21-754DS 2012-2015 BMW 335i 3.0L 1 ITEM NO. PART NUMBER DESCRIPTION QTY. 1 21-2057DK AIR FILTER 1 2 9-0442 TUBE;
16 April 2012 1032011-F 1994-2002 Dodge Adjustable Track bar with Relocation Bracket 1
 16 April 2012 1032011-F 1994-2002 Dodge Adjustable Track bar with Relocation Bracket 1 BD Adjustable Track Bar w/bracket Dodge 2500-3500 4WD Models 1994-2002 Dodge 1500 4WD Model 1994-2001 P/N# 1032011-F
Replacing the noisy cooling fan in ICOM IC-2KL by Bert Almemo, VE3OBU/SM7BUR
 Replacing the noisy cooling fan in ICOM IC-2KL by Bert Almemo, VE3OBU/SM7BUR The following describes how to replace the cooling fan for a quieter one in the IC-2KL with as little effort as possible. The
TABLE OF CONTENTS. Section 1 - Assembling your new pit bike.
 Orion Pit Bike Sales Owners Manual (All information and content is the property of Orion Pit Bike Sales. Any attempt to copy or resell is a direct violation of our copyright. All violators will be prosecuted)
Making a Rain Barrel at Home
 Making a Rain Barrel at Home This is a step by step guide to making your own rain barrels. Constructing a rain barrel is a pretty simple project that helps conserve water and protects the environment.
How To Change Your Oil and Filter-Suzuki GS by BassCliff (a.k.a. BikeCliff)
") How To Change Your Oil and Filter-Suzuki GS by BassCliff (a.k.a. BikeCliff) By popular demand I have undertaken the task of documenting one of my recent oil and filter changes on my GS850GT. I hope you
How To Change Your Oil and Filter-Suzuki GS by BassCliff (a.k.a. BikeCliff) By popular demand I have undertaken the task of documenting one of my recent oil and filter changes on my GS850GT. I hope you
LG G5 Chassis Brace Gen 5 Camaro THE MOST POWERFUL HEADERS ON THE PLANET Brought to you by LG Motorsports 972-429-1963
 LG G5 Chassis Brace Gen 5 Camaro THE MOST POWERFUL HEADERS ON THE PLANET Brought to you by LG Motorsports 972-429-1963 Thank you for purchasing LG Motorsports products for your Gen 5 Camaro. Parts Inventory:
Finding and Fixing Oil leaks on the LT5 Engine Marc Haibeck
 Finding and Fixing Oil leaks on the LT5 Engine Marc Haibeck Most LT5 s drip oil on the floor by the time 10,000 miles are covered. This may be disappointing, but it is not as bad as it may seem. Here s
COOPER S PULLEY UPGRADE KIT INSTALLATION INSTRUCTIONS PART NUMBER NME5011
 COOPER S PULLEY UPGRADE KIT INSTALLATION INSTRUCTIONS PART NUMBER NME5011 Below are instructions for the Mini Mania Pulley Upgrade Kit, Part Number NME5011. Please take all necessary precautions for working
Softail Oil Change. Tools
 From time to time I see question on the forum regarding doing an oil change on a Harley and more specifically about doing a scavenging oil change on a Softail. Since there didn't seem to be a good thread
XL PREMIUM OIL COOLER KIT
 -J05 REV. 0-0-0 XL PREMIUM OIL COOLER KIT GENERAL Kit Number 0008 Models For model fitment information, see the P&A Retail Catalog or the Parts and Accessories section of www.harley-davidson.com (English
2003 ACCORD - Automatic Transmission Removal
 2003 ACCORD - Automatic Transmission Removal Special Tools Required Engine support hanger, A and Reds AAR-T-12566 Engine hanger balancer bar VSB02C000019 Front subframe adapter VSB02C000016 These special
Installation Guide for the TJ LCG PRO Suspension System (Low Center of Gravity) Available 4 or 5
 Available 4 or 5") INSTALLATION GUIDE Installation Guide for the TJ LCG PRO Suspension System (Low Center of Gravity) Available 4 or 5 Take every precaution to make this installation a safe procedure. Make safety the number
INSTALLATION GUIDE Installation Guide for the TJ LCG PRO Suspension System (Low Center of Gravity) Available 4 or 5 Take every precaution to make this installation a safe procedure. Make safety the number
with installation dynafact boost GAUGE this manual is for use with systems 64050-64054
 owners manual with installation instructions dynafact boost GAUGE this manual is for use with systems 64050-64054 GENERAL INSTALLATION PRACTICES This manual is an installation guide for all 1. Banks DynaFact
Tooling List 17mm Socket 17mm Wrench 24mm Wrench 26mm Wrench 3/8 Drive Ratchet Torque Wrench
 Thank you for purchasing the CorkSport Rear Adjustable Camber Arms. By replacing your OEM camber arms with the CorkSport Adjustable Camber Arms, you will be able to dial in your suspension with +/- 5 degrees
Written By: Walter Galan
 ipad 2 GSM Front Panel Replacement Replace the front panel in your ipad 2 GSM. Written By: Walter Galan INTRODUCTION Note: this is a complete guide for replacing a plain front panel. If you have a Front
Convertible Top Hydraulic Cylinder Removal Manual for W124 E-Class Convertibles 1993-1995 Models 300CE (1993) and E320 (1994-1995)
 and E320 (1994-1995)") Convertible Top Hydraulic Cylinder Removal Manual for W124 E-Class Convertibles 1993-1995 Models 300CE (1993) and E320 (1994-1995) Written by Samit Ghosh with picture material from vexed of benzworld.org
Convertible Top Hydraulic Cylinder Removal Manual for W124 E-Class Convertibles 1993-1995 Models 300CE (1993) and E320 (1994-1995) Written by Samit Ghosh with picture material from vexed of benzworld.org
www.cornholesupplies.com
 www.cornholesupplies.com How To Build Regulation Cornhole Boards Home of the Original Cornhole Bags and Boards Supply List: 1-4' X 8' Piece of Plywood (pre sanded) 4-2" X 4" X 8' Studs (2 by 4s make sure
TRANSMISSION INSTALLATION CONTENTS
 A Regal Beloit Company TRANSMISSION INSTALLATION CONTENTS RICHMOND 6-SPEED AND SUPER STREET 5-SPEED WITH OVER DRIVE TRANS AM, CAMARO, CHEVELLE, GTO, CUTLASS, WITH T-10/MUNCIE....2 RICHMOND 6-SPEED 1963
Cylinder head gasket, replacement
 "VCC065612 EN 20110604" 1(7) Cylinder head gasket, replacement Special tools: 999 5098 Disconnect battery earth lead Drain coolant Remove heat shield over exhaust manifold. (Only the two bottom bolts on
Written By: Walter Galan
 Installing iphone 4S Display Assembly Written By: Walter Galan TOOLS: Phillips 00 Screwdriver (1) Plastic Opening Tools (1) PARTS: iphone 4S Display Assembly (1) iphone 4 and 4S Screen Protector (1) Small
Folding Bath Screen Instruction Manual
 Folding Bath Screen Instruction Manual Consumer Guarantee - Please make sure the purchaser/end user completes and returns the Guarantee card which is enclosed with this product. Failure to validate the
AWE Tuning Air/Air Intercooler Kit for 2000-04 Audi 2.7T
 AWE Tuning Air/Air Intercooler Kit for 2000-04 Audi 2.7T Congratulations on your purchase of the AWE Tuning Intercoolers for your 2.7T Audi. Hundreds of hours of design and operational testing were spent
Dive Rite 200 & 300 Bar Isolator Manifold Service Manual
 Dive Rite 200 & 300 Bar Isolator Manifold Service Manual Principal Photography and Text by Pete Nawrocky Copyright 2003 Lamartek Inc. D/B/A Dive Rite 0 Warning This manual is only to be used as a guide
How To: Retrofit the Morimoto Mini D2S bi-xenon Projectors
 How To: Retrofit the Morimoto Mini D2S bi-xenon Projectors Warning: By reading this document I agree that it is only intended to be used as an educational guide. The Retrofit Source Inc. makes no guarantee
Black Wolf POCKET BILLIARD TABLE INSTALLATION MANUAL. SERVICE DEPARTMENT P.O. BOX 68 BRISTOL, WI 53104
 Black Wolf TM POCKET BILLIARD TABLE INSTALLATION MANUAL www.brunswickbilliards.com SERVICE DEPARTMENT P.O. BOX 68 BRISTOL, WI 53104 51-905710-000 SEPTEMBER 2010 NOTE: Please use the instructions in this
INSTALL/REMOVAL INSTRUCTIONS: WINDOW LIFT MOTOR
 REMOVAL/INSTALL OF WINDOW LIFT MOTOR (742-273) Ford Expedition 1997 2002, Lincoln Navigator 1998 2002, Ford F-150 Super Crew Cab 2001 General Tech Tips: Use painter s tape rather than duct tape to secure
1.8 CRANKSHAFT OIL SEALS
 SERIES 60 SERVICE MANUAL 1.8 CRANKSHAFT OIL SEALS An oil seal is fitted between each end of the crankshaft and the bores of the flywheel housing and gear case cover to retain the lubricating oil in the
INSTRUCTIONS. FLHR/C/S (Road King) FRONT END LOWERING KIT 1WARNING -J03242 REV. 10-19-04. General. Removal (Left and Right Forks) Kit Number 54614-05
 FRONT END LOWERING KIT 1WARNING -J03242 REV. 10-19-04. General. Removal (Left and Right Forks) Kit Number 54614-05") INSTRUCTIONS -J04 REV. 0-9-04 General FLHR/C/S (Road King) FRONT END LOWERING KIT This kit is designed for installation on 00 and later FLHR/C/S Model Motorcycles. Road King models use the conventional
INSTRUCTIONS -J04 REV. 0-9-04 General FLHR/C/S (Road King) FRONT END LOWERING KIT This kit is designed for installation on 00 and later FLHR/C/S Model Motorcycles. Road King models use the conventional
3. SEISCO PARTS & SERVICE REMOVAL AND REPAIR GUIDE
 4 3. SEISCO PARTS & SERVICE REMOVAL AND REPAIR GUIDE A. Changing the Control Board B. Replacing a Heating Element C. Thermistor Replacement D. High Limit Switch Replacement E. Level Detector Replacement
BUGGY SETUP GUIDE. Volume GOKARTSUSA GY6 150, CN250. Buggy Setup Guide
 BUGGY SETUP GUIDE Volume 1 GOKARTSUSA GY6 150, CN250 Buggy Setup Guide GY6 150, CN250 DUNE BUGGY Buggy Setup Guide GOKARTSUSA.COM 2000 Highway 50 S. Lake Tahoe, CA 96150 Phone 800.603.1437 2 Table of Contents
The Ford Model A Water Pump
 The Ford Model A Water Pump George Washington Chapter, Inc. 3903 Old Lee Highway Fairfax, VA 22030 1 Table of Contents Introduction/Specifications.. 3 1. Water Pump Inspection and Removal. 4 a. Removal..
2002 2005 Mini Cooper S Grille Install Instructions
 2002 2005 Mini Cooper S Grille Install Instructions Lower Front Grille BEFORE AFTER Package Contents 1 perforated grille (Stiletto, RAZR, or Monster) 6 Zip Tie Mounting Pads 1 is for the temp. sensor 5
Things you need to assemble the tube actuator. Left to right. are small piece of masking tape, super glue,pen knife and small
 Things you need to assemble the tube actuator. Left to right are small piece of masking tape, super glue,pen knife and small crosspoint screwdriver. You will also need a few drops of light oil. Begin by
Instruction Manual. Please read the manual carefully before installing and using this product. This product is for off road use only.
 Instruction Manual Please read the manual carefully before installing and using this product. This product is for off road use only. PARTS 1. LIST BLOW OFF VALVE 1 5. GASKET 1 2. VACUUM HOSE 4.5φ 1 6.
REMOVAL AND INSTALLATION
 303-01C-1 REMOVAL AND INSTALLATION Engine Body On Special Tool(s) Adapter For 303-D043 303-D043-02 or equivalent Special Tool(s) 303-01C-1 Turbocharger Lifting Bracket 303-1266 Wrench, Fan Clutch Nut 303-214
INSTALLATION MANUAL. Installation Instructions
 INSTALLATION MANUAL Power-Pole Signature Series Shallow Water Anchor Installation Instructions CAUTION: Read this instruction manual carefully. Become familiar with the controls and know how to operate
»Product» Safety Warning
 C1200 Installation Instructions 2007-2016 Chevy/GM 1500 2/4wd 2" Strut Spacer Lift Read and understand all instructions and warnings prior to installation of product and operation of vehicle. Zone Offroad
Power Window/Power Lock Installation. To begin with you will need all the parts listed below:
 Power Window/Power Lock Installation To begin with you will need all the parts listed below: From Donor Fiero: Fiero power window regulators Power window motors (Generic GM type part) -motors are riveted
BMW E46 Convertible Bow Cylinder replacement guide
 BMW E46 Convertible Bow Cylinder replacement guide There is nothing better than a BMW convertible, until uh oh... what s that? You find a wet spot on the cover or rear deck. You clean it and it comes back.
M-9424-463V Intake Manifold INSTALLATION INSTRUCTIONS
 Please visit www.fordracingparts.com for the most current instruction information!!! PLEASE READ ALL OF THE FOLLOWING INSTRUCTIONS CAREFULLY PRIOR TO INSTALLATION. AT ANY TIME YOU DO NOT UNDERSTAND THE
INGROUND, ROPED, AND HOLELESS JACK SEAL REPLACEMENT
 D. L. Martin Company INGROUND, ROPED, AND HOLELESS JACK SEAL REPLACEMENT TYPICAL HYDRAULIC JACK HEAD ASSEMBLY 1 TOOLS REQUIRED: 1) Container to hold hydraulic fluid. 2) Clean rags and protective covers
ADDING AN ELECTRIC AUXILIARY FAN TO RADIATOR STACK ON 03 ALPINE COACH
 ADDING AN ELECTRIC AUXILIARY FAN TO RADIATOR STACK ON 03 ALPINE COACH The original design of the 03 Alpine Coaches (and perhaps other years as well) did not include any kind of engine fan engage mechanism
Post Mount Light Installation*
 Post Mount Light Installation* *For the general installation of most Post Mount Spotlights, many vehicles may need slight modifications to these instructions. You will need the following tools: High torque
INSTALL/REMOVAL INSTRUCTIONS: WINDOW REGULATOR
 REMOVAL/INSTALL OF WINDOW REGULATOR (748-547) Chrysler 300 2005 10, Dodge Magnum 2005 08, Dodge Charger 2006 09 General Tech Tips: Use painter s tape rather than duct tape to secure window. It will not
Replacing the handbrake drum/rear output shaft oil seal. Series models.
 Replacing the handbrake drum/rear output shaft oil seal. Series models. You may notice oil coming out of your handbrake (transmission brake) drum. This will in all probability be a leak from the gearbox
How To Install Your Frameless Shower Enclosure
 How To Install Your Frameless Shower Enclosure a) Installing Single Frameless Door Side Mounted Wall Hinges b) Installing Frameless Door with In-Line Panel c) Installing Frameless Door Between In-Line
1000-LB. TRAILER JACK OWNER S MANUAL
 1000-LB. TRAILER JACK OWNER S MANUAL WARNING: Read carefully and understand all INSTRUCTIONS before operating. Failure to follow the safety rules and other basic safety precautions may result in serious
Volkswagen New Beetle 2.0 Liter 4-cyl General, Engine (Engine Code AEG) 17 Engine-Lubrication system (Page GR-17)
 17 Engine-Lubrication system (Page GR-17)") 17 Engine-Lubrication system (Page GR-17) Lubrication system components, removing and installing Oil pan, removing and installing Oil pressure and oil pressure switch, checking Dynamic oil pressure warning
17 Engine-Lubrication system (Page GR-17) Lubrication system components, removing and installing Oil pan, removing and installing Oil pressure and oil pressure switch, checking Dynamic oil pressure warning
Contents. Front Derailleurs... 2. Part One - Planning... 2 I. Objectives... 2 II. Materials Needed... 2 III. Setting...2 IV. Evaluation...
 Contents... 2 Part One - Planning... 2 I. Objectives... 2 II. Materials Needed... 2 III. Setting...2 IV. Evaluation... 2 Part Two - Activity Instructions... 3 Steps to Adjusting and Replacing... 3 Disassemble...
MGA Alternator Conversion
 MGA Alternator Conversion Installation Instructions For 1955 to 1962 MGA PART # 130-078 and #130-088 440 Rutherford St. P.O. Box 847 Goleta, CA 93117 1-800-667-7872 FAX 805-692-2525 www.mossmotors.com
PARTS NEEDED FOR CONVERTING FROM LP TO NG
 1 6 7 8 3 5 4 10 9 2 PARTS NEEDED FOR CONVERTING FROM LP TO NG Number Description 1 30" NG Manifold 2 NG side burner valve 3 NG Regulator 4 Rear I/R NG orifice 4 Rear I/R NG orifice 5 Side burner NG orifice
Mercedes W208 (CLK 99 03) Case Cover Lock/Rear Bow Lock Replacement and Hydraulic Fluid Flush
 Case Cover Lock/Rear Bow Lock Replacement and Hydraulic Fluid Flush") Mercedes W208 (CLK 99 03) Case Cover Lock/Rear Bow Lock Replacement and Hydraulic Fluid Flush Because a convertible is only cool if the top goes down. Version 1.0 August 9, 2012 by joetwa Table of Contents
Mercedes W208 (CLK 99 03) Case Cover Lock/Rear Bow Lock Replacement and Hydraulic Fluid Flush Because a convertible is only cool if the top goes down. Version 1.0 August 9, 2012 by joetwa Table of Contents
Build Your Own Solar Car Teach build learn renewable Energy! Page 1 of 1
 Solar Car Teach build learn renewable Energy! Page 1 of 1 Background Not only is the sun a source of heat and light, it s a source of electricity too! Solar cells, also called photovoltaic cells, are used
Navico-Northstar 2kW JRC Radar Package, Scanner Cable Removal and Replacement
 Navico-Northstar 2kW JRC Radar Package, Scanner Cable Removal and Replacement This work instruction describes the methods and means for which to remove and reinstall optional scanner cable configurations
SPRITE and BIGFOOT DESKTOP CNC MACHINE KIT ASSEMBLY INSTRUCTIONS
 SPRITE and BIGFOOT DESKTOP CNC MACHINE KIT ASSEMBLY INSTRUCTIONS README FIRST: Thank you for purchasing your MyDIYCNC Desktop CNC Machine Kit. We hope this versatile and innovative machine brings you many
Before installation it is important to know what parts you have and what the capabilities of these parts are.
 INSTALLATION GUIDE Before installation it is important to know what parts you have and what the capabilities of these parts are. The Recon XZT is the smallest and most powerful gauge of its kind. With
Awning Instructions. Standard Manual 1.5m to 4.5m
 Awning Instructions Standard Manual 1.5m to 4.5m English Standard Manual Instructions Contents Warning 1.5m 3.0m Awnings 4 x Expansion bolts (2 per bracket)** 2 x brackets 1 x Awning 1 x Winder handle
specializing in AIR CONDITIONING, PARTS AND SYSTEMS for your classic vehicle PERFECT FIT IN-DASH HEAT/ COOL/ DEFROST 1967-72 CHEVROLET PICKUP
 specializing in AIR CONDITIONING, PARTS AND SYSTEMS for your classic vehicle PERFECT FIT IN-DASH HEAT/ COOL/ DEFROST 1967-72 CHEVROLET PICKUP CONTROL & OPERATING INSTRUCTIONS The controls on your new Perfect
Installation Directions for RubberForm Recycled Products Spill Berms
 Installation Directions for RubberForm Recycled Products Spill Berms 1. Tools Needed: a. Broom, mop, vacuum and cleaning solutions (green floor cleaner) If available, a Power-washer with hose if available
TUTORIAL. REbUILdING. REAR CALIpER O-RING CONVERSION CORVETTE 1965-82. Part #: HT-2
 Part #: HT-2 1965-82 CORVETTE O-RING CONVERSION REAR CALIpER REbUILdING TUTORIAL Choosing a Brake Caliper Rebuild Kit Standard Lip Seals vs. O-Ring Seals Lip seal design seals are used on 1965-1982 Corvette
TUTORIAL. REbUILdING. front CALIpER O-RING CONVERSION CORVETTE 1965-82. Part #: HT-1
 Part #: HT-1 1965-82 CORVETTE O-RING CONVERSION front CALIpER REbUILdING TUTORIAL Choosing a Brake Caliper Rebuild Kit Standard Lip Seals vs. O-Ring Seals Lip seal design seals are used on 1965-1982 Corvette
Installing RNS-E SAT NAV for Audi A4
 As one of the major options on the A4 you can get a DVD Satellite Navigation System call the RNS-E. With the help of ebay these sat nav systems are now available to by at a rough cost of 650 plus the cost
Firewall Cover Installation Instruction Sheet
 Firewall Cover Installation Instruction Sheet Please Read Carefully Our Firewall cover is designed to fit on the stock strut brace. If you have an aftermarket strut brace than it is you re responsibility
Volkswagen Jetta, Golf, GTI 1999, 2000 Brake System 46 Brakes - Mechanical Components (Page GR-46)
") 46 Brakes - Mechanical Components (Page GR-46) Front brakes Brake pads, removing and installing Brake pads, removing and installing FN 3 brake caliper, servicing FS III brake caliper, servicing Rear wheel
46 Brakes - Mechanical Components (Page GR-46) Front brakes Brake pads, removing and installing Brake pads, removing and installing FN 3 brake caliper, servicing FS III brake caliper, servicing Rear wheel
6 inch A-Arm Lift Kit WARNING: 16-018/16-019. installation instructions. will fit CLUB CAR DS. included:
 Revised May 205 6-08/6-09 6 inch A-Arm Lift Kit will fit CLUB CAR DS installation instructions included: Rear Lift Blocks Main Suspension Assembly Spindles A-Arms Rear Shock Mounting Plates U-Bolts WARNING:
MFH-5057 Ford Small-Block V-8 Fresh Water Cooling Kit Instructions
 MFH-5057 Ford Small-Block V-8 Fresh Water Cooling Kit Instructions MONITOR PRODUCTS, INC. 15400 Flight Path Dr Brooksville, FL 34604 Tel: 1-800-334-4591 or 352-544-2620 Sales: ext 201 Technical Support:
INSTRUCTIONS AND PARTS LIST FOR MODEL 70H & 75H HAND-OPERATED HYDRAULIC PRESS
 INSTRUCTIONS AND PARTS LIST FOR MODEL 70H & 75H HAND-OPERATED HYDRAULIC PRESS SETTING UP THE PRESS FOR OPERATION For shipping convenience, the gauge, pump handle, hoist crank, screw nose and base angles
SECTION G2: CABLE PROCESSOR MODULE MAINTENANCE
 SECTION G2: CABLE PROCESSOR MODULE MAINTENANCE Cable Processor Module overview WARNING! When tipping the Cable Processor Module back, (after removing the toggle arm pin), use extreme caution not to drop
This is the civilian transfer case with the cooling loop only found in the driven gear half of the front case.
 INTRODUCTION The Transfer case used in the AMG Hummer is a New Venture Gear, model 242. This case has been in use for the H-1/Hummer since the early 1990 s. There have been modifications to the internal
Pole Lathe and Shave Horse Design
 Pole Lathe and Shave Horse Design These pictures and accompanying words are Copyright Michael Hughes February 2002. They are not to be re-produced, in part or whole, without permission from the author.
Written By: Walter Galan
 ipad 2 GSM Rear Camera Replacement Replace the rear camera in your ipad 2 GSM. Written By: Walter Galan INTRODUCTION Use this guide to replace a broken rear camera. TOOLS: ifixit Opening Picks set of 6
Cable Drum Installation
 20 Cable Drum Installation COUNTERBALANCE None Shake the TorqueMaster spring tube gently to extend the winding shafts out about 5" on each side. For single spring applications, there will be no left hand
92-00 Civic/ 94-01 Integra/ 93-97 Del Sol/ 92-95 CRX Rear Kit Part No. 75540
 92-00 Civic/ 94-01 Integra/ 93-97 Del Sol/ 92-95 CRX Rear Kit Part No. 75540 www.airliftperformance.com MN-514 (06409) NPR 4762 Please read these instructions completely before proceeding with installation
No Rainfall Data is Collected
 No Rainfall Data is Collected There are a number of issues that can cause the system to not collect rainfall data, from clogged collectors to hardware failure or improper part replacement. The most common
Written By: Walter Galan
 ipad 2 GSM LCD Replacement Replace the LCD in your ipad 2 GSM. Written By: Walter Galan INTRODUCTION Use this guide to replace a broken LCD. TOOLS: iopener (1) Phillips #00 Screwdriver (1) Plastic Opening
Premier & Deluxe 3-Season Room Sliding Glass Door
 DTSSGD-11 Premier & Deluxe 3-Season Room Sliding Glass Door Installation Instructions Screen Door Seal Left Side Track Top Track Assembly Right Side Track Right Side Trim Sliding Glass Door Sliding Screen
Cleaning & Sanitisation
 Cleaning & Sanitisation Notice: The information and/or procedures presented in the following demonstration(s) should be performed by a trained Water Cooler Service Technician only. Never attempt to service