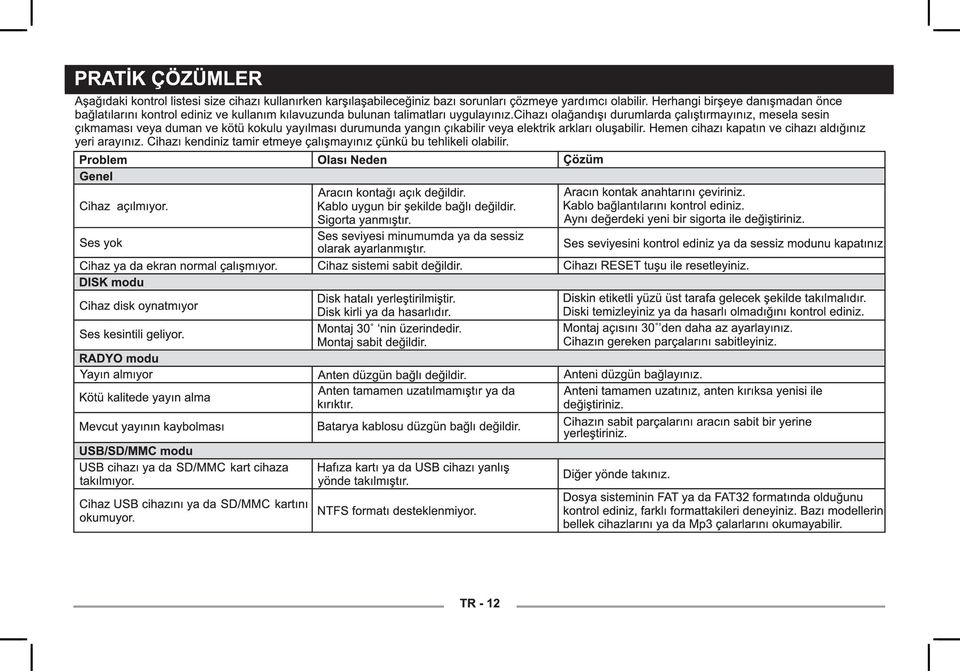
Cihazý açma: Ön paneldeki ve tuþlarýndan herhangi birine basýnýz. 1. Çýkarma
|
|
|
- Priscilla Douglas
- 8 years ago
- Views:
Transcription
1
2

3 Cihazý açma: Ön paneldeki ve tuþlarýndan herhangi birine basýnýz 1. Çýkarma

4

5 Radyo ayarlarý

6

7
8

9 Vol Modu Vol LAST: En son ayarlý sesi güç tekrar açýldýðýnda eski haline getirmektedir. Vol Adj:tuþuna basýldýðýnda ise her zaman ayný ses seviyesi ile açýlmaktadýr.

10

11
12
13
14

15

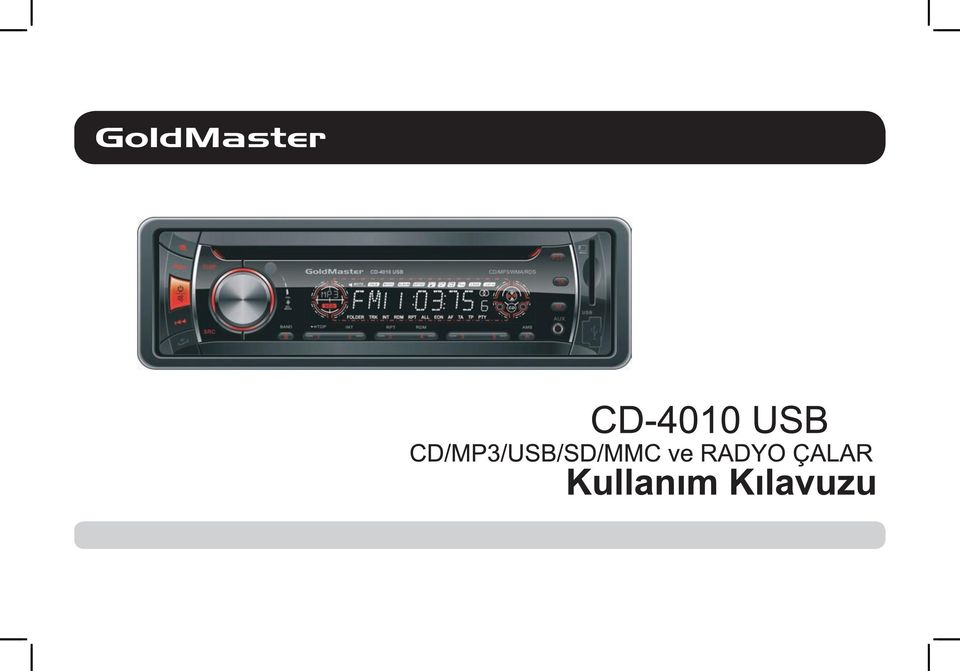
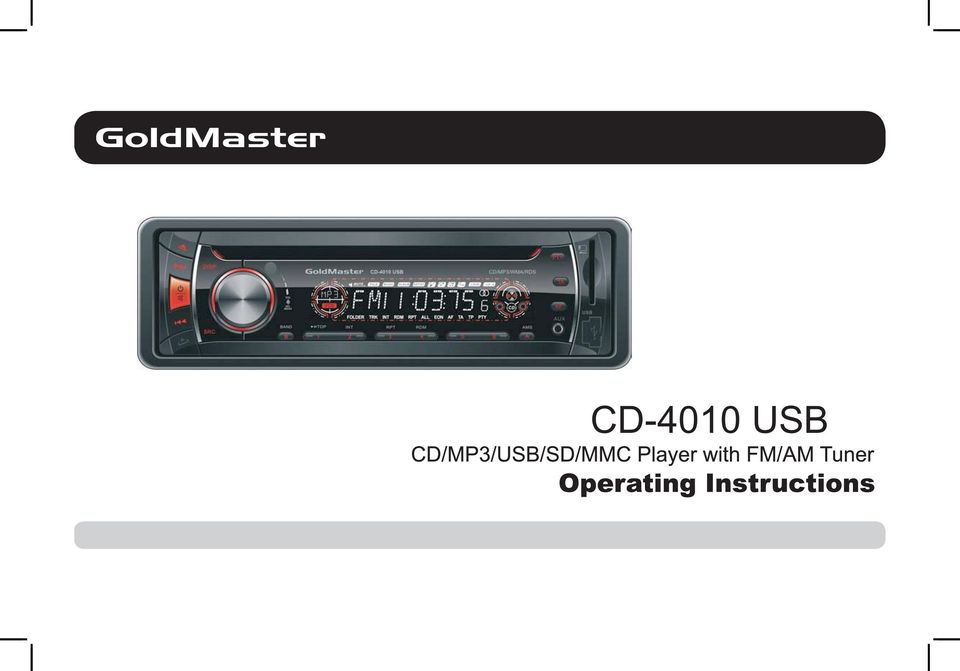
16 CD-4010 USB
17 Safety Information Thank you for purchasing this product. Please read this manual carefully before operating and reserve it for future reference. PRECAUTIONS Use only in a 12-volt DC negative-ground electrical system. When replacing the fuse, be sure to use one with an identical amperage rating. Using a fuse with a higher amperage rating may cause serious damage to the unit. DO NOT attempt to disassemble the unit. Laser beams from the optical pickup are dangerous to the eyes. Make sure that pins or other foreign objects do not get inside the unit, they may cause malfunctions, or create safety hazards such as electrical shock or laser beam exposure. If you have parked the car for a long time in hot or cold weather, wait until the temperature in the car becomes normal before operating the unit. Keep the volume at a level at which you can hear outside warning sound (horns sirens, etc.). CD Notes Playing a defective or dusty CD can cause dropouts in sound. Hold CDs as illustrated. Do not touch the unlabeled side. Do not attach any seal, label or data protection sheet to either side of a disc. Do not expose a CD to direct sunlight or excessive heat. Wipe a dirty CD from the center outward with a cleaning cloth. Never use solvents such as benzene or alcohol. This unit cannot play 3-inch ( 8cm ) CDs. NEVER insert a 3-inch CD contained in the adapter or an irregularly shaped CD. The unit may not be able to eject it, resulting in malfunction. Before Operation Do not raise the volume level too much, as this will block outside sounds, making driving dangerous. Stop the car before performing any complicated operation. CAUTION DO NOT open covers and do not repair yourself. Consult the dealer or an experienced technician for help. EN - 1 Contents Safety Information...1 Panel Controls...2 Remote Controls...3 General Operation...4 Tuner Operation...4 RDS (Radio Data System)...5 CD Player Operation...6 Playing MP3/WMA Files...7 Menu Function...8 USB/SD/MMC MP3 Playback...9 Electrical Connections...10 Installation Guide...11 Anti-Theft System...12 Troubleshooting...13 Specifcations...14 * In addition to ordinary CDs, this unit can playback CD-R or CD-RW, MP3.

18 Panel Controls Power on : Press any button on the panel except and to turn on the unit. PTY TA AF 1. - Disc eject 2. - Power on / off (long press) - Mute 3. - Radio tune - Track seek 4. - Panel release 5. SRC - Radio - Disc play (when disc inserted) - USB (when USB connected) - Card (when SD/MMC card inserted) - Aux-in 6. - Band switch: FM1,FM2,FM3,AM1(MW1),AM2(MW2) 7. Disc playback - Button 1: Play/Pause Top play (press more than 2 sec.) - Button 2: Intro play (10 sec.) - Button 3: Track repeat play - Button 4: Track random play - Button 5: - MP3 folder down (If there are more than 1 folders) - MP3 track -10 down (long press) - Button 6: - MP3 folder up (If there are more than 1 folders) - MP3 track +10 up (long press) Radio preset 1~6 - Press to tune in a preset station. - Hold for more than 2 seconds to store station AMS: Radio preset scan/radio auto preset - SEARCH: MP3 track/fle/character search EN Aux-in jack USB connector SD/MMC card slot Program type Traffc announcements identifcation REG on/off - Alternative frequency Disc slot Remote sensor Rotate the knob to adjust volume level. - Push to select VOL/BAS/TRE/BAL/FAD, rotate the knob to adjust level. - Press more than 2 seconds to enter menu mode Time display/adjust
 - Button 3: Track repeat play - Button 4: Track random play - Button 5: - MP3 folder down (If there are more than 1 folders) - MP3 track -10 down (long press) - Button 6: - MP3 folder up (If there")
19 Remote Controls Operating range Point the remote control unit to the remote sensor when you operate with it. The remote control can operate within a distance of 3~5m. RemoteSensor 1. - Power on/off 2. - Volume 3. - Mute 4. - Press to select VOL/BAS/TRE/BAL/FAD, use volume button to adjust level. - Press and hold it to enter Menu mode Traffc announcements identifcation 6. - Alternative frequency - REG on/off (long press) 7. - Disc Playback Button 1: - Play/Pause - Top play (press more than 2 sec) Button 2: - Intro play (10 sec) Button 3: - Track repeat play Button 4: - Track random play Button 5: - MP3 folder down - MP3 track -10 down (long press) Button 6: - MP3 folder up - MP3 track +10 up (long press) - Radio Preset Press to listen to a preset station. Press and hold to store station Radio tune/track seek 9. - Radio/Disc (when disc is in)/usb (when USB is connected)/card(sd/mmc card inserted)/aux-in 10.- AMS: Radio preset scan/radio auto preset - SEARCH: MP3 track/fle/character search 11.- Band switch: FM1, FM2, FM3, MW1, MW Program type 13.- Display switch EN - 3 Replacing the lithium battery of remote control unit. When the range of the operation of the card remote control becomes short or no functions while operating. Replace the battery with a new lithium battery. Make sure the battery Polarity replacement is correct. 1. Pull out the battery holder while pressing the stopper. 2. Insert the button-type battery with the stamped(+) mark facing upward. Insert the battery holder into the remote control. WARNING: (CR 2025 ) Store the battery in place where children cannot reach. If a child accidentally swallowed the battery, consult a doctor immediately. Do not recharge, short, disassemble or heat the battery or dispose it in a fire. Doing this may cause the battery to give off heat, crack or start a fre. Do not leave the battery with other metallic materials or poke the battery with tweezers or similar tools. When throwing away or saving the battery, wrap it in tape and insulate.
 Button 2: - Intro play (10 sec) Button 3: - Track repeat play Button 4: - Track random play Button 5: - MP3 folder down - MP3")
20 General Operation Power On/Off Button Press the button to turn the unit on when the vehicle ignition switch is on. Press and hold the button to turn the unit off. Adjust Volume level Rotate the VOL/MENU control to adjust volume level. Rotate it clockwise to increase and anticlockwise to decrease the volume. Audio Mute Press the button to mute the volume from the system. MUTE will appear on the display panel and the volume will be muted. Press the button again, or rotate or press the VOL/ MENU control to return the volume level to the setting in use before the Mute function was activated. Audio Controls To adjust the bass, treble, balance and fader, press the VOL/MENU control until the appropriate audio control appears on the display panel. Within fve seconds, rotate the VOL/MENU control to adjust the audio settings for the selected function. Mode Button (SRC) Press the SRC button to change between Radio, DISC (when disc is in), USB (when USB is connected), Card(when SD/MMC card is in) or AUX play, etc. Auxiliary Input To access an auxiliary device: 1. Connect the portable audio player to the AUX interface on the front panel. 2. Press the SRC button to select Aux-In mode. Press SRC again to cancel Aux-In mode and go to the next mode. Setting the Clock The correct time of day can be set by pressing and holding the DISP button. To set the clock, perform the following steps: 1. Turn the vehicle ignition and radio on. 2. Press the DISP button to view the clock. 3. With the clock visible on the display, press and hold the DISP button until the time display fashes. 4. Within 5 seconds, rotate the VOL/MENU control counter clockwise to adjust the minutes to the desired setting. To change the hour, rotate the VOL/MENU control clockwise to adjust the hour to the desired time. Tuner Operation Band During radio play, press the BAND button to choose between three FM, two MW bands. The indication MW, FM appears on the display panel according to your selection. Up Tuning Press the seek up >> button to tune stations upward step-by-step. The current frequency will be shown in digital format on the display panel. Press and hold the seek >> button to the next available station. Down Tuning Press the seek down << button to tune stations downward step-by-step. Press and hold the seek down << button to the previous available station. Auto Store Press the AMS button to scan preset stations 1-6. Hold it to automatically select six strong stations and store them in the current band. The new stations replace stations already stored in that band. To restore the original preset stations, press both DISP and 3 buttons on the panel more than 2 seconds, the unit will load the factory radio settings and power off. EN - 4

21 RDS (Radio Data System) RDS service availability varies with areas. Please understand if RDS service is not available in you area, the following service is not available. RDS Basics AF (Alternative Frequency): When the radio signal strength is poor, enabling the AF function will allow the unit to automatically search another station with the same PI (Program Identifcation) as the current station but with stronger signal strength. PS (Program Service name): The name of station will be display instead of frequency. AF Mode: Press AF button to switch AF mode on and off. AF on: AF function is activated. AF off: AF function is disabled. Remark: AF indicator on LCD will flash until RDS information is received. If RDS service is not available in your area, turn off the AF mode. REG Mode: Press AF for more than 2 seconds to switch REG mode on and off. REG on: AF function will implement the regional code (of the PI) and only stations in the current region can be tuned automatically. REG off: AF function will ignore the regional code(of the PI) and stations in the other regions can also be tuned automatically. CT Service ( Clock Time ) When receiving an RDS station, the CT (Clock Time) service automatically adjusts the time. Traffc Announcements Some RDS FM stations periodically provide traffc information. TP (Traffc Program Identifcation) Broadcasting of traffc information. TA (Traffc Announcements Identifcation) Radio announcements on traffc conditions. TA Mode : Press TA to turn on/off the TA function. When TA mode is turned on, the TA indicator will blink. When traffc announcement is received, the TA indicator will display. The unit will temporarily switch to the tuner mode (regardless of the current mode) and begin broadcasting the announcement at TA volume level. After the traffic announcement is over, it will return to the previous mode and volume level. When TA is turned on, SEEK, SCAN, AMS function can only be received or saved when traffic program identification (TP) code is received. EON (Enhanced Other Networks) When EON data is received, the EON indicator lights and the TA and AF functions are enhanced. TA: Traffc information can be received from the current station or stations in other network. AF: The frequency list of preset RDS stations is updated by EON data. EON enables the radio to make fuller use of RDS information. It constantly updates the AF list of preset stations, including the one that currently tuned into. If you preset a station around the area at your home, you will later be able to receive the same station at an alternative frequency, or any other station serving the same program, EON also keeps track of locally available TP stations for quick reception. PTY Reception ( Program Type ) RDS FM stations provide a program type identifcation signal. Example: news, rock, info, sport, etc. PTY Type Preset Press PTY button once to enter the MUSIC type or press PTY twice to enter the SPEECH type. Then use function to select the desired program type. The selected PTY type is shown and searching starts if no other function is selected for 2 seconds. If there is no corresponding program type, NO PTY is shown and the unit will return to normal mode. EN - 5
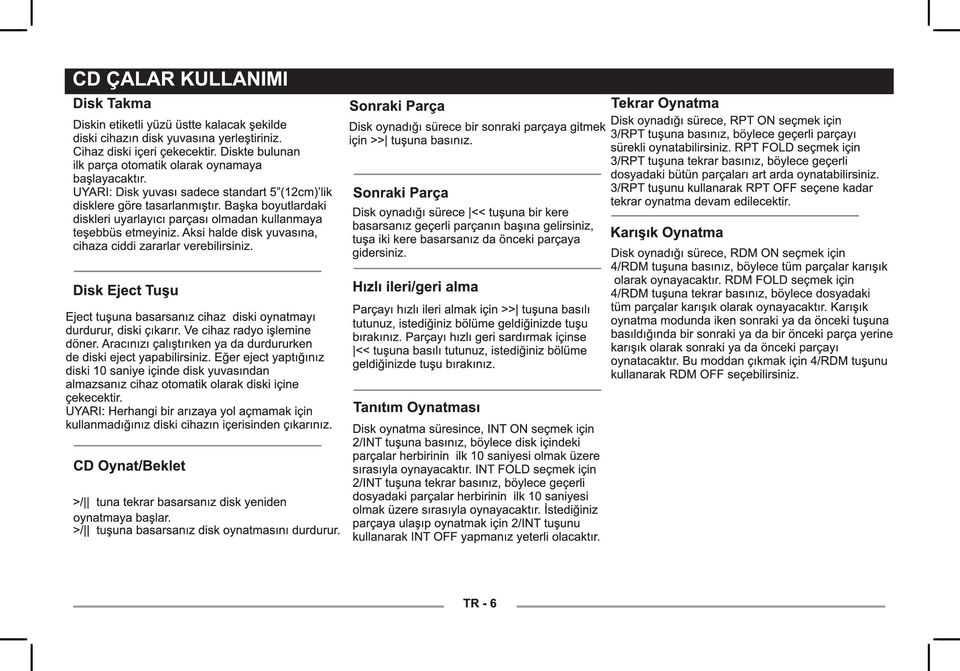
22 CD Player Operation Inserting a Disc With the label surface facing up, fully insert a compact disc into the disc slot until the mechanism engages and pulls the disc in. Play will automatically begin from the first track on the disc. NOTE: The unit is designed for play of standard 5 (12 cm.) compact discs only. Do not attempt to use 3 (8 cm.) CD singles in this unit, either with or without an adaptor, as damage to the player and/or the disc may occur. Disc Eject Button Press the eject button to stop disc play and eject the disc. The unit will revert to radio operation. Discs may be ejected with the vehicle ignition switch on or off. If an ejected disc is not removed from the disc slot within 10 seconds of being ejected, the disc will be re-inserted automatically. NOTE: To prevent a disc from accidentally being damaged, always remove the disc from the unit when disc play is fnished. CD Play/Pause Selector Press the 1 > button to freeze disc playback. Press 1 > again to resume disc playback. Seek Up/Next Track Press the next track >> button during disc play to select the beginning of the next track. Seek Down/Previous Track Press the previous track << button during disc play to select the beginning of the current track. Press twice to select the beginning of the previous track. Cue/Review Functions High-speed audible search to any section of the disc can be made by the Cue and Review functions. Press and hold the next track >> button to advance rapidly in the forward direction or the previous track << button to advance rapidly in the backward direction. Intro Play Selector During disc play, press the 2/INT button to select INT ON,and play the frst 10 seconds of each track. When a desired track is reached, press the 2/INT button to select INT OFF and play the current track. Track Repeat Play Select During disc play, press the 3/RPT button to select RPT ON and repeatedly play the selected track. Press 3/RPT again to select RPT FOLD and repeatedly play all tracks in the current folder. Repeat play will continue until 3/RPT is pressed to select RPT OFF. Random Play Select During disc play, press the 4/RDM button to select RDM ON and play all tracks on the disc in random, shuffled order. In Random Play mode, you can press the tune/track buttons to select tracks in a random order instead of the normal progression. Press 4/ RDM again to select RDM OFF and cancel Random Play mode. EN - 6
23 Playing MP3/WMA Files Display Information During playback, ID3 tag information display scrolling on the screen: FOLDER, FILE, ALBUM, TITLE, ARTIST and Track Number/ Elapsed Time. Folder Up/Down Press the 5 button to go to the previous folder. Press the 6 button to go to the next folder. MP3 Overview MP3 is short for MPEG Audio Layer 3 and refers to an audio compression technology standard. This product allows playback of MP3 fles on CD-R or CD-RW discs. The unit can read MP3 fles written in the format compliant with ISO However it does not support the MP3 data written by the method of packet write. The unit can not read an MP3 fle that has a fle extension other than.mp3. If you play a non-mp3 file that has the.mp3 extension, you may hear some noise. In this manual, we refer to what are called MP3 file and folder in PC terminology as Track and Album, respectively. Maximum number of directory level is 8, including the root directory. Maximum number of fles and folders per disc is 256. The unit may not play tracks in the order of track numbers. The unit plays only the audio tracks if a disc contains both audio tracks and MP3 fles. When playing a disc of 8kbps or VBR*, the elapsed playing time in the display window will not be correct and also the intro play may not function properly. *VBR: Variable Bit Rate. Note on creating your own CD-Rs or CD-RWs containing MP3 fles To e n j o y h i g h q u a l i t y s o u n d, w e recommend converting to MP3 files with a sampling frequency of 44.1 khz and a fxed bit rate of 128 kbps. DO NOT store more than 256 MP3 files per disc. For ISO 9660-compliant format, the maximum allowable depth of nested folders is 8, including the root directory(folder). When CD-R disc is used, playback is possible only for discs which have been fnalized. EN - 7 Make sure that when MP3 CD-R is burned that it is formatted as a data disc and NOT as an audio disc. You should not write non-mp3 files or unneeded folders along with MP3 fles on the CD-R otherwise it takes a long time until the unit starts to play MP3 fles. With some CD-R media, data may not be properly written depending on their manufacturing quality. In this case, data may not be reproduced correctly. High quality CD-R disc is recommended. Up to 16 characters are displayed for the name of an Album or a Track. ID3 TAG version 1.x is required. Note that the unit may not play tracks in the order that you wrote them to the disc.
24 Menu Function Press and hold the VOL/MENU knob more than 2 seconds to enter menu mode, then each press changes the mode as follows: TA mode Rotate the VOL/MENU knob to choose TA ALARM or TA SEEK mode. If the TA (traffc announcements) is turned on and there is no traffic program identification code received in the specified time, no TA/TP will display and either TA ALARM or TA SEEK will be activated. TA ALARM mode : Alarm is turned on. TA SEEK mode: TA SEEK is automatically activated. MASK mode Rotate the VOL/MENU knob to choose MASK DPI or MASK ALL mode. In some cases, the AF function may be influenced by some interference, examples are signals with strong field but without the RDS data. For this reason, the unit has two options to avoid the above interference. MASK DPI mode : Only AF which has different program identifcation is masked. MASK ALL mode : T he A F w h ich has diff erent p rogram identification and NO RDS signal with high feld strength is masked. TA VOL mode Rotate the VOL/MENU knob to adjust TA volume level. RETUNE mode Rotate the VOL/MENU knob to choose RETUNE-S or RETUNE-L. RETUNE-S or RETUNE-L is time length selection of TA SEEK retune interval. RETUNE-S: Short, TA SEEK retune interval is 45 seconds. RETUNE-L: Long, TA SEEK retune interval is 180 seconds. Remark: RETUNE mode functions for TA during TA SEEK mode only. DSP mode: Rotate the VOL/MENU knob to choose DSP sound effect: POP->ROCK->CLASSIC->FLAT-> DSP OFF LOUD ON/OFF Rotate the VOL/MENU knob to choose loudness on or off. WOOF ON/OFF Rotate the VOL/MENU knob to choose SUB- Woofer on or off. EN - 8 BEEP ON/OFF: Rotate the VOL/MENU knob to choose beep sound on or off. SEEK 1/2 mode: Rotate the VOL/MENU knob to choose radio seek mode 1 or 2. SEEK 1: Searching station will stop when next station is received. SEEK 2: Searching station will stop when or button is released and next station is received. - STEREO/MONO mode (Radio mode) Rotate the VOL/MENU knob to choose FM stereo or mono. LOCAL/DX mode (Radio mode) Rotate the VOL/MENU knob to choose tuner sensitivity local or distant. VOL mode: VOL LAST: the turn-on volume level is the volume level of latest power off. VOL ADJ: At volume adjust mode, press the knob to enter A-VOL mode, then rotate the knob to set the turn-on volume level.
25 Menu Function A-VOL mode: Rotate the VOL/MENU knob to select volume. The adjustable range of volume is 0 to /24 HOURS mode: Rotate the VOL/MENU knob to select 12 or 24 hour mode. USB/SD/MMC MP3 Playback 1. Loading SD/MMC Card Insert the SD/MMC card into the slot, with the front side at right. The unit will play the music automatically and the LCD will show CARD. 2. Take out SD/MMC Card Push SRC button and switch to non CARD mode, slight press SD/MMC card, take out the card when it was pop out. 3. Loading USB equipment Open the rubber cap, insert the USB into the connector and the unit play the music in the USB storer automatically, and the LCD will show USB. 4. Take out USB equipment Push the SRC button and switch to non USB mode, then take off the USB storer, close the rubber cap. USB/SD/MMC Notes USB functions (fash memory type) MP3 music play 1. SD/ MMC card support. 2. USB fash memory 2 in 1 (SD/MMC ) support. 3. Fat 12/fat 16/fat 32 is possible. 4. File name : 32 byte/dir name : 32 byte/tag name : 32 byte 5. Tag (ID3 tag ver 2.0) - title/artist/album : 32 byte support. 6. Multi card reader not support. 7. USB 1.1 support, USB 2.0 support (It can not support USB 2.0 speed. Just, get the same speed with USB 1.1). Not all kinds of USB devices are compatible with the unit. EN - 9
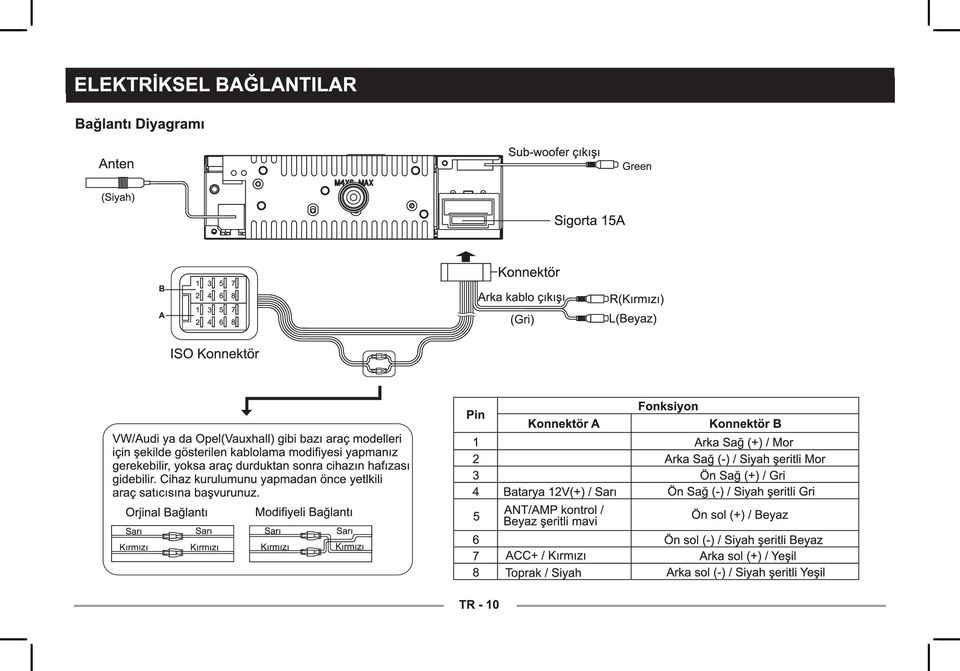
26 Electrical Connections Wiring Diagram (Black) SUB-Woofer OUT(Green ) Antenn a (Black) Location Connector A Function Connector B 1 Rear Right (+) / Purple 2 Rear Right (-) / Purple with Black Stripe 3 Front Right (+) / Gray 4 Battery 12V(+) / Yellow Front Right (-) / Gray with Black Stripe 5 ANT/AMP control / Blue with white stripe Front Left(+) / White 6 Front Left(-) / White with Black Stripe 7 ACC+ / Red Rear Left (+) / Green 8 Ground / Black Rear Left (-) / Green with Black Stripe EN - 10
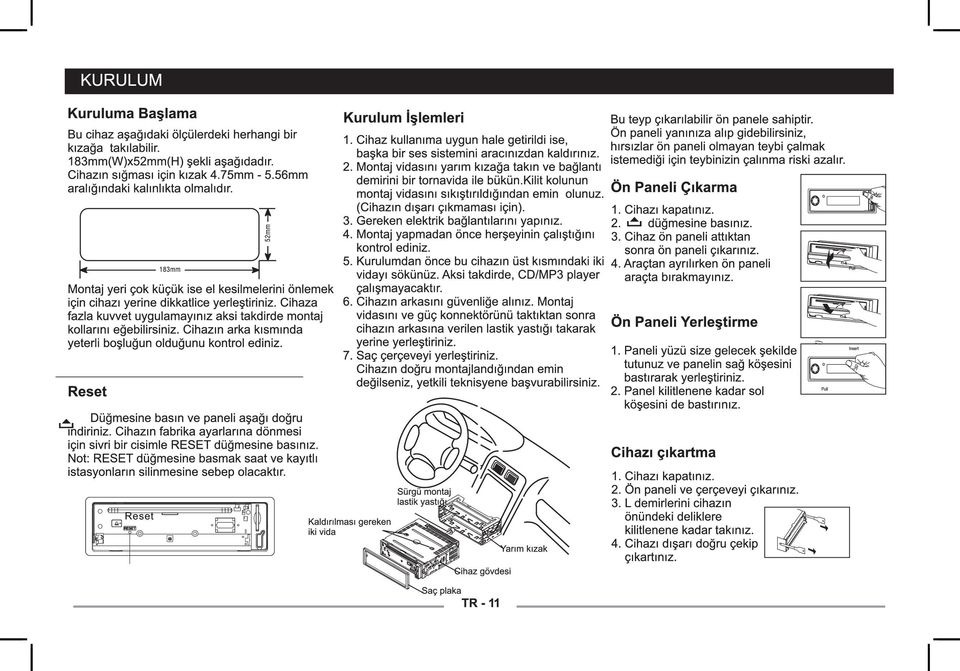
27 Installation Guide Installation Procedures First complete the electrical connections, and then check them for correctness. Important: Remove these two screws before installation. Otherwise, the player will not work. Reset Press the RESET button with a pointed object to reset the unit to the original status. Note: Press the RESET button will erase the clock setting and stored stations. Installation Opening This unit can be installed in any dashboard having an opening as shown below. The dashboard should be 4.75mm mm thick in order to be able to support the unit. 1. Insert mounting collar into the dashboard, and bend the mounting tabs out with a screwdriver. Make sure that lock lever is fush with the mounting Lock lever collar. (Not projecting outward) 2. Secure the rear of the unit. After fxing mounting bolt and power connector, fx the rear of the unit to the car body by rubber cushion. 3. Insert trim plate. EN - 11
28 Anti-Theft System This unit is equipped with a detachable panel. Removing this panel makes the radio totally inoperable. Remove the detachable panel 1. Switch off the power of the unit. 2. Remove the detachable panel. 3. Gently press the button of the case and open the cover. Place the panel into the case and take it with you when you leave the car. Install detachable panel 1. Fix right part of face plate in the right part of panel slot of the unit. 2. Press down the left side of the face plate until if clicks into the panel slot of the unit. Remove the unit 1. Switch off the power of the unit. 1. Remove the panel and the trim plate. 2. Insert both L-Keys into the hole on the front of the set until they lock. 3. Pull out the unit. EN - 12
29 Troubleshooting If you suspect something is wrong, immediately switch power off. Do not use the unit in abnormal condition, for example without sound, or with smoke or foul smell, can cause fre or electric shock. Immediately stop using it and call the store where you purchased it. Never try to repair the unit yourself because it is dangerous to do so. General No power or no sound. Car s engine switch is not on. Cable is not correctly connected. Fuse is burnt. Volume is too low or muted. If the above solutions cannot help. Turn your car s key to ACC or ON. Check connection. Replace fuse. Check volume or mute on / off. Press the RESET button. Radio Much noise in broadcast. Station is too far, or signals are too weak. Select other stations of higher signal level. Preset station lost. Battery cable is not correctly connected. Connect the battery cable to the terminal that is always live. Disc Disc is inside but no sound. Disc sound skips, tone quality is low. Sound skips due to vibration. Disc is upside down. Disc is dirty or damaged. Disc is dirty or damaged. Place disc in the correct direction, and the label side up. Clean disc or change another disc. Clean CD or change another CD. Mounting angle is over 30. Adjust mounting angle to less than 30. Unstable mounting. Mount the unit securely with the mounting parts. USB/SD/MMC mode Unable to insert USB device or The memory card or USB device has been SD/MMC card. inserted the wrong way round. The USB device or SD/MMC NTFS format is not supported. card cannot be read. Insert it the other way around. Check that the file system is in FAT or FAT32 format. Due to different formats, some models of devices may not be read. EN - 13
30 Specifcations General Power supply: 12V DC (11V-16V) Test voltage 14.4V, negative ground Max.current consumption 12A Maximum power output: 45Wx4 channels Continuous power output: 20Wx4 channels (4,10% T.H.D.) Suitable speaker impedance: 4-8 ohm Pre-Amp output voltage: 2.0V (CD play mode: 1KHz, 0 db, 10 K load) Fuse: 15A Dimensions(WxHxD): 178x50x155mm Weight: 1.8kg Aux-in: 300mV Subwoofer-out: 2.0V FM Stereo Radio Frequency range: MHz (Europe) MHz (America) Usable sensitivity: 8 dbì Quieting sensitivity(s/n=50db): 12 dbì Frequency response: 30Hz-15kHz Stereo separation: 30dB (1kHz) Image response ratio: 50dB IF response ratio: 70dB Signal/noise ratio: 55dB MW(AM) Radio Frequency range: Usable sensitivity(s/n=20db): KHz (Europe) KHz (America) 30 dbì Disc Player System: Disc digital audio system Frequency response: 20Hz-20kHz Signal/noise ratio: >80 db Total harmonic distortion: Less than 0.20% (1kHz) Wow and futter: Below measurable limits Channel separation: >55 db Components Mounting sleeve 1 Machine screws M5x6mm 4 Mounting bolt (50mm) 1 Wire connector 1 Removable face plate case 1 Trim plate 1 L-key 2 Operating instructions 1 Rubber cushion 1 Remote control unit 1 Note: Specifcations and the design are subject to change without notice due to improvements in technology. EN - 14
31 PN:
Operation Manual for Users
 Operation Manual for Users Model No.: FLTAMFMRCD!!!!!!!!!! ATTENTION!!!!!!!!!! THE RESET BUTTON MUST BE PRESSED TO ENSURE PROPER OPERATION. SEE INSTRUCTION MANUAL Table of Contents Table of Contents ---------------------------------------------------------------------------------------------
TR7322U-OR RDS / MP3-USB TUNER (24 Volt)
") www.vdo.com TR7322U-OR RDS / MP3-USB TUNER (24 Volt) OWNER'S MANUAL Safety Information Safety Information Thank you for purchasing this product, please read the manual carefully before operating, and reserve
www.vdo.com TR7322U-OR RDS / MP3-USB TUNER (24 Volt) OWNER'S MANUAL Safety Information Safety Information Thank you for purchasing this product, please read the manual carefully before operating, and reserve
Thank you for purchasing the player. Please read this manual carefully before operating and reserve it for future reference.
 Safety Information Thank you for purchasing the player. Please read this manual carefully before operating and reserve it for future reference. PRECAUTIONS Use only in a 12-volt DC negative-ground electrical
Owner s Manual AWM910 JENSEN AWM910 COMPACT DISC PLAYER RADIO CD COMPACT MUSIC SYSTEM MUTE AUX BAND AUX IN PUSH PUSH PWR VOL ALARM T/F AUD SPK A SPK B
 AWM910 Owner s Manual COMPACT DISC PLAYER PUSH 1 2 3 4 5 6 RPT SCAN RDM H M PUSH PWR VOL ALARM SET ON/OFF EQ T/F AUD RADIO CD COMPACT MUSIC SYSTEM MUTE AUX BAND CD AUX IN A B A+B JENSEN AWM910 Thank You!
 DVD-8095 DVD/VCD/CD/MP3/USB/SD/MMC Player with FM/MW Tuner Operating Instructions www.goldmaster.com.tr OK OK OK OK MUTE OK OK MUTE MUTE MUTE MUTE MUTE OK OK MUTE MUTE Safety Precautions 1. Only connect
CD988BT BLUETOOTH / USB / SD / MP3 / CD / RADIO. Operation Instructions
 CD988BT BLUETOOTH / USB / SD / MP3 / CD / RADIO Operation Instructions Safety Information Thank you for purchasing the player. Please read this manual carefully before operating and reserve it for future
High Power Receiver CR-W400U Operating Instructions
 High Power Receiver CR-W400U Operating Instructions Please read these instructions carefully before using this product and save this manual for future use. Panasonic welcomes you to our ever growing family
AM/FM/CD/MP3 Receiver with USB/SD & A u xiliary Input 3 Built-in Microphone inputs for P A Announcements. Installation/Operation Manual
 AM/FM/CD/MP3 Receiver with USB/SD & A u xiliary Input 3 Built-in Microphone inputs for P A Announcements Installation/Operation Manual 50W x 4 CD-2000 CONTROLS AND INDICATORS (1) Power Button (2) Volume/Select
Model No.: MR-140. REMARK: FINISH SIZE IS 145x210mm. Effected 31 / May / 07
 Model No.: MR-0 HI-POWER x Watts INT RPT RDM 6 This product is sold and serviced exclusively by Prospec Electronic Inc. and must be returned to Prospec for in and out of warranty repairs. It can not be
CD7316U-OR RDS / CD / MP3-USB TUNER WITH CD PLAYBACK (12 Volt)
") www.vdo.com CD7316U-OR RDS / CD / MP3-USB TUNER WITH CD PLAYBACK (12 Volt) OWNER'S MANUAL Safety Information Safety Information PRECAUTIONS Use only in a 12-volt DC negativeground electrical system. Disconnect
www.vdo.com CD7316U-OR RDS / CD / MP3-USB TUNER WITH CD PLAYBACK (12 Volt) OWNER'S MANUAL Safety Information Safety Information PRECAUTIONS Use only in a 12-volt DC negativeground electrical system. Disconnect
Model No.: MR-4.2 EST.JBL(MR4.2)-061129-I/B. 145x210mm. Revised 31 / May / 04
-061129-I/B. 145x210mm. Revised 31 / May / 04") EST.JBL(MR4.)-06-I/B Model No.: MR-4. MOD MR - 4. 4CHx45Watts SEL INT RPT 4 RDM 5 6 This product is sold and serviced exclusively by Prospec Electronic Inc. and must be returned to Prospec for in and out
EST.JBL(MR4.)-06-I/B Model No.: MR-4. MOD MR - 4. 4CHx45Watts SEL INT RPT 4 RDM 5 6 This product is sold and serviced exclusively by Prospec Electronic Inc. and must be returned to Prospec for in and out
CMP30. User Manual. www.audac.eu
 CMP30 User Manual www.audac.eu 2 Index Introduction 4 Precautions 5 Safety requirements 5 Caution servicing 5 EC Declaration of Conformity 5 Waste of Electrical and Electronic Equipment (WEEE) 6 Caution
Controls (front) 1. Loudspeaker 2. Light button 3. Band button 4. Auto tune button 5. Alarm button 6. LCD display
 1. Loudspeaker 2. Light button 3. Band button 4. Auto tune button 5. Alarm button 6. LCD display") GB Contents Controls... 2-4 Mains operation... 5 Operating your radio... 6 Selecting a station DAB... 7 Display modes DAB... 8 Finding new stations - DAB... 9 Secondary services DAB... 9 Manual tuning
GB Contents Controls... 2-4 Mains operation... 5 Operating your radio... 6 Selecting a station DAB... 7 Display modes DAB... 8 Finding new stations - DAB... 9 Secondary services DAB... 9 Manual tuning
AM/FM/CD/MP3 Weather Band Radio Receiver with USB/SD & Auxiliary Inputs, 3 Built-in Microphone inputs for PA Announcements
 AM/FM/CD/MP3 Weather Band Radio Receiver with USB/SD & Auxiliary Inputs, 3 Built-in Microphone inputs for PA Announcements Installation/Operation Manual 50W x 4 CD-3000 Thank you for purchasing the CD-3000
MANUAL PC1000R INFO@APART-AUDIO.COM
 MANUAL PC1000R INFO@APART-AUDIO.COM Features The APart PC1000R is a professional multisource CD/USB/SD card music player, equipped with balanced and unbalanced analog outputs, coaxial and optical digital
INSTRUCTION MANUAL K100C
 INSTRUCTION MANUAL K100C MP3/WMA CD PLAYER WITH AM/FM RADIO BEFORE USE Before operating the unit, please read this manual thoroughly and retain it for future reference 1. OPERATING INSTRUCTIONS ---------------------------------------------
CAR CD/MP3 PLAYER/FM-AM RADIO /Bluetooth(For TE-615s Only) MODEL: TE-605s/ TE-615s
 MODEL: TE-605s/ TE-615s") CAR CD/MP3 PLAYER/FM-AM RADIO /Bluetooth(For TE-615s Only) MODEL: TE-605s/ TE-615s Take the time to read this user manual. Familiarity with the manual will help you to obtain the best performance from
CAR CD/MP3 PLAYER/FM-AM RADIO /Bluetooth(For TE-615s Only) MODEL: TE-605s/ TE-615s Take the time to read this user manual. Familiarity with the manual will help you to obtain the best performance from
Model : TCM-3 Instruction Manual. Compact Disc CD/CD-R/CD-RW/MP3 Player with PLL MW/FM Radio, Radio Data System
 Model : TCM-3 Instruction Manual Compact Disc CD/CD-R/CD-RW/MP3 Player with PLL MW/FM Radio, Radio Data System LOCATIONS OF CONTROLS 1. POWER ON/OFF 2. FUNCTION SELECT BUTTON 3. VOL UP/VOL DOWN 4. MODE
THE NEW GENERATION IN TECHNOLOGY. NI-3103A Alarm Clock w/fm Radio ipod & iphone Docking. Operating Instructions
 THE NEW GENERATION IN TECHNOLOGY NI-3103A Alarm Clock w/fm Radio ipod & iphone Docking Operating Instructions Table of Contents Important Safeguards... 3 Parts... 6 Controls... 6 To Set Up... 7 ipod/iphone
INSTRUCTIONS Please read all instructions carefully before using
 Car Multimedia System XM-2DTSB79 AUX IR MIC RESET USB INSTRUCTIONS Please read all instructions carefully before using Touch calibration If touch calibration error occurs, you can adjust the touch coordinate
Controls. LCD Display. Tuning Up Time Set and Station Scan
 PR-D8 GB Revision 3 1 1 2 4 5 7 9 10 12 14 16 18 20 22 24 25 26 27 29 31 33 35 36 37 38 Controls Stereo Built-in Microphone (Left Channel) LCD Display Stereo Built-in Microphone (Right channel) Power/Auto
INSTALLATION. Remove the Old Unit from the Dashboard. DIN Front Mount. 1. Remove the outer trim frame.
 INSTALLATION Tools for Installation Use the 2 removal wrenches of the old unit to take out the old unit and place with this brand new car radio. The following tools and supplies may also be needed for
DAB1001. Wireless Digital Radio Interface. Installation & User Guide
 DAB1001 Wireless Digital Radio Interface Installation & User Guide Contents Contents... 2 Introduction... 3 Contents of Package... 4 Installation... 5 Product Overview... 5 Installation Procedure... 5
KDC-7080R KDC-7080RV CD-RECEIVER INSTRUCTION MANUAL B64-1596-00 (EW) COMPACT DIGITAL AUDIO
 COMPACT DIGITAL AUDIO") KDC-7080R KDC-7080RV CD-RECEIVER INSTRUCTION MANUAL COMPACT DIGITAL AUDIO B64-1596-00 (EW) Contents English Before use Safety precautions...3 Handling Compact discs...6 General features Power...7 Switching
KDC-7080R KDC-7080RV CD-RECEIVER INSTRUCTION MANUAL COMPACT DIGITAL AUDIO B64-1596-00 (EW) Contents English Before use Safety precautions...3 Handling Compact discs...6 General features Power...7 Switching
OWNER S MANUAL. Marine Audio System. Model 2641272
 Model 2641272 OWNER S MANUAL Marine Audio System PLL Synthesizer Stereo Radio Digital Compact Disc Player Automatically Memory Storing Fold Down Full Detachable Panel Auxiliary Input Function CD Changer
KDC-V7090R KDC-7090R CD-RECEIVER INSTRUCTION MANUAL B64-1902-00 (EN) COMPACT DIGITAL AUDIO
 COMPACT DIGITAL AUDIO") KDC-V7090R KDC-7090R CD-RECEIVER INSTRUCTION MANUAL COMPACT B64-1902-00 (EN) DIGITAL AUDIO Contents English Safety precautions...3 Handling Compact discs...6 General features Power...8 Switching Modes...8
KDC-V7090R KDC-7090R CD-RECEIVER INSTRUCTION MANUAL COMPACT B64-1902-00 (EN) DIGITAL AUDIO Contents English Safety precautions...3 Handling Compact discs...6 General features Power...8 Switching Modes...8
Car Radio CD USB SD Bluetooth
 Car Radio CD USB SD Bluetooth www.blaupunkt.com Helsinki 220 BT 1 011 200 210 / 1 011 200 211 London 120 1 011 300 311 / 1 011 300 312 Sydney 220 BT 1 011 200 110 / 1 011 200 111 Melbourne 120 1 011 300
IMPORTANT SAFETY INSTRUCTIONS. When using this electronic device, basic precautions should always be taken, including the following:
 IMPORTANT SAFETY INSTRUCTIONS When using this electronic device, basic precautions should always be taken, including the following: 1. Read all instructions before using the product. 2. Do not use this
Controls. Opening the cover
 BTS-102 GB 2013 CSR plc and its group companies. The aptx mark and the aptx logo are trademarks of CSR plc or one of its group companies and may be registered in one or more jurisdictions. The Bluetooth
IMPORTANT SAFETY INSTRUCTIONS
 IMPORTANT SAFETY INSTRUCTIONS When using this electronic device, basic precautions should always be taken, including the following: 1. Read all instructions before using the product. 2. Do not use this
CR9986 ROBERTS. Dual Alarm CD Clock Radio. Sound for Generations. Please read this manual before use
 ROBERTS Sound for Generations CR9986 Dual Alarm CD Clock Radio Please read this manual before use Contents Contents... Controls... - Switching on and setting the time... 4 Listening to the radio... 5 Compact
H203D 中文 GB Version 1
 H203D 中 GB文 Version 1 Contents Installing batteries... 4 Using the AC adapter (not supplied)... 5 Setting the clock... 6-7 Updating your radio - DAB... 8 Selecting a station - DAB... 9 Secondary services
User Manual. Listen to your favourite songs on the radio on the road & in a car
 Technaxx FMT500 Transmitter User Manual The Declaration of Conformity is under the Internet link: www.technaxx.de/ (in bottom bar Konformitätserklärung ); Before using the device, read the user manual
Product or Part Name PARTS LABOR. Two (2) Years One (1) Year. All In-dash car radios, radio/tape player combinations.
 Years One (1) Year. All In-dash car radios, radio/tape player combinations.") LIMITED WARRANTY If your product does not work properly because of a defect in material or workmanship, Custom Autosound Mfg.,Inc. (the Company) will for the length of the period indicated on the chart
LIMITED WARRANTY If your product does not work properly because of a defect in material or workmanship, Custom Autosound Mfg.,Inc. (the Company) will for the length of the period indicated on the chart
Digital Radio/DAB+/FM RDS digital clock radio with dual alarm Operating instruction
 381SE1D-A Digital Radio/DAB+/FM RDS digital clock radio with dual alarm Operating instruction GB Contents Controls... 2-3 Using the clock radio for the first time... 4 Operating your clock radio... 5 Selecting
Retro Style Turntable With CD/Radio/USB/SD/MP3/WMA and Vinyl-to-MP3 Encoding
 Retro Style Turntable With CD/Radio/USB/SD/MP3/WMA and Vinyl-to-MP3 Encoding PTCD8U INSTRUCTION MANUAL LOCATION OF CONTROLS 1) DUST COVER 2) DIAL POINTER 3) LEFT SPEAKER 4) LCD DISPLAY 5) FM STEREO LED
CD RECEIVER KD-G312. For canceling the display demonstration, see page 7. INSTRUCTIONS GET0260-015A [B]
![CD RECEIVER KD-G312. For canceling the display demonstration, see page 7. INSTRUCTIONS GET0260-015A [B]](/thumbs/24/3658863.jpg "CD RECEIVER KD-G312. For canceling the display demonstration, see page 7. INSTRUCTIONS GET0260-015A [B]") CD RECEIVER KD-G312 For canceling the display demonstration, see page 7. INSTRUCTIONS GET0260-015A [B] Thank you for purchasing a JVC product. Please read all instructions carefully before operation, to
CD RECEIVER KD-G312 For canceling the display demonstration, see page 7. INSTRUCTIONS GET0260-015A [B] Thank you for purchasing a JVC product. Please read all instructions carefully before operation, to
Single Day Alarm Clock with. Bluetooth and USB Play-through
 Single Day Alarm Clock with Bluetooth and USB Play-through MODEL : BSC 200 READ THIS INSTRUCTION MANUAL BEFORE OPERATING THE APPLIANCE. SAVE THIS MANUAL FOR FUTURE REFERENCE. TABLE OF CONTENTS IMPORTANT
Operation Manual $ English \ Multi-CD control DSP High power CD/MP3/WMA/MD. FM/AM œ @ð CD è d DSP àœ% CD/ MP3/WMA/MD t FH-P9200MP
 Operation Manual $ Multi-CD control DSP High power CD/MP3/WMA/MD player with FM/AM tuner FM/AM œ @ð CD è d DSP àœ% CD/ MP3/WMA/MD t FH-P9200MP English \ Contents Thank you for buying this Pioneer product.
DAB+ / FM Tuner Model: TU-201
 DAB+ / FM Tuner Model: TU-201 Instruction Manual www.pulse-audio.co.uk 1 Safety Information The lightning bolt within a triangle is intended to alert the user to the presence of dangerous voltage levels
Anti Shock CD / USB / SD Card Reader / Remote Control Player RM-CD
 Anti Shock CD / USB / SD Card Reader / Remote Control Player RM-CD DESCRIPTION OF CONTROLS: POWER: ON: Press Power button to switch on the power. OFF: Press and hold to switch off the power. CD / USB /
Infotainment Manual Model Year 2015 Edition: March 2014 KTA-2701/5-VX-en. VAUXHALL Movano
 Infotainment Manual Model Year 2015 Edition: March 2014 KTA-2701/5-VX-en VAUXHALL Movano 0-1 Infotainment Manual Model Year 2015 Edition: March 2014 KTA-2701/5-VX-en Contents Introduction... 2 Radio...
Contents ENGLISH. Operating Instructions CD/MP3/WMA WARNING. Getting Started. Sound Setting. Radio. Other Functions RDS
 ENGLISH Contents Operating Instructions WARNING WARNING... 3 CAUTION... 3 PRECAUTIONS... 3 Getting Started Turning Power On and Off... 6 Initial System Start-Up... 6 Opening and Closing the Movable Display...
In-Car Digital Radio Adaptor User Guide
 S1000-DAB In-Car Digital Radio Adaptor User Guide Table of Content INTRODUCTION... 1 CONTENTS OF PACKAGE... 2 INSTALLATION...3 OVERVIEW OF CONTROLS AND CONNECTORS... 5 STARTING UP THE SYSTEM... 7 USING
FMT600BT Transmitter
 Technaxx FMT600BT Transmitter User Manual Transfer of music and calls directly from your Bluetooth device to your car radio This device complies with the requirements of the standards referred to the Directive
Operation Manual. Model No.: MR-18.3 COMPACT
 COMPACT DIGITAL AUDIO Operation Manual Model No.: MR-8.3 This product is sold and serviced exclusively by Prospec Electronics Inc. and must be returned to Prospec for in and out of warranty repairs. It
DAB+ Digital Alarm Clock Radio with Dock for iphone
 DAB+ Digital Alarm Clock Radio with Dock for iphone BCR33DABIP The Gold Technical Support Line: 1902 215 259 (Charges will apply at $2.95 per minute) www.bushaustralia.com.au Safety Instructions Ensure
User Manual AUDIO OUT OFF 9V DC USB POWER. Digital On-Hold Audio System with analog line capability
 MP On-Hold Audio System User Manual memory card IMPEDANCE PHONE LINES on speaker off ON OFF 9V DC USB AUDIO OUT 8Ω 6Ω // /4 POWER Digital On-Hold Audio System with analog line capability al /06 Before
Quick Connection and Setup Guide
 3-300-262-13(1) Read this first Quick Connection and Setup Guide Quick start guide to main features GB HDD Network Audio System NAS-SC55PKE 2008 Sony Corporation Printed in Malaysia Table of Contents Checking
Always there to help you. Register your product and get support at www.philips.com/welcome PD7001B. Question? Contact Philips.
 Always there to help you Register your product and get support at www.philips.com/welcome Question? Contact Philips PD7001B User manual Contents 1 Important 3 Safety and notice 3 Safety 3 Compliance 4
KTC-D500E DIGITAL TV TUNER
 KTC-D500E DIGITAL TV TUNER INSTRUCTION MANUAL C B64-3808-00/00 (E) Contents Safety precautions 3 Notes 4 Getting Started 5 Switching to Digital TV Screen ÅıÇ 5 Functions During Digital TV Screen Åı 5 Functions
CSS-5930BT. Owner s Manual. AM/FM/WB/CD/MP3/WMA/Bluetooth, 4-CHANNEL, Public Address Capability
 CSS-5930BT AM/FM/WB/CD/MP3/WMA/Bluetooth, 4-CHANNEL, Public Address Capability Custom Radio Corp 4012 Merchant Rd. Fort Wayne, IN Tel : 20-49-202 www.customradio.net Owner s Manual Custom Radio Corporation
Radio BMR100 INSTRUCTION MANUAL. ENGLISH (Original instructions)
") ENGLISH (Original instructions) INSTRUCTION MANUAL Radio BMR00 WARNING: For your personal safety, READ and UNDERSTAND before using. SAVE THESE INSTRUCTIONS FOR FUTURE REFERENCE. Symbols The following show
ENGLISH (Original instructions) INSTRUCTION MANUAL Radio BMR00 WARNING: For your personal safety, READ and UNDERSTAND before using. SAVE THESE INSTRUCTIONS FOR FUTURE REFERENCE. Symbols The following show
PR-D9W. GB Version 1
 PR-D9W Version 1 Table of contents Important safety instructions... 2-3 Introduction... 4 Controls... 5-8 Using your weather alert radio for the first time... 9 Operating your radio Search tuning AM/FM...
************* OWNER'S MANUAL BAMF800/2 BAMF1250/2 BAMF1800/2 BAMF2200/2 BAMF2600/2 BAMF1200/4 BAMF1600/4 BAMF2000/1D BAMF4000/1D BAMF5500/1D
 ************* OWNER'S MANUAL BAMF800/2 BAMF1250/2 BAMF1800/2 BAMF2200/2 BAMF2600/2 BAMF1200/4 BAMF1600/4 BAMF2000/1D BAMF4000/1D BAMF5500/1D INTRODUCTION Power Acoustik amplifiers provide high-performance
Business Audio System: Music & Messaging MP3 Player. by Grace Digital Audio. User Guide. Model No. GDI-USBM10
 Business Audio System: Music & Messaging MP3 Player by Grace Digital Audio User Guide Model No. GDI-USBM10 User Guide Contents Introduction 2 Safety & General Use Information 2 Features 3 Set Up & Operation
Opel Astra Infotainment System
 Opel Astra Infotainment System Contents Introduction... 4 Radio... 28 CD Player... 44 AUX input... 50 USB port... 52 Digital picture frame... 56 Navigation... 59 Voice recognition... 104 Phone... 118
CR9971 2 Band Auto Set Dual Alarm Clock Radio ROBERTS. Sound for Generations. Please read this manual before use
 ROBERTS Sound for Generations CR9971 2 Band Auto Set Dual Alarm Clock Radio Please read this manual before use Contents Contents... 1 Controls...2-5 Switching on... 6 Setting the time manually... 6 Setting
CAR RADIO STOCKHOLM 230 DAB 1 011 402 220 001. Enjoy it. Operating and installation instructions
 CAR RADIO STOCKHOLM 230 DAB 1 011 402 220 001 Enjoy it. Operating and installation instructions Controls 1 2 3 4 5 6 7 8 9 16 15 14 13 12 11 10 1 button Unlock the detachable control panel 2 MENU button
Car Radio CD USB SD Bluetooth. Toronto 420 BT 1 011 202 420 / 1 011 202 421 San Francisco 320 1 011 202 320 / 1 011 202 321. www.blaupunkt.
 Car Radio CD USB SD Bluetooth www.blaupunkt.com Toronto 420 BT 1 011 202 420 / 1 011 202 421 San Francisco 320 1 011 202 320 / 1 011 202 321 www.blaupunkt.com Operating and installation instructions Controls
DAB2+ Dear Customer, Congratulations with your new Argon DAB2+
 Dear Customer, Quality has always been our driving force and founding Argon Audio is a natural extension of this philosophy. We have 20 years' experience in creating and specifying high quality products,
Ideal CD player and FM tuner for use with other 301 Reference Series components also supports RDS and USB memory playback
 Reference301 Series PD-301 CD Player /FM Tuner Ideal CD player and FM tuner for use with other 301 Reference Series components also supports RDS and USB memory playback Main functions High-precision slot-in
AVR 158. Audio/video receiver. Quick-Start Guide ENGLISH
 158 Audio/video receiver ENGLISH Quick-Start Guide 158 Introduction, Speaker Placement and Connection Introduction Thank you for choosing a harman kardon product! This quick-start guide contains all the
User Guide. CR-111IP Clock radio with dock for ipod
 User Guide CR-111IP Clock radio with dock for ipod IMPORTANT SAFETY INFORMATION CAUTION! RISK OF ELECTRIC SHOCK DO NOT OPEN TO REDUCE THE RISK OF ELECTRIC SHOCK DO NOT REMOVE COVER (OR BACK) This symbol
Compaq ipaq Personal Mini-CD Player PM-1. User Guide
 Compaq ipaq Personal Mini-CD Player PM-1 User Guide Notice 2001 Compaq Computer Corporation COMPAQ and the Compaq logo registered in U.S. Patent and Trademark Office. ipaq is a trademark of Compaq Information
Table of Contents. System Requirement of MP3 Player:... 4. Connection and Downloading... 7. Downloading DRM10 Files... 8.
 Table of Contents Instructions... 1 Precautions... 2 System requirements... 4 System Requirement of MP3 Player:... 4 Introduction... 5 Features... 5 Charging the Battery... 6 Connection and Downloading...
ŠkodaOctavia Tour CAR RADIO SYMPHONY SIMPLY CLEVER
 ŠkodaOctavia Tour CAR RADIO SYMPHONY SIMPLY CLEVER Contents 1 Contents Radio....................................... Radio - Overview............................. Important information........................
August International Ltd United Kingdom Telephone: +44 (0) 845 250 0586 www.augustint.com
 845 250 0586 www.augustint.com") August International Ltd United Kingdom Telephone: +44 (0) 845 250 0586 www.augustint.com EN FR DE IT ES FM Radio and Music Alarm Clock Radio-Réveil FM et Lecteur de Musique Musikanlage und Radiowecker
August International Ltd United Kingdom Telephone: +44 (0) 845 250 0586 www.augustint.com EN FR DE IT ES FM Radio and Music Alarm Clock Radio-Réveil FM et Lecteur de Musique Musikanlage und Radiowecker
Bluetooth FM transmitter User Manual
 Bluetooth FM transmitter User Manual Thank you in earnest that you choose and buy Bluetooth FM transmitter from us! Please browse all details of this manual before using it to get best playing effect.
Multi-Channel AV Master Unit ENGLISH. Before Using This Product. Owner s Manual AVM-P9000. This product conforms to new cord colors.
 Multi-Channel AV Master Unit ENGLISH Before Using This Product Owner s Manual AVM-P9000 This product conforms to new cord colors. Contents Before Using This Product... 3 Key Finder... 3 About This Product...
Tiny Audio C3. English TINY AUDIO C3. Please read carefully before using this product
 English TINY AUDIO C3 Please read carefully before using this product 1 Safety Instructions: 1. Do not use this radio near water. 2. Clean with dry cloth. 3. Do not block any ventilation openings. 4. Do
ATS-505. GB Version 1
 ATS-505 GB Version 1 Control Locations Power/Sleep Power On/off/Alarm off/sleep function Display Switch between radio frequency and time while radio is power on Mode Mode set up (please see below mode
MODEL: MEMPHIS FM STEREO RADIO OPERATING INSTRUCTIONS
 MODEL: MEMPHIS CD/USB/SD PLAYER WITH TURNTABLE. ENCODING TO USB AND SD CARD. FM STEREO RADIO OPERATING INSTRUCTIONS PLEASE READ THIS USER MANUAL COMPLETELY BEFORE OPERATING THIS UNIT AND RETAIN THIS BOOKLET
MODEL 2202IQ (1991-MSRP $549.00)
") F O R T H E L O V E O F M U S I C F O R T H E L O V E O F M U S I C MODEL 2202IQ (1991-MSRP $549.00) OWNER'S MANUAL AND INSTALLATION GUIDE INTRODUCTION Congratulations on your decision to purchase a LINEAR
F O R T H E L O V E O F M U S I C F O R T H E L O V E O F M U S I C MODEL 2202IQ (1991-MSRP $549.00) OWNER'S MANUAL AND INSTALLATION GUIDE INTRODUCTION Congratulations on your decision to purchase a LINEAR
MODEL NPB-252 PORTABLE CD MP3 RADIO PLAYER
 MODEL NPB-252 PORTABLE CD MP3 RADIO PLAYER PLEASE READ THIS USER MANUAL COMPLETELY BEFORE OPERATING THIS UNIT AND RETAIN THIS BOOKLET FOR FUTURE REFERENCE. WARNING TO PREVENT FIRE OR SHOCK HAZARD, DO NOT
UVO SYSTEM USER'S MANUAL
 UVO SYSTEM USER'S MANUAL Preface Congratulations on the Purchase of your new UVO system! Your new UVO system allows you to enjoy various audio and multimedia features through the main audio system. For
AM / FM Tuner + RDS. Model: TU-101. www.pulse-audio.co.uk
 AM / FM Tuner + RDS Model: TU-101 www.pulse-audio.co.uk 1 Safety Information The lightning bolt within a triangle is intended to alert the user to the presence of dangerous voltage levels within the product
Parrot MKi9000. User guide
 Parrot MKi9000 User guide Contents Contents... 2 Installation... 3 Before you begin... 3 Checking the car configuration... 3 Caution... 3 Removing the car stereo... 3 Installing the kit... 4 Car stereo
SL-D930. Stunning Sound from Compact Body A Retro-cool 2.1ch Bluetooth Speaker with CD/Radio. Main Features
 SL-D930 Stunning Sound from Compact Body A Retro-cool 2.1ch Bluetooth Speaker with CD/Radio Main Features >Wireless connection from Smartphones, Tablets, and Laptops via Bluetooth >2.1ch Speaker System
RD-11 ROBERTS. FM RDS/DAB digital radio with. Sound for Generations. Please read this manual before use
 ROBERTS Sound for Generations RD- FM RDS/DAB digital radio with Please read this manual before use Contents Controls... Battery operation... 3 Mains operation... 3 Operating your radio - DAB... 4 Selecting
Smart Music Control Application CONTENTS. Smart Music Control Application. User Guide CONTENTS 1 GETTING STARTED 1 MEDIA PLAYER MODE 1
 Smart Music Control Application JVC KENWOOD Corporation Smart Music Control Application User Guide CONTENTS CONTENTS 1 GETTING STARTED 1 How to Install Smart Music Control App 1 Preparing the Music Player
CAR RADIO BARCELONA 230 1 011 402 211 001 BRISBANE 230 1 011 402 201 001. Enjoy it. Operating and installation instructions
 CAR RADIO BARCELONA 230 1 011 402 211 001 BRISBANE 230 1 011 402 201 001 Enjoy it. Operating and installation instructions Controls 1 2 3 4 5 6 7 8 9 16 15 14 13 12 11 10 1 button Unlock the detachable
Breathe. Relax. Here Are the Most Commonly Asked Questions and Concerns About Setting Up and Programming the SurroundBar 3000.
 Breathe. Relax. Here Are the Most Commonly Asked Questions and Concerns About Setting Up and Programming the SurroundBar 3000. Our Customer Service Department has compiled the most commonly asked questions
DSB-100 Portable Premium Bluetooth Speaker Owner s Manual
 . DSB-100 Portable Premium Bluetooth Speaker Owner s Manual You can print more than one page of a PDF onto a single sheet of paper. 1 Index Preparation Unpacking 3 Overview 4 Sound Quality 4 Design 4 Operation
40 Watt Mixer Amplifier Owners Manual with Media Player
 40 Watt Mixer Amplifier with Media Player Model #USB-80 2009 MCM Electronics MCM Custom Audio MCM Electronics Centerville, Ohio www.mcmelectronics.com SAFETY INSTRUCTIONS Please be sure to read all the
RD-27 ROBERTS. FM RDS/DAB digital radio with. Sound for Generations. Please read this manual before use
 ROBERTS RD-7 Sound for Generations FM RDS/DAB digital radio with Please read this manual before use Contents Controls... Battery operation... 3 Mains operation... 3 Operating your radio - DAB... 4 Selecting
HCS-3300/3302/3304 USB Remote Programmable Laboratory Grade Switching Mode Power Supply
 1. INTRODUCTION HCS-3300/3302/3304 USB Remote Programmable Laboratory Grade Switching Mode Power Supply User Manual This family of efficient, upgraded SMPS with small form factor, auto cross over CV CC,
bba - Balboa Bluetooth Audio (AMP) Installation & User Guide
 Installation & User Guide") bba - Balboa Bluetooth Audio (AMP) Installation & User Guide Bluetooth Integration CONNECT YOUR SMART DEVICE TO YOUR HOT TUB With Bluetooth connection you can now play all your favorite songs directly
bba - Balboa Bluetooth Audio (AMP) Installation & User Guide Bluetooth Integration CONNECT YOUR SMART DEVICE TO YOUR HOT TUB With Bluetooth connection you can now play all your favorite songs directly
KVT-729DVD INSTALLATION MANUAL
 MONITOR WITH DVD RECEIVER KVT-729DVD INSTALLATION MANUAL B54-4516-00/00 (EV) Accessories 1 0...1...1 2!...1...2 3...1 4 5...1...1 6...2 7...4 8...4 9...2 2 KVT-729DVD Installation Procedure 1. To prevent
MANUAL ENGLISH UBR-180BT Ordercode: D1258
 MANUAL ENGLISH UBR-180BT Highlite International B.V. Vestastraat 2 6468 EX Kerkrade the Netherlands Table of contents Warning... 2 Unpacking Instructions... 2 Safety Instructions... 2 Operating Determinations...
RX-6010RBK / RX-6012RSL
 SLEEP TEST SUBWOOFER + MODE EFFECT CENTER + SOUND TV/VIDEO CD-DISC DVD CD TV VOL TV CH TV VCR AUDIO VCR CH + TV SOUND TAPE/CDR VOLUME REMOTE REAR L + MENU REAR R + ENTER VCR /DIGITAL FM/AM MUTING STANDBY
DAB Radio. Instruction Manual L55DAB10
 DAB Radio Instruction Manual L55DAB10 L55DAB10_IB_110810_Zell.indd 1 L55DAB10_IB_110810_Zell.indd 2 Contents Unpacking...5 Product Overview...6 Top View... 6 Rear View... 6 Power Source...7 Battery Power...
PORTABLE STEREO FM RADIO WITH CD/MP3/USB-PLAYER AND CASSETTE SCR-97 USB INSTRUCTION MANUAL
 PORTABLE STEREO FM RADIO WITH CD/MP3/USB-PLAYER AND CASSETTE SCR-97 USB INSTRUCTION MANUAL For information and support, www.lenco.eu WARNING CLASS 1 LASER PRODUCT CLASS 1 LASER PRODUCT APPAREIL Á LASER
Pocket DAB & FM Radio with Speaker
 Pocket DAB & FM Radio with Speaker P MODEL: GDPRDAB USER MANUAL 1 Welcome 2 Your DAB Digital Radio 2.1 In The Box 2.2 Front View 2.3 Rear View 3 Quick Setup 3.1 Power On and Autoscan 3.2 Changing DAB Stations
WIRELESS EARPHONES with ACTIVE NOISE CANCELLING Thank you for purchasing PHIATON BT 100 NC
 WIRELESS EARPHONES with ACTIVE NOISE CANCELLING Thank you for purchasing PHIATON BT 100 NC - Please follow the directions, and read the guidelines carefully before use. Please keep the owner s guide for
ŠkodaAuto CAR RADIO BEAT SIMPLY CLEVER
 ŠkodaAuto CAR RADIO BEAT SIMPLY CLEVER Contents 1 Contents Radio....................................... Radio - Overview............................. Important information........................ Anti-theft
STEREO PREAMPLIFIER INSTRUCTIONS FOR USE
 XX STEREO PREAMPLIFIER INSTRUCTIONS FOR USE Thank you for purchasing the Musical Fidelity A5 CR Preamplifier. Used properly and carefully, it should give many years of outstanding musical reproduction.
User Manual OHP 5000. On-Hold Audio Player/Recorder CD Autoload System DIGITAL FLASH MEMORY
 OHP 5000 User Manual DIGITAL FLASH MEMORY On-Hold Audio Player/Recorder CD Autoload System Before using this unit, please read these operating instructions carefully. Afterwards, keep them handy for future
ROBERTS. Enjoy Listening. DAB / FM RDS Digital Clock Radio with large display. Please read this manual before use
 ROBERTS Enjoy Listening DAB / FM RDS Digital Clock Radio with large display Please read this manual before use Contents Controls... -3 Using the clock radio for the fi rst time...4 Operating your clock
INSTRUCTION MANUAL PLEASE READ ALL THE INSTRUCTIONS COMPLETELY BEFORE USE AND SAVE THIS MANUAL FOR FUTURE REFERENCE
 INSTRUCTION MANUAL PLEASE READ ALL THE INSTRUCTIONS COMPLETELY BEFORE USE AND SAVE THIS MANUAL FOR FUTURE REFERENCE m Before Use Please read IMPORTANT SAFETY INSTRUCTIONS on page 10 before use. It is important