This manual should be considered a permanent part of the motorcycle and should remain with the motorcycle when it is resold.
|
|
|
- Meryl Hart
- 8 years ago
- Views:
Transcription
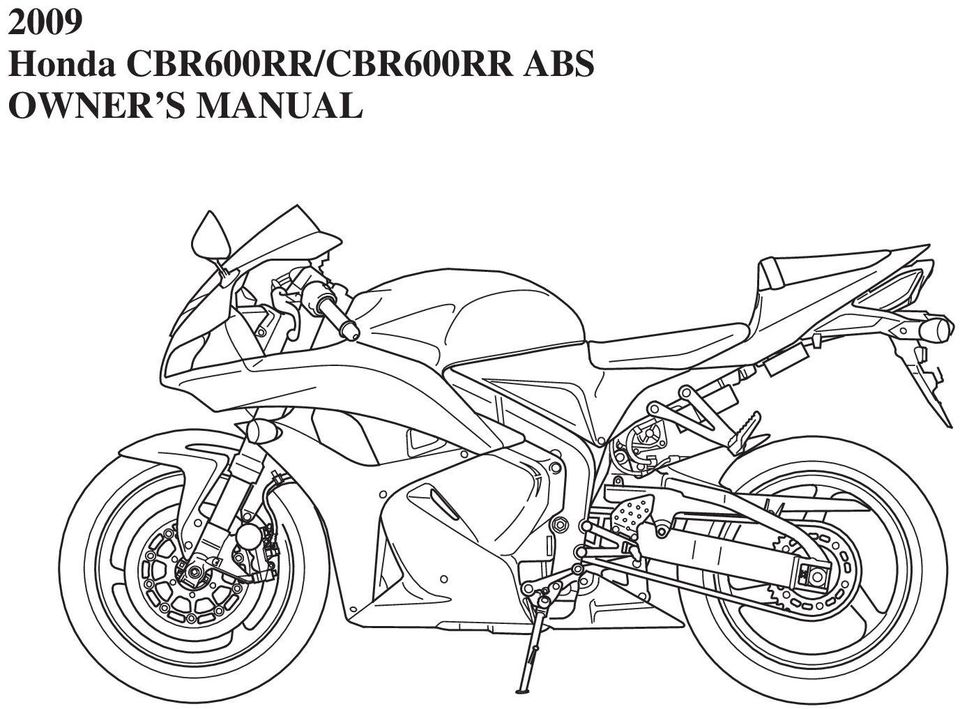
1 This manual should be considered a permanent part of the motorcycle and should remain with the motorcycle when it is resold. This Owner s Manual covers the CBR600RR and CBR600RR ABS models. You may find descriptions of equipment and features that are not on your particular model. All illustrations are based on the CBR600RR ABS model. This publication includes the latest production information available before printing. Honda Motor Co., Ltd. reserves the right to make changes at any time without notice and without incurring any obligation. No part of this publication may be reproduced without written permission. The vehicle pictured on the front cover may not match your vehicle Honda Motor Co., Ltd.

2 2009 Honda CBR600RR/CBR600RR ABS OWNER S MANUAL
3 Introduction Congratulations on choosing your Honda motorcycle. When you own a Honda, you re part of a worldwide family of satisfied customers people who appreciate Honda s reputation for building quality into every product. Before riding, take time to get acquainted with your motorcycle and how it works. To protect your investment, we urge you to take responsibility for keeping your motorcycle well maintained. Scheduled service is a must, of course. But it s just as important to observe the break-in guidelines, and perform all pre-ride and other periodic checks detailed in this manual. We also recommend that you read this owner s manual before you ride. It s full of facts, instructions, safety information, and helpful tips. To make it easy to use, the manual contains a detailed list of topics at the beginning of each section, and both an in-depth table of contents and an index at the back of the book. As you read this manual, you will find information that is preceded by a symbol. This information is intended to help you avoid damage to your Honda, other property, or the environment. Introduction

4 Introduction Read the Warranties Booklet (page 239 ) thoroughly so you understand the coverages that protect your new Honda and are aware of your rights and responsibilities. If you have any questions, or if you ever need special service or repairs, remember that your Honda dealer knows your motorcycle best and is dedicated to your complete satisfaction. You may also want to visit our website at Happy riding! California Proposition 65 Warning WARNING: This product contains or emits chemicals known to the State of California to cause cancer and birth defects or other reproductive harm. Please report any change of address or ownership to your Honda dealer so we will be able to contact you concerning important product information. Introduction

5 A Few Words About Safety Your safety, and the safety of others, is very important. And operating this motorcycle safely is an important responsibility. To help you make informed decisions about safety, we have provided operating procedures and other information on labels and in this manual. This information alerts you to potential hazards that could hurt you or others. Of course, it is not practical or possible to warn you about all hazards associated with operating or maintaining a motorcycle. You must use your own good judgment. You will find important safety information in a variety of forms, including: Safety Labels on the motorcycle. Safety Messages preceded by a safety alert symbol and one of three signal words: DANGER, WARNING, or CAUTION. These signal words mean: Safety Messages

6 A Few Words About Safety You WILL be KILLED or SERIOUSLY HURT if you don t follow instructions. You CAN be KILLED or SERIOUSLY HURT if you don t follow instructions. You CAN be HURT if you don t follow instructions. Safety Headings such as Important Safety Reminders or Important Safety Precautions. Safety Section such as Motorcycle Safety. Instructions how to use this motorcycle correctly and safely. This entire manual is filled with important safety information please read it carefully. Safety Messages

7 Contents These pages give an overview of the contents of your owner s manual. The first page of each section lists the topics covered in that section. Motorcycle Safety... 1 Important safety information you should know, plus a look at the safetyrelated labels on your motorcycle. Instruments & Controls... 9 The location and function of indicators, gauges, and controls on your motorcycle and operating instructions for various controls and features. Before Riding The importance of wearing a helmet and other protective gear, how to make sure you and your motorcycle are ready to ride, and important information about loading. Basic Operation & Riding How to start and stop the engine, shift gears, and brake. Also, riding precautions and important information about riding with a passenger or cargo. Contents

8 Contents Servicing Your Honda Why your motorcycle needs regular maintenance, what you need to know before servicing your Honda, an owner maintenance schedule, and instructions for specific maintenance and adjustment items. Tips How to store and transport your motorcycle and how to be an environmentally responsible rider. Taking Care of the Unexpected What to do if you have a flat tire, your engine won t start, etc. Technical Information ID numbers, technical specifications, and other technical facts. Consumer Information Information on warranties, emission controls, how to get Honda service manuals, and... Reporting Safety Defects Table of Contents Sequential listing of topics in this owner s manual. Index Quick Reference Handy facts about fuel, engine oil, tire sizes, and air pressures. Contents

9

10 Motorcycle Safety This section presents some of the most important information and recommendations to help you ride your motorcycle safely. Please take a few moments to read these pages. This section also includes information about the location of safety labels on your motorcycle. Important Safety Information... Accessories & Modifications... Safety Labels Motorcycle Safety 1

11 Important Safety Information Your motorcycle can provide many years of service and pleasure if you take responsibility for your own safety and understand the challenges you can meet while riding. There is much that you can do to protect yourself when you ride. You ll find many helpful recommendations throughout this manual. The following are a few that we consider to be most important. Always Wear a Helmet It s a proven fact: helmets significantly reduce the number and severity of head injuries. So always wear an approved motorcycle helmet and make sure your passenger does the same. We also recommend that you wear eye protection, sturdy boots, gloves, and other protective gear (page 42 ). 2 Motorcycle Safety

12 Important Safety Information Take Time to Learn & Practice Even if you have ridden other motorcycles, take time to become familiar with how this motorcycle works and handles. Practice in a safe area until you build your skills and get accustomed to the motorcycle s size and weight. Because many accidents involve inexperienced or untrained riders, we urge all riders to take a certified course approved by the Motorcycle Safety Foundation (MSF). See page 44. Ride Defensively The most frequent motorcycle collision happens when a car turns left in front of a motorcycle. Another common situation is a car moving suddenly into your lane. Always pay attention to other vehicles around you, and do not assume that other drivers see you. Be prepared to stop quickly or make an evasive maneuver. For other riding tips, see the booklet, You and Your Motorcycle Riding Tips, which came with your new motorcycle (USA only). Make Yourself Easy to See Some drivers do not see motorcycles because they are not looking for them. To make yourself more visible, wear bright reflective clothing, position yourself so other drivers can see you, signal before turning or changing lanes, and use your horn when it will help others notice you. Motorcycle Safety 3

13 Important Safety Information Ride within Your Limits Pushing limits is another major cause of motorcycle accidents. Never ride beyond your personal abilities or faster than conditions warrant. Remember that alcohol, drugs, fatigue, and inattention can significantly reduce your ability to make good judgments and ride safely. Don t Drink and Ride Alcohol and riding don t mix. Even one drink can reduce your ability to respond to changing conditions, and your reaction time gets worse with every additional drink. So don t drink and ride, and don t let your friends drink and ride either. Keep Your Honda in Safe Condition It s important to keep your motorcycle properly maintained and in safe riding condition. To help avoid problems, inspect your motorcycle before every ride and perform all recommended maintenance. Never exceed load limits (page 49 ), and do not modify your motorcycle (page 6 ) or install accessories that would make your motorcycle unsafe (page 5 ). 4 Motorcycle Safety

14 Accessories & Modifications Modifying your motorcycle or using non- Honda accessories can make your motorcycle unsafe. Before you consider making any modifications or adding an accessory, be sure to read the following information. Improper accessories or modifications can cause a crash in which you can be seriously hurt or killed. Follow all instructions in this owner s manual regarding accessories and modifications. Accessories We strongly recommend that you use only Honda Genuine Accessories that have been specifically designed and tested for your motorcycle. Because Honda cannot test all other accessories, you must be personally responsible for proper selection, installation, and use of non-honda accessories. Check with your Honda dealer for assistance and always follow these guidelines: Make sure the accessory does not obscure any lights, reduce ground clearance and lean angle, limit suspension travel or steering travel, alter your riding position, or interfere with operating any controls. (cont d) Motorcycle Safety 5

15 Accessories & Modifications Do not add any electrical equipment that will exceed the motorcycle s electrical system capacity (page 223 ). A blown fuse can cause a loss of lights or engine power (page 205 ). Do not pull a trailer or sidecar with your motorcycle. This motorcycle was not designed for these attachments, and their use can seriously impair your motorcycle s handling. Modifications We strongly advise you not to remove any original equipment or modify your motorcycle in any way that would change its design or operation. Such changes could seriously impair your motorcycle s handling, stability, and braking, making it unsafe to ride. Removing or modifying your lights, exhaust system, emission control system, or other equipment can also make your motorcycle illegal. 6 Motorcycle Safety

16 Safety Labels Safety labels on your motorcycle either warn you of potential hazards that could cause serious injury or they provide important safety information. Read these labels carefully and don t remove them. If a label comes off or becomes hard to read, contact your Honda dealer for a replacement. Motorcycle Safety 7

17 Safety Labels For USA For Canada 8 Motorcycle Safety

18 Instruments & Controls This section shows the location of all gauges, indicators, and controls you would normally use before or while riding your motorcycle. The items listed on this page are described in this section. Instructions for other components are presented in other sections of this manual where they will be most useful. Operation Component Locations Gauges, Indicators & Displays Fuel Gauge Multi-function Display Coolant Temperature Meter Speedometer Odometer/Tripmeter A & B Changing the Speed, Mileage and Temperature Unit Digital Clock (cont d) Instruments & Controls 9

19 Instruments & Controls Controls & Features Ignition Switch Start Button Engine Stop Switch Headlight Dimmer Switch Turn Signal Switch Horn Button RESET Button SEL Button HESD (Honda Electronic Steering Damper) Instruments & Controls
.")
20 Operation Component Locations ignition switch headlight dimmer switch engine stop switch clutch lever turn signal switch front brake lever throttle grip horn button start button Instruments & Controls 11

21 Operation Component Locations storage compartment for U-shaped lock rear brake pedal 12 Instruments & Controls
22 Operation Component Locations helmet holder shift lever Instruments & Controls 13
23 Gauges, Indicators & Displays The gauges, indicators and displays on your motorcycle keep you informed, alert you to possible problems, and make your riding safer and more enjoyable. Refer to the gauges, indicators and displays frequently. Their functions are described on the following pages. (15) (1) (2) (3) (4) (5) (6) (1) fuel gauge (2) left turn signal indicator (3) tachometer (4) tachometer red zone (5) right turn signal indicator (6) multi-function display (7) HESD indicator (8) PGM-FI malfunction indicator lamp (MIL) (9) high coolant temperature indicator (10) low oil pressure indicator (11) neutral indicator (12) high beam indicator (13) Combined ABS indicator (CBR600RR ABS only) (14) RESET button (15) SEL button (14) (13)(12) (11) (10) (9) (8) (7) 14 Instruments & Controls
24 Gauges, Indicators & Displays Lamp Check The low oil pressure indicator comes on when you turn the ignition switch ON so you can check that it is working. The indicator remains on until after the engine is started. The neutral indicator, high beam indicator, left turn signal indicator, right turn signal indicator, and high coolant temperature indicator light for a few seconds and then go off when you turn the ignition switch ON. The PGM-FI malfunction indicator lamp (MIL) and HESD indicator light for a few seconds and then go off when you turn the ignition switch ON and engine stop switch is at RUN. (CBR600RR ABS only) The Combined ABS indicator comes on when you turn the ignition switch ON. This indicator goes off after you ride the motorcycle at a speed above 6 mph (10 km/h). When applicable, the high beam and neutral indicators come on when you turn the ignition switch ON and remain on until you select the low beam or shift out of neutral. These indicators are identified in the table on pages with the words: Lamp Check. If one of these indicators does not come on when it should, have your Honda dealer check for problems. Instruments & Controls 15
25 Gauges, Indicators & Displays Meter Check The tachometer needle will swing to the end of the red zone once when you turn the ignition switch ON. The meter is identified in the table on page 18 with the words: Meter Check. If the tachometer needle does not swing to the end of the red zone when it should, have your Honda dealer check for problems. 16 Instruments & Controls
26 Gauges, Indicators & Displays Display Check When the ignition switch is turned ON, the multi-function display ( 1) and fuel gauge ( 2) will temporarily show the entire digital display. Thereafter, the speedometer ( 3) will show from 180 mph to0mph(from290km/hto0km/hin km/h) so that you can make sure the liquid crystal display is functioning properly. (1) (3) The displays are identified in the table on pages with the words: Display Check. If any part of these displays does not come on when it should, have your Honda dealer check for problems. (2) (1) multi-function display (2) fuel gauge (3) speedometer Instruments & Controls 17
27 Gauges, Indicators & Displays fuel gauge left turn signal indicator (green) tachometer tachometer red zone Shows approximate fuel supply available (page 23 ). Display Check. Flashes when the left turn signal operates. Lamp Check. Shows engine speed in revolutions per minute (rpm). Meter Check. Shows excessive engine rpm range (indicated from the beginning of the tachometer red zone) in which operation may damage the engine. Do not let the tachometer needle enter the red zone. 5 right turn signal indicator Flashes when the right turn signal operates. (green) Lamp Check. 18 Instruments & Controls
28 Gauges, Indicators & Displays 6 multi-function display The display includes the following functions: Display Check. coolant temperature Shows coolant temperature (page 26 ). meter Fahrenheit ( F) or Centigrade ( C). speedometer Shows riding speed in miles or kilometers per hour (page 28 ). odometer Shows the total miles or kilometers ridden (page 29 ). tripmeter A & B Shows the number of miles or kilometers ridden since you last reset the meter. The tripmeter has two sub modes, A and B. To zero (0) the tripmeter, push and hold the RESET button (page 29 ). digital clock Shows hour and minute (page 32 ). Instruments & Controls 19
29 Gauges, Indicators & Displays 7 8 HESD indicator (red) PGM-FI malfunction indicator lamp (MIL) (amber) 9 high coolant temperature indicator (red) Lights when there is any abnormality in the HESD (Honda Electronic Steering Damper). Should also light for a few seconds and then go off when the ignition switch is turned ON and the engine stop switch is at RUN. If the indicator comes on at any other time, reduce speed and take your motorcycle to a Honda dealer as soon as possible (page 39 ). Lamp Check. Lights when there is any abnormality in the PGM-FI (Programmed Fuel Injection) system. Should also light for a few seconds and then go off when the ignition switch is turned ON and the engine stop switch is at RUN. If the indicator comes on at any other time, reduce speed and take your motorcycle to a Honda dealer as soon as possible. Lamp Check. Lights when the coolant is over the specified temperature. If the indicator comes on, pull safely to the side of the road. See pages for instructions and cautions. Lamp Check. 20 Instruments & Controls
30 Gauges, Indicators & Displays 10 low oil pressure indicator (red) 11 neutral indicator (green) 12 high beam indicator (blue) 13 Combined ABS indicator (amber) (CBR600RR ABS) Lights when engine oil pressure is low enough to cause engine damage. If the low oil pressure indicator lights during operation, pull safely to the side of the road. See page 204 for instructions and cautions. Lamp Check. Lights when the transmission is in neutral. Lamp Check. Lights when the headlight is on high beam. Lamp Check. Lights when there is any abnormality in the Combined ABS (Combined Anti-lock Brake System). Normally, this indicator comes on when the ignition switch is turned ON, and goes off after you ride the motorcycle at a speed above 6 mph (10 km/h). If the indicator comes on while riding, stop the motorcycle in a safe place and turn off the engine. Refer to Combined ABS Indicator, page 64. For information about Combined ABS, see pages Lamp Check. Instruments & Controls 21
31 Gauges, Indicators & Displays RESET button SEL button Resets the tripmeter to zero (0) (page 29 ). Also used to change the speed, mileage and temperature units for the speedometer/odometer/ tripmeter/coolant temperature meter (pages ). Also used to set the digital clock (pages ). Selects the odometer, tripmeter A and tripmeter B (page 29 ). Also used to set the digital clock (pages ). 22 Instruments & Controls
32 Gauges, Indicators & Displays Fuel Gauge The fuel gauge liquid crystal display ( 1) shows the approximate fuel supply available in a graduated display. When segment F ( 2 ) goes on, the fuel tank capacity is: 4.76 US gal (18.0 ) When segment E ( 3) flashes, you should refill the tank as soon as possible. The amount of fuel remaining when the flashing starts is approximately: 1.00 US gal (3.8 ) (2) (1) (3) (1) fuel gauge liquid crystal display (2) segment F (3) segment E Instruments & Controls 23
33 Gauges, Indicators & Displays Fuel Gauge Failure Indication When the fuel system has an error, the fuel gauge indicators will be displayed as shown in the illustration. If this occurs, see your Honda dealer as soon as possible. 24 Instruments & Controls
34 Gauges, Indicators & Displays Multi-function Display (1) (2) The multi-function display ( 1) includes the following functions: speedometer odometer/tripmeter digital clock coolant temperature meter (3) Both the digital clock and tripmeter will reset if the battery is disconnected. (5) (4) (1) multi-function display (2) speedometer (3) odometer/tripmeter (4) digital clock (5) coolant temperature meter Instruments & Controls 25
35 Gauges, Indicators & Displays Coolant Temperature Meter The coolant temperature meter ( 1) shows the coolant temperature digitally. Temperature Display Below 94 F (34 C) Between 95 F 250 F (35 C 121 C) Between 251 F 269 F (122 C 131 C) Above 270 F (132 C) -- is displayed. Actual coolant temperature is displayed. Actual coolant temperature is displayed and flashed. The display remains and flashes 270 F (132 C). USA : Fahrenheit ( F), or Centigrade ( C). Canada : Centigrade ( C). Fahrenheit ( F) Centigrade ( C) (1) coolant temperature meter (1) 26 Instruments & Controls
36 Gauges, Indicators & Displays Overheating Message: When the coolant temperature reaches 251 F (122 C), the numbers in the temperature display start flashing and the high coolant temperature indicator ( 2) comes on. If this occurs, stop the engine and check the reserve tank coolant level. Read pages and do not ride the motorcycle until the problem has been corrected. Fahrenheit ( F) Centigrade ( C) Continuing to ride with an overheated engine can cause serious engine damage. (2) (2) high coolant temperature indicator Instruments & Controls 27
37 Gauges, Indicators & Displays Speedometer The speedometer ( 1) shows riding speed in miles or kilometers per hour. (1) (1) speedometer 28 Instruments & Controls
38 Gauges, Indicators & Displays Odometer/Tripmeter A & B The odometer ( 1) shows the total miles or kilometers ridden. The tripmeter A ( 2) and tripmeter B ( 3) show number of miles or kilometers ridden since you last reset the meter. To select the odometer, tripmeter A or tripmeter B, push the SEL button ( 4 ). (4) (1) (2) (3) To reset the tripmeter, push and hold the RESET button ( 5) for more than 2 seconds when the display is in the tripmeter A or tripmeter B. (5) (1) odometer (2) tripmeter A (3) tripmeter B (4) SEL button (5) RESET button Instruments & Controls 29
39 Gauges, Indicators & Displays Changing the Speed, Mileage and Temperature Unit The speedometer displays both mph and km/h. The odometer/tripmeter displays both mile and km. The coolant temperature meter displays both F (Fahrenheit) and C (Centigrade). To select mph / mile and km/h / km, push the RESET button ( 1) with the display in the tripmeter A mode. (1) (1) RESET button 30 Instruments & Controls
40 Gauges, Indicators & Displays (USA only) To select F (Fahrenheit) and C (Centigrade), push the RESET button ( 1 ) with the display in the tripmeter B mode. (1) Fahrenheit ( F) Centigrade ( C) (1) RESET button Instruments & Controls 31
41 Gauges, Indicators & Displays Digital Clock (1) Shows hour and minute. To adjust the time, proceed as follows: 1. Turn the ignition switch ON. 2. Push and hold both the SEL button ( 2 ) and RESET button ( 3) for more than 2 seconds. The clock will be set in the adjust mode with the hour display flashing. (2) (3) (1) digital clock (2) SEL button (3) RESET button 32 Instruments & Controls
42 Gauges, Indicators & Displays 3. To set the hour, push the RESET button 4. Push the SEL button. The minute until the desired hour and AM/PM are display will start flashing. displayed. The time is advanced by one hour, each time the button is pushed. Quick setting push and hold the RESET button until the desired hour and AM/PM appear. (cont d) Instruments & Controls 33
43 Gauges, Indicators & Displays 5. To set the minute, push and release the 6. To end the adjustment, push the SEL RESET button until the desired minute button or turn the ignition switch OFF. is displayed. The minute display will The display will stop flashing return to 00 when 60 is reached automatically and the adjustment will without affecting the hour display. be cancelled if the button is not pushed The time advances by one minute, for about 30 seconds. each time the button is pushed. Quick setting push and hold the RESET button until the desired minute appears. 34 Instruments & Controls
44 Controls & Features Ignition Switch FRONT (1) OFF ON The ignition switch ( 1) is used for starting and stopping the engine (page 53 ) and to lock the steering for theft prevention (page 67 ). Insert the key and turn it to the right for the ON position. Push down on the key and turn it to the left to the LOCK (steering lock) position. Key Position ON OFF LOCK (steering lock) Function Electrical circuits on. No electrical circuits function. No electrical circuits function. Locks the steering head. (1) ignition switch LOCK To unlock the steering lock, insert and push down on the key and turn it to the right to the OFF position. Instruments & Controls 35
45 Controls & Features Start Button The start button ( 1) is used for starting the engine. Pushing the button in starts the engine. See Starting Procedure, page 54. When the start button is pushed, the starter motor will crank the engine; the headlight will automatically go out, but the position light, taillight and license light will stay on. The engine will not operate if the engine stop switch is in the OFF position when the start button is pushed. Engine Stop Switch RIGHT HANDLEBAR (2) (1) (1) start button (2) engine stop switch OFF RUN The engine stop switch ( 2) is used to stop the engine in an emergency. To operate, push the switch to the OFF position. The switch must be in the RUN position to start the engine, and it should normally remain in the RUN position even when the engine is OFF. 36 Instruments & Controls
46 Controls & Features If your motorcycle is stopped with the ignition switch ON and the engine stop switch OFF, the headlight, position light, taillight and license light will remain on, resulting in battery discharge. Headlight Dimmer Switch The headlight dimmer switch ( 1) is used to change between the high and low beams of the headlight. To operate, turn the switch to HI for high beam, LO for low beam. Turn Signal Switch Theturnsignalswitch( 2)isusedtosignal a turn or a lane change. To operate, move the switch all the way in the proper direction and release it. The appropriate turn signal lights will start blinking. To cancel the light, push the switch in. LEFT HANDLEBAR (1) (2) (3) (1) headlight dimmer switch (2) turn signal switch (3) horn button Instruments & Controls HI LO 37
47 Controls & Features Horn Button The horn is used to alert other motorists. To operate, push the horn button ( 3 ). RESET Button The RESET button is used to reset (zero) the tripmeter. To reset the tripmeter, push and hold the button for more than 2 seconds (page 29 ). TheRESETbuttonisalsousedtosetthe digital clock (page 32 ). SEL Button The SEL button is used to select odometer, tripmeter A or tripmeter B. To select from one tripmeter to the other, push the button (page 29 ). TheSELbuttonisalsousedtosetthe digital clock (page 32 ). TheRESETbuttonisalsousedtochange the speed, mileage and temperature units for the speedometer/odometer/tripmeter/ coolant temperature meter (pages ). 38 Instruments & Controls
48 Controls & Features HESD (Honda Electronic Steering Damper) This motorcycle is equipped with the electronically-controlled steering damper. If the HESD indicator lights at any other time, reduce speed and take your motorcycle to a Honda dealer as soon as possible. (2) The HESD ( 1 ) automatically controls the steering damper characteristics in accordance with vehicle speed and acceleration. The HESD indicator ( 2) lights when there is any abnormality in the HESD. The HESD indicator should also light for a few seconds and then go off when the ignition switch is turned ON and engine stop switch is at RUN. (1) HESD (2) HESD indicator (1) Instruments & Controls 39
49 40 Instruments & Controls
50 Before Riding Before each ride, you need to make sure you and your Honda are both ready to ride. To help get you prepared, this section discusses how to evaluate your riding readiness, what items you should check on your motorcycle, and adjustments to make for your comfort, convenience, or safety. This section also includes important information about loading. Are You Ready to Ride? Protective Apparel Rider Training Is Your Motorcycle Ready to Ride? Pre-ride Inspection Load Limits & Guidelines Loading Load Limits Loading Guidelines For information about adjusting the suspension on your Honda, see page 126. Before Riding 41
51 Are You Ready to Ride? Before you ride your motorcycle for the first time, we urge you to: Read this owner s manual. Make sure you understand all the safety messages. Know how to operate all the controls. Before each ride, be sure: You feel well and are in good physical and mental condition. Youarewearinganapproved motorcycle helmet (with chin strap tightened securely), eye protection, and other protective clothing. You don t have any alcohol or drugs in your system. Make sure your passenger is ready to ride, too, and is wearing proper gear including a helmet. If you must carry an extra helmet while riding, use a commercially available elastic cord, strap, or net to secure the helmet to the seat. Protective Apparel For your safety, we strongly recommend that you always wear an approved motorcycle helmet, eye protection, boots, gloves, long pants, and a long-sleeved shirt or jacket whenever you ride. Although complete protection is not possible, wearing proper gear can reduce the chance of injury when you ride. Following are suggestions to help you choose the proper gear. 42 Before Riding
52 Are You Ready to Ride? Helmets and Eye Protection Your helmet is your most important piece of riding gear because it offers the best protection against head injuries. A helmet should fit your head comfortably and securely. A bright-colored helmet and reflective strips can make you more noticeable in traffic. An open-face helmet offers some protection, but a full-face helmet offers more. Regardless of the style, look for a DOT (Department of Transportation) sticker on any helmet you buy (USA only). Always wear a face shield or goggles to protect your eyes and help your vision. Not wearing a helmet increases the chance of serious injury or death in a crash. Be sure you and your passenger always wear a helmet, eye protection, and other protective apparel when you ride. Additional Riding Gear In addition to a helmet and eye protection, we also recommend: Sturdy boots with non-slip soles to help protect your feet and ankles. Leather gloves to help protect your hands. (cont d) Before Riding 43
53 Are You Ready to Ride? A motorcycle riding suit or jacket for comfort as well as protection. Bright-colored and reflective clothing can help make you more noticeable in traffic. Avoid loose clothes that could get caught on any part of your motorcycle. To avoid possible heat damage to your motorcycle or personal belongings, do not block or restrict air flow around the exhaust muffler with baggage or clothing. Rider Training Developing your riding skills is an ongoing process. Even if you have ridden other motorcycles, take time to become familiar with how this motorcycle works and handles. Practice riding the motorcycle in a safe area to build your skills. Do not ride in traffic until you get accustomed to the motorcycle s controls, and feel comfortable with its size and weight. We urge all riders to take a certified course approved by the Motorcycle Safety Foundation (MSF). New riders should start with the basic course, and even experienced riders will find the advanced course beneficial. For information about the MSF training course nearest you, call the national toll-free number: (800) Other riding tips can be found in the Riding Tips booklet that came with your motorcycle (USA only). 44 Before Riding
54 Is Your Motorcycle Ready to Ride? Before each ride, it s important to inspect your motorcycle and make sure any problem you find is corrected. A pre-ride inspection is a must, not only for safety, but because having a breakdown, or even a flat tire, can be a major inconvenience. Improperly maintaining this motorcycle or failing to correct a problem before riding can cause a crash in which you can be seriously hurt or killed. Always perform a pre-ride inspection before every ride and correct any problems. Pre-ride Inspection Check the following items before you get on the motorcycle: Tires & Wheels Chain Look at the tires. If a tire appears low, use an air pressure gauge to check its pressure. Also look for signs of excessive wear (page 145 ) or damage to the tires and wheels. Check the condition of the chain. Adjust slack and lubricate as needed (page 154 ). Before Riding 45
55 Is Your Motorcycle Ready to Ride? Leaks, Loose Parts Lights Walk around your motorcycle and look for anything that appears unusual, such as a leak or loose cable. Make sure the headlight, position light, brakelight, taillight, license light and turn signals are working properly. If you are carrying a passenger or cargo, also check the following: Load Limits Cargo Adjustments Make sure you do not exceed the load limits (page 49 ). Check that all cargo is secure. Adjust the suspension (pages 127, 132 ) according to your load. 46 Before Riding
56 Is Your Motorcycle Ready to Ride? Check these items after you get on the motorcycle: Throttle Brakes Rotate the throttle to check it moves smoothly without binding. Pull the brake lever and press on the brake pedal to check that they operate normally. If you haven t ridden the motorcycle in over a week, you should also check other items, such as the oil level and other fluids. See Periodic Maintenance (page 78 ). Periodic maintenance should also be done at least once a month, no matter how often you ride. Remember, be sure to take care of any problem you find, or have your Honda dealer correct it before you ride. Indicators Turn the ignition on and check for normal operation of the indicators (page 14 ). Before Riding 47
57 Load Limits & Guidelines Your motorcycle has been designed to carry you and one passenger. When you carry a passenger, you may feel some difference during acceleration and braking. But so long as you keep your motorcycle well-maintained, with good tires and brakes, you can safely carry loads within the given limits and guidelines. However, exceeding the weight limit or carrying an unbalanced load can seriously impair your motorcycle s handling, braking, and stability. Non-Honda accessories, improper modifications, and poor maintenance can also reduce your safety margin. Loading How much weight you put on your motorcycle, and how you load it, are important to your safety. Anytime you ride with a passenger or cargo, you should be aware of the following information. Overloading or improper loading can cause a crash and you can be seriously hurt or killed. Follow all load limits and other loading guidelines in this manual. 48 Before Riding
58 Load Limits & Guidelines Load Limits Following are the load limits for your motorcycle: maximum weight capacity: 366 lbs (166 kg) 375 lbs (170 kg) (Canada only) includes the weight of the rider, passenger, all cargo, and all accessories. maximum cargo weight: 31 lbs (14 kg) The weight of added accessories will reduce the maximum cargo weight you can carry. Loading Guidelines Your motorcycle is primarily intended for transporting you and a passenger. You may wish to secure a jacket or other small items to the seat when you are not riding with a passenger. If you wish to carry more cargo, check with your Honda dealer for advice, and be sure to read the information regarding accessories on page 5. Improperly loading your motorcycle can affect its stability and handling. Even if your motorcycle is properly loaded, you should ride at reduced speeds and never exceed 80 mph (130 km/h) when carrying cargo. Before Riding 49
59 Load Limits & Guidelines Follow these guidelines whenever you carry a passenger or cargo: Check that both tires are properly inflated (page 143). If you change your normal load, you may need to adjust the front suspension (page 127 ) and the rear suspension (page 132 ). To prevent loose items from creating a hazard, make sure that all cargo is tied down securely before you ride. Place cargo weight as low and close to the center of your motorcycle as possible. Balance cargo weight evenly on both sides. To avoid possible heat damage to your motorcycle or personal belongings, do not block or restrict air flow around the exhaust muffler with baggage or clothing. 50 Before Riding
60 Basic Operation & Riding This section gives basic riding instructions, including how to start and stop your engine, and how to use the throttle, clutch, and brakes. It also provides important information on riding with a passenger or cargo. To protect your new engine and enjoy optimum performance and service life, refer to Break-in Guidelines (page 224). To protect the catalytic converter in your motorcycle s exhaust system, avoid extended idling and the use of leaded gasoline. Safe Riding Precautions Starting & Stopping the Engine Preparation Starting Procedure Flooded Engine Bank Angle Sensor Ignition Cut-off System How to Stop the Engine Shifting Gears Braking Combined ABS ( CBR600RR ABS ) Combined ABS Indicator ( CBR600RR ABS ) Parking Theft-prevention Tips Riding with a Passenger or Cargo Basic Operation & Riding 51
61 Safe Riding Precautions Before riding your motorcycle for the first time, please review the Motorcycle Saf ety section beginning on page 1, and the Bef ore Riding section beginning on page 41. Even if you have ridden other motorcycles, take time to become familiar with how this motorcycle works and handles. Practice in a safe area until you build your skills and get accustomed to the motorcycle s size and weight. Make sure flammable materials such as dry grass or leaves do not come in contact with the exhaust system when riding, idling, or parking your motorcycle. 52 Basic Operation & Riding
62 Starting & Stopping the Engine Always follow the proper starting procedure described below. For your safety, avoid starting or operating the engine in an enclosed area such as a garage. Your motorcycle s exhaust contains poisonous carbon monoxide gas which can collect rapidly in an enclosed area and cause illness or death. Your motorcycle can be started with the transmission in gear by pulling in the clutch lever before operating the starter. Your motorcycle is equipped with a side stand ignition cut-off system. If the side stand is down the engine cannot be started unless the transmission is in neutral. If the side stand is up the engine can be started in neutral, or in gear with the clutch lever pulled in. After starting with the side stand down, the engine will stop if the transmission is put in gear before raising the side stand. Preparation Before starting, insert the key, turn the ignition switch ON, and confirm the following: The transmission is in neutral (neutral indicator is ON). The engine stop switch is set to RUN. The low oil pressure indicator is ON. The PGM-FI malfunction indicator lamp (MIL) is OFF. The high coolant temperature indicator is OFF. (cont d) Basic Operation & Riding 53
63 Starting & Stopping the Engine The HESD indicator is OFF. The Combined ABS indicator is ON. (CBR600RR ABS only) The low oil pressure indicator should go off a few seconds after the engine starts. If the low oil pressure indicator lights during operation, stop the engine immediately and check the engine oil level. (CBR600RR ABS only) The Combined ABS indicator should go off after you ride the motorcycle at a speed above 6 mph (10 km/h). Starting Procedure This motorcycle has a fuel-injected engine with an automatic choke. Follow the procedure indicated below. Any Air Temperature With the throttle completely closed, press the start button. The engine will not start if the throttle is fully open (because the electronic control module cuts off the fuel supply). Even if the engine coolant stays below the specified temperature, the cooling fan sometimes starts up running when you rev up the engine, but this is normal. 54 Basic Operation & Riding
64 Starting & Stopping the Engine Flooded Engine If the engine fails to start after repeated attempts, it may be flooded with excess fuel. To clear a flooded engine: 1. Leave the engine stop switch set to RUN. 2. Open the throttle fully. 3. Press the start button for 5 seconds. 4. Follow the normal starting procedure. 5. If the engine starts, then open the throttle slightly if idling is unstable. If the engine does not start, wait 10 seconds, then follow steps 1 4 again. Bank Angle Sensor Ignition Cut-off System Your motorcycle s banking (lean angle) sensor system is designed to automatically stop the engine and fuel pump if the motorcycle is overturned. Before restarting the engine, you must turn the ignition switch to the OFF position and then back to ON. The engine will not restart until you perform this procedure. If the engine still won t start, refer to If Your Engine Quits or Won t Start, page 183. Basic Operation & Riding 55
65 Starting & Stopping the Engine How to Stop the Engine Normal Engine Stop To stop the engine, shift into neutral and turn the ignition switch OFF. Emergency Engine Stop To stop the engine in an emergency, use the engine stop switch. To operate, press the switch to the OFF position. The engine stop switch should normally remain in the RUN position even when the engine is OFF. If your motorcycle is stopped with the engine stop switch OFF and the ignition switch ON, the headlight, position light, taillight, and license light will remain on, resulting in battery discharge. 56 Basic Operation & Riding
66 Shifting Gears shifting pattern Your motorcycle has six forward gears in a one-down, five-up shift pattern which is coordinated with a cable-operated clutch system. Learning when to shift gears comes with experience. Keep the following tips in mind: As a general rule, shift while moving in a straight line. Close the throttle and pull the clutch lever in completely before shifting. Improper shifting may damage the engine, transmission, and drive train. Learn to recognize the engagement point as you release the clutch lever. It is at this point the transmission of power to the rear wheel resumes. Upshift to a higher gear or reduce throttle before engine rpm (speed) gets too high. Learn the relationship between engine sound and the normal shifting points. Downshift to a lower gear before you feel the engine laboring (lugging) at low rpm. (cont d) Basic Operation & Riding 57
67 Shifting Gears Avoid downshifting to help slow your motorcycle when engine rpm is near its allowable maximum (near the tachometer red zone). In this situation, the rev limiter in the engine ignition control module may not prevent excessive engine speed which could damage the engine. To prevent transmission damage, do not coast or tow the motorcycle for long distances with the engine off. Shif ting Up: From 1st to 2nd: From 2nd to 3rd: From 3rd to 4th: From 4th to 5th: From 5th to 6th: Shif ting Down: From 6th to 5th: From 5th to 4th: From 4th to 3rd: 12 mph (20 km/h) 19 mph (30 km/h) 25 mph (40 km/h) 31 mph (50 km/h) 37 mph (60 km/h) 28 mph (45 km/h) 22 mph (35 km/h) 16 mph (25 km/h) Recommended Shift Points Ride in the highest gear that lets the engine run and accelerate smoothly. This will give you good fuel economy and effective emissions control. When changing gears under normal conditions, use these recommended shift points: Pull the clutch lever in when speed drops below 12 mph (20 km/h), when engine roughness is evident, or when engine stalling is imminent; and shift down to 1st gear for acceleration. 58 Basic Operation & Riding
68 Braking Your motorcycle is equipped with disc braking systems which are hydraulically activated. Operating the brake lever applies the two front disc brakes. Depressing the brake pedal applies the rear disc brake. For full braking effectiveness, use both the lever and pedal simultaneously. Using both braking systems will stop your motorcycle faster with greater stability. As a general rule, the front braking system provides about 70 percent of total stopping power. Basic Operation & Riding 59
69 Braking To slow or stop, apply the brake lever and brake pedal smoothly, while downshifting to match your speed. Gradually increase braking as you feel the brakes slowing your speed. The increase in engine compression from downshifting will help slow your motorcycle. To prevent stalling the engine, pull the clutch lever in before coming to a complete stop. For support, put your left foot down first, then your right foot when you have finished braking. Applying the brakes too hard may cause the wheels to lock and slide, reducing control of your motorcycle. If this happens, release the brake controls, steer straight ahead until you regain control, then reapply the brakes more gently. When possible, reduce your speed or complete braking before entering a turn. Avoid braking or closing the throttle quickly while turning. Either action may cause one or both wheels to slip and reduce your control of your motorcycle. 60 Basic Operation & Riding
70 Braking Your ability to brake in a turn and to brake hard in an emergency situation are important riding skills. We suggest attending a Motorcycle Safety Foundation experienced rider training course (page 44 ) to retain these skills. When riding in wet or rainy conditions, or on loose surfaces, the ability to maneuver and stop will be reduced. All of your actions should be smooth under these conditions. Rapid acceleration, braking or turning may cause loss of control. For your safety, exercise extreme caution when braking, accelerating or turning. When descending a long, steep grade, use engine compression braking by downshifting, with intermittent use of both brakes. Continuous brake application can overheat the brakes and reduce their effectiveness. Riding with your foot resting on the brake pedal or your hand on the brake lever may actuate the brakelight, giving a false indication to other drivers. It may also overheat the brakes, reducing effectiveness. Basic Operation & Riding 61
71 Braking Combined ABS (CBR600RR ABS) This model is equipped with Combined ABS (Combined Anti-lock Brake System). When the ignition switch is turned ON, the system performs a self-analysis and when the vehicle speed reaches 6 mph (10 km/h) the system starts to operate and remains on while riding. Combined ABS is selfchecking. Combined ABS is an electrically integrated system consisting of the Combined Brake System and Anti-lock Brake System. Combined ABS controls braking force by accurately monitoring the amount of force applied to the brakes and wheel speed. It balances the front-to-rear braking distribution, and has an anti-lock function designed to help prevent wheel lock up during hard braking. Moreover, Combined ABS helps provide more riding stability when braking hard and suddenly. Although the wheel may not lock up, if you are braking too hard in a turn, the motorcycle can still lose traction causing a loss of control. In general, you ll achieve the best results by braking while running in a straight line. Even if the front brake lever and the rear brake pedal are operated independently, the brake force is distributed appropriately to the front and the rear. However, for full braking effectiveness, use both the lever and pedal simultaneously, as you would with a conventional motorcycle braking system. 62 Basic Operation & Riding
72 Braking In some situations, a motorcycle with Combined ABS may require a longer stopping distance to stop on loose or uneven surfaces than an equivalent motorcycle without Combined ABS. Combined ABS cannot make up for road conditions, bad judgment, or improper operation of the brakes, and cannot stop rear wheel lift completely. It is still your responsibility to ride at reasonable speeds for weather, road surface, and traffic conditions, and to leave a margin of safety. The anti-lock brake function of the Combined ABS may be activated by riding over a sharp drop or rise in the road level while operating the brake. It is important to follow the tire recommendations (page 150 ). The Combined ABS computer works by comparing wheel speed. Nonrecommended tires can affect wheel speed and may confuse the Combined ABS computer. Combined ABS does not function at low speeds (approximately 4 mph (6 km/h)orbelow). Combined ABS does not function if the battery is discharged. Combined ABS does not function if the ABS main or the ABS motor fuses are blown. (cont d) Basic Operation & Riding 63
73 Braking When Combined ABS does not function, the brakes work like a conventional braking system. On conventional braking systems, operating the front brake lever applies the front brake and operating the rear pedal applies the rear brake. You may feel a change in the way the brake lever/pedal reacts when it is operated under the following conditions: Immediately after turning the ignition switch ON After braking to a stop Combined ABS Indicator (CBR600RR ABS) Normally, this indicator comes on when the ignition is turned ON, and goes off after you ride the motorcycle at a speed above 6 mph (10 km/h). If there is a problem with Combined ABS, the indicator lights or flashes and remains on. Combined ABS does not operate when the Combined ABS indicator is on. 64 Basic Operation & Riding
74 Braking If the Combined ABS indicator lights or flashes and remains on while riding, stop the motorcycle in a safe place and turn off the engine. Turn the ignition ON again. The indicator should come on, and go off after you ride the motorcycle at a speeds above 6 mph (10 km/h). If it does not go off, Combined ABS is not functioning, but the brakes still provide normal stopping ability like a conventional braking system. However, you should have the system checked by your Honda dealer as soon as possible. The Combined ABS indicator may flash if: The front wheel leaves the ground for 1 second or more. Either brake is applied continuously from 0 mph (0 km/h) to 31 mph (50 km/h). You turn the rear wheel while the motorcycle is uplight on the stand. This is normal but the Combined ABS is not in operation. To activate the system again, turn the ignition OFF, then ON again. Basic Operation & Riding 65
No part of this publication may be reproduced without written permission.
 This manual should be considered a permanent part of the motorcycle and should remain with the motorcycle when it is resold. This publication includes the latest production information available before
Multi-information Display (see MID )
") Driving Position Memory (see Seats ) Power Mirrors (see Mirrors ) Indicators/Gauges (see Instrument Panel ) Multi-information Display (see MID ) HomeLink (see HomeLink ) Navigation System (see Navigation
Driving Position Memory (see Seats ) Power Mirrors (see Mirrors ) Indicators/Gauges (see Instrument Panel ) Multi-information Display (see MID ) HomeLink (see HomeLink ) Navigation System (see Navigation
2009 QUICK REFERENCE GUIDE GET INFORMED. ROLL.
 xb 2009 QUICK REFERENCE GUIDE GET INFORMED. ROLL. 2009 Scion xb This Quick Reference Guide is a summary of basic vehicle operations. It contains brief descriptions of fundamental operations so you can
Table of Contents. Introducing AYGO. Accessing your vehicle 2 3. Lights 9. Wipers 10. Electric windows 4. Gear change 11
 AYGO Brief Guide Table of Contents Accessing your vehicle 2 3 Electric windows 4 Steering wheel (Vehicles with an adjustable type) 4 Seat and seat belt adjustment 5 Instrument Panel overview 6 Instrument
Thailand Motorcycle Safety Course
 Thailand Motorcycle Safety Course Lesson 3 Getting Ready to Ride PREPARING TO RIDE What you do before you start a trip goes a long way toward determining whether or not you ll get where you want to go
INSPECTION BEFORE RIDING
 INSPECTION BEFORE RIDING Check the following items before riding. ITEM Engine cum transmission oil Fuel Tyres Battery Speedometer Lighting Steering Throttle Clutch Brakes Wheels WHAT TO CHECK FOR Availability
GENERAL KNOWLEDGE PRACTICE TEST
 GENERAL KNOWLEDGE PRACTICE TEST 1. Driving under the influence of any drug that makes you drive unsafely is: a. Permitted if it is prescribed by a doctor b. Against the law c. Permitted if it is a diet
TROPIC LIGHTNING CHECKRIDE PERFORMANCE MEASURE
 TROPIC LIGHTNING CHECKRIDE PERFORMANCE MEASURES V4.0 TASK 1: PERSONAL PROTECTIVE EQUIPMENT PERFORMANCE MEASURE DOT Approved Helmet Proper Reflective Equipment Full Fingered Gloves Proper Eye Protection
OPERATOR'S MANUAL i-shift transmission
 OPERATOR'S MANUAL i-shift transmission R Volvo Trucks. Driving Success. Table of Contents i Foreword... 1 Safety Information... 2 Volvo I-Shift Transmission... 4 General Information... 4 Gear Selector...
YFM400FV OWNER S MANUAL WARNING. READ THIS MANUAL CAREFULLY! It contains important safety information.
 READ THIS MANUAL CAREFULLY! It contains important safety information. OWNER S MANUAL WARNING LIT-11626-19-08 YFM400FV This ATV should not be ridden by anyone under 16 years of age. 5FU-F8199-16 EBU00776
WEAR THE RIGHT GEAR HELMET USE HELMET SELECTION
 What you do before you start a trip goes a long way toward determining whether or not you ll get where you want to go safely. Before taking off on any trip, a safe rider makes a point to: 1. Wear the right
8. WHAT EVERY MOTORCYCLIST MUST KNOW
 8. WHAT EVERY MOTORCYCLIST MUST KNOW It is an offence to carry passengers on the handle bars, frame or tank of the motorcycle. It is also an offence to cling to or attach yourself or your vehicle to any
Do not remove this Owner s Manual from the vehicle. Read this manual carefully before operating the vehicle as it contains important safety
 Do not remove this Owner s Manual from the vehicle. Read this manual carefully before operating the vehicle as it contains important safety information. Read this manual carefully. This Owner s Manual
TOYOTA ELECTRONIC TRANSMISSION CHECKS & DIAGNOSIS
 Checks and Adjustments The transmission requires regular maintenance intervals if it is to continue to operate without failure. As we discussed in previous sections, transmission fluid loses certain properties
Scion xb. Pocket Reference Guide. <http://www.scion.com/>, Contact
 EMAIL US , Contact 2006 CHAT On weekdays you can chat with a Scion Customer Advocate. , Have a Question? or Contact CALL US For the Scion Customer Experience
Mini Pallet Jack OWNER S MANUAL
 Mini Pallet Jack OWNER S MANUAL WARNING: Read carefully and understand all ASSEMBLY AND OPERATION INSTRUCTIONS before operating. Failure to follow the safety rules and other basic safety precautions may
OPERATOR S MANUAL WARNING
 ELECTRIC PALLET TRUCK E30 SERIES OPERATOR S MANUAL WARNING DO NOT INSTALL, OPERATE OR SERVICE THIS PRODUCT UNLESS YOU HAVE READ AND FULLY UNDERSTAND THE ENTIRE CONTENTS OF THIS MANUAL. FAILURE TO DO SO
BUYING A USED CAR. Copyright Permission Data Wizard/Humboldt 2003, Scott Keele
 BUYING A USED CAR VOCABULARY and DEFINITIONS Anti-lock brakes: Brakes that won t lock up, a computer in the car pumps the brakes on and off so the car will not skid. As Is: Buyer beware, the car is sold
2015 Scion tc Quick Reference Guide
 2015 Scion tc Quick Reference Guide 2015 Scion tc This Quick Reference Guide is a summary of basic vehicle operations. It contains brief descriptions of fundamental operations so you can locate and use
SMART RIDE SAFE RIDE. What you need to know to operate an ATV in Ontario
 SMART RIDE SAFE RIDE What you need to know to operate an ATV in Ontario B The All Terrain Vehicle, or ATV as it s commonly called, is a very popular year-round utility and recreational vehicle, that offers
Bicycle Riding. WHAT ARE the. One Final Note... It is against the law to ride a bicycle under the influence of alcohol and/or drugs. (21200.
 One Final Note... It is against the law to ride a bicycle under the influence of alcohol and/or drugs. (21200.0 VC) Bicycle Riding WHAT ARE the CALIFORNIA HIGHWAY PATROL CHP 909 (12/11) OPI 013 94 75015
MODEL T-4 TRENCHER. Operators Manual
 DO NOT THROW AWAY IMPORTANT MANUAL MODEL TRENCHER Operators Manual P.O.BOX 290 San Bernardino, CA. 92402 Phone (909) 478-5700 (800) 922-4680 Fax (909) 478-5710 E-mail: sales@groundhoginc.com www.groundhoginc.com
2015 Scion xb Quick Reference Guide
 2015 Scion xb Quick Reference Guide 2015 Scion xb This Quick Reference Guide is a summary of basic vehicle operations. It contains brief descriptions of fundamental operations so you can locate and use
Videos for Safety Meetings
 Videos for Safety Meetings 2474 2005, ERI Safety Videos OPERATING ELECTRIC PALLET JACKS SAFELY This easy-to-use Leader s Guide is provided to assist in conducting a successful presentation. Featured are:
xd 2010 QUICK REFERENCE GUIDE GET INFORMED. ROLL.
 xd 2010 QUICK REFERENCE GUIDE GET INFORMED. ROLL. 2010 Scion xd This Quick Reference Guide is a summary of basic vehicle operations. It contains brief descriptions of fundamental operations so you can
DEFENSIVE DRIVING. It s an Attitude
 DEFENSIVE DRIVING It s an Attitude RLI Design Professionals Design Professionals Learning Event DPLE 155 July 15, 2015 RLI Design Professionals RLI Design Professionals is a Registered Provider with The
Cycle Safety. Some tips on safer cycling. Údarás Um Shábháilteacht Ar Bhóithre Road Safety Authority
 Cycle Safety Some tips on safer cycling Údarás Um Shábháilteacht Ar Bhóithre Road Safety Authority Be safe For further information on safe cycling, please look at the Rules of the Road website at www.rulesoftheroad.ie
SAFE CYCLING GUIDE. 7th Edition
 SAFE CYCLING GUIDE 7th Edition BEFORE SETTING OUT A Check tire pressure B Check that the chain does not slip C Check the brakes D Check lights and reflectors: 1 A WELL-MAINTAINED BICYCLE is key 3 4 5 Adjust
Do not remove this Owner s Manual from the vehicle. Read this manual carefully before operating the vehicle, as it contains important safety
 Do not remove this Owner s Manual from the vehicle. Read this manual carefully before operating the vehicle, as it contains important safety information. Read this manual carefully. This Owner s Manual
HOW TO PREPARE FOR YOUR MARYLAND NONCOMMERCIAL CLASS C DRIVER S TEST
 ` HOW TO PREPARE FOR YOUR MARYLAND NONCOMMERCIAL CLASS C DRIVER S TEST A portion of your noncommercial driving test will be conducted on a closed course to test your basic control of the vehicle, and a
SAFE CYCLING GUIDE. 6th Edition
 SAFE CYCLING GUIDE 6th Edition BEFORE SETTING OUT A WELL-MAINTAINED BICYCLE is key A Check tire pressure B Check that the chain does not slip C Check the brakes D Check lights and reflectors: 3 4 1 5 2
Quick guide. How to use a Mobeazy car, e-scooter or e-bike
 Quick guide How to use a Mobeazy car, e-scooter or e-bike Important INFORMATION In case of emergency: Dial 112 (European emergency number) 112 Mobeazy General: For general information, during office hours
Wynn s Extended Care
 Wynn s Extended Care Every car deserves to receive the very best care... especially yours. How Do You Keep Your Reliable Transportation Reliable? Count on Wynn s Because Wynn s has been caring for cars
ve been rolling Here, s to you, Oregon riders! You, , s no wonder for longer than you, ve been walking, so it
 THE BICYCLIST S 1 the bicyclist s survival guide ride safely. the way to go. 2 Here, s to you, Oregon riders! You, ve been rolling for longer than you, ve been walking, so it, s no wonder you feel right
general, accidents caused by misjudging
 Unit 3: The Effect of Natural Forces on your Vehicle Page 1 of 11 Purpose: Acquaint the student with some of the natural forces acting on a vehicle while stopping, maneuvering, and during a crash. Explain
Bicycle riding is a great way to get into shape
 Bicycle riding is a great way to get into shape and have fun. To remain safe on Illinois roads, it is important to follow the same traffic safety laws that govern vehicle drivers. No amount of bicycle
INSTRUMENT PANEL. 1995 Volvo 850 DESCRIPTION & OPERATION. 1995-96 ACCESSORIES & EQUIPMENT Volvo Instrument Panels
 INSTRUMENT PANEL 1995 Volvo 850 1995-96 ACCESSORIES & EQUIPMENT Volvo Instrument Panels 850 WARNING: When working around steering column and before performing repairs, disconnect and shield battery ground
Defensive Driving While Towing a Trailer By Elizabeth Koncki, Maryland Department of Agriculture
 Defensive Driving While Towing a Trailer By Elizabeth Koncki, Maryland Department of Agriculture Many of you have heard the term defensive driving, but maybe you may have not been taught the method or
Ell STEERING COLUMN CONTROLS STEERING COLUMN CONTROLS
 STEERING COLUMN CONTROLS Ignition Switch........ 2-1 LightinglTurn Signal Control Lever... 2-5 Windshield Wiper and Washer Lever... 2-6 Rear Window Wiper/Washer Switch (if equipped)... 2-8 Tilt Steering
Bicycle Safety Quiz Answers Parental Responsibilities
 Bicycle riding is a great way to get into shape and enjoy the outdoors. To remain safe on Illinois roads, it is important to follow the same traffic safety laws that govern vehicle drivers. No amount of
BUSINESS REPLY MAIL. P.O. Box 47700 Hamel, MN 55340-9960 USA. Attn: Warranty Dept NO POSTAGE NECESSARY IF MAILED IN THE UNITED STATES
 NO POSTAGE NECESSARY IF MAILED IN THE UNITED STATES BUSINESS REPLY MAIL FIRST CLASS PERMIT NO. 21907 MINNEAPOLIS, MINNESOTA POSTAGE WILL BE PAID BY ADDRESSEE P.O. Box 47700 Hamel, MN 55340-9960 USA Attn:
Hybrid System Overview
 1 Hybrid System Overview January 31, 2004 2 Chevrolet Silverado / GMC Sierra Models: Extended Cab Short Box, 2WD & 4WD Engine: VORTEC 5.3 Liter V-8 Transmission: 4-speed auto transmission Power: 295 hp
YFM25RX OWNER S MANUAL LIT-11626-21-22 4D3-28199-10 WARNING. READ THIS MANUAL CAREFULLY! It contains important safety information.
 READ THIS MANUAL CAREFULLY! It contains important safety information. OWNER S MANUAL WARNING LIT--- YFMRX This ATV A should not be ridden by anyone under years of age. D-- EBU EBU INTRODUCTION EBU0 Congratulations
FMCSA Webinar Nov.18th to Examine Large Truck Crash Fatalities Involving Pedestrians & Bicyclists. New Technology for Better Fleet Management
 In This Issue: FMCSA Webinar Nov.18th to Examine Large Truck Crash Fatalities Involving Pedestrians & Bicyclists Help Prevent Roadway Accidents involving Pedestrians How to Steer Clear of Accidents with
Imagine a bike that s there when you need it, wherever you are, and gone when you don t. That s B-cycle. In this guide, you ll find all you need to
 Imagine a bike that s there when you need it, wherever you are, and gone when you don t. That s B-cycle. In this guide, you ll find all you need to know about operating a B-cycle to ensure your ride is
VEHICLE SPEED CONTROL SYSTEM
 PL VEHICLE SPEED CONTROL SYSTEM 8H - 1 VEHICLE SPEED CONTROL SYSTEM TABLE OF CONTENTS page DESCRIPTION AND SPEED CONTROL SYSTEM...1 SPEED CONTROL SERVO-PCM OUTPUT....2 SPEED CONTROL SWITCHES PCM INPUT...2
1. When the roads are slippery, you should make turns as gentle as possible.
 GENERAL KNOWLEDGE KEY FACTS CDL 1. When the roads are slippery, you should make turns as gentle as possible. 2. The heavier a vehicle or the faster it is moving, the more heat the brakes have to absorb
Emergency Response Guide
 Emergency Response Guide Honda CNG Vehicle Prepared for Fire Service, Law Enforcement, Emergency Medical, and Professional Towing Personnel by American Honda Motor Co., Inc. Contents Key Components 1
SAMPLE VEHICLE FLEET SAFETY & USAGE POLICY
 SAMPLE VEHICLE FLEET SAFETY & USAGE POLICY Policy The purpose of this policy is to ensure the safety of those individuals who drive company vehicles and to provide guidance on the proper use of company
Motorcycle Safety. Goal. Objectives. Equipment. Overview
 Motorcycle Safety HS05-040B (03/09) Goal This program will provide information and tips for safely driving a motorcycle both on public streets and highways and off-terrain. Objectives Following this safety
OWNER S MANUAL RAM TRUCK DIESEL SUPPLEMENT
 2015 OWNER S MANUAL RAM TRUCK DIESEL SUPPLEMENT VEHICLES SOLD IN CANADA With respect to any Vehicles Sold in Canada, the name Chrysler Group LLC shall be deemed to be deleted and the name Chrysler Canada
Motorcycles. Motorcycles
 8 177 8 This chapter contains information on how to obtain a motorcycle driver s licence. It also provides safety information for the operation of a motorcycle. 178 Anyone who lives in Nova Scotia and
STEERING COLUMN CONTROLS
 STEERING COLUMN CONTROLS Ignition Switch... 2-1 Lighting/Turn Signal Control Lever... 2-5 Windshield Wiper and Washer Lever... 2-6 Rear Window WiperlWasher Switch (if equipped)... 2-8 Tilt Steering Lock
What Every Young Michigan Bicyclist Must Know
 What Every Young Michigan Bicyclist Must Know A Guide for Youth Tips for Riding Your Bicycle Legally and Safely Meet the LMB Safety Kids Sprocket Madison Hub Spokes Chase Ryder What Every Young Michigan
15GAL STEEL OIL DRAIN WITH 110V PUMP
 15GAL STEEL OIL DRAIN WITH 110V PUMP OWNER S MANUAL WARNING: Read carefully and understand all ASSEMBLY AND OPERATION INSTRUCTIONS before operating. Failure to follow the safety rules and other basic safety
Section 14. Forklift Safety Contents 14.1 Operator Safety
 Section 14. Forklift Safety Contents 14.1 Operator Safety... 14-1 14.2 Inspection and Maintenance... 14-2 14.3 Handling the Load... 14-3 14.4 Fueling Liquefied Petroleum (LP) Gas Forklifts... 14-3 14.5
Raider Max 175 (single-seat & double-seat): Owner s Manual EEC Version:1.0 Sep. 2004. Limited Warranty
: Owner s Manual EEC Version:1.0 Sep. 2004. Limited Warranty") Limited Warranty The warranty policy applies to those cases where the new seller vehicle unloaded from its shipping container, set up and delivered by authorized dealer and under normal use and service
Limited Warranty The warranty policy applies to those cases where the new seller vehicle unloaded from its shipping container, set up and delivered by authorized dealer and under normal use and service
Read this manual carefully before operating this vehicle. OWNER S MANUAL YN50FU 5C3-F8199-E2
 Read this manual carefully before operating this vehicle. OWNER S MANUAL YN50FU 5C3-F8199-E2 Read this manual carefully before operating this vehicle. This manual should stay with this vehicle if it is
RS900ER / RS901 SERIES III OPERATING INSTRUCTIONS
 RS900ER / RS901 SERIES III OPERATING INSTRUCTIONS CONGRATULATIONS on your choice of a CoolStart Remote Engine Starter by Crimestopper Security Products Inc. This booklet contains the information necessary
A SURVEY OF MOTORCYCLISTS BRAKING TECHNIQUES. Rudolf G. Mortimer Consultant Urbana, Illinois, USA ABSTRACT
 A SURVEY OF MOTORCYCLISTS BRAKING TECHNIQUES Rudolf G. Mortimer Consultant Urbana, Illinois, USA ABSTRACT A survey was made of 180 motorcyclists of the order in which they used the front and rear brakes
SPARTAN INSTRUMENTATION OPERATORS GUIDE
 SPARAN INSRUMNAION OPRAORS GUID 1 1. INRODUCION his operator s guide provides the information needed to operate and understand the Medallion Instrumentation System installed on Spartan Chassis. Although
Driver Certification
 Driver Certification Environmental Health & Safety/Risk Management Department of Campus Operations 300 College Park Dayton, Ohio 45469-2904 937-229-4503 Agenda: Part I: Review of UD Driver Certification
ZAPPY 3 OWNER S MANUAL. Read this manual completely before riding your Electric ZAPPY 3.
 ZAPPY 3 OWNER S MANUAL Read this manual completely before riding your Electric ZAPPY 3. TECHNICAL INFORMATION Model No. : ZAPPY 3 Product size Type of motor Motor power Battery type Battery Charger Charging
Motorcycles. Registering and insuring your motorcycle Rules for operating your motorcycle Motorcycle safety
 Motorcycles Registering and insuring your motorcycle Rules for operating your motorcycle Motorcycle safety Table of Contents Introduction 1 Registering your motorcycle 2 Insurance protection 3 Rules for
Model Fleet Safety Program Short
 TM Model Fleet Safety Program Short CORPORATE HEADQUARTERS 518 EAST BROAD STREET COLUMBUS, OHIO 43215 614.464.5000 STATEAUTO.COM TM Disclaimer: The information contained in this publication was obtained
Document Name: Driving Skills. Purpose: To outline necessary driving skills required to maximize driving safety.
 Document Name: Driving Skills Date Created: 8 October 2013 Date Reviewed: 4 February 2014 Date Approved: 29 July 2015 Purpose: To outline necessary driving skills required to maximize driving safety. Overview:
Swann Insurance Motorcycle of the Future
 Swann Insurance Motorcycle of the Future For more than 40 years Swann Insurance has been one of Australia s leading providers of motorcycle-related insurance products. Swann distributes its motorcycle
A Guide to Accident Prevention on Motorcycles
 A Guide to Accident Prevention on Motorcycles SEE me now? Always ride with your dipped headlight on DAY AND NIGHT Avoiding the 5 most common motorcycle accidents... 1 Collisions at Junctions... These can
TOYOTA ELECTRONIC CONTROL TRANSMISSION
 Electronic Control Transmission (ECT) The Electronic Control Transmission is an automatic transmission which uses modern electronic control technologies to control the transmission. The transmission itself,
Bike Laws: Massachusetts
 Bike Laws: Massachusetts Do you know your rights of the road? Do you know what your responsibilities are when biking in Massachusetts? Here is a summary of Massachusetts bike law that covers equipment,
Adaptive Cruise Control
 33 Adaptive Cruise Control Adaptive Cruise Control Adaptive Cruise Control is a driving support system intended to allow more comfortable driving on expressways, freeways and interstate highways. The vehicle
Vehicle Fire Protection. An Ownerʼs Manual for ANSUL Fire Suppression/Detection Systems
 Vehicle Fire Protection An Ownerʼs Manual for ANSUL Fire Suppression/Detection Systems 002792 Off-road vehicles do have fires Statistics show that off-road vehicles burn with alarming frequency. These
Remote Engine Start System User s Information Manual
 Remote Engine Start System User s Information Manual A Few Words About Safety Your safety, and the safety of others, is very important. Operating this Remote Engine Starter System safely is an important
Owner s Guide. ca6554
 PROFESSIONAL SERIES Owner s Guide For Models: ca6554 Deluxe Vehicle Security and Remote Start System with 2 Way Confirming LCD Remote Control IMPORTANT NOTE: The operation of the Security and Convenience
CARING FOR YOUR BMW. QUICK REFERENCE GUIDE.
 CARING FOR YOUR BMW. QUICK REFERENCE GUIDE. ALWAYS LIKE THE FIRST DAY. Your BMW will always be the benchmark of sheer driving pleasure, even after leaving the showroom. But as high as BMW standards are
ARTICLE BEGINNING * PLEASE READ THIS FIRST * MODEL IDENTIFICATION VIN LOCATION VIN CODE ID EXPLANATION
 Article Text ARTICLE BEGINNING 1993-96 MAINTENANCE Volkswagen Maintenance Information Golf III, GTI (1995-96), Jetta III Cabrio (1995-96) * PLEASE READ THIS FIRST * NOTE: For scheduled maintenance intervals
WARNING! WARNING! ENGLISH 18 ENGLISH
 SKELETON RAKES Carefully read, follow and understand the instructions given in this manual. It is an essential part of the product, and you should keep it in a safe place for future reference. MECHANIC
MATERIAL HANDLING PROGRAM (Section 10)
") MATERIAL HANDLING PROGRAM (Section 10) OVERVIEW (WMI Facility) (1) Only certified personnel will operate powered industrial lifts. (2) Training will be provided to those who require to be certified or
MATERIAL HANDLING PROGRAM (Section 10) OVERVIEW (WMI Facility) (1) Only certified personnel will operate powered industrial lifts. (2) Training will be provided to those who require to be certified or
Checklist and Tips for Safe Winter Driving
 Know Your Car Every vehicle handles differently; this is particularly true when driving on wet, icy, or snowy roads. Take time now to learn how to best handle your vehicle under winter weather driving
1. Safe Operation - Please be careful while operating the Rickshaw: the motor is fairly strong so be cautious while engaging the throttle.
 Preface Thank you for choosing Daymak s Rickshaw mobility scooter. The Rickshaw is the latest innovation in electric mobility providing absolute safety; for both its rider and the environment. In the age
UNITED STATES AND U.S. TERRITORIES AND POSSESSIONS EXCEPT PUERTO RICO 2016 / WARRANTY & MAINTENANCE MANUAL
 UNITED STATES AND U.S. TERRITORIES AND POSSESSIONS ECEPT PUERTO RICO 2016 / WARRANTY & MAINTENANCE MANUAL Maintenance Service precautions Vehicle maintenance is an important yet frequently neglected item.
a family guide to January 2009 Bike Ed
 a family guide to January 2009 Bike Ed Childhood Development e program was developed by ycle education instructor s of programs available visit: gresources/health VRPIN 02026 5.08 a bicycle education program
EVBIKE LCD Display Control User Guide. EVBIKE LCD Display Control User Guide WWW.EVBIKE.CZ - 1 -
 EVBIKE LCD Display Control User Guide WWW.EVBIKE.CZ - 1 - Table of Contents: 1) Description of the individual components and installation 2) Description of the measured quantities and user control display
BUYERS GUIDE. IMPORTANT: Spoken promises are difficult to enforce. Ask the dealer to put all promises in writing. Keep this form.
 BUYERS GUIDE IMPORTANT: Spoken promises are difficult to enforce. Ask the dealer to put all promises in writing. Keep this form. VEHICLE MAKE MODEL YEAR VIN NUMBER DEALER STOCK NUMBER (Optional) WARRANTIES
Cable Drum Machine. Operation Manual BC260 SERIES. Cleans 1 1/4" to 3" lines up to 50'
 Cable Drum Machine Operation Manual BC260 SERIES Cleans 1 1/4" to 3" lines up to 50' Used For: Sink, Shower & Floor Drains 42FM " WARNING - Read All Instructions, When Using Electric Tools, Basic Safety
Practical accident assistance
 Practical accident assistance A guideline for Mercedes-Benz customers Please note: Changes may have been made to the products since this brochure went to press (12/2009). This brochure has been compiled
A Guide to Safe Bicycling in Hawai i
 A Guide to Safe Bicycling in Hawai i Sharing the Road: A Guide to Safe Bicycling in Hawai i What Motorists & Bicyclists Should Know Everyone has the right to be safe on Hawai i s roads. Law of the Splintered
Keys and Locks. Keys. Protect the keys from direct sunlight, high temperature, and high humidity.
 Keys KEY NUMBER TAG MASTER KEYS (Black) VALET KEY (Gray) The valet key works only in the ignition and the door locks. You can keep the glove box and hatch locked when you leave your vehicle and the valet
CAR DAILY VEHICLE PRE CHECKS INFORMATION. Page 1 of 6
 Page 1 of 6 CAR DAILY VEHICLE PRE CHECKS INFORMATION There are approximately 2.5 million vehicles in national fleet in Ireland. As vehicles age they are subject to wear and tear and unless attended to
Bicycle Safety Enforcement Action Guidelines
 Introduction Bicycle Safety Enforcement Action Guidelines People ride bicycles for many different reasons: fitness, recreation, or for transportation. Regardless of the reason for riding, bicyclists young
BIKE BASICS. The AAA Guide to a Great Ride
 BIKE BASICS The AAA Guide to a Great Ride FREEDOM ON WHEELS Bicycles can be considered symbols of independence and freedom. They are also fun, providing riders a greener, healthier form of transportation.
Emergency Response Guide
 Emergency Response Guide Honda Natural Gas Vehicles This publilcation covers these Civic Natural Gas Models: 1998-2000 2001-2005 2006-2011 2012 Prepared for Fire Service, Law Enforcement, Emergency Medical,
ATV RIDER SAFETY HANDBOOK
 ATV RIDER SAFETY HANDBOOK Copyright 2009 ETON America, LLC. Forward This ATV Safety handbook is intended to be used as a supplemental guide to safe ATV operations in conjunction with the Owner s manual
Professional Truck Driver Training Course Syllabus
 Professional Truck Driver Training Course Syllabus The curriculum standards of this course incorporate the curricular recommendations of the U. S. Department of Transportation s Federal Highway Administration
APPENDIX D PUBLIC AWARENESS INFORMATION
 APPENDIX D PUBLIC AWARENESS INFORMATION READINESS FAILURE FACT SHEET Beginning December 2004, New York will implement a new motor vehicle emission testing program in 53 of New York s upstate counties,
Customer Demo Ride Manual
 Customer Demo Ride Manual Table of Contents Page Section 1 Dealer Responsibilities 3 Section 2 Customer Qualifications 5 Section 3 Conducting Rides 6 Section 4 Accidents 9 Section 5 Mechanical Failures
Headlight switch. The daytime running. lights) turn on.
 turn on.") Headlight switch The headlights can be operated manually or automatically. U.S.A. Canada The daytime running lights turn on The side marker, parking (vehicles with halogen headlights), daytime running
Headlight switch The headlights can be operated manually or automatically. U.S.A. Canada The daytime running lights turn on The side marker, parking (vehicles with halogen headlights), daytime running
DOT HS 807 709 Revised December 2007 MOTORCYCLE SAFETY
 DOT HS 807 709 Revised December 2007 MOTORCYCLE SAFETY How safe is motorcycling? How does it compare to driving an automobile? Are there any special precautions to be observed? What are the causes of motorcycle
WARRANTY BOOK PART NUMBER: 07-26-14N 15K /12M
 WARRANTY BOOK PART NUMBER: 07-26-14N 15K /12M HONDA NEW ZEALAND LIMITED Welcome to Honda New Zealand Limited and Honda Agents Nationwide. Honda New Zealand Limited congratulates you on your choice of one
Supplementary restraints system
 Supplementary restraints system PRINCIPLE OF OPERATION High speed impacts may cause serious injury or death irrespective of safety features fitted to the vehicle. Always drive with caution and consideration