The Axesstel TX240G is a dual-band (800/1900Mhz) fixed wireless voice terminal that is perfect for a
|
|
|
- Bonnie Porter
- 8 years ago
- Views:
Transcription

1 1
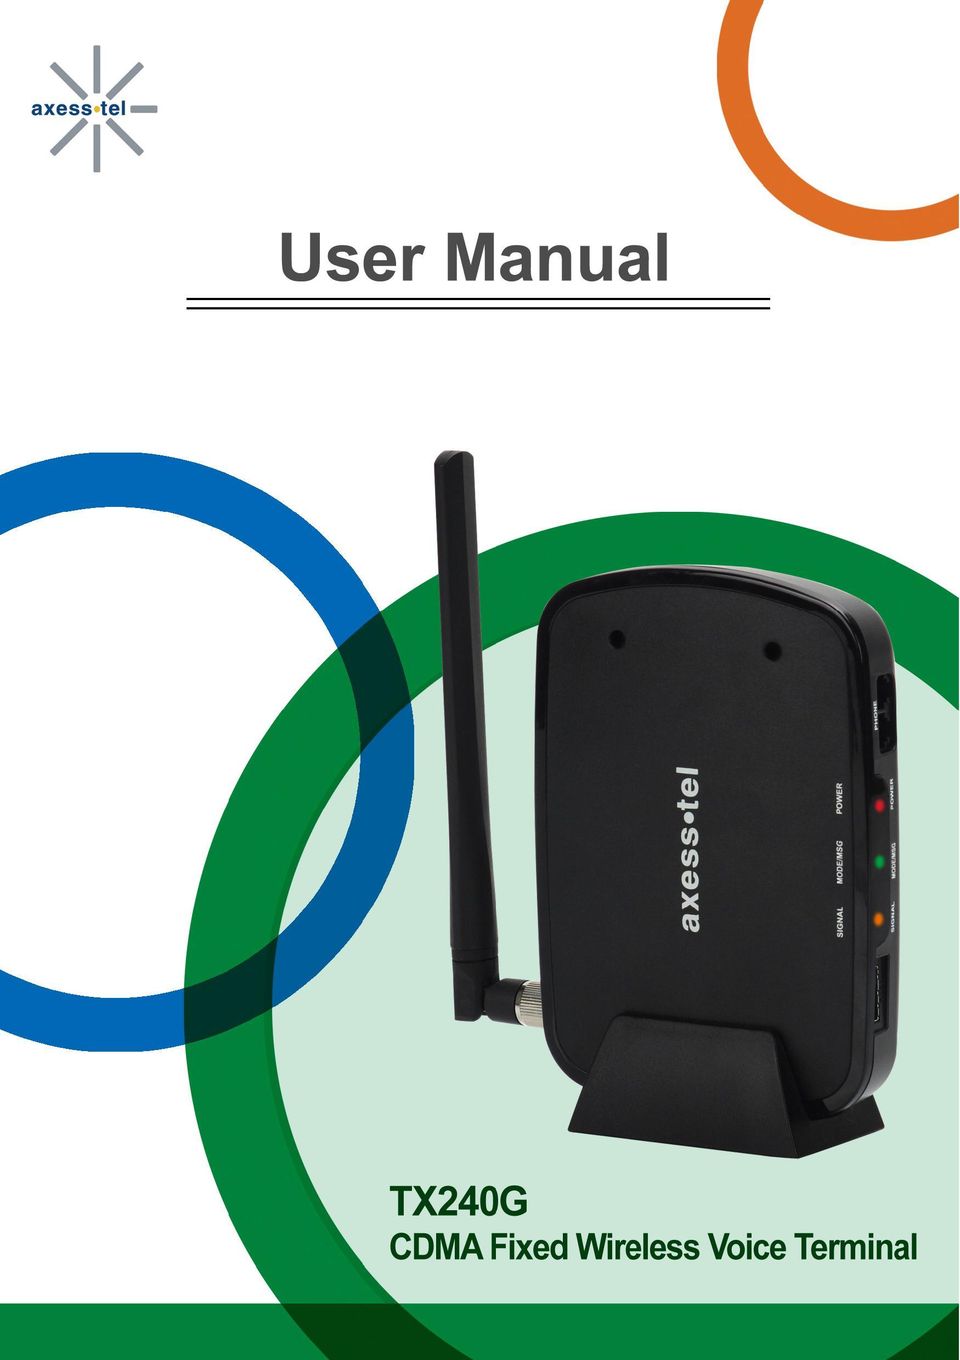
2 INTRODUCTION OVERVIEW The Axesstel TX240G is a dual-band (800/1900Mhz) fixed wireless voice terminal that is perfect for a seamless land-line like service. TX240G is designed to provide a simple phone service at a home or business. Its Assisted GPS feature provides E911 service to accurately determine the location of the caller in case of an emergency. Axesstel s TX240G allows the users to migrate from landline to wireless without losing any functionality of their regular home phone service. FEATURES - CDMA2000 1x voice services (backward compatible to IS-95 A/B) - 800/1900 MHz Dual Band - A-GPS for E911 location service (SMA Antenna Connector) - TTY/TDD Telephone Support - 3 multi-colored LED Indicators (Signal, Mode and Power) - 2 RJ-11 Bridged Ports (with max 3 REN) - Dial-Tone and DTMF Generation - Desktop and Wall-Mountable - Call Waiting, Three-way Calling and Call Forwarding - Call Restriction - Type II Caller ID (or Call Waiting Caller ID) - OTA(IS-683A) 2
 - 800/1900 MHz Dual Band - A-GPS for E911 location service (SMA Antenna Connector) - TTY/TDD Telephone Support - 3")
3 TABLE OF CONTENTS INTRODUCTION...2 Overview...2 Features...2 Safety Precautions...4 Package Content...5 BASIC INSTALLATION Internal Battery Installation...6 Setting Up the Terminal...6 Wall Jack Tester...7 RJ11 Cross Adaptor...8 A-GPS for E Wall Mount Installation...10 LED Indicators...11 Audible Indicators...12 BASIC OPERATION Power On/Off...14 Making Calls...14 Receiving Calls...15 Using # as Send Key. 19 Setting DTMF Length...19 SECURITY Changing Lock Code...20 Restricting Outgoing Calls...20 Factory Reset TTY/TDD Mode Setting OPTIONAL FEATURES Call Waiting...23 Three-Way Calling Voice Mail Service MISCELLANEOUS Menu Option Table...26 Troubleshooting...27 Specification...28 ADVANCED FEATURES SOUND Adjusting Voice Volume Adjusting Alert Tone Volume...17 Setting One Minute Volume...17 Setting Voice Privacy Alert...17 Setting Connection Alert...18 GENERAL Setting Caller ID and Call Waiting ID...18 Setting Auto Send Time. 18 3

4 SAFETY PRECAUTIONS 1. Avoid placing the terminal in a dusty location, or near a source of gas or fire. 2. Do not shake, hit or drop the terminal. 3. To clean the outside of the terminal, use only a soft, dry cloth, as chemicals such as alcohol, benzene or acetone can damage the surface of the terminal. 4. Do not twist or pull the cables. 5. Do not disassemble the terminal. 6. Do not use the power adapter if: - The power cord is damaged. - The adapter has been damaged in any way. 7. Use only the AXESSTEL provided power adapter. Do not use the AXESSTEL power adapter for any other purposes. 8. Use only the AXESSTEL provided antenna. Do not use the antenna for any other purposes. 9. Frequency and length of use can affect the life of the self-charging battery. Contact your point of sale s customer service department if the battery is not operating properly. 10. Use only the designated self-charging battery. Dispose of exhausted batteries properly. Never discard a battery in or near a fire or flame. 11. Do not use the terminal near water, for example, near a bathtub, sink, wet basement, or swimming..pool. NOTE: The input voltage and the shape of the power plug may vary from country to country. NOTE: Use wired or cordless telephones compatible to FCC part 68 only. Non-compliant telephones may not work properly. 4

5 PACKAGE CONTENTS After opening the package, check to make sure that you have all the parts shown below. If any item is missing or broken, please call your service provider s support center Axesstel 1x Fixed Wireless Terminal CDMA Dipole Antenna Power Adapter (Input: AC V, 50/60Hz / Output:5V/2A) Backup Battery User Manual and Quick Guide GPS Antenna with Cable and Pad RJ-11 Phone Cord PSTN Tester RJ-11 Cross Adaptor Desktop Stand CAUTION Use the provided power adapter only. Using other power adapter may cause permanent damage to the terminal. 5

6 BASIC INSTALLATION INTERNAL BATTERY INSTALLATION This TX240G operates by receiving electricity from an electrical outlet or internal battery. 1. Open the battery cover on the bottom side of the terminal. 2. Connect the Battery power cable to the terminal. 3. Insert the battery pack in the right position between the hold bars. 4. Close the battery cover. SETTING UP THE TERMINAL 1. Connect the antenna by screwing it into the TNC connector on the back of the terminal. 2. Connect a wired or cordless telephone to the terminal using the RJ-11 phone cord. NOTE: Use wired or cordless telephones compatible to FCC part 68 only. Non-compliant telephones may not work properly. 3. Plug the AC adapter plug into the DC 5V jack of the Terminal. 4. Plug the AC adapter plug into an appropriate electrical outlet. 6


7 Connecting the Terminal to Home Phone Wall Outlet. The TX240 can be connected to a home wall phone jack to generate a dial tone service throughout the entire home and allow users to use phones from any other home wall phone jack. Please verify that the home wall phone jacks do not have existing active telephone service and that they are not powered. Before connecting the terminal to home wall jack, please test with the included Wall Jack Tester. WALL JACK TESTER (PSTN Line Tester) The wall jack tester will verify if the wall phone jack is powered by existing or previous landline phone service. IMPORTANT NOTE DO NOT CONNECT YOUR TERMINAL TO A WALL JACK IF PSTN LINE IS STILL IN SERVICE. Connecting the terminal to the live wall jack may interfere with the existing phone service and damage the terminal. 1. Plug the tester into the wall jack. 2. If tester s Green colored LED illuminates (ON), your PSTN line is still active and powered. In this case, contact your existing or previous landline phone service provider to disconnect the phone service and power. NOTE: Alternately, 2-line cross adapter may be used to bypass the powered first phone line. Please.see next section, using 2-line cross adapter. 3. If Green colored LED does not illuminate, the wall phone jack is not powered and you can safely connect your terminal to wall jack. [LED OFF line is safe to use] 7

8 RJ-11 CROSS ADAPTOR (Line 1 to Line 2 Bypass Adapter) If the first line of the phone line is live and has power, you may still be able to use the terminal through your home phone wiring by using the RJ-11 cross adapter. Line 1 uses the middle two pins on the RJ- 11 cable. Line 2 uses the outer two pins on the RJ-11 connector. IMPORTANT NOTE Some house wirings may only have line 1. Some houses may have both line 1 and line 2 wires live. In such cases, please do not connect the terminal to your house wall jack. Instead, please consider using multi-handset cordless phone. Connect the base of the cordless phone directly to the terminal using RJ-11 cable. 1. Before connecting the terminal, test the line 2 in your house by plugging the cross adapter into the wall jack. Then plug the Wall Jack Tester into the back of the cross adapter. If the LED is lit, line 2 is also live. 2. If the line 2 is not live, connect one of the cross connector between the terminal and wall-jack. This will convert the terminal output to line 2 of the in-wall wiring. 3. Connect another cross connector between another wall jack and corded/cordless phone in another room. Check if there is dial tone or busy tone on the line. 4. If no tone is heard, please check if the terminal is turned on properly. If the problem persists, it may be possible that the home wiring line 2 is not available. NOTE: The default packaging may or may not include the cross adaptors. Cross adapter may be called a 2-Line Splitter and should be readily available at local electronic or office supply stores. 8

9 A-GPS for E911 Your terminal supports an A-GPS feature to meet a FCC 911 mandate, which makes the location of the terminal available to 911 operators in the case of emergency situations. During the emergency call, all the LEDs on the terminal will blink and your location can then be determined by the 911 operator. In order to increase the location accuracy, the external GPS antenna must be connected to the terminal and positioned at a location that can receive satellite signals, such as outside the home or building or near a window without obstructions to the sky. IMPORTANT NOTE The accuracy of the A-GPS location will significantly degrade if the A-GPS antenna is not connected to properly or located indoor or at a place with obstruction to the sky. In such cases, the emergency dispatcher will not be able to accurately locate your position. The A- GPS signal and location accuracy can be dependent on many factors and cannot be guaranteed. 1. Connect the A-GPS antenna to the SMA connector on the terminal. 2. Place the Magnetic Pad at a location that has no obstruction to the sky, such as outdoors or near a window. 3. Put the A-GPS antenna on the magnetic pad and position the antenna to face outside. 9

10 WALL MOUNT INSTALLATION 1. Mark two mounting hole locations on a wall to match the screw holes on the back of the terminal. 2. Drill two holes and put screws at the marked locations. 3. Tighten the screws until the head is about 5mm from the wall. 4. Plug in the AC power connector and route the power cord in the groove, if needed. Connect antenna. 5. Hang the terminal on the screws using the two holes on the back. 6. Push the terminal down until the unit is firmly locked into place. 10

11 GETTING TO KNOW THE TERMINAL LED INDICATORS Item Color Status Description POWER Green Solid In Battery Mode: Fully Charged Full In Adaptor Mode: Connected Blinking Charging Orange Solid Blinking Mid Battery Level Battery Error Red Solid Blinking Low Battery Low Battery Warning Off - No Battery SIGNAL Green Solid Excellent Signal Orange Solid Good Signal Red Solid Low Signal OFF - No Service MODE/MSG Green Solid Blinking Off-Hook or In Use Incoming Call Orange Blinking Voice Mail Waiting E911 Call All LEDs Blinking All LEDs blink during emergency call 11

12 AUDIBLE INDICATIORS No Tone Cadence Remark 1 Dial Tone Continuous beep 330ms ON / OFF 660ms ON / OFF Terminal is in service area and can make calls. 2 Busy Tone 3 Howler Tone 4 No Service Tone 5 Function Confirm Tone Beep - beep - beep 0.5s ON / 0.5s OFF High pitched beep ( Hz) 0.1S ON ( Hz) 0.1S OFF Long beep + pause 1.5s ON 800ms OFF Escalating bee bee -beep 1046Hz: 350ms ON 1328Hz: 350ms ON 1567Hz: 350ms ON 6 Function Error Tone Three Short Beeps 7 Outgoing Call Restriction Tone 800ms ON 200ms OFF Recipient line is busy Phone receiver is off the hook for more than specified duration Terminal cannot make or receive calls (No signal) Used when accessing menu. Menu selection or configuration successful Used when using menu. Menu selection or configuration not successful Terminal is configured to block outgoing call (incoming calls are permitted) 8 Voice Mail Indicate Tone 9 One Minute Alert Tone 0.1s ON 0.1s OFF(One Time) Short beep 0.1s(One Time) 12
 Used when accessing menu.")
13 Basic Operation POWER ON/OFF MAKING CALLS RECEIVING CALLS 13

14 POWER ON / OFF The power switch is located on the back side of the terminal 1. Turn on the unit by moving switch to ON position. 2. Turn off the unit by moving switch to OFF position. NOTE: When you turn on the terminal, it automatically searches for cellular service. After successfully acquiring cellular service, the Signal LED turns to Green, Orange or Red depending on signal strength. MAKING CALLS 1. Check if the terminal is turned on. 2. Pick up the handset of the phone. 3. If you hear a dial tone, dial the desired telephone number by using the wired or cordless telephone s keypad. NOTE: You can dial a phone number with a maximum of 32 digits, including * and #. 4. Wait for about 3 seconds until the call is automatically processed by the terminal. (Auto Dial Time can be configured from 3 seconds to 9 seconds, or turned-off). NOTE: If # as Send Key feature is enabled, press the # button to process the call immediately after entering the dialed number. Default setting is OFF. Please refer to the page 19 for Using # as Send Key. 5. When the other recipient answers, begin conversation. NOTE: If Connection Alert is turned on, a beep is heard when the call is connected. The default setting is OFF. 6. To hang up, put the phone receiver back on the phone hook or press the TALK or OFF button on your phone. 14

15 RECEIVING CALLS The wired or cordless telephone(s) connected to the terminal ring when an incoming call comes in. 1. Pick up the phone receiver to answer the call. 2. To disconnect after the call is finished, place the handset on the phone hook or press the TALK or OFF button on your phone. NOTE 1: If using cordless phone, press TALK or ON button to answer the phone call..refer to the cordless phone user manual for instruction. NOTE 2: Make sure that the attached telephone(s) ringers are enabled. NOTE 3: When there is another incoming call during an already active phone call, press any.key on the numeric keypad to answer the call. 15

16 Advanced Features SOUND ADJUSTING VOICE VOLUME ADJUSTING ALERT TONE VOLUME SETTING ONE MINUTE ALERT SETTING VOICE PRIVACY ALERT SETTING CONNECTION ALERT.GENERAL SETTING CALLER ID CALL WAITING ID CALLER NAME DISPLAY SETTING AUTO SEND TIME USING # AS SEND KEY SETTING DTMF LENGTH.SECURITY CHANGING LOCK CODE RESTRICTING OUTGOING CALLS FACTORY RESET.TTY/TDD MODE SETTING 16

17 SOUND ADJUSTING VOICE VOLUME You can control the volume level of the terminal. 1. Pick up the handset and listen to the dial-tone. 2. Press * * 1 1 * to raise the voice volume. 3. Press * * 1 1 # to lower the voice volume. 4. A confirmation beep will sound. NOTE 1: Some phones may have their own volume control. Use both the terminal and the phone.volume controls to optimize the sound level. NOTE 2: Volume cannot be adjusted while a conversation is in progress. ADJUSTING ALERT TONE VOLUME 1. Pick up the handset. 2. Press * * 1 2 * to raise the alert tone volume. 3. Press * * 1 2 # to lower the alert tone volume. SETTING ONE MINUTE ALERT When this feature is enabled, a discrete tone is generated at each one minute interval on the receiver during a conversation for both incoming and outgoing calls. This tone is to help the user keep track of the phone usage. To change the setting: 1. Pick up the handset. 2. Press * * 1 3 # to enable the feature. 3. Press * * 1 3 * to disable the feature. SETTING VOICE PRIVACY ALERT If enabled, a beep is generated when Voice Privacy is on. To change the setting: 1. Pick up the handset. 2. Press * * 1 4 # to enable the feature. 3. Press * * 1 4 * to disable the feature. 17

18 SETTING CONNECTION ALERT If enabled, a discrete tone is generated on the receiver when a call is connected. To change the setting: 1. Pick up the handset. 2. Press * * 1 5 # to enable the feature. 3. Press * * 1 5 * to disable the feature. NOTE: The default setting may depend on the service provider. GENERAL SETTING CALLER ID MODE If your phone connected to the terminal is caller ID enabled, you can set the terminal to display the caller identification number or name on the LCD display of the wired or cordless phone. To change the setting: 1. Pick up the handset. 2. Press * * # to disable the Caller ID feature. 3. Press * * # to enable DTMF Standard type. 4. Press * * # to enable FSK (Bellcore) type. NOTE: The default setting of Caller ID is FSK. CALL WAITING ID The Call Waiting ID feature allows the display of the second caller s number while already in a conversation (call waiting). This feature works only with FSK Caller ID setting. In order to use this feature, the corded/cordless phone must support caller ID and call waiting ID, also known as type II caller identification. CALLER NAME DISPLAY This feature allows the display of the caller s name on the corded or cordless phones that support alpha-numeric display for caller name display. This is a network dependent feature and works only if your service provider supports it. This feature may require an upgrade to premium service or an additional fee. 18

19 SETTING AUTOSEND TIME Similar to a landline phone, the terminal automatically makes the call shortly after the user finishes entering the phone number. To change the setting: 1. Pick up the handset. 2. Press * * 2 2 Then press 3, 9 or 0 and press #. For example, to set the auto-send time to 5 seconds, press * * #. NOTE 1: 0 value disables auto-send. If disabled, the user must press # to make a call. # functions as a SEND key on the mobile phone. If auto-send time is set to 0, then the # as SEND feature is automatically enabled. NOTE 2: The default auto send time is 3 seconds. USING # AS SEND KEY Similar to mobile phones, pressing the # key after entering the phone number can act as SEND key. This feature can be enabled or disabled. To change the setting: 1. Pick up the handset. 2. Press * * 2 3 # to enable the feature. 3. Press * * 2 3 * to disable the feature. Note: The default setting is OFF. If the Auto-Send Time is set as 0, then # as SEND key feature is automatically enabled. SETTING DTMF LENGTH Some ARS (Automatic Response Service) require short or long DTMF tones depending on the system. To change the setting: 1. Pick up the handset. 2. Press * * 2 4 # to select Short DTMF tone. 3. Press * * 2 4 * to select Long DTMF tone. 19

20 SECURITY CHANGING LOCK CODE The lock code prevents the terminal from being used by an unauthorized person without permission. The default lock code is To change the lock code: 1. Pick up the handset. 2. Press * * Enter the old 4 digit lock code. For example , a short beep will sound as confirmation. If not correct, an error tone will sound and the terminal will return to standby mode. 4. Enter the new 4 digit lock code followed by #. For example #, another short beep will sound as confirmation. 5. Re-enter the new 4 digit lock code followed by #. For example #, another beep will sound as confirmation. If not correct, error tone will sound and the terminal will return to standby mode. For example, to change the lock code from to , press * * # #. RESTRICTING OUTGOING CALLS This feature can be used to block outgoing calls from being made. But incoming call can still be received. To change the setting: 1. Pick up the handset. 2. Press * * Enter 4 digit lock code. 4. Press # to enable or * to disable. NOTE 1: The default lock code is To change, refer to Changing Lock Code section. NOTE 2: If someone tries to make a call when outgoing call restriction is enabled, the terminal sounds a beep and howler tone. 20

21 FACTORY RESET Reset the user configuration to factory default settings. 1. Pick up the handset. 2. Press * * Enter the 4 digit lock code. If not correct, an error tone will sound and the terminal will return to standby mode. 4. Press # to reset. NOTE 1: The default lock code is To change, refer to Changing Lock Code section. NOTE 2: Factory reset includes auto send time, lock code, call restrictions, caller ID type, voice.privacy alert, connection alert and 1 minute alert. TTY/TDD MODE SETTING To use the TTY/TDD feature, refer to following instruction. The default setting is OFF. 1. Connect the TTY/TDD phone to the terminal through the RJ-11 jack. 2. Pick up the handset. 3. Press * * # for TTY Full Mode. 4. Press * * # for TTY Talk Mode. 5. Press * * # for TTY Hear Mode. 6. Press * * # for Off. NOTE 1: For the detailed instructions, contact your service provider. NOTE 2: Some TTY device may not generate the DTMF tone for * and #, which is necessary to change the TTY/TDD mode. In such case, please use regular analog phone to enter the mode change key sequence. 21
22 Optional Features CALL WAITING THREE-WAY CALLING VOICE MAIL SERVICE 22
23 CALL WAITING Call Waiting is a feature which enables you to be alerted to a second incoming call when you are already on a phone call. Your service provider may or may not provide this feature. Please contact with your service provider to inquire. To use call waiting: 1. You will hear a beep from the earpiece when a second call is incoming. 2. Press the hook or press the FLASH key to answer to the second call. 3. Press the hook again or press the FLASH key to return to the first call. THREE-WAY CALLING Three-Way Calling is a feature that enables you to set up a three-way conversation with two other callers. Your service provider may or may not provide this feature. Please contact with your service provider to inquire. To use three-way calling: 1. Place a call. 2. Place a second call then press hook/flash key. 3. When the second call is answered, press the hook or press the FLASH key to start a three-way call. Optional 3-way calling procedure (Network Dependent) 1. Place a call. 2. Press Hook/Flash 3. Dial the second number. 4. Press Hook/Flash (This initiates the second call). 5. Wait for the second call to be connected (Answered). 6. Press Hook/Flash again to merge the calls. VOICE MAIL SERVICE When you receive voice message(s), the MODE/MSG LED will blink orange in color on the terminal. When you lift the receiver, a stuttered voice message tone will be heard. Once your voice messages are checked and deleted, the LED turns off and the shuttered dial tone will return to a steady tone after few seconds. The Voice mail feature may not be part of your service, so please check with your service provider. 23
24 Accessing your Voice Mail service Please check with your service provider for the voice mail access number. 1. Dial the voice mail access number as normal phone number. 2. Follow the voice instruction to listen and delete the messages. NOTE: Initially, you may need to set-up voice mail. Follow the voice instructions to set-up the voice mail service. 24
25 Miscellaneous MENU OPTION TABLE TROUBLESHOOTING SPECIFICATION 25
26 MENU OPTION TABLE Access the menu by first lifting the handset or pressing the TALK button and their pressing ** followed by the appropriate number sequence as shown below. MENU ("** ") Sub Menu ITEM EXAMPLE 1. Adjusting Voice Volume * Louder # Lower * * 1 1 * (louder) * * 1 1 # (lower) 2. Adjusting Alert Volume * Louder # Lower * * 1 2 * (louder) * * 1 2 # (lower) 1.Sound 3. Setting 1 Minute Alert * Off # On * * 1 3 * (off) * * 1 3 # (on) 4. Voice Privacy Alert * Off # On * * 1 4 * (off) * * 1 4 # (on) 5. Connection Alert * Off # On * * 1 5 * (off) * * 1 5 # (on) 0 No Caller ID * * # (No caller id) 1. Setting Caller ID 1 DTMF Standard 2 FSK (Bellcore):Default * * # (DTMF) * * # (FSK) 2. General 2. Setting Auto Send time 3~9 seconds 0 OFF * * # (3 seconds) * * # (off) 3. # as Send key * Off # On * * 2 3 * (off) * * 2 3 # (on) 4. Setting DTMF Length * Long # Short * * 2 4 * (Long) * * 2 4 # (Short) 1. Changing Lock code Old lock code,(tone), New lock code, #, To change from to * * (confirm tone) New lock code again # # # 3. Security 2. Restricting Outgoing Calls Lock code + * Off or # On If lock code is , press * * * (off) * * # (on) 3. Factory Reset Lock code, # If lock code is : * * # 0 TTY FULL * * # : TTY FULL 4.TTY 1. TTY Mode Set 1 TTY TALK 2 TTY HEAR * * # : TTY TALK * * # : TTY HEAR 3 TTY OFF (Default) * * # : TTY Off Three escalating beeps (bee-bee-beep) indicate a successful entry. Three short beeps (beep-beep-beep) indicate an unsuccessful entry. 26
27 TROUBLESHOOTING Problem: I Can t Place a Call 1. Check the Terminal s Power LED to make sure the Terminal is ON. 2. Check the antenna to make sure it is tightly connected to the Terminal. 3. Check the phone cord to make sure it is properly connected between the Terminal s RJ-11 port and the Telephone s RJ-11 port. 4. In case that the telephone isn t functioning properly, try connecting the Terminal to a different telephone. 5. If you perform all of the above steps and still can t make a call, contact your service provider. Problem: I Can t Receive a Call 1. Check the handset to make sure it is placed properly on the cradle. 2. Check the Terminal s Power LED to make sure the Terminal is ON. 3. Check the antenna to make sure it is tightly connected to the Terminal. 4. If you perform all of the above steps and still can t receive a call, contact your service provider. Problem: No Power 1. Make sure the power adapter (or External Power Supply) is securely connected between the electrical outlet and the Terminal. 2. Make sure a back-up battery is properly connected to the Terminal. (Refer to BASIC INSTALLATION section, Page 6) 3. When using in battery-only mode, make sure the back-up battery is fully charged. To view the charge level, check the Terminal s power LED. (Refer to LED INDICATORS section, Page 11) 4. Make sure the power switch is in the ON position. The power switch is located on the back side of the Terminal. Problem: No Signal If you don t hear any dial tone through the handset and RSSI (Received Signal Strength Indication) LED is OFF, 1. Check the Terminal s Power LED to make sure it is ON. 2. Make sure your telephone is operational. 3. Make sure the antenna is tightly connected to the Terminal. If the Terminal is powered on and the antenna is properly connected to the Terminal but you still don t hear a dial tone or see a light on the RSSI LED, contact your service provider. 27
28 SPECIFICATIONS Item Description Remark Air Interface CDMA2000 1X RF Frequency 800MHz/1900Mhz Dual band LED Indicator - 3 multi color - POWER, SIGNAL and MODE/MSG Green, Orange, Red, Off Interface - 2 RJ-11 Ports (bridged), Max 3 REN - DC power Jack - Power ON/OFF Switch - TNC Connector for CDMA antenna - SMA Connector for A-GPS antenna Battery Power Adapter Dimension Operating Condition - Li-ion rechargeable battery - Capacity :1000mAh (Standard) * Stand by time: 7Hrs * Talk time:1hr - Input: AC V, 50/60Hz - Output:5V/ 2A - Size: 165 X X 31 (mm) - Weight: 268g - Temperature: -10 ~ 50 - Relative humidity : 10~95% With standard battery AXT STD V 1.1 AXESSTEL INC Flanders Drive Ste. 210 San Diego, CA 92121, USA Axesstel Inc, All Rights Reserved 28
29 29
OM2260VW2 USER MANUAL VERIZON WIRELESS HOME PHONE CONNECT
 OM2260VW2 USER MANUAL VERIZON WIRELESS HOME PHONE CONNECT Welcome to Verizon Wireless Thank you for choosing Verizon Wireless Home Phone Connect. You re now connected to the power of America s most reliable
User Guide VERIZON WIRELESS HOME PHONE CONNECT
 User Guide VERIZON WIRELESS HOME PHONE CONNECT label Welcome to Verizon Wireless Thank you for choosing Verizon Wireless Home Phone Connect. You re now connected to America s most reliable wireless network.
ITC-BTTN Cellular Bluetooth Gateway. Owner s Manual 1
 ITC-BTTN Cellular Bluetooth Gateway Owner s Manual 1 2 Table of Contents Introduction...3 Package Contents...3 XLink Connections Diagram...4 Setup...5 Pairing your Bluetooth Cell Phone to the XLink...6
How To Use A U.S. Cell Phone At Home
 U.S. Cellular Home Phone 1 Contents Getting to Know Your Device...5 Appearance... 5 LED Indicators... 6 Device Installation...7 Before You Begin... 7 Installing the Battery... 7 Installing the Power Adapter...
Model PBX 416+ Programming & User Guide
 Model PBX 416+ Programming & User Guide 1 Introduction... 5 Installation hints... 5 Wall mounting... 5 System programming... 6 System password... 6 Changing the password... 6 Exchange line set up... 6
-Helping to make your life betterwww.person-to-person.net
 Household Telephone Management System Built on Interceptor ID Technology Owner/Operation Manual Telephone Management System- Model P2P101 Call Receiver - Model P2P301 (Receiver may be sold separately)
WF720 Wireless Home Phone User Manual
 WF720 Wireless Home Phone User Manual Content Getting to Know Your Device... 3 Appearance...3 LED Indicator...4 Device Installation... 5 Before You Begin...5 Installing the SIM Card and the Battery...5
Model 70A00-1. GSM Cellular Communications Center
 Home Automation, Inc. Model 70A00-1 GSM Cellular Communications Center Operation Manual Document Number 70I00-1 Rev A August, 2009 Contents Description... 1 Use with security systems...1 Everyday use...2
2.4 GHz Dual Handset Cordless Telephone Answering System 2255 with Caller ID/Call Waiting
 USER S MANUAL Part 2 2.4 GHz Dual Handset Cordless Telephone Answering System 2255 with Caller ID/Call Waiting Please also read Part 1 Important Product Information AT&T and the globe symbol are registered
DPH-50U VoIP USB Phone Adapter Quick User Guide
 DPH-50U VoIP USB Phone Adapter Quick User Guide Version 1.0 TABLE OF CONTENTS 1. INTRODUCTION...3 2. PACKAGE CONTENTS...4 3. REQUIREMENTS...5 4. DPH-50U INSTALLATION...6 5. ENABLING DPH-50U...16 6. DPH-50U
Model PBX 308 Plus System Administration Guide
 Model PBX 308 Plus System Administration Guide Introduction 3 Installation Hints 4 System Programming 5 IMPORTANT Exchange Lines 6 Assign Incoming calls to ring Nominated Extensions 7 Cascade Ringing Of
System Administration Guide. Model KS 832. Expandable up to 1664
 System Administration Guide Model KS 832 Expandable up to 1664 Introduction 4 Installation Hints 4 System Programming 5 - System Password 5 - Changing Password 5 Exchange Line Set up 6 - Caller Display
GSM Desktop phone DPH101. User manual v1.00
 GSM Desktop phone DPH101 User manual v1.00 LEGAL NOTICE Copyright 2011 TELTONIKA Ltd. All rights reserved. Reproduction, transfer, distribution or storage of part or all of the contents in this document
ZTE WIRELESS HOME PHONE BASE USER GUIDE
 ZTE WIRELESS HOME PHONE BASE USER GUIDE INTRODUCTION HOW IT WORKS Thank you for choosing Consumer Cellular! We know you re excited to use your new Wireless Home Phone Base and this short guide will help
Personal USB VoIP Gateway User s Guide
 Personal USB VoIP Gateway User s Guide Contents Contents... 2 Welcome... 3 Package Contents...4 Requirements... 5 USB Gateway Installation... 6 Enabling USB GATEWAY... 18 USB GATEWAY States... 20 USB Gateway
Model PBX 416 Plus System Administration Guide
 Model PBX 416 Plus System Administration Guide Introduction 4 Installation Hints 4 System Programming 5 - System Password 5 - Changing Password 5 - Entering password in Direct 5 Dial Mode Exchange Line
1. Power Light: indicates whether AC power is available to the unit. 2. DS (Downstream): indicates downstream connectivity
: indicates downstream connectivity") Wave Phone works just like other home phone services you may be used to, though it does require some equipment that you may not be familiar with. A Wave Technician will connect a small device called a
Wave Phone works just like other home phone services you may be used to, though it does require some equipment that you may not be familiar with. A Wave Technician will connect a small device called a
CS55H HOME EDITION... WIRELESS HEADSET SYSTEM
 CS55_HO_606.qxd /6/06 : PM Page ii WARRANTY Limited Warranty This warranty covers defects in materials and workmanship of products manufactured, sold or certified by Plantronics which were purchased and
Model PBX 308 Plus System Administration Guide
 Model PBX 308 Plus System Administration Guide Introduction 4 Installation Hints 4 System Programming 5 - System Password 5 - Changing Password 5 Exchange Line Set up 6 - Caller Display 6 - Setting Date
GSM1000 The Orchid Mobile Gateway. Benefits & Feature List
 GSM1000 The Orchid Mobile Gateway. Benefits & Feature List The Gateway to cost savings A Fixed Cellular terminal with Full Call Divert - getting the most Benefits from your mobile phone s free minutes
Personal VoIP Gateway SKG-300 User Manual
 Personal VoIP Gateway SKG-300 User Manual 1 Copyright Copyright (C) 2005 PLANET Technology Corp. All rights reserved. The products and programs described in this User s Manual are licensed products of
Four-Line Intercom Speakerphone 944
 1 USER S MANUAL Part 2 Four-Line Intercom Speakerphone 944 Please also read Part 1 Important Product Information AT&T and the globe symbol are registered trademarks of AT&T Corp. licensed to Advanced American
InnoMedia ESBC 9580-4B. Quick Install Guide. www.innomedia.com 1
 InnoMedia ESBC 9580-4B Quick Install Guide www.innomedia.com 1 Table of Contents Introduction 2 Package Contents 2 CAUTION 2 Installation 3 Wall-Mounting Instructions 5 Troubleshooting 6 Appendix A. LED
ADA COMPLIANT BOX STYLE TELEPHONE INSTALLATION, PROGRAMMING AND OPERATING INSTRUCTIONS FOR MODEL PBX
 ADA COMPLIANT BOX STYLE TELEPHONE INSTALLATION, PROGRAMMING AND OPERATING INSTRUCTIONS FOR MODEL PBX INSTALLATION INSTRUCTIONS Step 1. Determine the position for the Hands-free phone in the elevator phone
Model No. KX-TGP500. Model No. KX-TGP550
 User Guide SIP Cordless Phone Model No. KX-TGP500 Model No. KX-TGP550 Model shown is KX-TGP500. Model shown is KX-TGP550. Thank you for purchasing a Panasonic product. You can configure some of the features
Features Phone Access... 1. Features Web Access... 3. emta Quick Reference Guide...14. Troubleshooting...15. Quick Reference Guide...
 Phone TABLE OF CONTENTS Features Phone Access... 1 Features Web Access... 3 emta Quick Reference Guide...14 Troubleshooting...15 Quick Reference Guide...16 Features Phone Access Caller ID Feature that
Model No. KX-TGP500. Model No. KX-TGP550
 Panasonic Telephone Systems KX-TGP500/KX-TGP550 KX-TGP500, KXTGP500, TGP500, KX-TGP550, KXTGP550, TGP550 www.voicesonic.com Phone 877-289-2829 User Guide SIP Cordless Phone Model No. KX-TGP500 Model No.
ReadyNet Easy Jack 2 Voice/Data and Data Only Owner s Manual PX-211d and PX-211v
 ReadyNet Easy Jack 2 Voice/Data and Data Only Owner s Manual PX-211d and PX-211v Phonex Broadband Corporation dba ReadyNet 6952 High Tech Drive Midvale, Utah 84047 801.566.0100 Phone 801.566.0880 Fax www.readynetsolutions.com
Life Is Calling. Meet Your New CaptionCall Phone. Spoken Words into Captions. Free Service Means No Cost to You. 2 CaptionCall
 setup guide Life Is Calling Meet Your New CaptionCall Phone We d like to introduce you to CaptionCall. Your new CaptionCall phone looks and works pretty much like an ordinary telephone, but with one big
Four-Line Small Business System Speakerphone 945
 945 CIB 2ATT 3/14/05 9:58 AM Page III USER S MANUAL Part 2 Four-Line Small Business System Speakerphone 945 Please also read Part 1 Important Product Information 2005 Advanced American Telephones. All
User Guide for Cisco Unified IP Phones 7961G and 7941G
 User Guide for Cisco Unified IP Phones 7961G and 7941G Common Phone Tasks Softkey Definitions View online help on the phone Press. Place a call Redial a number Switch to the handset during a call Switch
Instruction Manual. CORTELCO 2700 Single-Line / Multi-Feature Set
 1 Instruction Manual CORTELCO 2700 Single-Line / Multi-Feature Set Table of Contents Why VoiceManager SM with Cortelco Phones?... 2 Cortelco 2700 Set Features... 3 Telephone Set Part Identification...
CelluLine CGW-TS GSM Cellular Gateway. Installation and Programming Manual
 CelluLine CGW-TS GSM Cellular Gateway Installation and Programming Manual CelluLine CGW-TS GSM Cellular Gateway Installation and Programming Manual CGWTS-M001A Version 1, Release 1, December 2004 NOTICE
B890 4G LTE Smart Hub Getting Started Guide
 B890 4G LTE Smart Hub Getting Started Guide HUAWEI TECHNOLOGIES CO., LTD. Thank You for Purchasing the B890 4G LTE Smart Hub! Before You Begin What s in the Box : 1. B890 4G LTE Smart Hub 2. Power adapter
Four-Line Intercom Speakerphone 955
 1 USER S Revised: August 3, 2000 MANUAL Part 2 Four-Line Intercom Speakerphone 955 2000 Advanced American Telephones. All rights reserved. Printed in Indonesia. 850004037 Issue 1AT&T 8/00 Please also read
Model PBX 308 System Administration Guide
 Model PBX 308 System Administration Guide Introduction 4 Installation Hints 4 Wall Mounting System Programming 5 System Password Changing the Password IMPORTANT Exchange Lines 6 1 Exchange Line connected:
USER GUIDE. Cisco Small Business Pro. SPA 500 Series IP Phones Models 504G, 508G, and 509G. Provided by
 USER GUIDE Cisco Small Business Pro SPA 500 Series IP Phones Models 504G, 508G, and 509G Provided by Understanding Your Phoneʼs Lines and Buttons Use the following graphic and table to identify the parts
Quick Start Guide to Your IP Phone
 Quick Start Guide to Your IP Phone SPA 300 Series IP Phone Models SPA 301 and SPA 303 SPA 300 Series IP phone Phone stand RJ-45 Ethernet cable Quick start guide Product CD-ROM Welcome Thank you for choosing
Ericsson W25. Mobile Networks. Quick Installation Guide
 Ericsson W25 Fixed Wireless Terminal for WCDMA/HSDPA Mobile Networks Quick Installation Guide Table of Contents INTRODUCTION... 3 Package Contents... 3 Requirements... 3 INSTALLATION... 4 Unit Preparation...
Wireless Home Phone Base. A Guide to Your Service and Device
 Wireless Home Phone Base A Guide to Your Service and Device 2 TABLE OF CONTENTS Introduction 3 About Your Service 4 7 About Your Device 8 9 Device Installation 10 13 How It Works 14 15 Voicemail 16 Using
Model 28871 DECT 6.0 Telephone/ Answering System with Cordless Handset User's Guide
 Model 28871 DECT 6.0 Telephone/ Answering System with Cordless Handset User's Guide Equipment Approval Information Your telephone equipment is approved for connection to the Public Switched Telephone Network
Motorola C12A. Digital Cordless Telephone with Digital Answering Machine. For C1211A, C1212A, C1213A and C1214A
 Digital Cordless Telephone with Digital Answering Machine Motorola C12A For C1211A, C1212A, C1213A and C1214A Warning: Charge the handset for 24 hours before use. Welcome... to your new Motorola C12A Digital
EP4300 4 Line Intercom Speakerphone with Caller ID and Jumbo Pivoting Display
 EP4300 4 Line Intercom Speakerphone with Caller ID and Jumbo Pivoting Display User s Guide Please read before using telephone Getting Started Congratulations! You ve purchased a HGC EP4300 System Intercom
GSM Door Phone System
 GSM Door Phone System System Installation, Setting and Operation Manual User Manual (263-S V1) Please read this user manual completely before operating this system and keep it in a safe place for future
AC-115 Compact Networked Single Door Controller. Installation and User Manual
 AC-115 Compact Networked Single Controller Installation and User Manual December 2007 Table of Contents Table of Contents 1. Introduction...5 1.1 Key Features... 6 1.2 Technical Specifications... 7 2.
Features of Your Cisco Unified IP Phone
 Cisco Unified IP Phone 8961, page 1 Cisco Unified IP Phone 9951, page 9 Cisco Unified IP Phone 9971, page 18 General Phone Information, page 27 Cisco Unified IP Phone 8961 The following sections describe
How To Use A Ppanasonic Cell Phone With A Cell Phone From A Cellphone From Alexa (Panasonic) For A Long Distance Phone From An Older Model (Panoramos) For An Extra Money (Panamontani
 For A Long Distance Phone From An Older Model (Panoramos) For An Extra Money (Panamontani") INTERCOM PLEASE READ BEFORE USE AND SAVE. Integrated Telephone System Operating Instructions Model No. KX-TS8B KX-TS8W Pulse-or-tone dialing capability KX-TS8W LINE Caller ID Compatible Panasonic World
INTERCOM PLEASE READ BEFORE USE AND SAVE. Integrated Telephone System Operating Instructions Model No. KX-TS8B KX-TS8W Pulse-or-tone dialing capability KX-TS8W LINE Caller ID Compatible Panasonic World
AT&T Small Business System Speakerphone with Intercom and Caller ID/Call Waiting 974
 974CIB_(Rev11-12)ml24.05.06 5/24/06 9:29 PM Page II USER S MANUAL Part 2 AT&T Small Business System Speakerphone with Intercom and Caller ID/Call Waiting 974 For Customer Service Or Product Information,
Digital Phone Installation & User Guide
 Digital Phone Installation & User Guide Telephone #1 Voicemail PIN Telephone #2 Voicemail PIN skybeam high speed internet digital phone We would like you to verify that the 911 address we have for you
BT Big Button 100. User Guide
 BT Big Button 100 User Guide Welcome to your BT Big Button 100 phone Large buttons for easy dialling. Handsfree make and receive calls using the loudspeaker. One-touch 1571 button dials your network answering
WIRELESS ALARM SYSTEM WITH TELEPHONE AUTO DIALER
 BAT.LOW AC WIRELESS ALARM SYSTEM WITH TELEPHONE AUTO DIALER THE SYSTEM THAT CALLS YOU! Our WIRELESS ALARM SYSTEM WITH TELEPHONE AUTO DIALER is designed to allow you to create your own security system.
Converse 320. Userfriendly Guide
 Converse 0 Userfriendly Guide Return Diversion Minder On Off At a glance IMPORTANT Next Inserts a space in a number when storing numbers in the memory. Clear Used to edit numbers when pre-dialling or when
Hardware Overview. Ooma Linx devices These are installed around the office and are used to connect phones and other devices to your Ooma Office system
 Quick Start Guide Introduction Installation Overview Setting up the Ooma Office system in your business is easy. You should have your first extensions up and running in about 20 minutes. Ooma Office blends
User s manual. speakerphone/ answering system and answering system with caller ID/call waiting caller ID/ call waiting
 User s manual 1080 Corded 4-Line small telephone/ business small system business with digital system/ speakerphone/ answering system and answering system with caller ID/call waiting caller ID/ call waiting
User s manual. 1070 4-Line small business system with caller ID/call waiting and speakerphone
 User s manual 1070 4-Line small business system with caller ID/call waiting and speakerphone 7 1 Congratulations on purchasing your new AT&T product. Before using this AT&T product, please read the Important
LW-2000-3A. Wireless Auto Dial Alarm System. Sentry Plus User Manual By Global Gadgets
 LW-2000-3A Wireless Auto Dial Alarm System Sentry Plus User Manual By Global Gadgets Main Features Simple to use keypad for operation and control. The system can store up to 9 telephone numbers: positions
Model PBX 206 System User Guide
 Model PBX 206 System User Guide Introduction 3 Installation Hints 3 System Programming 3 IMPORTANT Exchange Lines 4 Assign Incoming calls to ring Nominated Extensions 4 Call Barring / Call Restrictions
Model PBX816ex. Programming & User Guide
 Model PBX816ex Programming & User Guide 1 Introduction... 5 Installation hints... 5 Expanding Your System 5 System programming... 6 System password... 6 Changing the password... 6 Exchange line set up...
User s manual. 993 Two-line speakerphone with caller ID/call waiting
 User s manual 993 Two-line speakerphone with caller ID/call waiting Congratulations on purchasing your new AT&T product Before using this AT&T product, please read the Important product information on
Home Security Alarm System
 Home Security Alarm System User Manual (ALM-S02) Read manual carefully before use. PiSector Inc., USA www.pisector.com Thank you for purchasing this home security alarm system. For your safety and better
UK s best selling phone brand. User Guide. BT Big Button 200 Corded Phone
 UK s best selling phone brand User Guide BT Big Button 200 Corded Phone 2 Welcome. to your BT Big Button 200 telephone Large buttons for easy, accurate and more comfortable dialling Large display to assist
DSB-100 Portable Premium Bluetooth Speaker Owner s Manual
 . DSB-100 Portable Premium Bluetooth Speaker Owner s Manual You can print more than one page of a PDF onto a single sheet of paper. 1 Index Preparation Unpacking 3 Overview 4 Sound Quality 4 Design 4 Operation
Dock-N-Talk U S E R S G U I D E. Forming a New World of Communication. SM
 Dock-N-Talk U S E R S G U I D E Forming a New World of Communication. SM 2 UNIVERSAL DOCKING STATION USER S GUIDE INTRODUCTION...3 INSTALLATION...5 Line Pair Switch... 6 Extension Telephone Sets... 7 Warning:
Digital Voice Services Residential User Guide
 Digital Voice Services Residential User Guide 2 P a g e * Feature Access Codes *11 Broadworks Anywhere (pulling call to alternate phone) *62 Access Voicemail *72 Call Forwarding Always Activation *73 Call
Centrepoint Technologies. Phone System Solutions for: Smart homes Home businesses Small offices Branch/Remote offices DESKTOP PHONE SYSTEM.
 Centrepoint Technologies DESKTOP PHONE SYSTEM Phone System Solutions for: Smart homes Home businesses Small offices Branch/Remote offices User Guide Table of Contents 1.0 Installing TalkSwitch 1.1 What's
ITP-5112L IP phone User Guide. IP phone User Guide ITP-5112L
 ITP-5112L IP phone User Guide IP phone User Guide ITP-5112L SAFETY CONCERNS The following is the contents for securing user s safety and for preventing the damage to user s property. Please make a good
The following is a set of definitions used in FAQs for the Partner product line:
 Frequently Asked Questions Office Switching Systems Partner/Partner II/Partner Plus The following is a set of definitions used in FAQs for the Partner product line: PR1 = Partner Release 1 PR2,3,4 = Partner
2-9451. Four-Line Business Phone with Intercom User s Guide. We bring good things to life.
 2-9451 Four-Line Business Phone with Intercom User s Guide We bring good things to life. FCC REGISTRATION INFORMATION Your telephone equipment is registered with the Federal Communications Commission and
How To Use An Ip Phone On A Cell Phone On An Ipphone On A Sim Sim Sim (Cisco) Or Ip Phone (Ip Phone) On A Iphone Or Ipphone (Ipphone) On An Iphon Or Ip
 Or Ip Phone (Ip Phone) On A Iphone Or Ipphone (Ipphone) On An Iphon Or Ip") USER GUIDE Cisco Small Business SPA 300 Series IP Phones Models 301 and 303 Contents Chapter 1: Getting Started 6 About This Document 6 Overview of the Cisco Small Business 300 Series IP Phones 8 Caring
USER GUIDE Cisco Small Business SPA 300 Series IP Phones Models 301 and 303 Contents Chapter 1: Getting Started 6 About This Document 6 Overview of the Cisco Small Business 300 Series IP Phones 8 Caring
User Manual 821121-ATA-PAK
 User Manual 821121-ATA-PAK IMPORTANT SAFETY INSTRUCTIONS When using your telephone equipment, basic safety precautions should always be followed to reduce the risk of fire, electric shock and injury to
WIRELESS ALARM SYSTEM WITH TELEPHONE AUTO DIALER
 BAT.LOW AC WIRELESS ALARM SYSTEM WITH TELEPHONE AUTO DIALER THE SYSTEM THAT CALLS YOU! Our WIRELESS ALARM SYSTEM WITH TELEPHONE AUTO DIALER is designed to allow you to create your own security system.
Getting Started...2 Landline vs. Non-landline... 2 Provisioning (Landline version only)... 2
... 2") User Guide table of contents iii Getting Started...2 Landline vs. Non-landline... 2 Provisioning (Landline version only)... 2 Basic Calling...4 Verify ooma Service is Working... 4 Placing Calls... 4 Answering
User Guide table of contents iii Getting Started...2 Landline vs. Non-landline... 2 Provisioning (Landline version only)... 2 Basic Calling...4 Verify ooma Service is Working... 4 Placing Calls... 4 Answering
USER GUIDE Cisco Small Business
 USER GUIDE Cisco Small Business Cisco SPA50X and SPA51X SIP IP Phones Models SPA501G, SPA502G, SPA504G, SPA508G, SPA509G, SPA512G, and SPA514G Contents Chapter 1: Getting Started 6 About This Document
COLOR VIDEO DOOR PHONE CDV-71BE/D
 COLOR VIDEO DOOR PHONE CDV-71BE/D 513-11, Sangdaewon-dong, Jungwon-gu, Seongnam-si, Gyeonggi-do, Korea Int l Business Dept. : Tel.; +82-31-7393-540~550 Fax.; +82-31-745-2133 Web site : www.commax.com Printed
Operating Instructions
 5.8 GHz Digital Cordless Phone Operating Instructions Model No. KX-TG5050 Pulse-or-tone dialing capability The unit is Caller ID compatible. To display the Caller s name and phone number, you must subscribe
User Manual. Video Doorphone CDV-1020AQ
 User Manual Video Doorphone CDV-1020AQ 513-11, Sangdaewon-dong, Jungwon-gu, Seongnam-si, Gyeonggi-do, Korea Int l Business Dept. Tel. : +82-31-7393-540~550 Fax. : +82-31-745-2133 Web site : www.commax.com
User Guide. AT&T Wireless Home Phone Base
 User Guide AT&T Wireless Home Phone Base Wireless Home Phone ( WHP ) is a mobile device designed to provide service consistent with other AT&T wireless devices. 9 11 calls are routed based on the wireless
4 Line Intercom Speakerphone User s Guide. Please read this manual before operating this product for the first time.
 4 Line Intercom Speakerphone User s Guide Please read this manual before operating this product for the first time. Model 25413/14 Important Information Equipment Approval Information Your telephone equipment
User Guide BT CONVERSE 425
 User Guide BT CONVERSE 425 This product is intended for connection to analogue public switched telephone networks and private switchboards in the United Kingdom. Please open this page for an At a glance
Telephone User Guide. 02921 678 544/enquiries@seethelight.co.uk
 Telephone User Guide seethelight.co.uk 02921 678 544/enquiries@seethelight.co.uk Contents and Introduction 1. Your fibre equipment 3 2. Setting up your telephone 6 2.1 A connection through a telephone
Cisco Unified IP Phone 6945 User Guide for Cisco Unified Communications Manager Express Version 8.8 (SCCP)
") Cisco Unified IP Phone 6945 User Guide for Cisco Unified Communications Manager Express Version 8.8 (SCCP) First Published: July 22, 2011 Last Modified: July 22, 2011 Americas Headquarters Cisco Systems,
Cisco Unified IP Phone 6945 User Guide for Cisco Unified Communications Manager Express Version 8.8 (SCCP) First Published: July 22, 2011 Last Modified: July 22, 2011 Americas Headquarters Cisco Systems,
Cisco Unified IP Phone 3905 User Guide for Cisco Unified Communications Manager Express Version 8.8 (SIP)
") Cisco Unified IP Phone 3905 User Guide for Cisco Unified Communications Manager Express Version 8.8 (SIP) First Published: July 22, 2011 Last Modified: July 22, 2011 Americas Headquarters Cisco Systems,
Cisco Unified IP Phone 3905 User Guide for Cisco Unified Communications Manager Express Version 8.8 (SIP) First Published: July 22, 2011 Last Modified: July 22, 2011 Americas Headquarters Cisco Systems,
Big Button Plus 20200
 Big Button Plus 20200 Congratulations on your selection of the Big Button Plus 20200 from Northwestern Bell Phones. This quality telephone, like all Genuine BELL products, has been designed to give you
2-Line Intercom Speakerphone DECT6.0 Corded/Cordless Handset Telephone Answering System User s Guide 25255RE2
 2-Line Intercom Speakerphone DECT6.0 Corded/Cordless Handset Telephone Answering System User s Guide 25255RE2 ViSYS Equipment Approval Information Your telephone equipment is approved for connection to
Automatic Phone-Out Home Monitoring Systems
 Automatic Phone-Out Home Monitoring Systems Power Outage and Freeze Alarm Model Number: THP202 Power Outage, Freeze and Flood Alarm Product Description Model Number: THP201 These monitoring systems are
User s manual. 1070 4-Line small business system with caller ID/call waiting and speakerphone
 User s manual 1070 4-Line small business system with caller ID/call waiting and speakerphone 7 Congratulations on purchasing your new AT&T product. Before using this AT&T product, please read the Important
Home and Small Business 308 Mini-PABX Start up guide
 Home and Small Business 308 Mini-PABX Start up guide We would like to thank you for purchasing the Mini-PABX Kit; it is a very powerful solution for small business and home office scenarios. This guide
Using Your CapTel Model 200
 Using Your CapTel Model 200 305-014207 5/09 IMPORTANT! Dialing 911 in an Emergency To reach help as quickly as possible in an emergency, all 1-Line CapTel calls placed to 911 connect directly to Emergency
CapTel 800i. How-to Guide 305-016605 11/11
 CapTel 800i How-to Guide 305-016605 11/11 CapTel 800i Specifications Physical Dimensions Size: 9" x 6.5" x 7.5" Weight: 2 lb. 10 oz. Power AC Adapter: 6 VDC, 1670 ma (barrel is negative) Adapter is UL/CSA
Adapter GL386. User Manual is available in other languages at
 Adapter GL386 User Manual is available in other languages at www.glipfone.com GL386 User Manual Contents: Chapter 1 Introduction ---------------------------------------------------------------- 1 Chapter
Cisco IP Phones User Guides
 Cisco IP Phones User Guides Cisco Small Business Cisco SPA50X and SPA51X SIP IP Phones Models SPA501G, SPA502G, SPA504G, SPA508G, SPA509G, SPA512G, and SPA514G Contents Chapter 1: Getting Started 6 About
User s manual. 1070 4-Line small business system with caller ID/call waiting and speakerphone
 User s manual 100 4-Line small business system with caller ID/call waiting and speakerphone 1 Congratulations on purchasing your new AT&T product. Before using this AT&T product, please read the Important
Operating Instructions
 PLEASE READ BEFORE USE AND SAVE. Integrated Telephone System Model No. KX-T7FXW Pulse-or-tone dialing capability Operating Instructions Preparation Basic Operation Advanced Operation Useful Information
TELULAR SX4E PHONECELL WITH THE 8210 SPEECH MODEM APPLICATION NOTE
 TELULAR SX4E PHONECELL WITH THE 8210 SPEECH MODEM APPLICATION NOTE September 2004 Prepared by: Integrated Systems Division The Sutron Corporation 21300 Ridgetop Circle Sterling, VA 20166 Copyright 2004
How To Use An Ip Phone On A Cell Phone On An Ip Cell Phone
 USER GUIDE Cisco Small Business Cisco SPA50X and SPA51X SIP IP Phones Models SPA501G, SPA502G, SPA504G, SPA508G, SPA509G, SPA512G, and SPA514G Contents Chapter 1: Getting Started 6 About This Document
UK s best selling phone brand. User Guide. BT Decor 2200 Corded Phone
 UK s best selling phone brand User Guide BT Decor 2200 Corded Phone 2 This User Guide provides you with all the information you need to get the most from your phone. Before you make your first call you
UK s best selling phone brand. User Guide. BT3710 Digital Cordless Phone With Answering Machine
 UK s best selling phone brand User Guide BT3710 Digital Cordless Phone With Answering Machine 2 This User Guide provides you with all the information you need to get the most from your phone You must set
User Guide. AT&T Wireless Home Phone Base
 User Guide AT&T Wireless Home Phone Base Not compatible with home security systems, wireless messaging and data services, fax service, DVR/Satellite systems, or medical alert systems, credit card machines,
8200/8200a. Cordless telephone User Guide
 8200/8200a Cordless telephone User Guide This telephone has been designed for ease of use. Please read the instructions and keep it handy for future reference. If you have any problems with your phone,
Manufactures of: All. Dallas Delta Corporation Pty.Ltd. Pty.Ltd. 102 Albert St. East Brunswick, 3057 Vic. Tel: 613 93877388 Fax: 613 93873128
 Dallas Delta Corporation Pty.Ltd. 102 Albert St. East Brunswick, 3057 Vic. Tel: 613 93877388 Fax: 613 93873128 Email: sales@dallasdelta.com.au www.dallasdelta.com.au LP GUARD DOORSTATION MK II G UARD Doorstation