IER SBG AT. Secured Automated Boarding Gate. Operation Guide N0D302A
|
|
|
- Homer Small
- 8 years ago
- Views:
Transcription
1 Secured Automated Boarding Gate N0D302A N0D302A - Rev. 1

2 IER SIEGE - HEADQUARTERS IER S.A. 3, rue Salomon de Rothschild SURESNES CEDEX FRANCE Tel. +33 (0) Fax +33 (0) IER dans le monde - IER Worldwide CHINA GERMANY IER Shanghai Kuen Yang Plaza # Zhao Jia Bang Road SHANGHAI P.R.C. Phone: +86 (21) Fax: +86 (21) IER GmbH Praklastr. 1 D UETZE Phone: +49 (0) 5173/ Fax: +49 (0) 5173/ SINGAPORE SPAIN IER PTE Ltd 120 Lower Delta Road #14-13/16 Cendex Centre SINGAPORE Phone: Fax: IER Impresoras Especializadas, S.L. C/ Torre de Don Miguel, 23 E MADRID Phone: Fax: UNITED ARAB EMIRATES UNITED KINGDOM IER Dubai PO Box DUBAI Phone: Fax: IER Ltd Unit G4 Middlesex Business Centre Bridge Road SOUTHALL, MIDDX, UB2 4AB Phone: +44 (0) Fax: +44 (0) UNITED STATES IER Inc. Dallas 2015 Midway Road, Suite 118 CARROLLTON TX Phone: +1 (972) Fax: +1 (972) Toll free: IER Inc. Belton 815 Kirkley Blvd BELTON TX Phone: +1 (254) Fax: +1 (254) Page 2

3 NOTICE THIS PRODUCT COMES WITH A LITHIUM BATTERY. BATTERY REPLACEMENT MUST IMPERATIVELY BE PERFORMED BY QUALIFIED MAINTENANCE WARNING PERSONNEL. MOREOVER, ONLY IER APPROVED MODELS MAY BE USED. DANGER OF EXPLOSION IF BATTERY IS INCORRECTLY REPLACED. REPLACE ONLY WITH THE SAME OR EQUIVALENT TYPE RECOMMENDED BY THE MANUFACTURER. DISPOSE OF USED BATTERIES ACCORDING TO THE WARNING MANUFACTURER S INSTRUCTIONS. The United States Federal Communications Commission (in 47 CFR ) has specified that the following notice be brought to the attention of users of this product. NOTE: This equipment has been tested and found to comply with the limits for a Class B digital device, pursuant to Part 15 of the FCC Rules. These limits are designed to provide reasonable protection against harmful interference in a residential installation. This equipment generates, uses and can radiate radio frequency energy and, if not installed and used in accordance with the instructions, may cause harmful interference to radio communications. However, there is no guarantee that interference will not occur in a particular installation. If this equipment does cause harmful interference to radio or television reception, which can be determined by turning the equipment off and on, the user is encouraged to try to correct the interference by one or more of the following measures: - Reorient or relocate the receiving antenna. - Increase the separation between the equipment and receiver. - Connect the equipment into an outlet on a circuit different from that to which the receiver is connected. - Consult the dealer or an experienced radio/tv technician for help. In accordance with FCC requirements, changes or modifications not expressly approved by IER could void the user's authority to operate this product. Use of a shielded cable is required to comply within Class B limits of Part 15 of FCC Rules. NORWAY: This product is also designed for IT power distribution system with phase-to-phase voltage 230V. NORWAY & SWEDEN: Apparaten skall anslutas till jordat uttag när den ansluts till ett nätverk. Page 3
 has specified that the following notice be brought to the attention of users of this product.")
 COMPLYING WITH IEC 364 AND NFC15-100 REGULATIONS, AND -")
4 THIS APPLIANCE MUST BE GROUNDED. THIS PRODUCT MUST EXCLUSIVELY BE CONNECTED TO AN ELECTRICAL CIRCUIT THAT IS : WARNING - PROVIDED WITH A GROUND FAULT CIRCUIT INTERRUPTER (GFCI) COMPLYING WITH IEC 364 AND NFC REGULATIONS, AND - CONFORMING WITH THE VOLTAGE CHARACTERISTICS SPECIFIED BY THE NF EN STANDARD. The cover(s), door(s) and/or drawer(s) of this product is (are) intended for occasional use and must be normally closed. The warranty shall be null and void in case of use of any spare part, special tool or consumable not expressly approved in writing by IER and in the event of attempted repair or servicing of the machines by persons lacking the requisite technical qualifications. This document contains proprietary information of IER. It may not be reproduced or communicated without prior written of IER. It is intended solely for the use of the product described herein, to the exclusion of any other usage. It is provided as is, for information purposes only, without any warranty of any kind, including any warranty of fitness or a particular purpose, and may be modified by IER at any time. The information and specifications contained in this document are subject to change without prior notice. Translated from French - IER Documentation Department Page 4
, door(s) and/or drawer(s) of this product is (are) intended for occasional use and must be normally closed.")
5 In compliance with the European Directive 2002/96/CE relative to the management of Waste Electrical and Electronic Equipment (WEEE) implemented as of August 13, 2005, this product may not be disposed of with regular household waste. All products concerned by this directive are marked with the above symbol. The end owner of this product is responsible for either: Transferring the product to an authorized treatment facility where the product components, recognized to present a hazard to the environment and/or public health, will be recycled and recovered properly, or Consulting with the manufacturer for appropriate product waste management according to the terms of the manufacturer. Page 5

6 CONTENTS 1. INTRODUCTION GENERAL GENERAL DESCRIPTION SECURED AUTOMATED BOARDING GATE DESCRIPTION SINGLE FRONT OF THE SINGLE REAR OF THE SINGLE DUAL FRONT OF THE DUAL... REAR OF THE DUAL OPTIONAL PERIPHERALS GENERAL OPTIONAL PASSENGER INFORMATION SCREEN INSTALLED ON THE PORTAL DESCRIPTION... ORIENTATION PICTOGRAMS OPTIONAL CONTACTLESS CARD READER DESCRIPTION... OPERATIONAL PICTOGRAM OPTIONAL BARCODE SCANNER DESCRIPTION... OPERATIONAL PICTOGRAMS... BARCODE SCANNING RECOMMENDATIONS OPTIONAL BOARDING ENTITLEMENT PRINTER DESCRIPTION... OPERATIONAL PICTOGRAM OPENING/CLOSING THE DOORS PROCEDURE OPENING THE DOORS CLOSING THE DOORS OPERATING THE SBG AT SECURED AUTOMATED BOARDING GATE POWERING UP/POWERING DOWN THE POWER UP PROCEDURE... POWER DOWN PROCEDURE LOADING PRINT MEDIA PROCEDURE PICTOGRAMS, INDICATORS AND SOUND SIGNALS PICTOGRAM, INDICATOR AND SOUND SIGNAL FUNCTIONS Page 6

7 8. PROCESSING BOARDING OF A PASSENGER BOARDING PROCEDURE OPERATING FAULTS PAPER JAM MAINTENANCE PROCEDURES CLEANING THE SECURED AUTOMATED BOARDING GATE CLEANING THE PORTAL CLEANING THE FINGERPRINT READER CLEANING THE INFORMATION SCREEN OF THE USER INTERFACE CLEANING THE GLASS WALLS CLEANING THE PLEXIGLAS PARTS OF THE HOUSING CLEANING THE HOUSINGS CLEANING THE MAIN OPTIONAL DEVICES OF THE SECURED AUTOMATED BOARDING GATE CLEANING THE INFORMATION SCREEN ON THE PORTAL CLEANING THE CONTACTLESS CARD READER CLEANING THE BARCODE SCANNER CLEANING THE BOARDING ENTITLEMENT PRINTER Page 7

8 1 INTRODUCTION 1.1 GENERAL Note: The photos in the present document may not reflect the exact color and/or certain other aspects of the actual Boarding Gates installed on your site as they are can vary according to customer request. This document is intended for the user. It provides a general description of the Secured Automated Speed Boarding Gate with ASDAS Security System and describes the steps to follow to rapidly solve incidents that can occur during gate operation. This document also describes the various pictograms, indicators and sound signals installed to ensure optimized passenger flow through the gate and to help avoiding the possible problems listed below that might occur: - Fingerprint read errors Contactless smart card read errors Barcode (on multiple media type and format) read errors Fraudulent use of the gate General Description The Secured Boarding Gate is designed to automate the boarding process of one or several lines of passengers and thus to speed up access to the plane while responding to the most demanding security requirements. The gate includes the following technologies to achieve compliance with high security standards: - Passenger authentication technologies, such as: Biometrics Radio Frequency Identification (RFID) (optional) 2D barcode scanning (optional) - Automatic Systems Detection & Analysis Solution (ASDAS) technology: The Single Person Detection system makes it possible to ensure that only one single person passes through the gate. This is achieved with the built in ASDAS control system. Single person detection is performed at the time the passenger passes through the portal of the. The ASDAS control system is able to handle all possible configurations, such as adults passing through, children, carried bags, pulled or pushed luggage, etc. with a high success rate. The SBG AT has an open platform, based on the airline industry standards (AEA, CUSS), which makes it possible to fully interface the with the airlines' or railways' Departure Control Systems (DCS), and remote control systems. is available in several versions: - SINGLE, provided with a single walkway - DUAL with two walkways - ADA featuring a wide walkway complying with ADA (Americans with Disabilities Act) regulations. Page 8

9 Page 9

10 2 SECURED AUTOMATED BOARDING GATE DESCRIPTION 2.1 SINGLE (Refer to item numbers in the illustrations, see figure page 11) Front of the SINGLE The basic configuration of the SINGLE is the following: - ASDAS security portal (1) (single person detection system) comprising: Two orientation pictograms (2), in the shape of vertical light strips, signaling whether or not the gate is available - Biometric module comprising: Fingerprint reader (3) allowing the passenger to authenticate him/herself with a finger, usually the forefinger, at the time of boarding Operational pictogram (4) indicating to the passenger whether the authentication system is ready or not - User interface with a liquid crystal passenger information screen (5) explaining how to proceed and how to board - Left-hand, active, housing (6) (encloses the operational modules) - Right-hand, inactive, housing (7) (allowing installation of a second walkway) - Left (8) and right (9) glass wall marking the boundaries of the walkway and making it impossible for another passenger to supplant the one authenticated. The single person detection security portal (1) secures the entry of the walkway by limiting the access to one single person at a time. At the other end of the walkway, a flap (10) permits or prohibits exiting the gate. The area between the portal and the gate's flap is thus secured, which allows: - isolating the passenger physically during the authentication process - guaranteeing that only one single person passes through the gate Depending on the result of fingerprint data processing, the gate's flap opens or remains closed, allowing the passenger either to proceed or denying him/her access to the plane Rear of the SINGLE The following element is located at the rear of the gate: - Optional emergency button (11) located at the rear of the left, active, housing (6), allowing the personnel to release and open the flap (10). Page 10
 (single person detection system) comprising: Two orientation pictograms (2), in the shape of")
11 Figure 2.1 SINGLE Page 11

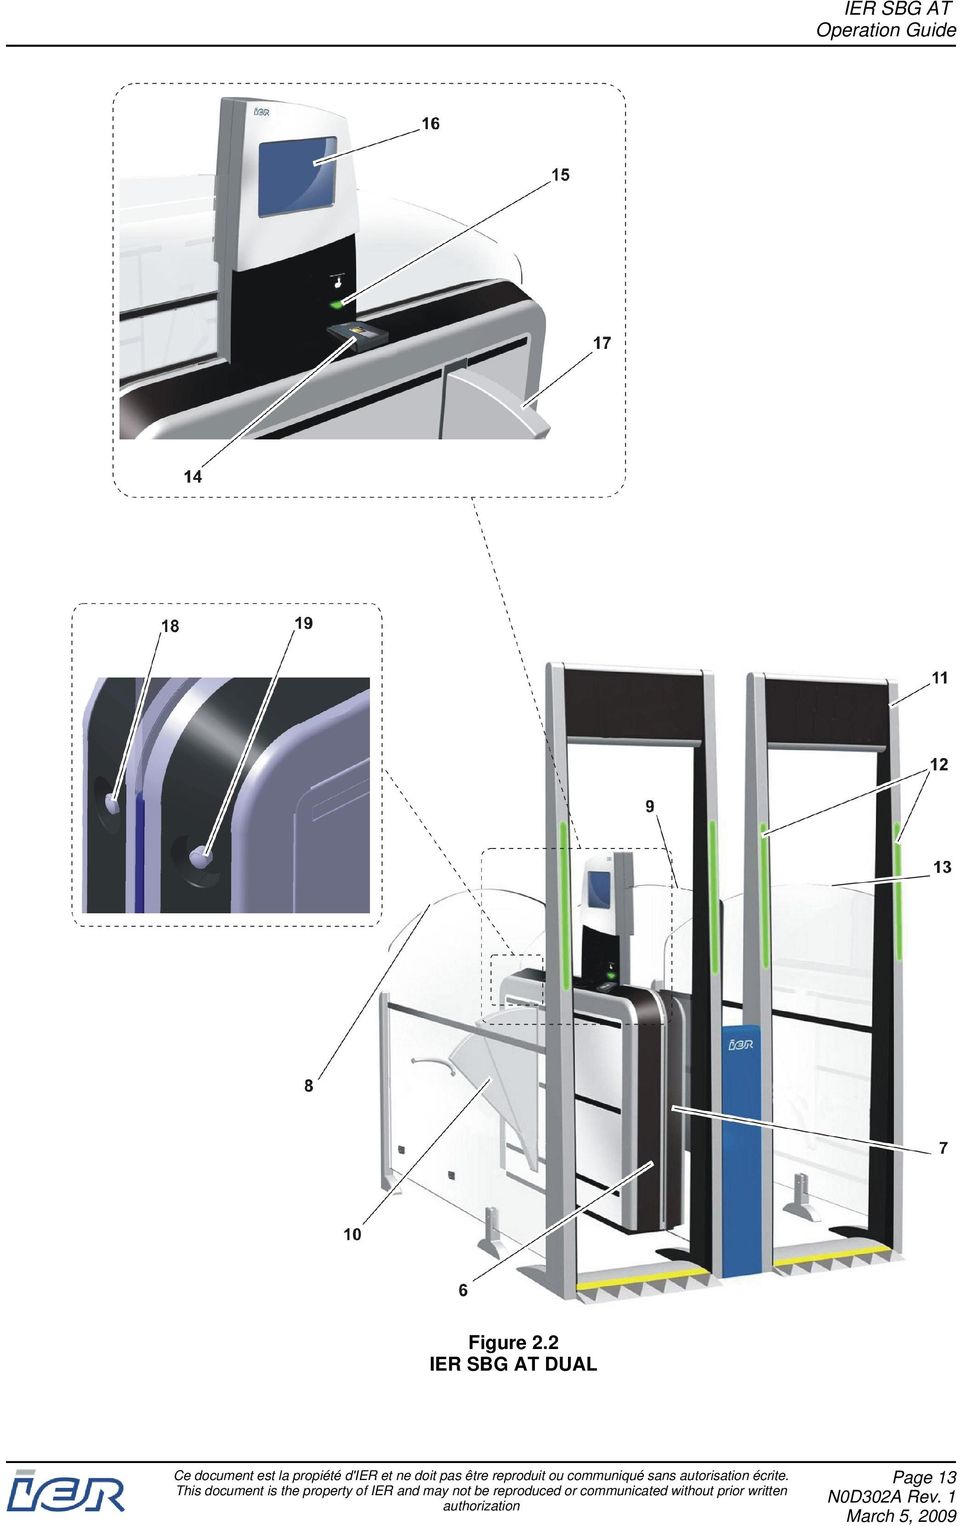
12 2.2 DUAL (Refer to the item numbers in the illustrations, see figure page 13) Front of the DUAL The configuration of the DUAL is the following: - Basic SINGLE (see page 10) whose inactive right-hand housing (7) is turned into an active housing for the second walkway. Elements added to the SINGLE for the second walkway: - Single person detection portal (11) comprising the following: Two orientation pictograms (12), in the shape of vertical light strips, signaling whether or not the gate is available - Biometric module similar to the one present on the SINGLE, comprising the following: Fingerprint reader (14) allowing passenger authentication Operational pictogram (15) inviting or not inviting the passenger to use the authentication system - LCD passenger information screen (16) explaining how to proceed and how to board - Glass wall (13), which marks the boundaries of the second walkway together with the now intermediate glass wall (9) of the dual gate. - Flap (17) Rear of the DUAL The following elements are located at the rear of the DUAL: - Optional emergency button (18) located at the rear of the right housing (7), allowing the personnel to release and open the flap (17) of the right-hand walkway. - Optional emergency button (19) located at the rear of the left housing (6), allowing the personnel to release and open the flap (10) of the left-hand walkway. Page 12
 inviting or not inviting the passenger to use the authentication system - LCD passenger information screen (16) explaining how to proceed and how to board - Glass wall (13), which")
13 Figure 2.2 DUAL Page 13
14 3 OPTIONAL PERIPHERALS 3.1 GENERAL The can feature the following options to implement various boarding procedures, such as: - Passenger information screen (1), installed in the external, upper part of the portal, dedicated to displaying passenger boarding or other information - Contactless card reader (4) (RFID technology) for passenger authentication based on the previously recorded biometric fingerprint data on an individual portable medium - Barcode scanner (5), able to process barcodes present on various media - Thermal printer (6) for printing boarding entitlements delivered to the passenger Note: Optional operational pictograms (2) are associated with each one of the optional peripherals inviting the passenger to perform or not perform the required action. Optional orientation pictograms (3) can be included to guide the passenger through the boarding process. Figure 3.1 Example: DUAL with all Options Page 14
, able to process barcodes present on various media - Thermal printer (6) for printing boarding entitlements delivered to the passenger Note: Optional")
15 3.2 OPTIONAL PASSENGER INFORMATION SCREEN INSTALLED ON THE PORTAL 1. Single Person Detection Portal 2. Passenger Information Screen 3. Orientation Pictogram Description To be easily visible for all passengers, the information screen (2) is installed in the upper part of the portal (1). Animated video sequences can be played on this LCD screen to inform the passengers before entering the gate of how the gate functions and of the boarding process. It is also possible to display the following type of information: - Flight number - Flight confirmation - Airline logo Orientation Pictograms The orientation pictograms (3), in the shape of two vertical light strips, are placed in the two jambs of the portal (1). If the strips light up green, they inform the passenger to enter the automated gate and if they are red, to wait outside the gate. Note: Red pictograms can also mean that the gate is out of order. These pictograms placed in the portal jambs are not optional. Page 15
, in the shape of two vertical light strips, are placed in the two jambs of the portal (1).")
16 3.3 OPTIONAL CONTACTLESS CARD READER 1. RFID Contactless Card Reader 2. Operational Pictogram Description The contactless RFID (Radio Frequency Identification) card reader is used to authenticate the passenger at the time of boarding. Digital passenger ID can be stored on various media: - Contactless card - NFC cell phone The passenger using a contactless card or a NFC cell phone is the only one carrying his/her biometric data on one of these media Operational Pictogram The operational pictogram corresponding to the contactless card reader informs the passenger of the following: - device is ready for authentication - authentication completed Page 16

17 3.4 OPTIONAL BARCODE SCANNER 1. Barcode Scanner 2. Operational Pictogram Corresponding to the Scanner Illumination System 3. Operational Pictogram Description The barcode scanner (1) can handle multiple barcode media, such as: Note: traditional boarding passes A4-size documents cell phone screens credit card size plastic cards The Barcode successfully read sound signal is activated to confirm correct barcode reading. On the other hand, the Barcode rejected sound signal is activated for a non-valid boarding document Operational Pictograms The barcode scanner illumination system (2), located under the scanner window acts as an operational pictogram to inform the passenger of the following: - If the scanner illumination system (2) is off, the barcode scanner is not operational - If the illumination system is on, the barcode scanner is ready for operation or is scanning a barcode The operational pictogram (3), associated with the barcode scanning function of the gate, informs the passenger of the following: - whether or not the scanner is operational (pictogram activated/deactivated) - how to proceed (scanner is ready to scan a barcode, barcode scanning is completed) Barcode Scanning Recommendations IMPORTANT: When scanning barcodes, it is important to keep the following recommendations in mind: - Present one single document at a time. - Place the barcode face down on and in the center of the scanner window, if possible, without moving it. - If thin paper documents, printed on both sides, need to be scanned, strong ambient light might enhance paper translucency and interfere with correct barcode scanning. Therefore, IER recommends the use of document media not printed on the back side or at least with a blank zone on the back of the barcode area. Furthermore, IER encourages its customers not to use very thin paper, colored paper, recycled paper, or documents that are damaged or folded in the barcode area. Page 17
, located under the scanner window acts as an operational pictogram to inform the passenger of the following: - If the scanner")
18 3.5 OPTIONAL BOARDING ENTITLEMENT PRINTER Boarding Entitlement Printer Blank Media Operational Pictogram Passenger Receipt (Boarding Entitlement) 5. Rear Part of the Secured Automated Boarding Gate Description The thermal printer (1) prints a boarding entitlement (4) on the roll media (2) if there are any changes to the boarding information and delivers it to the passenger. For waitlisted passengers, for example, the boarding entitlement bears the following information: - Seat number Flight number Airport of departure and arrival Airline logo The printer is located in the rear part (5) of the secured boarding gate, next to the flaps. Taking the boarding entitlement causes the flaps to open Operational Pictogram The operational pictogram (3), dedicated to the thermal printer (1), informs the passenger of the presence of the boarding entitlement in the output slot of the printer (4). It also informs the passenger of its operational status: - pictogram activated/deactivated - printing in progress - boarding entitlement taken Page 18

19 4 OPENING/CLOSING THE DOORS 4.1 PROCEDURE Opening the Doors The two doors of the housing open in the same way. They are unlocked with a latch (1) located just above the flap (3), discreetly integrated into the side panel of the housing. To open the left door (2) located behind the flap (3), press on the right edge of the latch (1). This releases door. IMPORTANT: When releasing the door, hold it, remove it from its seat and carefully place it on the floor to avoid any personal injury and/or damage to the door. To open the right hand door (4) located before the flap (3), press on the left edge of the latch (1). IMPORTANT: When releasing the door, hold it, remove it from its seat and carefully place it on the floor to avoid any personal injury and/or damage to the door. Page 19

20 4.1.2 Closing the Doors To close the door (1), install it in its seat, and push it home. Note: Insert the two tabs of the door (1) into the corresponding slots (2) before shutting the door. To be able to lock the door, it has to be flush with the surrounding side panel and the latch must be in its original position, i.e. not pushed in on either side. Page 20

21 5 OPERATING THE SBG AT SECURED AUTOMATED BOARDING GATE 5.1 POWERING UP/POWERING DOWN THE (Refer to the corresponding item numbers in the figures below) Power Up Procedure - Open the door located behind the flap (see page 19). - Set the circuit breakers (1), (2) and (3) to the I-position. Close the door (see page 19). - Check flap movement by opening and closing them using a maintenance service boarding pass. - Check the correct open and closed positions of the flaps Power Down Procedure - Open the two doors of the SBG AT (see page 19). - Power down the computer by pressing pushbutton (5) for approximately five seconds. - Wait for two minutes until the computer (4) has completely shut down. - Open the circuit breakers (1), (2) and (3) and close the doors (see page 19). Note: - Circuit breaker (1) powers or cuts power to the frequency inverter. - Circuit breaker (2) allows the 24V power supply to flow or to be cut (e.g.: thermal printer, mechanism controller module, pictograms and barcode scanner). - Circuit breaker (3) allows the 220V power supply to flow or to be cut. Figure 5.1 Powering Up/Powering Down the Page 21
22 6 LOADING PRINT MEDIA 6.1 PROCEDURE IMPORTANT: The heat-sensitive side of the media must IMPERATIVELY face up. To check which one is the heat sensitive side, simply scratch the media with your fingernail: black marks appear on the thermal side. - Power up the secured boarding gate (see page 21 ). - To gain access to the thermal printer, open cover (1) entirely by pressing down as shown in the illustration below. IMPORTANT: For easy access to the printer and to avoid any injury especially to your face when working on the printer, be sure to: - keep your face away from the cover (1) and to - fully open the cover (1) (more than 90 ). - Remove the roll media shaft (2) from the rear of the printer and place the media (4) on spindle (3), making sure to center it. Note: Page 22 For correct media feeding, make sure that the leading edge of the media is neatly cut at a right angle.
23 - Insert the media under the paper guide (5) until it is drawn into the printer. - Install the roll media shaft and make sure that shaft (8) is correctly inserted in its seats (7) and centered. - Remove the cut media (6), and close the cover (1). Page 23
24 7 PICTOGRAMS, INDICATORS AND SOUND SIGNALS 7.1 PICTOGRAM, INDICATOR AND SOUND SIGNAL FUNCTIONS The Secured Boarding Gate features a full range of pictograms, indicators and sound signals to optimize passenger flow. To easily locate the pictograms listed in the following Pictogram Functions table, we have numbered them in the illustrations below. Figure 7.1 Locating the Pictograms Page 24
25 The table below lists all the pictograms and sound signals, their functions and their various states. (Refer to the item numbers, see figure page 25). Note: If the orientation pictogram (5) (at the entry of the walkway) has the shape of two red crosses the is in the Alarm-state and indicates that a passenger has tried to enter the gate through the exit (i.e. case of an "Intruder enters gate in opposite direction"). Page 25
26 8 PROCESSING BOARDING OF A PASSENGER 8.1 BOARDING PROCEDURE To be able to access the boarding area, the passenger has to pass through the secured automated boarding gate (). To do so, he or she has to follow the steps below: - The passenger comes up to the portal (1). - The orientation pictograms on the portal jambs (2) are green and steadily lit. The three green arrows of the orientation pictogram at the entrance of the walkway (3) light up dynamically. - The passenger passes through the portal and enters the walkway. - As soon as the passenger has entered the walkway, the orientation pictograms (2) light up red to inform the other passengers to wait outside the gate as it is busy. Note: Page 26 If a second passenger tries to enter the gate while someone is already inside, he or she creates an intruder situation which causes the following to happen: any kind of authentication is deactivated the orientation pictograms (2) on the portal jambs (1) light up red and blink the three dynamic arrows of the orientation pictogram (3) light up red in reverse direction, inviting the second passenger to leave the gate through the entrance. If the second passenger has not left the gate after a certain amount of time a sound alarm is triggered.
27 - The passenger reaches the user interface (8) and follows the instructions displayed on the screen (7) to find out how to proceed with authentication: either using the fingerprint reader (4); in this case, the operational pictogram (9) associated with the reader lights up green, or using the contactless card reader (5), or the barcode scanner (6). Note: An operational pictogram is associated to each of these authentication devices. The lighting up of one of the pictograms invites the passenger to use the corresponding authentication device. Page 27
28 - Once the passenger has successfully authenticated him/herself: the flaps (10) open the three arrows of the orientation pictogram at the exit of the walkway (11) light up green, inviting the passenger to leave the gate through the exit. Note: If there are any changes to the passenger's boarding information, a boarding entitlement (12) is printed which the passenger has to remove from the printer before leaving the gate. In this case, the flap (10) opens only once the passenger has removed the document. - The passenger leaving the walkway causes the gate to reboot and to be ready to process boarding of the following passenger. Page 28
29 9 OPERATING FAULTS 9.1 PAPER JAM If a paper jam occurs in the printer, proceed as follows: - Do not power down the boarding gate. - To gain access to the printer, fully open the cover (1) by pressing down on it as shown in the illustration below. IMPORTANT: To easily access the printer and to avoid being hurt by the cover (especially in the face), we recommend you take the following precautions: - Keep your face away from the cover (1) - Fully open the cover (1) (beyond the 90 angle). - Rotate the ouput slot (2), and open the inner printer cover (3) to be able to access the area where the jam has occurred (4). Page 29
30 - Remove the media roll. - Remove the jammed paper and any chaff resulting from the jam. - Having cleared the jam, close the inner printer cover (3) and rotate the output slot (2) back to its original position. IMPORTANT: To easily access the printer and to avoid being hurt by the cover (especially in the face), we recommend you take the following precautions: : - Keep your face away from the cover (1) - Close the cover (1). - Install the media roll (see page 22). Page 30
31 10 MAINTENANCE 10.1 PROCEDURES CLEANING THE SECURED AUTOMATED BOARDING GATE (Refer to the item numbers in the illustrations, see figure page 32) CLEANING THE PORTAL To clean the metal parts of the portal (1), use a soft, lint-free cloth and a stainless steel cleaning agent. An approved cleaning agent, P/N 0/6031/000, can be ordered from Automatic Systems. Clean the Plexiglas sensor masking strips (7) and pictogram covers (2) using a soft, lint-free cloth dampened with an appropriate Plexiglas cleaning agent. IMPORTANT: Ensure that the cleaning agent leaves an anti-static coating on the Plexiglas to prevent dirt build-up. Do not use any abrasive or corrosive cleaning agents containing chlorine CLEANING THE FINGERPRINT READER To ensure optimum reader performance, the fingerprint reader (3) has to be cleaned as often as necessary. Use one of the soft, lint-free cloths contained in the cleaning kit, IER P/N S32129A CLEANING THE INFORMATION SCREEN OF THE USER INTERFACE Clean with caution and as often as necessary the liquid crystal screen (6), which is part of the user interface (5). To remove fingerprint marks and dust from the screen, carefully wipe it with a dry, soft and lint-free cloth. If that does not help to remove the marks, moisten the cloth with a liquid crystal screen cleaning agent and wipe the screen again. IMPORTANT: Make sure the screen is switched off before starting to clean it. Exclusively use liquid crystal screen cleaning products not containing any alcohol. Do not apply pressure to the outer plastic layer of the screen when cleaning it, as this may permanently damage the screen CLEANING THE GLASS WALLS IMPORTANT: Exclusively use window cleaners not containing any vinegar to clean the glass walls. Only use soft, non-abrasive cloths containing cotton. To clean the glass walls (9) and (10) use a soft cloth dampened with isopropyl alcohol or with a non-abrasive window cleaner not containing any vinegar. Remove dust from and clean the sensor masking strip (14) using a soft cloth dampened with a non-aggressive Plexiglas cleaning agent having anti-static properties. Page 31
32 CLEANING THE PLEXIGLAS PARTS OF THE HOUSING To clean the Plexiglas parts (12) and (13) of the Secured Automated Boarding Gate housing use a soft cloth moistened with Plexiglas cleaning agent. IMPORTANT: Ensure that the cleaning agent leaves an anti-static coating on the Plexiglas to prevent dirt build-up. Do not use any abrasive or corrosive cleaning products containing chlorine. Never use any paint thinner or any organic solvent CLEANING THE HOUSINGS To clean the housings, use a soft, lint-free cloth and a stainless steel cleaning agent. An approved cleaning agent, P/N 0/6031/000, can be ordered from Automatic Systems. Clean the flap(s) (8) with a cleaning agent for plastic surfaces. Remove dust from and clean the sensor masking strip (7) using a soft cloth dampened with a non-aggressive Plexiglas cleaning agent having anti-static properties. Figure 10.1 Cleaning the Secured Automated Boarding Gate Page 32
33 CLEANING THE MAIN OPTIONAL DEVICES OF THE SECURED AUTOMATED BOARDING GATE (Refer to the item numbers in the illustrations, see figure page 34) CLEANING THE INFORMATION SCREEN ON THE PORTAL Clean with caution and as often as necessary the liquid crystal screen (15), located in the upper part of the portal. To remove fingerprint marks and dust from the screen, carefully wipe it with a dry, soft and lint-free cloth. If that does not help to remove the marks, moisten the cloth with a liquid crystal screen cleaning agent and wipe the screen again. IMPORTANT: Make sure the screen is switched off before starting to clean it. Exclusively use liquid crystal screen cleaning products not containing any alcohol. Do not apply pressure to the outer plastic layer of the screen when cleaning it, as this may permanently damage the screen CLEANING THE CONTACTLESS CARD READER Clean the contactless card reader (16) as often as necessary to ensure optimum reader operation. To clean the reader, use one of the soft, lint-free cloths contained in the cleaning kit, IER P/N: S32129A CLEANING THE BARCODE SCANNER It is vital for optimum barcode scanner (17) operation that the scanner window is kept clean. Wipe it as often as necessary. To clean the scanner window, use a soft, lint-free cloth from the cleaning kit, IER P/N S32129A. IMPORTANT: Never spray or splash any water or other liquid cleaning agent on the scanner window and never use any product likely to scratch the window CLEANING THE BOARDING ENTITLEMENT PRINTER Periodic maintenance of the boarding entitlement printer (18) mainly consists of cleaning the printhead and the platen. IMPORTANT: Cut the power supply to the printer by opening the circuit breaker (2) (see page 21). Never touch the printhead with your bare fingers. Never clean the printhead immediately after a printing session as the heating elements can reach very high temperatures. Never use any sharp or abrasive tools or means that could damage the printhead. - Use the dust remover can from the cleaning kit, IER P/N S32129A, to remove any Page 33
34 dust from the printer, especially from the paper path. - To clean the printhead, use the alcohol filled foam swabs from the cleaning kit, IER P/N S32129A. - Clean the entire platen surface using one of the soft lint-free cloths contained in the cleaning kit, IER P/N S32129A. Moisten the cloth with cleaning solution also contained in the cleaning kit. Figure 10.2 Cleaning the Main Optional Devices of the Secured Automated Boarding Gate Page 34
35
36
IER 610. Reader. User Guide N0B902A
 IER 610 Reader N0B902A N0B902A - Rev. 3 IER SIEGE - HEADQUARTERS IER S.A. 3, rue Salomon de Rothschild 92156 SURESNES CEDEX FRANCE Tel. +33 (0)1 41 38 60 00 Fax +33 (0)1 41 38 62 75 IER dans le monde -
IER 506B PRINTER. User Guide N0B402A
 IER 506B PRINTER N0B402A N0B402A - Rev. 3 IER SIEGE - HEADQUARTERS IER S.A. 3, rue Salomon de Rothschild 92156 SURESNES CEDEX FRANCE Tel. +33 (0)1 41 38 60 00 Fax +33 (0)1 41 38 62 75 IER dans le monde
IER 600 TECHNICAL MANUAL N0B612A. Reader
 IER 600 Reader TECHNICAL MANUAL N0B612A IER SIEGE - HEADQUARTERS IER S.A. 3, rue Salomon de Rothschild 92156 SURESNES CEDEX FRANCE Tel. +33 (0)1 41 38 60 00 Fax +33 (0)1 41 38 62 75 IER dans le monde -
IER 400B PRINTER. User Guide N0C402B
 PRINTER N0C402B N0C402B - Rev. 1 IER SIEGE - HEADQUARTERS IER S.A. 3, rue Salomon de Rothschild 92156 SURESNES CEDEX FRANCE Tel. +33 (0)1 41 38 60 00 Fax +33 (0)1 41 38 62 75 IER dans le monde - IER Worldwide
IER 567 PRINTER. IER 567 Print er User Guid e
 IER 567 PRINTER IER 567 Print er User Guid e N00202A Revision Level 5 Jan. 22, 2009 NOTICE! Warning DANGER! Warning DANGER THIS IER PRODUCT COMES WITH A LITHIUM BATTERY. BATTERY REPLACEMENT MUST IMPERATIVELY
OPERATOR S Manual All specifications are subject to change without notice
 OPERATOR S Manual All specifications are subject to change without notice Warning - U.S. This equipment has been tested and founded to comply with the limits for a Class A digital device pursuant to Part
OC-3 SERIES OF PRINTERS
 110204-003 OC-3 SERIES OF PRINTERS User Guide TABLE OF CONTENTS OC-3 Printer Views... 1 Front and back view... 1 Side views... 1 Setting up your printer... 2 Unpacking your printer... 2 Installing/removing
2013 VTech Printed in China 91-009656-000 US
 Rechargeable Power Pack User s Manual 2013 VTech Printed in China 91-009656-000 US INTRODUCTION The Rechargeable Power Pack makes it easier than ever to keep the InnoTab 3 or InnoTab 3S charged and ready
When you switch off your system, or mute the sound, the red indicator light appears immediately, indicating that the subwoofer is not in use.
 BeoLab 11 Guide WARNING: To reduce the risk of fire or electric shock, do not expose this appliance to rain or moisture. Do not expose this equip ment to dripping or splashing and ensure that no objects
THE NEW GENERATION IN TECHNOLOGY. NI-3103A Alarm Clock w/fm Radio ipod & iphone Docking. Operating Instructions
 THE NEW GENERATION IN TECHNOLOGY NI-3103A Alarm Clock w/fm Radio ipod & iphone Docking Operating Instructions Table of Contents Important Safeguards... 3 Parts... 6 Controls... 6 To Set Up... 7 ipod/iphone
Owner s Manual. Not suitable for mobile applications. Important Safety Instructions 2. Quick Installation 3. Basic Operation 4. Storage & Service 7
 Register online today for a chance to win a FREE Tripp Lite product! www.tripplite.com/warranty Owner s Manual Internet Office & BC Personal UPS Systems Not suitable for mobile applications. Important
reflecta Super 8 Scanner
 reflecta Super 8 Scanner User Manual 1 FEDERAL COMMUNICATIONS COMMISSION (FCC) STATEMENT This Equipment has been tested and found to comply with the limits for a class B digital device, pursuant to Part
Installation Guide. Wyse VX0L and VX0LE Thin Clients 1-GB RAM Upgrade Option Kit. Issue: 022808 PN: 883884-07L Rev. A
 Installation Guide Wyse VX0L and VX0LE Thin Clients 1-GB RAM Upgrade Option Kit Issue: 022808 PN: 883884-07L Rev. A ii Copyright Notice 2008, Wyse Technology Inc. All rights reserved. This manual and the
Daily use. Never use alcohol or other solvents to clean any part of the loudspeakers!
 BeoLab 6002 Guide WARNING: To reduce the risk of fire or electric shock, do not expose this appliance to rain or moisture. Do not expose this equip ment to dripping or splashing and ensure that no objects
Ingenico. User Guide 5100M. Secure transaction and payment solutions
 User Guide Ingenico 5100M Secure transaction and payment solutions Ingenico 5100 M Contents 1 Presentation... 5 1.1 Overview of Ingenico 5100... 6 1.2 Keyboard details and functionality... 7 2 Use...
Solar Weather Station Model: BAR806 / BAR806A
 Solar Weather Station Model: BAR806 / BAR806A EN CONTENTS USER MANUAL Overview... 2 Front view... 2 Back view... 3 Remote sensor... 3 Getting started... 3 Solar panel... 3 Insert batteries... 4 Remote
CAUTION RISK OF ELECTRIC SHOCK DO NOT OPEN
 BeoLab 7-6 Guide CAUTION RISK OF ELECTRIC SHOCK DO NOT OPEN CAUTION: To reduce the risk of electric shock, do not remove cover (or back). No User-serviceable parts inside. Refer servicing to qualified
Portable Air Conditioner
 Portable Air Conditioner Owner's Manual Model:3 in 1 12,000 Btu/h Series 3 Please read this owner s manual carefully before operation and retain it for future reference. CONTENTS 1. SUMMARY...1 2. PORTABLE
For the US-market only! CAUTION: To reduce the risk of electric shock, do not remove cover (or back). No User-serviceable parts
. No User-serviceable parts") BeoLab 6000 Guide CAUTION: To reduce the risk of electric shock, do not remove cover (or back). No User-serviceable parts inside. Refer servicing to qualified service personnel. WARNING: To prevent fire
BeoLab 6000 Guide CAUTION: To reduce the risk of electric shock, do not remove cover (or back). No User-serviceable parts inside. Refer servicing to qualified service personnel. WARNING: To prevent fire
BroadBand PowerShield. User Manual
 BroadBand PowerShield User Manual 990-0375G 12/2006 Chapter 1 General Information The PowerShield provides a power source for broadband telephony and other DC applications. Safety This Safety Guide contains
NFC Communication Tray Model: HHX-IT3-Z
 INSTRUCTION MANUAL NFC Communication Tray Model: HHX-IT3-Z ENGLISH CONTENTS Introduction...3 Important safety information...4 Know your unit...6 Transferring data to the PC...7 Care and maintenance...8
PEARL Portable Reading Camera
 PEARL Portable Reading Camera Quick Start Guide Freedom Scientific, Inc. 440528-001 Rev. D Freedom Scientific, Inc., 11800 31 st Court North, St. Petersburg, Florida 33716-1805, USA www.freedomscientific.com
Disclaimers. Important Notice
 Disclaimers Disclaimers Important Notice Copyright SolarEdge Inc. All rights reserved. No part of this document may be reproduced, stored in a retrieval system, or transmitted, in any form or by any means,
TM Advanced Tracking Technologies, Inc. 2003 ATTI All rights reserved
 TM Advanced Tracking Technologies, Inc. 2003 ATTI All rights reserved Copyright 2003, Advanced Tracking Technologies, Inc. All rights reserved. No part of this publication may be reproduced or transmitted
Aura SSD. for the 2013 Apple Mac Pro INSTALLATION GUIDE
 Aura SSD for the 2013 Apple Mac Pro INSTALLATION GUIDE TABLE OF CONTENTS 1. INTRODUCTION...1 1.1 SYSTEM REQUIREMENTS 1.2 PACKAGE CONTENTS 1.3 ABOUT THIS MANUAL 2. INSTALLATION...2 2.1 PREPARING THE MAC
110244-003. PrintPAD CN3/4/3e/4e. User Guide
 110244-003 PrintPAD CN3/4/3e/4e User Guide TABLE OF CONTENTS PrintPAD CN3/4 & PrintPAD CN3e/4e Printer Views...1 Open View...1 Closed View...1 Using Batteries: General Guidelines...1 Installing and/or
Wiser Panel Meter, Model Number WISERCTPM200 Installer s Guide
 Instruction Bulletin EAV85226 08/2014 Wiser Panel Meter, Model Number WISERCTPM200 Installer s Guide Retain for future use. Product Description Kit Contents The Wiser Panel Meter is for use in energy management
CAUTION RISK OF ELECTRIC SHOCK DO NOT OPEN
 BeoLab 4000 Guide CAUTION RISK OF ELECTRIC SHOCK DO NOT OPEN CAUTION: To reduce the risk of electric shock, do not remove cover (or back). No User-serviceable parts inside. Refer servicing to qualified
4.3-inch Back-Up Camera
 TM 4.-inch Back-Up Camera Model No.: PKC0BU4 Owner s Manual and Warranty Information Read these instructions completely before using this product. Retain this Owner s Manual for future reference. INTRODUCTION
CR /Fusion. BEETLE /FUSION Side Combo. Operating Manual
 CR /Fusion BEETLE /FUSION Side Combo Operating Manual The reproduction, transmission or use of this document or its contents is not permitted without express authority. Offenders will be liable for damages.
FCC COMPLIANCE STATEMENT FOR AMERICAN USERS
 FCC COMPLIANCE STATEMENT FOR AMERICAN USERS This equipment has been tested and found to comply with the limits for a CLASS A digital device, pursuant to Part 15 of the FCC Rules. These limits are designed
Mercury Helios 2 ASSEMBLY MANUAL & USER GUIDE
 Mercury Helios 2 ASSEMBLY MANUAL & USER GUIDE TABLE OF CONTENTS INTRODUCTION...1 1.1 MINIMUM SYSTEM REQUIREMENTS 1.1.1 Apple Mac Requirements 1.1.2 PC Requirements 1.1.3 Supported PCIe Cards 1.2 PACKAGE
IMPORTANT SAFETY INSTRUCTIONS
 IMPORTANT SAFETY INSTRUCTIONS Before you install or use the apparatus, you must read and understand these Important Safety Instructions. At all times when using the apparatus you must follow these Important
ES-CAM2AU IP Camera. www.etiger.com
 ES-CAM2AU IP Camera www.etiger.com EN Box content Connect your smartphone to the camera - ES-CAM2AU x1 - Mounting bracket x1 - AC Adaptor x1 - User Manual x1 and apps Before using the ES-CAM2AU, download
500/600/1000. User Manual June 2011 Rev. 061311. 1 v061311
 500/600/1000 User Manual June 2011 Rev. 061311 1 v061311 http://shopping.netsuite.com/digitalcheck TABLE OF CONTENTS Contents Radio Frequency Interference... 3 About the SB Scanner... 3 SB Scanner Equipment...
HANDS-FREE BLUETOOTH CONTROLLER for SMART READY TABLETS AND COMPUTERS
 HANDS-FREE BLUETOOTH CONTROLLER for SMART READY TABLETS AND COMPUTERS Operating Manual 2 CONTENTS Before Turning on Your PED... 4 Power... 5 ON... 5 OFF... 5 Modes... 6 Changing the MODE... 7 Connecting
Intelli-Time Alarm Clock model 13027
 Instruction Manual Intelli-Time Alarm Clock model 13027 CONTENTS Unpacking Instructions... 2 Package Contents... 2 Product Registration... 2 Features & Benefits... 3 Clock Setup... 4 Intelli-Time Clock...
aseries A13B Mini Bullet Camera User Manual
 aseries A13B Mini Bullet Camera User Manual Thank you for purchasing our product. If there are any questions, or requests, please do not hesitate to contact the dealer. This manual applies to the MicroView
Business Audio System: Music & Messaging MP3 Player. by Grace Digital Audio. User Guide. Model No. GDI-USBM10
 Business Audio System: Music & Messaging MP3 Player by Grace Digital Audio User Guide Model No. GDI-USBM10 User Guide Contents Introduction 2 Safety & General Use Information 2 Features 3 Set Up & Operation
Wireless Alarm System. Silent Alert. User s Manual. Choice ALERT. Control all Sensors & accessories from one location
 45137 Wireless Alarm System Silent Alert User s Manual Choice ALERT Control all Sensors & accessories from one location Table of Contents Important Safeguards 4 Introduction 4 Adding a Silent Alert to
Wireless Alarm System. Panic Button. User s Manual. Choice ALERT. Control all sensors, accessories and remote transmitters from one location
 Wireless Alarm System Panic Button User s Manual Choice ALERT Control all sensors, accessories and remote transmitters from one location Table of Contents Important Safeguards 4 Introduction 5 Activating
C790 Series. Maintenance Guide
 C790 Series Maintenance Guide April 2011 www.lexmark.com Contents...3 Cleaning the exterior of the printer...3 Cleaning the printhead lenses...3 Storing supplies...4 Checking the status of supplies...5
BeoLab 1. User s guide
 BeoLab 1 User s guide Legal notice: CAUTION RISK OF ELECTRIC SHOCK DO NOT OPEN CAUTION: To reduce the risk of electric shock, do not remove cover (or back). No User-serviceable parts inside. Refer servicing
User Guide Nokia Portable Wireless Charging Plate DC-50
 User Guide Nokia Portable Wireless Charging Plate DC-50 Issue 1.1 EN User Guide Nokia Portable Wireless Charging Plate DC-50 Contents For your safety 3 About your accessory 4 Keys and parts 5 Top up your
A. FEDERAL COMMUNICATIONS COMMISSION (FCC) STATEMENT
 STATEMENT") A. FEDERAL COMMUNICATIONS COMMISSION (FCC) STATEMENT This equipment has been tested and found to comply with the limits for a Class B digital device, Pursuant to Part 15 the FCC rules. These limits are
A. FEDERAL COMMUNICATIONS COMMISSION (FCC) STATEMENT This equipment has been tested and found to comply with the limits for a Class B digital device, Pursuant to Part 15 the FCC rules. These limits are
BeoLab 7-1 BeoLab 7-2. Guide
 BeoLab 7-1 BeoLab 7-2 Guide CAUTION: To reduce the risk of electric shock, do not remove cover (or back). No User-serviceable parts inside. Refer servicing to qualified service personnel. WARNING: To prevent
Table of Contents. Stanley TLM330 1
 Table of Contents EN Instrument Set-up - - - - - - - - - - - - - - - - - - - - - - - Introduction- - - - - - - - - - - - - - - - - - - - - - - - - - - - - - - Overview - - - - - - - - - - - - - - - - -
Wireless Alarm System. Window/Door Sensor. User s Manual. Choice ALERT. Control all Sensors & accessories from one location
 45131 Wireless Alarm System Window/Door Sensor User s Manual Choice ALERT Control all Sensors & accessories from one location Table of Contents Important Safeguards 4 Introduction 5 Installation 6 Assigning
ATTENTION RISQUE D ÉLECTROCUTION! NE PAS OUVRIR!
 Quick Start Guide ATTENTION RISQUE D ÉLECTROCUTION! NE PAS OUVRIR! CAUTION: TO REDUCE THE RISK OF ELECTRIC SHOCK, DO NOT REMOVE COVER (OR BACK). NO USER-SERVICEABLE PARTS INSIDE. REFER SER- VICING TO QUALIFIED
CAUTION RISK OF ELECTRIC SHOCK DO NOT OPEN
 BeoLab 4 Guide CAUTION RISK OF ELECTRIC SHOCK DO NOT OPEN CAUTION: To reduce the risk of electric shock, do not remove cover (or back). No User-serviceable parts inside. Refer servicing to qualified service
ScreenLogic Wireless Connection Kit. Installation Guide. pool/spa control system
 pool/spa control system ScreenLogic Wireless Connection Kit Installation Guide P/N 520663 - Rev B 8 Technical Support Contact Technical Support at: Sanford, North Carolina (8 A.M. to 5 P.M.) Phone: (800)
ENERGY AWARE. Monitor User Guide
 ENERGY AWARE Monitor User Guide Table of contents Introduction 3 How it works 4 Have you got everything? 4 Before you get started 5 Setting up your TREC Display 6 Pairing the TREC Display and Transmitter
Installation and Operating Manual p. 23. Radio push button 2 channel: HM-PB-2-WM55-2
 Installation and Operating Manual p. 23 Radio push button 2 channel: HM-PB-2-WM55-2 1. English edition 10/2013 Documentation 2013 eq-3 Ltd., Hong Kong All rights reserved. No parts of this manual may be
GNOME PELLET E.I. Pellet Heater Owner's Manual Installation and Operating Instructions. Please read this entire manual before installation.
 Pellet Heater Owner's Manual Installation and Operating Instructions Please read this entire manual before installation. Save these instructions. SAFETY NOTICE HEATER MUST BE PROPERLY INSTALLED AND MAINTAINED
0311 A OI GT-1C-L/GT-1C. Apartment Intercom System Residential Monitor Station OPERATION MANUAL
 0311 A OI GT-1C-L/GT-1C Apartment Intercom System Residential Monitor Station OPERATION MANUAL PRECAUTIONS General Prohibitions Prohibition to Dismantle the Unit Prohibition on Subjecting the Unit to Water
Jarv Nmotion BTHL-201 Bluetooth Stereo Earbuds Users Guide
 Jarv Nmotion BTHL-201 Bluetooth Stereo Earbuds Users Guide Features: Bluetooth wireless technology Comfortable lightweight in-ear design with detachable sports ear hooks for added support High Definition
CL90i. 77-021 Please read these instructions before operating the product. 3 - Beam Self-Leveling Cross Line Laser
 3 - Beam Self-Leveling Cross Line Laser CL90i 77-01 Please read these instructions before operating the product Self-Leveling GB D F I E PT NL DK SE FIN NO PL GR CZ RU HU SK SI BG RO EE LV LT Contents
Point of View Mobii 10 Tegra Tablet. Notice... 2
 TABLE OF CONTENTS Notice... 2 1.0 Preface... 2 2.0 Getting to know the basics... 4 3.0 How to Start... 7 3.1 Home Shell... 7 3.1.1 Home Shell > Widgets (Search RSS Weather)... 8 3.1.2 Home Shell > Widgets,
The Third Rail System User Manual
 The Third Rail System User Manual System Contents: Slim Case and Smart Battery for iphone 4 Slim Case for iphone 4 Smart Battery micro-usb Cable USB Adapter Cable User Manual Smart Battery only Smart Battery
Digital Satellite Receiver
 USER GUIDE Digital Satellite Receiver Models DSR207, DSR317, DSR505, and DSR530 CONTENTS IMPORTANT SAFETY INSTRUCTIONS...1 DSR BASICS SYMBOLS/ICONS...6 Front Panel...6 Back Panel...7 CONNECTING YOUR DSR...10
7 High-Resolution Digital Photo Frame
 TM 16-1003 User s Guide 7 High-Resolution Digital Photo Frame One demo photo included, as illustrated Please read this user s guide before using your new photo frame. Package contents Photo Frame AC Adapter
StorTrends 3400 Hardware Guide for Onsite Support
 StorTrends 3400 Hardware Guide for Onsite Support MAN-3400-SS 11/21/2012 Copyright 1985-2012 American Megatrends, Inc. All rights reserved. American Megatrends, Inc. 5555 Oakbrook Parkway, Building 200
Instruction Manual. Window Wiper AFW900. (Read carefully before use)
") Instruction Manual Window Wiper AFW900 (Read carefully before use) When using electrical appliances, basic precautions should always be followed, including the fact READ ALL INSTRUCTIONS IN THIS MANUAL
Instruction Manual Window Wiper AFW900 (Read carefully before use) When using electrical appliances, basic precautions should always be followed, including the fact READ ALL INSTRUCTIONS IN THIS MANUAL
Single Lens Reflex (SLR) Camera
 Camera") 690 Single Lens Reflex (SLR) Camera User Guide 690 Single Lens Reflex (SLR) Camera User Guide Contents IMPORTANT SAFEGUARDS: FCC Notice 1 Camera Features 1 Camera Parts 1 Opening the Camera 2 Closing the
690 Single Lens Reflex (SLR) Camera User Guide 690 Single Lens Reflex (SLR) Camera User Guide Contents IMPORTANT SAFEGUARDS: FCC Notice 1 Camera Features 1 Camera Parts 1 Opening the Camera 2 Closing the
LED Security Spotlight User Manual
 MOT ION-TR ACKING LED Security Spotlight User Manual www.jascoproducts.com 1-800-654-8483 2 TABLE OF CONTENTS Parts List 3 Questions? Missing Parts? 4 Installation (Wall mount) 6-9 Installation (Eave mount)
ST815 Illumination Sensor with LCD
 ST815 Illumination Sensor with LCD The Illumination Sensor with LCD (refer to as Illumination Sensor hereafter) is a Z-Wave TM enabled device which is fully compatible with any Z-Wave TM enabled network.
MICA HEATER INSTRUCTION MANUAL Model No: UHM-786 230V 50Hz 2200W
 MICA HEATER INSTRUCTION MANUAL Model No: UHM-786 230V 50Hz 2200W Safety Precautions To reduce the risk of personal injury or damage to property, basic safety precautions must be observed including the
e-4 AWT07MLED 7 Q TFT LCD MONITOR (LED Backlighted) USER MANUAL
 USER MANUAL") Thank you for purchasing our product. Please read this User s Manual before using the product. Change without Notice AWT07MLED 7 Q TFT LCD MONITOR (LED Backlighted) USER MANUAL e-4 SAFETY PRECAUTIONS Federal
Thank you for purchasing our product. Please read this User s Manual before using the product. Change without Notice AWT07MLED 7 Q TFT LCD MONITOR (LED Backlighted) USER MANUAL e-4 SAFETY PRECAUTIONS Federal
Duplex ID Card & License Scanner. User Guide
 Duplex ID Card & License Scanner User Guide CE Conformity and FCC Statement This equipment has been tested and found to comply with the limits of the European Council Directive on the approximation of
CINEMATE 1 SR DIGITAL HOME THEATER SPEAKER SYSTEM. Operating Guide Guía del usuario Guide d utilisation
 CINEMATE 1 SR DIGITAL HOME THEATER SPEAKER SYSTEM Operating Guide Guía del usuario Guide d utilisation Notice This equipment has been tested and found to comply with the limits for a Class B digital device,
Hardware Guide for the Classic and Elite CR Systems. 2011-08-04 PN 9G9637 Version 1.0
 Hardware Guide for the Classic and Elite CR Systems 2011-08-04 PN 9G9637 Version 1.0 Use of the Content Carestream Health CR Systems are designed to meet international safety and performance standards.
PowlVac Vacuum Integrity Tester
 Instructions IB-60025B PowlVac Vacuum Integrity Tester POWELL ELECTRICAL MANUFACTURING COMPANY 8550 MOSLEY DRIVE HOUSTON, TEXAS 77075 USA PHONE (713) 944-6900 FAX (713) 947-4453 www.powellelectric.com
mysensors mysensors Wireless Sensors and Ethernet Gateway Quick Start Guide Information to Users Inside the Box mysensors Ethernet Gateway Quick Start
 mysensors Information to Users mysensors Wireless Sensors and Ethernet Gateway Quick Start Guide This equipment has been tested and found to comply with the limits for a Class B digital devices, pursuant
INSTRUCTION MANUAL PC5OO WITH PC5OORK KEYPAD
 INSTRUCTION MANUAL PC5OO WITH PC5OORK KEYPAD TABLE OF CONTENTS SYSTEM INFORMATION 2 INTRODUCTION 3 Test Your System Regularly...3 Important Notice...3 Glossary...3 BASIC OPERATION 4 Arming Your System...4
PROGRAMMER INSTALLATION INSTRUCTIONS
 PROGRAMMER INSTALLATION INSTRUCTIONS TABLE OF CONTENTS Description 4 Installation 4 Operation 5 Safety Precautions 6 Regulatory & Service Information 6 Important Safety and Usage Information 7 Regulatory
www.iconnectivity.com
 www.iconnectivity.com USER GUIDE WARRANTY INFORMATION iconnectivity warrants to the original purchaser that this unit is free of defects in materials and workmanship under normal use and maintenance for
25 Code GTO Digital Keypad
 2 Code GTO Digital Keypad Instructions for Wired and Wireless Installations (FM1-G only) Thank you for purchasing the GTO Digital Keypad. Be sure to read the directions carefully and completely. Before
ReadyNet Easy Jack 2 Voice/Data and Data Only Owner s Manual PX-211d and PX-211v
 ReadyNet Easy Jack 2 Voice/Data and Data Only Owner s Manual PX-211d and PX-211v Phonex Broadband Corporation dba ReadyNet 6952 High Tech Drive Midvale, Utah 84047 801.566.0100 Phone 801.566.0880 Fax www.readynetsolutions.com
Contents. Product Code -------------------------------------------------------15. Page 1
 Contents Important Safety Instructions -------------------------------------2 BT HP01 --------------------------------------------------------------4 BT HP01 Anatomy ---------------------------------------------------5
Panasonic. Proprietary Telephone for Electronic Modular Switching System MODEL NO. KX-17030. Illustrated Model: White 1
 Panasonic Proprietary Telephone for Electronic Modular Switching System MODEL NO. KX-17030 Illustrated Model: White 1 KX-T7030 is compatible with all of the Panasonic Electronic Modular Switching Systems
Wireless Travel Mouse with 5-Buttons User Manual
 Wireless Travel Mouse with 5-Buttons User Manual Product Features 1. Radio frequency 27MHz wireless transmission 2. Use of 256 ID codes to prevent interference between several wireless mice being used
EVOLUTION Thermal Imaging Camera Remote Wireless Video Receiver System
 EVOLUTION Thermal Imaging Camera Remote Wireless Video Receiver System Instruction Manual DELUXE AND MINI RECEIVER KIT (RX) INSTRUCTIONS " WARNING THIS MANUAL MUST BE READ CAREFULLY BY ALL INDIVIDUALS
Model: 308-1412 Manual DC: 080215 WIRELESS COLOR FORECAST STATION
 Model: 308-1412 Manual DC: 080215 WIRELESS COLOR FORECAST STATION FRONT VIEW SENSOR TX141TH-Bv2 LED TX Sensor Battery Cover Sensor Battery Compartment 2 AA Buttons Battery Compartment 3 AAA BACK VIEW Battery
ES-CAM2A IP Camera. www.etiger.com
 ES-CAM2A IP Camera www.etiger.com EN Box content - ES-CAM2A x1 - Mounting bracket x1 - AC Adaptor x1 - User Manual x1 and apps Before using the ES-CAM2A, download the app isecurity+ on the App Store or
Model: 616-146v2 Quick Setup Guide DC: 071015 Atomic Projection Alarm with Indoor and Outdoor Temperature
 Model: 616-146v2 Quick Setup Guide DC: 071015 Atomic Projection Alarm with Indoor and Outdoor Temperature Snooze/Backlight BUTTONS Time, Alarm with Snooze, & Calendar Projection Arm Rotates 180 Indoor/Outdoor
by QUICK START GUIDE 1
 by QUICK START GUIDE 1 BUTTONS & CONTROLS TALK* PREVIOUS / NEXT* POWER BUTTON & LED PAIRING BUTTON LINE IN USB DC IN PLAY / PAUSE* VOLUME DOWN / UP * Only works when connected wirelessly via Bluetooth
Wireless Indoor/ Outdoor Thermometer
 Wireless Indoor/ Outdoor Thermometer Owner s Manual Please read before using this equipment. ˆ Contents FCC Information... 3 FCC Declaration of Conformity... 5 Preparation... 5 Installing Batteries...
User's Manual. Metapace L-1. Label Printer Rev. 1.00
 User's Manual Label Printer Rev. 1.00 Table of Contents Manual Information & Usage Precautions 3 1. Content Confirmation 6 2. Product Part Names 7 3. Installation & Usage 9 3-1 Power Connection 9 3-2 Interface
Wireless Alarm System. Alarm Siren. User s Manual. Choice ALERT. Control all Sensors & accessories from one location
 45136 Wireless Alarm System Alarm Siren User s Manual Low Batt On Armed ON/OFF LEARN Choice ALERT Control all Sensors & accessories from one location Table of Contents Important Safeguards 4 Introduction
Wireless Security System. Wireless Security Camera. SI519 Instructions. SI513 Instructions. Read and save these instructions.
 Wireless Security System SI519 Instructions Wireless Security Camera SI513 Instructions Read and save these instructions. Dear Sharper Image Customer, Thank you for your purchase of a Sharper Image product.
LF-IRX. Limited Warranty LF-IRX. Remote Control Extender OWNER S MANUAL
 Limited Warranty OWNER S MANUAL Audiovox Corporation (Audiovox) warrants this product against defects in materials or workmanship for one (1) year from the date of purchase. During this period, this product
musical auto mirror day & night light Control Panel Features Mirror Features Front View Mirror Features Rear View B C Remote Receiver C
 Control Panel Features A Power, Low/High Volume Switch Note: The dual-mode night light and music can only be activated by pressing the buttons on the remote. A Mirror Features Front View B Dual-Mode Night
Product Overview. Product Interface
 mobile speaker Product Overview Thank you for purchasing the bēm wireless Mobile Speaker. Our speaker will bring you a new found freedom from wires while delivering an incredible sound. The Mobile Speaker
ALPHA Meter Installation Information
 October 006 IL4-400Q ALPHA Meter Installation Information General This instructional leaflet contains general installation instructions for the following single phase and polyphase watthour meters: socket-connected
WLAN600 Wireless IP Phone Administrator s Guide
 WLAN600 Wireless IP Phone Administrator s Guide Trademark Acknowledgement All brand names are trademarks or registered trademarks of their respective companies. Disclaimer This document is supplied by
SmartCard On-Board Reader (# 8105) SmartCard Desktop Reader (# 8108) SmartCards, Pack of 10 (# 8112) Starter Interrupter Kit (# 8116)
 SmartCard Desktop Reader (# 8108) SmartCards, Pack of 10 (# 8112) Starter Interrupter Kit (# 8116)") athena Includes: SmartCard On-Board Reader (# 8105) SmartCard Desktop Reader (# 8108) SmartCards, Pack of 10 (# 8112) Starter Interrupter Kit (# 8116) Davis Instruments, 3465 Diablo Avenue, Hayward, CA
athena Includes: SmartCard On-Board Reader (# 8105) SmartCard Desktop Reader (# 8108) SmartCards, Pack of 10 (# 8112) Starter Interrupter Kit (# 8116) Davis Instruments, 3465 Diablo Avenue, Hayward, CA
How To Use An Easypad On A Pc Or Macbook Or Ipad (For Pc)
") User Guide Congratulations on your new EasyPad 1000. Please follow the instructions in this manual carefully. Statement: If the final version of this product has any differences from the description of
User Guide Congratulations on your new EasyPad 1000. Please follow the instructions in this manual carefully. Statement: If the final version of this product has any differences from the description of
Operating and Installation Instructions
 Operating and Installation Instructions System Drawer ESS 2062 To prevent accidents and en - US, CA appliance damage, read these instructions before installation or use. M.-Nr. 07 342 360 Contents IMPORTANT
Auto Sentry-eXP Maintenance
 Auto Sentry-eXP Maintenance Maintenance Procedures for Auto Sentry exp Bill Dispenser Credit Card Reader Bill Acceptor Bill Dispenser Maintenance Bill Dispenser Problem / Cause Bill Dispenser Error Codes
Kinivo 301BN HDMI Switch
 Kinivo 301BN HDMI Switch User Manual 2012 Kinivo LLC. All rights reserved. Kinivo is a trademark of Kinivo LLC. Bluetooth word mark and the Bluetooth logo are registered trademarks of Bluetooth SIG. All