Table of Contents. Introduction... Home screen. Power media applications. Bluetooth. General information Your mobile Text input...
|
|
|
- Rosaline Cummings
- 8 years ago
- Views:
Transcription
1
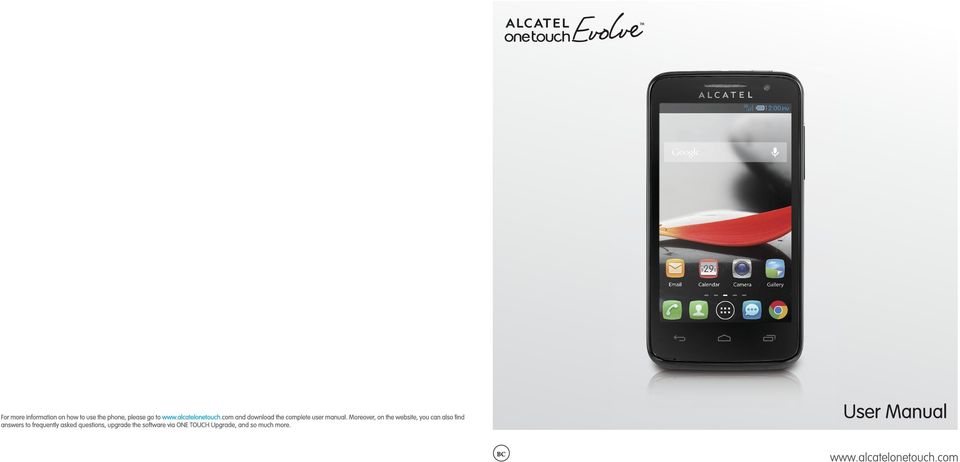
2 Introduction... Thank you for purchasing your new ALCATEL ONE TOUCH Evolve TM model 5020T. The 5020T comes equipped with many of the features and functions you want and need. Home screen Convenient at-a-glance view of Shortcut applications Menu shortcuts for quick access Power media applications Music & Radio Video & Streaming Bluetooth With Bluetooth BT4.0 supporting HFP 1.6 profiles, you can enjoy hands-free conversations Table of Contents General information Your mobile Keys and connectors Getting started Home screen Applications and widgets menu Text input Using Onscreen Keyboard Text editing Phone call, Call log and People Phone Wi-Fi Calling Call log People Messaging, Messaging Gmail/ Google Talk Calendar, Alarm clock & Calculator Calendar Clock Calculator...63 CJA1749ALAAA 1 2

3 6 Getting connected Connecting to the Internet Chrome Connecting to Bluetooth devices Connecting to a computer Sharing your phone's mobile data connection Connecting to virtual private networks Google Play Store Locate the item you want to download and install Download and install Manage your downloads Multimedia applications Camera Gallery YouTube Music Video Player Google Maps Get My Location Search for a location Star a location Get driving, public transportation or walking directions Arrangement of Layers Join Latitude to see your friends' locations and share yours with them Others File Manager Sound Recorder Radio Setup Other applications Settings Wireless & networks Device Personal Accounts System Making the most of your phone ONE TOUCH Manager Upgrade MONTH LIMITED WARRANTY Troubleshooting Safety and Use

4 General information... Your ALCATEL ONE TOUCH Evolve TM is a transceiver that operates on UMTS Triband 850/1900/ AWS. Protection against theft Your mobile phone is identified by an IMEI (mobile phone serial number) shown on the packaging label and in the product s memory. We recommend that you note the number the first time you use your mobile phone by entering *#06# and keep it in a safe place. It may be requested by the police or your network operator if your mobile phone is stolen. 1 Your mobile Keys and connectors Power key Headset connector This product meets applicable national SAR limits of 1.6W/kg. The specific maximum SAR values can be found in the SAR INFORMATION section of this user guide. Front camera When carrying the product or using it while worn on your body, either use an approved accessory such as a holster or otherwise maintain a distance of 1.5 cm from the body to ensure compliance with RF exposure requirements. Note that the product may be transmitting even if you are not making a phone call. Touch screen Back key Home key Recent apps key 5 6

5 Micro-USB connector Camera Volume up Volume down Power key Press: Lock the screen/light up the screen Press and hold: Show the pop-up menu to select from Power off/restart/airplane mode/ Quick start/ringer mode Press and hold: Power on Press and hold Power key and Volume down key to capture a screenshot. Press to mute the ringtone when there s an incoming call. Back key Touch to go back to the previous screen, or to close a dialog box, options menu, the notification panel, etc. These keys are visible when the screen lights up. Home key While on any application or screen, touch to return to the Home screen. Recent apps key Displays recently used apps list, touch app in list to open app. To remove an app from list drag app to left or right side. Touch and hold: As Menu key, touch and hold it to access Wallpaper, Manage applications and Settings. Volume Keys In call mode adjusts the earpiece or headset volume. In Music/Video/Streaming mode adjusts the media volume. In general mode adjusts the ring tone volume. Mute the ringtone of an incoming call. In Camera mode use as capture key to take a photo and start or stop video recording. Press to light up the screen when it dims during a call. 7 8

6 1.2 Getting started Set-up Removing or installing the back cover Installing or removing the battery Please power off your phone before removing the battery. Inserting or removing the SIM card You must insert your SIM card to make phone calls. Please power off your phone and remove battery before inserting or removing the SIM card. Insert battery into slot until locked in position, then close the battery cover. Remove battery cover and unlock battery from slot, then remove. Installing or removing the microsd card To install, ensure SIM card gold contacts are facing downward and that cropped corner of SIM card is on top right corner, then align SIM card with metal tray and gently push in SIM card until it locks into slot. To remove, gently push left side of SIM card until SIM card slides out of slot. Installing microsd card 1. To install microsd card, start by sliding the metal microsd card tray to right unlock position, tray will click and release when unlocked. 2. Place microsd card into the slot with the gold contacts facing downword. 3. Once microsd card is placed into slot, close metal microsd card tray, then slide tray to left lock position, tray will click when locked. 9 10

7 Removing microsd card 1. To remove microsd card, start by sliding the metal microsd card tray to right unlock position, tray will click and release when unlocked. 2. Remove microsd card from slot. 3. Once microsd card is removed from slot, close metal microsd card tray, then slide tray to left lock position, tray will click when locked. Charging the battery Connect the battery charger to your phone, then the charging icon will show on the right of status bar. The charging icon will not display if your battery is completely consumed. To reduce power consumption and energy waste, when battery is fully charged disconnect your charger from the plug; switch off Wi-Fi, GPS, Bluetooth or background-running applications when not in use; reduce the backlight time, etc Power on your phone Hold down the Power key until the phone powers on, unlock your phone (Slide, PIN, password, pattern) if necessary, once unlocked Home screen is displayed. If you do not know your PIN code or if you have forgotten it, contact your network operator. Do not store PIN code within your phone, instead store PIN in a location that is accessible without using phone. Set up your phone for the first time The first time you power on the phone, you should set the following options: Touch Get started, then select the phone's language. The device will search for service, the process of activiation will take a few minutes. Select Wi-Fi: Touch Add network to add a new Wi-Fi, touch Back to return to language selection, touch Skip to setup your Google account. Setup your Google account: Touch Setup now. Move down to new sentence. If you forget your password, you can go to to retrieve it. If you don t own a Google Account, you are prompted to create one by touching No and then touch Get an account. Touch Not now to skip to the next step. Touch Next to select Google location service, mark the checkboxes to activate location and search service. Touch Next to setup voic , sign into and sign into social network(s). When the setup is complete, touch Go to Home screen. When phone is powered on without a SIM card inserted, you may still sign into your Google account and use some features by connecting to Wi-Fi network (refer to section Wi-Fi) Power off your phone Hold down the Power key from the Home screen until the Phone options appear, select Power off

8 1.3 Home screen Home screen is provided in an extended format to allow more space for adding applications, shortcuts etc. Slide the Home screen horizontally left and right to get a complete view of the Home screens. The white short line at the lower part of the screen indicates which screen you are viewing. Touch and Hold Touch and hold the home screen to access the available options for setting the wallpaper. Status bar Status/Notification indicators Touch and drag down to open the notification panel. Drag Place your finger on any item to drag it to another location. Slide/Swipe Search bar Touch to enter text search screen. Touch to enter voice search screen. Favorite tray applications Touch to enter the application. Touch and hold to move or change applications. Application tab Touch to open applications and widgets menu. You can bring all your favorite and most frequently used items (applications, shortcuts, folders and widgets) to your Home screens for quick access. Touch the Home key to switch to last viewed Home screen from any screen, touch Home key twice to access default Home screen Using the touchscreen Touch To access an application, touch it with your finger. Slide/swipe your finger up and down and left to right to scroll through screens, applications, web pages, etc. Flick Flick your finger across screen to move through screens faster. Pinch/Spread Place your index finger and thumb on the screen surface and draw them apart or together to scale an element on the screen. Rotate Automatically change the screen orientation from portrait to landscape by turning the phone sideways to have a better view Status bar From status bar, you can view both phone status (to the right side) and notification information (to the left side)

9 Status icons Notification icons GPRS connected Receiving location data from GPS New text or multimedia message Call in progress using Bluetooth headset GPRS in use USB debugging connected Problem with SMS or MMS delivery Missed call EDGE connected No SIM card inserted (gray) New Google Talk message Call on hold EDGE in use Vibrate mode New voic Call forwarding is on 3G connected Ringer is silenced Upcoming event Uploading data 3G in use Phone microphone is mute Song is playing Downloading data Data transfer Battery is very low Screenshot error Download finished Connected to a Wi-Fi network Battery is low USB tethering is on Select input method Wi-Fi calling Battery is partially drained Portable Wi-Fi hotspot is on An open Wi-Fi network is available Bluetooth is on Battery is full Screenshot captured Phone is connected via USB cable Connected to a Bluetooth device (blue) Airplane mode Alarm is set Battery is charging Headset connected No signal (gray) Carrier data use threshold approaching or exceeded Call in progress Radio is on System update available GPS is on Signal strength (white) 15 16

10 Notification panel Touch and drag down the Status bar to open the notification panel. Touch and drag up to close it. From the Notification panel, you can open items and other reminders indicated by notification icons or view wireless service information Search bar The phone provides a Search function which can be used to locate information within applications, the phone or the web. Quick settings bar Touch to enable/disable functions or change modes. Slide left and right to view more. Touch a notification and slide it to the left to delete it. Touch the Settings icon to access Settings. Once you inserted SIM card, you can drag down the notification panel even from the locked screen. Search by text Touch Search bar from the Home screen. Enter the text/phrase you want to search for. Touch the Search key on the keyboard to begin search. Search by voice Touch from Search bar to display a dialog screen. Speak the word/phrase you want to search for, once speaking is completed a search will automatically take place and a list of search results will be displayed

11 1.3.4 Lock/Unlock your screen To protect your phone and privacy, you can lock the phone screen by choosing slide or creating a variety of patterns, PIN or password. To create a screen unlock pattern (refer to section Screen lock for detail settings) Drag down the notification panel and touch to enter Settings, then touch Security\Set up screen lock\pattern. Draw your own pattern. To unlock phone screen Press the power key once to light up the screen, draw the unlock pattern you have created or enter PIN or password to unlock the screen. If you have chosen slide as the screen lock, touch and drag the icon right to unlock the screen. Draw your unlock pattern Touch to confirm by drawing pattern again To create a screen unlock PIN/Password Touch Settings\Security\Set up screen lock\pin or Password. Set your PIN or password. To lock phone screen Press the Power key once to lock the screen Personalize your Home screen Add Touch the application tab, touch and hold an application or a widget to activate the Move mode, and drag the item to any Home screen. While adding an application to a Home screen, drag it to the top of App info icon to view its detail information. If the application is downloaded, drag it to the top of Uninstall icon to unmount it directly

12 Reposition Touch and hold the item to be repositioned to activate the Move mode, drag the item to the desired position and then release. You can move items both on the Home screens and in the Favorites tray. Hold the icon on the left or right edge of the screen to drag the item to another Home screen. Remove Touch and hold the item to be removed to activate the Move mode, drag the item up to Remove icon, and release after the item turns red Application tab Touch on the Home screen to enter applications and widgets list. To return to the Home screen, touch the Home key. Consult recently-used applications To view recently-used applications touch the Recent apps key. Touch an app in list to open application. To remove an app from list drag app to left or right side. Create folders To improve the organization of items (shortcuts or applications) on the Home screens and the Favorites tray, you can add them to a folder by stacking one item on top of another. To rename a folder, open folder, touch the folder s title bar and input new name. Wallpaper customization Touch and hold an empty area on any Home screen, a Select wallpaper from pop-up window will appear, offering a range of options. Gallery includes pictures you have taken, cropped or downloaded. Live wallpapers includes a scrolling list of animated wallpapers. Video wallpaper includes preset videos in phone, videos stored in microsd card and camera. Wallpaper gallery includes all preset wallpapers in the phone. Slide left and right to locate a desired image, touch Set wallpaper to confirm Volume adjustment Using volume key Press Volume key to adjust phone volume. To active the vibrate mode, press the Volume down key until the phone vibrates. Press the Volume down key once more to active the silent mode. Using Settings menu Drag down the notification panel and touch to enter Settings, select Audio profiles and touch the icon, then select Volume you can set the volume of media, ringtone, alarm, and etc to your preference

13 1.4 Applications and widgets menu This menu contains all pre-embedded and newly installed applications and widgets. To access the menu, touch from the Home screen. Touch the Home key or the Back key to return to a Home screen. Slide left and right to view all applications and widgets. Touch APPS or WIDGETS located at top of menu to access the category directly. Touch the icon to access the Google play store. 2 Text input Using Onscreen Keyboard Onscreen Keyboard settings Touch from the Home screen, select Settings\Language & input. Touch the Settings icon on the right of Android keyboard, Google voice typing or Swype to view available settings for each input option. Adjust the Onscreen Keyboard orientation Turn the phone sideways or upright to adjust the Onscreen Keyboard orientation. You can also adjust Onscreen Keyboard orientation by changing the settings (On application list, touch Settings\Display\ Auto Rotation)

14 2.1.1 Swype keyboard Touch to switch between "abc/ Abc" mode, Touch & hold to switch between "abc/abc" mode. Press and hold to open settings. Drag down the Status bar to open the notification panel to switch keyboards Touch to enter text or numbers. Touch once to start a new line. 2.2 Text editing You can edit the text you have entered. Touch and hold or double-tap within the text you would like to edit. Drag the tabs to change the high-lighted selection. The following options will show on top bar: Select all, Cut, Copy and Paste. Touch the icon when editing is completed, to exit out of edit mode. Touch to input space. Touch to switch between symbol and numeric keyboard. Switch keyboards from the messaging screen On messaging screen, drag down the Status bar to open the notification panel. From the Notification panel, touch Select input method, you can switch from Swype keyboard to Android keyboard or Google Voice typing. You can also insert new text Touch where you want to type, or touch and hold a blank space, the cursor will blink and the tab will show. Drag the tab to move the cursor. If you have selected any text, touch the tab to show PASTE & REPLACE icon which allows you to paste any text you have previously copied or replace with other text

15 3 Phone call, Call log and People Phone Placing a call International call To dial an international call, touch and hold to enter +, then enter the international country prefix followed by the full phone number and finally touch. Emergency call If your phone has network coverage, dial emergency number and touch to make an emergency call. This works even without a SIM card and without typing the PIN code. You can easily launch a call using Phone. Touch from Favorites tray or from Application menu Answering or rejecting a call Touch and hold to access voic Slide to access Call log and Contacts Touch to find contacts Touch to access Speed Dial, People, Settings Enter the desired number directly into dial pad or select a contact from Contacts or Call log by sliding or touching tabs, then touch to place the call. The number you entered can be saved to Contacts by touching and touching Add to contacts. If you make a mistake, you can delete the incorrect digit(s) by touching. To hang up a call, touch or the Power key. When you receive a call, touch. Slide the green icon rightward to answer; Slide the red icon leftward to reject; Slide the icon upward to reject a call and send a preset text message. To mute incoming calls, press the Volume up/down key or turn the phone face down if Turn over to mute is activated. To activate touch Settings\Gestures\Turn over to mute

16 3.1.3 Calling your voic Voic s are recorded messages left by incoming callers when calls are missed or forwarded to voic . To access your voic , touch and hold on Phone dial pad. To set your voic number, touch Menu icon and touch Settings\Call settings\voice call\ Voic . If you receive a voic , a voic icon appears on the Status bar. Open the Notification panel, touch New to access voic During a call To adjust the volume during a call, press the Volume up/down key. Touch to end the current call. Touch to display dial pad. Touch to activate speaker mode during a call. Touch this icon again to deactivate speaker mode. Touch to mute the current call. Touch this icon again to unmute the call. Touch to hold the current call. Touch this icon again to retrieve the call. Touch Menu icon to Add call. To avoid misoperation on touchscreen during a call, screen will be locked automatically when you put the phone close to your ear; touchscreen will be unlocked when phone is taken away from your ear Call settings Touch Menu icon and settings from Dial screen, the following options are available: Voice call Voic Voic service Voic settings Opens a dialog box where you can select your carrier s voic service or another service. If you are using your carrier s voic service, this opens a dialog box where you can enter your voic phone number to manage and listen to voic s. You can enter a comma (,) to insert a pause into the number for example, to add a password after the phone number

17 IP prefix number Touch to set prefix number, touch OK to confirm, touch Cancel to cancel. Call forwarding Touch to configure how your calls are forwarded when you are busy, unanswered or unreachable. Additional settings Caller ID Opens a dialog box where you can set whether your phone number is displayed when making calls. Call waiting Mark the check box to notify you of a new incoming call. Call waiting status Touch to view call waiting status if available Other settings Fixed Dialing Numbers Power button ends call Mark the checkbox to end a call by pressing power button. Quick responses Touch to edit preset responses which will be used when you reject a call using message icon. TTY mode Turn on TTY mode to enable deaf or mute people to communicate by typing on the phone. Wi-Fi Calling Touch to activate or inactivate Wi-Fi calling. Hear aids Mark the checkbox to turn on hearing aid compatibility. Fixed Dialing Number (FDN) is a service mode of SIM, where outgoing calls are restricted to a set of phone numbers. These numbers are added to the FDN list. The most common application of FDN is for parents to restrict the phone numbers which their children can dial. For security reasons, you ll be prompted to enable FDN by entering SIM PIN2 which is usually acquired from your service provider or SIM maker. Minute reminder Mark the check box to enable minute reminder at 50s of every minute during a call. Vibrate reminder Mark the checkbox to enable vibration when the call is connected. Dual mic noise reduction Mark the checkbox to turn on dual mic for noise reduction

18 3.2 Wi-Fi Calling Wi-Fi Calling lets you make and receive voice calls and text /multimedia messages over your Wi-Fi network when your phone is connected to a Wi-Fi network and registered with your wireless carrier's network for Wi-Fi Calling. When your phone is connected to Wi-Fi network, you will see at the top of your screen. Now you are able to use your device for calling and messaging even if you have no cellular coverage. 3.3 Call log You can access your call log by touching from the Dial screen. Touch on the right side of contact/number to place a call directly. There are three kinds of calls in Call log: Incoming calls (blue arrows) Outgoing calls (green arrows) Missed calls (red arrows) Touch icons at the top of the call log to change between viewing options. Touch to make calls over Wi-Fi when connected to Wi-Fi network. Enter the desired number into dial pad or select a contact from Contacts or Call log by sliding or touching tabs, then touch to place the call. When the handset loses Wi-Fi coverage, any active call will drop and the phone will connect to the cellular network if available. To make Wi-Fi Calling a default setting on your phone, select this option from Wi-Fi Calling Settings (Touch and hold the Recent apps key from the Home Screen, then select Settings\More...\Wi-Fi Calling or to access from the Dial screen, touch, then touch Settings\Other settings\wi-fi Calling). For more information you can find tutorial and top questions by Settings\More...\Wi-Fi Calling\ Help. Touch a contact or number to view information or further operations. You can view detailed call information, launch a new call, send messages, or add numbers to People (only available for unsaved phone numbers), etc. Touch the photo to open the Quick Contact panel. To clear the entire call memory, touch Menu icon and Delete, select the call log entries you want to delete and then touch the trash bin. 3.4 People... People app enables quick and easy access to the people you want to reach. View, create contacts and synchronize contacts with your Gmail contacts or other web applications Consult your contacts To access People app, touch Application tab on the Home screen, then select People. Calls and messages made over Wi-Fi will be charged like cellular calls

19 Touch to view your contact groups Touch to view the contact s detailed information. Touch to view your favorite contacts. Touch icon to open Quick Contact panel Managing contact groups Contact groups help you organize your contacts. You can add, remove and view groups in the Contact group screen. Touch the icon to view local groups. To create a new group, touch the icon, enter the new name and touch Done to confirm Adding a contact Touch the icon in the contact list to create a new contact. Touch Menu icon Touch to search in Contacts to display contacts list option menu. Touch to add a new contact. You are asked to enter contact's name and other contact information. By scrolling up and down the screen, you can move from one field to another. Touch to save. Following actions are enabled: Delete contact Select and delete unwanted contacts. Contacts to display Choose contacts to display. Import/Export Import, export or share contacts between phone, SIM card or microsd card. Accounts Manage the synchronization settings for different accounts. Settings Touch to select a picture for the contact. Touch to add a new label. Touch to view other predefined category labels. Sort list by View contact names as Share visible contacts Touch to display contact information by first or last name. Touch to view contact names by first or last name. Share contacts with others by sending the contact's vcard to them via Bluetooth, , MMS, etc. If you want to add more information, touch Add another field to add a new category. When finished, touch Done to save. To exit without saving, you can touch Menu icon and then touch Discard

20 Add to/remove from Favorites To add a contact to favorites, touch a contact to view details then touch to add the contact to favorites (the star will turn yellow in color). To remove a contact from favorites, touch in contact details screen (the star will turn white in color) Editing your contacts To edit contact information, touch the Menu icon When finished, touch Done. in the contact details screen, then touch Edit. Delete a contact To delete a contact, touch Menu icon and Delete contact from contact (details) screen. Pick the contact you want to remove and touch to confirm. Touch to delete all contacts, touch to cancel the selected one. The contact you have deleted will also be removed from other applications on the phone or web the next time you synchronize your phone Communicating with your contacts From the contacts list, you can communicate with your contacts by making a call or exchanging messages. To launch a call to a contact, touch the contact to enter the detail screen, then touch the number. To send a message to a contact, touch the contact to enter the detail screen, then touch the icon on the right side of the number. Use Quick contact for Android Touch a contact s picture to open Quick Contact for Android, then you can touch the number or the icon for the way you want to connect. The icons available on Quick Contact panel depend on the information you have for the contact and the applications and accounts on your phone
 screen. Pick the contact you want to remove and touch to confirm.")
21 3.4.6 Contacts importing, exporting and sharing This phone enables you to import contacts from SIM/microSD card and export contacts to a microsd card which can then be used to back up your information. From Contacts screen, touch Menu icon to open options menu, touch Import/Export, then select Phone, SD Card, Internal Storage, account. To import/export a single contact from/to SIM card or account, choose a target storage device, select the contact you want to import/export, touch the icon and OK to confirm. To import/export all contacts from/to SIM card, choose an account and target SIM card(s), select, touch the icon and OK to confirm. You can share a single contact or contacts with others by sending the contact's vcard to them via Bluetooth, Gmail, etc. Touch a contact you want to share, touch Menu icon and Share from contact details screen, then select the application to perform this action Displaying contacts You can configure which group of contacts, for each account, you want to display in the Contacts list. Touch Menu icon and touch Contacts to display from contacts list screen, then you can choose contacts to display. Touch Menu icon and Settings, you can sort list by first or last name, as well as view contact names by first or last name Joining/Separating contacts To avoid duplication, you can add any new contact information to existing contacts in a single action. Touch the contact which you want to add information to, touch Menu icon and touch Edit, then touch Menu icon again and touch Join. At this time, you are required to select the contact whose information you want to join with the first contact. The information from the second contact is added to the first one, and the second contact will no longer be displayed in the Contacts list. To separate contact information, touch the contact whose information you want to separate, touch Menu icon and touch Edit, then touch Menu icon again and touch Separate, touch OK to confirm Accounts Contacts, data or other information can be synchronized from multiple accounts, depending on the applications installed on your phone. To add an account, drag down the notification panel and touch to enter Settings, then touch Add account; or from Contacts screen, touch and select Add new account; also you can choose the account directly from home screen. You are required to select the kind of account you are adding, like Google, Corporate, etc. As with other account set-ups, you need to enter detailed information, like username, password, etc. You can remove an account to delete it and all associated information from the phone.open the Settings screen, touch the account you want to delete, touch the Menu icon and Remove account, then confirm
22 Turn on/off the sync & Auto-sync Touch an account to enter the account screen, mark/unmark the checkbox(s) to turn on/off the account s auto-sync. When activated, all changes to information on the phone or online will be automatically synchronized to each other. Sync manually You can also synchronize an account manually on Account screen, touch an account in the list, then touch Menu icon and Sync now. 4 Messaging, Messaging... You can create, edit and receive SMS and MMS messages with this phone. To access this feature, touch Application tab from the Home screen, then select Messaging. All messages you receive or send out can be saved in phone memory or SIM card. To view messages stored in SIM card, touch Menu icon from Messaging screen, then touch Settings\ Manage SIM messages Write message In message screen, touch the new message icon to write text/multimedia messages. Touch to view the whole message thread. Touch & hold to activate delete mode. Touch message threads to delete, and touch the trash bin to confirm. Touch to create a new message. Touch to search in all messages
23 To communicate with a saved contact, touch contact photo to open Quick Contact panel. For unsaved contacts, touch default photo to add the number to your Contacts. Sending a text message Enter the mobile phone number of the recipient on To bar or touch to add recipients, touch Type to compose bar to enter the text of the message. When finished, touch to send the text message. An SMS message of more than 160 characters will be charged as several SMS. When the total number of characters you have entered is approaching the 160-character limit, a counter will appear on the lower right corner below Send option of the text box to remind you how many characters are allowed to be entered in one message. Specific letters (accent) will increase the size of the SMS, which may cause multiple SMS to be sent to your recipient. Sending a multimedia message MMS enables you to send video clips, images, photos, animations, slides and sounds to other compatible mobiles and addresses. An SMS will be converted to MMS automatically when media files (image, video, audio, slides, etc.) are attached or subject or addresses are added. To send a multimedia message, enter the recipient's phone number in the To bar, touch Type to compose bar to enter the text of the message. Touch Menu icon to open the option menu, touch Add subject to insert a subject, and touch to attach picture, video, audio or file. When finished, touch to send the multimedia message. Attach options: Pictures Capture picture Videos Capture video Audio Record audio Slideshow Contact Calendar Access Gallery application or File manager to select a picture as attachment. Access Camera to capture a new picture to attach. Access Gallery application or File manager to select a video as attachment. Access Camcorder to record a new video to attach. Access Ringtone or Audio to select a ringtone, music track or audio file as attachment. Enter voice message recorder to record a voice message to attach. Enter Edit slide show screen, touch Add slide to create a new slide, and touch currently existing slide to edit it (see following picture). Touch Menu icon to get more actions, like setting the slide duration, add music, etc. Access People application to select one or more contact(s) to attach. Enter Calendar to select events to attach
24 4.1.2 Manage messages Touch to go to previous or next slide. Touch to preview the current slide. Touch to edit the title of this slide. When receiving a message, an icon will appear on status bar as notification. Drag down the status bar to open the Notification panel, touch the new message to open and view. You can also access messages using Messaging application, touch message to open for viewing. Messages are displayed in conversational order. To reply to a message touch the current message to enter message-composing screen, enter the text, then touch to send. Touch and hold an SMS message in message details screen, the following message options are available: Copy message text Forward Lock/Unlock message Save message to SIM card View message details Delete message Select text This option displays when the message is an SMS message. Use this option to copy current message text and paste in new message. Touch to forward the message to another recipient. Touch to lock/unlock the message so it can't/can be deleted if you reach maximum number of stored messages. This option displays when the message is an SMS. Touch to save the message to SIM card. Touch to view message details. Deletes current message. Selects current message
25 4.1.3 Adjust message settings Adjust message settings from Messaging application screen, touch Menu icon Font size setting Touch to set message font size. Storage settings Delete old messages Text message limit Multimedia message limit and touch Settings. Select to delete old messages when the maximum number of stored messages is reached. Touch to set the number of text messages to be saved per conversation. Touch to set the number of multimedia messages to be saved per conversation. Text (SMS) Messages Delivery reports Select to request a delivery report for each text message you send. Manage SIM Touch to manage the messages stored in SIM card. messages Edit quick text Touch to add or edit message templates. SMS service Touch to view or edit SMS service center number. center SMS storage Touch to select phone or SIM card to store messages. location Alphabet management Touch to select GSM alphabet, Unicode or automatic. Multimedia (MMS) Messages Delivery reports Select to request a delivery report for each multimedia message you send. Read reports Send read report Auto-retrieve Roaming autoretrieve Creation mode Maximum message size Priority Select to request a report on whether each recipient has read a multimedia message sent by you. Select to request a report on whether the multimedia message is sent out. Select to download the full MMS message (including message body and attachment) automatically to your phone. Otherwise, download only the MMS message header. Select to download the full MMS message (including message body and attachment) automatically when roaming. Otherwise, download only the MMS message header to avoid extra charges. Select creation mode as restricted, warning or free. Select to edit the message size, but it should not be more than 1024KB. Select message priority as high, normal or low
26 Notifications Notifications Select ringtone Vibrate Select to display message notifications in status bar. Touch to select a ringtone as a new message notification tone. When a message comes, select as always vibrate, only vibrate when silent or never vibrate. Service message setting Enable service Select the checkbox to enable to receive service message. message Touch and hold operation guide Show animation Touch to show messaging operation guide animation. 4.2 Gmail/ The first time you set up your phone, you can select to use an existing Gmail or to create a new account Gmail... As Google's web-based service, Gmail is configured when you first set up your phone. Gmail on your phone can be automatically synchronized with your Gmail account on the web. Unlike other kinds of account, each message and its replies in Gmail are grouped in your inbox as a single conversation; all s are organized by labels instead of folders. To access Gmail From the Home screen, touch the Application tab to enter the applications list, then touch Gmail. Gmail displays messages and conversations from one single Gmail account at a time, if you own more than one account, you can add a new one by touching Menu icon and Settings from Inbox screen, then touch ADD ACCOUNT. When finished, you can switch accounts by touching the account name from Inbox screen, and touch the account you want to view. To create and send s Touch the icon from Inbox screen. Enter recipient(s) s address in To field, and if necessary, touch Menu icon Cc/Bcc to add a copy or a blind copy to the message. Enter the subject and the content of the message. Touch Menu icon and select to add an attachment. Finally, touch the icon to send. and touch Add 49 50
27 If you do not want to send the mail out right away, you can touch Menu icon and Save draft or touch Back key to save a copy. To view the draft, touch the icon, then select Drafts. If you do not want to send or save the mail, you can touch Menu icon and then touch Discard. To add a signature to s, touch Menu icon and Settings from inbox screen, choose an account, then touch Signature. To receive and read your s When a new arrives, you will be notified by a ringtone or vibration, and an icon will appear on Status bar. Touch and drag down the Status bar to display the Notification panel, touch the new to view. Or you can also access the Gmail Inbox label and touch the new mail to view. You can search for an by sender, subject, label, etc. Touch the icon from Inbox screen. Enter the keyword you want to search for in the searching box and touch the Search key in the software keyboard. To reply or forward s When viewing an , you will see three icons offering further options at the center of the conversation. Reply/Reply all Forward Touch to enter text-inputting mode, enter the message you want to reply, then touch icon to send this message to one single recipient or all people in a mail loop. Touch to forward the message to another person. You are required to enter the new recipient s address and then touch. Managing Gmails by Labels To conveniently manage conversations and messages, you can organize them using a Label. To label a conversation when reading a conversation s messages, touch the icon and select the label to assign to the conversation. To view conversations by labels when viewing your inbox or another conversation list, touch the icon, then touch a label to view a list of conversations with that label. To manage labels, touch MANAGE LABELS from Labels screen. Mark the checkbox to select to activate batch mode, and produce the following options: Touch to archive the message. Touch to delete the message. Touch to add or change the label of message or conversation. Touch to mark an message as read or unread. / To assign a star or remove the star from the conversation. Mark as To Mark the as important or not important. important Mute To mute the entire conversation. When muted, new mails related to this conversation will not be displayed in Inbox, but archived. Report spam To report the message/conversation as spam
28 Gmail settings To manage Gmail settings, touch Menu icon and Settings in Inbox screen. General settings Confirm before Mark the checkbox to confirm before deleting s. deleting Confirm before Mark the checkbox to confirm before archiving s. archiving Confirm before Mark the checkbox to confirm before sending s. sending Swiping conversation list No effect Select to inactivate deleting mails by sliding them right or left. Archive/unlabel/delete Touch a mail and slide it right or left to delete and archive. Always delete Touch a mail and slide it right or left to delete. Reply all Touch to mark the checkbox to make the default responding to messages. Auto-fit messages Mark the checkbox to shrink messages to fit the screen and allow zooming. Auto-advance Touch to select which screen to show after you delete or archive a conversation. Hide checkboxes Mark the checkbox to hide checkboxes while selecting s in the batch mode. Message Actions Touch to show/hide message actions. Touch an account, the following settings will show: Priority Inbox Notifications Sound & vibrate Signature Gmail sync is ON Days of mail to sync Manage labels Download attachments To set this inbox as the default one. Select to activate notification when a new arrives. Touch to set Ringtone, Vibrate and Notify once. To add a signature text to the end of each mail you send. Touch to turn on/off Gmail sync. Touch to set the duration of days for mail sync. Touch to open the Label screen, where you can manage synchronization and notifications. Mark the checkbox to auto download attachments to recent messages via Wi-Fi In addition to your Gmail account, you can also set-up external POP3 or IMAP accounts in your phone. To access this function, touch Application tab from the Home screen, then select . An wizard will guide you through the steps to set-up an account. Enter the address and password of the account you want to set-up and touch Next
29 If the account you entered is not provided by your service provider, you will be prompted to go to the account settings screen to enter settings manually. Or you can touch Manual setup to directly enter the incoming and outgoing settings for the account you are setting up. Enter the account name and display name in outgoing s. To add another account, you can touch Menu icon and Settings. Touch Add account on the right of the title to create. To create and send s Touch the icon from Inbox screen. Enter recipient(s) address(es) in To field. If necessary, touch Menu icon and touch Add Cc/Bcc to add a copy or a blind copy to the message. Enter the subject and the content of the message. Touch Menu icon, touch Attach file to add an attachment. Finally, touch to send. If you do not want to send the mail right away, you can touch Menu icon and Save draft or touch Back key to save a copy. 4.3 Google Talk... Google's instant messaging service, Google Talk, lets you communicate with your friends whenever they are connected to this service. To access this feature and sign in, touch Application tab from the Home screen, then touch Talk. All friends added by using Google Talk from the web or phone will be displayed in your friends list. Touch your account to set your online status. Touch the text box below your online status to enter your status message. To sign out, touch Menu icon from Friends list to display options, then touch Sign out. Or you can also select Sign out from online status Chatting with your friends To start a chat, touch the name of a friend in your Friends list, then enter your message and finally touch. You can invite other friends to join in a group chat by touching Menu icon and Add to chat and then selecting the friend you want to add To add a new friend From Friends list, touch Menu icon and select Add friend to add a new friend. Enter the Google Talk ID or Gmail address of the friend you want to add, and then touch Done. A notification with this invitation will be received by the friend. By touching the invitation, the friend can select Block, Decline or Accept in response To close a chat When you want to end a chat, touch Menu icon from Chatting screen directly, and then touch End chat. If you want to end all chats, touch Menu icon and End all chats from Friends list screen
30 4.3.4 To manage your friends Besides adding new friends to your friends list, the following actions are available for your choice: To view all friends/ most popular friends To block/remove a friend By default, only friends that you frequently communicate with are displayed in Friends list. To view all friends, touch Menu icon and Display options, then touch Name. To return to displaying most popular friends screen, touch Availability or Recency from Display options. To block a friend from exchanging messages or remove them from your friends list, touch Menu icon and Friend info from Chatting screen, then touch Block or Remove. All blocked friends can be viewed by touching Menu icon and Settings, touch an account then choose Blocked friends.to unblock a friend, touch the name of this friend and touch OK when prompted Settings A series of settings are available for your selection by touching Menu icon Friends list screen, and choose an account. and Settings from Mobile indicator Select to display an indicator icon along with your name in other people s Friends list. Away when screen Select to set status as Away when the screen is turned off. off Invitation notifications IM notifications Notification ringtone Vibrate Video chat notifications Video chat ringtone Vibrate Blocked friends Clear search history Manage account Terms & privacy Select to activate the notification function on status bar when a new message arrives. Select notification status when an IM arrives. Touch to select a ringtone for notification. Touch to set the vibrate status when an IM arrives. Touch to select showing notification or opening dialog when invited to a voice or video chat. Touch to choose a ringtone for Video chat. Touch to set vibrate for Video chat. Touch to show/unblock blocked friends. Touch to clear previous chat search history from showing up in the Search box. Touch to remove or sync your accounts. Touch to show more information about Talk
31 5 Calendar, Alarm clock & Calculator Calendar... Use Calendar to keep track of important meetings, appointments, etc. To access this function, touch Application tab from the Home screen, then touch Calendar Multimode view You can display the Calendar in daily, weekly, monthly or agenda view. Touch the date to change your Calendar view, a drop-down menu will show for you to choose. Touch the icon to return to Today's view. Agenda view Day view Week view To create new events You can add new events from any Calendar view. In portrait mode, touch Menu icon and New event from Calendar screen; or in landscape mode, touch the icon to access new event edit screen. Fill in all required information for this new event. If it is a whole-day event, you can select All day. Invite guests to the event. Enter the addresses of the guests you want to invite with commas to separate. The guests will receive an invitation from Calendar and . When finished, touch DONE from the top of the screen. To quickly create an event from Day, Week view screen, touch and hold an empty spot or an event to open Option menu, then touch New event to enter the event details screen of the time you have previously selected. Or you can also touch the empty spot to select the target area which will turn blue, and tap again to create the new event To delete or edit an event To share, delete or edit an event, touch the event to enter details screen, touch the icon the event to other people by Bluetooth, and messaging, etc., touch the icon event, and touch the icon to delete. to share to edit the Month view Event reminder If a reminder is set for an event, the upcoming event icon when the reminder time arrives. will appear on Status bar as a notification In Agenda, Day or Week view touch an event to view its details. Touch a day in Month view to open that day's events
32 Touch and drag down the status bar to open the notification panel, touch event name to view Calendar notification list. Touch Snooze to turn off all event reminders for 5 minutes. Touch Back key to keep the reminders pending in the status bar and the notification panel. Access important options by touching Menu icon from Calendar main screen: New event To add a new event Refresh To refresh the calendar Search To search in the calendar Calendars to display To show or hide, remove or add calendars Clear events To clear events in the calendar. Settings To set a series of Calendar settings 5.2 Clock... Your mobile phone has a built-in clock. To access this function, touch the Application tab from the Home screen, then touch Clock. Touch anywhere of the screen to dim/light the screen.touch Set alarm to add or set an alarm To set an alarm From Clock screen, touch to enter Alarms screen, touch to add a new alarm. Following options will show: Enable alarm Time Repeat Ringtone Vibrate Label Crazy alarm Touch to enable the alarm Touch to set time Touch to select days you want alarm to work Touch to select a ringtone for the alarm Select to activate vibration Touch to set a name for the alarm Touch to set an alarm without snooze mode, the alarm will keep work until you press dismiss button When finished, touch DONE to confirm. To delete an alarm, touch it from Alarms screen to enter the alarm editing screen, touch Touch OK to confirm, touch Cancel to cancel. to delete
Introduction... Table of Contents. General information... Home screen. Power media applications. Protection against theft
 Introduction... Thank you for purchasing your new ALCATEL ONE TOUCH Fierce TM phone. The ALCATEL ONE TOUCH Fierce TM comes equipped with many of the features and functions you want and need. Home screen
User manual. Smart 4 power. Some services and apps may not be available in all countries. Please ask in-store for details.
 User manual Smart 4 power Some services and apps may not be available in all countries. Please ask in-store for details. Android is a trademark of Google Inc. The Android robot is reproduced or modified
Table of Contents. Introduction... Home screen. Power media applications. Bluetooth
 1 POP 3-5.5 4G_5054N_USA_UM_20150911_final.indd 1-2 2 9/30/2015 8:19:15 AM Introduction... Thank you for purchasing an ALCATEL Onetouch Fierce XL model 5054N. The 5054N comes equipped with many of the
User Manual. English - CJA60G5KFAAA
 User Manual For more information about how to use the cellphone, please go to www.alcatelonetouch.com to download complete user manual. Moreover, from the website you can also consult FAQ, realize software
Table of Contents. 1 Your device...4. 2 Text input...19. 3 People...22. 4 Messaging, Email...27. 5 Calendar & Time...39. 6 Getting connected...
 P310A 1 Table of Contents 1 Your device...4 1.1 Keys and connectors... 4 1.2 Getting started... 7 1.3 Home screen... 9 2 Text input...19 2.1 Using Onscreen Keyboard...19 2.2 Android keyboard...19 2.3 Text
Smart 4 fun User manual
 Smart 4 fun User manual Some services and apps may not be available in all countries. Please ask in-store for details. Android is a trademark of Google Inc. The Android robot is reproduced or modified
Smart 4 mini User manual
 Smart 4 mini User manual Some services and apps may not be available in all countries. Please ask in-store for details. Android is a trademark of Google Inc. The Android robot is reproduced or modified
User manual. Smart Tab 4. Vodafone. Power to you
 User manual Smart Tab 4 Vodafone Power to you 1 Table of Contents 1 Your device... 5 1.1 Keys and connectors...5 1.2 Getting started...7 1.3 Home screen...9 2 Text input...18 2.1 Using Onscreen Keyboard...18
Android Mobile Phone User Manual
 Android Mobile Phone User Manual The manual is applicable for the Grand X mobile phone. Contents Let s get started... 1 Getting to know your phone... 2 Screen control... 2 Open and switch applications...
Smart Kicka User manual
 Smart Kicka User manual Some services and apps may not be available in all countries. Please ask in-store for details. Android is a trademark of Google Inc. The Android robot is reproduced or modified
User Guide. Welcome to HUAWEI
 User Guide Welcome to HUAWEI Contents Introduction.................................... 1 Installation..................................... 2 Keys and Functions.................................. 2 Installation..........................................
Contents Getting started Personalizing Knowing the basics
 User Guide Some of the contents in this manual may differ from your phone depending on the software of the phone. Actual color may vary. Your phone is designed to make it easy for you to access a wide
BLU Vivo 4.3 User Manual
 BLU Vivo 4.3 User Manual 1 Table of Contents Phone Safety Information... 3 Appearance and Key Functions... 4 Installation and Charging... 5 Phone Operation... 7 Communication... 10 Camera... 11 Gallery...
Unimax MAXBravo User Manual
 Unimax MAXBravo User Manual U670C Accessories available at www.unimaxmobile.com U670CUG Conventions used in this guide In this user guide, we use the following symbols to indicate useful and important
May 20, 2011 AUG-2.3.4-106 Android mobile technology platform 2.3.4. Android 2.3.4 User s Guide
 May 20, 2011 Android mobile technology platform 2.3.4 Android 2.3.4 User s Guide 2 Legal Copyright 2010 Google Inc. All rights reserved. Google, the stylized Google logo, Android, the stylized Android
User manual CJA6197VDAAA
 User manual Vodafone Group 2015. Vodafone and the Vodafone logos are trade marks of Vodafone Group. Any product or company names mentioned herein may be the trade marks of their respective owners. CJA6197VDAAA
User manual. Smart speed
 User manual Smart speed Vodafone Group 2015. Vodafone and the Vodafone logos are trade marks of Vodafone Group. Any product or company names mentioned herein may be the trade marks of their respective
V9A Light User Manual
 V9A Light User Manual 1 Table of Content Getting Started...25 Taking a Glance at Your Light... 25 Over view... 25 Key Definition... 26 Starting Up... 26 Install the SIM/USIM Card/ microsd Card/ Battery...
USER MANUAL Z660G. www.zteusa.com
 USER MANUAL Z660G www.zteusa.com Table of Contents Copyright 2013 ZTE CORPORATION. All rights reserved. No part of this publication may be excerpted, reproduced, translated or utilized in any form or by
Your HTC Explorer User guide
 Your HTC Explorer User guide 2 Contents Contents Getting started Inside the box 8 HTC Explorer 8 Back cover 10 SIM card 11 Storage card 12 Battery 13 Switching the power on or off 14 Entering your PIN
HTC Wildfire S. Call Basics. Answer calls. Reject calls. Block calls. Dial. To answer a call, follow these steps: Display on. 1. Tap Answer.
 HTC Wildfire S Call Basics Answer calls To answer a call, follow these steps: Display on 1. Tap Answer. Display off 1. Tap the screen and drag down. Reject calls To reject a call, follow these steps: Display
INQ CLOUD TOUCH USER GUIDE
 INQ CLOUD TOUCH USER GUIDE OVERVIEW THE BASICS The Basics overview Your phone Remove the back cover Insert SIM, microsd & battery Charge the battery Power on/off First-time setup Lock & unlock your screen
AT&T Avail. User Manual
 AT&T Avail User Manual Legal Information Devices purchased for use on AT&T s system are designed for use exclusively on AT&T s system. You agree that you won t make any modifications to the Equipment or
OPERATING INSTRUCTIONS SmartPhone Android 2.1
 OPERATING INSTRUCTIONS SmartPhone Android 2.1 Reading Before Proceeding......................... 1 Safety Precautions....................................... 1 Notice and Copyright......................................
http://www.ztedevice.com User Manual and Safety Information
 http://www.ztedevice.com User Manual and Safety Information User Manual and Safety information 1 About This Manual LEGAL INFORMATION Copyright 2014 ZTE CORPORATION All rights reserved. Approved Firmware
ZTE Blade C2+ DUAL SIM. Mobile Phone User Manual
 ZTE Blade C2+ DUAL SIM Mobile Phone User Manual 1 LEGAL INFORMATION Copyright 2014 ZTE CORPORATION. All rights reserved. No part of this publication may be quoted, reproduced, translated or used in any
TABLE OF CONTENTS YOUR PHONE 3
 TABLE OF CONTENTS 3 Front View Features 3 Bottom View 4 Side by Side View 5 Cool Apps 6 SIM Card 7 Memory Card 11 Battery 13 Power 15 Making a Call 16 Sending a Message 16 Home Screen 18 Ringtone 24 Volume
ZTE Sonata 2 User Guide
 ZTE Sonata 2 User Guide Some of the contents in this manual may differ from your phone depending on the software of the phone. Actual color may vary. Your phone is designed to make it easy for you to access
USER MANUAL Z665C. www.zteusa.com
 USER MANUAL Z665C www.zteusa.com About This Manual Thank you for choosing this ZTE mobile device. In order to keep your device in its best condition, please read this manual and keep it for future reference.
USER MANUAL. www.zteusa.com
 USER MANUAL www.zteusa.com Copyright 2012 ZTE CORPORATION. All rights reserved. No part of this publication may be excerpted, reproduced, translated or utilized in any form or by any means, electronic
User manual. Smart Tab 3G. Vodafone. Power to you
 User manual Smart Tab 3G Vodafone Power to you 1 Table of Contents 1 Your device... 4 1.1 Keys and connectors...4 1.2 Getting started...6 1.3 Home screen...8 2 Text input...16 2.1 Using Onscreen Keyboard...16
Secure Work Space for Android. User Guide
 User Guide Published: 2015-10-07 SWD-20151007211003333 Contents... 4 About Secure Work Space for BES12...4 About Work Space Manager for BES12... 4 Switch between your personal space and work space... 4
User Guide. BlackBerry Storm 9530 Smartphone. Version: 4.7
 BlackBerry Storm 9530 Smartphone Version: 4.7 SWD-490426-0909090640-001 Contents Shortcuts... 9 BlackBerry basics shortcuts... 9 Phone shortcuts... 9 Camera shortcuts... 9 Media shortcuts... 9 Typing shortcuts...
ZTE Blade III WCDMA/GSM Mobile Phone User Manual
 ZTE Blade III WCDMA/GSM Mobile Phone User Manual 1 LEGAL INFORMATION Copyright 2012 ZTE CORPORATION. All rights reserved. No part of this publication may be quoted, reproduced, translated or used in any
ZTE Grand X Max User Guide
 ZTE Grand X Max User Guide Some of the contents in this manual may differ from your phone depending on the software of the phone. Actual color may vary. Your phone is designed to make it easy for you to
Table of Contents. 8 Multimedia applications...94 8.1 Camera...94 8.2 Gallery...97 8.3 YouTube...99 8.4 Music...100 8.5 Video Player...
 Table of Contents Safety and use...4 1 Your mobile...12 1.1 Keys and connectors...12 1.2 Getting started...15 1.3 Home screen...19 2 Text input...29 2.1 Using Onscreen Keyboard...29 2.2 Text editing...30
Table of Contents. 4 Messaging, Email...49 4.1 Messaging...49 4.2 Gmail/Email...56 4.3 Hangouts...62
 Note: Your phone is a unibody device, so the back cover and battery are not removable. Your phone only supports micro-sim cards. Do not attempt to insert other SIM card types like mini and nano cards,
ZTE Overture 2 User Guide
 ZTE Overture 2 User Guide Some of the contents in this manual may differ from your phone depending on the software of the phone. Actual color may vary. Your phone is designed to make it easy for you to
Cat B10 Smartphone User manual
 Cat B10 Smartphone User manual Please Read Before Proceeding Safety Precautions Please read the safety precautions carefully to ensure the correct use of your mobile phone. Despite the nature of this rugged
Table of Contents. Note: This is a shared user manual for ONE TOUCH 7040D/ONE TOUCH 7041D.
 Note: This is a shared user manual for ONE TOUCH 7040D/ONE TOUCH 7041D. Table of Contents Safety and use...4 General information...12 1 Your mobile...14 1.1 Keys and connectors...14 1.2 Getting started...17
Thank you for buying Alcatel ONE TOUCH STAR. We hope you will enjoy your high-quality mobile communication experience.
 Thank you for buying Alcatel ONE TOUCH STAR. We hope you will enjoy your high-quality mobile communication experience. For more information about how to use the cellphone, please go to www.alcatelonetouch.com
PRIV. Version: 5.1. User Guide
 PRIV Version: 5.1 User Guide Published: 2015-11-17 SWD-20151117142111283 Contents Setup and basics... 5 Your device at a glance...5 Insert the SIM card...6 Insert a media card... 7 Move between home screens...
Available applications and services are subject to change at any time.
 Available applications and services are subject to change at any time. Table of Contents Get Started 1 Your Phone at a Glance 1 Set Up Your Phone 1 Activate Your Phone 2 Complete the Setup Screens 3 Set
Your HTC Inspire 4G. User guide
 Your HTC Inspire 4G User guide 2 Conventions used in this guide In this user guide, we use the following symbols to indicate useful and important information: This is a note. A note often gives additional
ZTE Concord II User Manual and Safety information
 ZTE Concord II User Manual and Safety information 1 About This Manual LEGAL INFORMATION Copyright 2014 ZTE CORPORATION All rights reserved. No part of this publication may be quoted, reproduced, translated
User Guide PUSH TO TALK PLUS. For Android
 User Guide PUSH TO TALK PLUS For Android PUSH TO TALK PLUS For Android Contents Introduction and Key Features...4 PTT+ Calling to Individuals and Groups...4 Supervisory Override...4 Real-Time Presence...4
Your HTC Wildfire S User guide
 Your HTC Wildfire S User guide 2 Contents Contents Getting started Inside the box 8 HTC Wildfire S 8 Back cover 10 SIM card 11 Storage card 14 Battery 15 Switching the power on or off 17 Entering your
User guide. Xperia E1
 User guide Xperia E1 D2004/D2005 Contents Getting started...6 Overview...6 Assembly...7 Starting your device for the first time...8 Why do I need a Google account?...9 Charging your device...9 Learning
For more information about your phone, download complete user manual and check available updates, visit us on www.alcatelonetouch.
 For more information about your phone, download complete user manual and check available updates, visit us on www.facebook.com/alcatelonetouchusa www.twitter.com/alcatel1touch www.alcatelonetouch.com Table
Panasonic. www.mobile.panasonic.co.in
 Panasonic P51 www.mobile.panasonic.co.in For more information on how to use the phone, please go to www.mobile.panasonic.co.in and download the complete user manual. Moreover, on the website, you can also
User manual. Smart 4 turbo
 User manual Smart 4 turbo Some services and apps may not be available in all countries. Please ask in-store for details. Android is a trademark of Google Inc. The Android robot is reproduced or modified
ZTE N850 User Manual
 ZTE N850 User Manual 1 LEGAL INFORMATION Copyright 2013 ZTE CORPORATION. All rights reserved. No part of this publication may be quoted, reproduced, translated or used in any form or by any means, electronic
Your HTC Desire S User guide
 Your HTC Desire S User guide 2 Contents Contents Getting started Inside the box 8 Your phone 8 Bottom cover 10 Battery compartment door 12 SIM card 13 Storage card 14 Battery 15 Switching your phone on
TABLE OF CONTENTS. Legend:
 user guide Android Ed. 1.1 TABLE OF CONTENTS 1 INTRODUCTION... 4 1.1 Indicators on the top tool bar... 5 1.2 First control bar... 7 1.3 Second control bar... 7 1.4 Description of the icons in the main
USER MANUAL. www.zteusa.com
 USER MANUAL www.zteusa.com Table of Contents Copyright 2012 ZTE CORPORATION. All rights reserved. No part of this publication may be excerpted, reproduced, translated or utilized in any form or by any
Back, start, and search key... 3. Lock the keys and screen... 6. Unlock the keys and screen... 7. Set the keys and screen to lock automatically...
 Userguide Nokia Lumia 620 Table of Contents Keys and parts... 3 Back, start, and search key... 3 How to Insert a SIM card... 4 First start-up... 6 Switching Phone ON and OFF... 6 Switch the phone on...
Table of Contents. Table of Contents i
 User Guide Table of Contents Get Started...1 Your Phone at a Glance... 1 Set Up Your Phone... 4 Insert a SIM Card... 4 Remove a SIM Card... 5 Insert and Charge the Battery... 6 Charge the Battery Wirelessly...
Tablet of Contents. Note: Safety and use...4 General information...10 1 Your Tablet...12. 2 Text input...27. 3 People...30. 4 Messaging, Email...
 P310X Note: This is a shared user manual for ONE TOUCH P310A. Tablet of Contents Safety and use...4 General information...10 1 Your Tablet...12 1.1 Keys and connectors...12 1.2 Getting started...15 1.3
Your HTC Velocity 4G User guide
 Your HTC Velocity 4G User guide 2 Contents Contents Getting started Inside the box 8 HTC Velocity 4G 8 Back cover 10 SIM card 12 Storage card 13 Battery 14 Switching the power on or off 16 Entering your
Android 3.1 User s Guide. April 15, 2011 AUG-3.1-CC-100 Creative Commons Attribution 3.0 License Edition Android mobile technology platform 3.
 Android 3.1 User s Guide April 15, 2011 Creative Commons Attribution 3.0 License Edition Android mobile technology platform 3.1 2 Legal Except as otherwise noted at http://code.google.com/policies.html#restrictions,
ZTE Warp Sequent TM User Manual
 ZTE Warp Sequent TM User Manual 1 Table of Contents TIP: If you don't see it in the headings listed in the table of contents, try the Index on page 189. Getting Started...10 Your Phone at a Glance... 11
Welcome to Huawei. Ascend II User Guide. Model: HUAWEI M865
 Welcome to Huawei Ascend II User Guide Model: HUAWEI M865 Contents 1 Reading Before Proceeding...1 1.1 Safety Precautions... 1 1.2 Personal Information and Data Security... 2 1.3 Legal Notice... 3 2 Getting
Note: This is a shared user manual for one touch 4030X/one touch 4030D specifying Dual SIM information where relevant.
 For more information on how to use the phone, please go to www.alcatelonetouch.com and download the complete user manual. Moreover, on the website, you can also find answers to frequently asked questions,
KYOCERA Hydro XTRM. User Guide
 KYOCERA Hydro XTRM User Guide Table of Contents Phone Basics... 1 Battery... 1 Install the Battery... 1 Charge the Battery... 1 SIM Card... 2 Insert a SIM Card... 2 Turn the Phone On and Off... 3 Turn
Contents. New features. Getting started. Entertainment. Transferring data. Managing your phone. Tools
 User Guide Contents New features 1 Read before use 1 Unlocking with fingerprint 3 Safe 3 All focus mode 4 Taking photos from the timeline album screen 5 Scanning a QR code 6 Protecting your privacy Getting
Vodafone Smart ultra 6. User Manual
 User manual VF-995N Vodafone Smart ultra 6 User Manual 1 1. Getting started 7 1.1 Getting to know your phone... 7 1.2 Knowing the keys... 8 1.3 Installing your nano-sim card... 9 1.4 Installing an optional
Your HTC Amaze 4G User guide
 Your HTC Amaze 4G User guide 2 Contents Contents Getting started Inside the box 8 HTC Amaze 4G 8 Back cover 10 SIM card 12 Storage card 13 Battery 14 Switching the power on or off 16 Setting up HTC Amaze
User Guide C 12 M 100 Y 36 K 0
 User Guide Welcome to GreatCall! Thank you for choosing the Jitterbug Touch3. We ve made it easy for you to stay connected to friends and family with the simplicity of GreatCall. Additionally, our service
User guide. Xperia M 1904/C1905
 User guide Xperia M 1904/C1905 Contents Getting started...6 Android what and why?...6 Overview...6 Assembly...7 Turning the device on and off...9 Locking and unlocking the screen...9 Setup guide...10 Accounts
2 Safe 2 Taking a photo before focusing the camera 3 Launching the camera from gallery 3 QR code 4 Privacy protection
 G7 User Guide Contents Foreword First-class functions 2 Safe 2 Taking a photo before focusing the camera 3 Launching the camera from gallery 3 QR code 4 Privacy protection Getting started 6 Locking and
[Sprint UG template version 14a] VMU_SPH-L710T_Eng_UG_NE5_TE_061714_F3. User Guide
![[Sprint UG template version 14a] VMU_SPH-L710T_Eng_UG_NE5_TE_061714_F3. User Guide](/thumbs/31/15204424.jpg "[Sprint UG template version 14a] VMU_SPH-L710T_Eng_UG_NE5_TE_061714_F3. User Guide") [Sprint UG template version 14a] VMU_SPH-L710T_Eng_UG_NE5_TE_061714_F3 User Guide Table of Contents Get Started... 1 Your Phone at a Glance... 1 Set Up Your Phone... 1 Install the battery... 1 Charge the
[Sprint UG template version 14a] VMU_SPH-L710T_Eng_UG_NE5_TE_061714_F3 User Guide Table of Contents Get Started... 1 Your Phone at a Glance... 1 Set Up Your Phone... 1 Install the battery... 1 Charge the
USER GUIDE USER GUIDE
 USER GUIDE USER GUIDE Conventions used in this guide In this user guide, we use the following symbols to indicate useful and important information: This is a note It might give extra information that
Phone Calls...28 Make Phone Calls...28 Call Using the Phone Dialpad...28 Call from Recent Calls...29 Call from Contacts...29 Call Using a Speed Dial
 User Guide Table of Contents Get Started... 1 Your Phone at a Glance... 1 Set Up Your Phone... 3 Insert a SIM Card... 3 Remove a SIM Card... 4 Charge the Battery... 5 Charge the Battery Wirelessly... 5
KYOCERA Rise User Guide
 KYOCERA Rise User Guide 2012 Kyocera Corporation. All rights reserved. The Virgin name and the Virgin signature logo are registered trademarks of Virgin Enterprises Limited and are used under license.
HTC Hotline Support: 1866-449-8358 7 days a week 8am EST to 1am EST. Your HTC Desire 601 User guide
 HTC Hotline Support: 1866-449-8358 7 days a week 8am EST to 1am EST Your HTC Desire 601 User guide 21 Phone setup and transfer Home screen Your Home screen is where you make HTC Desire 601 your own. After
1 Your device... 1. 2 Text input...12. 3 AT&T Services... 14. 3.1 AT&T Ready2Go... 14 3.2 AT&T AllAccess... 14 3.3 Other AT&T services...
 AT&T Trek TM HD Table of Contents 1 Your device... 1 1.1 Keys and connectors...1 1.2 Getting started...3 1.3 Homescreen...6 2 Text input...12 2.1 Using onscreen keyboard... 12 2.2 Android keyboard... 12
User manual Vodafone Smart 4G
 User manual Vodafone Smart 4G 1. Your mobile 1 1.1 Removing the back cover 1 1.2 Charging the battery 2 1.3 SIM card and microsd card 3 1.4 Powering on/off and Airplane mode 3 1.5 Locking/unlocking the
KYOCERA Hydro User Guide
 KYOCERA Hydro User Guide 2012 Kyocera Corporation. All Rights Reserved. BOOST and BOOSTMOBILE and Logo, and the Logo are trademarks of Boost. Other marks are the property of their respective owners. KYOCERA
KYOCERA DuraForce User Guide
 KYOCERA DuraForce User Guide Table of Contents Get Started... 1 Your Phone at a Glance... 1 Set Up Your Phone... 3 Insert a SIM Card... 3 Remove a SIM Card... 4 Charge the Battery... 5 Charge the Battery
ZTE Imperial User Manual
 ZTE Imperial User Manual 1 About This Manual Thank you for choosing this ZTE mobile device. In order to keep your device in its best condition, please read this manual and keep it for future reference.
User Guide. Orion Pro X500. www.poshmobile.com
 User Guide Orion Pro X500 www.poshmobile.com 1 Introduction... 3 2 Safety & Notice... 4 3 Start to use... 5 3.1 Touch & type... 5 3.2 Assemble & charge... 5 3.2.1 Switch On and Off... 6 3.2.2 Unlock SIM
KYOCERA Hydro User Guide
 KYOCERA Hydro User Guide 2012 Kyocera Corporation. All Rights Reserved. Boost, the Logo, Re-Boost and Boost Mobile are trademarks of Boost Worldwide, Inc. Other marks are the property of their respective
KYOCERA Event User Guide
 KYOCERA Event User Guide 2013 Kyocera Corporation. All rights reserved. The Virgin name and the Virgin signature logo are registered trademarks of Virgin Enterprises Limited and are used under license.
Your HTC Desire User guide
 Your HTC Desire User guide Before you do anything else, please read this Charge the battery The battery in your phone hasn t been charged yet. While your phone is charging, it s important that you do not
User Guide. HUAWEI Ascend G 300. Welcome to HUAWEI
 User Guide HUAWEI Ascend G 300 Welcome to HUAWEI Contents 1 Read Before Proceeding...1 1.1 Safety Precautions... 1 1.2 Personal Information and Data Security... 2 1.3 Legal Notice... 3 2 Getting Started...5
USER GUIDE Insignia Flex Android Tablet NS-14T002
 USER GUIDE Insignia Flex Android Tablet NS-14T002 Before using your new product, please read these instructions to prevent any damage. NS-14T002 Insignia Flex Android Tablet Contents 2 Important Safety
ZTE Prelude user guide
 ZTE Prelude user guide Product meets FCC Radio Frequency Exposure Guidelines FCC ID Q78-Z992. This device complies with Part 15 of the FCC Rules. Operation is subject to the following two conditions: (1)
ZTE GRAND X Plus User Manual
 ZTE GRAND X Plus User Manual 1 About This Manual Thank you for choosing this ZTE mobile device. In order to keep your device in its best condition, please read this manual and keep it for future reference.
User Guide. AT&T Avail 2
 User Guide AT&T Avail 2 Devices purchased for use on AT&T s system are designed for use exclusively on AT&T s system. You agree that you won t make any modifications to the Equipment or programming to
Cat S40 Smartphone User manual
 Cat S40 Smartphone User manual Please Read Before Proceeding Safety Precautions Please read the safety precautions carefully to ensure the correct use of your mobile phone. Despite the nature of this rugged
Make Phone Calls...28 Call Using the Phone Dialer...28 Call from Call Logs...28 Call from Contacts...29 Call Using a Speed Dial Number...
 User Guide Table of Contents Get Started... 1 Your Phone at a Glance... 1 Set Up Your Phone... 2 Activation and Service... 4 Connect to an Account... 4 Build Your Own Plan... 4 Using Custom... 6 Set Up
KYOCERA Hydro XTRM. User Guide
 KYOCERA Hydro XTRM User Guide Table of Contents Phone Basics... 1 Phone Overview... 1 Key Functions... 2 Smart Sonic Receiver... 3 Get the Phone Ready... 4 Insert the Battery... 4 Charge the Battery...
Getting Started...10. Personalizing...23
 AWE User Manual 1 Contents Getting Started...10 Getting to Know Your Phone...10 Knowing the Keys...12 Installing the Battery...13 Installing the microsd Card (Not Included)...15 Charging the Battery...16
Version No. : V1.0 Edition Time: May 2015
 User Guide Copyright 2015 ZTE CORPORATION. All rights reserved. ZTE, Maven, and the ZTE logos are trademarks of the ZTE Corporation. No part of this publication may be excerpted, reproduced, translated
ZTE Grand X Max+ User Guide
 ZTE Grand X Max+ User Guide Some of the contents in this manual may differ from your phone depending on the software of the phone. Actual color may vary. Your phone is designed to make it easy for you
ALCATEL ONETOUCH IDOL 3
 ALCATEL ONETOUCH IDOL 3 Some of the contents in this manual may differ from your phone depending on the software of the phone. Actual color may vary. Your phone is designed to make it easy for you to access
USER MANUAL Z797C. www.zteusa.com Z079584506369
 USER MANUAL Z079584506369 www.zteusa.com Z797C About This Manual Thank you for choosing this ZTE mobile device. In order to keep your device in its best condition, please read this manual and keep it for
G525. User Guide. Welcome to HUAWEI
 G525 User Guide Welcome to HUAWEI Contents Contents Foreword...1 Safety precautions...2 Preparations...4 Your phone at a glance... 4 Inserting a USIM/SIM card... 5 Installing the microsd card... 6 Installing
Lync 2013 Quick Reference Lync Meetings. Join a Lync Meeting. Schedule a Lync Meeting. Do I need a PIN, work number or extension? Set meeting options
 Join a Lync Meeting 1. In the meeting request, click Join Lync Meeting or click Join Online in the meeting reminder. 2. On the Join Meeting Audio window, select one of the options: Use Lync (full audio
10 Magni Tablet User Guide
 10 Magni Tablet User Guide MODEL NUMBER: Wireless Mobile Internet Tablet Powered by SYTAB10ST Top View Front View Bottom View Side View SYTAB10ST Getting to Know Your New Tablet: MINI Micro SD Micro SD