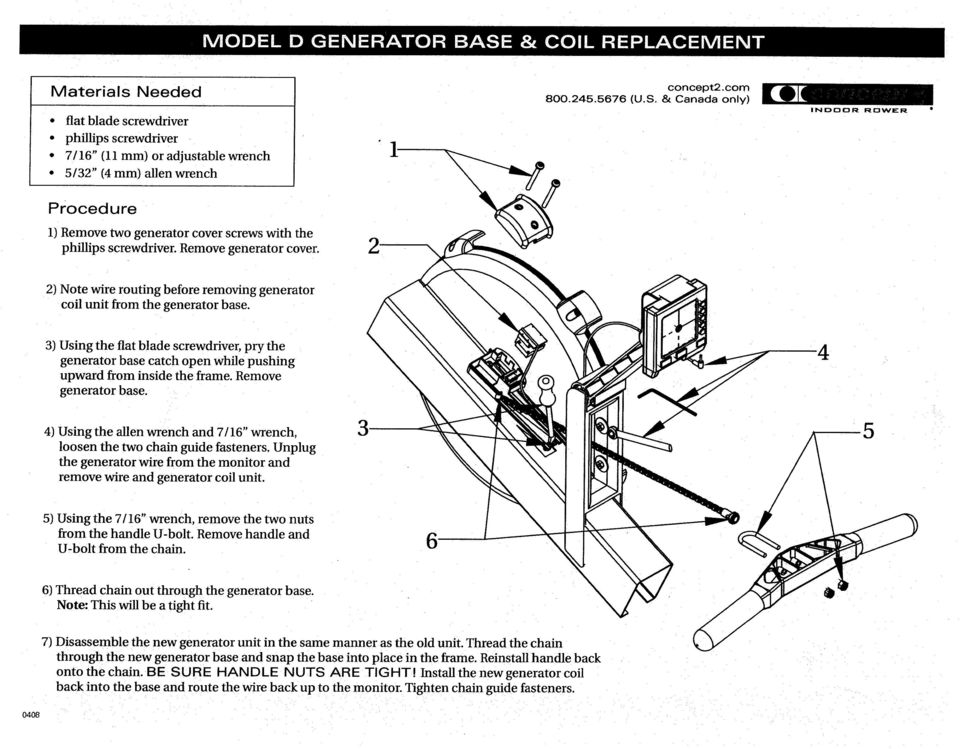
MODEL D GENERATOR COIL REPLACEMENT
|
|
|
- Judith Thornton
- 8 years ago
- Views:
Transcription
1

2 MODEL D GENERATOR COIL REPLACEMENT Materials Needed Procedure concept2.com (U.S. & Canada only) 0708

3
4 REPLACING THE MOUSE ON THE INDOOR ROWER 0409 TOOLS 5/32 7/16 or 11mm concept2.com 1. 2 & 3. Remove the footplate covers by taking out the 12 philips head screws. Remove the footplate bellies by taking out the 4 7/16 hex screws and plates Detach the two shock cord SCAMS to relieve bungee tension. Remove the two shock cord axle button head fasteners Spread the frame to remove the lower hanger axle. Spread the frame to remove the upper hanger axle. Use equal pressure on both sides.

5 REPLACING THE MOUSE ON THE INDOOR ROWER Pull out the mouse, shock cord pulleys and axle. Remove axle from pulleys and mouse. Remove mouse. Reassemble with new mouse following disassembly procedure in reverse. concept2.com Page

6
7

8

9

10 FLYWHEEL REPLACEMENT MODEL D & E 0807 TOOLS 9/16 or 14mm concept2.com Loosen 4 screws. Do not remove. Loosen only

11 FLYWHEEL REPLACEMENT MODEL D & E REPLACE Tighten all 4 screws. Tighten 13. concept2.com Page

12
13

14 Model C Shock Cord Routing Chain & Flywheel Omitted For Clarity (Front end is shown upside down) Front of Machine Flywheel Side of Machine Flywheel Axle #1113 & Sprocket #1112 Chain Idler Pulley #1024 & Axle #1130 Shock Cord #1731 Traveling Pulley Assy # /99 S.C.A.Ms(2) #1104 Shock Cord Pulleys (4) #1011 & Axles(2) #1130 MORRISVILLE, VERMONT USA ROWING@CONCEPT2.COM WEB:

15
16

17

18 shock cord adjustment You must use the shock cord available through Concept2. Use of other shock cord will have a significant effect on the performance of your machine. Concept2 part number PN FRONT OF MACHINE 1. Detach flywheel section and turn upside down. FLYWHEEL SIDE Flywheel Axle PN 1113 and Sprocket PN 1112 Idler Pulley PN 1024 Idler Axle PN 1130 S.C.A.M.s (2) PN 1104 Shock Cord (12.5') PN 1731 Travelling Pulley Assembly PN 1756 Shock Cord Pulleys (4) PN 1011 and Axles (2) PN 1130 Monorail shown upside down
 PN 1104 Shock Cord (12.")
19 5. 7. Push equal amounts of cord through both shock cord adjustment mechanisms

20 SEAT ROLLER REPLACEMENT - MODELS C,D, & E 0210 TOOLS 3/16 or 5mm 5/32 or 4mm concept2.com 7/16 or 11mm 9/16 or 14mm X 2 X 4 Model E X Top seat rollers Bottom seat rollers

21
22 Model C, Model D, and Model E
23
24 Model C, Model D, Model E
25
26 cleaning monorail top Clean daily after use Tools Needed: Cloth Cleaner: soap & water or any glass cleaner Mineral Acids Bleach Coarse Abrasives
27 Model C Chain Routing Shock Cord & Flywheel Omitted for Clarity (Front end is shown upside down) Front of Machine Flywheel Side Of Machine Dead End Connectors(2) #285 1/4-20 x 1 Screws (2) #1206 Traveling Pulley Assy #1756 Flywheel Axle #1113 Chain Idler Pulley(2) #1024 & Axle #1130 Chain with Connector & Swivel #1716 S.C.A.M.s(2) #1104 Hex Nut (2) # /99 Shock Cord Pulleys(4)#1011 & Axles(2) #1130 MORRISVILLE, VERMONT USA ROWING@CONCEPT2.COM WEB: WWW,CONCEPT2.COM
28
29
30
31
32 performance monitor arm tension adjustment Tools Needed: 2 wrenches: 7 16 " or 11mm 1. 2.
33 AXLE & SPROCKET REPLACEMENT MODEL D & E 0807 TOOLS 9/16 or 14mm concept2.com Loosen 4 screws. Do not remove. Loosen only
34 AXLE & SPROCKET REPLACEMENT MODEL D & E 7. Note: For Model D proceed to step 13. For Model E proceed to step 8. Model E only. Remove 2 screws 8. Model E only. Remove Model E only. B A Loosen only Model E only. Model E only. Remove 5 screws concept2.com Page
35 AXLE & SPROCKET REPLACEMENT MODEL D & E Remove old axle and replace with new axle For replacing sprocket only, follow steps 19 & 20. If you are not replacing the sprocket, proceed to step Remove old sprocket and replace with new sprocket concept2.com Page
36 AXLE & SPROCKET REPLACEMENT MODEL D & E To reassemble Model D follow steps 23-36, omitting steps To reassemble Model E follow steps On reassembly, push housing into place Model E only Model E only. Model E only. Tighten 5 screws A B concept2.com Page
37 AXLE & SPROCKET REPLACEMENT MODEL D & E Model E only. Replace Model E only. Tighten 2 screws Tighten Tighten Tighten 4 screws. 36. concept2.com Page
38
39
40
41
42 CASTER ASSEMBLY FOR MODELS A, B, D2 & E concept2.com (U.S. & Canada only) Procedure 1. Remove old rubber feet or molded plastic footcaster assembly (includes caster wheel). 2. Install new molded plastic footcaster assembly as shown. Note that the fit should be snug. Heating the footcaster assembly in hot water will help installation. Do not use lubricants for installation. Left Foot Caster Assembly Front of Machine Front Leg Right Foot Caster Assembly 0607
UNPACKING AND ASSEMBLY
 UNPACKING AND ASSEMBLY Assembly Instructions Step 1. Open the two boxes and remove all the parts. Lay out the parts as shown below and read through the assembly instructions before beginning assembly.
USE MANUAL. dynamic indoor rower
 USE MANUAL dynamic indoor rower 2 concept2.com TABLE OF CONTENTS USE & TRAINING The Dynamic Indoor Rower....4 Leveling the Dynamic Indoor Rower...4 Setting the Flexfoot...5 Use of Handle Hook...5 Use of
Neptune. replace. Owners Manual
 Neptune replace Owners Manual Training with the Neptune Rower 1. As with any piece of fitness equipment, consult a physician before beginning your Neptune Rower exercise program. 2. Follow instructions
TABLE OF CONTENTS. I. TROUBLESHOOTING... 2 - Section 1.01: Common Problems/Solutions... 2
 BAL Accu-Slide System I. Table of Contents TABLE OF CONTENTS I. TROUBLESHOOTING... 2 - Section 1.01: Common Problems/Solutions... 2 II. GETTING STARTED... 5 - Section 2.01: Tools You Will Need... 5 - Section
Operating Instructions
 587W Clinical Care Recliner Operating Instructions 587W-INS-LAB Graham-Field Health Products 2005 IMPORTANT: READ THIS MANUAL BEFORE OPERATING YOUR ORTHO-BIOTIC CLINICAL CARE RECLINER WARNINGS Warning:
ENG-10, Camshaft (Timing) Belt and Balance Shaft Belt Tension - Checking and Adjusting
 Belt and Balance Shaft Belt Tension - Checking and Adjusting") ENG-10, Camshaft (Timing) Belt and Balance Shaft Belt Tension - Checking and Adjusting Tools Jack stands Floor Jack Metric Socket set Metric Wrench set Porsche Timing Belt Tension tool (P9201) Thin 24
ENG-10, Camshaft (Timing) Belt and Balance Shaft Belt Tension - Checking and Adjusting Tools Jack stands Floor Jack Metric Socket set Metric Wrench set Porsche Timing Belt Tension tool (P9201) Thin 24
SEQUEL ASSEMBLY INSTRUCTIONS. 6003 Compact Desk CUSTOMERSERVICE@BDIUSA.COM
 BIUSA.COM CUSTOMERSERVICE@BIUSA.COM Component List Sequel is engineered for easy assembly. Carefully follow this procedure to prevent any damage. A - 4mm Hex Wrench B - 1/4-20 x 12 mm Flat Head Machine
MG1532 & MG2032 MIXER-GRINDERS
 MIXER-GRINDER MG1532 & MG2032 MIXER-GRINDERS MODEL MG1532 ML-134099 7.5 HP Grind Motor + 1 HP Mix Motor MG1532 ML-134103 5 HP Grind Motor + 1 HP Mix Motor MG1532 ML-134100 7.5 HP Grind Motor + 1 HP Mix
Drive shaft, servicing
 Volkswagen Passat B6 - Drive shaft, servicing Стр. 1 из 41 40-7 Drive shaft, servicing Drive shafts, overview I - Assembly overview: Drive axle with CV joint VL100 40-7, Drive axle with CV joint VL100,
Front axle components, overview
 just a test. Front axle components, overview 40-1 General Information Load bearing components and parts of the suspension must not be welded or straightened. Vehicles without drive axle must not be moved,
Model No: VS4815 1. SAFETY INSTRUCTIONS VS4800 2. INTRODUCTION & APPLICATIONS VS4815 3. CONTENTS. 2.1 Introduction. 2.
 Instructions for: Petrol Engine Twin Camshaft Setting / Locking Tool Kit - (incorporating Vanos Alignment) - BMW N42 & N46 Engines Model No: VS4800 Associated kit: Camshaft/Carrier Bracket Remover & Installer
Product Notice. Safety Notice: Sales Hold
 Product Notice Ariens Company 655 W. Ryan St. Brillion, WI 54110 www.ariens.com Product Family: Ariens and Gravely 36 Power Brushes Subject: Sales Hold Inspect and Repair Dealer Action: SALES HOLD Do not
New method, replacement of window and window lift, front door
 SERVICE INFORMATION Number: 831-1646 Year: 1996 Month: Market: FEBRUARI ALL New method, replacement of window and window lift, front door Cars concerned All Saab 900 M94- Background A new method of removing
Rear wheel brakes, servicing. Стр. 1 из 45. Note:
 Volkswagen Touareg - Rear wheel brakes, servicing Стр. 1 из 45 46-2 Rear wheel brakes, servicing Rear brakes, FN 44 brake caliper, servicing Note: After replacing brake pads, depress brake pedal firmly
ROTARY TUMBLER INSTRUCTIONS AND PARTS LIST
 ROTARY TUMBLER INSTRUCTIONS AND PARTS LIST Model 3-1.5B Model 45C Model 33B LORTONE 12130 Cyrus Way Mukilteo, WA 98275 (425) 493-1600 SETTING UP YOUR MACHINE For 45C Unit Only (33B & 3-1.5B already assembled)
758 Heavy-duty Ratchet Guy Wire Cutter
 INSTRUCTION MANUAL 758 Heavy-duty Ratchet Guy Wire Cutter Read and understand all of the instructions and safety information in this manual before operating or servicing this tool. Register this product
6 inch A-Arm Lift Kit WARNING: 16-018/16-019. installation instructions. will fit CLUB CAR DS. included:
 Revised May 205 6-08/6-09 6 inch A-Arm Lift Kit will fit CLUB CAR DS installation instructions included: Rear Lift Blocks Main Suspension Assembly Spindles A-Arms Rear Shock Mounting Plates U-Bolts WARNING:
INSTRUCTION MANUAL (WINDOW WIPER)
") INSTRUCTION MANUAL (WINDOW WIPER) SUBJECT CONTENTS PAGE 1. GENERAL 2 2. CONTRUCTION 2 2-1. STRAIGHT LINE TYPE WINDOW WIPER 2 2-2. CONTROL BOX 2 2-3. SPARE PARTS 2 3. MECHANISM AND OPERATION 2 3-1. STRAIGHT
INSTRUCTION MANUAL (WINDOW WIPER) SUBJECT CONTENTS PAGE 1. GENERAL 2 2. CONTRUCTION 2 2-1. STRAIGHT LINE TYPE WINDOW WIPER 2 2-2. CONTROL BOX 2 2-3. SPARE PARTS 2 3. MECHANISM AND OPERATION 2 3-1. STRAIGHT
1/29/2008 DR70. Baja Motorsports Inc. P.O. Box 61150 Phoenix, AZ 85082 Toll Free: 888-863-2252 PART NUMBERS PRICES ARE SUBJECT TO CHANGE 1 of 43
 DR70 Toll Free: 888-863-2252 PART NUMBERS PRICES ARE SUBJECT TO CHANGE 1 of 43 CYLINDER & CYLINDER HEAD 1 DR70-001 883099044472 CYLINDER 1 1 2 DR70-002 883099044489 GASKET, CYLINDER 1 1 3 DR70-003 883099044496
SE-1200-EI. Operation & Parts Manual
 SE-1200-EI Operation & Parts Manual SE 1200 EI OWNERS MANUAL Table of Contents 1. Installation guide 2. Set-up instructions 3. Operation instructions 4. Cleaning 5. Troubleshooting 6. Parts manual 7. Electrical
Installation instruction do88 Intercooler for Volvo S40 / V50 / C30
 Installation instruction do88 Intercooler for Volvo S40 / V50 / C30 This instruction shows how to replace the OEM intercooler with our performance intercooler. 2. 3. 1. 4. 5. Part number: ICM-170 6. At
1-800-295-5510 uline.com SPECIFICATIONS
 H-1394, H-1395, H-1396 H-1397, H-3859, H-3860 π GRAVITY CONVEYOR 1-800-295-5510 uline.com SPECIFICATIONS Conveyor Bed Width In (mm) 18, 24, 30 (457, 610, 762) Load Capacity Per Linear Foot (305mm) Lbs
Installation Instructions 4508 4508S
 SYMPHONY Spread Lavatory Faucet with Speed Connect Drain Congratulations on purchasing your American Standard faucet with Speed Connect drain, a feature found only on American Standard faucets. Speed Connect
TECHNICAL INFORMATION
 TECHNICAL INFORMATION Models No. 2012NB Description 304mm (12") Automatic Thickness Planer CONCEPTION AND MAIN APPLICATIONS * Compact and light weight (27 Kg./59 lbs) automatic thickness planer for easier
HYDRAULIC TABLE CART 500-LB.
 HYDRAULIC TABLE CART 500-LB. OWNER S MANUAL WARNING: Read carefully and understand all MACHINE ADJUSTMENT AND OPERATION INSTRUCTIONS before operating. Failure to follow the safety rules and other basic
Operating Instructions
 574G Ortho-Biotic 3-Position Recliner Operating Instructions 574G-INS-LAB Graham-Field Health Products 2005 IMPORTANT: READ THIS MANUAL BEFORE OPERATING YOUR ORTHO-BIOTIC 3-POSITION RECLINER WARNINGS Warning:
Andersen Electric Window Opener for Andersen Awning and Roof Windows
 W A Electric Window Opener Electric Window Opener for Awning and Roof Windows Congratulations! You have just purchased one of the many fine products. For ease of installation and continued enjoyment of
Best/Flex Roller Expandable Conveyor
 Best Diversified Products Ltd. Best/Flex Roller Expandable Conveyor Product Manual Best Diversified Products Ltd. Brunel Road, Earlstrees Industrial Estate Corby, Northants. NN17 4JW Tel: +44(0) 1536 206969
User Manual. Instructions for installing the Sure Stitch on the Next Generation Quilting Frame. Parts Included:
 User Manual Instructions for installing the Sure Stitch on the Next Generation Quilting Frame. Parts Included: 1: Display Console 1: Control Box 2: Encoder (Wires attached) (Not Shown) 1: 5v Power Supply
Auto Sentry-eXP Maintenance
 Auto Sentry-eXP Maintenance Maintenance Procedures for Auto Sentry exp Bill Dispenser Credit Card Reader Bill Acceptor Bill Dispenser Maintenance Bill Dispenser Problem / Cause Bill Dispenser Error Codes
DR90. Baja Motorsports Inc. P.O. Box 61150 Phoenix, AZ 85082 Toll Free: 888-863-2252 PART NUMBERS AND PRICES ARE SUBJECT TO CHANGE 1 of 51
 DR90 Toll Free: 888-863-2252 PART NUMBERS AND PRICES ARE SUBJECT TO CHANGE 1 of 51 CYLINDER & CYLINDER HEAD 1 DR90-001 842645048166 CYLINDER 1 1 2 DR90-002 842645048173 GASKET, CYLINDER 1 1 3 DR90-003
Overview PARTS LIST. B. Lever mounting base C. Flush handle assembly D. Grey/Blue float stop E. Grey float (Full Flush) F. Flush valve washer
 F. Flush valve washer") Overview READ ENTIRE INSTRUCTIONS BEFORE STARTING INSTALLATION PARTS LIST A. Flush valve B. Lever mounting base C. Flush handle assembly D. Grey/Blue float stop E. Grey float (Full Flush) F. Flush valve
Overview READ ENTIRE INSTRUCTIONS BEFORE STARTING INSTALLATION PARTS LIST A. Flush valve B. Lever mounting base C. Flush handle assembly D. Grey/Blue float stop E. Grey float (Full Flush) F. Flush valve
149mm. Walk-Thru Assembly Gate. MODEL NO: 1161, 1167 Owner s Manual. www.regalo-baby.com
 149mm 210mm Walk-Thru Assembly Gate MODEL NO: 1161, 1167 Owner s Manual READ ALL INSTRUCTIONS BEFORE ASSEMBLY AND USE OF GATE. KEEP INSTRUCTIONS FOR FUTURE USE. www.regalo-baby.com... Regalo International,
Installation Instructions 6028.801
 DAZZLE Installation Instructions 08.80 Spread Lavatory Faucet with Speed Connect Drain* Congratulations on purchasing your American Standard faucet with Speed Connect drain, a feature found only on American
5800 Temperature Sensor Cable Assembly
 5800 Temperature Sensor Cable Assembly Removal and Replacement Instruction Sheet #60-4702-070 Revision D, January 14, 2013 Overview The 5800 has two refrigeration temperature sensors, one attached to the
DMSG_0152_0112_V4 Mamas & Papas (Holdings) Ltd. 2012 Dream Swing - 1 -
 Ltd. 2012 Dream Swing - 1 -") DMSG_0152_0112_V4 Mamas & Papas (Holdings) Ltd. 2012 Dream Swing - 1 - DREAM SWING THESE INSTRUCTIONS ARE IMPORTANT. PLEASE READ CAREFULLY AND RETAIN FOR FUTURE REFERENCE. Read the entire instruction before
DMSG_0152_0112_V4 Mamas & Papas (Holdings) Ltd. 2012 Dream Swing - 1 - DREAM SWING THESE INSTRUCTIONS ARE IMPORTANT. PLEASE READ CAREFULLY AND RETAIN FOR FUTURE REFERENCE. Read the entire instruction before
For exploded diagram and part number information, refer to the Spare Parts Catalog available on our website at www.rockshox.com.
 For exploded diagram and part number information, refer to the Spare Parts Catalog available on our website at www.rockshox.com. Information contained in this publication is subject to change at anytime
Johnny G Spinner Pro and Johnny G Spinner Elite Owner s Manual
 Johnny G Spinner Pro and Johnny G Spinner Elite Owner s Manual www.startrac.com Table of Contents: 1) Introduction 2) Fitness Safeguards 3) Spinner Pro and Elite Features 4) Assembly Instructions / Parts
20 GALLON WET DRY VACUUM
 20 Gallon Wet & Dry Vacuum 110" Water Lift Vac Motor 24" Front Mount Squeegee Assembly 50' Cord Special Tip Pour Feature Warranty Contractor Tool Kit Includes: Wet p/u Tool, Dry p/u Tool, Crevice Tool,
MODEL E-AF. Drain Cleaning Machine. Operator s Manual
 MODEL E-AF Drain Cleaning Machine Operator s Manual!!!! FOR YOUR SAFETY Before you operate or maintenance this equipment, READ this manual carefully and completely! Purchase Date: Serial Number: ELECTRIC
Range Road RR Series Semi-Automatic Firewood Processor. Crated Unit Assembly Manual
 Range Road RR Series Semi-Automatic Firewood Processor Crated Unit Assembly Manual 1 1) Undo 8-18mm x 19mm Nuts and bolts, 2 on each leg of top frame 2) Lift top of Metal crate off and move out of work
Assembly Instructions
 city versa Assembly Instructions Read these instructions carefully before use and keep them for future reference. Your child s safety may be affected if you do not follow these instructions. This product
1/29/2008 DR50. Baja Motorsports Inc. P.O. Box 61150 Phoenix, AZ 85082 Toll Free: 888-863-2252 PART NUMBERS PRICES ARE SUBJECT TO CHANGE 1 of 45
 DR50 Toll Free: 888-863-2252 PART NUMBERS PRICES ARE SUBJECT TO CHANGE 1 of 45 CYLINDER & CYLINDER HEAD Part UPC Number Description Baja Description 1 DR50-001 842645074424 CYLINDER 1 1 2 DR50-002 842645074431
4 in 1 Strength Station
 Revision 0 September 2010 4 in 1 Strength Station Owner s Manual Record Serial Number Here Platinum by Tunturi www.tunturi.com Date www.tunturi.com of Purchase 4 in 1 Strength Station Owner s Manual Instructions
SLACK PERFORMANCE KARTS
 SLACK PERFORMANCE KARTS SET UP GUIDE Thank you for purchasing a 2013 Slack Axiom Chassis. Performance Mfg. strives to provide you with the very best chassis and components on the market today. Your satisfaction
DR90. Baja Motorsports Inc. P.O. Box 61150 Phoenix, AZ 85082 Toll Free: 888-863-2252 PART NUMBERS AND PRICES ARE SUBJECT TO CHANGE 1 of 51
 DR90 Toll Free: 888-863-2252 PART NUMBERS AND PRICES ARE SUBJECT TO CHANGE 1 of 51 CYLINDER & CYLINDER HEAD Part UPC Number Description Baja Description 1 DR90-001 842645048166 CYLINDER 1 1 2 DR90-002
Number Wheeler P/N Description Set Rex P/N Notes
 1 604041 Base 1 4041 2 604042 Base Cover 1 4042 3 608849 Washer (M5) 2 4 600124 Spring Washer (M5) 2 5 600329 Rd Hd Machine Screw (M5x8) 2 6 604047 Strainer 1 4047 7 600204 Rd Hd Machine Screw (M6x10)
Raz Rehab Shower Commode Chairs AP600 / SP600 Heavy Duty Models Dealer s Manual
 Raz Rehab Shower Commode Chairs AP600 / SP600 Heavy Duty Models Dealer s Manual A guide to help authorized Raz dealers safely set-up and adjust Raz Rehab Shower Chairs 20090122 SAFETY PRECAUTIONS Failure
MODEL 4065T-PM-CART POWERED MANUAL STRETCH WRAP SYSTEM OPERATOR S MANUAL
 MODEL 4065T-PM-CART POWERED MANUAL STRETCH WRAP SYSTEM OPERATOR S MANUAL 1 Table of Contents Introduction 3 Warranty 3 Modular Design 3 Assembly 4 Set-up 4 Film loading Constant Prestretch 4 Controls 5
Cooling system components, removing and installing
 Engine BHW Cooling system components, removing and installing Page 1 / 24 19-1 Cooling system components, removing and installing Warning! When doing any repair work, especially in the engine compartment,
HOME GYM. Model. Retain This Manual for Reference OWNER'S MANUAL. www.hyper-extension.com
 NOTE: Please read all instructions carefully before using this product Table of Contents Safety Notice www.hyper-extension.com HOME GYM 50036 Hardware Identifier Assembly Instruction Parts List Warranty
CAM-03, Camshaft Assembly Oil Seal Replacement
 CAM-03, Camshaft Assembly Oil Seal Replacement Tools Jack stands Floor Jack Metric Socket set Metric Wrench set Porsche Timing Belt Tension tool (P9201) Flywheel Lock (P9206) Balance Shaft Pin Spanner
ASSEMBLY DIAGRAM AND ASSEMBLY REFERENCE ULTIMA OLD SCHOOL 2 EVO & TC BELT DRIVE UNITS
 ASSEMBLY DIAGRAM AND ASSEMBLY REFERENCE ULTIMA OLD SCHOOL 2 EVO & TC BELT DRIVE UNITS BELT DRIVE ASSEMBLIES Part# 58-850 2 Old School Belt Drive Assembly - Polished Part# 58-851 2 Old School Belt Drive
ENGINE Dinli 904 D1033-011
 ENGINE Dinli 904 D1033-011 ENGINE Model Item Part no Description Specification Quantity 01 E140000-01 E14 ENGINE 450C.C. 1 FENDER SEAT D1033-021 FENDER SEAT Model Item Part no Description Specification
1. SAFETY RULES. 8. Avoid placing objects in the path of the blades.
 1 1. SAFETY RULES 1. To reduce the risk of electric shock, insure electricity has been turned off at the circuit breaker or fuse box before beginning. 2. All wiring must be in accordance with the National
Trillium 40 Axis Spring Tensioner Wire Replacement Instructions
 Trillium 40 Axis Spring Tensioner Wire Replacement Instructions 1 Overview The objective is to replace the broken axis spring tensioner wire. This requires the following tasks: 1. Remove the seismometer
SE-900-MP ECO -SERIES. Operation & Parts Manual
 SE-900-MP ECO -SERIES Operation & Parts Manual SE 900 MP ECO - SERIES OWNERS MANUAL Table of Contents 1. Installation guide 2. Set-up instructions 3. Operation instructions 4. Cleaning 5. Troubleshooting
AstroSystems Digital Setting Circles for Zhumell, GSO, Apertura and Astro-Tech
 AstroSystems Digital Setting Circles for Zhumell, GSO, Apertura and Astro-Tech Components 1 Sky Commander Digital Setting Circle Computer 2 Encoders 10,000 step 1 Sky Commander Digital Setting Circle Manual
1993 SUSPENSION Volkswagen Front. EuroVan
 Article Text ARTICLE BEGINNING 1993 SUSPENSION Volkswagen Front EuroVan DESCRIPTION FWD independent suspension is an double-wishbone type with torsion bars mounted on upper control arm. Wheel is supported
SERVICE PARTS LIST PAGE 1 OF 6 BASE ASSEMBLY SPECIFY CATALOG NO. AND SERIAL NO. WHEN ORDERING PARTS 12" DUAL BEVEL COMPOUND MITER SAW B27A
 PAGE 1 OF 6 BASE ASSEMBLY 00 0 EXAMPLE: Component Parts (Small #) Are Included When Ordering The Assembly (Large #). SPECIFY CATALOG NO. AND NO. WHEN ORDERING PARTS 1 02-80-0050 Thrust Bearing (1) 2 05-80-0510
Dive Rite 200 & 300 Bar Isolator Manifold Service Manual
 Dive Rite 200 & 300 Bar Isolator Manifold Service Manual Principal Photography and Text by Pete Nawrocky Copyright 2003 Lamartek Inc. D/B/A Dive Rite 0 Warning This manual is only to be used as a guide
PEDAL CAR - GO CART ASSEMBLY & OPERATING INSTRUCTIONS
 PEDAL CAR - GO CART 42822 ASSEMBLY & OPERATING INSTRUCTIONS 3491 Mission Oaks Blvd., Camarillo, CA 93011 Visit our Web site at: http://www.harborfreight.com Copyright 2000 by Harbor Freight Tools. All
Owner s Guide and Installation Manual. Vancouver Model Name. 21321, 21328 Model No. English Español
 For Your Records and Warranty Assistance For reference, also attach your receipt or a copy of your receipt to the manual. Vancouver Model Name 21321, 21328 Model No. Type A Models Owner s Guide and Installation
THE ULTIMATE WORKOUT JOIN THE ROWING COMMUNITY
 A Sport for All People turn to rowing for many reasons: training for a world championship, recovering from injury, cardiac rehabilitation, managing diabetes, keeping fit, losing weight, camaraderie the
INSTRUCTIONS. FLHR/C/S (Road King) FRONT END LOWERING KIT 1WARNING -J03242 REV. 10-19-04. General. Removal (Left and Right Forks) Kit Number 54614-05
 FRONT END LOWERING KIT 1WARNING -J03242 REV. 10-19-04. General. Removal (Left and Right Forks) Kit Number 54614-05") INSTRUCTIONS -J04 REV. 0-9-04 General FLHR/C/S (Road King) FRONT END LOWERING KIT This kit is designed for installation on 00 and later FLHR/C/S Model Motorcycles. Road King models use the conventional
INSTRUCTIONS -J04 REV. 0-9-04 General FLHR/C/S (Road King) FRONT END LOWERING KIT This kit is designed for installation on 00 and later FLHR/C/S Model Motorcycles. Road King models use the conventional
Number Wheeler P/N Description Set Rex P/N Notes 1 603500 Base 1 J001 2 603501 Support, Right 1 J002 3 603502 Support, Left 1 J003 4 600328 Nut (M8)
") 1 603500 Base 1 J001 2 603501 Support, Right 1 J002 3 603502 Support, Left 1 J003 4 600328 Nut (M8) 4 5 600130 Spring Washer (8mm) 4 6 600344 Roll Pin (M6x30) 4 7 600129 Socket Hd Cap Screw (M8x25) 4 8
1 603500 Base 1 J001 2 603501 Support, Right 1 J002 3 603502 Support, Left 1 J003 4 600328 Nut (M8) 4 5 600130 Spring Washer (8mm) 4 6 600344 Roll Pin (M6x30) 4 7 600129 Socket Hd Cap Screw (M8x25) 4 8
HYDRAULIC LIFT TABLE CART 2200-LB.
 HYDRAULIC LIFT TABLE CART 2200-LB. OWNER S MANUAL WARNING: Read carefully and understand all MACHINE ADJUSTMENT AND OPERATION INSTRUCTIONS before operating. Failure to follow the safety rules and other
DR50 Hensim Dirt Runner 49cc Dirt Bike (VIN PREFIX LLCH or LUAH)
") Page 1 of 21 Product Information Baja Web > Product Information > Parts Lists > DIRTBIKE > DR50 Hensim Dirt Runner 49cc Dirt Bike (VIN PREFIX LLCH or LUAH) DR50 Hensim Dirt Runner 49cc Dirt Bike (VIN PREFIX
Page 1 of 21 Product Information Baja Web > Product Information > Parts Lists > DIRTBIKE > DR50 Hensim Dirt Runner 49cc Dirt Bike (VIN PREFIX LLCH or LUAH) DR50 Hensim Dirt Runner 49cc Dirt Bike (VIN PREFIX
INSTALLATION INSTRUCTIONS for Bifold Doors (JII103)
") Thank you for selecting JELD-WEN products. Attached are JELD-WEN s recommended installation instructions for premium composite, hollow and solid core molded Bifold Doors. Bifolds are designed for fast
Thank you for selecting JELD-WEN products. Attached are JELD-WEN s recommended installation instructions for premium composite, hollow and solid core molded Bifold Doors. Bifolds are designed for fast
Rollator Cane and Brake Replacement SAFETY SUMMARY (CONTINUED)
") Rollator Cane and Replacement Assembly, Installation and Operating Instructions SAVE THESE INSTRUCTIONS NOTE: Check ALL parts for shipping damage. If shipping damage is noted, DO NOT use. Contact Carrier/Dealer
Rollator Cane and Replacement Assembly, Installation and Operating Instructions SAVE THESE INSTRUCTIONS NOTE: Check ALL parts for shipping damage. If shipping damage is noted, DO NOT use. Contact Carrier/Dealer
CAR SEAT/ STROLLER INSTRUCTION MANUAL
 CAR SEAT/ STROLLER INSTRUCTION MANUAL English PM-0624AB 3/98 Do not use this 4-in-1 System until you read and understand these instructions! IMPORTANT INFORMATION Thank you for selecting this 4-in-1 System
Whether your goal is general fitness or competing in the Olympics, rowing offers an efficient exercise that works all your major muscle groups as it
 INDOOR ROWER Whether your goal is general fitness or competing in the Olympics, rowing offers an efficient exercise that works all your major muscle groups as it improves your cardiovascular fitness. Indoor
Front brakes (FN- 3), servicing
, servicing") j a t Front brakes (FN- 3), servicing 46-1 Front brakes, servicing Note: Install complete repair kit. After replacing brake pads and before moving vehicle, depress brake pedal several times firmly to properly
j a t Front brakes (FN- 3), servicing 46-1 Front brakes, servicing Note: Install complete repair kit. After replacing brake pads and before moving vehicle, depress brake pedal several times firmly to properly
Table of Contents. www.hunterfan.com. What to Expect with. Preparation. Tools Needed. Wiring. Hanging the Fan. Blades. Motor Housing.
 www.hunterfan.com Table of Contents What to Expect with Your Installation 30 inches Hanging the Fan Wiring 8 Maintenance, Operation & Cleaning Light Kit 13??? 14 1 9 Troubleshooting 11 5 Blades Motor Housing
Installation Instructions
 Installation Instructions SELECTRONIC DC POWERED PROXIMITY EXPOSED TOILET FLUSH VALVE.,.8,.,./. &.8/. GPF Certified to comply with ASME A.9. 0 AS America, Inc. Exposed Flushometer for -/" Top Spud Bowls
Tube Type Oil Skimmer Comparison
 Process Overview- Tube Type Oil Skimmers Oil flows down the face of the skimmer and into a sludge pan that is plumbed to a barrel. Model BG01 & BG34 or 6V Oil Skimmer 1.0 or 3/4 Diameter Collector Tube
BR150 Pmi Baja Reaction 150cc Go Kart (VIN PREFIX L4VM)
") Page 1 of 21 Product Information Baja Web > Product Information > Parts Lists > GOKART > BR150 Pmi Baja Reaction 150cc Go Kart (VIN PREFIX L4VM) BR150 Pmi Baja Reaction 150cc Go Kart (VIN PREFIX L4VM)
Page 1 of 21 Product Information Baja Web > Product Information > Parts Lists > GOKART > BR150 Pmi Baja Reaction 150cc Go Kart (VIN PREFIX L4VM) BR150 Pmi Baja Reaction 150cc Go Kart (VIN PREFIX L4VM)
STEADYfast Stabilizer Installation Notes Fifth Wheel and Travel Trailers 11/23/13
 STEADYfast Stabilizer Installation Notes Fifth Wheel and Travel Trailers 11/23/13 (See Supplemental Instructions for trailers with heavy duty round footplates and/or Power Leveling Systems) PHONE SUPPORT
3. Loosen 3 x grub screws in the Dec end cap and unscrew the cap and counterweight shaft. NEQ6 Belt Modification Kit.
 NEQ6 Belt Modification Kit. Thank you for your purchase. Please read these instructions fully before fitting. Your package should contain 2 off 47 & 2 off 12 tooth aluminium pulleys 2 off belts 6mm wide
Contents. Front Derailleurs... 2. Part One - Planning... 2 I. Objectives... 2 II. Materials Needed... 2 III. Setting...2 IV. Evaluation...
 Contents... 2 Part One - Planning... 2 I. Objectives... 2 II. Materials Needed... 2 III. Setting...2 IV. Evaluation... 2 Part Two - Activity Instructions... 3 Steps to Adjusting and Replacing... 3 Disassemble...
TRANS-05, Torque Tube Removal, Rebuilding, and Installation
 TRANS-05, Torque Tube Removal, Rebuilding, and Installation Tools Metric Wrench Set Metric Socket Set Jack Stands (6 minimum) Floor Jack 8mm Cheesehead socket (also referred to as 12 point internal socket
ASSEMBLY MANUAL SE-4S35
 Automatic drive ASSEBLY ANUAL SE-4S35 AI-4S35 SG-4R35 Battery box otor unit Inter-4 hub CONTENTS WARNING 1 INSTALLATION CONITIONS Battery box Speed sensor Cable lengths and diameters otor unit Recommended
Installation Instructions HighRock 4x4 TM
 Installation Instructions HighRock 4x4 TM Slider Step Vehicle Application: Jeep YJ and TJ Wrangler 1986 2006 Part Number: 49312 www.bestop.com - We re here to help! Visit our web site and click on Ask
CETAC Z-Drive Assembly
 CETAC Z-Drive Assembly Replacement Guide Manual Part Number 610144 Rev 1, 2012 CETAC Technologies, Printed in USA Overview This guide describes the necessary steps to replace the Z-drive assembly on your
Permobil M300 Corpus HD
 SERVICE MANUAL US Permobil M300 Corpus HD Power Wheelchair How to contact Permobil Permobil Inc. USA 300 Duke Drive Lebanon, TN 37090 USA Phone: 800-736-0925 Fax: 800-231-3256 Email: info@permobilusa.com
13. REAR WHEEL/BRAKE/SUSPENSION
 13. REAR WHEEL/BRAKE/SUSPENSION 13 3.5~4.5kg-m 8.0~10.0kg-m 0.8~1.2kg-m 3.0~4.0kg-m 2.4~3.0kg-m 3.5~4.5kg-m 6.0~8.0kg-m 13-0 13. REAR WHEEL/BRAKE/SUSPENSION 13 REAR WHEEL/BRAKE/SUSPENSION SERVICE INFORMATION...
1. SAFETY RULES WARNING TO REDUCE THE RISK OF FIRE, ELECTRIC SHOCK OR PERSONAL INJURY, MOUNT FAN TO OUTLET BOX MARKED "ACCEPTABLE FOR FAN SUPPORT".
 1 1. SAFETY RULES 1. To reduce the risk of electric shock, insure electricity has been turned off at the circuit breaker or fuse box before beginning. 2. All wiring must be in accordance with the National
SERVICE LETTER SZ43-002-1A
 FREON CYCLE AIR CONDITIONING SYSTEM - MOTOR COMPRESSOR CONDENSER ASSEMBLY - FAN ASSEMBLY CONVERSION OF P/N: SZ43-002-1 TO SZ43-002-1A. 1. PLANNING INFORMATION A. EFFECTIVITY All ZEE Systems Part Number
TABLE OF CONTENTS. Section 1 - Assembling your new pit bike.
 Orion Pit Bike Sales Owners Manual (All information and content is the property of Orion Pit Bike Sales. Any attempt to copy or resell is a direct violation of our copyright. All violators will be prosecuted)
TABLE OF CONTENTS. Securing Child in Carrier...26. Child Requirements...24 Changing Harness Height...25
 TABLE OF CONTENTS Safe Use Checklist...4 Registration & Recall...5 Assistance...5 Warnings...6 Base Features Base Overview... Storage Compartment...3 Recline Adjustment...3 LATCH Removal & Storage...4
42U/45U 28" Wide Rack Installation & Service Guide
 42U/45U 28" Wide Rack Installation & Service Guide 96-00171-005 Rev B Important Information Information in this document is subject to change without notice and does not represent a commitment on the part
FRONT BUMPER INSTALLATION INSTRUCTIONS 2007-2011 DODGE / MERCEDES SPRINTER
 Aluminess Products Inc 9402 Wheatlands Ct. #A Santee, CA 92071 619-449-9930 FRONT BUMPER INSTALLATION INSTRUCTIONS 2007-2011 DODGE / MERCEDES SPRINTER Please read before beginning Stainless steel hardware
SE-600-P. Operation & Parts Manual
 SE-600-P Operation & Parts Manual SE 600 PC & PS SERIES OWNERS MANUAL Table of Contents 1. Set-up instructions 2. Bridge-Tramming Procedure 3. Operation instructions 4. Cleaning 5. Troubleshooting 6. Parts
EZ-Steer Assisted Steering System
 EZ-Steer Assisted Steering System Installation Instructions Platform Kit P/N 53059-54 Case IH CVX 1135 CVX 1145 CVX 1155 CVX 1170 CVX 1190 CVX 1195 CVX 135 CVX 145 CVX 155 CVX 175 CVX 195 New Holland TVT
Sebring Timing Belt and Water Pump Replacement
 Sebring Timing Belt and Water Pump Replacement I was motivated to do this work because of a bearing growling sound emanating from the engine. It would grind at low rpms when the engine was cold and then
2003 Audi A4. AUDI' '3.0L V6 - AVK Engine - A4 & A6
 Installation (A4) CAUTION: Before installation, ensure camshafts are aligned, crankshaft is locked in place and camshaft gear bolts are loose as described in removal procedures. When turning camshaft,
POLEMOUNT FIELD FIX ASSEMBLY INSTRUCTIONS
 POLEMOUNT FIELD FIX ASSEMBLY INSTRUCTIONS Polemount Field Fix Support If you have any questions or incur any problems installing or using the new Polemount, please use Miovision s Support System by emailing
Contents. Description Page Description Page
 Contents Description Page Description Page Auger Housing Assembly 1 Muffler 18 Handle and Control Assembly 3 Fuel Tank r Assembly 19 Engine and Drive Assembly 5 Clutch Retarder 20 Cylinder Head 7 Retarder
BILLET HEADLAMP SHELL
 -J008 REV. 007-07- BILLET HEADLAMP SHELL GENERAL Kit Number 770-0 Models For model fitment information, please see the P&A Retail Catalog or the Parts and Accessories section of www.harleydavidson.com
To Purchase This Item, Visit BMI Gaming www.bmigaming.com 1-800-746-2255 + 1-561-391-7200
 Table of Contents General Description and Play 2 Game Set Up 2 Loading Balloons 2 Technical Operation-General 3 Adjusting Balloon Sensor Wire 4 Programming Instructions 4 Default Settings Troubleshooting