Micro-computer Electronic Time Clock. User Manual
|
|
|
- Abner Scott
- 8 years ago
- Views:
Transcription
1 Micro-computer Electronic Time Clock User Manual
2 For more information on Acroprint products Acroprint offers a complete line of standard Time Recorders, state-of-the-art Electronic Time Recorders, Document Time Stamps, Watchmen s Systems, HRx Human Resource Software, and Time & Attendance Systems. Time for Business Departure Drive Raleigh, NC In USA Fax: sales@acroprint.com Visit our Web Site: Register online at All Rights Reserved Acroprint Time Recorder Company

3 Table of Contents I. Introduction... 1 Overview...1 Specifications...1 Accessories...1 Features...2 II. Package Contents... 2 III. Location of Components... 3 IV. Getting Started... 3 Installing clock dial battery...3 V. Setting the ATR Programming Hints...4 Selecting day of week...5 Setting the time...7 Setting the year, month, and date...7 Setting Daylight Saving Time...8 Setting the day change time...9 Setting the printing format...9 Setting the two-color printing and internal signal tone...10 Setting signal duration...13 Setting auto column shift print position...13 Setting how the hour will print...15 Setting the password...16 Exiting program mode...16 VI. Installing your ATR Wall-mounting...17 VII. Operating your ATR VIII. Maintenance Replacing the ribbon...19

4 IX. Troubleshooting Location of fuses...21 Error codes...21

5 I. Introduction Overview The ATR120 is an electronic across-the-card time clock, which can be used for a weekly or a biweekly pay period. The unique ATR121 Time Card offers a weekly time card on the front and a biweekly time card on the back. The day progresses across the card from left to right in six columns. This is accomplished by pressing one of the card-positioning buttons (IN-OUT) on top of the clock. The pay period (day of week) moves down the card, top to bottom. You may select the time of day you want this day change to occur. You may also select the starting day of your pay period during the easy set up procedure. The ATR120 offers two-color printing so employee punches outside normal punch times will print in RED allowing for quick and easy auditing of exception punches. The built-in signal can be programmed to audibly denote start and stop work times. The large analog clock face, not electronically synchronized with the digital display, is easy to read from across the room. With a built-in battery back-up, auto daylight saving adjustments and a perpetual calendar, the ATR120 Time Clock will always print the correct time. Specifications Power Source: 115VAC/60Hz Power Consumption: 0.3V Clock Accuracy: ±3s per week Ambient Temperature: 23 F~104ºF (-5 ~40 ) Ambient Humidity: 20%~80% Analog Clock: 1 AA Battery (1.5V) Size: 8.1"W 8.85"H 4.93"D (205mm W 225mm H 125mm D) Accessories: To assure proper operation please use the accessories designed to work with the ATR120. ATR121 Weekly/Bi-Weekly Time Card. Part Number Model 120R Time Card Rack holds 25 ATR121 Time Cards. Part Number ATR122 Two-Color Replacement Ribbon Cassette. Part Number

6 Features Compact design for desktop or wall mounting Weekly or bi-weekly pay periods Digital display shows time and date and is synchronized with dot matrix printer 9-pin dot matrix printer that allows for 12 or 24-hour & 60/100 print format Easily distinguish printing time between AM and PM. PM minutes or hundredths are over scored 8:00 (8:00 PM) 2-color (red/black) cassette ribbon can be programmed so punches outside of schedule will print in red Built-in signal tone to denote start and stop times Daylight Saving Time and perpetual calendar Password for program protection II. Package Contents Unpack the time clock and check its contents to ensure that it and all of the accessories shown below are included. 2

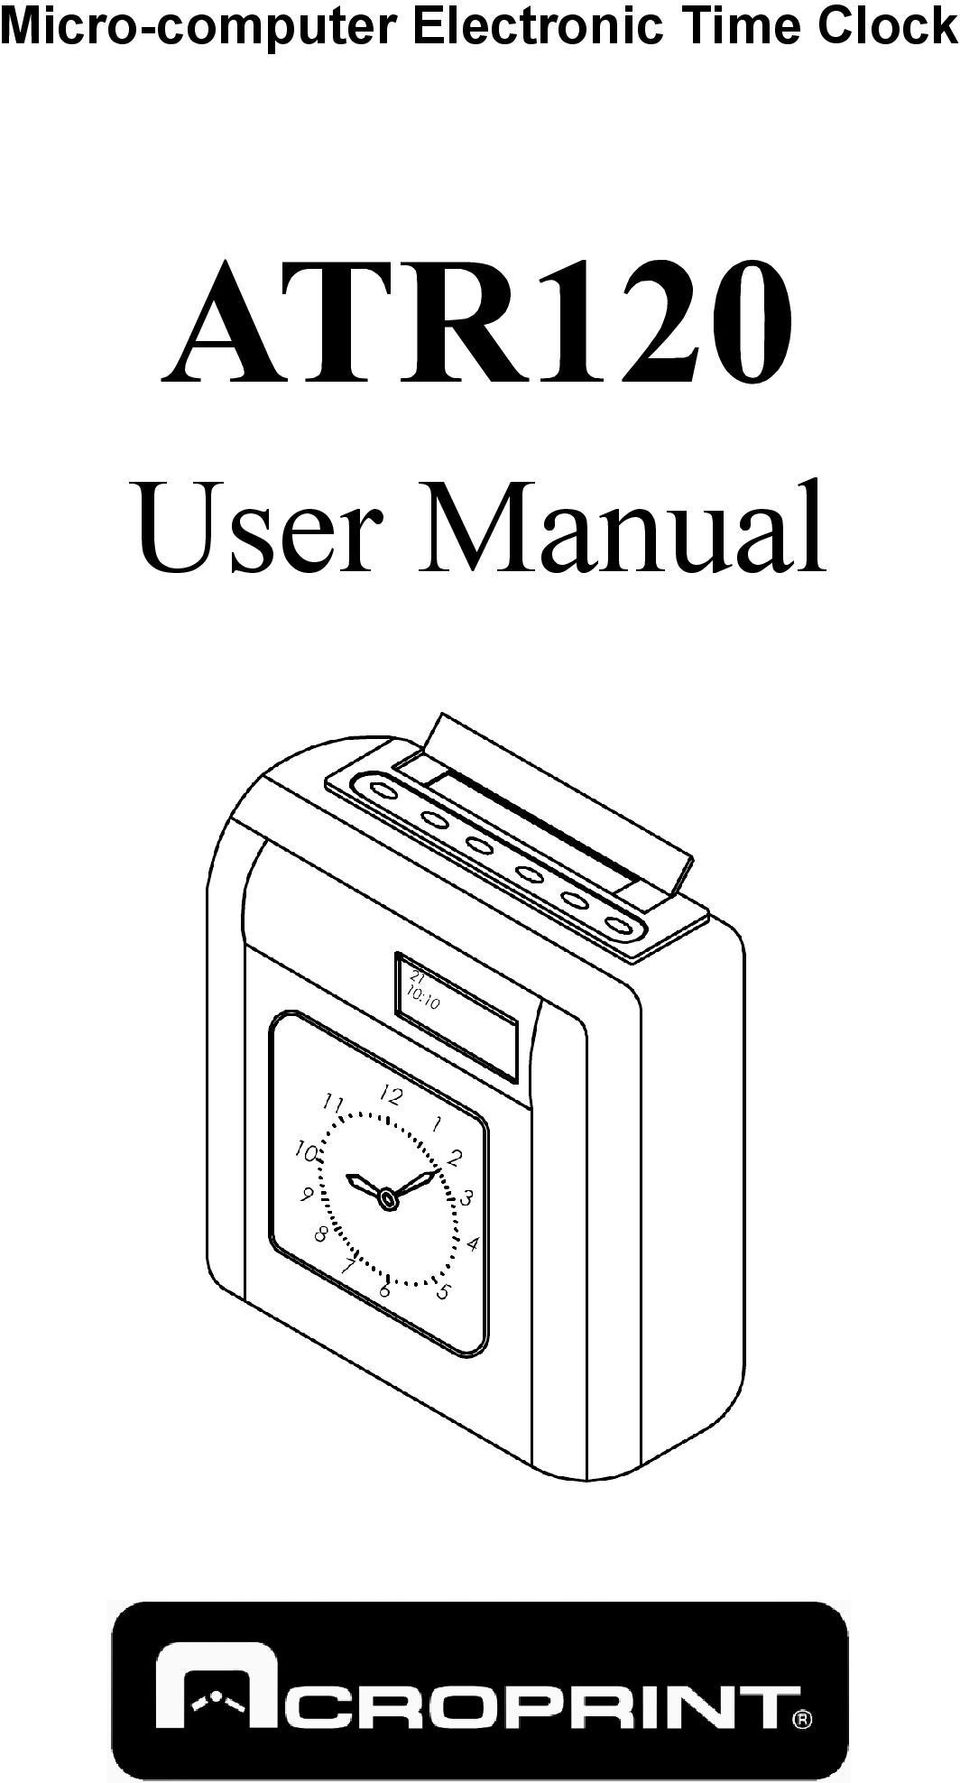
7 III. Location of Components 1. Anti-dust cover 2. Time card receiver 3. In/Out advance buttons (6) 4. Analog clock (Clock dial) 5. Display 6. Program mode switch 7. Reset (return to original factory settings) 8. Wall-mounting keyholes 9. Fuse access door IV. Getting started Installing clock dial battery The front cover must be opened before the clock dial battery can be installed. Opening the front cover also allows you to set the clock's analog time. You will need to do this occasionally to synchronize the clock dial to the digital display and printer. 3

8 To open the front cover, turn the clock on its back and remove the two outer screws on bottom of clock. Stand the clock upright with the back facing you. With both thumbs press down on IN1 and OUT3 buttons while using your fingers to push cover away. The clock dial panel is shipped locked into place. You have the option of removing the tab that locks the clock panel into place for easy access when setting the clock. If you remove the locking tab, we suggest you keep the tab. To remove the locking tab, unfasten the screw located in the front cover and remove the screw and clip. The screw and clip may be stored by securing it into the post screw hole below where it was removed. It is not necessary to remove the locking tab to install the battery or to adjust the clock dial time setting. Once the front cover is open, you will be able to install the battery and to set the time on the dial. Opening the front cover also allows you to access the ribbon cassette. V. Setting the ATR120 Programming Hints The ATR120 incorporates features to make the task of time and attendance faster and easier. The simplest way to program the ATR120 is to set all of the functions, at one time, while in the program mode. Although, you may set functions independently it is recommended that you follow the program sequence. When programming the time, and the time of day for events to occur, the display will show time in a 24-hour format (i.e. 3:00 PM will be 15:00). To place the clock in the program mode, set the program switch located on back of clock, in the upper left corner from NOR to PRO (top position). This now activates the 6 manual card-positioning switches ( IN1, OUT1, etc.) on top of the 4

9 clock to function as program switches. With the dust cover open you will find that these program switches are numbered 1 6 to simplify programming the ATR120 The first switch on the top left of the clock (IN1) functions as the feature selection switch and will advance you through the program mode. This switch also allows you to skip over a feature and advance to the next feature without programming. Once a feature is selected, switches OUT2 through IN3 will be used for programming. We'll refer to the switches as buttons one through six. The last switch on the right, button six or OUT3 is used to save the program selection to memory. IMPORTANT: If OUT3 is flashing in the lower right corner of the display, the programmed changes have not been saved. IN1 OUT1 IN2 OUT2 IN3 OUT3 O O O Select Programming Switches (When in the PRO mode) Save To return to the original factory settings press the RESET button located to the left of the PRO/NOR switch on back of the clock. Note: Each time you modify the program, you must press button six to save the program changes. OUT3 flashes in the lower right corner of the digital display until the programming change is saved. If OUT3 is flashing in the lower right corner of the display, the program changes have not been saved. Selecting day of week The ATR120 can be programmed for either weekly or biweekly pay periods. For weekly pay periods, program the time clock as follows: Enter the programming mode by setting the switch on the back of the ATR120 to the PRO position. The display indicates

10 Press button four once. The display reads 2-1. The 2 indicates this is a weekly pay period. OUT3 flashes in the lower right hand corner of the display. This will flash until the changes are saved. Press button five to choose the current day of the week for your weekly pay period. 2-1 = Monday 2-2 = Tuesday 2-3 = Wednesday 2-4 = Thursday 2-5 = Friday 2-6 = Saturday 2-7 = Sunday Press button six to save your settings. OUT3 is no longer displayed. For biweekly pay periods, you must select the current day of week within the pay period. Example: if the current day of the week (today) is Monday you must choose which Monday, the first (3-1) or second Monday (3-8) of the pay period. Enter the programming mode by setting the switch on the back of the ATR120 to the PRO position. The display reads 1-31 or the last setting. Press button four twice. The display reads 3-1. The 3 indicates this is a biweekly pay period. OUT3 flashes in the lower right hand corner of the display. This will flash until the changes are saved. Press button five to choose the first day of your weekly pay period. 3-1 = first Monday of pay period 3-2 = first Tuesday of pay period 3-3 = first Wednesday of pay period 3-4 = first Thursday of pay period 3-5 = first Friday of pay period 3-6 = first Saturday of pay period 3-7 = first Sunday of pay period 3-8 = second Monday of pay period 3-9 = second Tuesday of pay period 3-10 = second Wednesday of pay period 3-11 = second Thursday of pay period 3-12 = second Friday of pay period 3-13 = second Saturday of pay period 3-14 = second Sunday of pay period 6

11 Press button six to save your settings. OUT3 is no longer displayed. Setting the time Make sure the ATR120 is in programming mode. Press button one once to start setting the current time. This mode starts the clock-timing device. The display indicates the time at which the clock is currently set. Depending on how long you have been in the program mode, the display may advance from the default setting of 00 5:00. Press button four to set the hours (24-hour format; 0-23 with 0 = midnight). The display reads 00 6:00 with OUT3 flashing in the lower right hand corner. Advance to the correct hour. Note: Hold down button four to rapidly advance the hour. Press button five to set the minutes. The display reads 00 6:50 with OUT 3 flashing in the lower-right hand corner. Advance to the correct minutes. Press button six to save the time setting. OUT3 disappears. The seconds reset to 0. Setting the year, month, and date Press button one once (twice if just entering the programming mode) to set the year, month and date. The display indicates the last programmed year, month, and date with the default being Press button three to set the year. The display reads with OUT 3 flashing in the lower right-hand corner of the display. Press button three until the correct year is set. Press button four to set the month (1-12, with 1= January, 2 = February, etc.) OUT3 flashes in the lower-right hand corner of the display. Press button four until the current month is set. Press button five to set the date. OUT3 flashes in the lower-right hand corner of the display. Press button five until the current date is set. Press button six to save the year, month, and date settings. The display should show the correct month and date. 7

12 Setting Daylight Saving Time Press button one once. If you are entering the programming mode for the first time, you will need to press button one three times to set Daylight Saving Time. The display reads S1 0-0 with S1 indicating the start of Daylight Saving Time. Press button four to set the month (1-12, with 1= January, 2 = February, etc.) The display reads S1 0-0 with OUT3 flashing in the lower-right hand corner of the display. Press button four until the month Daylight Saving Time should start is set. Press button five to set the day of the month. OUT3 flashes in the lower-right hand corner of the display. Press button five until the day Daylight Saving Time should start is set. Press button six to save the month and day Daylight Saving Time should start. OUT3 will no longer be displayed indicating this setting has been saved. The program will automatically switch to setting the ending date for Daylight Saving Time. The display should now read S The ending date for Daylight Saving Time is set exactly the same as the beginning date. Press button four to set the month (1-12, with 1= January, 2 = February, etc.) The display reads S2 0-0 with OUT3 flashing in the lower-right hand corner of the display. Press button four until the month Daylight Saving Time should end is set. Press button five to set the day of the month. OUT3 flashes in the lower-right hand corner of the display. Press button five until the day Daylight Saving Time should end is set. Press button six to save the month and day Daylight Saving Time should end. OUT3 will no longer be displayed indicating this setting has been saved. The display will return to the starting date. Note: The starting and ending dates for Daylight Saving Time must be set each year. Both the starting and ending dates must be set for Daylight Saving Time to be operational. At midnight on the starting date, the clock will automatically advance one hour. At midnight on the ending date, the clock will go back one hour. For 8

13 example, on the first date of Daylight Saving Time, the clock will advance from midnight to 01:00. At midnight on the last day, the clock will change from 00:00 to 23:00. Setting the day change time Press button one once. If you are entering the programming mode for the first time, you will need to press button one four times to set the Day Change Time. The display should read 5:00, indicating the day change time. Five o'clock AM is the default time for the day change to take place. This is the time that the ATR120 will change to printing the time on the next row for the next day. You may want to change this to another time, such as midnight (00:00). Press button four to adjust the hour (00~23h) the day change should take place. OUT3 flashes in the lower right-hand corner of the display indicating this setting has not been saved. Press button six one time to save the day change time setting. Setting the printing format The ATR120 will print in standard minutes (60) or in decimal hundredths (100) of an hour. For example, 12:45 will be printed 12:45 in the standard minute format or as if hundredths is chosen. PM hours are indicated by minutes being over scored. Example: Two fifteen in the afternoon would print as 02:15 in 12-hour format or 14:15 in 24-hour format. Press button one once. If you are entering the programming mode for the first time, press button one five times to set the printing format. The display should now read Cd 60, indicating the ATR120 is set to print standard minutes. Press button five to change the printing format. The display will toggle back and forth between Cd 60 and Cd 100 with OUT3 flashing in the lower right-hand corner. Cd 100 represents minutes being printed in a decimal hundredths format. Press button six once to save the print format. OUT3 will no longer be displayed. 9
.")
14 Setting the two-color printing and internal signal tone Time cards can be audited much easier by highlighting in red, punches outside the normal work schedule. Using the internal audible signal will remind your employees of start and stop times in their work schedule. You can even have a warning signal two minutes before start time to alert your employees. This program allows for a total combination of 32 scheduled events. Events can be selected to allow a ribbon color change or a signal tone or a combination of both. Each event can be programmed for the time of day in hours and minutes and the day of week. The events available are: Clock to print in RED Clock to print in RED with SIGNAL Clock to print in BLACK Clock to print in BLACK with SIGNAL Clock to SIGNAL without a color change Note: The default ribbon color is black. The clock has to be programmed at a specific time to print in red. Once a color change occurs the clock will print in that color until an opposite color change is activated. The following is a sample schedule of events for a 8:00 AM to 5:00 PM work schedule with a one hour lunch period from 12:00 Noon to 1:00 PM (13:00) This schedule has the clock printing in RED at 8:01 AM to 12 Noon. Any late in or early out punches will print in RED, The clock will print in BLACK during the lunch period. Then printing in RED at 1:01 PM (13:01) until 5:00 PM (17:00). At 5:00 PM the clock will print in BLACK allowing for exit punches. At 5:30 (17:30) the clock will return to RED to note OT punches or late outs. The clock will return to BLACK at 07:30 in the morning to allow for IN punches for that day. The internal signal will sound at 8:00 AM, 12:00, 1:00 PM and 5:00 PM audibly notifying start and stop times. On the chart on the next page, the IN/OUT under each event denotes the event selection shown on bottom of the display during the programming of these events. 10

15 Event Max 32 Print in Red IN1 Print in Black OUT1 Signal Only IN2 Print Red & Signal IN1 IN2 Print Black & Signal OUT1 IN2 1 08: : : : : : : :30 Event Time Description of Event 1 8:00 SIGNAL Only to denote start of work schedule 2 8:01 Color changes to RED to denote late or early lunch punches 3 12:00 SIGNAL noting start of lunch period and color change to BLACK SIGNAL 4 13:00 SIGNAL Only to denote end of lunch period 5 13:01 Color change to RED to show late in punches or early end of day out punches 6 17:00 SIGNAL to denote end of work schedule and color change to BLACK 7 17:30 Color change to RED to indicate possible overtime 8 07:30 Color change to BLACK to allow morning in punches When the display shows 01 5:00 Press button two to select the event (IN1, print in red or OUT1, print in black, etc.) Press button three to confirm the event (OUT3 will continue to flash). Press button four to select the hour of the event. Press button five to select the minute the event will occur. To have the event occur each day (Recommended), press button six to save the event and advance to the next scheduled event, 02 5:00. If you do not want an event to occur each day, you may select the day(s) of the week you want the event to occur. After selecting the minute the event will occur, press button two. At the bottom of the display, the event indicator will be displayed and OUT 3 will be flashing. As the top of the display, SUN will be flashing. To select SUN, press button three or to advance to MON, press button two. Remember to use button three to save the day of the week. Cycle between buttons two and three as 11

16 necessary to set the day(s) the event should occur on. The event will occur on the day(s) shown across the top of the display. It is recommended that a program chart be used to create a schedule to assist in programming this feature. The typical company uses eight events, similar to the previous example on page 11. Program Print in Red IN1 Print in Black OUT1 Signal 12 IN2 Print Red & Signal IN1 IN2 Print Black & Signal OUT1 IN2

17 Setting signal duration The ATR120 can be set to produce a signal lasting from zero (0) 0 to sixty (60) seconds, with the default being five (5) seconds. Press button one once. If you are entering the programming mode to set or adjust of the signal duration, press button one seven times. The display should now read 5, indicating the signal will sound for five seconds. Press button five to change the signal duration. The display indicates 5 with OUT3 flashing in the lower right-hand corner. The 5 represents five seconds. Press the fifth button to choose the signal duration from 0 to 60 seconds. Once you have chosen the signal duration, press button six one time to save it. OUT3 will no longer be displayed. Setting auto column shift print position This feature may not be appropriate for all installations. The auto column shift is a special feature for installations where most or all employees arrive and depart at the same time. Employees who arrive or depart at different times may be required to manually reset the card column position. Failure to do so will result in printing in the wrong location on the time card. For ease of operation of the ATR120, caution should be used in selecting this feature. If the auto column shift position is manually changed, the clock will return to the scheduled auto position after 7 8 seconds. The auto column shift feature allows for a total of 18 horizontal moves. It is recommended that a program chart be used to create a schedule to assist in programming this feature. A sample program chart is shown below for an 8:00 AM to 5:00 PM shift with lunch between 12:00 Noon and 1:00 PM. Employees may punch in after 7:30 AM. Employees start lunch at 12:00 PM and must take at least a 15-minute lunch to punch in IN2 column. AT 5:00 PM the clock will advance to OUT2. Overtime punching is allowed after 5:30 PM. And a minimum of 30 minutes is permitted before moving to the column OUT3 at 6:00 PM. EVENT IN1 OUT1 IN2 OUT2 IN3 OUT3 1 07:30 12:00 12:15 17:00 17:30 18:

18 Use this chart to plan your Auto Column Shift times. EVENT IN1 OUT1 IN2 OUT2 IN3 OUT To program the auto column shift: Press the first button one time to advance to programming the auto column shift feature. If you are entering the programming mode to adjust the auto column shift position you will need to press the first button eight times. The display indicates 01 5:00 with all days of the week displayed. 01 indicates the event sequence number (01-18). 5:00 indicates the default time (5:00 AM) of the event Press button two to advance through column selections. The column position (IN1, OUT1, icons) will flash at the bottom of the display. The day of week icons are displayed at the top. IN1 OUT1 First In Punch of the shift Out Punch (Lunch) 14
.")
19 IN2 OUT2 IN3 OUT3 In Punch (Lunch) Out Punch end of shift In Punch Overtime Period Out Punch Overtime Period Select the column position by pressing button three. The column position icon at the bottom of the display will stop flashing. ALL days of the week will appear at the top of the display. To select this move everyday of the week (recommended), press button six to select and to advance to the next column selection. To select certain day(s) of the week, after pressing button three to select column position (icon at bottom of display will stop flashing), press button two, and SUNday icon will flash at top of display. Press button three to select that day. Press button two to advance to the next day. Pressing button two without pressing button three will skip that day of the week. Press button six to save selections and advance to next event. To select the hour for the column change, press button four. To select the minutes for the column change, press button five. Remember to press button six to save and advance to the next programming sequence. Each sequence is programmed the same way. Selecting how the hour will print The ATR120 will print hours in either 12- or 24-hour format. Press button one once. If you are entering the programming mode to adjust the hour printing format, you will need to press button one nine times. The default setting is 24H. Press button four to toggle between 12- and 24-hour printing format (12H and 24H). OUT3 flashes on the display. Press button six to save the hour printing format. OUT3 no longer flashes on the display. 15
 of the week, after pressing button three to select column position (icon at bottom of display will stop flashing), press button two, and SUNday icon will flash at top of")
20 Setting the password The ATR120 allows for the use of a four-digit number as a password to protect programmed settings. When the password is set, you will be asked to enter it each time you enter the programming mode. It is recommended that if a password is used that you write it down and store it in a safe place. If an incorrect password is entered you will be prevented from entering the programming mode. Note: If correct password cannot be entered, the clock can be reset to original settings by pressing the RESET switch on back of clock next to the program switch. Doing so will reset ALL functions, requiring the ATR120 to be re-programmed. Press button one once. If you are entering the programming mode to set or adjust the password, press button one ten times. The display indicates Press button four to choose the first two digits of the password. You may use any digits from 00 to 99. OUT3 flashes in the lower right corner of the display. Press button five to choose the last two digits of the password. You may use any digits from 00 to 99. OUT3 flashes in the lower right corner of the display. Press button six one time to save the password setting. The flashing OUT3 disappears. Once the password has been set, when you enter the program, the ATR120 will display The password must be entered and button six pressed, then the time clock will display and enter program mode. If the password is incorrect, then the ATR120 will beep and Error Message E-40 is displayed. You will not be allowed to enter the programming mode until the correct password is entered. Exiting program mode When you have finished programming the ATR120, reset the program switch on the back of the clock, to the NOR position and press button one once to return to the normal mode. The ATR120 will now display the current time and date and is ready for operation. VI. Installing your ATR120 The ATR120 can be installed in any normal office environment. It may be installed on a smooth, flat surface or wall-mounted. No special wiring is needed. However, 16

21 we recommend installing the ATR120 on a separate power circuit. We do not recommend using a power strip. Always follow basic safety precautions when using this product to reduce the risk of injury, fire, or electric shock. Caution: Read and understand all instructions in the ATR120 User's Manual before installing and operating this time clock. Do not install the ATR120 in areas where it may be exposed to direct sunlight or high temperatures, such as near a heater. Do not install the ATR120 where it may be exposed to excessive dust or to high humidity, resulting in condensation. Do not use this product near water or when you are wet. If the product comes in contact with any liquids, unplug the electric cord immediately. Do not plug the product back in until it has thoroughly dried. Securely install the time clock on a stable, level surface, or if wall mounting the ATR120, follow the wall mounting instructions to install it securely on the wall. Place the time clock where no one can step or trip over the cord. Do not place objects on the power cord that can cause damage or abrasion. If this product does not operate normally, please consult the Troubleshooting section of this manual. Wall-mounting 1. Following the diagram, insert a screw about 94cm to 124cm above the floor. Allow about 1/8" between the screw head and the wall. 17
22 2. Following the diagram, insert screws at positions B and C. Place a screw anchor in the wall at position D. 3. Use the two screws (M4X10) to attach the wall-mounted frame to the bottom of the time clock. 4. Line up the keyholes on the back of the time clock with the screws in the wall. Slide the ATR120 downwards to firmly mount it on the wall. 5. Place a screw in the bottom hole of the wall-mounting frame to secure it to the wall. VII. Operating your ATR120 The Clock will print in the column indicated by the red light above the IN/OUT buttons. Press the appropriate IN or OUT button to choose the print position for time cards. The print position will not change until another column button is pressed. If an auto shift schedule is programmed, then the ATR120 will automatically shift from column to column. If manually changed, while in auto shift, the clock will return to the programmed position after 7 or 8 seconds. In Morning/Out Lunch IN Lunch/Out End of Day OT In/OT Out IN1 OUT1 IN2 OUT2 IN3 OUT3 18
23 To print, insert a time card into the receiver with the pay period selected, facing you. Note: The clock cannot differentiate the pay period and will print on either side of the time card. The card is automatically pulled in and printed. Do not attempt to pull the card out during the printing operation or to insert any objects other than time cards. Doing so can result in damage to printer. VIII. Maintenance Several simple suggestions may extend the life of your ATR120. Close the anti-dust cover after operation. When the case is dirty, wipe it with a damp soft cloth. If necessary, a mild detergent may be used. Do not use any type of thinner or other chemical for cleaning because the chemical could damage or discolor the case. Replacing the ribbon When the printing on the time card becomes light or hard to read it will be necessary to replace the ribbon. Use the ATR122 replacement ribbon cassette (part number ). Attempting to re-ink the cassette will cause permanent damage to the printer. To open the front cover, turn the clock on its back and remove the two outer screws. Stand the clock upright with the back facing you. With both thumbs press down on IN1 and OUT3 buttons while using your fingers to push cover away. 19
24 Next, remove and discard the pin and clip. Remove the ribbon cassette by first sliding it left and then upwards as shown by the illustration (A & B). Place the new ribbon into the ATR120. It is not necessary to replace the pin and clip. Turn the ribbon feed knob counterclockwise until the ribbon is taut. Close the front cover. IX. Troubleshooting Problem Possible Cause Check Clock does not accept time cards Printing light Printing in wrong position Not printing Clock stopped Analog clock slow or stopped AC power is OFF Power cord is disconnected AC fuse blown DC fuse blown Still in program mode Worn ribbon Ribbon cassette not seated correctly Incorrect pay period starting day Time card inserted incorrectly Printing head fuse blown Ribbon cassette not seated correctly AC power is off Power cord is disconnected AC fuse blown Battery weak Out of synchronization Restore power Restore cord to outlet Replace AC240V 1A fuse Replace DC 12V 2A fuse Return switch to NOR position Replace ribbon cassette Reinstall ribbon cassette Set correct day Insert card correctly Replace DC 12V 1.5 Amp fuse Reinstall ribbon cassette Restore power Restore cord to outlet Replace AC240V 1A fuse Replace AA battery Reset to digital display 20
25 Location of fuses The fuse panel is located on the back of the ATR120 in the lower left corner. To access fuses, disconnect the power from the clock and remove the screw securing door. Replace blown fuse with only the same rated fuse. Do not substitute. 1. Printer Head Fuse (1.5A DC 12V) 2. AC Fuse (1A AC 240V) 3. DC Fuse (2A DC 12V) Error Codes The ATR120 has built-in diagnostics to guide you in maintaining your time clock. These Error Codes, when occurring, will be seen on the display. Code Meaning of Error Check E-01 Clock motor or sensor failure Unplug and reconnect power cord or turn the program switch on-off twice, letting the clock readjust. E-03 Card positioning Contact dealer or factory E-05 Card does not feed correctly Re-insert card and print. E-30 Printer head fails to return to home Contact dealer or factory position E-33 Can t change color Check that the ribbon is installed correctly. Contact dealer or factory E-35 The card can t be returned Make sure there are no obstructions in card receiver Contact dealer or factory E-37 Sensor cannot locate card Contact dealer or factory E-38 Printer head jammed Contact dealer or factory E-40 Wrong password entered Enter the correct password 21
26 For any other Error Codes contact your dealer or Acroprint Time Recorder. To return to the original Factory settings, press the reset switch, located on the back of the clock next to the PRO switch. When resetting the clock make sure the PRO/NOR is in the NOR position. After resetting enter the PRO mode to reprogram the clock. 22
27
28 5640 Departure Drive Raleigh, NC IN USA P/N Rev. A
Time Clocks WARNING. For Repair or Service
 T100 USER MANUAL WARNING This equipment has been tested and found to comply with the limits for a Class A digital device, pursuant to Part 15 of the FCC Rules. These limits are designed to provide reasonable
SETTING UP YOUR 6000 SERIES TIME RECORDER
 INTRODUCTION The Pyramid 6000 Series Time Recorder is an electronic time recorder designed to make payroll processing easier and more efficient. The 6000 series will meet your business needs whether your
Time Recorder. User Manual. PDF created with FinePrint pdffactory trial version www.pdffactory.com
 Time Recorder User Manual 1 (1) Specifications: 1. Power supply 100, 110, 200, 220, 230 V AC (as designated), 50/60 Hz, single phase. 2. Power consumption Normal 2W (MAX 30W) 3. Standard time signal Quartz
PIX-10 Electronic Time Recorder User s Guide
 PIX-10 Electronic Time Recorder User s Guide Thank you for purchasing another fine product from Amano Cincinnati, Inc. IMPORTANT The Daylight Saving Time date settings have been preset. DO NOT change the
Portable Air Conditioner
 Portable Air Conditioner Owner's Manual Model:3 in 1 12,000 Btu/h Series 3 Please read this owner s manual carefully before operation and retain it for future reference. CONTENTS 1. SUMMARY...1 2. PORTABLE
Single Day Alarm Clock with. Bluetooth and USB Play-through
 Single Day Alarm Clock with Bluetooth and USB Play-through MODEL : BSC 200 READ THIS INSTRUCTION MANUAL BEFORE OPERATING THE APPLIANCE. SAVE THIS MANUAL FOR FUTURE REFERENCE. TABLE OF CONTENTS IMPORTANT
GSM Temperature Alerter. User Manual. Manual version 1.0
 GSM Temperature Alerter User Manual Manual version 1.0 This brochure suits for 19-0415 model. 19-0415 GSM Temperature Alerter USER MANUAL 19-0415 GSM Temperature Alerter Thank you for purchasing the 19-0415.
Electronic Time Recorder
 CP-3000 Electronic Time Recorder User s Guide PROPRIETARY NOTICE This document contains proprietary information and such information may not be reproduced in whole or in part without the written permission
How To Program An Autodialer
 GJD HYL005 GSM Autodialer Instruction Manual Please read these instructions before you start the installation Features: LCD display. Programmable 9 x 32 digit phone numbers for each trigger. 10 second
GSM AD05 Slave GSM Auto Dialer- Instruction Manual
 GSM AD05 Slave GSM Auto Dialer- Instruction Manual Please read these instructions before you start the installation Features LCD display Programmable 9 x 32 digit phone numbers for each trigger. 10 second
AD-01 Slave Auto Dialer. Owner s Manual
 AD-01 Slave Auto Dialer Owner s Manual AD-01 Slave Manual.indd 1 10/15/2009 10:20:44 AM 2 AD-01 Slave Manual.indd 2 10/15/2009 10:20:44 AM Features: Programmable entry/exit delay time; select up to 9 (32
TABLE OF CONTENTS QUICK START... 1 DIAGRAM OF THE DIGITAL PHOTO FRAME... 2 KEYPAD BUTTON FUNCTIONS... 3 REMOTE CONTROL FUNCTIONS..
 TABLE OF CONTENTS QUICK START........ 1 DIAGRAM OF THE DIGITAL PHOTO FRAME... 2 KEYPAD BUTTON FUNCTIONS..... 3 REMOTE CONTROL FUNCTIONS..4 DIGITAL PHOTO FRAME NAVIGATION........5 OSD MENU FUNCTIONS..6
User Manual. Video Doorphone CDV-1020AQ
 User Manual Video Doorphone CDV-1020AQ 513-11, Sangdaewon-dong, Jungwon-gu, Seongnam-si, Gyeonggi-do, Korea Int l Business Dept. Tel. : +82-31-7393-540~550 Fax. : +82-31-745-2133 Web site : www.commax.com
COLOR VIDEO DOOR PHONE CDV-71BE/D
 COLOR VIDEO DOOR PHONE CDV-71BE/D 513-11, Sangdaewon-dong, Jungwon-gu, Seongnam-si, Gyeonggi-do, Korea Int l Business Dept. : Tel.; +82-31-7393-540~550 Fax.; +82-31-745-2133 Web site : www.commax.com Printed
Master Time Clock MTC-200 MTC-400 MTC-600. Users Manual
 Master Time Clock MTC-200 MTC-400 MTC-600 Users Manual Toll Free (888)713-0373 Phone (972)987-4408 FAX (877)720-9291 www.midwest-time.com sales@midwest-time.com TABLE OF CONTENTS TOPIC PAGE GENERAL DESCRIPTION
CAD-05 Kit GSM Auto Dialer. Owner s Manual
 CAD-05 Kit GSM Auto Dialer Owner s Manual CAD-05 Kit Manual.indd 1 Warnings: This device complies with Part 15 of the FCC rules, Operation of this device is subject to the following conditions: 1. This
24 Wide Screen LED Monitor with HDMI
 24 Wide Screen LED Monitor with HDMI USER MANUAL L24LE11B_MANUAL_EN_R1 Please read this manual carefully before using, and keep it for future reference. TABLE OF CONTENTS GETTING STARTED Monitor Stand
GSM Door Phone System
 GSM Door Phone System System Installation, Setting and Operation Manual User Manual (263-S V1) Please read this user manual completely before operating this system and keep it in a safe place for future
Wireless Home Security System Product Manual (Model #80355)
") Wireless Home Security System Product Manual (Model #80355) Installation Instructions During set-up, if no key is pressed for 15 seconds it will come out of the setup mode and you will have to start over.
Wireless Home Security System Product Manual (Model #80355) Installation Instructions During set-up, if no key is pressed for 15 seconds it will come out of the setup mode and you will have to start over.
PERFECT 2005. Operating and Installation Manual
 PERFECT 2005 Operating and Installation Manual PERFECT 2005 Time recorder Manual for the operation and installation of the time recorder. Copyright 2009 ISGUS GmbH The company ISGUS GmbH claims copyright
User Manual Color video door phone
 User Manual Color video door phone CDV-70KM Thank you for purchasing COMMAX products. Please carefully read this User s Guide (in particular, precautions for safety) before using a product and follow instructions
CarePartner Telephone With Reminders
 Philips wordmark and Lifeline K100 CarePartner Telephone With Reminders Model 9500 User s Manual Black and white version For use with newsprint and other one-color applications. 1 x P height 1 x P height
USER INSTRUCTIONS FOR GET PORTABLE 12k BTU AIR CONDITIONER MODEL No. GPACU12HR
 USER INSTRUCTIONS FOR GET PORTABLE 12k BTU AIR CONDITIONER MODEL No. GPACU12HR CONTENTS Introduction Safety Notes Identification of parts Installation instructions Operation instructions Maintenance Troubleshooting
Quick Start Guide See Inside for Use and Safety Information
 3 rd Generation Personal 3D Printer Quick Start Guide See Inside for Use and Safety Information The USB Mass Storage Device Contains the User Guide and Quick Start Guide in other Languages Congratulations
2.4 GHz Dual Handset Cordless Telephone Answering System 2255 with Caller ID/Call Waiting
 USER S MANUAL Part 2 2.4 GHz Dual Handset Cordless Telephone Answering System 2255 with Caller ID/Call Waiting Please also read Part 1 Important Product Information AT&T and the globe symbol are registered
Use and Care Manual. Model CPA12KH AIR CONDITIONER
 Use and Care Manual Model CPA12KH AIR CONDITIONER Introduction Thank you for choosing this air conditioner to provide you and your family with all of the "Home Comfort" requirements for your home, cottage
Emergency Dialer DIAL-ALERT MODEL: AD-105. www.skylinkhome.com
 www.skylinkhome.com Emergency Dialer TM DIAL-ALERT MODEL: AD-105 If you would like to order Skylink s products or have difficulty getting them to work or download information and user manual, please :
Advantium 2 Plus Alarm
 ADI 9510-B Advantium 2 Plus Alarm INSTALLATION AND OPERATING INSTRUCTIONS Carefully Read These Instructions Before Operating Carefully Read These Controls Corporation of America 1501 Harpers Road Virginia
CR9971 2 Band Auto Set Dual Alarm Clock Radio ROBERTS. Sound for Generations. Please read this manual before use
 ROBERTS Sound for Generations CR9971 2 Band Auto Set Dual Alarm Clock Radio Please read this manual before use Contents Contents... 1 Controls...2-5 Switching on... 6 Setting the time manually... 6 Setting
Operating Instructions
 PLEASE READ BEFORE USE AND SAVE. Integrated Telephone System Model No. KX-T7FXW Pulse-or-tone dialing capability Operating Instructions Preparation Basic Operation Advanced Operation Useful Information
Operator Manual. Postage meter T-1000 TELESET
 Operator Manual Postage meter T-1000 TELESET 1 Introduction 1 About your new meter The T-1000 is the first fully electronic postage meter offering a completely new design compared to all other postage
Dehumidifier Users manual. For Models: DH45S DH65S
 Dehumidifier Users manual For Models: DH45S DH65S 950-0062-revD Jan. 9 2007 FORWARD The appearance of the units that you purchase might be slightly different from the ones described in the Manual, but
How To Use An Easypad On A Pc Or Macbook Or Ipad (For Pc)
") User Guide Congratulations on your new EasyPad 1000. Please follow the instructions in this manual carefully. Statement: If the final version of this product has any differences from the description of
User Guide Congratulations on your new EasyPad 1000. Please follow the instructions in this manual carefully. Statement: If the final version of this product has any differences from the description of
NetworX NX-6V2. LED Keypad User Manual
 NetworX NX-6V2 LED Keypad User Manual POWER Light is on when AC power is present; flashes to indicate a low battery condition. ARMED Light is on when armed; off when disarmed; flashes to indicate a previous
GSM HOME SECURITY SYSTEM
 Cell /Mobile phone home security system GSM HOME SECURITY SYSTEM Model : GSM-120 TABLE OF CONTENTS 1. FEATURES... 1 2. APPLICATION... 2 3. SPECIFICATIONS... 3 4. FRONT PANEL & LAYOUT DESCRIPTION...6 5.
Digital Photo Picture Frame. Operation Manual
 Digital Photo Picture Frame Operation Manual 20070309 CONGRATULATIONS on your purchase of a Polaroid 7 LCD Digital Photo Picture Frame. Please read carefully and follow all warnings and instructions in
Bench Autoclave. Standard Operating Procedure. For Installation, Use and Maintenance
 Bench Autoclave Standard Operating Procedure For Installation, Use and Maintenance 1. Introduction This SOP is intended for use with the following model, in a laboratory context: Type: Nuve Bench Top Steam
FCC COMPLIANCE STATEMENT FOR AMERICAN USERS
 FCC COMPLIANCE STATEMENT FOR AMERICAN USERS This equipment has been tested and found to comply with the limits for a CLASS A digital device, pursuant to Part 15 of the FCC Rules. These limits are designed
Vertical Display and Storage B1350-2. SKOPE Gen2: Three Door Chiller
 Vertical Display and Storage User Manual MAN1227 Rev. 3.0 March 2008 edition CONTACT ADDRESSES Designed and Manufactured by New Zealand SKOPE INDUSTRIES LIMITED PO Box 1091, Christchurch New Zealand Freephone:
THE NEW GENERATION IN TECHNOLOGY. NI-3103A Alarm Clock w/fm Radio ipod & iphone Docking. Operating Instructions
 THE NEW GENERATION IN TECHNOLOGY NI-3103A Alarm Clock w/fm Radio ipod & iphone Docking Operating Instructions Table of Contents Important Safeguards... 3 Parts... 6 Controls... 6 To Set Up... 7 ipod/iphone
Operating Instructions
 Operating Instructions Integrated Telephone System Model No. KX-TS560ML Model shown is KX-TS560ML This unit is compatible with Caller ID. You must subscribe to the appropriate service offered by your service
ES&S AutoMARK. Pre-Election Day Checklist
 ES&S AutoMARK Pre-Election Day Checklist Rear Access Door Touch Screen Monitor Lid Compact Flash Access Door Lid Latches Key-Operated Mode Switch Keypad Ballot Feed Tray ADA Port Headphone Jacks 1 Checking
OPL BASIC. Dosing System for Professional Laundry machines. Contents
 OPL BASIC Dosing System for Professional Laundry machines Contents 1 Getting Started. Page 2 2 Installation. Page 4 3 Set Up & Operation. Page 8 4 Maintenance & Accessories. Page 10 5 Troubleshooting Page
ATS Overhead Table Shelf System INSTRUCTION MANUAL
 ATS Overhead Table Shelf System INSTRUCTION MANUAL ATS Overhead Table Shelf System Instruction Manual Warranty Newport Corporation warrants this product to be free of defects in material and workmanship
USER S MANUAL HSC-24A
 AIRREX AIR CONDITIONER USER S MANUAL HSC-24A Thank you for purchasing an AIRREX AIR CONDITIONER. BEFORE operation please read this user s manual carefully. Keep this manual readily available. It is ESSENTIAL
Operating Instructions
 Integrated Telephone System Model No. KX-TS05HGW PLEASE READ BEFORE USE AND SAVE. Pulse-or-tone dialing capability Operating Instructions Preparation Basic Operation Advanced Operation Useful Information
SECURITY SYSTEM NOTES
 SECURITY SYSTEM NOTES Installing/Service Company For Service Call Central Station Duress Code FUNCTION CODES Function Code Controls Function EMERGENCY ACTIVATION KEYS (check if enabled) Fire Auxiliary
HP Laser Jet 4200/4240/4250/4300/4350 Swing Plate
 HP Laser Jet 4200/4240/4250/4300/4350 Swing Plate 1 Swing Plate Assembly-RM1-0043 1 Swing Plate Kit-5851-2766 (RM1-0043 plus RM1-1091 gear) CAUTION: Fuser may be hot. Turn off printer, unplug it and allow
Portable Air Conditioner. OWNER S MANUAL Read these instructions before use. Model: MF08CESWW. Voltage rating: 115V~60Hz Power rating : 800W
 MODE ALARM Portable Air Conditioner OWNER S MANUAL Read these instructions before use 8 Model: MF08CESWW Voltage rating: 115V~60Hz Power rating : 800W Customer Support : 1-800-474-2147 For product inquiries
WIRELESS HOME ALARM SYSTEM (WHA1)
") WIRELESS HOME ALARM SYSTEM (WHA1) IMPORTANT : PLEASE READ THIS MANUAL CAREFULLY BEFORE ATTEMPTING TO INSTALL AND OPERATE THIS ALARM SYSTEM. SAFETY Please note: Before you start to install this alarm, we
WIRELESS HOME ALARM SYSTEM (WHA1) IMPORTANT : PLEASE READ THIS MANUAL CAREFULLY BEFORE ATTEMPTING TO INSTALL AND OPERATE THIS ALARM SYSTEM. SAFETY Please note: Before you start to install this alarm, we
AC-115 Compact Networked Single Door Controller. Installation and User Manual
 AC-115 Compact Networked Single Controller Installation and User Manual December 2007 Table of Contents Table of Contents 1. Introduction...5 1.1 Key Features... 6 1.2 Technical Specifications... 7 2.
4.3-inch Back-Up Camera
 TM 4.-inch Back-Up Camera Model No.: PKC0BU4 Owner s Manual and Warranty Information Read these instructions completely before using this product. Retain this Owner s Manual for future reference. INTRODUCTION
OWNER'S MANUAL R-410A Duct Free Split System Air Conditioner and Heat Pump
 R-410A Duct Free Split System Air Conditioner and Heat Pump Product Family: DFS4(A/H)-System, DFC4(A/H)3-Outdoor, DFF4(A/H)H-Indoor Please read the operating instructions and safety precautions carefully
INSTALLER S & OWNER S MANUAL
 INSTALLER S & OWNER S MANUAL HVAC INSTALLER: PLEASE LEAVE MANUAL FOR HOMEOWNER DEH 3000 DEH 3000 Part No. 4028539 Dehumidifier & Ventilation System Controller P.O. Box 8680 Madison, WI 53708 TOLL-FREE
SECURITY SYSTEM NOTES
 SECURITY SYSTEM NOTES Installing/Service Company For Service Call Central Station Duress Code FUNCTION CODES Function Code Controls Function This system is is not partitioned. EMERGENCY ACTIVATION KEYS
USER INSTRUCTIONS FOR 10 LITRE PORTABLE DEHUMIDIFIER MODEL NO. DHMD102
 USER INSTRUCTIONS FOR 10 LITRE PORTABLE DEHUMIDIFIER MODEL NO. DHMD102 THANK YOU FOR CHOOSING YOUR NEW DEHUMIDIFIER. BEFORE USING THE UNIT READ THESE INSTRUCTIONS FULLY AND RETAIN THEM FOR FUTURE REFERENCE
Portable Air Conditioner. OWNER S MANUAL Read these instructions before use. Model: MM14CCS. Voltage rating: 115V~60Hz Power rating : 1400W
 Portable Air Conditioner OWNER S MANUAL Read these instructions before use Model: MM14CCS Customer Support : 1-800-474-2147 Voltage rating: 115V~60Hz Power rating : 1400W For product inquiries or support
IMPORTANT SAFETY RULES TO FOLLOW
 WARNING FLOOR & CARPET CLEANER Any piece of equipment can be dangerous if not operated properly. YOU are responsible for the safe operation of this equipment. The operator must carefully read and follow
162 CB CABLE TRACER. Filter Probe & Tone Generator INSTRUCTION MANUAL
 162 CB CABLE TRACER Filter Probe & Tone Generator INSTRUCTION MANUAL INDEX PAGE 1. INTRODUCTION... 1 2. FILTER PROBE... 1-3 3. TONE GENERATOR... 3-6 4. SPECIFICATION... 7-8 5. MAINTENANCE... 8 1. INTRODUCTION
Wine Cooler with Thermo-Electric Cooling & Heating Technology
 Wine Cooler with Thermo-Electric Cooling & Heating Technology Model number: WC-0888H (8-bottles capacity) Instruction Manual Please read carefully and follow all safety rules and operating instructions.
Satellite LED Plus Pro Instructions
 Satellite LED Plus Pro Instructions To avoid injury and possible electric shock, it is imperative you: READ AND FOLLOW ALL SAFETY INSTRUCTIONS AND WARNINGS Important Warnings Save these Instructions This
Auto Dialer. Manual E-921APQ E-921GPQ
 Troubleshooting: Auto dialer will not arm/disarm Auto dialer will not dial out Unit doesn t respond to a call-back Difficulty in activating room monitor by telephone remote control Make sure that you have
Dear Customer, User Memo: Please visit us on facebook or twitter! Thank you for purchasing this product.
 Owner s Manual 1 Dear Customer, Thank you for purchasing this product. For optimum performance and safety, please read these instructions carefully. User Memo: Date of purchase: Dealer name: Dealer address:
Auto Sentry-eXP Maintenance
 Auto Sentry-eXP Maintenance Maintenance Procedures for Auto Sentry exp Bill Dispenser Credit Card Reader Bill Acceptor Bill Dispenser Maintenance Bill Dispenser Problem / Cause Bill Dispenser Error Codes
AUTODIALLER / QUICKDIALLER - SA132
 AUTODIALLER / QUICKDIALLER - SA132 INSTRUCTION LEAFLET ENGLISH www.thermomax-group.com CONTENTS 1 SETUP AT A GLANCE... 2 2 FOREWORD....... 3 3 INSTALLATION...... 4 4 KEYPAD AND INDICATORS...... 5 SETTING
Model No. KX-TS560MX. Model shown is KX-TS580MX
 Operating Instructions Integrated Telephone System Model No. KX-TS560MX KX-TS580MX Model shown is KX-TS580MX This unit is compatible with Caller ID. You must subscribe to the appropriate service offered
Automatic Phone-Out Home Monitoring Systems
 Automatic Phone-Out Home Monitoring Systems Power Outage and Freeze Alarm Model Number: THP202 Power Outage, Freeze and Flood Alarm Product Description Model Number: THP201 These monitoring systems are
Operating Instructions
 PQQX04YA-0 0..8 8: AM y[w PLEASE READ BEFORE USE AND SAVE. Integrated Telephone System Model No. KX-T78JXW Pulse-or-tone dialing capability Operating Instructions LINE Preparation Basic Operation Advanced
SECURITY SYSTEM NOTES. EMERGENCY ACTIVATION KEYS (check if enabled) PROGRAMMED FUNCTIONS
 PROGRAMMED FUNCTIONS") SECURITY SYSTEM NOTES Installing/Service Company For Service Call Installation Date / / Central Station Duress Code EMERGENCY ACTIVATION KEYS (check if enabled) Fire Auxiliary Emergency Police PROGRAMMED
SECURITY SYSTEM NOTES Installing/Service Company For Service Call Installation Date / / Central Station Duress Code EMERGENCY ACTIVATION KEYS (check if enabled) Fire Auxiliary Emergency Police PROGRAMMED
Portable Air Conditioner. OWNER S MANUAL Read these instructions before use. Model: MN12CES / MN10CESWW
 Portable Air Conditioner OWNER S MANUAL Read these instructions before use 8 Model: MN12CES / MN10CESWW Voltage rating: 120V~60Hz Power rating : 1100W (MN12CES) Power rating : 900W (MN10CESWW) Customer
Weather Radio Alarm Clock
 1200093 User s Guide Weather Radio Alarm Clock Thank you for purchasing your Weather Radio Alarm Clock from RadioShack. Please read this user s guide before installing, setting up, and using your new weather
16/32 Channel 1U Rack Mount CCTV Power Supply
 16/32 Channel 1U Rack Mount CCTV Power Supply Manual PH-A3224-GUQ Shown 16-Channel 32-Channel PTC PH-A1612-PUQ PH-A3224-PUQ Glass Fuse PH-A1612-GUQ PH-A3224-GUQ Industrial design 12 Amp 3 Amps per channel
http://www.coastalamusements.com
 Nexus is a Registered Trademark of Coastal Amusements. OWNERS MANUAL 1935 Swarthmore Avenue, Lakewood, NJ 08701 (732)-905-6662 FAX (732)-905-6815 http://www.coastalamusements.com GAME DESCRIPTION Nexus
GNOME PELLET E.I. Pellet Heater Owner's Manual Installation and Operating Instructions. Please read this entire manual before installation.
 Pellet Heater Owner's Manual Installation and Operating Instructions Please read this entire manual before installation. Save these instructions. SAFETY NOTICE HEATER MUST BE PROPERLY INSTALLED AND MAINTAINED
AA9604 Auto Attendant
 AA9604 Auto Attendant Operation Manual 10AA96V4M.2.13.EN1 DSG, DSG logo, AA9604, VL880, VL880L, IM1200, IM2400, IL1000 and IL5000 are trademarks of DSG Technology. Windows and Outlook Express are trademarks
Please read this owner s Manual carefully before operating the unit. - Cooling - Heating - Dehumidifying - Fan
 Please read this owner s Manual carefully before operating the unit. - Cooling - Heating - Dehumidifying - Fan TABLE OF CONTENTS INTRODUCTION 2 IMPORTANT SAFEGUARDS...2 PACKAGE CONTAINS..2 NAMES OF PARTS.3
User Guide. Model: MAS-WA-SYS
 User Guide Model: MAS-WA-SYS CONTENTS Section : Getting started... 4. General system overview. Introduction to the system.3 Items included with the system.4 Introduction to the Wireless Alarm Panel.5 Introduction
Quick Reference Guide
 Important Information Quick Reference Guide Model No. KX-T7710 When using the KX-T7710, keep the following conditions in mind. If there is any problem, unplug the extension line and connect a known working
Lexmark E260, E260d, and E260dn Series. Maintenance Guide
 Lexmark E260, E260d, and E260dn Series Maintenance Guide May 2008 www.lexmark.com Contents...3 Cleaning the exterior of the printer...3 Storing supplies...3 Conserving supplies...3 Checking the status
MAKING MODERN LIVING POSSIBLE. living connect. Installation and User Guide. Danfoss heating
 MAKING MORN LIVING POSSIBLE Danfoss heating living connect Installation and User Guide Contents 1.0 System overview... 3 2.0 Overview of display and control buttons... 3 3.0 Installation - step by step...
Rain+Birdt. Simple To Set Timer (SST) Setup & Operation Instructions. English. 1-800- RAIN BIRD (800-724-6247) or visit www.rainbird.
 Setup & Operation Instructions. English. 1-800- RAIN BIRD (800-724-6247) or visit www.rainbird.") Rain+Birdt Simple To Set r (SST) Setup & Operation Instructions English Installation...2 Tools and Supplies Needed...2 Step 1. Mount r...2 Step 2. Connect Power...2 Indoor r...2 Outdoor r...2 Step 3. Connect
Rain+Birdt Simple To Set r (SST) Setup & Operation Instructions English Installation...2 Tools and Supplies Needed...2 Step 1. Mount r...2 Step 2. Connect Power...2 Indoor r...2 Outdoor r...2 Step 3. Connect
W850. Maintenance Guide
 W850 Maintenance Guide August 2011 www.lexmark.com Contents...3 Cleaning the exterior of the printer...3 Storing supplies...3 Conserving supplies...3 Checking the status of supplies...4 Checking the status
WALL MOUNTED SPLIT TYPE AIR CONDITIONER
 WALL MOUNTED SPLIT TYPE AIR CONDITIONER MANUAL 8 OM-G12-ACSON CONTENTS - Operating Guide page 1 - G12 Remote Controller Indication page 2 - Indicator Lights page 4 - Installation of Aroma page 5 - Auto
Business Audio System: Music & Messaging MP3 Player. by Grace Digital Audio. User Guide. Model No. GDI-USBM10
 Business Audio System: Music & Messaging MP3 Player by Grace Digital Audio User Guide Model No. GDI-USBM10 User Guide Contents Introduction 2 Safety & General Use Information 2 Features 3 Set Up & Operation
LD2 One & Two Zone Water Detection Alarm Installation and Operation Manual
 CMR Electrical Ltd Bolton House Five Chimneys Lane Hadlow Down East Sussex TN22 4DX Tel: 01825 733600 LD2 One & Two Zone Water Detection Alarm Installation and Operation Manual Contents 1) Operation 2)
INSTALLATION GUIDE. Card Reader & Controller with KIM Swipe Reader for Solitaire 850 / 950 / 850L Learnlok PK2930
 INSTALLATION GUIDE Card Reader & Controller with KIM Swipe Reader for Solitaire 850 / 950 / 850L Learnlok PK2930 Card Reader and Controller Model 3.5 with KIM Swipe Reader Table of Contents 1. Features..................................
Split Type Room Air Conditioner. KSWM units
 OWNER S MANUAL Split Type Room Air Conditioner KSWM units Please read the operating instructions and safety precautions carefully and thoroughly before installing and operating your room air conditioner.
GenStore Archive Cabinet
 GenStore Archive Cabinet Setup and Maintenance Manual Version A April 2014 Two GenStore Archives shown mounted on optional table stand. 2 Contents Getting Started... 4 Using this Manual...4 Safety Precautions...4
Autodialler. Installation & Programming Guide HYL004. Please read these instructions before you start the installation. Installation.
 Autodialler HYL004 Installation & Programming Guide Features Please read these instructions before you start the installation LCD Display Programmable 9 x 32 digit phone numbers for each trigger. 10 second
Mobile Data Power Model: MDP-25
 Mobile Data Power Model: MDP-25 Topic Section Features... 2 Operational Features Summary... 2 Back-up Battery Power Internal Charger Voltage Spike Protection RF Noise Filtering Warning of Imminent Loss
Vision Engravers and Routers PRE-Installation Guide. 2015 Vision Engraving & Routing Systems
 Vision Engravers and Routers PRE-Installation Guide Revised: 8/19/2015 Vision Engravers and Routers PRE-Installation Guide All rights reserved. No parts of this work may be reproduced in any form or by
SERVICE MANUAL 12VDC WALL THERMOSTAT AIR CONDITIONING SYSTEMS ROOFTOP UNITS ONLY
 SERVICE MANUAL 12VDC WALL THERMOSTAT AIR CONDITIONING SYSTEMS ROOFTOP UNITS ONLY! WARNING - SHOCK HAZARD! TO PREVENT THE POSSIBILITY OF SEVERE PERSONAL INJURY, DEATH, OR EQUIPMENT DAMAGE DUE TO ELECTRICAL
NewAir AC-10100E / AC-10100H Portable Air Conditioner Owner s Manual PLEASE READ AND SAVE THESE INSTRUCTIONS
 NewAir AC-10100E / AC-10100H Portable Air Conditioner Owner s Manual PLEASE READ AND SAVE THESE INSTRUCTIONS ELECTRICAL SAFETY This appliance is for indoor use only. Always turn off the unit and unplug
PROGRAMMING GUIDE. MARKS USA 365 Bayview Ave., Amityville, NY 11701 631-225-5400 1-800-526-0233 Fax 631-225-6136 www.marksusa.com
 PROGRAMMING GUIDE MARKS USA 365 Bayview Ave., Amityville, NY 11701 631-225-5400 1-800-526-0233 Fax 631-225-6136 www.marksusa.com Congratulations, you have just purchased the i-qwik PROX Series lockset
Wireless Alarm System. Window/Door Sensor. User s Manual. Choice ALERT. Control all Sensors & accessories from one location
 45131 Wireless Alarm System Window/Door Sensor User s Manual Choice ALERT Control all Sensors & accessories from one location Table of Contents Important Safeguards 4 Introduction 5 Installation 6 Assigning
Part 2. Copyright 1998 Philips Consumer Communications L.P. All rights reserved. Printed in Mexico. Issue 1AT&T 848229506
 2 User's Manual for Two-Line Digital Answering System Telephone with Speakerphone 1872 Fold open this paper for information about this telephone's installation and operation. Please read Part 1 Important
FOR THE FOLLOWING MODELS: EE-8075W EE-8075O EE-8075R EE-8075BK
 FIREPLACE HEATER FOR THE FOLLOWING MODELS: EE-8075W EE-8075O EE-8075R EE-8075BK If you have any questions about the operation of your fireplace heater, please contact Crane Customer Care. Toll Free: 888-599-0992
How To Use A Cell Phone On A Cellphone On A Kx-Tvm Series 2 (Kx) (Kox-Tvp) ( Kx) Series 2.5 (Kuk) Series (Kq) Series 1
 (Kox-Tvp) ( Kx) Series 2.5 (Kuk) Series (Kq) Series 1") Model No. KX-DT321 Thank you for purchasing a Digital Proprietary Telephone (DPT). Please read this manual carefully before using this product and save this manual for future use. For more details, please
Model No. KX-DT321 Thank you for purchasing a Digital Proprietary Telephone (DPT). Please read this manual carefully before using this product and save this manual for future use. For more details, please
Quick Reference Guide
 Important Information Digital Proprietary Telephone Quick Reference Guide Model No. KX-T7665 When using the KX-T7665, keep the following conditions in mind. If there is any problem, unplug the extension
BLOOD COLLECTION MIXER
 USER S MANUAL BLOOD COLLECTION MIXER Model CM735 No. CAT.CM73522Ce Centron Technologies Corporation 319-25 Sadang-4-dong, Dongjak-ku Seoul, Korea 156-823 Tel. +82-2.522.7807 Fax +82-2.522.7806 Table of