Getting Started with NeatScan To Office
|
|
|
- Molly Benson
- 10 years ago
- Views:
Transcription
1 Getting Started with NeatScan To Office NeatScan To Office is easy and convenient to use. You'll soon be scanning documents, business cards, and receipts into Office applications. 1

2 What is NeatScan To Office? NeatScan To Office installs a "Scan" button in Microsoft Office applications that enables you to: Scan receipts into customizable Excel expense report templates (called "Neat Sheets") Scan business cards into Outlook Contacts. Scan and insert text, images, or entire documents into PowerPoint presentations or Word documents. NeatScan To Office will boost your productivity while helping you clear paper and clutter from your desk. You'll be able to store digital records of all your important paperwork with the simple click of a button. 2

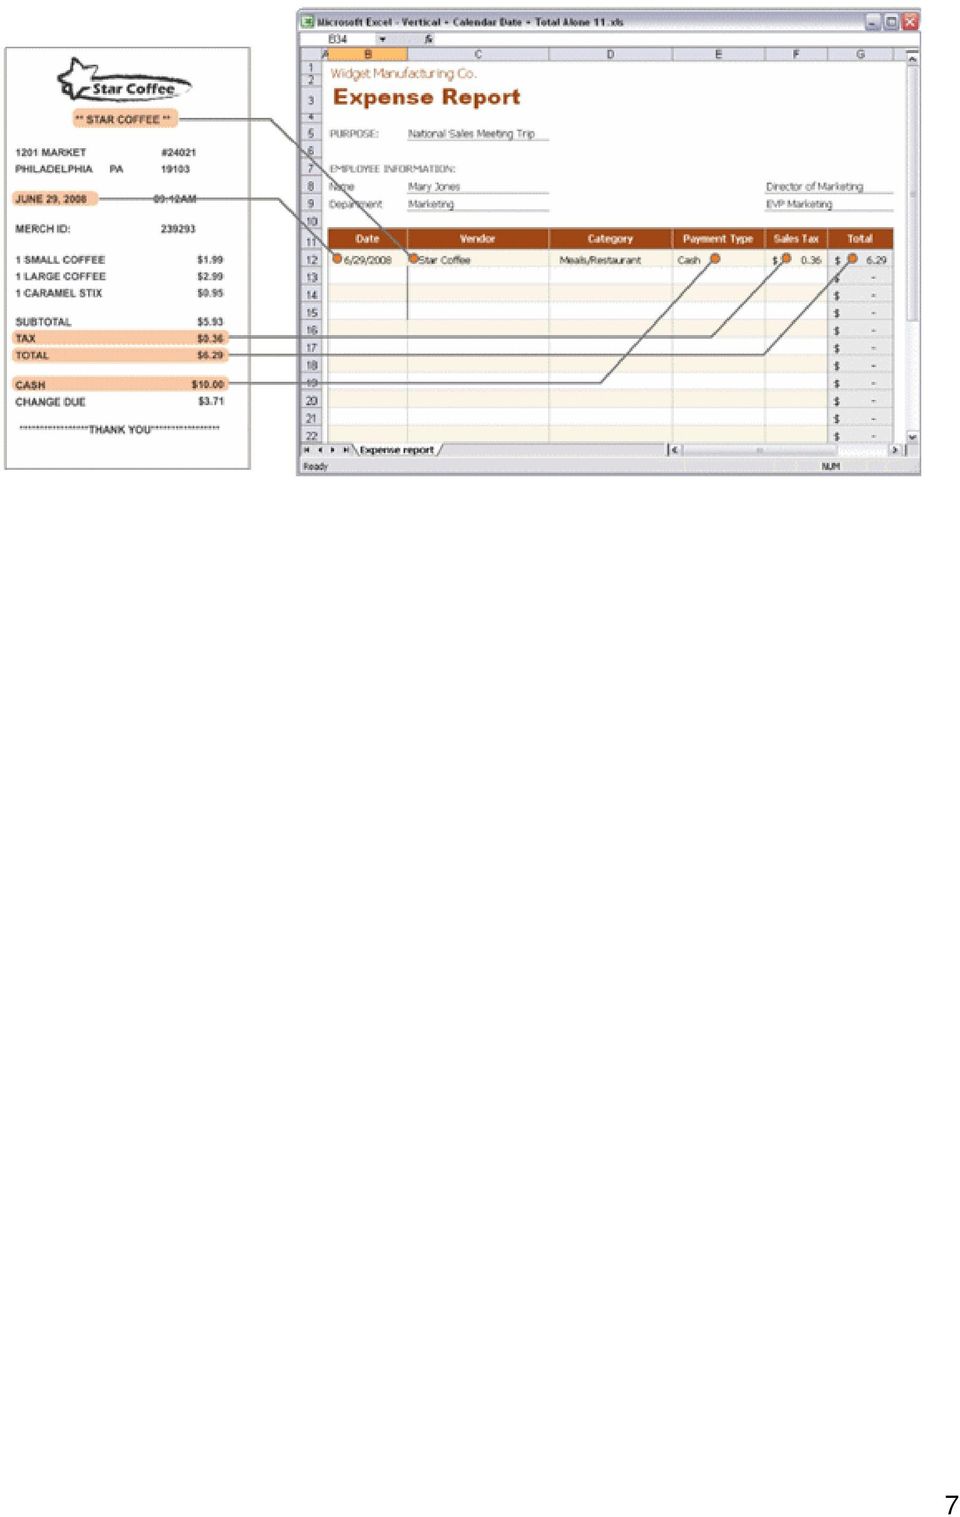
3 Scanning Documents to Excel You can scan an image directly into an Excel spreadsheet. You can also scan receipt data and images directly into an expense report by using a Neat Sheet, or intelligent template. Note: To scan to a PDF file instead, click Scan to PDF. For more information, see Scanning to PDF. Scanning Images into an Excel Spreadsheet 1. Open Excel. 2. Insert a document face down in your scanner. 3. If you have not done so already, select the desired color option by clicking the Settings button (see Excel Settings for more information). 4. Click Scan to Excel. When the scan is complete, the image will display at the current cursor location in your Excel spreadsheet. Scanning Receipt Data and Images into a Neat Sheet By using a Neat Sheet, or intelligent template, receipt data such as date, vendor, sales tax and total will automatically be placed in the appropriate fields of your expense report upon scanning. The receipt image will be scanned as well, and you can modify your view of it as needed. A variety of Neat Sheets are available for your selection. Just choose the one that best meets your needs. You can even customize a Neat Sheet for your own purposes, and then save it for future use. Follow the steps below to use a Neat Sheet: 1. Open Excel. 2. Insert a document face down in your scanner. 3. Click the Open Neat Sheet button on the NeatScan To Office toolbar. 4. When the following screen displays, click Browse Neat Sheets. 3
. 4. Click Scan to Excel.")
4 5. Select the desired Neat Sheet from the list that displays, as shown below: 4

5 6. The Neat Sheet displays: 7. You can customize the Neat Sheet by performing steps You can then use the customized Neat Sheet again whenever you like. If you do not want to customize your Neat Sheet, advance to step 13. Caution: Do not merge cells or split merged cells, protect or unprotect cells, or protect the spreadsheet. 8. Insert your Company Name or Logo in the designated cell. 9. Insert additional rows or columns if desired. 10. Rename the Expense Categories if desired. For example, change 'Taxi' to 'Cab'. However, do not change the category type (for example, do not change 'Taxi' to 'Meals'). 5

6 11. You can change the appearance of cells by modifying the font, color and spacing if desired. 12. Save the Neat Sheet to a location on your computer. 13. Click Scan To Neat Sheet. A "Scanning" message displays. When the scan is complete, your results display in the Excel viewer, as explained in the example below: Note: For detailed information about managing your lists of vendors, categories, and payment types, see List Manager. 14. Modify the results as desired, and click Save. Your expense report fills with the receipt information, which is automatically placed in the appropriate fields as shown in the example below: 6

7 7
8 Choosing Your Excel Settings With NeatScan To Office, you can: Choose the color of the images you scan directly into an Excel spreadsheet or a PDF file Manage the list of vendors, categories, and payment types associated with your Neat Sheets Tip: To view your current default settings, hold your mouse pointer over the Settings button on the toolbar. 1. Click the Settings button on the NeatScan to Office Excel toolbar. 2. The Settings screen displays: ` Note: Remember that the settings you choose apply only to Excel. 3. Select whether you want images that you scan directly into Excel or PDF to be scanned in color or black and white. To do so, click the appropriate circle(s) in the Color Option and PDF Color Option areas of the screen. 4. Click OK. Note: For information about scanning directly to PDF, see Scanning to PDF. 8

9 5. Your settings are now saved as the default and will be used the next time you scan into Excel. To change this default, repeat steps 1-4 above. 6. You can now calibrate or clean your scanner by clicking the appropriate button. 9

10 List Manager The List Manager enables you to manage three different lists of Excel data. These include: Vendor Names Category Names Payment Types You can manage your lists in two ways: 1) by using the Manage Lists button on the Settings screen, or 2) by using the receipt preview screen that is displayed after you scan a receipt into a Neat Sheet. Managing Lists by using the Manage Lists Button on the Settings Screen 1. Click Settings on the NeatScan To Office toolbar. 2. Click Manage Lists, as shown below: The following screen displays: 10

11 3. The Vendor, Category, and Payment Type dropdown menus enable you to perform the following tasks: Select an item from the list. You can use the dropdown menus to select the desired item. You can also search for the item you want by typing the first few letters of that item in the appropriate field and then selecting from the list that displays. Add an item to a list: To add an item, just type it into the appropriate field, press the Enter key, and then select Yes in response to the prompt that displays. Delete an item from a list. To delete an item, select that item, press the Delete key, and then select Yes in response to the prompt that displays. Any vendor name can be deleted from the list. However, certain required Payment Type and Category fields cannot be deleted, and will result in a prompt that states, "Unable to perform requested operation." If you receive this prompt, you must click OK to return to the Manage Lists screen. Note: You cannot rename an item on a list. However, you can delete that item and then add the desired item instead. 4. Click OK to close the Manage Lists window. 5. Click OK to close the Settings Window. Managing Lists by Using the Receipt Preview Screen 1. After you scan a receipt into a Neat Sheet, the Receipt Preview screen displays. This screen includes the Vendor, Category, and Payment Type dropdown menus that also appear on the Settings screen. 11

12 2. See step 3 above for information about how to manage your lists by using the dropdown menus. 12

13 Outlook Overview With NeatScan To Office, you can scan text, images or entire documents directly into Outlook: Contacts Calendar Tasks Mail 13

14 Scanning to Contacts With NeatScan To Office, you can scan contact information from business cards directly into Outlook. 1. Open Outlook. 2. Select Contacts. The Contacts screen displays, with the NeatScan to Office toolbar on top. 3. Insert the business card into your scanner with the front of the card facing down, and click Scan to Contacts on the NeatScan to Office toolbar. Note: You can also scan by clicking the New button, and then clicking Scan to Contacts on the toolbar that displays on the New Contact screen. 4. A "Scanning" message displays. When the scan is complete, the information contained on the card fills the appropriate fields, while an image of the card displays on the bottom right side of the screen: 14

15 5. Check the scanned information to make sure it is accurate. You can edit it as needed. 6. To scan the other side of the card, place the back of the card face down in your scanner and click Scan to Notes. The scanned image will display below the image of the card's front. 7. You can now save the information and exit by clicking Save and Close. 8. NeatScan To Office adds an item to the "Contacts" list in Outlook that enables you to view only those contacts you created by scanning. To do so, just click the circle next to Neat Created Contacts, as shown below: 15

16 Note: Remember that your results are based on your "Settings" choices. For more information, see Outlook Settings. Tip: Also, remember that you can scan in other items associated with a contact, such as a resume or notes. 16

17 Scanning to Your Calendar With NeatScan To Office, you can scan text, images, or entire documents directly into your Outlook calendar. Note: You can also scan a document directly to a PDF file. For more information, see Scanning to PDF. 1. Open your Outlook calendar. 2. Insert a document face down into your scanner. 3. If you have not done so already, select the desired save option and document format by clicking the Settings button (see Outlook Settings for more information). 4. Click the Scan To Calendar button on the NeatScan To Office toolbar, as shown below: 5. A "Scanning" message displays. When the scan is complete, the results display on your Calendar. Note: Remember that your results are based on the "Settings" choices that you make. For more information, see Outlook Settings. 17

18 Scanning to Tasks With NeatScan To Office, you can scan text, images, or entire documents directly into your Outlook tasks. Note: You can also scan a document directly to a PDF file. For more information, see Scanning to PDF. 1. Open your Outlook Tasks. 2. Insert a document face down into your scanner. 3. If you have not done so already, select the desired save option and document format by clicking the Settings button (see Outlook Settings for more information). 4. Click the Scan To Tasks button on the NeatScan To Office toolbar, as shown below: 5. A scanning message displays. When the scan is complete, your results display on the Tasks tab. Note: Remember that your results are based on the "Settings" choices that you make. For more information, see Outlook Settings. 18

19 Scanning to an With NeatScan To Office, you can scan text, images, or entire documents directly into your . Note: You can also scan a document directly to a PDF file. For more information, see Scanning to PDF. 1. Open Outlook. 2. Insert a document face down into your scanner. 3. If you have not done so already, select the desired save option and document format by clicking the Settings button (see Outlook Settings for more information). 4. Click the Scan To Mail button on the NeatScan To Office toolbar, as shown below: Note: You can also scan by clicking the New button, and then clicking Scan to Mail on the toolbar that displays on the New Mail screen. 5. A "Scanning" message displays while your document is scanned. When the scan is complete, your results display in the . Note: Remember that your results are based on the "Settings" choices that you make. For more information, see Outlook Settings. 19

20 Outlook Settings With NeatScan To Office, you can choose the format, color, and way you want to save the document that you scan into Outlook. Tip: To view your current default settings, hold your mouse pointer over the Settings button on the toolbar. 1. Open Outlook. 2. Click the Settings tab on the NeatScan to Office toolbar, as shown below: 3. The Settings screen displays: Note: Remember that the settings you choose apply only to Outlook. 20

21 4. Select the document format you want by clicking the appropriate circle in the Document Format area of the screen: Choose Image Only to scan an image of the document. The text will not be editable. Choose Text Only to scan the text of your document.. Images will not be scanned. Choose Full Document to scan the entire document. This format enables you to edit all text and graphics. However, you cannot select Full Document without first choosing Add as Attachment in the Save Option area. 5. Select the way you want to save the scanned item by clicking the appropriate circle in the Save Option area of the screen. Choose Add as Attachment to link text and images as attachments to Outlook. Choose Embed to embed text and graphics directly into Outlook. 6. Select whether you want items to be scanned in color or black and white by clicking the appropriate circle(s) in the Color Option and PDF Color Option areas of the screen. Note: For information about scanning directly to PDF, see Scanning to PDF. 7. Click OK. 8. Your settings are now saved as the default and will be used the next time you scan a document into Outlook. To change this default, repeat steps 1-7 above. Note: You can also use the Settings Screen to Calibrate or Clean your scanner. 21
22 Scanning Documents to PowerPoint With NeatScan To Office, you can scan text, images, or entire documents directly into your PowerPoint presentation. Note: You can also scan a document directly to a PDF file. For more information, see Scanning to PDF. 1. Open PowerPoint. 2. Insert a document face down into your scanner. 3. If you have not done so already, select the desired save option and document format by clicking the Settings button (see PowerPoint Settings for more information). 4. Click the Scan To PowerPoint button on the NeatScan to Office toolbar, as shown below: 5. A "Scanning" message displays. When the scan is complete, your results display in the PowerPoint slide, as shown in the example of a scanned image below. (If you selected Text as your setting, the text is scanned into a new text box on the slide.) 22
23 Note: Remember that your results are based on the "Settings" choices that you make. In this example, the user selected "Embed" and "Image," so an embedded image displays in the PowerPoint slide. For more information, see PowerPoint Settings. 23
24 Choosing Your PowerPoint Settings With NeatScan To Office, you can choose the format, color, and way you want to save the documents that you scan into a PowerPoint presentation. Tip: To view your current default settings, hold your mouse pointer over the Settings button on the toolbar. 1. Open PowerPoint. 2. Click the Settings button on the NeatScan to Office toolbar, as shown below: 3. The Settings screen displays: 24
25 Note: Remember that the settings you choose apply only to PowerPoint. 4. Select the document format you want by clicking the appropriate circle in the Document Format area of the screen: Choose Image Only to scan an image of the document. The text will not be editable. Choose Text Only to scan the text of your document. Images will not be scanned. Choose Full Document to scan the entire document. This format enables you to edit all text and graphics. However, you cannot select Full Document without first choosing Add as Attachment in the Save Option area. 5. Select the way you want to save the scanned item by clicking the appropriate circle in the Save Option area of the screen. Choose Add as Attachment to link text and images as attachments to your PowerPoint presentation. Choose Embed to embed text and graphics directly into your PowerPoint presentation. 6. Select whether you want items to be scanned in color or black and white by clicking the appropriate circle(s) in the Color Option and PDF Color Option areas of the screen. Note: For information about scanning directly to PDF, see Scanning to PDF. 7. Click OK. 8. Your settings are now saved as the default and will be used the next time you scan a document into PowerPoint. To change this default, repeat steps 1-7 above. Note: You can also use the Settings Screen to Calibrate or Clean your scanner. 25
26 Scanning Documents to Word NeatScan To Office enables you to scan documents directly into a Word file as text, image, or an entire document. Note: You can also scan a document directly to a PDF file. For more information, see Scanning to PDF. 1. Open Word. 2. Insert a document face down into your scanner. 3. If you have not done so already, select the desired save option and document format by clicking the Settings button (see Word Settings for more information). 4. Click the Scan to Word button on the NeatScan To Office toolbar, as shown below: 5. A "Scanning" message displays. When the scan is complete, your results display in the Word file, as shown in the example below: 26
27 Note: Remember that your results are based on the "Settings" choices that you make. In this example, the user selected "Embed" and "Image," so an embedded image displays in the Word document. For more information, see Word Settings. 27
28 Choosing Your Word Settings With NeatScan To Office, you can choose the format, color, and way you want to save the document that you scan into a Word file. Tip: To view your current default settings, hold your mouse pointer over the Settings button on the toolbar. 1. Open Word. 2. Click the Settings button on the NeatScan To Office toolbar, as shown below: 3. The following screen displays: 28
29 Note: Remember that the settings you choose apply only to Word. 4. Select the document format you want by clicking the appropriate circle in the Document Format area of the screen: Choose Image Only to scan an image of the document. The text will not be editable. Choose Text Only to scan the text of your document. Images will not be scanned. Choose Full Document to scan the entire document. This format enables you to edit all text and graphics. If you select Exact Page Size, the size of the page will match that of the original. However, you cannot select Exact Page Size without first choosing Embed in the Save Option area. 5. Select the way you want to save the scanned item by clicking the appropriate circle in the Save Option area of the screen. Choose Add as Attachment to link text and images as attachments to your Word document. Choose Embed to embed text and graphics directly into your Word document. 6. Select whether you want items to be scanned in color or black and white by clicking the appropriate circle(s) in the Color Option and PDF Color Option areas of the screen. Note: For information about scanning directly to PDF, see Scanning to PDF. 7. Click OK. 8. Your settings are now saved as the default and will be used the next time you scan a document into Word. To change this default, repeat steps 1-7 above. Note: You can also use the Settings screen to Calibrate or Clean your scanner. 29
30 Scanning to PDF NeatScan To Office enables you to scan documents directly into PDF files, which you can then save, view, search, and print by using the Adobe Reader. Note: You must have the Adobe Reader installed on your computer in order to open the scanned file. If you do not have the Adobe Reader, click and follow the download instructions provided by Adobe. 1. Insert the document you wish to scan face down in your scanner. 2. Click Scan to PDF on any NeatScan to Office toolbar. 3. When the scan is complete, the Save Attachment screen displays, as shown below: 30
31 4. Enter a name for the scanned file in the File Name field, and click Save. 5. The scanned PDF file opens in the Adobe Reader, as shown below. 31
32 Note: You can choose whether to scan a PDF file in color or black and white by using the Settings option on any NeatScan To Office toolbar. The options you select will apply whenever you scan a PDF using any of the applications. 32
33 Cleaning Your Scanner How do I clean the scanner? Keeping your scanner clean is an important part of scanner maintenance and should not be overlooked. Dust and other obstructions on the scanner lens can cause streaks on scanned images. The cleaning process will remove flecks of dust or small pieces of paper that have been caught in the scanner, which will in turn improve the quality of your scans. You will find two types of cleaning paper in the NeatScan To Office box: Our traditional, dry NeatScan To Office cleaning paper is a small, white, 'cottony' piece of paper that almost resembles a dryer sheet. In addition, scanners come with a sheet of alcohol cleaning paper, which is particularly useful for older scanners, or any scanners that are producing very streaky images. To remove non-sticky dirt such as dust flecks and fibers, use the traditional, dry cleaning paper: 1. Remove the cleaning paper from the NeatScan To Office box. 2. Feed the cleaning paper into the scanner, just as you would a document. 3. Click Settings on any NeatScan To Office toolbar, as shown below: 4. Click the Clean button on the Settings screen that displays:: 33
34 Note: During the cleaning process, the cleaning paper will move back and forth through the scanner for approximately 25 seconds before pulling the paper through all the way. 5. During cleaning, you will see a message that says: "Cleaning." When cleaning is complete, you will receive a message that says the scanner has been successfully cleaned. 6. Click OK. 7. If, upon scanning, your scans still appear faint or streaky, please try cleaning with the alcohol cleaning paper, as described below. To remove sticky or gummy substances, use the "wet" alcohol cleaning paper. (It can only be used once.) 1. Remove the alcohol cleaning paper from the NeatScan To Office box. 2. Repeat steps 1-6 above. I love the alcohol cleaning paper--where can I get more? Should your alcohol cleaning paper dry out, or if you require more, you can go to our website and order a Scanner Maintenance Kit, which includes 6 sheets of alcohol cleaning paper and 3 sheets of calibration paper! 34
35 Calibrating Your Scanner Calibration is a simple process that enables your scanner to distinguish between colors and shades. This helps the scanner to "see" correctly and provide accurate images. While NeatScan To Office prompts you to calibrate the scanner during installation, you may need to recalibrate sometimes if your images appear faint or off-balance in any way. To calibrate in NeatScan To Office, do the following: 1. Remove the calibration paper from the NeatScan To Office box and load it into your scanner with the arrows facing up, as shown in the following picture: 2. Click Settings on any NeatScan To Office toolbar. 3. Click the Calibrate button on the screen that displays: 35
36 4. The calibration paper is scanned. 5. Once the scanning is complete, click the OK button. 6. Your scanner has now been successfully calibrated. If your images ever seem faint or unclear, remember to recalibrate by repeating this process. 36
37 FAQs Which versions of Microsoft Office is NeatScan To Office compatible with? NeatScan To Office is compatible with Microsoft Office 2003 and Can I install NeatScan To Office on the same computer where NeatReceipts is installed? Yes, you can. NeatReceipts and NeatScan To Office are two separate applications. One does not overwrite or replace the other, and the two applications can be run side by side. However, if you will be installing side by side, you must be running NeatReceipts Version 3 Service Pack 1 (or higher). If I m using Microsoft Vista, do I need Administrative rights to install NeatScan To Office? No, you do not need to have Administrative rights to install NeatScan To Office. What are some ways I can use NeatScan To Office? Instantly create Outlook contacts by scanning business cards Instead of faxing, open an Outlook and scan and attach a PDF, or scan the text or image directly into the body of the Scan documents into an Outlook Calendar entry and send a meeting request Create expense reports using one of the provided Neat Sheets Instead of re-typing a document, scan it into Word and edit the text Scan an image directly into a PowerPoint presentation Where can I learn how to get the most out of NeatScan To Office? An overview video and tutorials are available in the Additional Resources section of Help. Where is my NeatScan To Office toolbar? In Microsoft Office 2003, the NeatScan To Office toolbar displays on the top left, as shown in the example below. 37
38 In Microsoft Office 2007, the NeatScan To Office toolbar displays in the Add-Ins Tab, as shown in the example below: How do I view an item that I've scanned as a PDF file? You'll need the Adobe reader to view any items that you've scanned as PDF files. If you don't have the Adobe Reader loaded on your computer, click follow the download instructions provided by Adobe. and What is a Neat Sheet? Neat Sheets are intelligent templates that allow you to scan receipt data and images directly into an expense report. Receipt data, such as date, vendor, sales tax and total is automatically placed in the appropriate fields. You can access a Neat Sheet by clicking the "Open Neat Sheet" button on the NeatScan to Office Excel toolbar. Can I create my own Neat Sheet? Currently, it is not possible to create your own Neat Sheet. However, if you have an expense template that you would like formatted as a Neat Sheet, please it to Jenn Choi at [email protected] for our review. How often should I clean my scanner? You only need to clean your scanner when you feel that the scanned images are less crisp and clear than usual. You received two different kinds of cleaning paper in the NeatScan to Office box. Use the traditional, dry cleaning paper to remove non-sticky dirt such as dust flecks and fibers. The "wet" alcohol paper is for removing sticky, gummy substances from the scanner. For more information, see Cleaning Your Scanner. I love the alcohol cleaning paper--where can I get more? 38
39 Should your alcohol cleaning paper dry out, or if you require more, you can go to our website and order a Scanner Maintenance Kit, which includes 6 sheets of alcohol cleaning paper and 3 sheets of calibration paper. What about calibrating my scanner? Is that something I have to do often? You may need to recalibrate once in a while if your images appear faint or off-balance in any way. Calibration is a simple process that enables your scanner to distinguish between colors and shades. This helps the scanner to "see" correctly and provide accurate images. For more information, see Calibrating Your Scanner. My scanner isn t responding, what should I do? Disconnect your scanner, wait 1 minute, and then reconnect it. If the scanner is still unresponsive, please contact customer support at
40 Overview Video To view a brief video that explains the features and benefits of using NeatScan To Office, click here. 40
41 Other Video Tutorials To view a series of short videos that explain how to use NeatScan To Office with each Office application, click here. 41
42 Registration You must register your copy of NeatScan To Office in order to take advantage of free technical support and to qualify for your hardware warranty. To register, follow these steps: 1. Click registration. 2. When the Customer Registration form displays, complete all the mandatory fields. 3. Click Submit on the bottom of the form. 42
Google Sites: Creating, editing, and sharing a site
 Google Sites: Creating, editing, and sharing a site Google Sites is an application that makes building a website for your organization as easy as editing a document. With Google Sites, teams can quickly
Advanced Presentation Features and Animation
 There are three features that you should remember as you work within PowerPoint 2007: the Microsoft Office Button, the Quick Access Toolbar, and the Ribbon. The function of these features will be more
Microsoft Outlook 2010. Reference Guide for Lotus Notes Users
 Microsoft Outlook 2010 Reference Guide for Lotus Notes Users ContentsWelcome to Office Outlook 2010... 2 Mail... 3 Viewing Messages... 4 Working with Messages... 7 Responding to Messages... 11 Organizing
TABLE OF CONTENTS BACKGROUND: HIGH IMPACT EMAIL 4.0 PROFESSIONAL AND ACT!. 3 SELECT MAIL MERGE OPTION ON THE MAIN SCREEN.0 TEMPLATE.
 TABLE OF CONTENTS BACKGROUND: HIGH IMPACT EMAIL 4.0 PROFESSIONAL AND ACT!... 3 SELECT MAIL MERGE OPTION ON THE MAIN SCREEN... 4 SELECT A HIGH IMPACT EMAIL 4.0 TEMPLATE... 5 SELECT A PROFILE TO BE USED
Create a PDF File. Tip. In this lesson, you will learn how to:
 Create a PDF File Now that you ve seen what an ETD looks like and how to browse the contents, it s time to learn how to convert your own thesis or dissertation into a PDF file. There are several different
Google Docs Basics Website: http://etc.usf.edu/te/
 Website: http://etc.usf.edu/te/ Google Docs is a free web-based office suite that allows you to store documents online so you can access them from any computer with an internet connection. With Google
REDUCING YOUR MICROSOFT OUTLOOK MAILBOX SIZE
 There are several ways to eliminate having too much email on the Exchange mail server. To reduce your mailbox size it is recommended that you practice the following tasks: Delete items from your Mailbox:
Sample Table. Columns. Column 1 Column 2 Column 3 Row 1 Cell 1 Cell 2 Cell 3 Row 2 Cell 4 Cell 5 Cell 6 Row 3 Cell 7 Cell 8 Cell 9.
 Working with Tables in Microsoft Word The purpose of this document is to lead you through the steps of creating, editing and deleting tables and parts of tables. This document follows a tutorial format
Working together with Word, Excel and PowerPoint
 Working together with Word, Excel and PowerPoint Have you ever wanted your Word document to include data from an Excel spreadsheet, or diagrams you ve created in PowerPoint? This note shows you how to
MICROSOFT WORD: MAIL MERGE
 SIU Medical Library / Department of Information and Communication Sciences MICROSOFT WORD: MAIL MERGE MICROSOFT WORD 2010 OVERVIEW Mail Merge allows you to automatically merge a list of variable information,
Excel 2010: Create your first spreadsheet
 Excel 2010: Create your first spreadsheet Goals: After completing this course you will be able to: Create a new spreadsheet. Add, subtract, multiply, and divide in a spreadsheet. Enter and format column
Software Application Tutorial
 Software Application Tutorial Copyright 2005, Software Application Training Unit, West Chester University. No Portion of this document may be reproduced without the written permission of the authors. For
How To Insert Hyperlinks In Powerpoint Powerpoint
 Lesson 5 Inserting Hyperlinks & Action Buttons Introduction A hyperlink is a graphic or piece of text that links to another web page, document, or slide. By clicking on the hyperlink will activate it and
MS Excel Template Building and Mapping for Neat 5
 MS Excel Template Building and Mapping for Neat 5 Neat 5 provides the opportunity to export data directly from the Neat 5 program to an Excel template, entering in column information using receipts saved
Task Force on Technology / EXCEL
 Task Force on Technology EXCEL Basic terminology Spreadsheet A spreadsheet is an electronic document that stores various types of data. There are vertical columns and horizontal rows. A cell is where the
Contents Release Notes... ... 3 System Requirements... ... 4 Using Jive for Office... ... 5
 Jive for Office TOC 2 Contents Release Notes...3 System Requirements... 4 Using Jive for Office... 5 What is Jive for Office?...5 Working with Shared Office Documents... 5 Get set up...6 Get connected
Using FileMaker Pro with Microsoft Office
 Hands-on Guide Using FileMaker Pro with Microsoft Office Making FileMaker Pro Your Office Companion page 1 Table of Contents Introduction... 3 Before You Get Started... 4 Sharing Data between FileMaker
Reporting Tips and Tricks
 Chapter 16 Reporting Tips and Tricks Intuit Statement Writer New for 2009! Company Snapshot New for 2009! Using the Report Center Reporting Preferences Modifying Reports Report Groups Memorized Reports
What is a Mail Merge?
 NDUS Training and Documentation What is a Mail Merge? A mail merge is generally used to personalize form letters, to produce mailing labels and for mass mailings. A mail merge can be very helpful if you
NDSU Technology Learning & Media Center. Introduction to Google Sites
 NDSU Technology Learning & Media Center QBB 150C 231-5130 www.ndsu.edu/its/tlmc Introduction to Google Sites Get Help at the TLMC 1. Get help with class projects on a walk-in basis; student learning assistants
Introduction to Microsoft Access 2003
 Introduction to Microsoft Access 2003 Zhi Liu School of Information Fall/2006 Introduction and Objectives Microsoft Access 2003 is a powerful, yet easy to learn, relational database application for Microsoft
Unified Communications Using Microsoft Office Live Meeting 2007
 Unified Communications Using Microsoft Office Live Meeting 2007 Text version of online course. Contents Unified Communications... 1 About Microsoft Office Live Meeting 2007... 3 Copyright Information...
Search help. More on Office.com: images templates. Here are some basic tasks that you can do in Microsoft Excel 2010.
 Page 1 of 8 Excel 2010 Home > Excel 2010 Help and How-to > Getting started with Excel Search help More on Office.com: images templates Basic tasks in Excel 2010 Here are some basic tasks that you can do
The first thing to do is choose if you are creating a mail merge for printing or an e-mail merge for distribution over e-mail.
 Create a mail or e-mail merge Use mail or e-mail merge when you want to create a large number of documents that are mostly identical but include some unique information. For example, you can use mail merge
Word 2010: Mail Merge to Email with Attachments
 Word 2010: Mail Merge to Email with Attachments Table of Contents TO SEE THE SECTION FOR MACROS, YOU MUST TURN ON THE DEVELOPER TAB:... 2 SET REFERENCE IN VISUAL BASIC:... 2 CREATE THE MACRO TO USE WITHIN
Google Drive Create, Share and Edit Documents Online
 Revision 3 (1-31-2014) Google Drive Create, Share and Edit Documents Online With Google Drive, you can easily create, share, and edit documents online. Here are a few specific things you can do: Convert
To reuse a template that you ve recently used, click Recent Templates, click the template that you want, and then click Create.
 What is Excel? Applies to: Excel 2010 Excel is a spreadsheet program in the Microsoft Office system. You can use Excel to create and format workbooks (a collection of spreadsheets) in order to analyze
Creating Electronic Portfolios using Microsoft Word and Excel
 Step-by-Step Creating Electronic Portfolios using Microsoft Word and Excel The Reflective Portfolio document will include the following: A Cover Page for the portfolio - Include a Picture or graphic A
Mail Merge Tutorial (for Word 2003-2007) By Allison King Spring 2007 (updated Fall 2007)
 By Allison King Spring 2007 (updated Fall 2007)") Mail Merge Tutorial (for Word 2003-2007) By Allison King Spring 2007 (updated Fall 2007) What is mail merge? You've probably heard it mentioned around the office or at an interview (especially for a temp
Mail Merge Tutorial (for Word 2003-2007) By Allison King Spring 2007 (updated Fall 2007) What is mail merge? You've probably heard it mentioned around the office or at an interview (especially for a temp
Introduction. Inserting Hyperlinks. PowerPoint 2010 Hyperlinks and Action Buttons. About Hyperlinks. Page 1
 PowerPoint 2010 Hyperlinks and Action Buttons Introduction Page 1 Whenever you use the Web, you are using hyperlinks to navigate from one web page to another. If you want to include a web address or email
Adobe Acrobat X Pro Creating & Working with PDF Documents
 Adobe Acrobat X Pro Creating & Working with PDF Documents Overview Creating PDF documents is useful when you want to maintain the format of your document(s). As a PDF document, your file maintains its
Microsoft Word 2011: Create a Table of Contents
 Microsoft Word 2011: Create a Table of Contents Creating a Table of Contents for a document can be updated quickly any time you need to add or remove details for it will update page numbers for you. A
Word 2007 WOWS of Word Office 2007 brings a whole new basket of bells and whistles for our enjoyment. The whistles turn to wows.
 WOWS of Word Office brings a whole new basket of bells and whistles for our enjoyment. The whistles turn to wows. [email protected] Templates Click on the Office Button PDF and select New. You can now change
Increasing Productivity and Collaboration with Google Docs. Charina Ong Educational Technologist [email protected]
 Increasing Productivity and Collaboration with Google Docs [email protected] Table of Contents About the Workshop... i Workshop Objectives... i Session Prerequisites... i Google Apps... 1 Creating
Section 1: Ribbon Customization
 WHAT S NEW, COMMON FEATURES IN OFFICE 2010 2 Contents Section 1: Ribbon Customization... 4 Customizable Ribbon... 4 Section 2: File is back... 5 Info Tab... 5 Recent Documents Tab... 7 New Documents Tab...
How to Fix Time Matters. 2011 Active Practice LLC
 How to Fix Time Matters How to Fix Time Matters Troubleshooting tips, techniques and solutions by Wells H. Anderson, J.D., CIC. Contents 3 Table of Contents Part I Backing Up Time Matters 4 1 Manual...
How to configure your Acrobat Signature Appearance
 How to configure your Acrobat Signature Appearance An Acrobat Signature Appearance for use within SpeediSign is created within Adobe Acrobat Professional. This signature appearance is then called within
Time Matters and Billing Matters 11.1. User Guide
 Time Matters and Billing Matters 11.1 User Guide About this guide This guide provides steps to achieve basic, commonly performed tasks. For additional details, including interface elements and advanced
WHAT YOU OWN HOME INVENTORY SOFTWARE
 WHAT YOU OWN HOME INVENTORY Version 4.19 Copyright 2013 M- One Studio, LLC www.m-onestudio.com Contents Getting Started... 1 About WHAT YOU OWN HOME INVENTORY SOFTWARE... 1 Download and Install the Software...
Microsoft PowerPoint 2008
 Microsoft PowerPoint 2008 Starting PowerPoint... 2 Creating Slides in Your Presentation... 3 Beginning with the Title Slide... 3 Inserting a New Slide... 3 Slide Layouts... 3 Adding an Image to a Slide...
Use Mail Merge to create a form letter
 Use Mail Merge to create a form letter Suppose that you want to send a form letter to 1,000 different contacts. With the Mail Merge Manager, you can write one form letter, and then have Word merge each
Instructions for creating a data entry form in Microsoft Excel
 1 of 5 You have several options when you want to enter data manually in Excel. You can enter data in one cell, in several cells at the same time, or on more than one worksheet (worksheet/spreadsheet: The
Appointment Scheduler
 EZClaim Appointment Scheduler User Guide Last Update: 11/19/2008 Copyright 2008 EZClaim This page intentionally left blank Contents Contents... iii Getting Started... 5 System Requirements... 5 Installing
Communication Manager Email Template Library
 Communication Manager Email Template Library Create and edit email templates for use in mass email and drip campaigns. Email templates can be stored in Template Tags for easy access to frequently used
Outlook 2013 ~ Advanced
 Mail Using Categories 1. Select the message that for the category. 2. Select the appropriate category. 3. The category color displays next to the message. Renaming Categories 1. Select a message. 2. Select
ACADEMIC TECHNOLOGY SUPPORT
 ACADEMIC TECHNOLOGY SUPPORT Microsoft OneNote: Complete Storage Application [email protected] 439-8611 www.etsu.edu/ats Table of Contents What is OneNote?... 2 Notebook Storage... 2 OneDrive Storage... 3 Network
Acrobat PDF Forms - Part 2
 Acrobat PDF Forms - Part 2 PDF Form Fields In this lesson, you will be given a file named Information Request Form that can be used in either Word 2003 or Word 2007. This lesson will guide you through
Step 1: How to Create Links / Hyperlinks
 Step 1: How to Create Links / Hyperlinks Links allow you to use text or images to link a site visitor to another page or file either on your site or on another site. To learn how to create links, watch
Creating Forms with Acrobat 10
 Creating Forms with Acrobat 10 Copyright 2013, Software Application Training, West Chester University. A member of the Pennsylvania State Systems of Higher Education. No portion of this document may be
LETTERS, LABELS & EMAIL
 22 LETTERS, LABELS & EMAIL Now that we have explored the Contacts and Contact Lists sections of the program, you have seen how to enter your contacts and group contacts on lists. You are ready to generate
Generating lesson plans with. Adobe Acrobat
 Generating lesson plans with Adobe Acrobat Introduction Being a teacher requires so many non-teaching administrative tasks that sometimes just teaching gets lost in the paper shuffle. You can automate
Creating and Managing Online Surveys LEVEL 2
 Creating and Managing Online Surveys LEVEL 2 Accessing your online survey account 1. If you are logged into UNF s network, go to https://survey. You will automatically be logged in. 2. If you are not logged
Microsoft Office System Tip Sheet
 The 2007 Microsoft Office System The 2007 Microsoft Office system is a complete set of desktop and server software that can help streamline the way you and your people do business. This latest release
OUTLOOK 2010 TIPS TABLE OF CONTENTS 1. SEND A BLIND CARBON COPY MARQUETTE UNIVERSITY IT SERVICES
 OUTLOOK 2010 TIPS TABLE OF CONTENTS 1.Send a Blind Carbon Copy... 1 2. Change the view of the Outlook window... 2 3. Use Out of Office Assistant... 2 4. Create Rules... 4 5. Use Autocomplete... 5 6. Request
User guide. Tax & Accounting. Version 4.1. Last updated April 16, 2010. Copyright 2010 Thomson Reuters/ONESOURCE. All Rights Reserved
 Onesource Fileroom User guide Version 4.1 Last updated April 16, 2010 Tax & Accounting Copyright 2010 Thomson Reuters/ONESOURCE. Proprietary Materials No use of these Proprietary materials is permitted
Getting Started with Neat
 Getting Started with Neat Neat s scanner, software, and cloud solutions create the ultimate Digital Filing System, making it easier for you to stay organized. This Getting Started Guide will help you get
Website Editor User Guide
 CONTENTS Minimum System Requirements... 3 Design Your Website... 3 Choosing your Theme... 4 Choosing your Header Style... 4-5 Website Content Editor... 6 Text Editor Toolbar features... 6 Main Menu Items...
Mobility with Eye-Fi Scanning Guide
 Mobility with Eye-Fi Scanning Guide Scan and Transfer Images Wirelessly with Eye-Fi This document is to be used in addition to the scanner s user guide located on the installation disc. The instructions
Ingeniux 8 CMS Web Management System ICIT Technology Training and Advancement ([email protected])
") Ingeniux 8 CMS Web Management System ICIT Technology Training and Advancement ([email protected]) Updated on 10/17/2014 Table of Contents About... 4 Who Can Use It... 4 Log into Ingeniux... 4 Using Ingeniux
Ingeniux 8 CMS Web Management System ICIT Technology Training and Advancement ([email protected]) Updated on 10/17/2014 Table of Contents About... 4 Who Can Use It... 4 Log into Ingeniux... 4 Using Ingeniux
Customizing forms and writing QuickBooks Letters
 LESSON 15 Customizing forms and writing QuickBooks Letters 15 Lesson objectives, 398 Supporting materials, 398 Instructor preparation, 398 To start this lesson, 398 About QuickBooks forms, 399 Customizing
Assigning a Digital Signature to Electronic Documents Guide
 Assigning a Digital Signature to Electronic Documents Guide This guide will take you through how to add/view and remove a digital signature from electronic documents. The most common types of document
DATAVIZ, INC. User Manual for Android 2/10/2014
 DATAVIZ, INC. Documents To Go User Manual for Android 2/10/2014 Contents Documents To Go for Android... 4 Introduction... 4 Installation and Activation... 5 Installing Documents To Go for Android... 5
QUICK START GUIDE. Draft twice the documents in half the time starting now.
 QUICK START GUIDE Draft twice the documents in half the time starting now. WELCOME TO PRODOC Thank you for choosing ProDoc, your forms solution to save time and money, reduce errors, and better serve your
Site Maintenance. Table of Contents
 Site Maintenance Table of Contents Adobe Contribute How to Install... 1 Publisher and Editor Roles... 1 Editing a Page in Contribute... 2 Designing a Page... 4 Publishing a Draft... 7 Common Problems...
Spreadsheet - Introduction
 CSCA0102 IT and Business Applications Chapter 6 Spreadsheet - Introduction Spreadsheet A spreadsheet (or spreadsheet program) is software that permits numerical data to be used and to perform automatic
Web Ambassador Training on the CMS
 Web Ambassador Training on the CMS Learning Objectives Upon completion of this training, participants will be able to: Describe what is a CMS and how to login Upload files and images Organize content Create
Lync 2013 Quick Reference Lync Meetings. Join a Lync Meeting. Schedule a Lync Meeting. Do I need a PIN, work number or extension? Set meeting options
 Join a Lync Meeting 1. In the meeting request, click Join Lync Meeting or click Join Online in the meeting reminder. 2. On the Join Meeting Audio window, select one of the options: Use Lync (full audio
Microsoft Word 2013 Tutorial
 Microsoft Word 2013 Tutorial GETTING STARTED Microsoft Word is one of the most popular word processing programs supported by both Mac and PC platforms. Microsoft Word can be used to create documents, brochures,
SnagIt Add-Ins User Guide
 Version 8.1 User Guide By TechSmith Corp. User Guide User Guide Contents User s Guide 1 Overview...1 Word, PowerPoint, and Excel Add-Ins...2 Outlook Add-In...2 Internet Explorer / Windows Explorer Add-In...2
Microsoft Outlook 2003 Basic Guide
 Microsoft Outlook 2003 Basic Guide Table of Contents Introduction... 2 Getting Help... 2 Exploring Outlook... 3 Drop-Down Menus... 3 Navigation Pane... 4 Folder Pane... 7 Reading Pane... 7 Toolbars...
Email Receipting Guide. DonorPerfect Online
 Guide DonorPerfect Online SofterWare, Inc. DonorPerfect Online September 2010 Table of Contents Table of Contents INTRODUCTION...3 Choosing Email and/or Letter Receipting... 3 Workflow... 3 Regenerating
SMART Board Tips & Tricks (version 9.0) Getting Started. SMART Tools vs. SMART Notebook software
 Getting Started. SMART Tools vs. SMART Notebook software") SMART Board Tips & Tricks (version 9.0) Getting Started SMART Tools vs. SMART Notebook software Click the SMART Board icon (in the system tray at the bottom right of your screen) to access the SMART Board
SMART Board Tips & Tricks (version 9.0) Getting Started SMART Tools vs. SMART Notebook software Click the SMART Board icon (in the system tray at the bottom right of your screen) to access the SMART Board
Mail Merge. Course Description. Objectives: Design a Main Document. Design a Data Source. Directories. Merge the Main Document with the Data
 Mail Merge Course Description The Mail Merge feature allows you to combine items from a data source into a document. This allows you to create form letters, mailing labels, envelopes, etc. You also have
ScanShell.Net Install Guide
 ScanShell.Net Install Guide Please install the software first - DO NOT PLUG IN THE SCANNER The scanner has been carefully packaged to avoid damage during transportation. Before operating the scanner, please
DESIGN A WEB SITE USING PUBLISHER Before you begin, plan your Web site
 Page 1 of 22 DESIGN A WEB SITE USING PUBLISHER Before you begin, plan your Web site Before you create your Web site, ask yourself these questions: What do I want the site to do? Whom do I want to visit
Titanium Schedule Center Management Software USER MANUAL. Sales and Customer Service Technical Support
 Titanium Schedule Center Management Software USER MANUAL Sales and Customer Service Technical Support Postal Mail Web Site 281-443-3544 (telephone) [email protected] (email) 281-443-3544 (telephone)
HP EMAIL ARCHIVING SOFTWARE FOR EXCHANGE
 You can read the recommendations in the user guide, the technical guide or the installation guide for HP EMAIL ARCHIVING SOFTWARE FOR EXCHANGE. You'll find the answers to all your questions on the HP EMAIL
Creating a Poster in PowerPoint 2010. A. Set Up Your Poster
 View the Best Practices in Poster Design located at http://www.emich.edu/training/poster before you begin creating a poster. Then in PowerPoint: (A) set up the poster size and orientation, (B) add and
EMAIL QUICK START GUIDE
 IT Services Microsoft Outlook 2010 EMAIL QUICK START GUIDE Contents What is Outlook?...2 Quick Guide to Email...2 Create a new e-mail message...2 Forward or reply to an e-mail message...2 Creating new
1. User Guide... 2 1.1 Logging On to OnDemand... 2 1.2 Managing Your Files... 3 1.2.1 Saving Files from OnDemand... 4 1.2.2 Transferring Files
 User Guide................................................................................................. 2 1 Logging On to OnDemand................................................................................
Creating Interactive PDF Forms
 Creating Interactive PDF Forms Using Adobe Acrobat X Pro Information Technology Services Outreach and Distance Learning Technologies Copyright 2012 KSU Department of Information Technology Services This
Hands-on Guide. FileMaker Pro. Using FileMaker Pro with Microsoft Office
 Hands-on Guide FileMaker Pro Using FileMaker Pro with Microsoft Office Table of Contents Introduction... 3 Before You Get Started... 4 Sharing Data between FileMaker Pro and Microsoft Excel... 5 Drag and
Planning and Managing Projects with Microsoft Project Professional 2013
 Project management deliverables (e.g. reports); WBS deliverables can be used for report timing Steps to Create a Project from an Existing Template: 1. Click File then New. 2. Select any of the featured
ITCS QUICK REFERENCE GUIDE: EXPRESSION WEB SITE
 Create a One-Page Website Using Microsoft Expression Web This tutorial uses Microsoft Expression Web 3 Part 1. Create the Site on your computer Create a folder in My Documents to house the Web files. Save
High Impact email & Alpha Five: A Mail Merge Guide.
 High Impact email & Alpha Five: A Mail Merge Guide. Performing a Mail Merge that utilizes your Alpha Five database takes just a few moments and allows you to easily send HTML messages to your contacts.
Outlook Web App User Guide
 Outlook Web App Table of Contents QUICK REFERENCE... 2 OUTLOOK WEB APP URL... 2 Imagine! Help Desk...... 2 OUTLOOK WEB APP MAIN WINDOW... 2 KEY NEW FEATURES... 3 GETTING STARTED WITH OUTLOOK... 4 LOGGING
Word 2007: Basics Learning Guide
 Word 2007: Basics Learning Guide Exploring Word At first glance, the new Word 2007 interface may seem a bit unsettling, with fat bands called Ribbons replacing cascading text menus and task bars. This
Microsoft Access 2007 Introduction
 Microsoft Access 2007 Introduction Access is the database management system in Microsoft Office. A database is an organized collection of facts about a particular subject. Examples of databases are an
Search help. More on Office.com: images templates
 Page 1 of 14 Access 2010 Home > Access 2010 Help and How-to > Getting started Search help More on Office.com: images templates Access 2010: database tasks Here are some basic database tasks that you can
How to Use Swiftpage for Microsoft Outlook
 How to Use Swiftpage for Microsoft Outlook 1 Table of Contents Basics of the Swiftpage for Microsoft Outlook Integration.. 3 How to Install Swiftpage for Microsoft Outlook and Set Up Your Account...4 The
MICROSOFT OUTLOOK 2010
 MICROSOFT OUTLOOK 2010 George W. Rumsey Computer Resource Center 1525 East 53rd, Suite 906 Chicago, IL 60615 (773) 955-4455 www.computer-resource.com [email protected] What Is Outlook?... 1 Folders... 2
Google Docs: Share and collaborate
 Google Docs: Share and collaborate Once you've created your document, share it with others! Collaborators can then edit the same document at the same time -- you'll always have the most up-to-date version
A Beginner s Guide to PowerPoint 2010
 A Beginner s Guide to PowerPoint 2010 I. The Opening Screen You will see the default opening screen is actually composed of three parts: 1. The Slides/Outline tabs on the left which displays thumbnails
Outlook 2007: Managing your mailbox
 Outlook 2007: Managing your mailbox Find its size and trim it down Use Mailbox Cleanup On the Tools menu, click Mailbox Cleanup. You can do any of the following from this one location: View the size of
New Features in Microsoft Office 2007
 New Features in Microsoft Office 2007 TABLE OF CONTENTS The Microsoft Office Button... 2 The Quick Access Toolbar... 2 Adding buttons to the Quick Access Toolbar... 2 Removing buttons from the Quick Access
Decision Support AITS University Administration. Web Intelligence Rich Client 4.1 User Guide
 Decision Support AITS University Administration Web Intelligence Rich Client 4.1 User Guide 2 P age Web Intelligence 4.1 User Guide Web Intelligence 4.1 User Guide Contents Getting Started in Web Intelligence
Email Basics. a. Click the arrow to the right of the Options button, and then click Bcc.
 Email Basics Add CC or BCC You can display the Bcc box in all new messages that you compose. In a new message, do one of the following: 1. If Microsoft Word is your e-mail editor a. Click the arrow to
Creating a Participants Mailing and/or Contact List:
 Creating a Participants Mailing and/or Contact List: The Limited Query function allows a staff member to retrieve (query) certain information from the Mediated Services system. This information is from
How to create pop-up menus
 How to create pop-up menus Pop-up menus are menus that are displayed in a browser when a site visitor moves the pointer over or clicks a trigger image. Items in a pop-up menu can have URL links attached
Creating a Database in Access
 Creating a Database in Access Microsoft Access is a database application. A database is collection of records and files organized for a particular purpose. For example, you could use a database to store