BIKE SENSE ON-BIKE Introduction Background for Bicycle Safety
|
|
|
- Audrey Weaver
- 8 years ago
- Views:
Transcription
1 BIKE SENSE ON-BIKE Introduction Bike Louisville s Bike Sense program is designed as a series of five minute lessons for Grades 3-5 Physical Education (P.E) Classes. In addition to the 5 lessons the Bike Sense curriculum also includes a youth cycling enforcement component. Bike Sense is recommended to be taught to Grades 3-5. These lessons presume that students already know how to balance a two-wheeled bicycle. Most students will know how to do this by Grade 1 or 2, but for those who have not been taught how to bicycle, this curriculum provides techniques which will teach non-bicycle rides to ride in no time! Background for Bicycle Safety Teaching safe bicycling skills is one important way to support Louisville students in bicycling to school. In Louisville s rural communities, bicycling is one significant way that children can "extend their range" beyond walking whether it is to school, to a friend's house, or for other social or recreational activities. The Bike Sense On-Bike curriculum is designed to teach students the skills they need to avoid typical childhood crash types. There is sometimes a misperception that most bicycle crashes involve motor vehicles. However, for bicyclists of all ages, the most frequent crash type is a simple fall in which the bicyclist loses control of the bicycle. The bicyclist may encounter an obstacle in the roadway, have problems braking, lose control due to riding too fast, or simply lose his or her balance. Younger children are more likely to fall, as they have less experience judging road hazards, partially developed motor skills, and a less developed sense of balance. Falls can cause scraped knees, but they can also cause serious injury or death, particularly for bicyclists not wearing a helmet. Since up to 90% of fatal bicycle crashes are the result of head trauma, Bike Sense stresses the importance of always wearing a properly fitted helmet. Bike Sense On-Bike reinforces helmet wear, and both students and instructor will wear a helmet throughout the lesson series. Bike Sense On-Bike also teaches bicycle handling skills to avoid falls. Some crashes do involve motor vehicles; Bike Sense On-Bike teaches bicycle traffic safety skills, designed to address typical crash causes. 1
2 Many people have the mistaken impression that bicyclists are most at risk of being hit by a car from behind. Yet, nearly 90% of crashes occur in front of the bicyclist, due to turning movements, mostly at intersections. Motorists may not see a bicyclist who has the right of way, or a bicyclist may ride through a light or stop sign. Children who are hit by a motor vehicle from behind are likely to have caused the crash by swerving into the car's path without looking. This underscores the importance of practicing riding in a straight line and looking over the shoulder before turning left. Tables 1, 2 and 3 provide additional detail about typical crash types. Table 1: Typical Car-Bike Crashes by Age Group Median Age Major Cause of car-bike crashes Under 12 Entering the roadway; swerving about Right-of-way errors; wrong-way riding Over 14 Signal changes; motorist drive-out; motorist turns; motorist overtaking Crash information from Effective Cycling, John Forrester. MIT Press p
3 Table 2: Frequent Child Errors/Ages Most Likely for Them to Occur Error Occurrence Bike Sense Driveway ride-out: not stopping and/or not looking for traffic at end of driveway or edge or curb before entering street Stop sign ride-out: not stopping, or stopping and not really looking before riding into intersection Sudden swerve in front of motor vehicle: child wants to go to left side of street, or turn left but fails to look behind for other vehicles. Wrong way riding Up to 30% child crashes. Most frequently, ages 5-9 Up to 20% of child crashes. Most frequently, ages Up to 30% of child crashes. Most frequently, ages Nearly 1/3 of all crashes, (child and adult involve a bicyclist going against traffic). Marking end of driveway and setting rules help children avoid this error. Parental Rules: Small children do not cross the mark at end of drive, bigger kids walk bike to end of drive, stop first before looking and then, when no traffic is passing and with pedal in "power position," leave driveway and enter travel area of street or road. Children this age want to know the rules of the road and why they are important. They many not yet understand who is supposed to yield, but they do understand "stop" means "stop". The intersection drills in Lesson #3 are oriented toward this crash-type. This skill is taught in Lesson #2, in the section called "Look back, lifesaver." The action of looking back before turning left can literally be a lifesaver. Emphasize the importance of riding with traffic throughout the lessons. Crash data based on statewide data from Wisconsin, summarized by the Wisconsin Department of Transportation. 3
4 Table 3: Car-Bike Crashes in Urban and Rural Settings, by Age Group Urban Rural Child 1. Bicyclist Running Stop Sign 1. Bicyclist exiting residential driveway 2. Bicyclist exiting a residential driveway 2. Bicyclist swerving on the road 3. Bicyclist riding on sidewalk truing to exit driveway 3. Bicyclist swerving left 4. Bicyclist entering road from a sidewalk/shoulder 5. Bicyclist running stop sign Teen 1. Wrong way bicyclist hit by motorist 1. Bicyclist turns left from curb lane restarting from stop sign 2. Bicyclist turning left from curb lane 2. Wrong-way bicyclist head on 3. Bicyclist exiting commercial driveway 3. Wrong-way bicyclist hit by motorist restarting from stop sign 4. Wrong-way bicyclist running stop sign 4. Bicyclist turning left from curb lane, hitting car from opposite direction 5. Wrong-way bicyclist head on 5. Right-of-way error at uncontrolled intersection Adult 1. Motorist turning left 1. Motorist overtaking unseen bicyclist (mostly in darkness) 2. Signal light change 2. Motorist overtaking too closely 3. Motorist turning right 3. Motorist turning left 4. Motorist restarting from stop sign 4. Motorist restarting from stop sign 5. Motorist exiting commercial driveway 5. Bicyclist swerving around obstruction 4
5 History What worked in Louisville and how can this model work in your community Louisville s Bike Sense Program began in the fall of 2010 with the inspiration of a young 5 th grader who had a passion for bikes and bike safety. A course was set up at Indian Trail Elementary School that trained 60 students in grades 3-5 proper bike safety techniques. By spring of 2011 two other elementary schools, Rangeland and Wellington Elementary Schools added Bike Sense curriculum to their after school programs, where 60 additional students were trained on bike safety. In the summer of 2011, Bike Sense professional development curriculum was instituted in Jefferson County Public Schools (JCPS) that gave teachers the opportunity to become trained on Bike Safety measures that would be taught in classrooms. Seventeen JCPS teachers participated in the training which allowed for 1,500 students to become trained on bicycle safety measures in the fall of Curriculum Overview The Bike Sense Program teaches Bicycle Safety to children in grades 3-5 who will be navigating the roads in metropolitan areas. In an attempt to keep the content manageable for one annual lesson on bike safety, many choices had to be made about the key concepts and skills to feature in the curriculum. The lessons are designed to: Keep Children actively engaged Integrate children s experience and skills into the activities Practice decision-making skills for healthy and safe choices Bicycle Safety Educators The Bike Sense curriculum encourages classroom or physical education teachers, school administrators, volunteers from local bike clubs, police officers or anyone who wants to encourage bicycling in their local area. Prior to implementing the program it is important to be Bike Sense trained. It is important for the teacher to be a good role model, someone who seeks to share a love of physical activity with the next generation. 5
6 Bike Sense Certification Before implementing the Bike Sense On-Bike! Curriculum we stronger suggest you become Bike Sense Certified. A one day, six hour, free Bike Sense certification will teach the knowledge and skills necessary by Bike Louisville, the National Highway and Traffic Safety Administration (NHTSA) and the US Department of Education (USDOE) to train and certify teachers to teach 3 rd, 4 th and 5 th grade elementary school students in the concepts and skills related to bicycle safety. The Bike Sense certification will certify you to teach your students the following criteria: 1. Ride bikes for transportation, especially to and from school 2. Learn safe riding skills and use proper equipment 3. Ride for fitness and experience new cycling skills, including racing skills 4. Learn to maintain their bike and make minor repairs 5. Learn basic safety and first aid techniques Homework Students should be assigned the following homework to make the first lesson of Bike Sense run smoothly: Wear clothes appropriate for bicycling to school for the Bike Sense modules: Light, bright and tight. If you are bringing your bicycle to school, check that it passes the ABC Bike Quick Check this week, so you have time to get it fixed if it does not pass the test. Ask a parent or another adult to help you fix it, or take it to the local bike shop. If it still does not pass the test, don t ride it to school. Preparing to Teach Bike Sense On-Bike includes two aspects that are atypical of P.E. classes: 1) the curriculum is designed to work, in part, by asking students to bring their own equipment from home: and 2) the curriculum includes a field-trip for which permission slips may be needed. 6
7 Table 4: Below is a recommended timeline for implementation of Bike Sense on Bikes Timeline At School From Parents / At Home Prior to scheduling unit Six weeks before Four weeks before 7 If needed, obtain permission to teach the unit. Talk with school administration about space and facilities needs, e.g., use parking lot or school driveway, arrange for bicycle parking.* Ask students for a show of hands who has a helmet? How many can bring bicycles? If you are planning a bicycle field trip, ask your Bicycle and Pedestrian Coordinator for maps (see lesson 5) Helmet orders due; place helmet order with local bike shop or ask your Bicycle and Pedestrian Coordinator for helmets Send home parent/ guardian letter #1, with Bicycle Equipment Survey and helmet order form (See Supporting Materials)*** Two weeks before Conduct Bike Sense classroom instructions. Assign homework as above One week before Recruit staff member or local bicyclists from the community for bicycle field trip (Lesson #6) During Bike Sense On-Bikes Send home second letter for Bike Sense On-Bike, and permission slip for field trip. Recruit parent volunteers for bicycle field trip. * If you wish to use a school parking lot or driveway, you will need to arrange this with your administration in advance of the classes. You may use a parking lot with parked cars in it, if it has sufficient space, but no cars should be driven during your classes. To save time getting and storing bicycles, you will find it helpful to have your students park their bicycles near your teaching area. However, don't move the school bike rack to a less convenient location for bicycling to school. ** Asking student s increases buy-in for the idea of bringing and sharing their bicycles for the lesson. Don t count entirely on these numbers: students who would need to be driven to school with a bicycle may not consider whether it is practical or realistic to bring the bicycle to school. Where to Order Helmets Each student should also be asked to bring his or her own helmet to school. In order to make sure that most or all students have helmets, you may wish to your local Bicycle and Pedestrian for additional helmets. If you are planning to share helmets it s important for the children to use hairnets for personal hygiene.
8 8 Instructor Equipment Instructors are encouraged to bring their own properly working bicycles and helmets. Instructor bicycles do not need to be of a particular style but should be in good working condition. Instructor helmets should meet current safety standards (CPSC sticker inside). If your helmet is not recent in style, you may wish to use a student s helmet as an example of more current styling. As modern bicycle helmets are lighter and fit better, you may wish to upgrade your helmet. Although you will be teaching bicycling, it is recommended to wear regular clothes, rather than bicycling shorts and jersey. Most students do not have specialized bicycling clothing. Do wear clothes that are light, bright and tight comfortable, light/bright-colored, and tucked close to the body for safety. Summary: Instructor bicycle in good condition Instructor helmet Comfortable clothing Student s Equipment As noted above, this curriculum asks students to bring their own bicycles from home to be used and shared in instruction. You will need at least one bicycle for every three students. By having students from all classes share bicycles, you may be able to outfit each PE class with bicycles for every student. IF students will share bicycles with other classes, you may wish to have a cable lock to secure all bicycles in this category between classes. Each student should also be asked to bring his or her own helmet to school. In the first lesson, you and the students will conduct ABC Bike Quick Checks on all of the bicycles to be used for basic safety. If a bicycle does not pass the bicycle safety check, it should not be used for instruction. If students need to share bicycle helmets, then protective headgear (hair nets or surgeon s caps) should be used to prevent potential spread for lice. You may be able to get these donated from local hospitals or school cafeterias. Summary: Student Bicycles at minimum, one for every 3 students Student Helmets- recommended, one per student Surgeon caps or hair nets- if helmets must be shared
9 ACTIVITY SHEETS Table 5: Bike Sense On-Bike Props and Equipment Lesson 1: Ready to Ride Fitting a Bicycle Helmet ABC Bike Quick Check Lesson 2: Stop & Go Look Back Lesson 3: Driving at Intersections Lesson 4: Bicycle Handling All Lessons- Bicycles & Helmets for Instructors & Students Car Placards (optional) Stop signs Car placards Traffic light Drain grate Lesson 5: Prep for Fieldtrip Lesson 6: Bicycle Fieldtrip Bicycle Field Trip Leader Information OPTIONAL based on site EQUIPMENT OTHER Traffic cones Chalk or tape Cable lock Bicycle floor pump Bicycle repair tools (see Reference section- Notes on Student Bike Maintenance) Pre test Assessment Rubric Traffic cones Chalk or tape Cable lock Assessment Rubric Traffic cones Chalk or tape Cable lock Assessment Rubric Traffic cones Chalk or tape Cable lock 5 Kitchen sponges Water (to wet sponges) Parked car (unlocked) Assessment Rubric Traffic cones Chalk or tape Cable lock Map of town Post test Cable lock Portable bicycle pump Bicycle patch kit First aid kit Cell phone or radios to communicate with school Route maps Assistant ride leaders (parents or other adults) Rider leader emergency contract info & plan. Activity Sheets are found in the appendices. Setting and Environment Bike Sense lessons are designed to be conducted on your school grounds, preferably outside. You may need to set up chalk lines or traffic cones in advance of the lessons. However, if your school site has driveways or parking lots that you can incorporate into your lesson, you may be able to minimize this set up. Throughout your lesson planning, you are encouraged to think creatively about how to use the existing environment. 9
10 Some of the lessons can be taught indoors, in a gymnasium or large multi-purpose room, if this is critical to maintain you teaching schedule. You may need to shift some sections of lesson #2 and lesson #4 from an indoor to an outdoor setting. Any time you are practicing the look back skill, a riding area of in length is needed- preferably outdoors. In preparation for inclement weather, check the forecast for the coming week and make adjustments to the training schedule that will accommodate the forecast for the coming week. 10
11 LESSON 1: GETTING READY TO RIDE OVERVIEW On the first day of class it is important to determine the experience level of the class. If a class has a number of children in it that aren t familiar with bikes, an instructor may want to seek additional help with the course curriculum. In a class that has a number of children who are not familiar with riding bikes or bicycle safety it will be hard for an instructor to manage teaching and supervising the curriculum while keeping the class in order. PRE AND POST TEST Pre and Post Test evaluations will help instructors determine the bike safety education level of each class and help determine the effectiveness of the bike safe training program. It is recommended that each instructor give pre and post test surveys to students. See appendix 11 for a sample survey that can be given to students as an evaluative tool before and after the bike sense training is conducted. ICEBREAKERS It is important that the children understand that bikes safety is to be taken seriously. It is also important to express to the students how much fun riding bikes can be. At the beginning of the program, use icebreakers to help students become comfortable with the idea of riding a bike. Ask the students questions like: Who has ridden a bike before? Who has a bike at home? Who has ever fallen off a bike? Why is bike safety important? Additionally, telling personal stories about your experiences with bikes can help students relate to the process of learning how to ride a bike and make them feel more comfortable. Time: 40 minutes 11
12 Key Concepts and Skills Helmet Safety Know how to wear a helmet eyes, ears, mouth adjust helmets for use in lesson Dress for Safety Dress Light bright and tight Equipment Needed Bicycles and Helmets Hairnets Reflective Clothing Bicycle white and red lights ABC Bike Quick Check Check air, brakes, chain and quick releases Check headset/steering Bicycle Handling Skills Try and assess who can ride Ride in a straight line Sweatshirt Method Bicycle Fit Know whether a bicycle fits Adjust seat height DRESS FOR SAFETY Light-Bright-Tight Discuss with the children that they want their clothing to have three main characteristics when riding the bike: light, bright and tight. Remind them that day or evening it is important wear white or light clothing so they can be seen by cars. Demonstrate: Show the importance of tight clothing by tucking in lose shoelaces or cuffing pants and explaining the hazard of getting shoelaces or lose fitting pants caught in the bicycle chain. Also discuss the importance of being seen at night. Ask the students if they think cars can see them easily in the evenings. Discuss the danger of riding at dusk, when the sun can often obstruct from drivers ability to see them. Ask them what they can do to remain visible while on their bikes. Discuss lights, reflectors and light colored clothing as safety measures while riding. 12
13 Activity: Ask the students to look at themselves and decide if what they are wearing qualifies as light or bright. In bicycle teams of 2-3, ask the students to make sure their clothes are tight tuck in shoelaces and pant cuffs and any loose strings, straps, or clothing. PARTS OF THE BIKE Go through the individual parts of the bike, chain, wheel, handlebars etc. and familiarize them with the language of the different bicycle parts. Rear Hand brake Handle bar Seat Seat post Rear brake Frame Fork Tire Single speed cog Spoke Chain Kick Stand Chain ring Pedal Explain: Demonstrate: ABC QUICK CHECK Explain to the children that they should check their bikes each time they ride and discuss the ABC s of the bike, Air, Brakes and Chain. Encourage them to memorize this acronym. Demonstrate: Air: Squeeze the tires to check for low air pressure and ask if the tire looks like it feels firm. Brakes: Squeeze each brake lever and ask: Does the wheel stop quickly? Does the brake lever hit the handlebar? Are the brake pads hitting the tires instead of the wheel rim? 13
14 Crank/Chain: Is the chain on track? Is there anything caught in the chain? Is the chain clean and lubed? Is either of the crank arms loose? Quick: Check the quick releases on the front and rear hubs and on the seat post. Are they in the closed position? Spin: Spin the wheels Do they spin smoothly? Do they have any broken spokes? Once you ve demonstrated the importance of the ABC Quick Check demonstrate the importance of having a properly aligned bike. Standing over the bike, hold the handlebars even and check to make sure that the front wheels line up with the frame of the bicycle. Also check to make sure that you can t move the front of the wheel side to side when you hold the handlebars steady. Explain: HELMET FIT Discuss the importance of wearing a helmet every time they ride their bikes, regardless of how far they ride. Discuss the proper criteria for wearing a helmet which can be found in appendix 3. Explain to the children that a helmet needs to be fitted for each person s Head. If it is hanging to the side or sliding up, it won t help protect them if they get into an accident. Demonstrate: Check your own helmet by doing an Eyes, Ears and Mouth check. Eyes: You should see the very edge of your helmet when you look up Ears: Straps should meet right under your ear lobes to form a V Mouth: Strap should be loose enough so you can talk, but tight enough so you feel the helmet pull down when you open your mouth wide. 14
15 Activity: Have the children stand in two lines facing each other. Review the proper safety measurements for fitting a helmet properly and have them check the person in front of them to make sure that their helmet is fitting them correctly. Have them check to make sure the helmet is fitted correctly by looking directly down at their shoes. Lessons Learned: Children may need a larger helmet because of barrettes and pony tails Many helmets are color coded by size, have children remember the color of their helmet so they know which size helmet to use each day. Don t forget hairnets Explain: Observe: RIDE IN A STRAIGHT LINE In the next part of the lesson, you will practice riding the bicycle in a straight line. You will usually want to ride in a straight line on the road, unless you are turning onto another road or into a driveway. How straight do the students ride? Try and gain a sense for who can ride proficiently and who may need some extra coaching. If there is not time to give individual attention, make a note to try and assist students who are needing extra assistance first thing during lesson 2. 15
16 SWEATSHIRT METHOD It is important that instructors keep respectful physical boundaries between themselves and the children they are instructing. The sweatshirt method is a practice that instructors can use to assist children who are having a hard time learning how to ride a bike safely. Instructors can use a sweatshirt and wrap it around the front of a child, while holding onto the arms of the sweatshirt as a way to balance the child while they are learning how to ride in a straight line. Instructors will want to do this one on one, at the end of Lesson #1 or before Lesson #2. Child learning how to ride in a straight line using the sweatshirt method. 16
17 Time: 40 minutes LESSON 2: STOP AND GO/LOOK BACK OVERVIEW Swerving out into traffic is the leading cause of car-bicycle crashes for children and youth. Bicyclists must learn to look over the left shoulder for traffic when turning left. There are also instances in which a bicyclist will need to look to the right; upper grades should practice looking over both shoulders. For older grades, you may wish to proceed through the starting and braking exercises more rapidly if you feel the class is comfortable with these skills. If you are using bikes with gears, you could then do a quick lesson on down shifting before stopping. Key Concepts and Skills Bicycle Handling Skills Turning Hand Signals Lane Positioning Equipment Needed Bicycles and Helmets Hairnets Cones Traffic Safety Concepts Stop and Go Braking Scan and Signal Stop and Go with Power Pedal Scan Drill LESSON SET UP For this lesson you will need 3 or more lanes, marked with chalk or using lines already marked on your track, parking lot, or field. The lanes should be 4-6 wide and long. You may use cones to help delineate the ends of the lanes, but a line still needs to be marked between the cones. 17
18 INDOORS: The look back part of the lesson may be conducted inside only if you have a space at least 100 long. If you do not have a large enough room and the weather prohibits going outside, you can save the look back part of the lesson for Lesson #3 and substitute the first intersection drill from Lesson #3 into this lesson. Starting and stopping drills may be done in a smaller space as well. STOP AND GO Tell them that first we will be learning stop and go. First we will cover at few tips for starts and stops and then we will practice by riding in a straight line while starting, stopping, pedaling and looking over your shoulders. Discuss that is it is important to ride smoothly so you don t lose your balance as you are starting because you don t want to wobble into cars as you start. Having some power will help you get started, especially if you are going uphill. Demonstrate: POWER PEDAL: Mount the bicycle and put your rear leg over the back wheel. When you start riding, you want to have one of your pedals in the power pedal position so that your thigh muscle (one of the strongest muscles in your body) is ready, like a spring, to push down on the pedal and five you a little burst of energy to move the bike forward as you start. Push: If your bike has a free wheel in the back, you can put your pedal in the power pedal position when you bike is stopped by pedaling backward. If your bicycle has a coaster brake, you will need to walk you bike forward slightly while pushing the pedal forward with your foot, to get into the power pedal position. Coast to a Stop: Once you are ready to stop place allow the bike to naturally decelerate and place your feet on the ground slowly working the bike to a halt. Explain: 18 Tell them next we will practice braking. If you have brakes on both of your handlebars, those are called brakes. If you brake by pedaling backwards that is called a coaster brake. For those who have both
19 front and rear brakes, it is important to use both together. The front brake provides most of your stopping power. Demonstrate: To start, push off with the foot that is on the ground, while pushing on your power pedal. Keep both hands on the handle bars. You want to get started smoothly and quickly (but not fast) since the forward motion of the bicycle helps you with balance. Ride on the right side of the lane, coast to a stop. Ask: What are some things that are important about braking? It is important not to go over the handlebars! Why would you want to go over the handlebars? Discuss just using the front brake: When you are going down a hill it is even more important to use both brakes together because the combination of a downhill momentum and front braking can cause the rider to go over the handlebar. It is important to remember to steer while braking It can be hard to brake and use your hands to give a turn signal at the same time. If you choose, it is more important to brake safely. Demonstrate: Show how to brake correctly by squeezing the brakes together. If you just squeeze the front brake, your bicycle will rotate around the front wheel. That is why you don t want to use the front brake alone. Squeeze your front brake, and show how the back wheel lifts up easily. Reinforce how to brake correctly. Demonstrate riding a very shot distance, and show stopping- braking, putting your foot down, and resetting your pedal to the power pedal position to be ready to start again. Explain: 19 HAND SIGNALS Hand Signals Communicate to the drivers of other vehicles which way you would like to go. There are three hand signals to know:
20 turn left, turn right and stop or slow. Demonstrate: Show the signals for left, right and stop Activity: Practice Hand Signals with students Look Back, Lifesaver: Explain: This is an exercise to practice riding straight while turning your head to look back over your shoulder for traffic. This is a very important skill to be able to find out if there is a car behind you, especially if you want to turn left, or if you want to move toward the middle of the street to avoid a road hazard, like a rock or a pothole. Looking back over your shoulder is called a lifesaver because it can save your life. It is also called scanning. This is a skill that you will someday use when you are driving a car. Next time you are in a car with someone on a multi-lane road, watch the driver as he or she moves into the left-hand lane. The driver should look back over his or her shoulder to check for traffic. It is very important that the driver doesn t steer left until the way is clear. When you look back over your shoulder, you need to keep your bicycle pointed forward, and just turn your head. You want to keep the bicycle riding straight ahead. Be careful that you don t also move your arms and handlebars. In addition to turning your neck, you will also twist your upper body, but keep your arms straight ahead. 20
21 If you have trouble doing this with both hands on the handlebars, you may drop your left- hand off the handlebars, while continuing to steer straight ahead with the right hand. This is a good skill to practice with a friend or parent. You may find that your parents could use some practice too! Demonstrate: Ride away from the students, and demonstrate looking back over your left shoulder while riding straight. Return to the group, and show up-close how your upper body twists as you keep the handlebars straight. Show how it can be easier to avoid turning the handlebars if you drop you left hand off the handlebars. Activity: At least two team members will participate in this exercise; team member #3 may walk or jog in a separate area. Team member #1, with the bicycle, will ride in a straight line, along your designated lanes (at least 100 long, but preferably 200 long). Team member #2 will stand at the start of the lane, so that he or she is standing behind the bicyclist. Team member #1 will ride in a straight line and will periodically be asked to look back over his or her left shoulder when the teacher or group leader yells the word scan. Team member #2 will hold up one arm, two arms or no arms. Team member #1 will have to identify one, two, or none. Rotate positions so all students have a chance to ride and a chance to be an observer. LESSONS LEARNED This is the first on the bike group activity done in the training and it can be hard to keep the class s attention. Having the kids who are waiting for a bike can run in place or do jumping jacks to keep their attention spans under control. Some children may be having a hard time learning how to get going on the bike and may feel embarrassed that they don t know how to ride. The instructor can take a sweatshirt and wrap it around the child s waist and run behind the child as an assist for balance and stability on the bike. 21
22 LESSON 3: BICYCLE DRIVING AT INTERSECTIONS OVERVIEW This lesson focuses on bicycling at intersections, including hand signals, riding at stop signs and traffic light, and lane positioning. Most car-bike crashes occur at intersections, particularly in an urban or small-town environment. Children and youth are more likely to be at fault in these crashes, due to a misunderstanding of the need to stop at traffic signs and signals, or due to a misunderstanding of who has the right-of-way. Even in rural areas, most carbike crashes involving children or teens occur at intersections-not on the open road. Time: minutes Key Concepts and Skills Bicycle Handling Skills Intersections Driveways Right of Way Turn Signals Lane Positions Equipment Bicycles and Helmets Hairnets Tape or Chalk (to mark intersections) 4 Placards (to mark stop signs) INTERSECTIONS Explain: As you begin the lesson explain to the children the importance of intersection safety by telling them that bicycles must obey the same rules that cars do. Tell them that intersections are very dangerous areas to ride a bike so it is important that they be extra careful and learn how to communicate with cars in instances when they may not be sure if they have the right of way. That s why we have hand signals, stop signs and street lights, so we can communicate! Go over the following terms: 22
23 Starting: Demonstrate the power pedal position and check that the students can explain how to properly execute a smooth start. Stopping: Check that the students can explain the importance of using both hands on the handlebars and demonstrate a smooth stop, including returning the pedal to the power position. Look-back Lifesaver: Check that the students understand how to ride in a straight line and look over their shoulders and demonstrate how to do this properly. Hand Signals: Check that the students can explain and demonstrate all three hand signals: Left Right Stop/Slow DRIVEWAYS Explain: Your driveway is like a small private road, just for your family and visitors to your house. It is best to treat driveways just like miniature roads. At the end of your driveway is an edge, where your private road stops and the public road starts. Ask them, how they know who has the right to go first at an intersection. (There are two things that affect who gets to go first at an intersection: who got to the intersection first, and whether any of the drivers have a stop sign or a traffic light.) Demonstrate: Use your mock intersection without a stop sign. Pick one leg of the intersection to be the driveway, and ride down the right hand side of the driveway. Demonstrate stopping at the driveway as you come to a stop, you will brake, and stop with one foot on the ground and the other on the pedal in the power-position to be ready to start again. Point out the 23
24 edge of the driveway, and that there is no stop sign, but that the same traffic rules apply as if there were a stop sign. Explain: STOP SIGNS At an all-way stop, you will need to stop, but the other traffic will need to stop too. It is very important not to get confused between an intersection where everyone has to stop, and an intersection where only you have a stop sign. All- Way stops are first come, first served. Everyone takes turns in the order in which they arrived at the stop sign. If there is a line of cars on one street, the drivers on that street will take turns with the traffic arriving from other directions. The rules are the same for bicycles. However, when you are riding a bicycle, the driver may not see you even if you have the right to go first. You must pay attention to whether the driver sees you and/or waves you on. If a driver is talking on a cell phone, adjusting the car radio, or talking to a passenger, they may not see you. Even if the driver looks like they are looking right at you, they may not really see you. When it is your turn, you should go but you should go carefully in case the driver does not see you to let you have your turn. Ask: How can you use your body language to communicate to a driver? When you are stopped at a stop sign, putting your foot down is body language to show that you are stopped and waiting your turn. You can look at the other drivers at the intersection- turning your head to look at them. Turning your head to look communicates more than just looking with your eyes. Using a hand signal also communicates to the drivers the direction you are planning to turn. How can you tell from a driver s body language what they are planning to do? A driver who waves you on is communicating that he or she sees you, and can let you go. A driver who is talking on the cell phone may not be paying attention- use extra caution. How can you tell what direction a driver is planning to turn? 24
25 Cars have turn signal lights that flash when the driver activates the light. The light will flash on the side of the car where the car is planning to turn, both front and back. However, not all drivers use their signals, so you cannot count on the turn signal. Sometimes you can tell if a driver is planning to turn by the car s position on the road, o by the direction the front wheels are pointing. What happens if a pedestrian appears at the intersection at the crosswalk? Bicyclist must stop for pedestrians in crosswalks, just like cars must stop. STOP LIGHTS Explain: A traffic light is usually placed at a fairly busy intersection and gives several drivers in a row from the same direction the right to go, one after the other. A traffic light is different than a stop sign. Instead of taking turns, the opposing traffic (the traffic facing you) has the right to go at the same time. If you are both going straight, you simply pass each other. Any traffic that is turning left must wait for the traffic going straight to go first. Traffic lights would be easy if all cars were going straight. What makes intersections with traffic lights complicated is turning traffic. When you are coming up to a traffic light on you bicycle, you must be cautious of drivers who are turning. And if you are the one who is turning, you must be cautious of the drivers who are going straight. Generally drivers or bicyclists who are turning left must wait for drivers who are going straight or turning right. Left turns are therefore the most difficult turn to make at a traffic light. When riding your bicycle through an intersection with a traffic light, you plan your path through the intersection in advance, and position yourself so that drivers can tell from your land position, body language and hand signals, what you are planning to do. You want to convey confidence and place the bicycle in 25
26 a place where drivers are expecting to see traffic. You and your bicycle are traffic, just as the car is traffic. RIGHT TURNS Explain: Explain that it is important know how to safely navigate four way intersections. Many accidents happen at four way intersections because of a lack of communication between the drivers and bicyclists. It is important that you convey proper communication with vehicles through body language, hand signals and eye contact, so drivers know what your intentions are. Demonstrate: 26 Demonstrate lane positioning for a bicyclist approaching the intersection. Set up a mock four way intersection either in a gymnasium or a open space such as a parking lot. Split the children up into four equal groups at each stop sign based on height, so you can appropriately place them with the correct sized bike. Have them ride around their block making a series of right turns. They must stop and let the first approaching bike at the intersection go first, even though they may not be directly crossing paths. This teaches them to yield to
27 the first approaching bike without having to face each other in the intersections directly. Once the child has gone around the block he/she will hand the bike off to the next child in line. 27
28 GOING STRAIGHT Ride up to the traffic light on the right hand side of the road. Before you get to the intersection, look back over your left shoulder for traffic, and when the way is clear, move slightly toward the center of the lane. Proceed straight through the intersection on the green light. If there is a right-turn lane but you are going straight, do not ride in the right turn lane. You should be on the right side of the lane that will go straight. Explain: Watch out for cars turning across your path that may not see you. It is ok to make noise 0 yell, should or ring a bicycle bell- if you think a driver does not see you. If the night is red when you get to the intersection, you will need to wait in line with the cars. Otherwise, wait in line behind the last car that was there when you arrived at the intersection. Be careful of cars turning right. If you come to a red light with a car already at the intersection, stop behind the car. Do not pull up on the right side of the car. The car may turn, even if the driver does not have a turn signal on. LEFT TURNS The other way to turn left is as a vehicle, on the road. Remember that the opposing traffic that is going straight gets to go first, before any traffic that is turning left. Turning left at a small intersection with a traffic light is similar to any other intersection. Look, signal, look, move left and then get ready to turn left on the green light. When you have a green light, you must wait until the lane opposite you is clear. If a driver waves you on in this situation, make sure that there is not a driver right behind that first car. The driver who is behind might not see you and could pull around the first car, hitting you. A green arrow indicates a special rule for who gets to go first. With a green arrow to the left, the traffic turning left has the right to go first. The traffic on the other side of the road that is going straight still has the red light and has to wait. 28
29 Demonstrate: If you are not sure how an intersection works, you may want to ride over to the intersection and watch how it works as the lights change a few times. Who has the right to go, in what order? Does the light have any special arrows indicating a special right to turn? Set up a four way stop using cones, tape or chalk and markers as stop signs. Demonstrate the drill by starting in the power pedal position at the back of one of the blocks and riding forward to the stop sign. Tell the students that you are going to turn left and make the appropriate hand signal to turning left, raising your left arm straight out to the side. Once you reach the stop sign make a complete stop, scan and turn to the left. Next organize the kids in groups of four by height so the bikes can be adjusted to the appropriate size. Then have the children line up at the back of each block and have them start at the power pedal position signaling them to go until they have made a complete stop. Once they come to a stop they execute a left hand turn crossing through the intersection. At the opposite end of the block they are required to dismount their bikes and navigate around obstacles. The instructor is in the middle of the intersection checking to make sure that the student has properly executed the following: o o o o o A smooth start with the power pedal position The proper hand signal for a right turn A smooth stop A proper scan A proper right turn, returning to the right of the lane Children will be crossing paths during this exercise. It is important to maintain a vigilant amount of control during this exercise. Once the child has gone around two blocks, he/she will then give the bike to the next student in line and the next student will go. 29
30 LESSONS LEARNED Make sure the instructions about handing the bike to the next person in line is very clear so the drill will run quickly. If a child is still uneasy riding, have them scoot to the stop sign. 30
31 LESSON 4: OBSTACLES AND HANDLING SKILLS OVERVIEW The fourth lesson focuses on more advanced bicycle handling skills, including emergency maneuvers. This lesson is best done outside, but may be done inside if weather does not cooperate. Most bicycle crashes for bicyclist of all ages, but especially for children, are falls. This lesson concentrates on improving bicycle handling skills, and learning how to avoid road hazards that may cause a crash. Time: 40 minutes Key Concepts and Skills Bicycle Handling Skills Balance Quick Stop Rock Dodge Obstacles Traffic Safety Concepts Identification of potential roadway hazards Equipment Bicycles and Helmets Hairnets Tape or Chalk Hazards Placards (to mark stop signs) Explain: BALANCE It is much harder to balance your bicycle when it is going very slowly, or stopped. You may have seen some bicyclist balance on their bicycles at a complete stop, and stay that way for several minutes. Some mountain bikers can do this, and it is something that bicycle messengers will do as they are riding in traffic. This is called a track stand, and to learn how to do it, you can start by practicing riding slowly. Demonstrate: Show how to ride the bicycle slowly without falling over and tell the children that they will practice this in the next exercise. 31
32 SLOW RACE Ask: Explain: Is it harder to go fast or slow, when riding a bicycle? (It is harder to go slowly). Our next challenge is to practice balance. It is much harder to balance your bicycle when it is going very slowly, or stopped. This exercise will challenge each of you to see how effectively you can balance. You may have seen some bicyclists balance on their bicycles at a complete stop, and stay that way for several minutes. Some mountain bikers can do this, and it is something that bicycle messengers (bicycle package delivery services, often in cities) will do when they are riding in traffic. This is called a track stand. And to learn how to do it, you can start by practicing riding slowly. This exercise is to practice riding slowly but without falling over. If you have to put your foot down to catch yourself, that will take you out of the race. Demonstrate: Activity: Show how to ride your bicycle slowly. If you can do a track stand, this is a chance to show off to the class! When you have to put a foot down, stop and proceed. Have team members #1 with the bicycle line up at one end of your practice area, and ride as slowly as possible to the other end of the 50 area. The other students can watch the race. The last person across the finish ine wins. Any bicyclist who has to put a foot down is disqualified and is out of the race. Rotate the bicycles, and run the race again with the other team members riding. Ask: Explain: 32 How is riding slowly a useful skill to have? (It improves your balance, and you may use it in traffic, such as when you need to wait for a car to pass you.) QUICK STOP When you brake on your bicycle, the front wheel does most of the stopping. As you will remember from our first lesson on braking, if you brake with just your front brake, you could go over the handlebars. IF you brake very hard, even if
33 you are using both brakes, your weight will still shift forward, and you could loose your balance, skid out or go over the handlebars. There is a technique called the quick stop that will allow you to stop very quickly without crashing. The most important difference between this stop and an ordinary stop is shifting your weight toward the rear of the bike. You would do a quick stop like this when you are riding fast, and you suddenly need to stop. Demonstrate: Ride your bicycle past the students. Pedal a few strong strokes to get up some speed, and then do a quick stop. Shift your body weight back on your bicycle so that your butt is hanging out behind the bicycle seat. Squeeze harder on the front brake than on the rear. If your back wheel starts to skid, ease up on the front brake. RAILROAD TRACKS Railroad tracks and drain grates are both particularly dangerous to bicyclists. Both have long slots that can grab your bicycle wheel and force your wheel in a different direction than you are trying to go this causes you to fall. Any time you see a long, skinny hazard that could grab your bicycle wheel, the way to ride across this safely is to steer your bicycle wheel perpendicular to the hole. Demonstrate: Use the drain grate activity sheet to show how a bicycle wheel could get stuck in the long slots of the grate. Explain how a railroad track could similarly force the bicycle wheel to go along the length of the track. Show how to ride across the drain grate with your wheel perpendicular to these slots. 33
34 Explain: OBSTACLES As you are riding your bicycle on the right side of the road you should be looking ahead, and thinking about potential hazards ahead of you. If you see an obstacle in your path, you should plan in advance to stop or steer out of the way. If you need to move further out into the roadway to avoid an obstacle, do the life-saver look back to ensure that there is no traffic before you move into the traffic lane. Ask the students what are some obstacles that you want to avoid hitting? (Rocks, potholes, drain grates, tree branch lying in the road, broken glass, sand or gravel on the road, untrimmed vegetation/shrubs along the road, car pulled off along the side of the road or a slower moving bicyclist). Tell them that they want to ride about three feet away from the side of a parked car to avoid being doored. Demonstrate: Ride the bike up to a group of obstacles doing a life saver look back before approaching the obstacles and determining they are unsafe to ride though. Stop the bike, dismount and walk the bike through the group of obstacles before getting back on the bike. Explain: 34 ROCK DODGE If you don t have time to avoid a rock or other road hazard, you may be able to use the rock dodge to steer around it at the last minute. The front wheel is the wheel that steers on a bicycle. If you hit something with the front wheel, there is a good chance that you will fall. When you do the rock dodge, you first steer around the rock, and then straighten your front wheel while your bicycle frame is still going over the rock. If you hit the rock with your rear wheel, you
35 probably won t fall because it s the front wheel that is most important for steering and balance. Demonstrate: Turn the handlebar to the left and show how the bike leans to the right. Turn the handlebar to the right, and show how the bike straightens up. Doing this sequence quickly is how to get past a rock. Activity: Set up the children into four groups based by height so they will have the appropriately sized bike. Make four squares with chalk or cones indicating four city blocks with stop signs at the center indicating a four way stop. The instructor stands at the center of the intersection and directs traffic. Place hazards at the center of the back of each block so they can ride steadily for a period of time before having to dismount. Each child will start at the stop sign and continue straight to the end of the second block where they will turn left and work their way through the hazards until they return back to the starting point and pass the bike off to the next student. 35
36 Time : 40 Minutes LESSON 5: BICYCLE HANDLING SKILLS OVERVIEW The last lesson will incorporate all of the skills that the students have learned throughout the course. This lesson is best done outside but can be done inside if weather does not allow. POST TEST Post Test evaluations will help instructors determine the bike safety education level of each class and help determine the effectiveness of the bike safe training program. It is recommended that each instructor give post test surveys to students. See appendix 11 for a sample survey that can be given to students as an evaluative tool. The Post tests can be compared to the pre test answers to determine a change in knowledge. Key Concepts and Skills Bicycle Handling Skills Successful Obstacle Course Completion Post test Equipment Bikes and Helmets Stop Signs Hazards Tape or Chalk Cones The fifth lesson will be your opportunity to assess the class and decide if they need some remediation on certain lessons or if you can set up an obstacle course that will incorporate all of the information that they have learned in previous lessons. Using the placards at the end of the book and the resources available set up an obstacle course that contains stop 36
37 signs, stop lights, railroad crossings, right turns, left turns, hazards and straight aways. Depending on the resources available to you, each obstacle course will vary. Try to recruit other assistants, as this lesson will require a lot of extra space where supervision of many children can be a challenge. Examples of different obstacles courses that can be used based on the environment are attached. 37
38 38
39 LESSON 6: FIELD TRIP/RAIN DAY (OPTIONAL) TIME: 25 minutes (or longer, as time permits) 39 OVERVIEW You will need to recruit some other adult bicyclist to join the class for the field trip, to make an approximate ration of one adult for every 5-7 kids. For a typical class, you will need to recruit 2-4 parents or other school staff. You may wish to ask the principal, health educator, or other educators who are bicyclists. You could also ask your local park/recreation department staff. A local bicycle club may also have members who can help. MAKE AN EMERGENCY PLAN o Take a cell phone or walkie-talkie that will enable you to contact the school office and/or emergency services o Find out in advance if any of your assistant ride leaders can bring a cell phone or walkie-talkie and get their cell phone numbers o Find out in advance if any of your assistant ride leaders are skilled in bicycle maintenance, know how to fix a flat, or are certified in first aid. o Make an information sheet for everyone leading the ride, so that everyone has each other s cell phone numbers and knows each other s skills (bike repair, fist aid). Leave a copy of this at the school office. o Think about how you would deal with the instance in which a student gets a flat tire or has another equipment failure en route. You may be able to assign an adult to assist infixing the bicycle or walking back to school. If you are too far away, and no one can easily fix the bicycle, you may need to arrange a ride. o What happens if a student has a fall, and has a cut needing attention? If the cut is minor, can an adult skilled in first aid deal with the situation and return to school with the student? o How could you deal with a more serious fall or crash in which emergency services are needed? Keep in mind that, although it is good to be prepared, there is only a slim chance that you would need to use your emergency plan.
40 LESSON SCRIPT Check Equipment: Have the students get their bicycles and line up in their bicycle teams. When the students are ready, have them do the Eyes, Ears, Mouth, test for their helmets, and the ABC Bike Quick Check for their bicycles. Have them check clothing for light, bright and tight. Explain: INTRODUCE THE RIDE In the bicycle field trip, we will follow all of the rules of the road, and put into practice all of the lessons that we have learned in this unit. When you have ridden with adults before, you may have followed the adults through intersections, with the adults making the decisions. Today you are the ones driving. Each student will make his or her own decisionjust as each motorist drives his or her own car. When we get to intersections, each bicyclist will take his or her turn, and decide when it is safe to go. When we arrive at more complicated sections of the ride, we may stop, pull over, and discuss the best approach before we ride. When we stop, get completely off the rod. Adult ride leaders should also get completely off the road. As we ride together, leave at least two bicycle-lengths between you and the bicyclist in front of you. When we are going downhill, you may need to use your brakes gently to keep from getting too close to the rider in front of you. Remember that there may be road hazards that you cannot see if there is someone in front of you. As a courtesy, point out road hazards to the bicyclist behind you, as long as you can do so without swearing. We will ride single file; no passing. 40
41 RAIN DAY Overview: It is useful to use rain days as opportunities to introduce logistical skills and safety curriculum into training. The following are ideas of things that can be introduced into a classroom setting in the case of rain. BOOT SCOOTIN BOOGIE The following video is an informative and useful video to introduce to the classroom that will keep children engaged with the common principles of Bike Sense. MAP GAME Gather maps of your city for each child in your classroom. Ideally, these maps will have common bike routes or safe routes laid out for bicyclists. Ask the children to find their house. Then ask them to find their school. Once they have found these two areas, ask them to find the safest routes from home to school. If the children catch on quickly to this lesson, you can find common markers in the area, such as the grocery store or library and have them navigate how they would get to and from these places to their house on a bike. HELMET SAFETY Find a Styrofoam manikin head, 4 eggs in individual ziplock bags and a helmet. Cut the bust in half and hollow out the inside to place the egg in. The eggs need to be wrapped in bags to avoid making a mess. Place the egg in the bust and drop the bust on the floor to demonstrate what happens to the human brain when a bicyclist gets into an accident. Then, place a helmet on the head of the bust and drop the bust on the floor to indicate how safe the brain is when wearing the helmet. 41
42 ENFORCEMENT The Bike Sense Program is unique in that it pairs bike education with enforcement. This allows children of the community to be taught not only how to ride a bike safely and properly, but allows for their bike safety skills to be reinforced in a positive way. The Bike Sense enforcement piece was modeled after the Minneapolis Bike Cops for Kids program that provides bike safety outreach to children in the Minneapolis area by School Liaison officers during the summer months. The enforcement piece of the Bike Sense Program is only one key element of a bigger goal of within the bike sense program, youth outreach. The Bike Sense Program provides a link between officers and youth for enforcement, encouragement and engagement within local neighborhoods where a police presence often stigmatized by youth in a negative way. The ultimate goal of enforcing the Bike Sense program is to use bike safety as a catalyst to create positive interactions between law enforcement officers and youth. 42 ENFORCEMENT Enforcement of the Bike Sense Program cannot be done without creating a relationship within the local police department. Local bike programs are encouraged to reach out to their local public affairs officer to create a partnership between bike safety education and bike safety enforcement within the community. There are different avenues of approach for hiring and compensating bicycle safety enforcement officers within each community. School liaison officers often times are willing to participate in summer programs as a way to stay engaged with youth in the summer months rather than going back on patrol. Grant funding can also be acquired and distributed as overtime pay to bike safety officers. It is important that bike safety officers meet the physical and interpersonal requirements necessary to be an effective youth bicycle enforcement engagement officer. It is highly recommended that officers become certified as qualified bicycle officers through IPMBA, the International Police Mountain Bike Association. Officers must be in good physical shape and have good youth communication skills. These officers will be on patrol for extended periods during the summer months so it is important
43 that they are able to sustain prolonged periods of physical activity and maintain the enthusiasm necessary for the Bike Sense program to be effective. 43 IMPLEMENTATION Youth bicycle safety officers are sent out on patrol in pairs for two-hour increments, two times per week. These patrols can be extended based on funding for each program. These areas are selected in conjunction with the Bike Sense Education program such as Community Centers. Bike Sense training is often implemented in areas of lower socioeconomic status where the local community often stigmatizes police presence. Bike Safety Officers are able to interact with youth in these areas in a manner that builds trust and confidence in local law enforcement agents that will have lasting impact on the community. There are many different factors that contribute to running a successful Bike Sense enforcement program. Officers are responsible for many different requirements that are necessary for marketing the program, operating the program, community outreach and evaluation of the program. MARKETING With so many of our youth connected to social media outlets, social media and the Internet are great ways to reach out to the community. Facebook, Blogs and Websites are great ways to promote the Bike Sense program in local areas. As the officers engage with youth, encourage them to take pictures of their interactions and post them on social media pages. It is recommended that each department consult their legal department first however; about the procedures of posting children s pictures on social media pages. It may be useful to have a parental waiver for parents to sign before posting pictures of children on social networking sites as well. Social media marketing be done in the mornings before officers go out on patrols, or officers can post where they will be that day and encourage youth to come engage with the officers while on their patrol. If funding allows, officers can incentivize these interactions with the promise of a prize. Ideally, incentives that are given out to children will promote bicycle safety. Local partnerships with businesses may allow for programs to buy helmets in bulk that can be given out to children while officers are on patrol. Additionally, information about local youth bicycle education classes, which are being implemented in the area, can be given out to children with a certificate for a free class. This interaction between child and officer will not only be a
44 positive interaction for local youth, but it will help build trust between enforcement officials and youth. If funding does not allow for bike helmets, stickers or other smaller incentives can be used as well. OPERATION The ideal times for officers to be out in the community has been shown to be between 8 am- 10 pm while the target demographic of youth (between 6-12 years old) are outside. Different patrolling locations are determined by where the youth bicycle education classes are being implemented. Officers can set up a schedule and determine which areas they would like to patrol a week prior to implementation based on the different schools or community centers that have implemented the program. This will allow for positive interaction with youth and useful evaluation for children who have gone through the Bike Sense Program. Officers can then follow-up to make sure that they are following the necessary safety guidelines that they learned during the Bike Safe training course. Once the officers are out on patrol, encourage them to engage with youth as much as possible regardless of weather they are on a bike. Officers are encouraged to give children helmets and a certificate for a free bike safety-training course in the community. Bike Cops for Kids has implemented a successful strategy of giving children helmets that do not have them. Then they are telling youth that if they see them wearing their new helmets the next time they are on patrol, even if they aren t on their bike, they will win a free bike. This encourages youth to carry around their helmets with them in anticipation of seeing youth bicycle enforcement officers. This bike is then given to them in a special ceremony in front of family and friends. This ceremony, or the interactions between officers and youth when they receive their helmets can be documented with a camera and then posted on social media outlets as an invaluable marketing tool for youth outreach. Officers who are on patrol are also encouraged to stop and evaluate bike safety standards with children on bikes. They can mentor them on the ABC Bike Quick Check, Equipment standards and other bicycle safety measures that are taught in the Bike Sense Program. If the child is not wearing a helmet, officers can give the child a helmet and talk to them about the importance of being safe on the road. If the child hasn t already done so the officer can give him or her a certificate for a local Bike Sense program. 44
45 Youth bike safety officers have many opportunities to engage with youth and also to learn more about the neighborhoods that they are patrolling. During the summer month s crime is at an all time high. Officers spend much of their time reacting to situations. Youth Bike Safety Officers are encouraged to interact with youth in a positive way that will prevent crime in high-risk areas in both in the long term and short term. Because officers are more available on bikes, they will be able to learn about different situations in local areas that can be dealt with before they become problems. Additionally, the rapport that they officers are building with youth will encourage youth act as proactive crime prevention. CREATING PARTNERSHIPS Partnerships with local bike stores and bike clubs can be useful partnerships for the Bike Sense Program. Because of the limited resources and highly skilled requirements needed to run the program smoothly, it is important that the program pick its opportunities wisely. Officers and Instructors of the Bike Sense Program are highly trained in youth engagement and bicycle safety laws. Creating partnerships with local hospitals, businesses or bicycle safety programs can be great way to gain the resources necessary to outfit the program with bikes, helmets and funds for skilled law enforcement officials. It is important that officers meet youth in their neighborhoods. The premise of the Bike Sense program is to develop safety measures with youth in their communities. Promoting Bike Sense at events like National Night out is a great way to promote the program, however, one on one interaction are always best. Handing a child a helmet and talking about the importance of bike safety can be much more effective with limited resources than handing out helmets to children in a line without any discussion of bike safety measures. 45
46 Appendices Appendix 1: Parent / Guardian Letter #1 Appendix 2: Bicycle Equipment Survey Appendix 3: Fitting a Bicycle Helmet Appendix 4: ABC Bike Quick Check Appendix 5: Parent / Guardian Letter #2 Appendix 6: Bicycle Field Trip Leader Information Appendix 7: Notes on Student Bicycle Maintenance Appendix 8: Summary of Bicycle- Related Laws Appendix 9: Participation Record & Curriculum Feedback Appendix 10: Assessment Rubric Appendix 11: Bike Sense Questions (Pre and Post Tests) Appendix 12: Instruction Propos (Car, Stop Sign, Traffic Signal, Drain Grate Appendix 13: Graduation Certificates Appendix 14: Bicycle Education Check-up (Enforcement) 46
47 INTRODUCTION TO BIKE SENSE ON-BIKE! Dear Parents and Guardians, In a few weeks, our school will provide Bike Sense On-Bikes safety education lessons. This program was developed through the Bike Louisville Program to teach children bicycle handling and traffic safety skills. Bicycles are legal vehicles under Kentucky state law. Bicycle safety is a first step in learning to operate a vehicle safety on the roadway. We are contacting you at this time, to find out if your child will be able to bring his or her bicycle and bicycle helmet to school to use during the lessons. The school will have bicycles if you do not have one or can not bring it to school. Students will share bicycle during the instruction in a supervised setting. Please return the enclosed equipment survey to indicate your ability to bring a bicycle to school, and your willingness to share with others. Each student who does bring a bicycle helmet will be able to use the schools bicycle helmet with a hairnet for personal safety and hygiene. Up to 90% of child bicycle fatalities could be prevented by wearing a properly fitted helmet. Before participating in the Bike Smart curriculum, please use the enclosures to help your child prepare: Make sure your child s helmet is sized and fitted correctly using Fitting a Bicycle Helmet. Check your child s bicycle using the enclosed ABC Quick Check worksheet. Plan with your child to wear bicycling appropriate clothing that is light, bright and tight. If your child will ride his or her bicycle to school to participate in the Bike Sense On-Bike lessons, we encourage you to accompany your child to school, or ensure that he or she has a good route and adequate safety skills for traffic along this route. We look forward to your child s participation in a successful bicycle safety program in our school. Thank you for your support. Sincerely, Enclosures Parent Survey; Fitting a Bicycle Helmet; ABC Bike Quick Check This program is made possible with Sharing the Road License Plate funding from the Paula Nye Grant and is based on the curriculum BikeSmart On-Bike developed by the Center for Health & Learning Bike Sense On-Bike: Parent / Guardian Letter #1 47
48 BICYCLE EQUIPMENT SURVEY For School / educator to complete before sending home: Weather permitting; Bike Sense On-Bike instruction dates will be as below: Lesson 1 Lesson 2 Lesson 3 Lesson 4 Lesson 5 Lesson 6 (optional Field trip) To be filled out by parent or guardian, and returned to school. Please return to school by (Date) Student s Name Grade: Student s Classroom Teacher: The Bike Sense On-Bike Lessons will be taught as a series. BICYCLES Can your child bring a bicycle to school on the dates above? Yes No HELMETS Does your child have a bicycle helmet that fits? Yes No BICYCLE FIELDTRIP PARENT PARTICIPATION Our unity may include a bicycle field trip on local streets. Would you be interested in joining a bicycle field trip for one day only? You would be required to bring your bicycle and helmet and ride with the class Yes No Not sure Depends on date 48
49 FITTING A BICYCLE HELMET If your helmet fails the Eyes, Ears, Mouth test, this is how to adjust the fit. 1. Unbuckle the chinstrap, take the helmet off, and open up the plastic support system Not all helmets have a plastic support system. If you helmet has one, it will look like a large ring of plastic around the back of your helmet, with an adjustable dial or buckles at the rear. 2. Place your helmet level on your head, so that it would pass the Eyes test. You should be able to see the brim of your helmet when you look up 3. Check that the helmet is the right size for your head. If the helmet sits up on top of your head, it is too small and you need a new helmet! If the helmet is very loose on your head, your helmet is too big. 4. If you have a plastic support system at the back of your helmet, tighten it. Make sure your helmet is still level on your forehead. The support system should be snug but not too tight. 5. Adjust the ears straps to form a Y under your ears. Work with a buddy to do this, as it is hard to do this yourself. There are plastic sliders on these straps. If the slider has a buckle, loosen it to adjust the straps. Adjust the slider on both straps to form a V shape under, and slightly in front of, the ears. Keep your helmet level on your head while you do this adjustment. Lock the slider if possible. 6. Adjust the chin strap so that it is snug under your chin. Buckle your chin strap. Adjust how the strap goes through the buckle until it is snug, so that no more than one or tow figures fit under the strap. You may need to buckle and unbuckle your helmet several times as you adjust the strap and check the fit. 7. Do the Eyes, Ears, Mouth test again to confirm that your helmet now fits properly! Illustrations from the National Traffic Highway Safety Administration Active sheet from BikeSmart On-Bike by Becka Roolf Center for Health & Learning, 2008 Developed for the Vermont Safe Routes to School Program 49
50 50 Equipment Standards
51 51
52 ABC BIKE QUICK CHECK A is for air pressure Squeeze the tires to check for low air pressure. Does the wheel feel firm? B is for brakes Squeeze each brake lever. (Note: Coaster brakes do not need to be checked) Does the wheel stop quickly? Does the brake lever hit the handlebar? C is for chain Is the chain on track? Is there anything caught in the chain? Is the chain clean and lubed? QUICK is for Quick Releases. Check the quick release on the front and rear hub and on the seat post. Are they in the closed position? SPIN is for spinning the wheels Do they spin smoothly? Do they have any broken spokes? Other: Check reflectors and lights Dare they clean, working and visible? If you cannot check off every item, ask a knowledgeable adult for assistance, or bring your bike to a bike shop. 52
53 BIKE SENSE ON-BIKE Dear Parents and Guardians, Our school is currently providing Bike Sense On-Bike safety lessons. This program was developed through the Bike Louisville Program to teach children bicycle handling and traffic safety skills. As part of this module, we plan a short bicycle ride with the students on local roads. In order for your child to participate, we ask that you return the enclosed permission slip to the school. Bicycles are legal vehicles under Kentucky state law. Bicycle safety is a first step in learning to operate a vehicle safely on the roadway. The Bike Sense On-Bike curriculum focuses on these critical concepts and skills for bicycle safety. We encourage you to discuss these concepts and skills with your child: Ask them where they should ride on the roadway with regard to other traffic. Practice having them look back over the shoulder for traffic, without swerving. Practice stopping at the end of the driveway and at stop signs, looking for traffic, and determining when it is safe to go. Practice making left-hand turns on neighborhood streets or busier roadways, as appropriate to age. Ask them to explain how stop signs and traffic signals control the flow of traffic. Map out some bicycle-friendly routes to destinations such as: school, recreation fields, library, general store, etc. Talk through how to approach the traffic patterns and intersections on the way to each of these destinations, and practice riding them at low-traffic times of the day. Bicycling is healthy for your child. Biking cuts down on pollution and vehicle traffic, and is also fun! Thank you for your support. Sincerely, Enclosure: Bicycle Fieldtrip Permission Slip This program is made possible with Sharing the Road License Plate funding from the Paula Nye Grant and is based on the curriculum BikeSmart On-Bike developed by the Center for Health & Learning Bike Sense On-Bike: Parent / Guardian Letter #2 53
54 54 BICYCLE FIELD TRIP LEADER INFORMATION This information is for parent or community volunteers who join the Bike Sense On-Bike class for a bicycle ride. You will be riding with students who have recently received instruction in bicycle safety. We will be riding on the right side of the road and obeying all traffic laws. The students should be encouraged to look and make their own decisions about traffic. Your role is to supervise but not to shepherd. Please plan to be at the school, ready to ride, 5 minutes before the ride starts. YOUR EQUIPMENT Bring your bicycle in good working condition and your helmet. Check your quick releases especially if you have removed a wheel to transport your bike. Remember to dress in bright or light clothing, modeling clothing that a typical child bicyclist might wear. This is a short ride so you do not need "bike clothes." COMMUNICATION Introduce yourself and learn the names of the students in your sub-group. Be clear and specific when giving directions. Give responsibility to students by rotating ride leaders. If problems occur or a student is being difficult, discuss problems individually. State they will not be allowed to ride again if they do not follow directions. Remind students to be safe and predictable riders. PRE-RIDE Everyone will do a helmet and bicycle safety check. Remind students to obey all traffic rules and signals and to ride in a single file, passing is not allowed. State that each person must think and act for himself or herself; not just follow the leader. Remind students to stop for yellow lights. RIDING TECHNIQUES Position yourself at the front or back of the group. Give clear and loud verbal warnings and directions, encourage students to be verbal. Ride on the right side of the road with space cushion for opening car doors or other obstacles. Avoid riding on sidewalks and making illegal maneuvers. Left turn look back for traffic, give left turn signal and move to the left side of lane, give signal again at intersection, watch for oncoming traffic and turn back into the right side on the adjacent street. Stop signs and red lights a) group stops in a single file; b) ride leader (you) rides to front of group; c) leader coaches each rider individually through intersection; d) leader instructs first student to wait ahead while the remaining riders cross the intersection. Be specific (e.g. have student leader wait near a parked car, driveway, mailbox, or tree). Stop your ride and walk the bikes if you feel uncomfortable with the riding conditions or the group is out of control. Stick to the same route as the overall group leader. Rider leader information adapted from the Bicycle Transportation Alliance of Oregon, as a Bike Sense Activity sheet. Developed by the Center for Health & Learning for the Vermont Safe Routes to School Program
55 NOTES ON STUDENT BICYCLE MAINTENANCE If you can arrange for a local bike shop mechanic to come to school at the start of the school day when your students are bringing bicycles for Bike Sense On-Bike, the mechanic may help you to deal with any major problems. Bike mechanics will usually bring a portable repair stand; you could set this up near your school bike rack in the morning. If you feel comfortable with basic bicycle maintenance, you may wish to also bring the following tools to class (especially the first class). Chain lube Penetrating oil (Liquid Wrench) Set of adjustable wrenches (large and small) Allen wrench set (also called hex wrenches) Screwdrivers, Phillips and flathead Air: The most common problem you will find with the students' bicycles is low air pressure in the tires. If the air pressure is just slightly low, allow students to use the bicycle without taking the time to pump up tires. Make the bicycle floor pump available before / after class or before / after school. Brakes: Failing brakes, on the other hand, are a serious problem. If brakes are not easily adjusted to work properly, or if you do not feel comfortable with making a bicycle repair, you will need to forgo using that bicycle. Refer the student to a bike shop. Chain / Crank: Some chain lube, and/or liquid wrench (penetrating oil, frees rusted parts) may be all that's needed to get a stuck chain back in operation. When you test the cranks, make sure that the crank-arms are securely fastened to the bicycle. If there is just a little wobble in the crank arms, it is probably still OK to ride. If there is significant play, or if the bottom bracket feels very "gritty", refer the student to a bike shop. Quick: Check the quick releases on the wheels and seat post. Spin: If a wheel is only slightly out of true, you may still use the bicycle. A brake might rub slightly, which is not too big a deal. See if the student can have it fixed before the bicycle field trip. If a wheel is very out of true and the brake rubs severely, you will again have to refer the student to the bike shop. Stem Bolt / Handlebar Steering: If the handlebars are very crooked with regard to the direction of the front wheel, or if the stem bolt is loose so that the wheel does not turn when the handlebars turn, do not use the bike in class. If you feel comfortable tightening a handlebar bolt, this is an easy repair. If not, refer the student to a bike shop. 55
, the Kentucky Administrative Regulations (KAR) of the Transportation Cabinet, and the Ordinances of Louisville-Jefferson County Metro Government.")

56 SUMMARY OF BICYCLE RELATED LAWS IN KENTUCKY Rules of the Road The operation of a bicycle in the City of Louisville is governed by several state and local regulations: the Kentucky Revised Statutes (KRS), the Kentucky Administrative Regulations (KAR) of the Transportation Cabinet, and the Ordinances of Louisville-Jefferson County Metro Government. This page will summarize the rights and responsibilities of bicyclists as defined in these regulations, and is not intended as a comprehensive reference guide. Links to the full-text of the regulations are included on this page; please follow them for complete reference information. Note: For information about laws pertaining to mopeds, go here and review Chapter 71: Traffic Laws. (Mopeds are covered in section ) State Regulations: The Kentucky Revised Statues (KRS ) give the Transportation Cabinet the right to "promulgate bicycle safety regulations and standards." These regulations are defined in the Kentucky Administrative Regulations (601 KAR 14:020). The less obvious regulations are summarized below: You MUST use a front light when riding at night or whenever it is darker than usual (i.e. when it is heavily overcast). [See KRS (1) for description of when a light is required.] You MUST use a red rear reflector or light on yourself or your bicycle whenever riding on a highway or shoulder (definitions). At night or when overcast (as described above), you MUST use a steady or flashing red rear light. You MUST shout or sound a bell or horn when approaching a pedestrian or other bicycle. It is illegal to carry more passengers than the bicycle was designed to accommodate. You may not carry a package which prevents you from keeping at least one hand on the handlebars. It is illegal to attach yourself or your bicycle to another vehicle. Bicycles shall be operated the same as a motor vehicle EXCEPT for the following: A bicycle MAY be operated on the shoulder of a highway. If a bicycle lane is provided, it MUST be used whenever feasible. Not more than TWO bicycles may ride side-by-side in a single highway lane. 56
57 SUMMARY OF BICYCLE RELATED LAWS IN LOUISVILLE Local Regulations: KRS states that riders and bicycles complying with the 601 KAR 14:020 regulations are exempt from the provisions of KRS (9), KRS (1), KRS (5), and KRS (regarding lights and horns). Such bicycles and riders are also exempt from municipal and other local government regulations concerning safety equipment but not method of operation." A number of local regulations apply to the operation of bicycles, defined in the local Traffic Code chapter on Bicycles and Motorcycles, TITLE VII, CHAPTER 74. This ordinance specifies more detailed usage restrictions than do state regulations. They are summarized here: No person over 11 years old shall operate a bicycle on any sidewalk in Louisville Metro, and nobody of any age shall ride on the sidewalk downtown. o This does NOT apply to officers of Louisville Metro Police Department, employees of Louisville Metro Emergency Medical Services, Louisville Fire and Rescue, the suburban fire protection districts, Louisville and Jefferson County Emergency Management Agency, nor to Downtown Management District Clean and Safety Team personnel, nor to private security personnel employed by hospitals located within the Downtown Form District, as long as they are acting within the scope of their official duties. Children are allowed to ride as passengers as long as certain conditions are met. No person shall operate a motorized vehicle on a designated bike path or bike lane. o Metro Government maintenance vehicles are exempted from this regulation. You MUST wear a helmet if you are under 18 years old and you are riding in any Metro Park. In all other ways, bicycles are considered "vehicles" by the Kentucky and Local regulations and are subject to all rights and regulations of other vehicles. These include: You must stop at all stop signs and red lights as must other vehicles. You must pass on the left and make turns from the appropriate lane. o However you are encouraged to remain in an on-road bicycle lane even if it means you will pass some stopped traffic on the right. You must signal, using your hands (see the Bicycle Safety page for hand signals), lamps, or mechanical devices. The signal must be given intermittently for the last fifty feet before the turn. All slow moving vehicles must bear as far right in their lane as is safe and practical, including bicycles. o If there is on-road parking, a particularly narrow street, debris, or other hazards, you are allowed to claim as much of the lane as necessary to ride safely. As stated in Section (C) of the Traffic Code: "Every person riding a bicycle or an animal on any roadway, and every person driving any animal on any roadway, and every person driving any animal-drawn vehicle shall be subject to the provisions of this traffic code applicable to the driver of any vehicle, except those provisions of this traffic code which by their very nature can have no application." 57
58 SUMMARY OF BICYCLE RELATED LAWS IN KENTUCKY Rules for Motorists Concerning Bicycles Since motor vehicles and bicycles are both considered "vehicles" under the eyes of the law, there are rules which apply to motorists as well as to bicyclists regarding their behavior on the road. Motorists MUST: Share the road with bicyclists. Before passing a cyclist: Look to see if there is something in the right lane (debris, parked cars, drainage grates, etc.) that might cause the cyclist to divert their course to the left. Pass only when you can allow at least three feet between yourself (as measured from the extent of your rear-view mirrors) and the cyclist. Return to your lane only when completely clear of the cyclist. If you turn right after passing a cyclist, only do so if you leave enough room that his forward path is not obstructed. When opening your car door, look for cyclists in your rearview mirror. The information in the "Rules for Motorists Concerning Bicycles" section comes from the Kentucky Drivers Manual. 58
59 PARTICIPATION RECORD & CURRICULUM FEEDBACK Bike Sense On-Bike 59

60 Fill Fill Fill Fill Fill 60
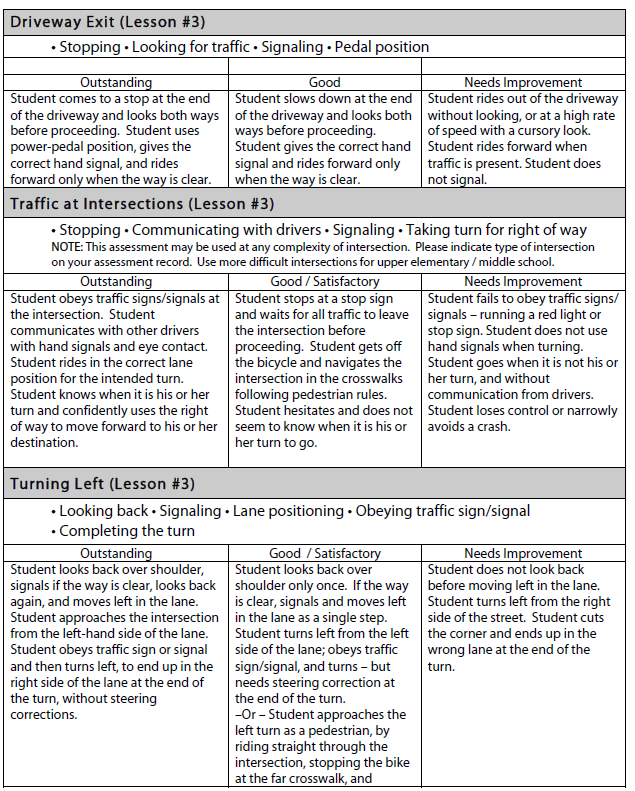
61 61
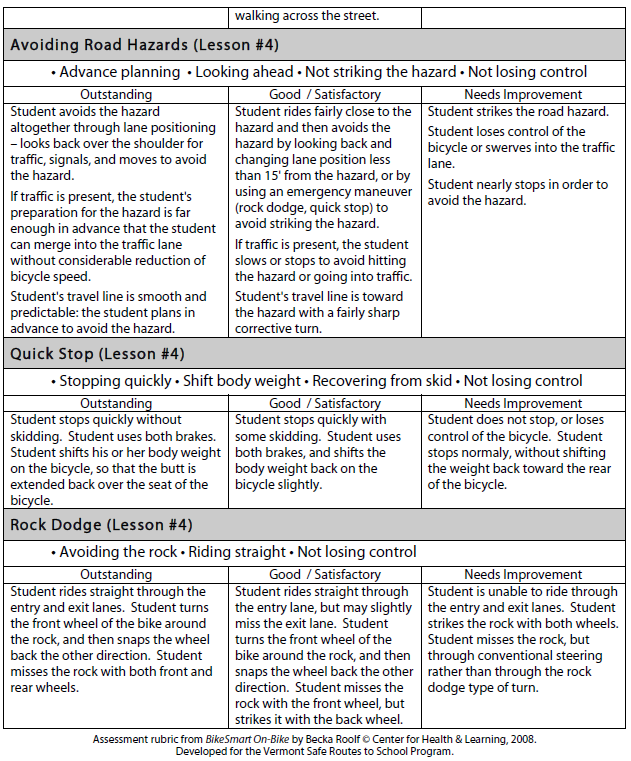
62 62
63 63 Bike Sense Questions Please circle the best answer to the question School Name: Grade 1. When should you wear a bicycle helmet? a. When riding in traffic b. Whenever you are riding Date: Pre test or Post Test 2. What are the things you check for proper helmet fit? a. Light and tight b. Eyes ears and mouth 3. When is it time to get a new helmet? a. When it is more than five years old or has been in an accident b. Every year 4. How should you dress safely when riding a bike? a. Comfortable clothes b. Light and tight c. Doesn't Matter 5. When you are riding a bicycle should you ride facing the cars or with the cars coming from behind you? a. Cars coming from behind you b. Facing the cars Please turn over for more questions
64 6. When should you signal? a. When making a turn b. When going straight 7. Does yield mean stop or slow down and look for traffic? a. Slow down and look for traffic b. Stop 8. When you are riding with a friend who is also riding, is it best to ride next to the friend or single file? a. Next to the friend b. Single file 9. When you do the ABC-Quick Check, which should you check? a. Air in the tires b. Chain c. Both a and b 10. Does a bicyclist have a right to ride in the road when there is a sidewalk? a. Yes, you have the right to ride in the road b. No, you must ride on the sidewalk. 11. Bonus. What is a good reason to ride your bike? a. It is good exercise and fun b. It cuts down on pollution c. both a and b Tell us one thing you like about biking? 64 Thank you!
65 65

66 66
67 67
68 68
69 69

70 70
Bicycle riding is a great way to get into shape
 Bicycle riding is a great way to get into shape and have fun. To remain safe on Illinois roads, it is important to follow the same traffic safety laws that govern vehicle drivers. No amount of bicycle
What Every Young Michigan Bicyclist Must Know
 What Every Young Michigan Bicyclist Must Know A Guide for Youth Tips for Riding Your Bicycle Legally and Safely Meet the LMB Safety Kids Sprocket Madison Hub Spokes Chase Ryder What Every Young Michigan
Bicycle Safety Quiz Answers Parental Responsibilities
 Bicycle riding is a great way to get into shape and enjoy the outdoors. To remain safe on Illinois roads, it is important to follow the same traffic safety laws that govern vehicle drivers. No amount of
A Guide to Safe Bicycling in Hawai i
 A Guide to Safe Bicycling in Hawai i Sharing the Road: A Guide to Safe Bicycling in Hawai i What Motorists & Bicyclists Should Know Everyone has the right to be safe on Hawai i s roads. Law of the Splintered
Bicycle Riding. WHAT ARE the. One Final Note... It is against the law to ride a bicycle under the influence of alcohol and/or drugs. (21200.
 One Final Note... It is against the law to ride a bicycle under the influence of alcohol and/or drugs. (21200.0 VC) Bicycle Riding WHAT ARE the CALIFORNIA HIGHWAY PATROL CHP 909 (12/11) OPI 013 94 75015
ve been rolling Here, s to you, Oregon riders! You, , s no wonder for longer than you, ve been walking, so it
 THE BICYCLIST S 1 the bicyclist s survival guide ride safely. the way to go. 2 Here, s to you, Oregon riders! You, ve been rolling for longer than you, ve been walking, so it, s no wonder you feel right
Back to School Car Safety. Direct Buy Warranty Staff September 19, 2014
 Back to School Car Safety Direct Buy Warranty Staff September 19, 2014 It s back to school season, and that means kids are picking out new clothes, putting on their backpacks, and hitting the road to get
New York Bicycling Pocket Guide
 New York Bicycling Pocket Guide Prepared by the New York Bicycling Coalition About This Guide Getting around by bike is good for one s health and wallet, and the environment. But many people aren t sure
The Statistics. Tips for Parents
 The Statistics In 2001, the most recent statistics for Texas, 985 children, age 0-14, were injured in crashes with motor vehicles. For that same period of time and age range, 9 children died and 66 percent
BIKE BASICS. The AAA Guide to a Great Ride
 BIKE BASICS The AAA Guide to a Great Ride FREEDOM ON WHEELS Bicycles can be considered symbols of independence and freedom. They are also fun, providing riders a greener, healthier form of transportation.
AAA S GUIDE TO A SAFE
 Credit: ThinkStock SAME ROADS SAME RULES SAME RIGHTS AAA S GUIDE TO A SAFE BIKE RIDE DRIVING A BICYCLE Yes, bicyclists MUST drive their bicycles in the same manner that motorists drive their cars. Most
Imagine a bike that s there when you need it, wherever you are, and gone when you don t. That s B-cycle. In this guide, you ll find all you need to
 Imagine a bike that s there when you need it, wherever you are, and gone when you don t. That s B-cycle. In this guide, you ll find all you need to know about operating a B-cycle to ensure your ride is
Bicycle Safety Enforcement Action Guidelines
 Introduction Bicycle Safety Enforcement Action Guidelines People ride bicycles for many different reasons: fitness, recreation, or for transportation. Regardless of the reason for riding, bicyclists young
SAFE CYCLING GUIDE. 7th Edition
 SAFE CYCLING GUIDE 7th Edition BEFORE SETTING OUT A Check tire pressure B Check that the chain does not slip C Check the brakes D Check lights and reflectors: 1 A WELL-MAINTAINED BICYCLE is key 3 4 5 Adjust
SAFE CYCLING GUIDE. 6th Edition
 SAFE CYCLING GUIDE 6th Edition BEFORE SETTING OUT A WELL-MAINTAINED BICYCLE is key A Check tire pressure B Check that the chain does not slip C Check the brakes D Check lights and reflectors: 3 4 1 5 2
YOUR GUIDE TO INTRA-TOWN CYCLING
 YOUR GUIDE TO INTRA-TOWN CYCLING Content 04 Introduction 05 Attire Before you set off 06 Safety Checklist for Bicycle 07 Maintenance 08 Preventing Bicycle Theft What to look out for on the way 10 Signs
Cycle Safety. Some tips on safer cycling. Údarás Um Shábháilteacht Ar Bhóithre Road Safety Authority
 Cycle Safety Some tips on safer cycling Údarás Um Shábháilteacht Ar Bhóithre Road Safety Authority Be safe For further information on safe cycling, please look at the Rules of the Road website at www.rulesoftheroad.ie
These "rules of the road" are based on Texas Transportation Code statutes. Find the complete bicycle code at the bottom of the page
 Texas Bicycle Laws These "rules of the road" are based on Texas Transportation Code statutes. Find the complete bicycle code at the bottom of the page Bicyclists have the rights and duties of other vehicle
- FREE! - The Official San Francisco BIKE GUIDE. 1st Edition
 - FREE! - The Official San Francisco BIKE GUIDE 1st Edition SF BIKE LAWS SAN FRANCISCO BICYCLISTS MUST: Yield to People Walking Whether they re in a crosswalk or not, ALWAYS yield to people walking. Stop
Traffic Safety Quiz Show. Grade level: 4/5
 Traffic Safety Quiz Show Grade level: 4/5 Introduction: In this activity, students play a game that allows them to demonstrate and develop bicycle and pedestrian safety knowledge. The game is based on
6: LANE POSITIONS, TURNING, & PASSING
 6: LANE POSITIONS, TURNING, & PASSING BASIC LANE POSITIONS Traffic law says that slower vehicles should stay to the right. But where exactly should bicycles ride? Here are some basics. Never Ride Against
TEST ON Driving Safely Among Bicyclists and Pedestrians
 TEST ON Driving Safely Among Bicyclists and Pedestrians Next you will take a 16 question test about driving safely among bicyclists and pedestrians. Please take out a sheet of paper to mark down and score
BICYCLE Safety Unit. Lesson 2 of 3: TRAFFIC SAFETY
 BICYCLE Safety Unit Lesson 2 of 3: TRAFFIC SAFETY 1 2012 BICYCLE Safety Unit Activities Materials Lesson 2 of 3: TRAFFIC SAFETY 4th Grade. Classroom setting. Traffic Safety addresses how to safely and
Smart Cycling IN SANTA MONICA SANTA MONICA POLICE DEPARTMENT BE SMART. BE VISIBLE. BE ATTENTIVE. HAVE FUN!
 Smart Cycling IN SANTA MONICA BE SMART. BE VISIBLE. BE ATTENTIVE. HAVE FUN! Safety Tips and Rules of the Road for Cyclists SANTA MONICA POLICE DEPARTMENT Rules of the Road Drivers, bicyclists, and pedestrians
A South Carolina Bicycle Safety Curricula. for all audiences, in a classroom setting
 A South Carolina Bicycle Safety Curricula for all audiences, in a classroom setting 1 About the Safe Streets Save Lives (SSSL) campaign The Palmetto Cycling Coalition, in collaboration with Bikelaw and
a family guide to January 2009 Bike Ed
 a family guide to January 2009 Bike Ed Childhood Development e program was developed by ycle education instructor s of programs available visit: gresources/health VRPIN 02026 5.08 a bicycle education program
Teaching Your Teen to Drive
 MetLife Auto & Home Teaching Your Teen to Drive Without driving each other crazy! Dear Parent/Guardian, One of the best ways for you to influence your teen s driving habits is to sit in the copilot seat
Bicycle Book. This book belongs to. Name. Address. Telephone number. Make of bicycle. Color of bicycle. Serial number.
 Bicycle Book Bicycle Book This book belongs to Name Address Telephone number Make of bicycle Color of bicycle Serial number License number Other identifying marks Message to Parents Most children love
Bike 101. a s. c s. Bi cycle Safety. A Guide For Grades 7-12
 Bike 101 Bi cycle Safety B a s i c s A Guide For Grades 7-12 The Road To Safer Cycling Today, more bicyclists and motorists are sharing the road than ever before. Unfortunately, this increase in traffic
Tennessee Traffic Laws Relating to Bicycles A HANDBOOK FOR MOTORISTS & BICYCLISTS
 Tennessee Traffic Laws Relating to Bicycles A HANDBOOK FOR MOTORISTS & BICYCLISTS About the Knoxville Regional Bicycle Program The Knoxville Regional Transportation Planning Organization (TPO) coordinates
Atlanta, Georgia Road Test
 1. When driving your car Into traffic from a parked position, you should: A. Sound your horn and pull Into the other lane. B. Signal and proceed when safe. C. Signal other traffic and pull directly into
Bike Laws: Massachusetts
 Bike Laws: Massachusetts Do you know your rights of the road? Do you know what your responsibilities are when biking in Massachusetts? Here is a summary of Massachusetts bike law that covers equipment,
Bicycle Safety in North Dakota
 North Dakota State University Bicycle Safety & Rules of the Road I. Introduction Bicycling is a fun and healthy exercise. Before riding your bicycle on roadways, take time to learn the rules. Many bicyclists
ILLINOIS STATUTES REGARDING BICYCLES Updated March 2009
 ILLINOIS STATUTES REGARDING BICYCLES Updated March 2009 ILLINOIS VEHICLE CODE 625 ILCS 5/ "Every person riding a bicycle upon a highway shall be granted all of the rights and shall be subject to all of
Safe Routes To School: Bike Safety
 Safe Routes To School: Bike Safety Developed by Hands On: Real World Lessons for Middle School Classrooms Funded by Tennessee Department of Transportation Contact: Jerry Everett. Ste 309 Conference Bldg,
MISSISSAUGA CYCLISTS HANDBOOK THE. English
 THE MISSISSAUGA CYCLISTS HANDBOOK English Cycling is affordable, healthy and convenient. Join thousands of Mississauga men, women and children who choose to ride a bicycle because it is inexpensive, healthy,
Aguide for sharing Vermont s roads for bicyclists, pedestrians, motorists and others. Please VERMONT. Agency of Transportation
 Aguide for sharing Vermont s roads for bicyclists, pedestrians, motorists and others. Please VERMONT Agency of Transportation Vermont s roadways are used by motorists, pedestrians, bicyclists and others.
safety bicycle safety
 safety bicycle safety our mission The mission of The USAA Educational Foundation is to help consumers make informed decisions by providing information on financial management, safety concerns and significant
Why Do We Bike? And where, how, who, when, and with what
 Why Do We Bike? And where, how, who, when, and with what What will I learn today? Knowledge of laws for bikes in traffic: your rights and responsibilities as a bicyclist and motorist Examples of safe and
RIDE ON THE RIGHT TIP:
 B I C Y C L I N G I N C O L O R A D O RULES OF THE ROAD Please consult the Colorado Revised Statutes for the specific language of the law regarding bicycles and their operation. Municipalities and other
NASHVILLE BICYCLE LAW 3/18/09
 NASHVILLE BICYCLE LAW 3/18/09 12.60.010 Compliance with Title 12 provisions. It is unlawful for any person to do any act prohibited or fail to perform any act required by Title 12 of this code. (Prior
Bicycle, In-Line Skating & Skateboarding Safety
 Bicycle, In-Line Skating & Skateboarding Safety Overview Over 70 percent of children between the ages of 5 and 14 ride bicycles. In-line skating and skateboarding are also very popular among this age group.
chapter 3 basic driving skills
 chapter 3 basic driving skills When curving to the left, keep the front wheels close to the right edge of the lane to keep your driver s side rear wheels out of the next lane of traffic. Curve ahead slow
BIKE AND PEDESTRIAN CRASH SURVERY
 This survey includes questions regarding biking activity, accidents, and injuries, as well as the answer options provided by the Nashville MPO. Introduction 1. Have you ridden a bicycle within the past
Document Name: Driving Skills. Purpose: To outline necessary driving skills required to maximize driving safety.
 Document Name: Driving Skills Date Created: 8 October 2013 Date Reviewed: 4 February 2014 Date Approved: 29 July 2015 Purpose: To outline necessary driving skills required to maximize driving safety. Overview:
Safety Evidence for Bicycling
 Photo: Boegh (Flickr) Cycling in Cities Research Program School of Population & Public Health The University of British Columbia Faculty of Health Sciences Simon Fraser University Driving near bicyclists
A Bicyclist s Guide to Traffic Law in Tucson and Pima County. Traffic Laws, Fines and Phone Numbers
 A Bicyclist s Guide to Traffic Law in Tucson and Pima County Traffic Laws, Fines and Phone Numbers This booklet contains a listing of relevant Arizona State, Pima County and City of Tucson laws as of January,
Chapter 4 DEFENSIVE DRIVING
 Chapter 4 DEFENSIVE DRIVING Chapter 4 Table of Contents Chapter 4 DEFENSIVE DRIVING... 4-1 DEFENSIVE DRIVING... 4-3 Positioning The Bus... 4-3 When Making a Turn at an Intersection... 4-3 Making the perfect
FMCSA Webinar Nov.18th to Examine Large Truck Crash Fatalities Involving Pedestrians & Bicyclists. New Technology for Better Fleet Management
 In This Issue: FMCSA Webinar Nov.18th to Examine Large Truck Crash Fatalities Involving Pedestrians & Bicyclists Help Prevent Roadway Accidents involving Pedestrians How to Steer Clear of Accidents with
Department of Transport. Cycling Rules
 Department of Transport Cycling Rules 2 Contents Definition of a bicycle Standard requirements Power-assisted pedal cycles Carrying or towing loads The rider, passenger and helmets Rules affecting cycling
How To Know The Laws Of A Bike Ride In California
 The Rules Of The Road For Colorado Cyclists Your Rights and Responsibilities as a Colorado Cyclist Crawford Weiss, LLC Phone (303) 741-0249 www.denversaccidentlawyer.com 2015 The Rules Of The Road For
ORDINANCE NO. Section 21-197. Traffic laws apply to persons riding bicycles, shall be amended to read as follows:
 ORDINANCE NO. AN ORDINANCE TO AMEND CHAPTER 21, ARTICLE V, CODE OF ORDINANCES, CITY OF MEMPHIS, TO UPDATE REGULATIONS REGARDING THE OPERATION OF BICYCLES WITHIN THE CITY OF MEMPHIS WHEREAS, the current
Summary of Bicycle Ordinances Tulsa Metropolitan Region. Passing requirement. Use of permanent seat
 May 2009 Updated 10/2011 Summary of Bicycle Ordinances Tulsa Metropolitan Region Mandatory Sidepath Two Abreast Bicycles considered vehicles Passing requirement Use of permanent seat Ride as far to the
Middle School Lessons Grades 6-8
 Middle School Lessons Grades 6-8 MIDDLE SCHOOL LESSONS: BICYCLING AS A SPORT, BRAIN INJURIES, HELMETS, BICYCLING SKILLS, BASIC MAINTENANCE & NAVIGATING In middle school, students are riding bicycles regularly
Ski on specific terrain (green, blue, black diamond, double black diamond) B Balancing Maintaining balance while in motion
 B Balancing Maintaining balance while in motion") Developing Skills A ski lesson should focus on a skier s skill development through the use of various encouraging tactics which include using exercises to help a student: Reinforce key movement Ski in
Developing Skills A ski lesson should focus on a skier s skill development through the use of various encouraging tactics which include using exercises to help a student: Reinforce key movement Ski in
The State Government recognises. areas, and regulates bicycle
 cycling & THE LAW rules introduction for roads The State Government recognises The cycling South Australian as a legitimate Road Traffic form of Act including transport the Australian and an increasingly
New Jersey Bicycle Laws
 39:1-1 Words and phrases defined Right-of-way means the privilege of the immediate use of the highway. Traffic means pedestrians, ridden or herded animals, vehicles, streetcars, and other conveyances either
BICYCLE AND IN-LINE SKATE LAWS ROAD SHARING RESPONSIBILITIES OF BICYCLISTS AND MOTORISTS, REQUIRED EQUIPMENT AND PARENTAL RESPONSIBILITY
 BICYCLE AND IN-LINE SKATE LAWS ROAD SHARING RESPONSIBILITIES OF BICYCLISTS AND MOTORISTS, REQUIRED EQUIPMENT AND PARENTAL RESPONSIBILITY The statutes in this material have been generated from the database
New Hampshire State Laws Pertaining To Bicycles. CHAPTER 230 STATE HIGHWAYS Planning and Laying Out Bicycle Routes
 New Hampshire State Laws Pertaining To Bicycles Current as of April 21, 2009; most but not all laws mentioning bicycles are included below. For current laws, see http://www.gencourt.state.nh.us/rsa/. Compiled
HOW TO PREPARE FOR YOUR MARYLAND NONCOMMERCIAL CLASS C DRIVER S TEST
 ` HOW TO PREPARE FOR YOUR MARYLAND NONCOMMERCIAL CLASS C DRIVER S TEST A portion of your noncommercial driving test will be conducted on a closed course to test your basic control of the vehicle, and a
Videos for Safety Meetings
 Videos for Safety Meetings 2474 2005, ERI Safety Videos OPERATING ELECTRIC PALLET JACKS SAFELY This easy-to-use Leader s Guide is provided to assist in conducting a successful presentation. Featured are:
15-Passenger Van Safety Awareness Program. Environmental Health & Safety Department 570-662-4906
 15-Passenger Van Safety Awareness Program Environmental Health & Safety Department 570-662-4906 Course Objective The objective of this presentation is to increase the safety awareness of passenger van
RULES OF THE ROAD BY LWTL Staff Writer
 RULES OF THE ROAD BY LWTL Staff Writer Publisher s Note This is the First of a Three Part Series on Pedestrian and Bicycle Safety. This First Part is made available to all readers. The final two parts
Pilot Staff Bike Share Project. Induction Notes
 Pilot Staff Bike Share Project Induction Notes www.capetown.gov.za/travelsmart travel.smart@capetown.gov.za Contents Contents... i Introduction.... 1 How do I get access to the bicycles?... 1 Location
a U.S. Department of Transportation National Highway Traffic Safety Administration Computer Accident Typing for Bicyclist Accidents Coder's Handbook
 a U.S. Department of Transportation National Highway Traffic Safety Administration Computer Accident Typing for Bicyclist Accidents Coder's Handbook INTRODUCTION This Coder's Handbook is part of a package
DEFENSIVE DRIVING. It s an Attitude
 DEFENSIVE DRIVING It s an Attitude RLI Design Professionals Design Professionals Learning Event DPLE 155 July 15, 2015 RLI Design Professionals RLI Design Professionals is a Registered Provider with The
GET IT IN WRITING. PARENTS ARE THE KEY TO SAFE TEEN DRIVING. LEARN HOW.
 GET IT IN WRITING. Don t just talk about safe driving; set your family s own driving rules and get your teen to agree to them in writing through a Parent-Teen Driving Agreement. Put a copy of your agreement
Your New Frog Bike. Congratulations on purchasing a new bike and thank you for choosing Frog!
 Your New Frog Bike Congratulations on purchasing a new bike and thank you for choosing Frog! We know that you must be raring to go but before you do there s a few little things still to do to get you up
Broward County Public Schools Core Curriculum Department. Driver s Education Basic Driving Skills: Study Guide
 Broward County Public Schools Core Curriculum Department Driver s Education Basic Driving Skills: Study Guide 5 th Edition 2 nd Edition K.C. Wright Administrative Building 600 Southeast Third Avenue Fort
Safe Cycling in Stillwater
 Safe Cycling in Stillwater by Logan West 2011/9/3 1 Bicycle Laws and Safe Riding Habits Motorists are sometimes unaware of the rights that cyclists have on the road but cyclists themselves are often guilty
Lesson 5: School Bus Safety
 Time: approximately 40 minutes Lesson 5: School Bus Safety LESSON PLAN: Lesson 5 This curriculum does not cover every possible scenario that a child may encounter as a pedestrian, but instead addresses
Beginner s Permit. Survival Guide. Compliments of. (843) 263-5023 www.123drivedrivingacademy.com info@123drivedrivingacademy.com
 263-5023 www.123drivedrivingacademy.com info@123drivedrivingacademy.com") Beginner s Permit Survival Guide Compliments of (843) 263-5023 www.123drivedrivingacademy.com info@123drivedrivingacademy.com Please use this study guide to assist you in studying for your written knowledge
Beginner s Permit Survival Guide Compliments of (843) 263-5023 www.123drivedrivingacademy.com info@123drivedrivingacademy.com Please use this study guide to assist you in studying for your written knowledge
POCKET GUIDE TO DC BIKE LAWS
 POCKET GUIDE TO DC BIKE LAWS 1 2 INTRODUCTION Thanks for picking up a copy of the Pocket Guide to DC Bike Laws. This guide, which is produced by the Washington Area Bicyclist Association, the District
A Guide To Frequently Asked Questions. Bicycles and Vehicles BICYCLE & PEDESTRIAN
 A Guide To Frequently Asked Questions Bicycles and Vehicles BICYCLE & PEDESTRIAN MOVE OVER 3 FEET FOR CYCLISTS Share the Road MOVE OVER FOR CYCLISTS ON MULTI-LANE ROADS Resources For more information
GENERAL KNOWLEDGE PRACTICE TEST
 GENERAL KNOWLEDGE PRACTICE TEST 1. Driving under the influence of any drug that makes you drive unsafely is: a. Permitted if it is prescribed by a doctor b. Against the law c. Permitted if it is a diet
Defensive Driving While Towing a Trailer By Elizabeth Koncki, Maryland Department of Agriculture
 Defensive Driving While Towing a Trailer By Elizabeth Koncki, Maryland Department of Agriculture Many of you have heard the term defensive driving, but maybe you may have not been taught the method or
CHAPTER 5-A. Bicycle and Skateboard Ordinance
 CHAPTER 5-A Bicycle and Skateboard Ordinance Article I. Bicycles. 5-A.01. Definitions. 5-A.02. Applicability. 5-A.03 Registration Required. 5-A.04. General Bike Regulations. Article II. Skateboards, Scooters
Sharing the road safely
 6 sharing the road in this chapter Sharing the road safely Pedestrians Cyclists Motorcycle riders Passenger vehicles Large vehicles School buses Public transit buses Emergency vehicles Emergency workers
Cycling Safety Handbook
 Cycling Safety Handbook RKSHIFT CARPOOL TRANSIT CARSHARE WALK CYCLE RUN WOR ARPOOL TRANSIT CARSHARE WALK CYCLE RUN WORKSHIFT CA ARPOOL TRANSIT CARSHARE WALK CYCLE RUN WORKSHIFT CA CARPOOL TRANSIT CARSHARE
potentially life-saving lessons. Brought to you by Lee Jeans, the maker of Lee Pipes, students in grade three as well.
 Every year nearly 500 children under age 15 die in bicycle accidents involving a car. Most of these deaths are due to the biker s behavior riding into the street without stopping, running a stop sign,
general, accidents caused by misjudging
 Unit 3: The Effect of Natural Forces on your Vehicle Page 1 of 11 Purpose: Acquaint the student with some of the natural forces acting on a vehicle while stopping, maneuvering, and during a crash. Explain
OHIO DEPARTMENT OF TRANSPORTATION S CYCLING SMARTER GUIDE
 OHIO DEPARTMENT OF TRANSPORTATION S CYCLING SMARTER GUIDE INTRODUCTION This copy of the Ohio Department of Transportation s (ODOT s) Cycling Smarter Guide was developed by the ODOT Bicycle and Pedestrian
TENNESSEE BICYCLE. Law Enforcement Guide. The Knoxville Regional Bicycle Program A REVIEW OF TENNESSEE BICYCLE TRAFFIC LAWS
 TENNESSEE BICYCLE Law Enforcement Guide A REVIEW OF TENNESSEE BICYCLE TRAFFIC LAWS The Knoxville Regional Bicycle Program About the Knoxville Regional Bicycle Program The Knoxville Regional Transportation
Riding Risk Assessment and Pre-Ride Preparation
 North Cheshire Clarion Generic Assessment Road Rides NCC Assessment Introduction Firstly, thank you very much for taking the time to read this document. It goes without saying that looking out for one
SAFE Streets for CHICAGO
 Overview Each day, hundreds of thousands of Chicagoans walk or drive in the city. Ensuring their safety is the City s top priority. Over the past several years, Chicago has developed many successful strategies
Preparing your teen for the road ahead.
 Preparing your teen for the road ahead. Helpful tips for safe driving. CONGRATULATIONS Your teenager will soon be driving a major milestone for both of you. You and your teen may be experiencing all kinds
8. WHAT EVERY MOTORCYCLIST MUST KNOW
 8. WHAT EVERY MOTORCYCLIST MUST KNOW It is an offence to carry passengers on the handle bars, frame or tank of the motorcycle. It is also an offence to cling to or attach yourself or your vehicle to any
TROPIC LIGHTNING CHECKRIDE PERFORMANCE MEASURE
 TROPIC LIGHTNING CHECKRIDE PERFORMANCE MEASURES V4.0 TASK 1: PERSONAL PROTECTIVE EQUIPMENT PERFORMANCE MEASURE DOT Approved Helmet Proper Reflective Equipment Full Fingered Gloves Proper Eye Protection
Memo: Background Research, Bike Law/Safety Enforcement Video
 Memo: Background Research, Bike Law/Safety Enforcement Video Values, roles, and challenges of training law enforcers in bicycle safety What the value behind training law enforcers? Increasing knowledge
SMART RIDE SAFE RIDE. What you need to know to operate an ATV in Ontario
 SMART RIDE SAFE RIDE What you need to know to operate an ATV in Ontario B The All Terrain Vehicle, or ATV as it s commonly called, is a very popular year-round utility and recreational vehicle, that offers
cornering C O R N E R I N G Have you ever over-cooked a corner? Did your confidence take a knock as a result? Did you work out why it happened?
 This THINK is a pdf Norfolk is FREE Partnership to download - 011 for personal use - all content remains the property of the THINK Norfolk Partnership - 011 Page 1 Have you ever over-cooked a corner? Did
Operating Vehicle Control Devices
 Module 2 Topic 3 Operating Vehicle Control Devices 1. Identify the vehicle controls in the pictures below: 1. 2. 3. 4. 7. 7. 5. 6. 1. accelerator 2. parking brake 3. foot brake 4. gear shift lever_ 5.
Safety-conscious Drivers Prevent Crashes. Defensive Driving: Managing Visibility, Time and Space. Improve Your Defensive Driving Skills
 Defensive Driving: Managing Visibility, Time and Space Motor vehicle travel is the primary means of travel in the United States. With all the benefits that come along with mobility, there are thousands
Bicycles on Board. A Quick Reference Guide for Carrying Your Bicycle on AC Transit Buses
 Bicycles on Board A Quick Reference Guide for Carrying Your Bicycle on AC Transit Buses Welcome Aboard! Hundreds of bicyclists use AC Transit every day. With 129 bus lines, including 31 transbay lines
Owner s Manual Read and keep this manual. Patents World Wide
 Owner s Manual Read and keep this manual. Patents World Wide S & S Industries, Inc., Sarasota, FL, USA www.trail-gator.com Copyright 2008 All Rights Reserved The following manual is provided to assist
PEDESTRIAN LAWS OF NORTH CAROLINA
 PEDESTRIAN LAWS OF NORTH CAROLINA Under North Carolina law, pedestrians have the right of way at all intersections and driveways. However, pedestrians must act responsibly, using pedestrian signals where
Model Fleet Safety Program Short
 TM Model Fleet Safety Program Short CORPORATE HEADQUARTERS 518 EAST BROAD STREET COLUMBUS, OHIO 43215 614.464.5000 STATEAUTO.COM TM Disclaimer: The information contained in this publication was obtained
Driver Certification
 Driver Certification Environmental Health & Safety/Risk Management Department of Campus Operations 300 College Park Dayton, Ohio 45469-2904 937-229-4503 Agenda: Part I: Review of UD Driver Certification
Bike Safely. Important safety gear Sharing the road Common traffic situations
 Bike Safely Important safety gear Sharing the road Common traffic situations Thank you to all contributors The information in this brochure was produced in collaboration with representatives from Bike
LESSONS OF AN EXPERIENCED NEW YORK BIKE ACCIDENT LAWYER
 April 2009 BIKING IN NYC LESSONS OF AN EXPERIENCED NEW YORK BIKE ACCIDENT LAWYER The Perils Of Bicycle Riding In New York City- Here s What You Need To Know EVER BEEN DOORED? I have. EVER BEEN CUT OFF