BDMS Banner Document Management Suite DRAFT User Instructions Page 1 of 19
|
|
|
- Norma Robbins
- 8 years ago
- Views:
Transcription
1 DRAFT Page 1 of 19 INTRODUCTION BDMS is an imaging and electronic document management system for clients who use Banner products. It is designed to meet the imaging and document management requirements of higher education. BDMS provides integration with the Banner application suite. Specific integration is within each of the five functional areas Human Resources, Finance, Student, Financial Aid, and Advancement. BDMS works as an integrated product with Banner and Documentum Software s document management system, ApplicationXtender (AX). Access to BDMS is controlled by your login to My Portal. You are not required to learn a new id and password. Document Organization Very Important Student documents will be stored or indexed using the student s CWID (Campus Wide Identification Number) and a document type. Document types have been pre defined and will be selected from a list. A couple of examples are Other College Transcript, High School Transcript and Petition. Each student can have only one BDMS document for each document type, such as Petition. However the student s Petition BDMS document may contain multiple scanned petitions. It is most likely that a student will have multiple BDMS document types, such as on titled Petitions, one titled Other College Transcripts, etc. Here is a list of all the document types defined to be used with student data: Document Input Document scanning will take place in a central location in Admissions and Records at each college. All forms to be scanned will be marked with the student s CWID prior to scanning. Documents can be scanned one at a time and then indexed or in a batch of multiple documents and indexed after the batch is scanned. BDMS can also be used to store and attach other types of documents such as pdf, MS Word documents and jpg images (or photos). These other documents do not need to be scanned if they are already in a machine readable format. Document Viewing There are two options for viewing documents: 1. Clicking on the Banner Document Management System link under Banner Applications on the Banner tab. 2. Selecting the BDM view icon from an Internet Native Banner (INB) form. Pre defined Student Document Types
. Access to BDMS is controlled by your login to My Portal.")
2 VIEWING DOCUMENTS Using Banner Tab Link From My Portal a user can go to their Banner tab and then select Banner Document Management System. The web version of BDMS will open in a pop up window which can be closed using the X in the lower right corner. Page 2 of 19 All student documents are stored in B S ID BANNER STUDENT COMMON which in the world of BDMS is called an application. Clicking on the second icon from the left (under Edit) will take you back to this view. BDMS referrers to this view as the Application List. Each folder icon represents a different application. Each folder/application/file cabinet under PROD is called contains different documents and you must select the correct application to find the data you are looking for. Starting July 10, 2011, new documents being entered into BDMS will be stored in the appropriate B S folder. Documents brought over from earlier imaging systems are stored in the appropriate STARRS CONV folder. Application Name B S ID BANNER STUDENT COMMON B S SECT BANNR CATALOG/COURSE SECTION STARRS CONV INSTRUCTOR DOCS REJECT STARRS CONV INSTRUCTOR RECORDS STARRS CONV STUDENT DOCS STARRS CONV STUDENT DOCS REJECTS Description Where all student related documents entered after the July 10, 2011 Go Live date, are stored. Where all catalog/course related documents entered after the July 10, 2011 Go Live date, are stored. Where instructor related documents that did not convert cleanly are stored Where converted instructor related documents are stored Where converted student related documents are stored Where student related documents that did not convert cleanly are stored Important: If your search of one Application Folder doesn t produce the document you are looking for, you will need to search the other Application Folders that may contain the document.
 will take you back to this view. BDMS referrers to this view as the Application List. Each folder icon represents a different application.")
3 Right Clicking on Application Folder Page 3 of 19 BDMS is designed for a PC and most functions can be accesses by clicking the right button on your mouse. Then move the cursor to the function that you want click as you normally do (with the left button). To right click on a Mac hold down the Control key and click. The following functions are available by placing your mouse on the application/folder/file cabinet you want to access and right clicking: Options Use New Query New Cross App Query New Document Properties Set As Active Application Reports Will bring up the query options for the selected application Allows you to query two applications at the same time. (Not currently supported) Allows you to save a new document via one of 6 options Information only For student data the B S ID BANNER STUDENT COMMON application should be bold to indicate it is the Active Application. Use this to change or re set the Active Application Not available Searching for a Document There are several ways to initiate a search. You can right click on the Application Folder, click the search icon (third from left on top tool bar) of select from the View drop down menu. The search view will display where you can enter the criteria you wish to search on. Note that each Application Folder contains different criteria that are searchable. After entering the search value click on submit at the bottom of the screen to view the results. Below is a screen shot of the B S ID BANNER STUDENT COMMON Application Folder query screen:

4 Query Screen for STARRS CONV STUDENT DOCS: Page 4 of 19 Query Screen for STARRS CONV STUDENT DOCS REJECTS: Note that these documents are indexed by the students social security number, name, and birth date. At the time of the conversion there was no matching CWID.

5 From INB Form Page 5 of 19 To view the BDMS documents associated with a student, you can use a Banner form such as SPAIDEN, to select the student by name or CWID. Once the student s name and ID display, you can use either of the two BDMS button on the top of the form to open a new window or tab with the The system will display a list of BDMS documents stored for the selected student. In the example above, there are three document types, Advanced Placements with one page, Academic Renewals with one page and Miscellaneous with two pages. Click on the document icon to the left of the listing to display the document image(s). If a document you expect to see is not displayed, you will need to check the other Application Folders: 1. Click on the Application List icon to display the list of Application folders 2. Right click on the folder which you want to search, move your mouse over New Query and click to display the list of search criteria. 3. Follow the instruction on page 3 on Searching for a Document.
. If a document you expect to see is not displayed, you will need to check the other Application Folders: 1.")
6 Page 6 of 19 To view the thumbnail images, use the View drop down menu or click on the right most icon. To include the index in your display, use the drop down View menu or click on the icon to its left Use the Page drop down menu or Page Back and Page Forward icons to view the two pages in this document. Use the Document drop down menu or Document Up and Document Down icons to view the other documents for this student. When View with Index is turned on, the display will look like this:

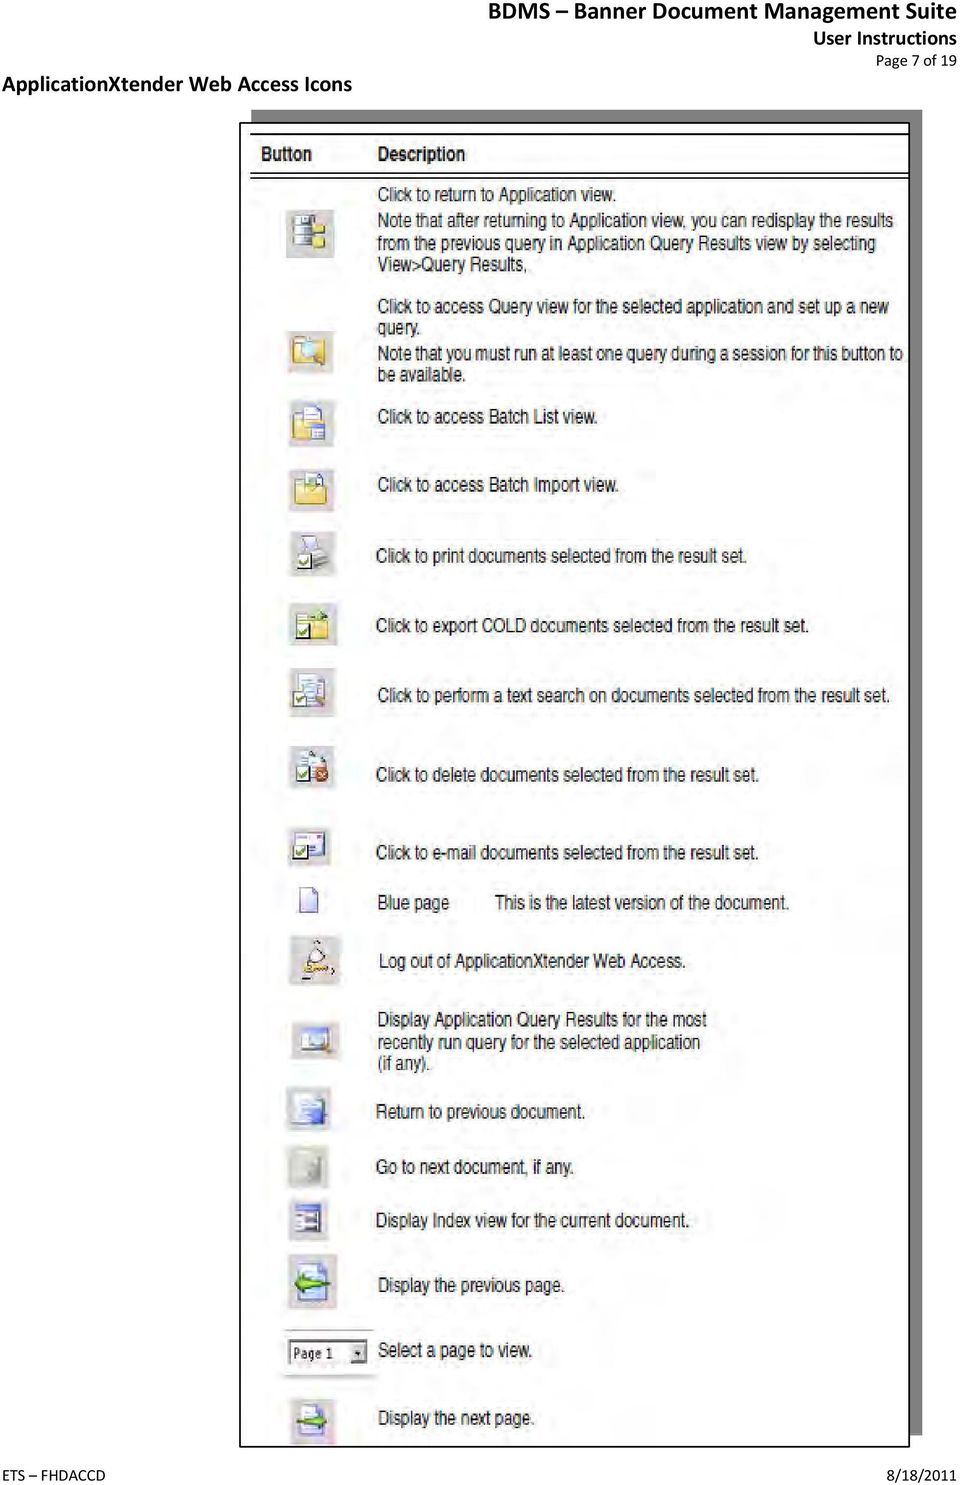
7 ApplicationXtender Web Access Icons Page 7 of 19
8 Page 8 of 19 ApplicationXtender Web Access Drop Down Menus

9 SCANNING DOCUMENTS Getting Started Page 9 of 19 Scanning will be performed on a PC/Windows system. The user must log into the system with the user name BDMS and the password provided by your supervisor. This will link the PC to BDMS. On the desktop you will see two short cuts. Document Management is used to scan a one document at a time and to index all documents including those scanned as a batch using Image Capture. Image Capture is used only to scan batches of documents and will be covered under Batch Scanning. Clicking on the shortcut will take you into ApplicationXtender Document Manager. This program will be used to scan in documents. On the left, the file (cabinet) titled B S ID Banner Student Common should be in bold. This is where all student documents will be stored. Setting up the Scanner 1. Adjust the scanner settings using the drop down Scan menu. 2. Resolution should be 150 unless the page is especially poor quality 3. Mode should be 256 level grey unless color is absolutely needed 4. Paper Size is almost always Letter (8 1/2" x 11")

10 Page 10 of Choose Rotation Front and Rotation Back as needed to make sure the scanned pages are oriented properly. Rule of Thumb: the scanned image you see at scanning time is what will be seen via Banner. Banner users will be able to magnify pages but not necessarily able to spin pages 6. Configuration Driver Configuration is where to adjust Contrast and Brightness

11 Page 11 of 19 De Anza 1. Set up the scanner for flatbed mode 2. Put the piece of paper onto the flatbed, up against the top left corner Foothill 1. Make sure the scanner driver in use is the "ISIS Fujitsu fi 4530C" driver 2. Go to Scan Configuration Select Scanner via the menu tree 3. Select the ISIS driver it's about 1/3 of the way from the top of the list. NOTE: Testing has found that BDMS works much better with the ISIS driver than with the WIA driver at the bottom of the list of drivers 4. Source: To scan only one side, choose ADF Simplex. To scan both sides, use ADF Duplex 5. Choose Rotation Front and Rotation Back as needed to make sure the scanned pages are oriented properly. 6. Feed: Leave on Auto as a rule IMPORTANT CONCEPT: Be aware if you are scanning a new document or a new page into a document. Documents are made up of one or more pages. You must tell the system that you are scanning a new document. Other wise the additional pages scanned will be added to the current document. Scanning and Indexing One Item at a Time 1. Load the document in the scanner. 2. Click the New Document button (the yellow folder beneath the View menu choice), choose Scan, and click OK >> OR Choose Document New Scan from dffffthe menu tree 3. The piece of paper will be scanned and will display on the screen 4. Enter the ID of the student and hit Tab 5. Make sure the Student Name matches the name on the document 6. Choose the appropriate Document Type from list. 7. Choose the appropriate Term Code 8. Click Save at the bottom of the screen. 9. If you get the error message A document with the same unique key already exists, that means that the student already has a BDMS document of that document type. You must locate that document and add the new pages to it. These instructions can be found on page x of this guide.

12 Page 12 of At this point you have created a BDMS Document containing one scanned page. To scan the next Document, repeat steps 1 through If you want to add a page to the current document, select Page Menu Scan New. You now have three options: Insert Before (page displayed), Insert After (page displayed) or Append (add as last page of document). Indexing Scanned Documents To retrieve a BDMS Document for deletion or to add/delete pages 1. Right click on the appropriate BDMS Application and choose New Query, or right click on an existing query and choose Edit Query 2. Enter the query information needed to retrieve the Document you want and then click Search 3. If only one Document is retrieved, it will display on the screen. If multiple Documents are returned, a list will display. Double click on the Document in the list 4. To delete this entire Document from BDMS, use the Document Delete menu item 5. To delete pages from this Document, make active the page you want to delete and choose Page Delete from the menu 6. To add pages to this Document, use the Page New Scan menu items. Place the new page as appropriate via Insert Before, Insert After, or Append 7. If you reorder pages within a Document, you will need to create a new version of the Document and then remove the old version: 7.1. Go to Scan New Version Current View to create a new version of the Document Go to Scan Purge Version to remove the old version of the Document

13 Adding Items to an Existing BDMS Document Page 13 of 19 ApplicationXtender allows you to search for index information from existing documents and append pages to previously indexed documents. The Attach feature allows you to choose an existing document from a result set and add a new page to the existing document. To append a new page to an existing document: 1. From the Document menu, select New and then select an input option from the submenu to create a new document. AppXtender displays the Index view. 2. Enter data in one or more of the index fields, and then press [F4] to initiate a search for documents that meet the specified criteria. The AppXtender Result Set appears, listing the results. 3. Select the index record and click Attach. The new page is added to the existing document that you selected. De Anza To scan multiple pieces of paper as a single BDMS Document into the B S ID Application (cabinet): 1. Set up the scanner for flatbed mode 2. Put the first piece of paper onto the flatbed, up against the top left corner 3. Click the New Document button (the yellow folder beneath the View menu choice), choose Scan, and click OK >> OR << 4. Choose Document New Scan from the menu tree 5. The piece of paper will be scanned and will display on the screen 6. Enter the ID of the student and hit Tab 7. Make sure the Student Name matches the name on the document 8. Choose the appropriate Document Type 9. Choose the appropriate Term Code 10. Click Save at the bottom of the screen. 11. Put the next piece of paper of the Document onto the flatbed, up against the top left corner 12. Hit Ctrl S >> OR << Choose Scan Scan Page from the menu tree 13. At this point the next page has been added to the Document. To continue adding pages to this Document, repeat steps 9 10 as needed Adjusting Scanned Documents Quality and Orientation 1. Place the pages into the scanner. a. For Portrait pages, put Page 1 face down and upside down, with subsequent pages in order and oriented the same way b. For Landscape, control rotation via the Scan Rotation Front and Rotation Back settings (see 2e above) 2. Click the New Document button (the yellow folder beneath the "View" menu choice), choose "Scan", and click OK >> OR << Choose Document New Scan from the menu tree 3. The paper(s) will be scanned and the image(s) will display on the screen. Use the page buttons (the arrows in the boxes two rows beneath the "Annotate" menu item) to cycle through the pages 4. IF the images are of not sufficient quality, choose Document Delete to erase the scans, reset the scanner via the steps in (2) above as needed, and rescan per steps IF the images are satisfactory, index the images by entering the ID of the student and hitting Tab 6. Make sure the Student Name matches the name on the document 7. Choose the appropriate Document type 8. Click Save at the bottom of the screen

14 Page 14 of At this point you have created a BDMS Document containing the image(s) you scanned. You can delete individual pages, change page order, etc. via the Page menu items 10. Once you are satisfied with the BDMS Document, close it by clicking the grey "X" just below the Red "X" at the top right. DO NOT click the Red "X"; this will exit you completely from Document manager 11. Repeat steps 1 10 for each BDMS Document you want to create. Scanning Multiple Items at a Time Foothill To add pages to an already existing BDMS Document: 1. Retrieve from BDMS the Document to which you want to add pages by: a. Right click on the B S ID Application at the left of the screen, and choose New Query, or click on an existing Query and choose Edit Query b. Enter the information into the Query screen needed to retrieve the Document you want c. If your Query retrieves only one Document, it will automatically open. If your Query returns more than one Document, a list of Documents will be presented. Double click on the Document you want to open. 2. Adjust the scanner as needed for your new pages 3. Choose drop down menu: Page New Scan Append to add the new pages at the end of the Document 4. Your pages will be scanned and added automatically to the Document. No Save is needed. 5. You can delete individual pages, change page order, etc. via the Page menu items 6. Once you are satisfied with the BDMS Document, close it by clicking the grey "X" just below the Red "X" at the top right. 7. DO NOT click the Red "X"; this will exit you completely from Document Manager To create a batch of scanned pages which can then be indexed as BDMS Documents: 1. Open Image Capture using the shortcut on your desktop. Log into the Image Capture software using your MyPortal ID and password 2. At De Anza, set the scanner to Flatbed via the Scan menu. We cannot depend on the document feeder working dependably. At Foothill, set the scanner per the instructions in the Creating a New BDMS Document section. 3. Create a new Batch Right click on the BDMS Application into which Documents will be placed, and choose New Batch Click View Applications to display the list of Applications Use a local naming convention to give unique names to batches, recognizing that multiple people may be accessing the batch list at any one time 4. De Anza Place a piece of paper onto the flatbed and hit Ctrl S to scan it. Foothill you can set the feeder to Auto, meaning when you hit Ctrl S all the papers will scan. Alternately, you can set the feeder to Single, meaning each time you hit Ctrl S one sheet will feed & scan per your scanner setup items. 5. Repeat step 4 as needed to scan your entire set of papers to scan 6. If you scan a page and want to remove it from the batch, hit Ctrl X OR use Page Delete from the menu 7. Once the batch is completely scanned and ready to index, use the File Close menu item to close the batch. 8. Exit the Image Capture Software.

15 Page 15 of 19 To index a batch of un indexed batches of scanned documents: 1. Log into the Document Manager software using your MyPortal ID and password. 2. Make sure to make active the correct BDMS Application into which the batch s scans will be saved as Documents 3. Choose Utilities Batch Index (List) to bring up a list of eligible batches ready for indexing. 4. Select the batch you want to index and then click Index 5. The first scanned image in the index will display. Click on the New Document icon the first icon in the third row of icons, under the File menu. The Index window will open. 6. Enter the ID of the student and hit Tab 7. Make sure the Student Name matches the name on the document 8. Choose the appropriate Document Type 9. Choose the appropriate Term Code 10. Click Save at the bottom of the screen. 11. In the dialog box Would You Like To Add More Indexes, click No 12. At this point you have created a BDMS Document containing one image. If you want to add additional images to this Document, use the Attach page icon (third row of icons, second icon) for each additional page. 13. Once you are finished with this Document and want to create a new Document, repeat steps 5 11 as needed. 14. Once the last image in the batch has been indexed, a dialog box will display asking if you want to index a new batch. Proceed accordingly. 15. Note that individual pages can be deleted from a batch via the Page Delete menu item OR via the small Red X icon next to the New Document & Attach Page icons Setting Up your screen for scanning To display thumbnail images of documents in the queue, select from the Main Toolbar User Settings, select Document View from the menu on the left side, deselect the first option Show Page Thumbnails. Copying Existing Index Information ApplicationXtender allows you to search for index information from existing documents and copy the existing index information to populate the new document s index. The Copy Index feature allows you to choose an existing document from a result set and copy the existing index information to the new document. To copy index information to a new document: 1. From the Document menu, select new and then select an input option from the submenu to create a new document. The Index view displays. 2. Enter data in one or more of the index fields, and then press the {F4} function key to initiate a search for documents that meet the specified criteria. A list of results will display. 3. Select an index record and click Copy Index. The index information from the existing document that you selected appears in the new document s Index View. 4. If needed, make changes to the index information. 5. Click Save.

16 Copying the Previous Index information Page 16 of 19 If you are adding a series of documents and entering similar index information, such as term, for the entire series, the Copy Previous Index Info feature may help you to save time and avoid mistakes. To copy the previous index information: 1. Add the first document in the series. Enter index information and click Save. 2. Add the next document in the series. Select one of the index fields and press {F9}. The index fields are populated with the same information as the previously indexed document. 3. If necessary, make changes to the index information. 4. Click Save. 5. Repeat steps 2 4 for each additional document in the series.

17 Main Toolbar Toolbar Buttons Page 17 of 19

18 Batch Indexing Toolbar Page 18 of 19 Imaging Toolbar Buttons Scan Toolbar Buttons

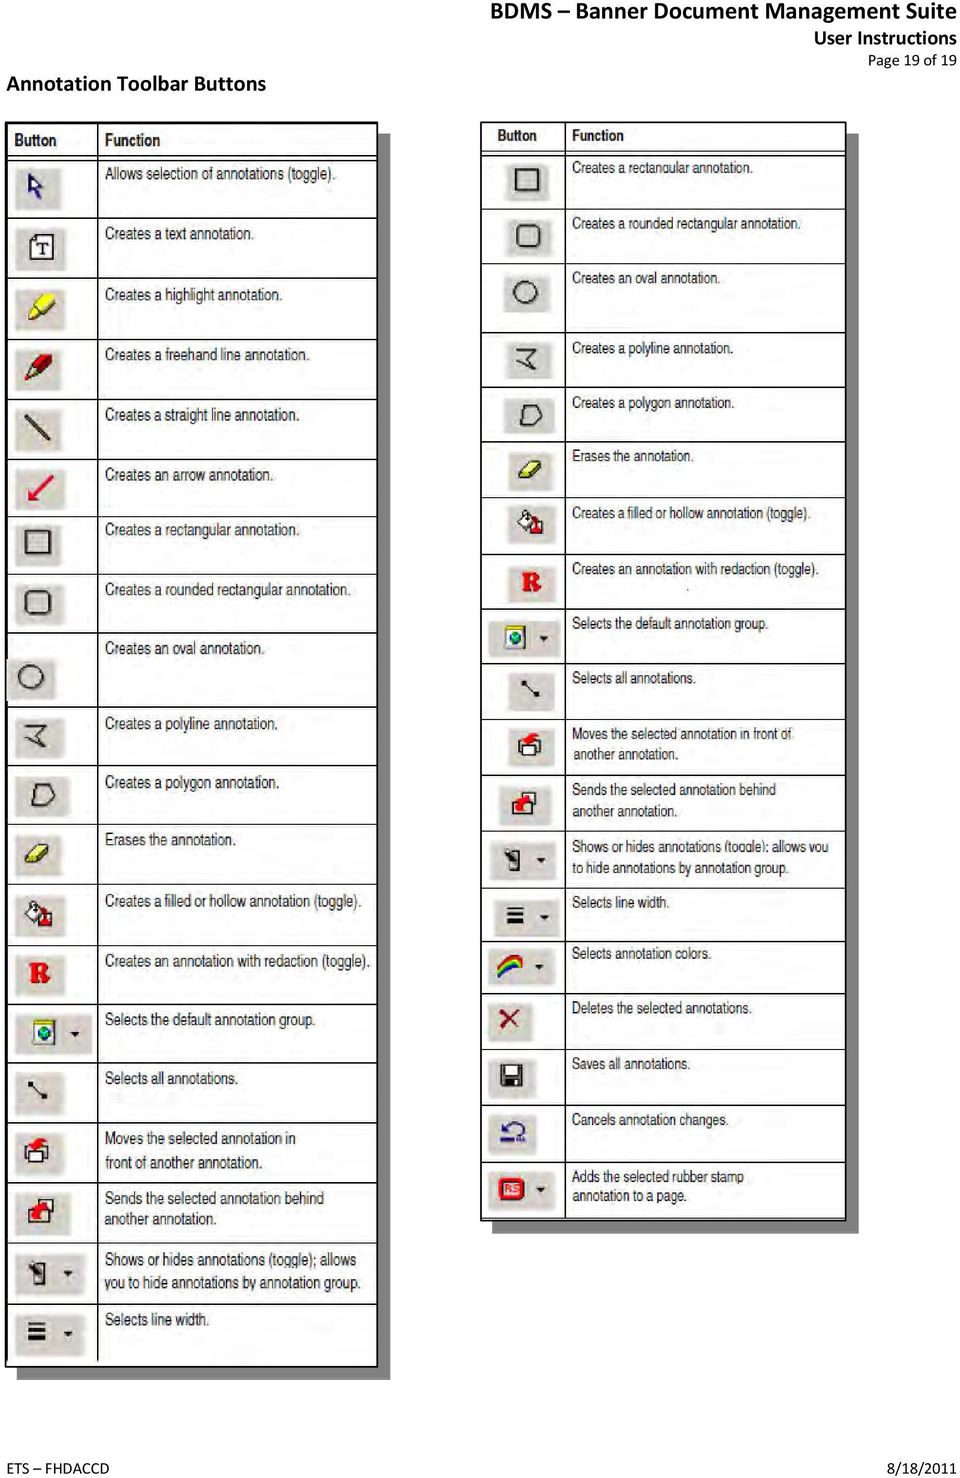
19 Annotation Toolbar Buttons Page 19 of 19
Banner Document Management Suite (BDMS) Web Access Help
 Web Access Help") May 10 th, 2011 Banner Document Management Suite (BDMS) Web Access Help Division of Information Technology AppXtender Web Access Help: For questions regarding AppXtender Web Access, please contact the
May 10 th, 2011 Banner Document Management Suite (BDMS) Web Access Help Division of Information Technology AppXtender Web Access Help: For questions regarding AppXtender Web Access, please contact the
Banner Document Management Suite Scanning / Indexing with webxtender DU Student Services
 Before You Begin... Page 1 Banner Document Management Suite Applications... Page 2 User Preferences and Setup... Page 2 Document Preparation Before You Scan... Page 9 Naming Conventions... Page 9 Ready
UNIVERSITY INFORMATION TECHNOLOGY SERVICES IT TRAINING. OnBase Training Guide. Document Prepare and Scan
 UNIVERSITY INFORMATION TECHNOLOGY SERVICES IT TRAINING OnBase Training Guide Document Prepare and Scan About IT Training The University Information Technology Services (UITS) IT Training program at Indiana
State of Ohio DMS Solution for Personnel Records Training
 State of Ohio DMS Solution for Personnel Records Training 1 Contents LOGGING IN AND THE BASICS... 3 LOGGING INTO THE DMS... 3 NAVIGATING THE UNITY CLIENT... 4 CREATING PERSONAL PAGES... 6 ADDING WEB LINKS
How To Create A Document On A Pc Or Macbook
 ApplicationXtender 6.5 Document Manager User Guide (version 1.0) CCS Computing and Communications Service June 2013 Table of Contents OVERVIEW... 3 Logging in to AppXtender Document Manager... 4 Changing
How to Query, View & Print Documents in BDM. Banner Document Management (BDM)
") (BDM) How to Query, View & Print Documents in BDM 1 Table of Contents 1. Overview 3 2. Creating & Saving Queries 2.1 Creating Queries within an Application 4 2.2 Creating a Cross Application Query 5 3.
(BDM) How to Query, View & Print Documents in BDM 1 Table of Contents 1. Overview 3 2. Creating & Saving Queries 2.1 Creating Queries within an Application 4 2.2 Creating a Cross Application Query 5 3.
July 29, 2010 Revision 5
 Table of Content AppXtender Web Access Introduction... 2 Synchronizing Your Password... 3 Accessing AppXtender Web Access (EKU Direct Finance Self Service View Document )... 5 Accessing AppXtender Web
October 23, 2009 Revision 3
 October 23, 2009 Revision 3 Table of Content AppXtender Document Manager - (Application Xtender) Introduction... 4 Terminology... 5 General Notes: Overall... 6 Accessing AppXtender Document Manger... 7
Banner Document Management Suite (BDMS) Viewing and Printing Documents User Guide
 Viewing and Printing Documents User Guide") Banner Document Management Suite (BDMS) Viewing and Printing Documents Updated August 2015 Table of Contents Accessing and Working with BDMS/AppXtender... 2 Synchronizing Your Passwords... 2 Logging In...
Banner Document Management Suite (BDMS) Viewing and Printing Documents Updated August 2015 Table of Contents Accessing and Working with BDMS/AppXtender... 2 Synchronizing Your Passwords... 2 Logging In...
Scanned image. If multiple scanner installed in the computer then click here to select desired scanner. Select Resolution, Color, and Scan Type.
 Objectives & Goals Scanning & Document Management Opening & Understanding Multi Scan/Select Scanning & Drag/Drop Documents Set Document Details Set Reminders, Actions and Links Create New Document From
How to Scan, Import & Index Documents in BDM. Banner Document Management (BDM)
") (BDM) How to Scan, Import & Index Documents in BDM 1 This How To guide provides an introduction to the processes of scanning and importing documents for the purpose of indexing them in BDM. These processes,
(BDM) How to Scan, Import & Index Documents in BDM 1 This How To guide provides an introduction to the processes of scanning and importing documents for the purpose of indexing them in BDM. These processes,
University of Minnesota Financial Document Scanning Guide for ImageNow 6.2
 University of Minnesota Financial Document Scanning Guide for ImageNow 6.2 INTRODUCTION... 2 LAUNCHING IMAGENOW AND LOGGING IN... 2 IMAGENOW TOOLBAR... 3 SCANNING DOCUMENTS INTO IMAGENOW... 3 PREPARATION...
BDMS (aka Xtender) Training. Prepared by: Edgar Coronel Date: 03/06/2012
 Training. Prepared by: Edgar Coronel Date: 03/06/2012") BDMS (aka Xtender) Training Prepared by: Edgar Coronel Date: 03/06/2012 Overview of BDMS BDMS is an imaging and electronic document management system The BDMS product represents the integration of Banner
BDMS (aka Xtender) Training Prepared by: Edgar Coronel Date: 03/06/2012 Overview of BDMS BDMS is an imaging and electronic document management system The BDMS product represents the integration of Banner
Now part of ALLSCRIPTS. HealthMatics EMR Input Manager
 Now part of ALLSCRIPTS HealthMatics EMR Input Manager May 9, 2006 Statement of Confidentiality The information contained herein is proprietary and confidential to A 4 HEALTH SYSTEMS. No part of this document
OnBase Quick Reference Guide
 Support: Team M teamm@onbase.com 440.788.6605 Prepared by: Hyland Software, Inc. 28500 Clemens Road Westlake, Ohio 44145 Ph: (440) 788-5000 Fax: (440) 788-5100 www.hyland.com DISCLAIMER Copyright Hyland
IRIS OPENDOCS. Getting Started Guide. IRIS OpenDocs IRIS OpenDocs
 IRIS OPENDOCS Getting Started Guide IRIS OpenDocs IRIS OpenDocs Contents Page What is IRIS OpenDocs?... 3 Guide Introduction... 3 Switching Modes... 5 Getting Documents into the System... 6 Scan a Document
How to remotely access your Virtual Desktop from outside the college using VMware View Client. How to guide
 How to remotely access your Virtual Desktop from outside the college using VMware View Client How to guide Author: ICT Services Version: 1.0 Date: November 2015 Contents What is the VMware View Client?...
17 April 2014. Remote Scan
 17 April 2014 Remote Scan 2014 Electronics For Imaging. The information in this publication is covered under Legal Notices for this product. Contents 3 Contents...5 Accessing...5 Mailboxes...5 Connecting
Quick Guide for ImageNow (IN) Client for Human Resources
 Client for Human Resources") Quick Guide for ImageNow (IN) Client for Human Resources Welcome to UVa s HR Online Document Management Service known as ImageNow (IN-HR). ImageNow procedures include capturing and digitally linking documents
Quick Guide for ImageNow (IN) Client for Human Resources Welcome to UVa s HR Online Document Management Service known as ImageNow (IN-HR). ImageNow procedures include capturing and digitally linking documents
ImageNow User. Getting Started Guide. ImageNow Version: 6.7. x
 ImageNow User Getting Started Guide ImageNow Version: 6.7. x Written by: Product Documentation, R&D Date: June 2012 2012 Perceptive Software. All rights reserved CaptureNow, ImageNow, Interact, and WebNow
Office of History. Using Code ZH Document Management System
 Office of History Document Management System Using Code ZH Document The ZH Document (ZH DMS) uses a set of integrated tools to satisfy the requirements for managing its archive of electronic documents.
WVSOM. BDMS webxtender Tutorial
 WVSOM BDMS webxtender Tutorial Chris Hollandsworth 2/16/2012 Introduction The Banner Document Management System (BDMS) is a software application that interfaces with the Banner database system at WVSOM.
Configure a scanning device Install ImageNow If you are using Kofax/VRS, install the Kofax application as an administrator. the following procedure.
 Setting Up the ImageNow Scanner and ImageNow Printer To perform these procedures, you must be a manager or local admin in ImageNow. To create a scanning profile, the user logged in to the local machine
ProSeries DMS. Getting Started Guide
 ProSeries DMS Getting Started Guide Copyright 00 Intuit Inc. All Rights Reserved. Intuit, the Intuit logo, Intuit ProLine, ProSeries, and QuickBooks, among others, are trademarks or registered trademarks
USING DOCUWARE TO MANAGE WORKFORCE SOLUTIONS FILES CAREER OFFICE
 USING DOCUWARE TO MANAGE WORKFORCE SOLUTIONS FILES CAREER OFFICE Using DocuWare to Manage Workforce Solutions Files Workforce Solutions 2015 Version 1.1, 3/17/15 Workforce Solutions is an equal opportunity
Snap 9 Professional s Scanning Module
 Miami s Quick Start Guide for Using Snap 9 Professional s Scanning Module to Create a Scannable Paper Survey Miami s Survey Solutions Snap 9 Professional Scanning Module Overview The Snap Scanning Module
Q. The Phone Manager call banner disappears after being displayed for a couple of seconds...5 Q. The Phone Manager icon in the taskbar is blue and
 Phone Manager FAQ s Q. The Phone Manager call banner disappears after being displayed for a couple of seconds...5 Q. The Phone Manager icon in the taskbar is blue and has a cross on it. 5 Q. Some options
GoodReader User Guide. Version 1.0 GoodReader version 3.16.0
 GoodReader User Guide Version 1.0 GoodReader version 3.16.0 Contents Operating GoodReader 1 Send PDF files to Your ipad 2 Copy Files with itunes 2 Copy Files to a Cloud Service 5 Download Files from the
EMC ApplicationXtender Web Access
 EMC ApplicationXtender Web Access 6.5 User s Guide P/N 300-010-573 A01 EMC Corporation Corporate Headquarters: Hopkinton, MA 01748-9103 1-508-435-1000 www.emc.com Copyright 2002-2010 EMC Corporation. All
Electronic Attachments Using Banner Document Management Suite (BDMS) Attaching Documentation to Requisitions in Banner
 Attaching Documentation to Requisitions in Banner") Electronic Attachments Using Banner Document Management Suite (BDMS) Banner Document Management Suite (BDMS) can be used to electronically attach documentation to a variety of Banner document types in
Electronic Attachments Using Banner Document Management Suite (BDMS) Banner Document Management Suite (BDMS) can be used to electronically attach documentation to a variety of Banner document types in
Updox, LLC support@updox.com 614-547-9635
 Set Up and User Guide Version 3.2.2 Updox, LLC support@updox.com 614-547-9635 Table of Contents Creating and Managing Internal Updox Users... 3 How to Send and Receive Faxes... 4 How to Import Files into
Xerox 700 Digital Color Press with Integrated Fiery Color Server. Utilities
 Xerox 700 Digital Color Press with Integrated Fiery Color Server Utilities 2008 Electronics for Imaging, Inc. The information in this publication is covered under Legal Notices for this product. 45072726
Document Management Quick Start and Shortcut Guide
 Document Management Quick Start and Shortcut Guide For the attention of SystmOne users: This document explains the basic Document Management functionality. It is highly advisable that you read the in-detail
Banner Employee Training
 2012 Banner Employee Training Moraine Park Technical College Document Imaging for Financial Aid COURSE NUMBER (999-515) COURSE LENGTH (30 min.) PREREQUISITES CONTENT CONTRIBUTORS Contents BANNER PROCESS
Smart Sync. Computer Classroom Management Software. What is SMART Sync? Table of Contents
 Smart Sync Computer Classroom Management Software What is SMART Sync? SMART Sync software helps instructors manage the computers in their classroom. SMART Sync keeps a student engaged and focused, and
Installing Lync. Configuring and Signing into Lync
 Microsoft Lync 2013 Contents Installing Lync... 1 Configuring and Signing into Lync... 1 Changing your Picture... 2 Adding and Managing Contacts... 2 Create and Manage Contact Groups... 3 Start an Instant
Using Web Services for scanning on your network (Windows Vista SP2 or greater, Windows 7 and Windows 8)
") Using Web Services for scanning on your network (Windows Vista SP2 or greater, Windows 7 and Windows 8) The Web Services protocol allows Windows Vista (SP2 or greater), Windows 7 and Windows 8 users to
Using Web Services for scanning on your network (Windows Vista SP2 or greater, Windows 7 and Windows 8) The Web Services protocol allows Windows Vista (SP2 or greater), Windows 7 and Windows 8 users to
Enhanced Imaging Options for Client Profiles for Windows
 C ase Manag e m e n t by C l i e n t P rofiles Enhanced Imaging Options for Client Profiles for Windows T E C H N O L O G Y F O R T H E B U S I N E S S O F L A W Table of Contents 2 Table of Contents Scanning
How to use Fujitsu fi-5220c scanner on LIB-DSS 11
 How to use Fujitsu fi-5220c scanner on LIB-DSS 11 ***** LIB-DSS 11 is not connected to the internet nor to printers. Save scanned images to your USB to take the files out of the computer. ***** The Fujitsu
Task Card #2 SMART Board: Notebook
 Task Card #2 SMART Board: Notebook Objectives: Participants will learn how to utilize the SMART Notebook. Table of Contents: Launching The SMART Notebook Page 1 Entering Text Page 1 Top Toolbar Page 2
Document Management User Guide
 Document Management User Guide For the attention of SystmOne users: This document explains how to use the Document Management functionality once the setup has been completed. Contents Beginning to Scan...
University of Minnesota Voucher and Journal Imaging Guide for ImageNow 6.2
 University of Minnesota Voucher and Journal Imaging Guide for ImageNow 6.2 INTRODUCTION... 2 LAUNCHING IMAGENOW AND LOGGING IN... 2 IMAGENOW TOOLBAR... 3 VENDOR PAYMENT OR JOURNAL ENTRY WORKFLOW... 3 OPENING
You ve Got Mail Groupwise 6.5 for OSX
 You ve Got Mail Groupwise 6.5 for OSX The new Groupwise email version is on all OSX computers. It can be used only when you are in school. To access your Groupwise email from home, you will have to use
How To Use A Computer Printout With A Pdf Document From A Pdf.Com (For A Free Download) On A Pc Or Macbook Or Ipa (For Free) On Your Computer Or Ipam (For An Ipa) On An
 On A Pc Or Macbook Or Ipa (For Free) On Your Computer Or Ipam (For An Ipa) On An") Registrar s Office Quick Reference Guide For Scanning & Linking Documents Using ImageNow Note: This Quick Reference Guide is not intended to cover all aspects of the ImageNow system but rather to highlight
Registrar s Office Quick Reference Guide For Scanning & Linking Documents Using ImageNow Note: This Quick Reference Guide is not intended to cover all aspects of the ImageNow system but rather to highlight
Table of Contents. 1. Overview... 3. 1.1 Materials Required. 3 1.2 System Requirements. 3 1.3 User Mode 3. 2. Installation Instructions..
 Table of Contents 1. Overview..... 3 1.1 Materials Required. 3 1.2 System Requirements. 3 1.3 User Mode 3 2. Installation Instructions.. 4 2.1 Installing the On Call Diabetes Management Software. 4 2.2
Contents. A-61623 July 2008 i
 Contents Image Processing......................................................... 1 Overview.......................................................... 1 Terminology and features..............................................
Banner Document Management System (BDMS) for Finance. Campus User Guide
 for Finance. Campus User Guide") Banner Document Management System (BDMS) for Finance Contact Information Danielle Green, Purchasing Officer Eastern Illinois University Department of Procurement, Disbursements and Contract Services Phone:
Banner Document Management System (BDMS) for Finance Contact Information Danielle Green, Purchasing Officer Eastern Illinois University Department of Procurement, Disbursements and Contract Services Phone:
Mapping ITS s File Server Folder to Mosaic Windows to Publish a Website
 Mapping ITS s File Server Folder to Mosaic Windows to Publish a Website April 16 2012 The following instructions are to show you how to map your Home drive using ITS s Network in order to publish a website
Mobility with Eye-Fi Scanning Guide
 Mobility with Eye-Fi Scanning Guide Scan and Transfer Images Wirelessly with Eye-Fi This document is to be used in addition to the scanner s user guide located on the installation disc. The instructions
Cabinet Retriever 3/1/2010
 2010 Cabinet Retriever 3/1/2010 Purpose... 4 Overview... 5 Installation... 5 Things to know before configuring Retriever... 6 Setting up your first connection... 7 Step 1 Run the Retriever... 7 Setup...
Operating Instructions (For Document Manager and Document Viewer)
") Operating Instructions (For Document Manager and Document Viewer) Software Model No. DP-C262/C322 Editing Documents General Description System Requirements Document Management Menus Explanation Basic Operations
Operating Instructions (For Document Manager and Document Viewer) Software Model No. DP-C262/C322 Editing Documents General Description System Requirements Document Management Menus Explanation Basic Operations
Fleet Maintenance Software
 Fleet Maintenance Software Welcome Thank you for taking time to review FleetWise VB Maintenance Management Made Simple. This guide is intended to provide a quick overview of installing the software and
User guide. Business Email
 User guide Business Email June 2013 Contents Introduction 3 Logging on to the UC Management Centre User Interface 3 Exchange User Summary 4 Downloading Outlook 5 Outlook Configuration 6 Configuring Outlook
RETRIEVER USER S GUIDE
 RETRIEVER USER S GUIDE Table of Contents Purpose... 3 Overview... 3 Installation... 3 Things to know before configuring Retriever... 3 Setting up your first connection... 4 Step 1 Run Retriever... 4 Step
Intellect Platform - Tables and Templates Basic Document Management System - A101
 Intellect Platform - Tables and Templates Basic Document Management System - A101 Interneer, Inc. 4/12/2010 Created by Erika Keresztyen 2 Tables and Templates - A101 - Basic Document Management System
Virtual Communities Operations Manual
 Virtual Communities Operations Manual The Chapter Virtual Communities (VC) have been developed to improve communication among chapter leaders and members, to facilitate networking and communication among
Horizon Patient Folder User s Guide
 Horizon Patient Folder User s Guide - 1 - Overview St. Mary's Medical Center is embarking on a new way to view the medical record for patients on-line. This information will guide you through the Horizon
OnBase 13. Unity Client Retrieval, Upload and Batch Processing. User Guide. IT Training (818) 677-1700 training@csun.edu www.csun.
 677-1700 training@csun.edu www.csun.") User Guide OnBase 13 Unity Client Retrieval, Upload and Batch Processing IT Training (818) 677-1700 training@csun.edu www.csun.edu/it/training *The information in this guide was provided by Hyland Software,
User Guide OnBase 13 Unity Client Retrieval, Upload and Batch Processing IT Training (818) 677-1700 training@csun.edu www.csun.edu/it/training *The information in this guide was provided by Hyland Software,
ImageNow Document Scanning and QA Created on 8/15/2011 11:38:00 AM
 ImageNow Document Scanning and QA Created on 8/15/2011 11:38:00 AM Table of Contents ImageNow Document Scanning and QA... 1 Scanning Documents... 1 Single Mode Scan... 1 Batch Mode Scan... 6 Capturing
Event Record Monitoring and Analysis Software. Software Rev. 3.0 and Up. User s Guide
 Event Record Monitoring and Analysis Software Software Rev. 3.0 and Up User s Guide 2 Contents Contents Chapter 1: About ERMAWin 4 Chapter 2: Overview 5 About this Manual 5 System Requirements 5 Installing
OnBase with Workflow
 Table of Contents with Workflow 9.2.0 User Manual February 2010 Page 1 of 55 2008 Northwoods Consulting Partners, Inc. ABOUT NORTHWOODS CONSULTING PARTNERS Northwoods Consulting Partners provides document
Scanning. WorkCentre C2424 Copier-Printer
 Scanning This chapter includes: "Basic Scanning" on page 4-2 "Installing the Scan Driver" on page 4-4 "Adjusting Scanning Options" on page 4-5 "Retrieving Images" on page 4-11 "Managing Files and Controlling
EMC Documentum Webtop
 EMC Documentum Webtop Version 6.5 User Guide P/N 300 007 239 A01 EMC Corporation Corporate Headquarters: Hopkinton, MA 01748 9103 1 508 435 1000 www.emc.com Copyright 1994 2008 EMC Corporation. All rights
Cleaning your Windows 7, Windows XP and Macintosh OSX Computers
 Cleaning your Windows 7, Windows XP and Macintosh OSX Computers A cleaning of your computer can help your computer run faster and make you more efficient. We have listed some tools and how to use these
How To Use Syntheticys User Management On A Pc Or Mac Or Macbook Powerbook (For Mac) On A Computer Or Mac (For Pc Or Pc) On Your Computer Or Ipa (For Ipa) On An Pc Or Ipad
 On A Computer Or Mac (For Pc Or Pc) On Your Computer Or Ipa (For Ipa) On An Pc Or Ipad") SYNTHESYS MANAGEMENT User Management Synthesys.Net User Management 1 SYNTHESYS.NET USER MANAGEMENT INTRODUCTION...3 STARTING SYNTHESYS USER MANAGEMENT...4 Viewing User Details... 5 Locating individual
SYNTHESYS MANAGEMENT User Management Synthesys.Net User Management 1 SYNTHESYS.NET USER MANAGEMENT INTRODUCTION...3 STARTING SYNTHESYS USER MANAGEMENT...4 Viewing User Details... 5 Locating individual
Creating Forms With Adobe LiveCycle Designer 8.2
 Creating Forms With Adobe LiveCycle Designer 8.2 Instructional Media Center HCC Version 2 Modified Date 1/20/10 Learning Objectives: At the end of this training session the student will be able to use
Xtender Invoicing Process
 Xtender Invoicing Process Description: Xtender Electronic Invoice Paying is a virtual paperless way to pay invoices that have a Purchase Order set up for payment. Invoices are received in Accounts Payable
Maximizing Performance on Cognos, Workflow, and BDMS
 Maximizing Performance on Cognos, Workflow, and BDMS System Configuration In order Cognos, Banner Document Management (ApplicationXtender), and Banner Workflow to work optimally, some initial configuration
Business Objects. Report Writing - CMS Net and CCS Claims
 Business Objects Report Writing - CMS Net and CCS Claims Updated 11/28/2012 1 Introduction/Background... 4 Report Writing (Ad-Hoc)... 4 Requesting Report Writing Access... 4 Java Version... 4 Create A
Using Delphi Data with Excel and Access
 $FDGHPLF&RPSXWLQJ &RPSXWHU 7UDLQLQJ 6XSSRUW 6HUYLFHV 1HWZRUNLQJ6HUYLFHV :HEHU%XLOGLQJ Using Delphi Data with Excel and Access Using Delphi Data The raw data used to create the CSU financial, human resource,
MICROSOFT WORD TUTORIAL
 MICROSOFT WORD TUTORIAL G E T T I N G S T A R T E D Microsoft Word is one of the most popular word processing programs supported by both Mac and PC platforms. Microsoft Word can be used to create documents,
RSCCD REMOTE PORTAL TABLE OF CONTENTS: Technology Requirements NOTE
 RSCCD REMOTE PORTAL The RSCCD Remote Portal allows employees to access their RSCCD Email (via Outlook Web Access), Department (Public) Folders, Personal (H Drive) Folder, and the District Intranet from
Kurzweil 3000 version 10.0.4 General User Guide
 Kurzweil 3000 version 10.0.4 General User Guide Kurzweil 3000 is software that provides students with specialized tools for reading, highlighting and note taking. In addition this tool allows students
ImageNow User Getting Started Guide
 ImageNow User Getting Started Guide Version: 6.6.x Written by: Product Documentation, R&D Date: February 2011 ImageNow and CaptureNow are registered trademarks of Perceptive Software, Inc. All other products
Installing Remote Desktop Connection
 SETTING UP YOUR REMOTE DESKTOP This section will assist you in setting you Remote Desktop Connection. This will allow you to create an icon for easy access to your virtual desktop. DISCLAIMER: All images
RevTrak Software Training Guide
 RevTrak Software Training Guide Introduction: There should be two icons on your desktop: 1. This is the shortcut for the regular RevTrak Software. 2. This is the shortcut for RevTrak Express. If you do
PAGE NUMBERING FOR THESIS/DISSERTATION
 PAGE NUMBERING FOR THESIS/DISSERTATION PAGE NUMBERS A BRIEF OVERVIEW: Though normally we insert page numbers at the beginning of documents, the graduate school has special requirements regarding page numbers.
Communicating with Skype for Business
 Communicating with Skype for Business Information Services Communicating with Skype for Business This guide is for people who are new to Skype for Business, and provides information on how to begin using
SMART Ink 1.5. Windows operating systems. Scan the following QR code to view the SMART Ink Help on your smart phone or other mobile device.
 SMART Ink 1.5 Windows operating systems User s guide Scan the following QR code to view the SMART Ink Help on your smart phone or other mobile device. Trademark notice SMART Ink, SMART Notebook, SMART
Table of Contents 2. Table of Contents
 Scanning Options Table of Contents 2 Table of Contents Scanning Overview and Setup... 3 Scanning Tools and Equipment... 3 File Locations... 4 Other Settings... 5 Scanning Options and Techniques... 6 Scanned
Editing your Website User Guide
 User Guide Adding content to your Website To add or replace content on your website you will need to log in to your Content Management System (Joomla) using your username and password. If you do not already
Sharing Files and Whiteboards
 Your user role in a meeting determines your level of file sharing. The type of files you can share include documents, presentations, and videos. About Sharing Files, page 1 Changing Views in a File or
Part II Acrobat 8 Professional
 Part II Acrobat 8 Professional Exporting Images There will be times when images will need to be exported out of a PDF document and saved as a file type in which it can be used in a different application.
ECR Vault Capture User Guide
 ECR Vault Capture User Guide An ImageDirector product from Milner Technologies, Inc. Version 7.6 COPYRIGHT Copyright 1995-2014 Milner Technologies, Inc. (formerly Comsquared Systems, Inc.). This manual
How to Launch WebXtender for BDM. Banner Document Management (BDM)
") (BDM) How to Launch WebXtender for BDM 1 Table of Contents 1. Overview 3 2. Launching WebXtender from Banner 4 3. Launching WebXtender from Direct Login 7 Appendix A 9 2 1. Overview WebXtender is the web
(BDM) How to Launch WebXtender for BDM 1 Table of Contents 1. Overview 3 2. Launching WebXtender from Banner 4 3. Launching WebXtender from Direct Login 7 Appendix A 9 2 1. Overview WebXtender is the web
BACK OFFICE INTRODUCTION REVISION 1.1
 BACK OFFICE INTRODUCTION REVISION 1.1 Contents Contents... 2 BEACON BACK OFFICE INTRODUCTION... 4 BEACON BACK OFFICE SCREEN LAYOUT... 4 BACK OFFICE MENU LAYOUT... 5 BACK OFFICE TOOLBAR ICONS... 5 TOOLBAR
Windows: File Management. Lesson Notes Author: Pamela Schmidt
 Lesson Notes Author: Pamela Schmidt Task Bar Properties One way to change the Task Bar Properties is to right click on the task bar. This will bring up the Task Bar Shortcut Menu. Choose Properties off
Banner Document Management Suite (BDMS) Web Access FAQ
 Web Access FAQ") Banner Document Management Suite (BDMS) Web Access FAQ Revised: 6/11/2015 3:27 PM FAQs End User 1. I have a new PC and need BDMS Installed. 2. How do I log into BDMS? 3. POPUP Blockers 4. I m getting an
Banner Document Management Suite (BDMS) Web Access FAQ Revised: 6/11/2015 3:27 PM FAQs End User 1. I have a new PC and need BDMS Installed. 2. How do I log into BDMS? 3. POPUP Blockers 4. I m getting an
INSTALLING THE SOFTWARE AND GETTING STARTED 2-1 THE USER INTERFACE 3-1 JOB SETUP 4-1 PATCH SETUP 5-1 BAR CODE AND OCR SETUP 6-1 PAGE SETUP 7-1
 OVERVIEW 1-1 INSTALLING THE SOFTWARE AND GETTING STARTED 2-1 THE USER INTERFACE 3-1 JOB SETUP 4-1 PATCH SETUP 5-1 BAR CODE AND OCR SETUP 6-1 PAGE SETUP 7-1 PRODUCTIVITY SHORTCUTS 8-1 USER AND GROUP SETUP
Verizon Cloud Desktop Application Help Guide Version 4.1 72
 Verizon Cloud Desktop Application Help Guide Version 4.1 72 CONTENTS I. Getting started... 4 A. Verizon Cloud... 4 B. Main navigation... 5 C. System requirements... 5 D. Installing the application... 6
CONTENT. 1 Normal Printing. 2 Secure Printing. 3 Faxing from PC. 4 Setting Mailbox. 5 Scanning documents into mailbox. 6 Retrieve Scanned Image
 CONTENT 1 Normal Printing 2 Secure Printing 3 Faxing from PC 4 Setting Mailbox 5 Scanning documents into mailbox 6 Retrieve Scanned Image 7 Scanning Documents to Ifax 8 Setting Of Speed Dial Via Internet
Last Updated: June 25, 2015
 Introduction Welcome to Elements CRM! This Quick Start Guide is designed to get you up and running quickly. Learn how to download the application as well as the basics in navigating through it. This Quick
Lync for Mac Get Help Guide
 How do I download the Lync Client Tool for Mac? The Lync Client allows you to use your computer as a telephone as well as enabling the unified communication features. Part 1: Installing the Lync Client
UniFLOW Print and Copy Instructions for Students
 UniFLOW Print and Copy Instructions for Students Getting Started, Setting up your PIN Page 2 Purchasing Credits for printing and Photocopying Page 4 How to use the MFD Page 8 Photocopying Page 10 Printing
Identity Finder Setup
 Identity Finder Information Sheet for MAC This document will walk you through how to install, scan, and secure any SI found on your computer, or storage devices using the Identity Finder Software. This
PowerChart: View Only
 Page 1 of 16 PowerChart: View Only Accessing ecentral ecentral consists of multiple domains: Production, Build, Train, and Cert. The Production domain contains real patient data and is the permanent medical
1. Installing The Monitoring Software
 SD7000 Digital Microphone Monitor Software manual Table of Contents 1. Installing The Monitor Software 1.1 Setting Up Receivers For Monitoring 1.2 Running The Application 1.3 Shutdown 2. The Detail Monitoring
Check current version of Remote Desktop Connection for Mac.. Page 2. Remove Old Version Remote Desktop Connection..Page 8
 CONTENTS SECTION 1 Check current version of Remote Desktop Connection for Mac.. Page 2 SECTION 2 Remove Old Version Remote Desktop Connection..Page 8 SECTION 3 Download and Install Remote Desktop Connection
Google Drive Create, Share and Edit Documents Online
 Revision 3 (1-31-2014) Google Drive Create, Share and Edit Documents Online With Google Drive, you can easily create, share, and edit documents online. Here are a few specific things you can do: Convert
User Guide. Trade Finance Global. Reports Centre. October 2015. nordea.com/cm OR tradefinance Name of document 8/8 2015/V1
 User Guide Trade Finance Global Reports Centre October 2015 nordea.com/cm OR tradefinance Name of document 2015/V1 8/8 Table of Contents 1 Trade Finance Global (TFG) Reports Centre Overview... 4 1.1 Key