Chapter 8--Fixed Prosthodontics
|
|
|
- Griffin Boone
- 8 years ago
- Views:
Transcription
1 Overview Introduction --Fixed Prosthodontics Many excellent crown and bridge tests and courses are available, with some of them expressing seemingly contradictory opinions and approaches. This chapter of the manual is not intended to compete with any of them, but rather help you in applying concepts that you have acquired from them. The procedures described in this chapter are the result of the evolution of adopting techniques that most general practitioners can learn quickly. New materials can make significant changes in the way dentistry is practiced. Recent advances in adhesive resin technology have had, and will continue to have, a profound effect on fixed prosthodontics. Their effect will be a recurring theme throughout this chapter. This chapter will cover the following topics: Section Topic Page A Principles of Fixed Prosthodontics 8-1 Patient Selection 8-5 Fixed Prosthodontics vs. Operative 8-6 Fixed Prosthodontics vs. Removable Partial Dentures 8-9 Ante's Rule of Abutment 8-11 Problem Areas in Fixed Prosthodontics 8-12 B Impression Technique 8-15 Packing the Retraction Cord 8-15 Removing the Packing Cord 8-16 Injecting Impression Material 8-18 C Standardized Tooth Preparation Sequence 8-23 Determining Indicated Amount of Tooth Reduction 8-23 Depth Guides 8-27 Working in a Prescribed Logical Sequence 8-32 Opening the Interproximal Spaces 8-34 Establishing Midtooth Depth Cuts 8-36 Reducing Occlusal/Incisal Surface 8-38 Reducing the Lingual Surface (Anterior and Posterior Teeth) 8-42 Reducing the Labial/Buccal Surface 8-46 Checking the Line of Draw/Path of Insertion

2 Establishing the Final Gingival Margin Configuration and Depth 8-51 Smoothing the Proximal Surfaces of Adjacent Teeth 8-52 Smoothing Line and Point Angles of Preparation 8-54 D Finish Line Configuration 8-56 Margin Configurations 8-56 Suggested Margin Configurations 8-62 Margin Discrepancies 8-64 E Variations in Tooth Preparation Sequence 8-68 Using Full Metal Crowns 8-68 Using the Porcelain Jacket Crown and Bonded Porcelain Jacket Crown 8-70 Using Porcelain Veneer 8-72 F Resin Bonded Fixed Partial Dentures 8-78 Historical Development 8-78 Indications/Contraindications for Maryland Bridges 8-79 Anterior Maryland Bridges 8-81 Posterior Resin Bonded Fixed partial Dentures 8-83 Cementation 8-85 G Dowel Cores 8-87 Patient Selection 8-87 Custom Dowel Core versus Prefabricated 8-88 Preparation of a Dowel Space 8-89 Prefabricated Patterns and Post 8-90 Cementation of the Custom Dowel 8-90 H All Ceramic Restorations 8-91 Dicor 8-92 Procera 8-92 IPS Empress I 8-92 IPS Empress II 8-93 In-Ceram 8-93 General Preparation for All Ceramic Crowns 8-94 I Implants 8-97 General Policy 8-97 Basic types of Endosseous Implants 8-97 Endosseous Implant Identification 8-99 Contacting the surgeon 8-99 Maintenance Variables in Prosthodontics 8-2

3 There are three variables in restorative dentistry: operator variables material variables patient variables Without denying the importance of material and patient variables, the operator and the skill that must be applied in selecting and treating prosthodontic patients is by far the most important. The best materials available today can be misused and fail. No one can successfully place a prosthodontic restoration without the patient's cooperation in maintaining it. Responsibilities An attitude of being a continuous student and making a commitment to excellence will go a long way in making your restorative dentistry rewarding. There is a very strong correlation between one's interest and skill in operative dentistry and in fixed prosthodontics. One is an extension of the other. Every dentist capable of preparing and placing sound composite and amalgam restorations is capable of preparing and placing sound fixed prosthodontic restorations. Not every IHS clinician can or should be providing a significant amount of prosthodontics treatment. The clinician should be able to practice enough prosthodontics to maintain and improve all skills to a desired level. Attention to detail seems to be one of the main ingredients in achieving long-lasting restorations. This does not equate to spending a long time to accomplish a procedure. It does equate to spending time up front to master the mechanics of the procedure. To do this you should-- participate in hands-on courses practice Read Overview Section A--Principles of Fixed Prosthodontics 8-3

4 Introduction This section discusses some of the basic principles of fixed prosthodontics to help you in the decision-making process. Most of this information will serve as a review to you. Although new technology and materials have impacted on the choices available to you, the guidelines presented in this section should hold true with or without these new materials. However, some interesting variations are occurring already as the fact and fiction of these materials are sorted out. Patient Selection Introduction Given that the need for treatment grossly exceeds the ability to provide it, the decision on who should receive treatment must be made. On a clinical level, it seems appropriate to direct our efforts toward including as many people as possible and getting the maximum service life out of the treatment we do provide. General Guidelines The following general guidelines will assist you in your case selection decision making: The prognosis for a restoration is better for a patient that already demonstrates good oral hygiene. Well-aligned teeth and well-designed restorations require less effort to achieve good oral hygiene. The simpler the restorative needs of the patient the better the prognosis. Other considerations being equal, the long range usefulness of a prosthesis decreases as the patient's age increases. In general, prosthodontics should not be started prior to the completion of other needed preventive and corrective services. The potential effect of dental aesthetics on a person's self-esteem deserves recognition. It is fully appropriate that aesthetics receive due deliberation with function in treatment planning. Note: It would not be entirely facetious to say that you could limit your IHS crown and bridge 8-4

5 treatment to single crowns and three-unit bridges for young patients with good oral hygiene and who are missing one front tooth. Fixed Prosthodontics vs. Operative Introduction There are many factors that you must weigh when deciding between fixed prosthodontics and operative procedures. You must weigh each carefully, considering the functional and aesthetic impacts of each. Decision-Making Considerations The following considerations will assist you in deciding between fixed prosthodontics and operative procedures: Apply as many sound operative procedures as are practical prior to committing to crown treatment for a tooth. Well-placed amalgam and composite restorations can provide excellent service life and in many cases outlast a crown. Consider not crowning a complex amalgam just because of its size, especially if it has some history of successful function and adequate deep subgingival margins. Achieving good crown margins on sound tooth structure apical to a deep proximal box is not easily accomplished, nor are crown lengthening procedures if there are approximating teeth. The service life of amalgam restorations with adequate subgingival margins can be extended greatly by dressing down the accessible margins, recontouring as appropriate, and polishing the margins with an abrasive rubber cup. If marginal breakdown is more severe than polishing will correct, localized repair of the margin is feasible with sealant, amalgam, or composite. In vital teeth with existing complex amalgam restorations, an isolated natural tooth cusp in danger of fracture-- - can be reduced and polished - probably will not fracture - probably will still be restorable with a crown if it does fracture 8-5

6 - probably will result in a nonrestorable fracture right after you tell the patient not to worry Consider a cusp-protecting amalgam in preference to a crown. There are far more teeth that would benefit from cusp protection than we can provide with crowns. The literature supports their longevity and most clinicians have more experience with amalgam than they do with crowns. This suggestion is very important to consider on endodontically treated teeth. If a crown is done even years later, these restorations provide an excellent buildup for the crown preparation. The amount of cusp reduction required to achieve sufficient bulk/strength in amalgam is significant. If you are not familiar with the requirements of a cusp-protecting amalgam, you should seek advice from clinicians who use them. Bonded amalgams are one of the areas that will be receiving significant attention in dental literature. While these bonding agents are not going to negate sound principles of operative dentistry, they may be of great benefit in the complex and cusp-protecting amalgam situations. The author suggests that all amalgams be bonded. Where aesthetics will allow, indirect metal restorations will last longer than tooth-colored restorations. Additionally, you should be aware that-- - Two composites, notably Herculite and Heliomolar, have established long-term records for resistance to wear. There is no reason to believe that other composites are not capable of achieving similar resistance-to-wear records. - The major concerns relative to current composites involve their high coefficient of thermal expansion and contraction, questionable bond to dentin, and polymerization shrinkage. All of these concerns are being addressed at this time. In aesthetics situations, where crown and bridge are difficult to provide and where all of the restoration margins can be placed on well-isolated tooth structure, nonstandard composite restorations can provide a very adequate service life. Caution: It is easy for many of these restorations to become more difficult and time consuming than placing a crown. Partial coverage restorations (e.g., onlays, 3/4, and fractional crowns) are initially more conservative of tooth structure. They are technically more difficult to perform and are frequently associated with a high rate of failure. Full-coverage crowns constitute the majority of crowns provided by the IHS. Given the IHS's emphasis on exhausting operative procedures prior to committing to a crown, full-coverage crowns seem justified. 8-6

7 In contrast, the remarkable retention and resistance to dissolution provided by resin cements bonded to etched enamel are bringing about the increased use of very conservative preparations to bond partial coverage indirect restorations to the tooth. This includes such restorations as-- - tooth-colored veneers and onlays - bonded porcelain jacket crowns - sandblasted or etched base metal inlays, onlays, fractional crowns, and bridge retainers The use of such restorations in the IHS is complicated by the necessary inclusion of a laboratory service and the associated fees. Also, the need to preserve sufficient enamel with which to bond requires an early commitment to prosthodontics rather than extensive operative procedures. The classic G.V. Black Class II preparation should be put aside, since hydrophilic sealants, preventive resin restorations, bonded amalgams, composites, aesthetic and metal inlays, and retainers do work. We need to accept and use them. The resin-bonded bridge retainer (Maryland Bridge) is one of these restorations that can be of great value in the IHS. The final consideration prior to committing to a crown involves how complicated it will be to provide the crown and how important it is to keep the tooth. - The decision to extract rather than crown the tooth is simple if you can provide a Maryland Bridge and keeping the tooth might involve-- o endodontics o post and core treatment o crown lengthening - Considerable effort to keep the tooth is justified if the tooth is-- o a cuspid 8-7

8 o only remaining distal abutment in a mandibular arch Fixed Prosthodontics vs. Removable Partial Dentures Introduction There are also many factors that you must weigh when deciding between fixed prosthodontics and operative procedures. You must weigh each carefully, considering the functional and aesthetic impacts of each. Decision-Making Considerations The following considerations will assist you in deciding between fixed prosthodontics and removable partial dentures: When a fixed bridge is possible, it usually becomes the restoration of choice. The most easily agreed upon indications for removable partial dentures involve-- - long-span situations where support for a bridge is questionable - cases where the restoration must replace both missing teeth and substantial amounts of alveolar tissue Removable partial dentures that replace only one or two teeth are generally not desirable appliances. Unilateral partial dentures (Nesbitt Bridges) have significant risk associated with possible aspiration or swallowing of the appliance. Their use is generally discouraged. Considerable disagreement over fixed versus removable can be generated in cases involving multiple areas of missing teeth. It has been estimated that there are over 65,000 possible combinations of teeth and edentulous spaces in a single arch. - Prior to evaluating fixed versus removable, consider if any restoration is indicated at all. - Second bicuspid occlusion, while far from ideal, has support in literature as being acceptable. 8-8

9 - Removable appliances that do not replace aesthetically important teeth, or make a significant improvement in the patient's ability to masticate, usually end up in a drawer rather than in the mouth. - If the posterior occlusion is such that the remaining teeth already are, or likely will be stable, the patient may be better served without restoration of the posterior edentulous space. - Many patients will accept a compromised posterior occlusion if their anterior aesthetic needs can be met. Be aware that frequently the posterior occlusion must be corrected in order to properly fabricate anterior restorations. - As a matter of practicality, we favor partials to treat arches with multiple edentulous areas. However, to the extent that modification spaces can be eliminated and the partial designed to treat the spaces not amenable to fixed restoration, the better the partial will function. - The use of the Maryland Bridge concept to fully restore many of these cases with fixed prosthodontics in two to three appointments is one of the most dramatic demonstrations of their potential. - The mandibular alveolar ridge can be expected to incur significant loss of bone when removable prostheses oppose maxillary natural dentition. Maxillary ridges can be expected to do better than the mandibular ridge in supporting removable prostheses opposing natural dentition, but it is important to design the partial for maximum palatal support. Cantilevered Maryland-style bridges have been used very successfully to aid in solving some of these situations (especially in the mandibular arch). - Level and improve the plane of occlusion as often as you can. This applies to both fixed and removable prosthodontics. Note: Too often prostheses are fabricated to accommodate an existing occlusal problem, i.e., an opposing supraerupted tooth. For fixed restorations in particular, this can result in a worse situation than if no prosthodontics had been provided. Even with well-aligned arches, the occlusion and performance of a prosthesis generally will be improved by recontouring and polishing opposing restorations and teeth before the prosthesis is fabricated. 8-9

10 Ante's Rule of Abutment Introduction Most clinicians are familiar with Ante's Rule of Abutment. It is a useful guide in determining-- the number of abutments to use fixed versus removable It is only a generalization, and it is not the only factor to consider. Ante's Rule Ante's Rule states: The combined pericemental area of the abutment teeth should be equal to or greater than the pericemental area of the teeth being replaced. Implications Because of the length of the lever arm and the direction of forces, maxillary bridges replacing teeth 7, 8, 9, and 10 should frequently utilize four abutments (canines and first bicuspids). Mandibular bridges replacing teeth 23, 24, 25, and 26 will usually do well with bilateral single canine abutments. When utilizing multiple abutments, it is critical that the gingival embrasure area be kept open and properly contoured. When this is done, teeth anterior to the molars (bicuspids, canines, and incisors) seem to perform well and tolerate the condition without bone loss. Molars do not do well in multiple abutment situations, and they are frequently associated with periodontal bone loss from double abutting. An exception to double abutting with molars is the postperiodontal surgery patient with wide open gingival embrasures who is maintaining good oral hygiene. Problem Areas in Fixed Prosthodontics Introduction Dental laboratories are in a unique position to identify trends common to clinicians. It is clear from their perspective that clinicians share two major problems that seriously impede the fabrication of sound restorations: poor impressions of the gingival margins (primarily due to the lack of hemorrhage control) 8-10

11 inadequate reduction of tooth structure Other problems exist, but these are the most frequent and important to address. Each of these problems is discussed on this and the following pages. Problem Area 1: Poor Impressions and Hemorrhage Poor impressions of the preparation margin are probably the main source of recurrent decay and failure of fixed prosthodontic restorations. Fortunately, they are also one of the easiest problems to solve. Lack of hemorrhage control is the primary difficulty. Solutions for Problem Area 1: The following solutions are provided for these related problems: Poor impressions. To obtain high-quality, bubble-free impressions, try the technique described in this chapter. (See Injecting Impression Material) Hemorrhage. Use any packing technique that you prefer as long as hemostasis is properly attained prior to final packing. (See Packing the Retraction Cord) The easiest solution to hemorrhage control is virtually product specific. Contact: Ultradent Products, Inc. 505 West South South Jordon, UT (800) (801) Their "Tissue Management Infusion Technique" is highly effective and easily mastered. The technique is clearly presented in their catalog and videotape. The tape is especially useful and recommended. Supplies can be purchased as kits or separately. The essential items are-- - Astringedent solution (ferric sulfate solution) - dento-infusor tips (especially the metal tip--up#0122) 8-11

12 - Ultrapak knitted retraction cord [purchase kit first (UP#1030) then buy individual refills] - plastic Leur-Lock syringe (UP#0124) - Brasseler cord packing instrument (250N113-SR) (Ultradent's is also good.) Caution: Astringedent is sometimes listed as one of the many possible contaminants to cause a surface nonset of polyvinyl siloxane impression materials. It is actually blood products combined with almost any of the hemostatic agents that can cause the surface nonset. Surface nonset can be prevented by thoroughly washing the prepared tooth and sulcus till free of coagulum. This is easily done. Also since Astringedent is acidic, there is minor concern that it may inadvertently etch the tooth, opening the dentinal tubules and increase the pulpal trauma/ sensitivity. Problem Area 2: Inadequate Tooth Reduction No matter what kind of prosthodontic preparation is being cut, conservative clinicians almost universally under prepare the tooth. This is usually done with the best intention--desiring to preserve tooth structure and avoid pulpal exposures. In almost every instance, under preparation works to the detriment of the restoration and the tooth. The norm for underprepared teeth is unaesthetic, easily broken, and overcontoured restorations with poor gingival response which result in a loss of periodontal support. Conservation of tooth structure is well ingrained in most dentists as they leave dental school. Prosthodontics by nature is not conservative. Conservative treatment has already failed by the time a tooth requires a crown. If a crown is indicated, the tooth should be fully reduced consistent with the restoration being provided. Solutions for Problem Area 2: The following steps to adequate tooth reduction are recommended: Determine the amount of tooth reduction required for the intended restoration. Use some form of depth guide to ensure sufficient reduction. Work in a prescribed logical sequence. Each of these steps is described in detail in Procedures for Reducing Teeth. 8-12

13 Section B--Impression Technique Overview This section details the impression technique that residents and Continuing Dental Education (CDE) participants have found the easiest to use. It is highly suggested that you master this technique prior to employing variations. This addresses Problem Area 1--Poor Impressions and Hemorrhage. It is probably the most important area to resolve first. Packing the Retraction Cord Introduction Proper packing is obtainable using any of the following techniques that you prefer: prepreparation packing postpreparation packing one-cord packing two-cord packing aluminum chloride on one cord and Astringedent on the other As long as hemostasis is properly attained prior to final packing, any of the techniques will work. Procedures for Packing the Retraction Cord The following clinical technique has been well accepted consistently by residents and CDE participants: Step Action 1 Remove all prepacked cords prior to using the infuser tip. Note: Use water, Visine, or aluminum chloride to dampen prepacking cords. Astringedent (ferric sulfate) offers no advantage at this point. 2 Select the diameter of cord that you estimate will fill the smallest most delicate area of the sulcus, i.e., the labial or buccal aspect of anterior preparations (usually Ultradent size #1) 3 Use one long (approximately 2 inches) cord for each preparation. 4 Place the cord in a dappen dish/medicine cup containing Astringedent solution. 8-13

14 5 Allow cord to soak 6 Use the infuser tip as directed. Note: Angle the tip toward the gingiva (not the tooth) and gently rub the sulcus while slowly expressing Astringedent solution. 7 When bleeding stops, wash all coagulum off the tooth and out of the sulcus. 8 Continue to use the syringe and Astringedent until the sulcus can be vigorously washed with the three-way syringe without bleeding. Caution: Do not pack retraction cord prior to obtaining this degree of hemorrhage control. If necessary, localized areas of persistent bleeding can be infiltrated with anesthetic containing epinephrine. 9 Begin packing where the sulcular tissue is least likely to be damaged, i.e., palatal aspect of maxillary preparations or deepest part of sulcus. 10 Start packing at the end of the cord (not in the middle of the cord). 11 Pack the soaked cord once around the tooth in a deliberate manner so that all (not just portions) of the sulcus receives and is displaced by cord. Note: This is a critical step. A frequent error is attempting to pack too rapidly and leaving portions of the sulcus unpacked 12 Use the extra length of cord to double pack and displace those areas of the sulcus not adequately displaced while avoiding those areas already adequately displaced by the single first layer of the cord. Note: Portions of the sulcus are not adequately displaced since the diameter of the cord was selected to fill the smallest most delicate area of the sulcus. 13 Cut off any remaining excess length of cord leaving an unpacked tag at the end to aid removal. 14 Wait approximately 5 minutes. Note: Approximately 5 minutes is adequate time for the tissues to be displaced and yet short enough to minimize ischemic damage. While not promoting extended waiting times, waiting beyond 5 minutes may still result in successful tissue recovery. 15 Obtain bite records or allow the patient to take a break. Removing the Packing Cord Note: After completion of packing, it is not necessary to maintain isolation. 8-14

15 Introduction There are several variations in the techniques used to remove the packing cord depending on the number and types of preparations: partial coverage preparations multiple preparations preparations separated by edentulous areas Removing the Packing Cord (Partial Coverage Preparations) For impressions of partial coverage preparations (e.g., veneers with minimal subgingival involvement) one short length of cord will usually expose all of the margins as well as some tooth structure apical to the margin. In this case, rinse, dry, isolate, and take the impression with the cord in place. Remove the cord after inspecting the impression for accuracy. Removing the Packing Cord (Multiple Preparations) For multiple preparations choose one of the following two techniques: The first technique involves pulling the cord prior to final rinsing, drying, and isolating. If any bleeding does occur when the cord is pulled, reenter the sulcus with the syringe and infuser tip until hemorrhage is controlled, then rinse, dry, isolate, and take the impression. This technique can be used for multiple preparation impressions, but it probably is at its best for one or two preparations. It is an excellent technique to use when first gaining confidence that you do have some control over the situation. Since bleeding rarely occurs, and since the technique involves a protracted waiting time to maintain isolation while the impression material is mixed, the next technique may be preferable. In the second technique, prior to pulling the retraction cord for the impression, wash and thoroughly dry the entire arch, re-isolate the preparation area, and specifically dry the sulci of the prepared teeth (including the cord). Removing the Packing Cord (Multiple Adjacent Preparations) For multiple adjacent preparations, it generally is easier to pull all of the cords prior to injecting 8-15

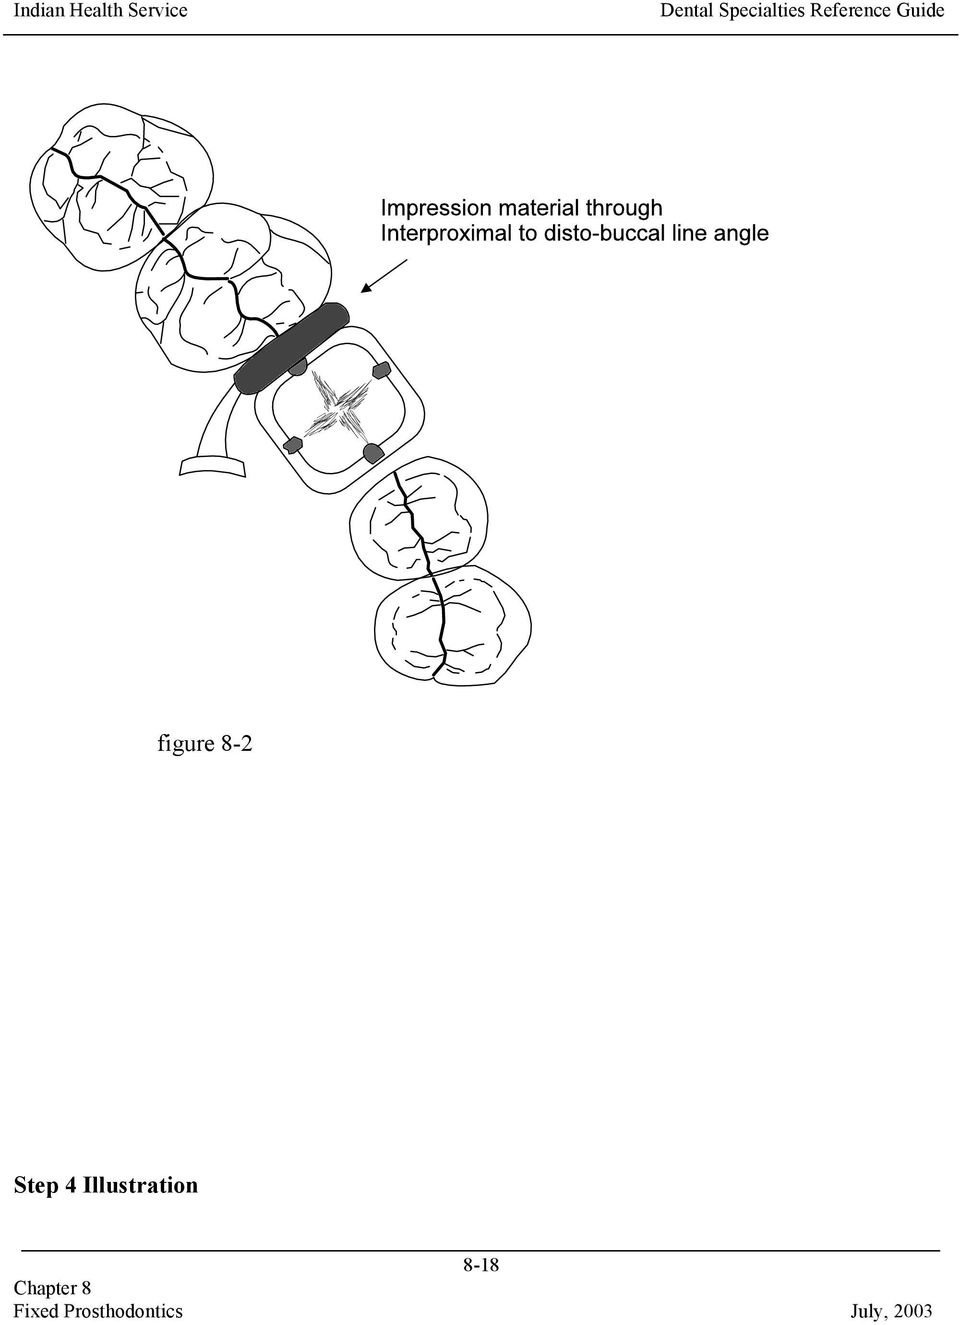
16 the impression material. Removing the Packing Cord (Preparations Separated by Edentulous Areas) For preparations separated by edentulous areas, it is often more convenient to start with the most distal preparation and work anteriorly pulling the cord and injecting impression material, one preparation at a time. You may also lightly dry the sulci with an air syringe after pulling the cord to ensure that moisture is not left apical to the cord (especially in areas containing two layers of cord). Injecting Impression Material Introduction Injection of the impression material is another critical step. With all of the techniques that are advocated by various clinicians, the technique described on this and the following pages has been consistently one of the easiest ones to use with excellent results. Procedures for Injecting Impression Material The following technique has consistently produced bubble-free impressions: Step Action 1 Beginning at the disto-lingual line angle of the most distal preparation, place the injection tip into, or just barely above, the sulcus touching both the prepared tooth and the distal approximating tooth (Figure 8-1). 2 With the curve of the tip angled toward the buccal, express enough impression material to fill the distal interproximal sulcus to the disto-buccal line angle (Figure 8-2). 3 Continue to express the impression material. 4 Without raising the tip, turn the syringe and begin advancing the tip mesially along the lingual sulcus (Figure 8-3). Note: Impression material is being expressed into the sulcus ahead of the injection tip. Always keep the impression material flowing ahead of the tip. 5 Advance the tip along the lingual surface and into the mesial interproximal area until blocked by the mesial approximating tooth. Note: At this point, impression material will be extruded far enough ahead of 8-16
.")
17 the tip to fill the mesial interproximal sulcus (Figure 8-4). 6 Raise the tip just high enough to pass to the mesio-buccal without breaking contact with the impression material being pushed ahead of the tip. 7 Turn the mesio-buccal line angle while the impression material flows ahead of the syringe and moves distally to fill the buccal sulcus (Figure 8-5). Note: Do not stop until the syringe tip itself makes contact with, and is immersed in, the originally injected impression material at the disto-buccal line angle (Figure 8-6). The impression material being extruded ahead of the syringe will make contact with the originally extruded material before the syringe tip reaches the point (Figure 8-7). Failure to advance the tip until it is immersed in the originally extruded impression material will frequently result in a fold or a bubble-like defect. 8 Use the same technique of encircling each tooth one at a time for multiple adjacent preparations. Step 1 Illustration Note: The impression material is always expressed ahead of the advancing syringe tip and can be visualized flowing into the sulcus. figure 8-1 Step 2 Illustration 8-17
.")
18 figure 8-2 Step 4 Illustration 8-18
19 Step 5 Illustration figure 8-3 figure 8-4 Step 7 Illustrations 8-19

20 figure 8-5 figure

21 figure 8-7 Limitations This technique is easier to master than other techniques such as blowing the impression material into the sulcus with an air syringe. Although this is a good technique, unless you are familiar with blowing air on polyvinyl siloxanes, there is a strong tendency to blow them completely off the tooth. On the occasions that bleeding does occur when the cord is pulled, this technique does not allow time to reuse the Astringedent and infuser tip since the impression material is already mixed. Blowing air into the sulcus at the bleeding site can be used quite successfully at this time. However, the emphasis is on blowing the blood out of the sulcus while still using the same injection technique rather than blowing the impression material in. 8-21
22 Overview Section C--Standardized Tooth Preparation Sequence This section addresses Problem Area 2--Inadequate Tooth Reduction. Emphasis is placed on rapid bulk reduction of roughed in tooth preparation followed by refinement of the details of the preparation. The description is for a porcelain fused to metal (PFM) restoration. The principles apply to all restorations. Section E of this chapter describes variations related to full metal crowns, porcelain veneers, and bonded porcelain jacket crowns. Determining Indicated Amount of Tooth Reduction Introduction Most clinicians are familiar with the indicated amount of reduction as described in textbooks. The difficulty is in actually achieving the stated amount of reduction, even though you will rarely cause yourself or the tooth harm by taking slightly more reduction. Porcelain fused to metal restorations are perhaps the most frequently underprepared restorations and the least forgiving. Figures 8-8 through 8-11 are presented for review. Remember the depths listed in texts usually represent the minimum required reduction. Full Metal Crown figure
23 Porcelain Fused to Metal Crown (With Margin Configurations) figure 8-9 Porcelain Jacket Crown (PJC) 8-23
24 figure 8-10 Note: Reductions for Bonded Porcelain Jacket Crown (BPJC) are indicated in parentheses. Porcelain Veneer (with Incisal Configurations) 8-24
25 Depth Guides figure
26 Introduction You should use some form of depth guide to ensure sufficient reduction and to maintain relative position of the preparation. Preparation depth guides generally involve--! cuts placed with a bur of known diameter at appropriate or convenient locations! uncut tooth structures compared (or referenced) to sections of the tooth prepared to full reduction! combination of the above two techniques With all three techniques, you must know the diameter of the bur you are using. Keep a measuring gauge available and measure the burs you use until you are familiar with their dimensions. For example, the--! 1557L carbide bur is 1 mm in diameter with a rounded tip! tapered cylinder diamond (Brasseler) is 1.6 mm at its greatest diameter and tapers to just over 1 mm at the rounded tip Both make excellent depth guide burs and can be used to rough in tooth preparations without necessitating a bur change. The 1 mm size is an easy reference by which to judge the depth of a cut. Placement of Depth Guide Cuts The most critical areas for placing depth guide cuts are--! occlusal/incisal surfaces! any surface to be covered with porcelain (generally labial or buccal surfaces) Types of Depth Cuts The following types of depth cuts are described in this section:! multiple-depth guide cuts 8-26
27 ! gingival crest and midtooth depth cuts! midtooth and incisal depth cuts! one midtooth depth cut! depth cut in grooves and fossa Multiple Depth Cuts Multiple depth cuts (Figure 8-12) have the advantage of forcing the timid operator to achieve adequate reduction. The system has the disadvantages of making it more difficult to stabilize the handpiece during preparation, encouraging lumpy preparations, and consuming time. figure 8-12 Gingival Crest and Midtooth Depth Cuts The combination of a gingival crest and a midtooth depth cut, usually prepared with a round bur 8-27
28 or diamond bur, can be a very useful approach. The gingival crest cut can establish a well contoured rough-in of a deep chamfer finish line as well as indicate gingival crest position. The deep cut does, however, complicate placement of prepreparation retraction cord. figure 8-13 Incisal and Midtooth Depth Cuts Perhaps the ultimate in combining depth guide cuts with using uncut tooth structure as a reference is presented by Dr. John W. McLean in his Monographs on the Science and Art of Dental Ceramics. After placing incisal and midtooth depth cuts (Figure 8-14A), Dr. McLean fully prepares one half of the tooth leaving the uncut half of the tooth as a depth guide reference (Figure 8-14B). You must work rapidly and use a minimum number of bur changes to employ this technique. figure 8-14A figure 8-14B 8-28
29 One Midtooth Depth Cut The technique recommended by the author is the one midtooth depth cut (Figure 8-15).! Its apical extension is placed at the operator's desired reference point to the free gingival margin (above, at, or below).! The incisal meeting point of the labial and lingual depth cuts indicates the level of necessary incisal reduction. It also maintains the proper labio-lingual position of the incisal edge of the preparation.! Gingival crest information can be supplemented by scribing a line with an alcohol pen or the tip of a diamond bur. Note: Prepreparation packing techniques result in differing amounts of gingival retraction even within the same sulcus. It may be necessary to prepare the tooth to the level of the prepacked cord. The scribed or scratched line will provide that information. figure 8-15 Depth Cut in Grooves and Fossa For molars, the occlusal portion of the depth cut should be placed in the grooves and fossa, rather than on cusp tips, to ensure adequate reduction in these areas. 8-29
30 figure 8-16 Working in a Prescribed Logical Sequence Introduction While most operators have a reasonably good mental image of the final preparation they want to achieve, how to create it often is not clear. Working in a logical sequence each time simplifies the procedure to a routine. The following lengthy discussion of crown preparation sequence is sincerely not meant to insult anyone's intelligence. The vast majority of CDE participants and residents have found the use of this sequence to be of value. Practicing the sequence a few times on extracted teeth is highly encouraged. Procedures for Reducing Teeth The following procedures are for reducing teeth in a prescribed logical sequence. The technique is intended to employ both depth cuts and reference to uncut tooth structure. Details of each of these steps are provided on following pages of this section. Step Action 1 Open the interproximal embrasures. 8-30
31 Note: For posterior teeth with deep interproximal alloys, find the tooth structure at the gingival floor of the proximal box. 2 Establish midtooth depth cuts. 3 Reduce occlusal/incisal surface. 4 Reduce the axial wall (parallel walls, cervical 2/3 to 3/4 of tooth). 5 Reduce the lingual surface of the anterior teeth (nonparallel lingual wall). 6 Reduce the second plane labial or buccal surface (nonparallel walls, occlusal/incisal 1/4 to 1/3 of tooth). 7 Check the line of draw/path of insertion. 8 Establish final gingival margin configuration and depth. 9 Smooth proximal surfaces of adjacent teeth. 10 Round off/smooth line and point angles of preparation. Reduction of Preparation Time Working in the sequence just described for full-coverage restorations will reduce preparation time by--! isolating the tooth to be prepared from adjacent teeth! dividing the tooth in half to allow visualization of the preparation by tooth sections (reference to uncut tooth structure)! encouraging full-depth, rough-in cuts rather than nonproductive paint brush strokes of the bur! organizing occlusal reduction of molars and bicuspids into 1/4 of the occlusal surface at a time (or one cusp at a time)! organizing occlusal reduction of incisors and cuspids into mesial and distal cuts off the incisal edge! dividing axial wall reduction into parallel wall reduction first, in the cervical 2/3 to 3/4 of the tooth, and then second plane or tapered reduction of the occlusal 1/4 to 1/3 of the wall later! dividing circumferential reduction into full depth cuts by sections of tooth! following a rapid rough-in of the preparation, the preparation is refined, and final margin 8-31
32 placement and configuration can be addressed as one separate step. Full attention can be given to creating definite continuous margins. Note: The 1557L carbide bur or the super coarse round-end tapered diamond (Brasseler) are the "workhorse" burs for roughing in the preparation. Make changes as desired; the concept, not the instrument, is the important item. Generally carbide burs will cut more rapidly than diamonds, but will result in a rougher outline form in need of more refinement. Most operators will prefer to use the carbide bur to open the interproximal spaces and then use the diamond bur for the remainder of the preparation. Opening the Interproximal Spaces Introduction Isolating the teeth to be prepared from adjacent teeth will minimize damage to adjacent interproximal surfaces and allow the operator to concentrate on the tooth being prepared. During this step in reducing teeth, no attempt is made at establishing an interproximal gingival margin. The goal is only to open the interproximal areas and isolate the tooth to be prepared (Figure 8-17). figure Note: The rounded end of the 1557L is useful in not involving the start of any sort of gingival cut. Finding the Apical Tooth Structure for Teeth with Interproximal Alloys Attempting to place a gingival margin on sound tooth structure apical to a proximal box, without first locating the depth of the box usually leads to carrying the margin much further apically than necessary. Therefore, it is highly recommended that for any box that does not clearly demonstrate tooth structure apical to the restoration following the interproximal cuts, that the dentist switch burs and locate the gingival floor of the box (Figure 8-18). 8-32
33 figure 8-18 Note: Flat-ended burs (#57 and #557) are most useful for this purpose. Finding Sound Tooth Structure Apical to a Proximal Box Three basic approaches can be used to locate sound tooth structure apical to a proximal box:! Approach 1. Remove part (or all) of the restorative material only in the proximal box to the gingival floor, and then proceed with crown preparation. The resulting box can be used as a retentive feature of the crown preparation if necessary.! Approach 2. Remove all of the old restoration and base it back out using dentin bonding agents, composite, glass ionomer, or new amalgam. Leave the cavosurface of the floor of the box uncovered and visible. Note: This approach is time consuming but indicated if you question the adequacy of the old restoration.! Approach 3. Rough in the crown preparation with the margin intentionally left occlusal to the gingival floor of the box. Then remove part (or all) of the old restoration to identify sound tooth structure. This approach offers the best visibility and access to the box. Remember to modify the roughed-in crown margins to be continuous with the floor of the box prior to proceeding further when using this approach. Every effort should be made to end crown margins on sound tooth structure. It should be rare that a crown margin ends on an existing restoration, i.e., crown margin occlusal to amalgam 8-33
34 margin. Establishing Midtooth Depth Cuts Introduction The next step in reducing teeth is to establish midtooth depth cuts. The midtooth depth cut--! provides depth guide information! divides the tooth in half making visualization of the tooth sections more meaningful Procedures for Establishing Midtooth Depth Cuts The following procedures are for establishing midtooth depth cuts (Figure 8-19): Step Action 1 Starting at the midfacial of the tooth (at or just above the free gingival crest), scribe a depth cut up the labial/buccal surface and across the incisal/occlusal surface. 2 Use a 1 mm diameter bur to accurately judge and vary the depth of the cut. Note: View the bur laterally. 3 Make a lingual depth cut extending from the intended finish line location and connecting with the first cut at the occlusal/incisal surface. Illustration of Procedures for Establishing Midtooth Depth Cuts 8-34
35 figure 8-19 Reducing Occlusal/Incisal Surface Introduction The next step in reducing teeth is to reduce the occlusal/incisal surface. The following pages provide procedures and details to consider when reducing the occlusal/incisal surface of--! molars! bicuspids 8-35
36 ! incisors and cuspids Procedures for Reducing Occlusal Surface of Molars Step Action 1 From the buccal or lingual turn the bur horizontally to match the contour of the occlusal surface and place it into the depth cut with the tip of the bur extending to the central groove (Figure 8-20). 2 Following cusp contours reduce one cusp (mesial or distal) in a deliberate full-depth cut (Figure 8-21A). 3 Refer to uncut walls of remaining tooth structure to judge adequacy of reduction (Figures 8-21A and 8-21B). 4 Reduce remaining (same side) cusp still using deliberate full-depth cut following cusp contours (Figure 8-21B). 5 Refer again to the uncut walls of the remaining cusps and make further reduction for the entire 1/2 of the occlusal surface if indicated. 6 When reduction appears adequate, turn the bur horizontally in the other direction, and starting at the depth cut, reduce the remaining cusps one at a time. Note: The tip of the bur should simply rest on the already established surface in the central groove area. Full depth, contour following cuts are still used. 7 Verify that there is adequate occlusal reduction. Note: The confirmation of occlusal reduction is best accomplished after axial wall reduction but is described here for convenience Step 1 Illustration 8-36
37 figure 8-20 Steps 2 through 4 Illustrations figure 8-21A 8-37
38 figure 8-21B Verification of Adequate Occlusal Reduction Verify adequate reduction by--! visually inspecting with the teeth occluded! using a feeler gauge concept whereby you draw a soft material of known thickness between the occluded teeth and the preparation - Belle de Saint Claire markets these type of gauges. - Rubber bands of known thickness can be cut in pieces and the pieces held with cotton pliers.! having the patient close into soft boxing or tray wax placed over the preparation and then examining the thickness of the wax Note: In general, over reduction of the occlusal surface will be a far better error to make than under reduction. 8-38
39 Reducing the Occlusal Surface of Bicuspids The midtooth depth cut will essentially divide bicuspids in half at the cusp tips. By the time the interproximal surfaces have been opened and the midtooth depth cut made, little remains of the occlusal surface. Each cusp can be reduced in one cut, but bur placement and angulation should be done in the same manner as just described for molars. Reducing the Incisal Surface of Incisors and Cuspids The midtooth depth cut for incisors and cuspids dramatically demonstrates that the recommended incisal reduction of approximately one-third of the tooth length is not an overstatement, but in fact is the level at which the labial and lingual depth cuts meet (Figure 8-22). The depth cut also tends to keep the incisal edge of the preparation properly located labio-lingually for support and proper placement of the restoration. figure
40 Incisal edge reduction is accomplished by placing the bur in the depth-cut groove, angled slightly toward the lingual and cutting the incisal edge off following the incisal contour (Figures 8-23A and 8-23B). figure 8-23A figure 8-22B 8-40
41 Reducing the Lingual Surface (Anterior and Posterior Teeth) Introduction The next step in reducing teeth is to perform a second plane lingual reduction. The procedures used for anterior and posterior teeth differ. Lingual Reduction in Posterior Teeth For posterior teeth, lingual reduction is simply planing off the second plane of the axial wall (Figure 8-23).! For mandibular posterior teeth this wall may no longer exist (although, it should).! For maxillary teeth, the bur is placed into the remaining portion of the depth cut, and the wall is reduced at that angle following cusp configuration. Since this is a centric holding cusp, adequate reduction should be verified as previously described for occlusal reduction. Note: Err on the side of overpreparation if any error is to be made. Under preparation leads to a wide occlusal table in the restoration or to having a thin area in the casting that is subject to perforation when doing occlusal adjustments. For occlusal coverage in porcelain, 2 mm of space is advisable. figure
42 Lingual Reduction in Anterior Teeth For anterior teeth, lingual reduction necessitates a bur change to a football- or wheel-shaped diamond.! Similar to the porcelain jacket crown, the lingual surface is reduced prior to the labial surface to encourage adequate reduction of the lingual surface.! Using the depth cut as an initial guide to depth of reduction, reduce the lingual surface while preserving the parallel lingual axial wall and the relative labio-lingual position of the incisal edge (Figure 8-24). figure 8-24! After removal of the tooth structure to the depth indicated by the depth cut guide, check the actual reduction with the teeth occluded. For full porcelain coverage 1.5 mm clearance in the CO contact area is indicated; 1 mm is indicated for metal coverage of the contact area (Figure 8-25). figure 8-25! The lingual porcelain-metal finish line of the restoration can be placed above or below 8-42
43 the CO contact area, but not at it. Since this can be difficult to judge clinically, give yourself as much clearance as is reasonably available (Figures 8-26 and 8-27). figure
44 figure 8-27 Reducing the Labial/Buccal Surface Introduction The next step in reducing teeth is to perform a second plane reduction of the labial/buccal surface (occlusal/incisal one-third to one-fourth). This step is frequently overlooked in the mistaken attempt to incorporate the reduction in the parallel axial wall reduction. Failure to make this second plane reduction results in--! the "halo effect" of opaque showing through the labio-incisal porcelain on anterior teeth (Figure 8-28)! weakening the porcelain on posterior teeth! widening the occlusal table (Figure 8-29)! thin areas in full-metal crowns (Figure 8-30) 8-44
45 figure 8-28 figure
46 figure 8-30 Second Plane Reduction of the Labial/ Buccal Surface If the parallel axial wall reduction was accomplished as described, there should still be visible the remnant of the original labial depth cut. Simply place the bur into the depth cut and reduce the second plane at the indicated depth and angle. (See Figures 8-31, 8-32, and 8-33.) figure
47 figure 8-32 figure 8-33 Checking the Line of Draw/Path of Insertion Introduction The next step in reducing teeth is to check the line of draw/path of insertion. Tips for Checking the Line of Draw/Path of Insertion The following tips will assist you when checking the line of draw/path of insertion: 8-47
48 ! Intraoral photographic mirrors, or the large 1 1/2-inch mouth mirrors, greatly simplify checking line of draw (Figure 8-34). figure 8-34! Pencil or alcohol pen can be used to highlight the shoulder/ chamfer area if desired.! If you have a tendency to undercut or significantly alter the parallel axial walls during final margin placement, this check should be delayed until after margin placement.! For most operators, the gingival margin will only be moved 1 mm or less apically, and this is a convenient, bloodless, and lower stress time to check alignment.! Most three-unit bridges (prepared in this fashion) will already draw with little or no modification of the preparations.! The more abutments involved in a bridge, the more the axial walls will need to be tapered. Thankfully, retention also increases as the number of abutments increases.! Severely divergent abutments will hopefully have been apparent prior to preparation and accommodations made.! An easily overlooked situation involving divergence of abutments is that of maxillary incisors paired with bicuspids. Always be skeptical of a bridge replacing a cuspid (for 8-48
49 more reasons than just path of insertion). Establishing the Final Gingival Margin Configuration and Depth Introduction The eighth step in reducing teeth is to establish the final gingival margin configuration and depth. A discussion of margin configurations is found in Section D. Distinct continuous margins, accurately recorded in the impression, are more important than their configuration. Tips for Establishing the Final Gingival Margin Configuration and Depth The following tips will assist you in establishing the gingival margin configuration and depth:! Any margin that can be placed supragingivally, should be placed supragingivally.! Caries, aesthetics, retention, and previous restorations are the primary reasons for subgingival margin placement.! It is generally taught that the gingival margin should never enter the sulcus by more than half the depth of the sulcus. In the average case this equals a depth of 1.0 mm or less, with less being favored.! The final subgingival margin placement should be as atraumatic to the gingiva as possible.! Packing a small length of retraction cord (dampened with water, Visine, or aluminum chloride solution) in the area of the sulcus to receive the subgingival margin works very well.! Final margin placement should be accomplished with a slow-speed handpiece and friction grip contraangle attachment. If you have magnification available, use it.! Considerable heat can be generated even at slow speed. Water spray coolant via the three-way syringe is important.! If the roughed-in margin was placed at or near gingival crest height, apical placement with the slow-speed handpiece is quite easy. If the margin is in the range of 1 mm above the gingiva, bring it down with the high speed and finish with slow speed. 8-49
Full Crown Module: Learner Level 1
 Full Crown Module Restoration / Tooth # Full Gold Crown (FGC) / 30 Extensions: Porcelain Fused to Metal (PFM) / 12 All Ceramic / 8 Learner Level 1 Mastery of Tooth Preparation Estimated Set Up Time: 30
Universal Crown and Bridge Preparation
 Universal Crown and Bridge Preparation The All-Ceramic Crown Preparation Technique for Predictable Success According to Dr. Ronald E. Goldstein Expect the Best. Buy Direct. The Universal * Crown and Bridge
CHAPTER 10 RESTS AND PREPARATIONS. 4. Serve as a reference point for evaluating the fit of the framework to the teeth.
 CHAPTER 10 RESTS AND DEFINITIONS A REST is any rigid part of an RPD framework which contacts a properly prepared surface of a tooth. A REST PREPARATION or REST SEAT is any portion of a tooth or restoration
porcelain fused to metal crown
 Lectur.5 Dr.Adel F.Ibraheem porcelain fused to metal crown the most widely used fixed restoration,it is full metal crown having facial surface (or all surfaces) covered by ceramic material. It consist
Implants in your Laboratory: Abutment Design
 1/2 point CDT documented scientific credit. See Page 41. Implants in your Laboratory: Abutment Design By Leon Hermanides, CDT A patient s anatomical limitations have the greatest predictive value for successful
Class I and II Indirect Tooth-Colored Restorations
 Class I and II Indirect Tooth-Colored Restorations Most indirect restorations are made on a replica of the prepared tooth in a dental laboratory by a trained technician. Tooth-colored indirect systems
Tooth preparation J. C. Davenport, 1 R. M. Basker, 2 J. R. Heath, 3 J. P. Ralph, 4 P-O. Glantz, 5 and P. Hammond, 6
 12 5 Tooth preparation J. C. Davenport, 1 R. M. Basker, 2 J. R. Heath, 3 J. P. Ralph, 4 P-O. Glantz, 5 and P. Hammond, 6 This final article in the series describes the modification of teeth to improve
4-1-2005. Dental Clinical Criteria and Documentation Requirements
 4-1-2005 Dental Clinical Criteria and Documentation Requirements Table of Contents Dental Clinical Criteria Cast Restorations and Veneer Procedures... Pages 1-3 Crown Repair... Page 3 Endodontic Procedures...
IMPLANT DENTISTRY EXAM BANK
 IMPLANT DENTISTRY EXAM BANK 1. Define osseointegration. (4 points, 1/4 2. What are the critical components of an acceptable clinical trial? (10 points) 3. Compare the masticatory performance of individuals
Treatment planning for the class 0, 1A, 1B dental arches
 Treatment planning for the class 0, 1A, 1B dental arches Dr.. Peter Hermann Dr Reminder: Torquing movement on tooth supported denture : no movement Class 1 movement in one direction (depression) Class
2016 Buy Up Dental Care Plan Procedure List
 * This is in addition to the embedded Preventive Plan (see procedure list at deltadentalco.com/kp_preventive. BASIC SERVICES Minor Restorative Services D2140 Amalgam 1 surface, primary or permanent D2150
A collection of pus. Usually forms because of infection. A tooth or tooth structure which is responsible for the anchorage of a bridge or a denture.
 Abscess A collection of pus. Usually forms because of infection. Abutment A tooth or tooth structure which is responsible for the anchorage of a bridge or a denture. Amalgam A silver filling material.
portion of the tooth such as 3/4 Crown, 7/8Crown.
 Lecture.1 Dr.Adel F.Ibraheem Crown and Bridge: It s a branch of dental science that deals with restoration of damaged teeth with artificial crown replacing the missing natural teeth by a cast prosthesis
CLASSIFICATION OF CARIOUS LESIONS AND TOOTH PREPARATION.
 CLASSIFICATION OF CARIOUS LESIONS AND TOOTH PREPARATION. ١ G.V. BLACK who is known as the father of operative dentistry,he classified carious lesions into groups according to their locations in permanent
Structur. Structur 2 SC / Structur Premium EXCELLENT TEMPORARIES WITH STRUCTUR
 Structur Structur 2 SC / Structur Premium EXCELLENT TEMPORARIES WITH STRUCTUR Simple to use Reliable products are required to provide your patients with prosthetic treatments, especially with regard to
ARTICLE 20-03 DENTAL ASSISTANTS CHAPTER 20-03-01 DUTIES
 ARTICLE 20-03 DENTAL ASSISTANTS Chapter 20-03-01 Duties CHAPTER 20-03-01 DUTIES Section 20-03-01-01 Duties 20-03-01-01.1 Expanded Duties of Registered Dental Assistants 20-03-01-02 Prohibited Services
Jacket crown. Advantage : Crown and Bridge
 Crown and Bridge Lecture 1 Dr.Nibras AL-Kuraine Jacket crown It is a type of crown that is formed by a tooth colored material. It is mainly used as a single unit in the anterior quadrant of the mouth.
In Class IV arch: Fulcrum line passes through two abutments adjacent to single edentulous space.
 It is that part of removable partial denture which assists the direct retainers in preventing displacement of distal extension denture bases by resisting lever action from the opposite side of the fulcrum
Removing fixed prostheses using the ATD automatic crown and bridge remover
 Removing fixed prostheses using the ATD automatic crown and bridge remover By Dr. Ian E. Shuman, Baltimore, MD. Information provided by J. Morita USA When removing cemented provisionals and final fixed
Another Implant Option for Missing Teeth with Challenging Symmetry Patrick Gannon, DDS and Luke Kahng, CDT
 Another Implant Option for Missing Teeth with Challenging Symmetry Patrick Gannon, DDS and Luke Kahng, CDT Introduction A 58 year old male had been missing teeth #7=12 for approximately 28 years. During
ADA Insurance Codes for Laboratory Procedures:
 ADA Insurance Codes for Laboratory Procedures: Inlay/Onlay Restorations D2510 Inlay - metallic - one surface D2520 Inlay - metallic - two surfaces D2530 Inlay - metallic - three or more surfaces D2542
Attachments And Their Use In Removable Partial Denture Fabrication
 Unless otherwise noted, the content of this course material is licensed under a Creative Commons Attribution - Non-Commercial - Share Alike 3.0 License. Copyright 2008, Dr. Jeff Shotwell. The following
CLASS II AMALGAM. Design Principles
 CLASS II AMALGAM Design Principles CLASS II Class II cavitated caries lesions Class II cavitated caries lesions opaque white haloes identify areas of enamel undermining and decalcification from within
CDT 2015 Code Change Summary New codes effective 1/1/2015
 CDT 2015 Code Change Summary New codes effective 1/1/2015 Code Nomenclature Delta Dental Policy D0171 Re-Evaluation Post Operative Office Visit Not a Covered Benefit D0351 3D Photographic Image Not a Covered
CLASSIFICATION OF REMOVABLE PARTIAL DENTURES
 Unless otherwise noted, the content of this course material is licensed under a Creative Commons Attribution - Non-Commercial - Share Alike 3.0 License. Copyright 2008, Dr. Jeff Shotwell. The following
HEALTH SERVICES POLICY & PROCEDURE MANUAL. SUBJECT: Types of Dental Treatments Provided EFFECTIVE DATE: July 2014 SUPERCEDES DATE: January 2014
 PAGE 1 of 5 References Related ACA Standards 4 th Edition Standards for Adult Correctional Institutions 4-4369, 4-4375 PURPOSE To provide guidelines for determining appropriate levels of care and types
Taking the Mystique out of Implant Dentistry. Dr. Michael Weinberg B.Sc., DDS, FICOI
 Taking the Mystique out of Implant Dentistry Dr. Michael Weinberg B.Sc., DDS, FICOI What is Restorative Implant Dentistry? Restorative implant dentistry involves taking a few simple mechanical principles
ATLANTIS abutments design guide CAD/CAM patient-specific abutments
 ATLANTIS abutments design guide CAD/CAM patient-specific abutments Contents Introduction 4 This manual helps you to explore all the benefits of ATLANTIS CAD/CAM patient-specific abutments. It gives you
Prosthodontist s Perspective
 Unless otherwise noted, the content of this course material is licensed under a Creative Commons Attribution - Non-Commercial - Share Alike 3.0 License. Copyright 2008, Dr. Jeff Shotwell. The following
Introduction to Charting. Tooth Surfaces: M = mesial D = distal O = Occlusal B = buccal F = facial I = incisal L = lingual
 Tooth Surfaces: M = mesial D = distal O = Occlusal B = buccal F = facial I = incisal L = lingual When combining tooth surfaces, as in defining cavity preparations or restorations, there are some spelling
Restoration of a screw retained single tooth restoration in the upper jaw with Thommen Titanium base abutment.
 Restoration of a screw retained single tooth restoration in the upper jaw with Thommen Titanium base abutment. Dr. med. dent. David McFadden, Dallas County, USA Initial situation (single X-ray) Tooth 16
General Dentist Fees
 General Dentist Fees January 1, 2015 Not all codes are covered benefits. Please check the member s plan for verification and limitations. There are no fee increases for 2015, but new CDT codes have been
Chart 1. Chart 2. How to Use the Following Charts. Be sure to follow the legal requirements to perform dental radiographic procedures.
 These data are presented for informational purposes only and are not intended as a legal opinion regarding dental practice in any state. DANB confers with each state s dental board at least annually regarding
How to Achieve Shade Harmony With Different Restorations
 Procera Alumina vs. Feldspathic Porcelain How to Achieve Shade Harmony With Different Restorations Luke S. Kahng, CDT Key Words: Stump shade, Feldspathic Porcelain, Zirconia, Alumina, LSK Treatment Plan
CHAPTER 12 SURVEY LINES. portion of the tooth is undercut to the path of placement of the denture. DEFINITIONS
 CHAPTER 12 portion of the tooth is undercut to the path of placement of the denture. SURVEY LINES DEFINITIONS A SURVEY LINE is a line produced on a cast by a surveyor or scribe marking the greatest prominence
Removable Partial Dentures 101 Back to the Basics. Luther A. Ison, CDT University of Minnesota School of Dentistry
 Removable Partial Dentures 101 Back to the Basics Luther A. Ison, CDT University of Minnesota School of Dentistry Anterior-Posterior Palatal Strap Major connector Lingual Bar Major Connector, Kennedy Class
Humana Health Plans of Florida. Important:
 Humana Health Plans of Florida Important: Dental discount membership in Florida is determined by viewing the member s ID card and verifying that the Humana Logo and Medicare name is listed with an effective
FABRICATING CUSTOM ABUTMENTS
 FABRICATING CUSTOM ABUTMENTS LUC AND PATRICK RUTTEN How much should a Dental Technician know about the clinical aspects of implantology? The answer is clear: as much as possible. This is the distinction
deltadentalins.com/usc
 Plan Benefit Highlights for: UNIVERSITY OF SOUTHERN CALIFORNIA STUDENT PLAN Group No: 05008 The Delta Dental PPO table plan provides you great dental benefits at a reasonable cost. With a table of allowance
The Successful Crown Delivery
 The Successful Crown Delivery Understanding Occlusal and Contact Problems in Crown and Bridge Robert R. Cowie, DDS, FAGD 1/2 point CDT or RG documented scientiþc credit. See Page 44. 38 hen I talk with
PROSTHETIC PROCEDURE. for HG IMPLANT SYSTEM
 PROSTHETIC PROCEDURE for HG IMPLANT SYSTEM PROSTHETIC PROCEDURE for HG IMPLANT SYSTEM HG Implant System Contents Cement retained restoration Rigid abutment When abutment reduction is unnecessary When abutment
Postendodontic Tooth Restoration - Part I: The Aim and the Plan of. the procedure.
 Postendodontic Tooth Restoration - Part I: The Aim and the Plan of the Procedure Sanja egoviê 1 Nada GaliÊ 1 Ana Davanzo 2 Boæidar PaveliÊ 1 1 Department of Dental Pathology School of Dental Medicine University
Molar Uprighting Dr. Margherita Santoro Division of Orthodontics School of Dental and Oral surgery. Consequences of tooth loss.
 Molar Uprighting Dr. Margherita Santoro Division of Orthodontics School of Dental and Oral surgery Molars The wide occlusal surface is designed for food grinding. The surface needs to be aligned with the
Principles of Partial Denture Design
 Principles of Partial Denture Design 1. Keep the RPD design as simple as possible Simple those design elements which promote function, esthetics, comfort, ease of fabrication, and ease of maintenance,
Contents. Cement retained restoration. Screw retained restoration. Overdenture retained restoration. TS Implant System. 70 ComOcta Gold Abutment
 Contents TS Implant System Cement retained restoration Screw retained restoration 06 Cement-retained bridges with the Solid abutment system (non- 72 Screw retained crown with the ComOcta Gold abutment
Ando A., Nakamura Y., Kanbara R., Kumano H., Miyata T., Masuda T., Ohno Y. and Tanaka Y.
 11. The Effect of Abutment Tooth Connection with Extracoronal Attachment using the Three Dimensional Finite Element Method - Part 2. The Construction of Finite Element Model from CT Data - Ando A., Nakamura
Improving Esthetics with Sequential Treatment Planning and Implant-Retained Dentures
 Improving Esthetics with Sequential Treatment Planning and Implant-Retained Dentures by Timothy F. Kosinski, DDS, MAGD While oral function is the primary concern for most patients, the importance of esthetics
priti crown Your patients deserve you
 priti crown Your patients deserve you 3 and you deserve the priti crown So close to nature priti crown is a high-tech solution for making perfect crown and bridge restorations using state-of-the-art CAD/CAM
Dental Updates. Excerpted Article e-mail: re777@comcast.net. Why Implant Screws Loosen Part 1. Richard Erickson, MS, DDS
 ¼ ½ ¾ µ mw/cm 2 Volume 17; 2007 Dental Updates "CUTTING EDGE INFORMATION FOR THE DENTAL PROFESSIONAL " 200 SEMINARS AND 30 JOURNALS REVIEWED YEARLY FOR THE LATEST, CUTTING EDGE INFORMATION Excerpted Article
Replacement of the upper left central incisor with a Straumann Bone Level Implant and a Straumann Customized Ceramic Abutment
 Replacement of the upper left central incisor with a Straumann Bone Level Implant and a Straumann Customized Ceramic Abutment by Dr. Ronald Jung and Master Dental Technician Xavier Zahno Initial situation
Restorative Guidelines
 Restorative Guidelines Contents Restorative Guidelines 4.1 Neoss Implant System 4.2 4.2 Esthetiline Solution 4.3 4.3 Provisional Abutments 4.8 4.4 Impression Techniques Implant Level 4.12 4.5 NeoLink
Composite artistry- speedy mock up
 Case Report: Composite artistry- speedy mock up Dr.Shikha Kanodia*, Dr.Manjit Kaur**, Dr.Girish J. Parmar*** * Asst. Professor, **Post Graduate Part 3, ***Head and Dean, Department of Conservative Dentistry
Clinical and Laboratory Procedures for Fixed Margin Implant Abutments
 Clinical and Laboratory Procedures for Fixed Margin Implant Abutments Dr. Carl Drago DDS, MS, American Board of Prosthodontics Director, Dental Research BIOMET 3i, Adjunct Faculty Department of Prosthodontics,
(a) The performance of intraoral tasks by dental hygienists or assistants shall be under the direct supervision of the employer-dentist;
 The performance of intraoral tasks by dental hygienists or assistants shall be under the direct supervision of the employer-dentist;") 5-1-8. Expanded duties of dental hygienists and dental assistants. 8.1. General. Licensed dentists may assign to their employed dental hygienists or assistants intraoral tasks as set out in this section
5-1-8. Expanded duties of dental hygienists and dental assistants. 8.1. General. Licensed dentists may assign to their employed dental hygienists or assistants intraoral tasks as set out in this section
Dentalworkers JOB DESCRIPTIONS Great Team Members make your Office function!
 Dentalworkers JOB DESCRIPTIONS Great Team Members make your Office function! Dental Assistant Registered Dental Assistant with Expanded Function: RDAEF Sterilization Assistant Dental Hygienist General
The Attractive Glass Abutment System (ZX-27) HANDOUT
 HANDOUT") The Attractive Glass Abutment System () HANDOUT! " " # $ % $ # & ' ( ) FAQs New Solutions Pharmaceuticals Tel.: +971 6 7460661 Fax : +971 6 7460771 P.O.Box. 18161 Ajman - UAE e-mail : info@newsolutionsdl.com
The Attractive Glass Abutment System () HANDOUT! " " # $ % $ # & ' ( ) FAQs New Solutions Pharmaceuticals Tel.: +971 6 7460661 Fax : +971 6 7460771 P.O.Box. 18161 Ajman - UAE e-mail : info@newsolutionsdl.com
MEDICAID DENTAL PROGRAMS CODING, POLICY AND RELATED FEE REVISION INFORMATION
 MEDICAID DENTAL PROGRAMS CODING, POLICY AND RELATED FEE REVISION INFORMATION Effective for dates of service on and after November 1, 2005, the following dental coding, policy and related fee revisions
Schedule B Indemnity plan People First Plan Code #4084
 : Calendar year deductible Waived for Type I preventive dental services Calendar year maximum Type I, II, III Waiting period Type I, II, III $50 individual $150 family (3 per family) $1,000 per covered
Anterior crowns used in children
 Anterior crowns used in children Objectives of this session Discuss strip crowns, temporary crown use and acrylic jacket crowns. Discuss the possible use of porcelain jacket crowns in paediatric dental
WAX-UP AND CERAMIC EXTENSIVE COURSE Dr. Dario Adolfi Dr. Ivan Ronald Huanca
 WAX-UP AND CERAMIC EXTENSIVE COURSE Dr. Dario Adolfi Dr. Ivan Ronald Huanca Duration: 6 meses STEP 1: WAX-UP OF FOUR UPPER POSTERIOR TEETH with Dr. Ivan Ronald Huanca The objective of this course s step
Denture Trouble Shooting Guide
 Denture Trouble Shooting Guide Comfort Sore spot in vestibuleupper or lower denture 1. Overextended borders 2. Rough spot in base 1. Shorten borders and polish. 2. Refinish borders. Sore spot in upper
What is a dental implant?
 What is a dental implant? Today, the preferred method of tooth replacement is a dental implant. They replace missing tooth roots and form a stable foundation for replacement teeth that look, feel and function
Use of variable torque brackets to enhance treatment outcomes
 Use of variable torque brackets to enhance treatment outcomes Ralph Nicassio DDS Many clinicians performing Orthodontics for their patients are missing an opportunity to get better results because they
20TDNH 214. Course Description:
 Revised: Fall 2015 20TDNH 214 20TPractical Materials for Dental Hygiene Course Description: 37TStudies the current technologic advances, expanded functions, and clinical/laboratory materials used in dental
IMPLANTS IN FOCUS. Endosseous dental implant restorations PLANNING FOR IMPLANT RESTORATIONS
 IMPLANTS IN FOCUS PLANNING FOR IMPLANT RESTORATIONS Replacing a missing maxillary central incisor with a dental implant can be the most demanding restoration in dentistry, so it s important to consider
SECURITY LIFE INSURANCE COMPANY OF AMERICA Minnetonka, Minnesota
 SECURITY LIFE INSURANCE COMPANY OF AMERICA Minnetonka, Minnesota COVERAGE SCHEDULE PREFERRED (In-Network) PROVIDER: WE WILL PAY BASED ON THE CONTRACTED FEE FOR SERVICE WITH THE PREFERRED PROVIDER ORGANIZATION
Nobel Clinician - Quick Guide
 1220 E. Birch St. #201 Brea, CA 92821 (800)750-5004 Haupt Dental Lab Inc. Nobel Clinician - Quick Guide Step #1 - Diagnostics Make impressions of both the upper and lower arches using custom trays. Care
Renaissance of One-Piece Implants
 2 EDI Minimally invasive and patient-friendly treatment concepts using one-piece implants Renaissance of One-Piece Implants Hannes Thurm-Meyer, dentist, Bremen, Germany, Thomas Horn, master dental technician,
Teeth and Dental Implants: When to save, and when to extract.
 Teeth and Dental Implants: When to save, and when to extract. One of the most difficult decisions a restorative dentist has to make is when to refer a patient for extraction and placement of dental implants.
Telescopic Denture A Treatment Modality for Minimizing the Conventional Removable Complete Denture Problems: A Case Report
 Dentistry Section Case Report ID: JCDR/2012/3886:2351 Telescopic Denture A Treatment Modality for Minimizing the Conventional Removable Complete Denture Problems: A Case Report Kunwarjeet Singh, Nidhi
OVERVIEW The MetLife Dental Plan for Retirees
 OVERVIEW The MetLife Dental Plan for Retirees IN NETWORK: Staying in network saves you money. 1 Participating dentists have agreed to MetLife s negotiated fees which are typically 15% to 45% below the
Cigna Dental Care (*DHMO) Patient Charge Schedule
 Patient Charge Schedule") A3O08 Cigna Dental Care (*DHMO) Schedule This Schedule lists the benefits of the Dental Plan including covered procedures and patient charges. Important Highlights This Schedule applies only when covered
A3O08 Cigna Dental Care (*DHMO) Schedule This Schedule lists the benefits of the Dental Plan including covered procedures and patient charges. Important Highlights This Schedule applies only when covered
Bitewing Radiography B.E. DIXON. B.D.S., M.Sc., D.P.D.S.
 Bitewing Radiography B.E. DIXON B.D.S., M.Sc., D.P.D.S. Main Indications Detection of Dental Caries Monitoring progression of caries Assessment of existing restorations Assessment of Periodontal status
Dental Implants and Esthetics
 Dental Implants and Esthetics Charles J. Goodacre, DDS, MSD; Chad J. Anderson, MS, DMD Continuing Education Units: 1 hour Online Course: www.dentalcare.com/en-us/dental-education/continuing-education/ce203/ce203.aspx
The Mandibular Two-Implant Overdenture First-Choice. Standard of Care for the Edentulous Denture Patient
 The Mandibular Two-Implant Overdenture First-Choice Standard of Care for the Edentulous Denture Patient Joseph R. Carpentieri, DDS Dennis P. Tarnow, DDS ii Preface Preface The prosthetic management of
Job Ready Assessment Blueprint. Dental Assisting. Test Code: 4026 / Version: 01
 Job Ready Assessment Blueprint Dental Assisting Test Code: 4026 / Version: 01 Measuring What Matters Specific Competencies and Skills Tested in this Assessment: Introduction to the Dental Assisting Profession
Restoring the Endodontically Treated Tooth:Post and Core Design and Material 根 管 治 療 後 牙 齒 的 修 復 :Post and Core 的 設 計 與 材 料
 劉 俊 麟 高 雄 醫 學 大 學 牙 醫 學 系 31 屆 美 國 賓 州 大 學 牙 周 病 學 研 究 所 畢 業 美 國 賓 州 大 學 牙 周 - 補 綴 學 研 究 所 畢 業 美 國 賓 州 大 學 臨 床 副 教 授 美 國 賓 州 大 學 人 工 植 牙 課 程 主 任 Restoring the Endodontically Treated Tooth:Post and Core
Ideal treatment of the impaired
 RESEARCH IMPLANTS AS ANCHORAGE IN ORTHODONTICS: ACLINICAL CASE REPORT Dale B. Herrero, DDS KEY WORDS External anchorage Pneumatized Often, in dental reconstruction, orthodontics is required for either
Understanding Dental Implants
 Understanding Dental Implants Comfort and Confidence Again A new smile It s no fun when you re missing teeth. You may not feel comfortable eating or speaking. You might even avoid smiling in public. Fortunately,
Managing worn teeth with composites
 6 Managing worn teeth with composites Clinical details A 50-year-old man presents to you complaining about his worn teeth and would like the appearance improved (Fig. 6.1). He complains of regurgitation
2007 Insurance Benefits Guide. Dental and Dental Plus. Dental and. Dental Plus. www.eip.sc.gov Employee Insurance Program 91
 Dental and www.eip.sc.gov Employee Insurance Program 91 Table of Contents Introduction...93 Your Dental Benefits at a Glance...94 Claim Examples (using Class III procedure claims)...95 How to File a Dental
The Lower Free End Saddle (distal extension saddle)
") Giles Perryer 1997 I The Lower Free End Saddle (distal extension saddle) Free end saddle dentures move Excessive movement of the denture can cause pain, tissue damage, and complaints of instability and
Giles Perryer 1997 I The Lower Free End Saddle (distal extension saddle) Free end saddle dentures move Excessive movement of the denture can cause pain, tissue damage, and complaints of instability and
Introduction of Removable Partial Denture - Design and Retention
 Introduction of Removable Partial Denture - Design and Retention By : Dr Zaihan Ariffin BDS(Malaya), GDCDent (Adelaide), Doctor of Clinical Dentistry (Adelaide), FRACDS (Australia) Type of denture Full
Chart 1. Chart 2. How to Use the Following Charts. Be sure to follow the legal requirements to perform dental radiographic procedures.
 These data are presented for informational purposes only and are not intended as a legal opinion regarding dental practice in any state. DANB confers with each state s dental board at least annually regarding
T E M P O R A R Y C R O W N R E S T O R A T I O N S. Second Edition. Produced by. QUERCUS CORPORATION 2768 Pineridge Road Castro Valley, CA 94546
 T E M P O R A R Y C R O W N R E S T O R A T I O N S Second Edition Produced by QUERCUS CORPORATION 2768 Pineridge Road Castro Valley, CA 94546 Copyright 1979 Department of Health, Education and Welfare
SCD Case Study. Treatment Considerations for Implant Rehabilitation
 SCD Case Study Treatment Considerations for Implant Rehabilitation Multiple surgical and restorative factors play a role in the treatment planning of implant restorations for the edentulous patient (Ali
IPS. Special Edition. Press-on-Metal Ceramic. Harald Gritsch Max Wörishofer Christoph Zobler
 InLine PoM Press-on-Metal Ceramic IPS Special Edition Harald Gritsch Max Wörishofer Christoph Zobler Press-on technique on metal frameworks Combining the widely known casting technique and press technique
Implant Abutments and Crowns on your CEREC. Welcome
 Welcome Welcome Welcome Robert Marcus D.M.D. UConn Dental 1993 Poway (SD) office since 1997 CEREC user since 2004 CEREC Mentor and Trainer Founder of Kick Your Apps, Inc. Control Freak Welcome Many thanks
Periodontal surgery report for crown lengthening of tooth number 24,25
 411 PDS Periodontal surgery report for crown lengthening of tooth number -Course director : Dr. Nahid Ashri - instructor: Dr.Fatin Awaratani - - Student Name: Hanadi Alyami Computer Number: K S U - D E
PREPARATION OF MOUTH FOR REMOVABLE PARTIAL DENTURES Dr. Mazen kanout
 PREPARATION OF MOUTH FOR REMOVABLE PARTIAL DENTURES Dr. Mazen kanout Mouth preparation includes procedures in four categories: 1. Oral Surgical Preparation. 2. Conditioning of Abused and Irritated Tissue.
Optimizing Referral Team Collaboration Using Dynamic Visual Communication Software
 Optimizing Referral Team Collaboration Using Dynamic Visual Communication Software XCPT Patient Engagement System was developed and engineered to combine scientific research relating to the brain s ability
Table of Contents Section 6 Table of Contents
 Table of Contents Section Table of Contents Victory Series First Molar Bands...2 Victory Series Second Molar Bands... Unitek General Purpose Molar Bands...10 Unitek Pedodontic Molar Bands...11 Unitek Proportioned
SURGICAL MANUAL. Step By Step Techniques
 SURGICAL MANUAL Step By Step Techniques TABLE OF CONTENTS PRE-SURGICAL 1 8 MEASUREMENT OF BONE.......................... 2 BONE CLASSIFICATION........................... 3 IMPLANT SIZE SELECTION.........................
DISCOUNT DENTAL PLAN COMPLETE LISTING OF MEMBER COPAYMENTS
 DISCOUNT DENTAL PLAN COMPLETE LISTING OF MEMBER COPAYMENTS 0120 PERIODIC ORAL EXAMINATION - ESTABLISHED PATIENT 20 0140 LIMITED ORAL EVALUATION - PROBLEM FOCUSED 33 0150 COMPREHENSIVE ORAL EVALUATION -
CUSTOMIZED PROVISIONAL ABUTMENT AND PROVISIONAL RESTORATION FOR AN IMMEDIATELY-PLACED IMPLANT
 CONTINUING EDUCATION 1 4 CUSTOMIZED PROVISIONAL ABUTMENT AND PROVISIONAL RESTORATION FOR AN IMMEDIATELY-PLACED IMPLANT Gerard J. Lemongello, Jr, DMD* LEMONGELLO 19 7 AUGUST The use of immediate implant
Zirconium Abutments for Improved Esthetics in Anterior Restorations
 Zirconium Abutments for Improved Esthetics in Anterior Restorations by Luke S., C.D.T. Mr. is the founder and owner of Capital Dental Technology Laboratory, Inc., in Naperville, Illinois. The laboratory
Dental Benefits Summary
 CODE Office Visit Copay PATIENT PAYS CODE DIAGNOSTIC PATIENT PAYS D0120-D0180 Oral Evaluations D0277 Vertical Bitewings - 7 to 8 Films D0210 Full mouth series X-rays D0330 Panoramic X-Ray D0220-D0230 Periapicals
Choosing the right type of abutment
 50 Producing custom implant abutments using CAD/CAM Choosing the right type of abutment S. KHALILOVA 1, F. KISTLER 2, S. ADLER 3, S. WEISS 3, S. KISTLER 2 AND J. NEUGEBAUER 2,4 Rapid developments in the
BICON DENTAL IMPLANTS
 BICON DENTAL IMPLANTS The Bicon Dental Implant System, since 1985, has offered discerning dentists the ability to provide secure implant restorations that look, feel, and function like natural teeth. With